ESP CITROEN DS3 2018 Handbook (in English)
[x] Cancel search | Manufacturer: CITROEN, Model Year: 2018, Model line: DS3, Model: CITROEN DS3 2018Pages: 248, PDF Size: 8.79 MB
Page 184 of 248
182
Installing electrical accessories
Your vehicle's electrical system is designed
to operate with standard or optional
equipment.
Before installing other electrical equipment
or accessories on your vehicle, contact the
dealer network or a qualified workshop.
DS AUTOMOBILES accepts no
responsibility for the cost incurred in
repairing your vehicle or for rectifying
malfunctions resulting from the installation of
accessories not supplied, not recommended
and not installed in accordance with its
specifications, in particular when the
combined power consumption of all of the
additional equipment connected exceeds
10
milliamperes.Fuses in the dashboard
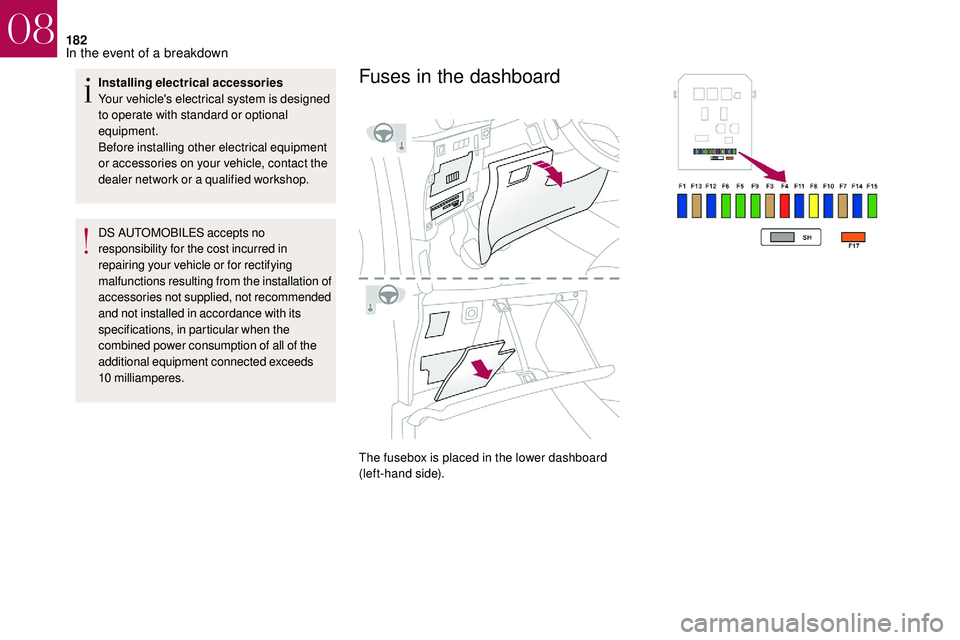
The fusebox is placed in the lower dashboard
(left-hand side).
08
In the event of a breakdown
Page 193 of 248
191
F switch off all electrical consumers (audio system, wipers, lighting, etc.),
F
s
witch off the ignition and wait for four
minutes.
Upon accessing the battery, you only need to
disconnect the positive (+) terminal.
Quick-release terminal clamp
Disconnecting the (+) terminal
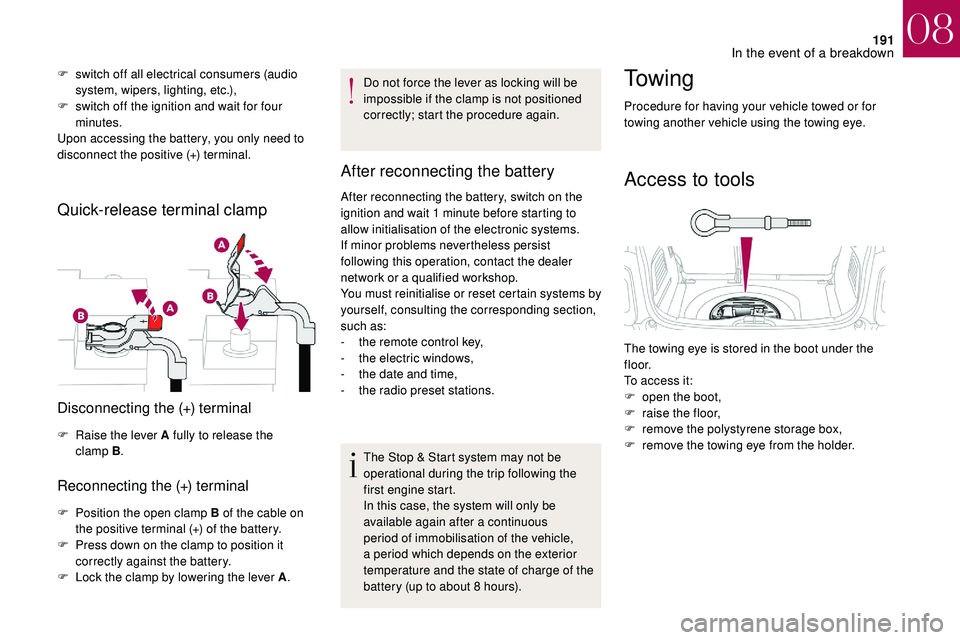
F Raise the lever A fully to release the clamp B .
Reconnecting the (+) terminal
F Position the open clamp B of the cable on
the positive terminal (+) of the battery.
F
P
ress down on the clamp to position it
correctly against the battery.
F
L
ock the clamp by lowering the lever A .Do not force the lever as locking will be
impossible if the clamp is not positioned
correctly; start the procedure again.
After reconnecting the battery
After reconnecting the battery, switch on the
ignition and wait 1
minute before starting to
allow initialisation of the electronic systems.
If minor problems nevertheless persist
following this operation, contact the dealer
network or a
qualified workshop.
You must reinitialise or reset certain systems by
yourself, consulting the corresponding section,
such as:
-
t
he remote control key,
-
t
he electric windows,
-
t
he date and time,
-
t
he radio preset stations.The Stop & Start system may not be
operational during the trip following the
first engine start.
In this case, the system will only be
available again after a
continuous
period of immobilisation of the vehicle,
a period which depends on the exterior
temperature and the state of charge of the
battery (up to about 8
hours).
To w i n g
Procedure for having your vehicle towed or for
towing another vehicle using the towing eye.
Access to tools
The towing eye is stored in the boot under the
f l o o r.
To access it:
F
o
pen the boot,
F
r
aise the floor,
F
r
emove the polystyrene storage box,
F
r
emove the towing eye from the holder.
08
In the event of a breakdown
Page 196 of 248
194
Characteristics of engines
and towed loads
Engines
The engine specifications (capacity, max.
power, max. speed, energy, CO
2 emissions,
e
tc.) for your vehicle are given in the
registration document and in the sales
literature.
These characteristics correspond to the values
type-approved on a
test bed, under conditions
defined in European legislation
(Directive 1999/99/EC).
For more information, contact the dealer
network or a
qualified workshop.
Weights and towed loads
The maximum weights and towed loads for
your vehicle are given in the registration
document and in the sales literature.
These values are also given on the
manufacturer's plate or label.
For more information, contact the dealer
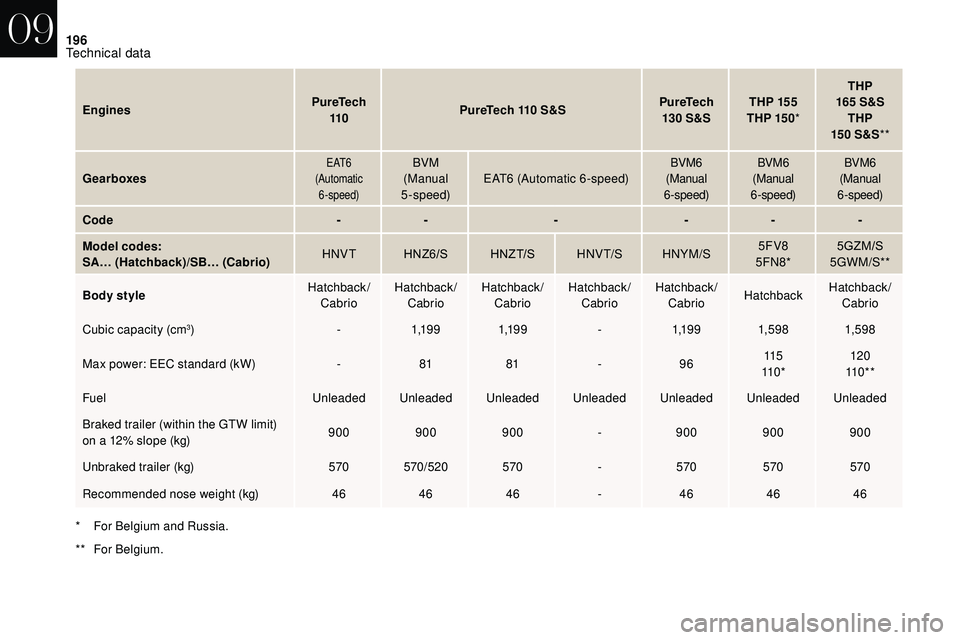
network or a qualified workshop. The GTW and towed load values indicated are
valid up to a
maximum altitude of 1,000 metres.
The towed load value must be reduced by 10%
for each additional 1,000 metres of altitude.
The maximum authorised nose weight
corresponds to the weight permitted on the
towbar (removable with or without a tool).
GT W: Gross train weight.
High exterior temperatures may result
in a reduction in the per formance of
the vehicle to protect the engine. If the
exterior temperature is above 37°C, limit
the towed load.
Towing with a
towing vehicle which is only
slightly laden may negatively affect its
handling.
Towing a
trailer increases the braking
distance.
When towing, never exceed the speed
of 62
mph (100 km/h) (obser ve the local
legislation in force). If the exterior temperature is high, it is
recommended that the engine be allowed
to idle for 1
to 2 minutes after the vehicle
comes to a stop, to facilitate its cooling.
09
Technical data
Page 197 of 248
195
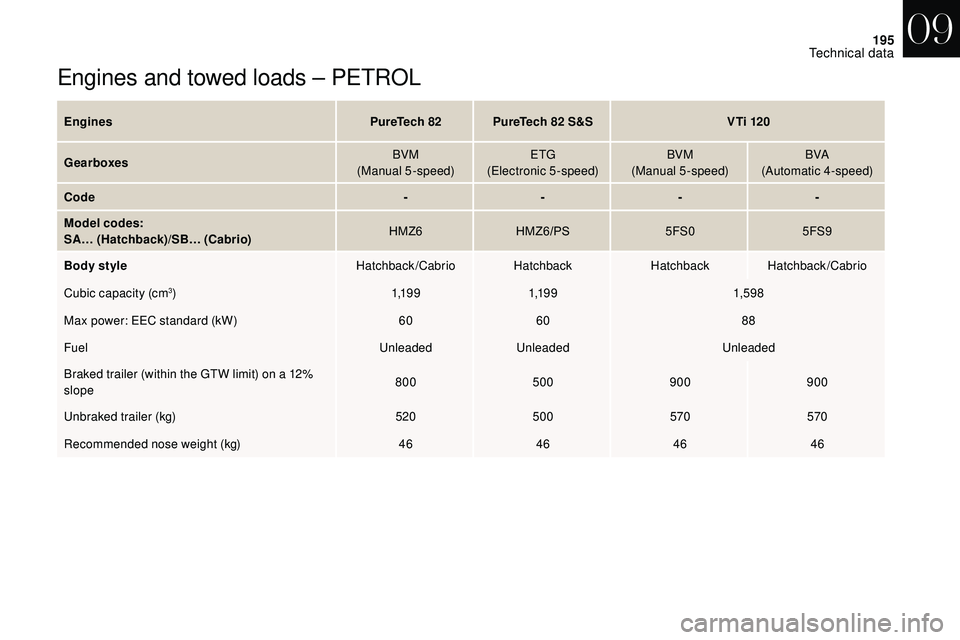
Engines and towed loads – PETROL
EnginesPureTech 82PureTech 82 S&SV Ti 120
Gearboxes BVM
(Manual 5-speed) ETG
(Electronic 5-speed) BVM
(Manual 5-speed) BVA
(Automatic 4-speed)
Code ----
Model codes:
SA… (Hatchback)/SB… (Cabrio) HMZ6
HMZ6/PS 5FS05FS9
Body style Hatchback/Cabrio Hatchback Hatchback Hatchback/Cabrio
Cubic capacity (cm
3) 1,1 9 91,1 9 9 1,59 8
Max power: EEC standard (kW) 6060 88
Fuel UnleadedUnleaded Unleaded
Braked trailer (within the GTW limit) on a
12%
slope 800
500900 900
Unbraked trailer (kg) 520500 570570
Recommended nose weight (kg) 46464646
09
Technical data
Page 198 of 248
196
EnginesPureTech
110 PureTech 110
S&SPureTech
130 S&STHP 155
THP 15 0 * THP
165 S&S
THP
15 0
S&S**
Gearboxes
E AT 6
(Automatic 6 -speed)BVM
(Manual
5-speed) EAT6
(Automatic 6-speed)BVM6
(Manual
6 -speed) BVM6
(Manual
6 -speed) BVM6
(Manual
6 -speed)
Code -- ----
Model codes:
SA… (Hatchback)/SB… (Cabrio) HNVT
HNZ6/S H NZ T/SH N V T/SHNYM/S 5FV8
5FN8* 5GZM/S
5GWM/S**
Body style Hatchback/
Cabrio Hatchback/
Cabrio Hatchback/
Cabrio Hatchback/
Cabrio Hatchback/
Cabrio Hatchback Hatchback/
Cabrio
Cubic capacity (cm
3) -1,1 9 9 1,1 9 9 -1,1 9 9 1,59 8 1,59 8
Max power: EEC standard (kW) -81 81 -96 115
11 0 * 120
11 0 * *
Fuel Unleaded Unleaded Unleaded Unleaded Unleaded Unleaded Unleaded
Braked trailer (within the GTW limit)
on a
12% slope (kg) 900
900900 -900 900900
Unbraked trailer (kg) 570 570/520 570 -570 570570
Recommended nose weight (kg) 464646 -46 4646
*
F
or Belgium and Russia.
**
F
or Belgium.
09
Technical data
Page 212 of 248
8
Radio reception may be affected by the
use of electrical equipment not approved
by DS AUTOMOBILES, such as a USB
charger connected to the 12
V socket.
The external environment (hills, buildings,
tunnels, basement car parks, etc.) may
block reception, including in RDS mode.
This is a
normal effect of the way in
which radio waves are transmitted and
does not indicate any failure of the audio
equipment.
Changing a frequency
Press Radio Media to display the
primary page.
By automatic frequency search
Press 3
or 4 to move the cursor for an
automatic search down or up for a
radio
frequency.
THEN
Select change source.
Select "FM Radio ".
Or "
AM Radio ".
OR Press Radio Media to display the
primary page.
Press on the secondary page.
Press " Frequency ".
THEN Enter the frequency in full (e.g.
92.10 MHz) using the keypad then
" Confirm ".
Changing radio station
Pressing the name of the current radio station
brings up a list.
To change radio station press the name of the
desired station.
Presetting a station
Select a radio station or frequency (refer to the
c orresponding section).
Press " Preset".
Select a
number in the list to preset the
previously chosen/adjusted radio station.
A long press on a
number saves (presets) the
station. Or
A press on the button in the upper-right part of
the screen presets all of the stations one after
the other.
Recalling preset stations
Press Radio Media
to display the
primary page.
Select " Preset".
Activating/Deactivating RDS
Press Radio Media to display the
primary page.
Press on the secondary page. Select "Settings ".
Select " Radio".
Activate/Deactivate " RDS options".
RDS, if activated, allows you to continue
listening to the same station by automatically
retuning to alternative frequencies. However,
in certain conditions, coverage of an RDS
station may not be assured throughout the
entire country as radio stations do not cover
100% of the territory. This explains the loss of
reception of the station during a
journey.
7-inch touch screen tablet
Page 213 of 248
9
DAB (Digital Audio
Broadcasting) radio
Digital radio
Digital radio provides higher quality
reception and also the graphical display
of current information on the radio station
being listened to. Select "List" in the
primary page.
The different multiplexes offer a choice
of radio stations arranged in alphabetical
o r d e r.
Press Radio Media to display the
primary page.
Select change of source. Select "DAB Radio ".
Select " List" in the primary page.
or
Select " Radio list " on the
secondary page.
Select a
radio station from the list offered.
DAB/FM station tracking
"DAB" does not cover 100% of the
te r r i to r y.
When the digital radio signal is poor,
the "DAB/FM station tracking" allows
you to continue listening to the same
station, by automatically switching to the
corresponding FM analogue station (if
there is one). Press Radio Media to display the
primary page.
Press on the secondary page. Select "Settings ".
Select " Radio".
Select " Digital/FM auto tracking " then
" Confirm ".
If "DAB/FM station tracking" is enabled,
there is a
lag of a few seconds when the
system switches to analogue radio "FM",
sometimes with a
change in volume.
Once the digital signal quality is restored,
the system automatically changes back
to " DA B ". If the "DAB" station being listened to is
not available on "FM" ("
DAB/FM" option
greyed out), or "DAB/FM station tracking"
is not activated, the sound will cut out
while the digital signal is too weak.
Media
USB port
Insert the USB memory stick into the USB port
or connect the USB device to the USB port
using a
suitable cable (not supplied).
To protect the system, do not use a
USB
hub.
The system builds playlists (in temporary
memory), an operation which can take from
a
few seconds to several minutes at the first
connection.
7-inch touch screen tablet
Page 216 of 248
12
- "Ambience " (choice of 6 musical ambiences).- "Bass ".- "Tr e b l e ".- "Loudness " (Activate/Deactivate).- "Balance " ("Driver ", "All passengers ",
" Front only ").
- "Audible response from touch screen ".- "Volume linked to speed " (Activate/
Deactivate).
Onboard audio: Arkamys© Sound Staging
optimises the distribution of sound in the
passenger compartment.
Modifying system settings
Press Settings to display the
primary page.
Press on the secondary page. Select "System Settings ".
Select " Units" to change the units of distance,
fuel consumption and temperature.
Select " Delete data " to delete the list of recent
destinations, personal points of interest,
contacts in the list. Check the settings then select
"
Delete ".
Select " Factory settings " to return to the
original settings.
Press Settings to display the
primary page.
Press on the secondary page. Select "Screen settings ".
Activate or deactivate: " Activate
automatic text scrolling " and
" Activate animations ".
Press Settings to display the
primary page.
Press on the secondary page. Select "Time/Date " to change the
time zone, synchronisation with
GPS, the time and its format, then
the date.
The system does not automatically
manage the change between winter and
summer time (depending on country). Select "
Languages " to change the
language.
Select " Calculator " to display
a
calculator.
Select " Calendar " to display
a
calendar.
Connected services
MirrorLinkTM
MirrorLink™ smartphone
connection
As a safety measure and because it
r equires sustained attention by the driver,
using a
smartphone when driving is
prohibited.
All operations must be done with the
vehicle stationary .
7-inch touch screen tablet
Page 222 of 248
18
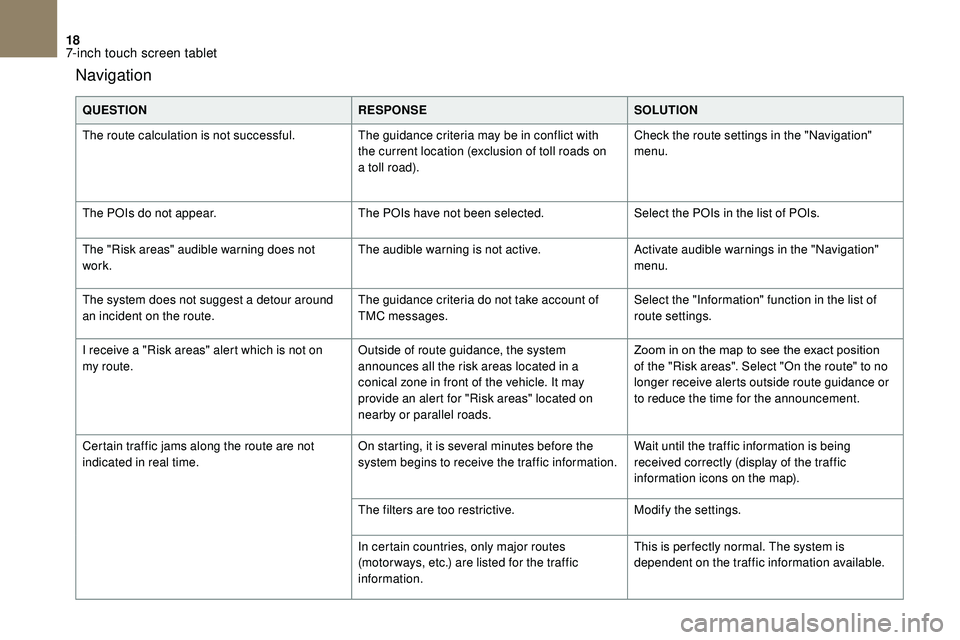
Navigation
QUESTIONRESPONSESOLUTION
The route calculation is not successful. The guidance criteria may be in conflict with
the current location (exclusion of toll roads on
a
toll road).Check the route settings in the "Navigation"
menu.
The POIs do not appear. The POIs have not been selected.Select the POIs in the list of POIs.
The "Risk areas" audible warning does not
work. The audible warning is not active.
Activate audible warnings in the "Navigation"
menu.
The system does not suggest a
detour around
an incident on the route. The guidance criteria do not take account of
TMC messages.Select the "Information" function in the list of
route settings.
I receive a "Risk areas" alert which is not on
my route. Outside of route guidance, the system
announces all the risk areas located in a
conical zone in front of the vehicle. It may
provide an alert for "Risk areas" located on
nearby or parallel roads.Zoom
in on the map to see the exact position
o
f the "Risk areas". Select "On the route" to no
longer receive alerts outside route guidance or
to reduce the time for the announcement.
Certain traffic jams along the route are not
indicated in real time. On starting, it is several minutes before the
system begins to receive the traffic information.Wait until the traffic information is being
received correctly (display of the traffic
information icons on the map).
The filters are too restrictive. Modify the settings.
In certain countries, only major routes
(motor ways, etc.) are listed for the traffic
information. This is per fectly normal. The system is
dependent on the traffic information available.
7-inch touch screen tablet
Page 223 of 248
19
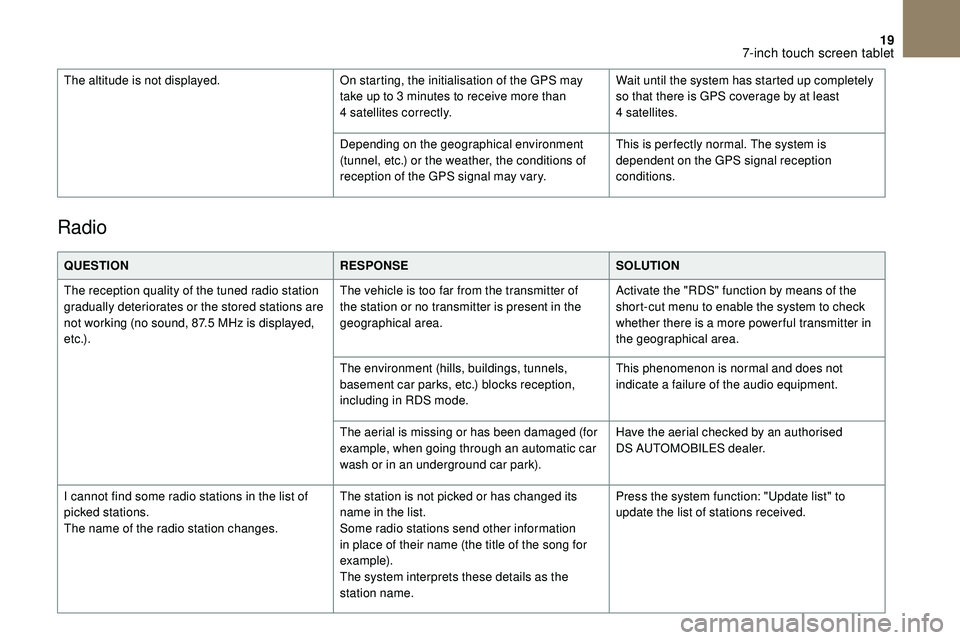
Radio
QUESTIONRESPONSESOLUTION
The reception quality of the tuned radio station
gradually deteriorates or the stored stations are
not working (no sound, 87.5
MHz is displayed,
e t c .) . The vehicle is too far from the transmitter of
the station or no transmitter is present in the
geographical area.
Activate the "RDS" function by means of the
short-cut menu to enable the system to check
whether there is a
more power ful transmitter in
the geographical area.
The environment (hills, buildings, tunnels,
basement car parks, etc.) blocks reception,
including in RDS mode. This phenomenon is normal and does not
indicate a
failure of the audio equipment.
The aerial is missing or has been damaged (for
example, when going through an automatic car
wash or in an underground car park). Have the aerial checked by an authorised
DS
AUTOMOBILES dealer.
I cannot find some radio stations in the list of
picked stations.
The name of the radio station changes. The station is not picked or has changed its
name in the list.
Some radio stations send other information
in place of their name (the title of the song for
example).
The system interprets these details as the
station name.Press the system function: "Update list" to
update the list of stations received.
The altitude is not displayed.
On starting, the initialisation of the GPS may
take up to 3 minutes to receive more than
4
satellites correctly.
Wait until the system has started up completely
so that there is GPS coverage by at least
4
satellites.
Depending on the geographical environment
(tunnel, etc.) or the weather, the conditions of
reception of the GPS signal may vary. This is per fectly normal. The system is
dependent on the GPS signal reception
conditions.
7-inch touch screen tablet