ESP CITROEN DS3 2018 Handbook (in English)
[x] Cancel search | Manufacturer: CITROEN, Model Year: 2018, Model line: DS3, Model: CITROEN DS3 2018Pages: 248, PDF Size: 8.79 MB
Page 90 of 248
88
Wiper control stalk
The vehicle's front and rear wipers are
designed to improve the driver's visibility
progressively according to the climatic
conditions.
Programming
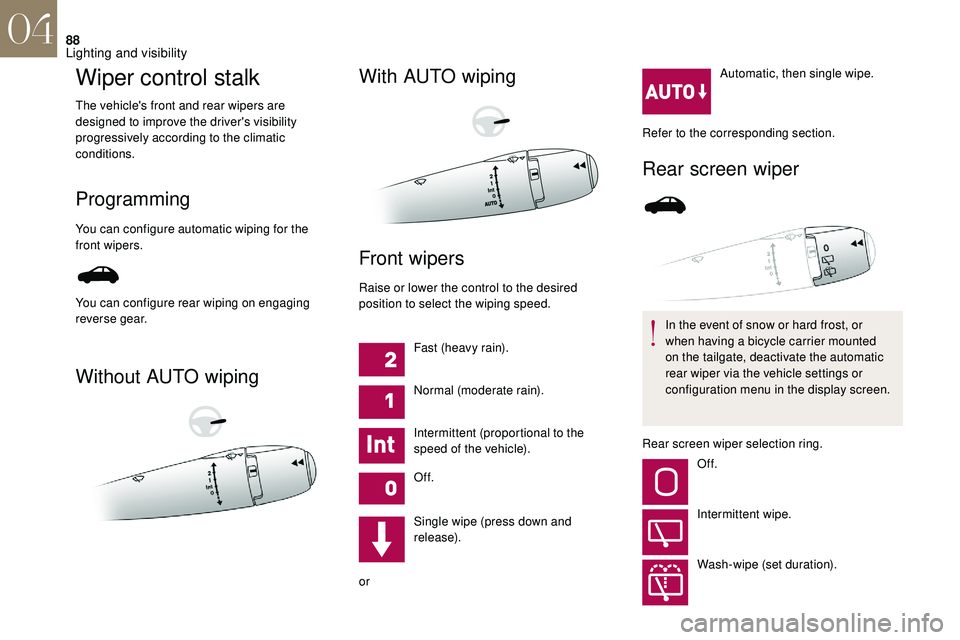
You can configure automatic wiping for the
front wipers.
Without AUTO wipingWith AUTO wiping
Front wipers
Raise or lower the control to the desired
position to select the wiping speed.
Fast (heavy rain).
Normal (moderate rain).
Intermittent (proportional to the
speed of the vehicle).
Of f.
Single wipe (press down and
release).
or Automatic, then single wipe.
Refer to the corresponding section.
Rear screen wiper
In the event of snow or hard frost, or
when having a bicycle carrier mounted
on the tailgate, deactivate the automatic
rear wiper via the vehicle settings or
configuration menu in the display screen.
Rear screen wiper selection ring. Of f.
Intermittent wipe.
Wash-wipe (set duration).
You can configure rear wiping on engaging
reverse gear.
04
Lighting and visibility
Page 94 of 248
92
General safety
recommendations
Labels are attached in different places on
your vehicle. They include safety warnings
as well as identification information for
your vehicle. Do not remove them: they
are an integral part of your vehicle.We draw your attention to the following
points:
-
T
he fitting of electrical equipment
or accessories not approved by
DS AUTOMOBILES may cause
excessive current consumption and
faults and failures with the electrical
system of your vehicle. Contact the
dealer network for information on the
range of recommended accessories.
-
A
s a safety measure, access to
the diagnostic socket, used for the
vehicle's electronic systems, is
reser ved strictly for the dealer network
or qualified workshops, equipped
with the special tools required (risk
of malfunctions of the vehicle's
electronic systems that could cause
breakdowns or serious accidents).
The manufacturer cannot be held
responsible if this advice is not
followed.
-
A
ny modification or adaptation
not intended or authorised by
DS
AUTOMOBILES or carried
out without meeting the technical
requirements defined by the
manufacturer will result in the
suspension of the legal and contractual
warranties. Installation of accessory radio
communication transmitters
Before installing a
radio communication
transmitter with an external antenna,
you must contact a member of the
dealer network for the specification
of transmitters which can be fitted
(frequency, maximum power,
aerial position, specific installation
requirements), in line with the Vehicle
Electromagnetic Compatibility
Directive (2004/104/EC).
Depending on country regulations, some
safety equipment may be compulsory:
high visibility safety vests, warning
triangles, breathalysers, spare bulbs,
spare fuses, fire extinguisher, first aid kit,
mud flaps at the rear of the vehicle, etc.
05
Safety
Page 102 of 248
100
Advice
The driver must ensure that the passengers
use the seat belts correctly and that they are
all fastened before driving.
Wherever you are seated in the vehicle,
always fasten your seat belt, even for short
journeys.
Do not interchange the seat belt buckles as
they will not completely fulfil their role.
The seat belts are equipped with an inertia
reel which allows the strap length to adjust
automatically to your shape. The seat belt is
stowed automatically when not in use.
Before and after use, ensure that the seat belt
is reeled in correctly.
The lower part of the strap must be positioned
as low as possible on the pelvis.
The upper part must be positioned in the
hollow of the shoulder.
The inertia reels have an automatic blocking
device at the time of a collision, during
sudden braking or if the vehicle turns over.
You can release the device by pulling the
strap firmly and then releasing it so that it
reels in slightly. In order to be effective, a seat belt must:
-
b e tightened as close to the body as
possible,
-
b
e pulled in front of you with a smooth
movement, checking that it does not twist,
-
b
e used to restrain only one person,
-
n
ot show any signs of cuts or fraying,
-
n
ot be converted or modified to avoid
affecting its performance. Recommendations for children
Use a
suitable child seat if the passenger is
less than 12
years old or shorter than one and
a
half metres.
Never use the same seat belt to secure more
than one person.
Never allow a
child to travel on your lap.
For more information on Child seats , refer to
the corresponding section.
In accordance with current safety regulations,
for all repairs on your vehicle's seat belts, go
to a
qualified workshop with the skills and
equipment needed, which the dealer network
is able to provide.
Have your seat belts checked regularly in
the dealer network or a
qualified workshop,
particularly if the straps show signs of
damage.
Clean the seat belt straps with soapy water or
a
textile cleaning product, sold in the dealer
network.
After folding or moving a
seat or a rear bench
seat, ensure that the seat belt is positioned
and reeled in correctly. In the event of an impact
Depending on the nature and seriousness
of the impact
, the pyrotechnic device may
be deployed before and independent of the
airbags. Deployment of the pre-tensioners
is accompanied by a
slight discharge of
harmless smoke and a
noise, due to the
activation of the pyrotechnic cartridge
incorporated in the system.
In all cases, the airbag warning lamp comes
on.
Following an impact, have the seat belt
system checked, and if necessary replaced,
in the dealer network or by a
qualified
workshop.
05
Safety
Page 104 of 248
102
Deployment
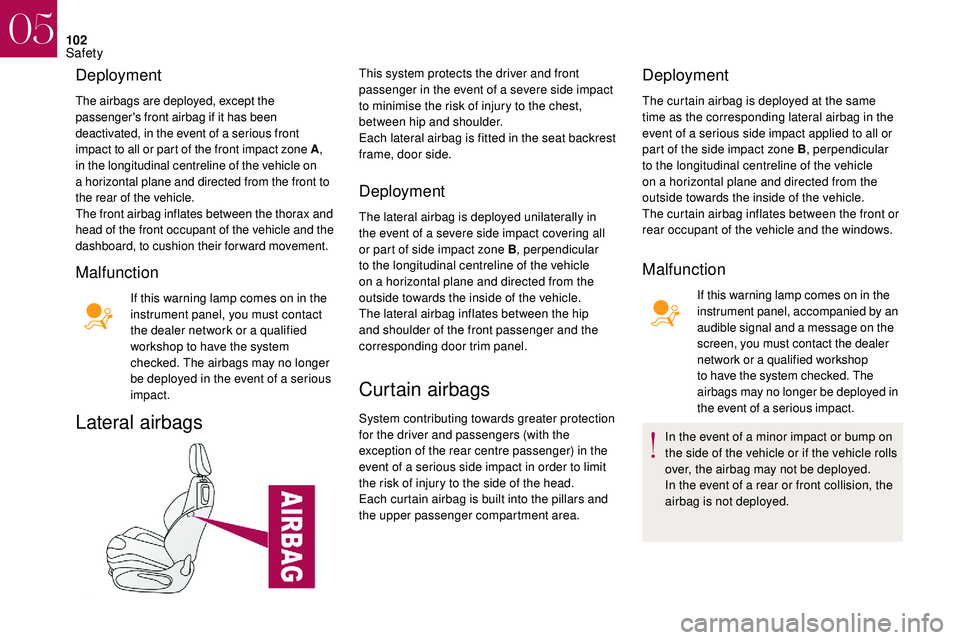
The airbags are deployed, except the
passenger's front airbag if it has been
deactivated, in the event of a serious front
impact to all or part of the front impact zone A ,
in the longitudinal centreline of the vehicle on
a
horizontal plane and directed from the front to
the rear of the vehicle.
The front airbag inflates between the thorax and
head of the front occupant of the vehicle and the
dashboard, to cushion their forward movement.
Malfunction
If this warning lamp comes on in the
instrument panel, you must contact
the dealer network or a
qualified
workshop to have the system
checked. The airbags may no longer
be deployed in the event of a
serious
impact.
Lateral airbags
This system protects the driver and front
passenger in the event of a severe side impact
to minimise the risk of injury to the chest,
between hip and shoulder.
Each lateral airbag is fitted in the seat backrest
frame, door side.
Deployment
The lateral airbag is deployed unilaterally in
the event of a severe side impact covering all
or part of side impact zone B , perpendicular
to the longitudinal centreline of the vehicle
on a
horizontal plane and directed from the
outside towards the inside of the vehicle.
The lateral airbag inflates between the hip
and shoulder of the front passenger and the
corresponding door trim panel.
Curtain airbags
System contributing towards greater protection
for the driver and passengers (with the
exception of the rear centre passenger) in the
event of a
serious side impact in order to limit
the risk of injury to the side of the head.
Each curtain airbag is built into the pillars and
the upper passenger compartment area.
Deployment
The curtain airbag is deployed at the same
time as the corresponding lateral airbag in the
event of a
serious side impact applied to all or
part of the side impact zone B , perpendicular
to the longitudinal centreline of the vehicle
on a
horizontal plane and directed from the
outside towards the inside of the vehicle.
The curtain airbag inflates between the front or
rear occupant of the vehicle and the windows.
Malfunction
If this warning lamp comes on in the
instrument panel, accompanied by an
audible signal and a
message on the
screen, you must contact the dealer
network or a
qualified workshop
to have the system checked. The
airbags may no longer be deployed in
the event of a
serious impact.
In the event of a
minor impact or bump on
the side of the vehicle or if the vehicle rolls
over, the airbag may not be deployed.
In the event of a
rear or front collision, the
airbag is not deployed.
05
Safety
Page 108 of 248
106
For more information on the Airbags,
refer to the corresponding section.
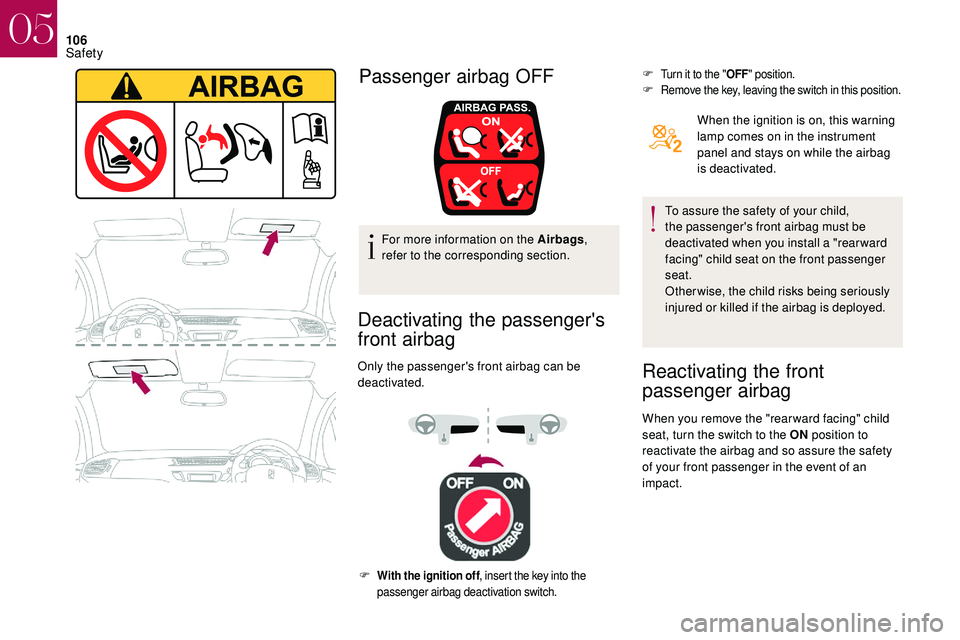
Deactivating the passenger's
front airbag
Only the passenger's front airbag can be
deactivated. F
Turn it to the "
OFF" position.F Remove the key, leaving the switch in this position.
When the ignition is on, this warning
lamp comes on in the instrument
panel and stays on while the airbag
is deactivated.
To assure the safety of your child,
the passenger's front airbag must be
deactivated when you install a "rear ward
facing" child seat on the front passenger
seat.
Otherwise, the child risks being seriously
injured or killed if the airbag is deployed.
Reactivating the front
passenger airbag
When you remove the "rear ward facing" child
seat, turn the switch to the ON position to
reactivate the airbag and so assure the safety
of your front passenger in the event of an
impact.
Passenger airbag OFF
F With the ignition off , insert the key into the
passenger airbag deactivation switch.
05
Safety
Page 109 of 248
107
AR
BG НИКОГА
НЕ инсталирайте детско столче на седалка с АКТИВИРАНА предна ВЪЗДУШНА ВЪЗГЛАВНИЦА. Това може да причини
С
МЪРТ или СЕРИОЗНО НАРАНЯВАНЕ на детето.
CS NIKDY
neumisťujte dětské zádržné zařízení orientované směrem dozadu na sedadlo chráněné AKTIVOVANÝM čelním AIRBAGEM. Hrozí
n
ebezpečí SMRTI DÍTĚTE nebo VÁ ŽNÉHO ZR ANĚNÍ.
DA Brug ALDRIG en bagudvendt barnestol på et sæde, der er beskyttet af en AKTIV AIRBAG. BARNET risikerer at blive ALVORLIGT
K VÆSTET eller DR ÆBT.
DE Montieren Sie auf einem Sitz mit AKTIVIERTEM Front-Airbag NIEMALS einen Kindersitz oder eine Babyschale entgegen der Fahrtrichtung,
das Kind könnte schwere oder sogar tödliche Verletzungen erleiden.
EL Μη
χρησιμοποιείτε ΠΟΤΕ παιδικό κάθισμα με την πλάτη του προς το εμπρός μέρος του αυτοκινήτου, σε μια θέση που προστατεύεται από
Μ
ΕΤΩΠΙΚΟ αερόσακο που είναι ΕΝΕΡΓΟΣ. Αυτό μπορεί να έχει σαν συνέπεια το ΘΑΝΑΤΟ ή το ΣΟΒΑΡΟ ΤΡΑΥΜΑΤΙΣΜΟ του ΠΑΙΔΙΟΥ
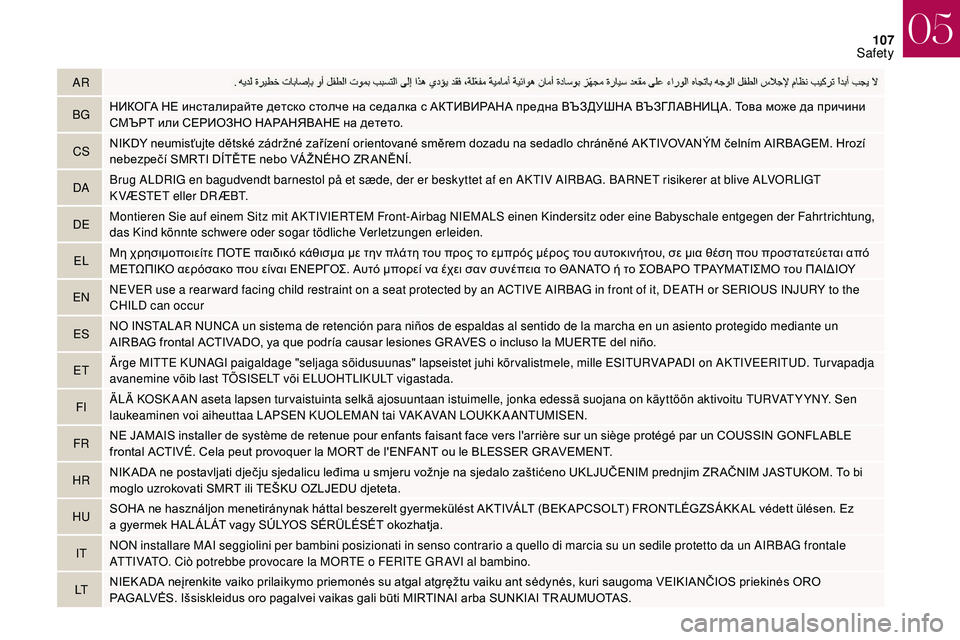
EN NEVER use a
rear ward facing child restraint on a seat protected by an ACTIVE AIRBAG in front of it, DEATH or SERIOUS INJURY to the
CHILD can occur
ES NO INSTALAR NUNCA un sistema de retención para niños de espaldas al sentido de la marcha en un asiento protegido mediante un
AIRBAG
frontal ACTIVADO, ya que podría causar lesiones GR AVES o incluso la MUERTE del niño.
ET Ärge MITTE KUNAGI paigaldage "seljaga sõidusuunas" lapseistet juhi kõr valistmele, mille ESITURVAPADI on AKTIVEERITUD. Tur vapadja
avanemine võib last TÕSISELT või ELUOHTLIKULT vigastada.
FI ÄLÄ KOSK A AN aseta lapsen tur vaistuinta selkä ajosuuntaan istuimelle, jonka edessä suojana on käyttöön aktivoitu TURVAT Y YNY. Sen
laukeaminen voi aiheuttaa LAPSEN KUOLEMAN tai VAK AVAN LOUKK A ANTUMISEN.
FR NE
JAMAIS installer de système de retenue pour enfants faisant face vers l'arrière sur un siège protégé par un COUSSIN GONFLABLE
f
rontal ACTIVÉ. Cela peut provoquer la MORT de l'ENFANT ou le BLESSER GR AVEMENT.
HR NIK ADA
ne postavljati dječju sjedalicu leđima u smjeru vožnje na sjedalo zaštićeno UKLJUČENIM prednjim ZR AČNIM JASTUKOM. To bi
m
oglo uzrokovati SMRT ili TEŠKU OZLJEDU djeteta.
HU SOHA
ne használjon menetiránynak háttal beszerelt gyermekülést AKTIVÁLT (BEK APCSOLT) FRONTLÉGZSÁKK AL védett ülésen. Ez
a
gyermek HALÁLÁT vagy SÚLYOS SÉRÜLÉSÉT okozhatja.
IT NON installare MAI seggiolini per bambini posizionati in senso contrario a
quello di marcia su un sedile protetto da un AIRBAG frontale
ATTIVATO. Ciò potrebbe provocare la MORTE o
FERITE GR AVI al bambino.
LT NIEK ADA
neįrenkite vaiko prilaikymo priemonės su atgal atgręžtu vaiku ant sėdynės, kuri saugoma VEIKIANČIOS priekinės ORO
P
AGALVĖS. Išsiskleidus oro pagalvei vaikas gali būti MIRTINAI arba SUNKIAI TR AUMUOTAS.
05
Safety
Page 119 of 248
11 7
In case of towing
Driving with a trailer places greater
d emands on the towing vehicle and
requires extra care from the driver.
Distribution of loads
F Distribute the load in the trailer so that the heaviest items are as close as possible to
the axle and the nose weight approaches
the maximum permitted without exceeding
it.
Air density decreases with altitude, thus
reducing engine performance. The maximum
towed load must be reduced by 10% for every
1,000
metres of altitude.
Please respect the maximum towable
weights.
Side wind
F Take into account the increased sensitivity to wind.
Cooling
Towing a trailer on a slope increases the
t emperature of the coolant.
As the fan is electrically controlled, its cooling
capacity is not dependent on the engine speed.
F
T
o lower the engine speed, reduce your
speed.
The maximum towable load on an incline
depends on the gradient and the exterior
temperature.
In all cases, keep a
check on the coolant
temperature.
F
I
f this warning lamp and the
STOP warning lamp come on,
stop the vehicle and switch off
the engine as soon as possible.
New vehicle
Do not pull a trailer before having driven at least
approximately 600
miles (1,000
kilometres).
Braking
Towing a trailer increases the braking distance.
T o avoid overheating of the brakes, the use of
engine braking is recommended.
Ty r e s
F Check the tyre pressures of the towing vehicle and of the trailer, observing the
recommended pressures.
Lighting
F Check the electrical lighting and signalling on the trailer and the headlamp beam height
of your vehicle.
For more information on Headlamp
beam height adjustment , refer to the
corresponding section.
The rear parking sensors will be
deactivated automatically to avoid
the audible signal if a
genuine
DS
AUTOMOBILES towbar is used.
If the exterior temperature is high, it is
recommended that the engine be allowed
to idle for 1
to 2 minutes after the vehicle
comes to a
stop, to facilitate its cooling.
06
Driving
Page 121 of 248
11 9
Wait until this warning lamp goes off
in the instrument panel then operate
the starter motor by turning the key
to position 3 without pressing the
accelerator pedal until the engine
starts. Once the engine is running,
release the key.
In wintry conditions, the warning lamp can
stay on for a
longer period. If the engine is
hot, the warning lamp does not come on.
If the engine does not start straight away,
switch off the ignition. Wait a
few moments
before operating the starter motor again.
If the engine does not start after several
attempts, do not keep trying: you risk
damaging the starter motor or the engine.
Contact the dealer network or a
qualified
workshop.
In temperate conditions, do not leave
the engine at idle to warm up but move
off straight away and drive at moderate
speed. Never run the engine in an enclosed
space without sufficient ventilation:
internal combustion engines give out toxic
exhaust gases such as carbon monoxide.
There is a danger of poisoning and
death. In very severe wintry conditions
(temperatures below -23°C) and to ensure
proper operation and longevity of the
mechanical parts of your vehicle, engine
and gearbox, you must let the engine run
for 4
minutes before starting the vehicle.
Switching off the engine
F Stop the vehicle.
F T urn the key towards you to position
1
(Stop) .
F
R
emove the key from the ignition switch.
F
T
o lock the steering column, turn the
steering wheel until it locks.
To facilitate unlocking of the steering
column, it is recommended that the
wheels be returned to the straight ahead
position before switching off the engine.
F
C
heck that the parking brake is correctly
applied, particularly on sloping ground. Never switch off the ignition before the
vehicle is at a
complete stop. With the
engine off, the braking and steering
assistance systems are also deactivated:
risk of loss of control of the vehicle.
When you leave the vehicle, keep the key
with you and lock the vehicle.
Energy economy mode
After switching off the engine
(position 1 - Stop), for a
maximum of thirty
minutes you can still use functions such as the
audio and telematic system, wipers, dipped
beam headlamps, courtesy lamps, etc.
For more information on the Energy
economy mode , refer to the
corresponding section.
Key left in
There is an audible signal on opening the
driver's door if the key has been left in the
ignition switch.
06
Driving
Page 127 of 248

125
Gear selector positions
P.Park.
-
V ehicle immobilised, parking brake on
or of f.
-
S
tarting the engine.
R. Reverse.
-
R
eversing manoeuvres, vehicle
stationary, engine at idle.
N. Neutral.
-
V
ehicle immobilised, parking brake
on.
-
S
tarting the engine.
D. Automatic operation.
M +/-. Manual operation with sequential
changing of the four gears.
F
P
ush forwards to change up
through the gears.
or
F
P
ull backwards to change down
through the gears.
Displays in the instrument panel
When you move the drive selector through
the selector gate to select a position, the
corresponding indicator is displayed in the
instrument panel.
P. Park.
R. Reverse.
N. Neutral.
D. Drive (automatic driving).
S. Spor t programme.
T . Snow programme.
1
2 3 4.Gears engaged during manual
operation
-. Invalid value during manual
operation.
Foot on brake
F Press the brake pedal when this
indicator lamp is displayed in the
instrument panel (e.g. starting
the engine).
Moving off
F Apply the parking brake.
F Sel ect position P or N .
F
S
tart the engine.
Other wise, there is an audible signal,
accompanied by the display of a
warning
message.
F
W
ith the engine running, press the brake
pedal.
F
R
elease the parking brake.
F
Sel
ect position R , D or M.
F
G
radually release the brake pedal.
The vehicle moves off immediately.
If position N is selected inadvertently while
driving, allow the engine to return to idle,
then select position D to accelerate.
If the temperature is below -23°C, the
engine should be left at idle for four
minutes, to ensure the correct operation
and life of the engine and gearbox.
06
Driving
Page 130 of 248

128
Gear selector positions
P.Park.
-
V ehicle immobilised, parking brake on
or of f.
-
S
tarting the engine.
R. Reverse.
-
R
eversing manoeuvres, vehicle
stationary, engine at idle.
N. Neutral.
-
V
ehicle immobilised, parking brake
on.
-
S
tarting the engine.
D. Automatic operation. M +/-.
Manual operation with sequential
changing of the six gears.
F
P
ull back to change up through
the gears.
F
P
ush forward to change down
through the gears.
Displays in the instrument
panel
When you move the drive selector through
the selector gate to select a position, the
corresponding indicator is displayed in the
instrument panel.
P. Park.
R. Reverse.
N. Neutral.
D. Drive (Automatic operation).
1
2 3 4 5 6.Gears engaged during manual
operation.
-. Invalid value during manual
operation.
Foot on brake
F Press the brake pedal when this
indicator lamp is displayed in the
instrument panel (e.g. starting
the engine).
Moving off
F Apply the parking brake.
F Sel ect position P or N .
F
S
tart the engine.
If these conditions are not met, an audible
signal will be produced, accompanied by the
display of a
warning message.
F
W
ith the engine running, press the brake
pedal.
F
R
elease the parking brake.
F
Sel
ect position R , D or M.
F
G
radually release the brake pedal.
The vehicle moves off immediately.
If position N is selected inadvertently while
driving, allow the engine to return to idle,
then select position D to accelerate.
06
Driving