CITROEN DS3 CABRIO DAG 2015 Handbook (in English)
Manufacturer: CITROEN, Model Year: 2015, Model line: DS3 CABRIO DAG, Model: CITROEN DS3 CABRIO DAG 2015Pages: 404, PDF Size: 13.93 MB
Page 101 of 404
99
DS3_en_Chap05_amenagement_ed01
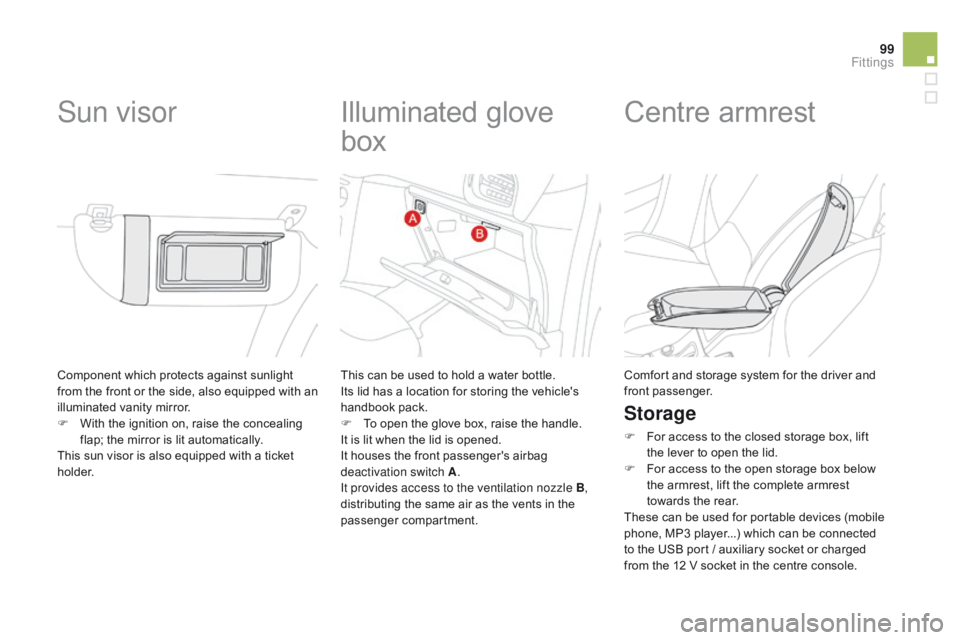
Component which protects against sunlight from t he f ront o r t he s ide, a lso e quipped w ith a n
i
lluminated
v
anity
m
irror.
F
W
ith the ignition on, raise the concealing
f
lap; the mirror is lit automatically.
This
sun visor is also equipped with a ticket
h
o l d e r.
Sun visor Illuminated g love
b
ox
This can be used to hold a water bottle.
I ts lid has a location for storing the vehicle's
han
dbook
pa
ck.
F
T
o open the glove box, raise the handle.
It
is lit when the lid is opened.
It
houses the front passenger's airbag
d
eactivation switch A .
It provides access to the ventilation nozzle B ,
distributing
the same air as the vents in the
p
assenger
c
ompartment.
Centre armrest
Storage
F For access to the closed storage box, lift t
he lever to open the lid.
F
F
or access to the open storage box below
t
he armrest, lift the complete armrest
t
owards the rear.
These
can be used for portable devices (mobile
p
hone, MP3 player...) which can be connected
t
o the USB port / auxiliary socket or charged
f
rom the 12 V socket in the centre console.
Comfort
and storage system for the driver and
f
ront
p
assenger.
Fittings
Page 102 of 404
DS3_en_Chap05_amenagement_ed01
Auxiliary socket
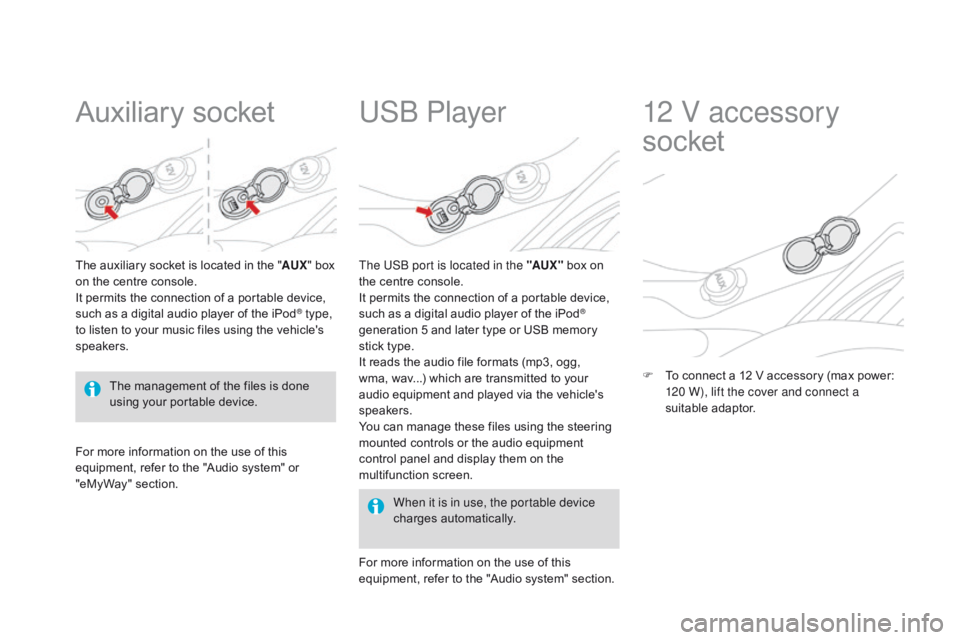
The auxiliary socket is located in the "AU X" box o
n the centre console.
It
permits the connection of a portable device,
s
uch as a digital audio player of the iPod
® type,
to
listen
to
your
music
files
using
the
vehicle's
s
peakers.
USb Player
For more information on the use of this e quipment, refer to the "Audio system" or
"e
MyWay" section. When it is in use, the portable device
charges
a
utomatically.
The US
b
port is located in the "AUX "
box on
t
he centre console.
It permits the connection of a portable device,
s
uch as a digital audio player of the iPod
®
generation
5
and
later
type
or
USB
memory
s
tick
type.
It
reads
the
audio
file
formats
(mp3,
ogg,
w
ma,
wav...)
which
are
transmitted
to
your
a
udio
equipment
and
played
via
the
vehicle's
s
peakers.
You
can
manage
these
files
using
the
steering
m
ounted
controls
or
the
audio
equipment
c
ontrol
panel
and
display
them
on
the
m
ultifunction
s
creen.
For
more
information
on
the
use
of
this
e
quipment,
refer
to
the
"Audio
system"
section.
12 V accessory
socket
F To connect a 12 V accessory (max power: 1
20 W), lift the cover and connect a
suitable
a
daptor.
The
management
of
the
files
is
done
u
sing
your
portable
device.
Page 103 of 404
101
DS3_en_Chap05_amenagement_ed01
MatsRemovable carpet protection.
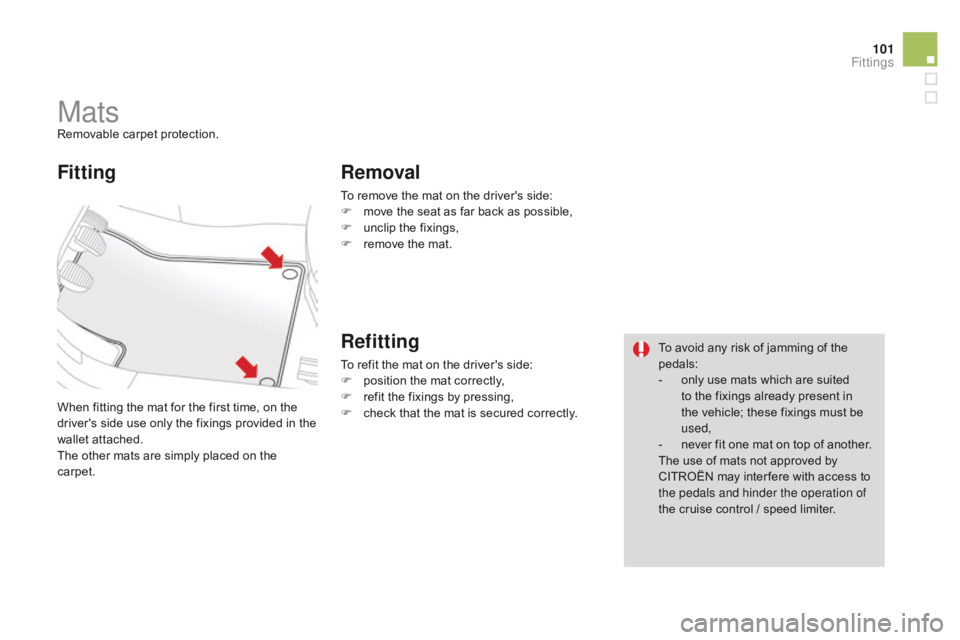
W hen fitting the mat for the first time, on the
d
river's side use only the fixings provided in the
w
allet attached.
The
other mats are simply placed on the
c
arpet.
Fitting Removal
To remove the mat on the driver's side:
F m ove the seat as far back as possible,
F
u
nclip the fixings,
F
r
emove the mat.
Refitting
To refit the mat on the driver's side:
F p osition the mat correctly,
F
r
efit the fixings by pressing,
F
c
heck that the mat is secured correctly.To
avoid any risk of jamming of the ped
als:
- o nly use mats which are suited
t
o the fixings already present in
t
he vehicle; these fixings must be
u
sed,
-
n
ever fit one mat on top of another.
The
use of mats not approved by
C
ITROËN may inter fere with access to
t
he pedals and hinder the operation of
the
cruise control / speed limiter.
Fittings
Page 104 of 404
DS3_en_Chap05_amenagement_ed01
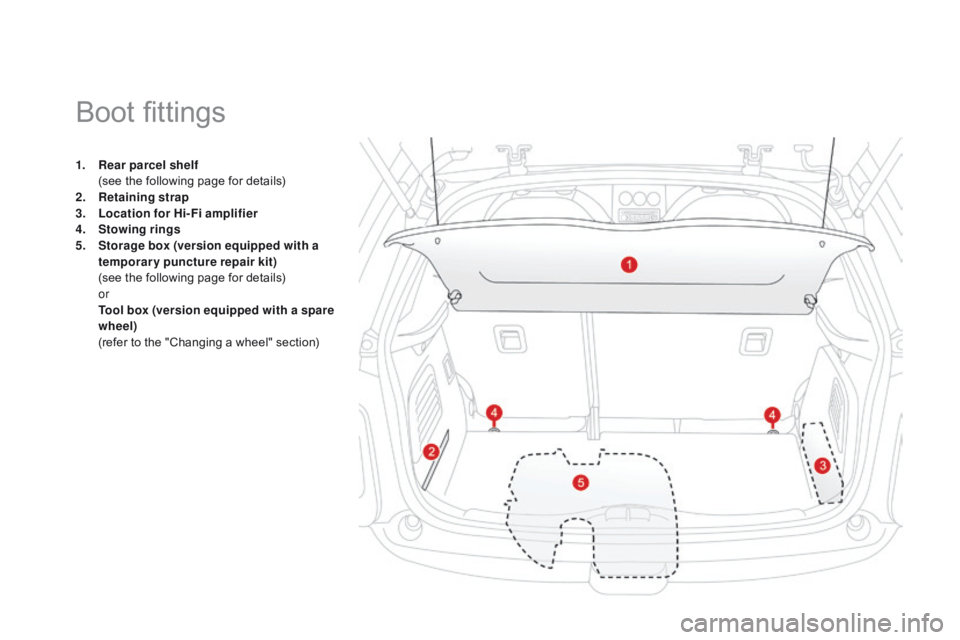
1. Rear parcel shelf (
see the following page for details)
2.
R
etaining strap
3.
L
ocation for Hi-Fi amplifier
4.
S
towing rings
5.
S
torage box (version equipped with a
temporary puncture repair kit)
(
see the following page for details)
or
T
ool box (version equipped with a spare
wheel)
(
refer to the "Changing a wheel" section)
Boot fittings
Page 105 of 404
103
DS3_en_Chap05_amenagement_ed01
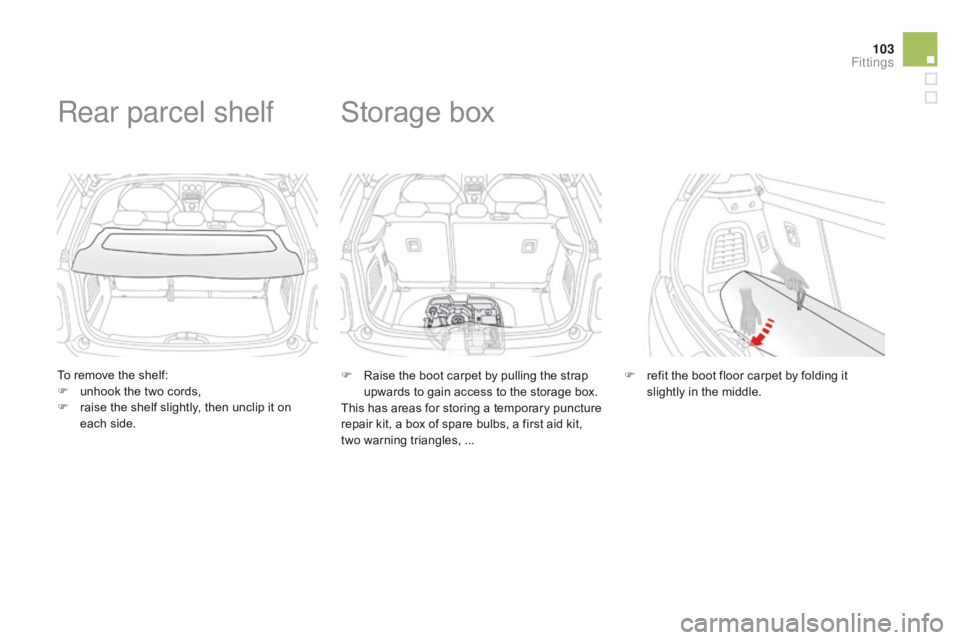
To remove the shelf:
F u nhook the two cords,
F
r
aise the shelf slightly, then unclip it on
e
ach side.
Rear parcel shelf
F Raise the boot carpet by pulling the strap u
pwards to gain access to the storage box.
This
has areas for storing a temporary puncture
r
epair kit, a box of spare bulbs, a first aid kit,
t
wo warning triangles, ...
Storage box
F refit the boot floor carpet by folding it s
lightly in the middle.
Fittings
Page 106 of 404

DS3_en_Chap06_conduite_ed01-2014
Driving
This section describes the use of the parking brake, the manual, electronic or automatic gearbox, the gear shift indicator and Stop & Start t
o help reduce fuel consumption, hill start assist, the speed limiter to
a
void exceeding a programmed speed, cruise control to maintain a
p
rogrammed speed, the rear parking sensors to detect obstacles.
Page 107 of 404
DS3_en_Chap06_conduite_ed01-2014
Page 108 of 404
DS3_en_Chap06_conduite_ed01-2014
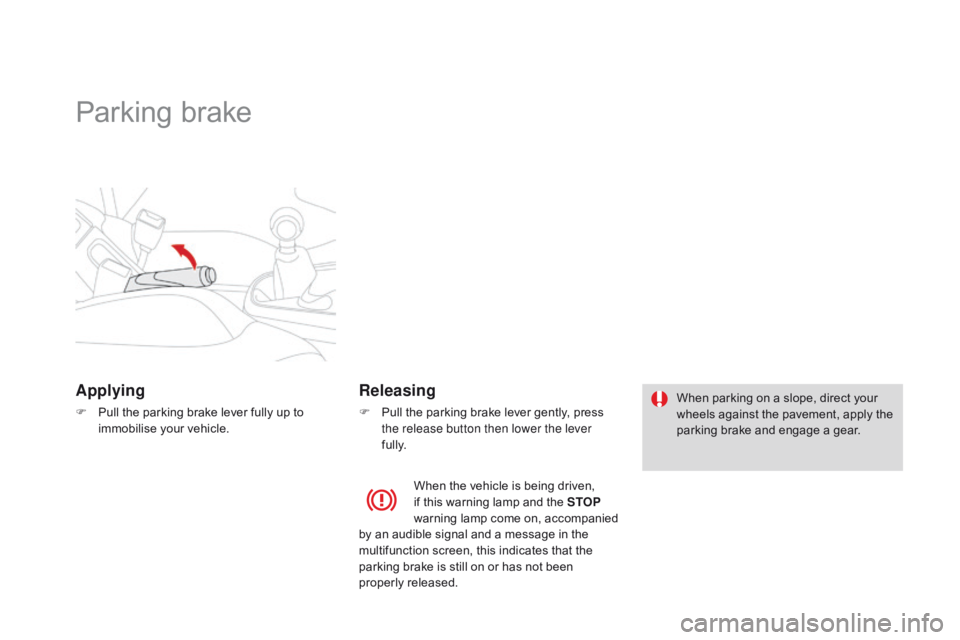
Parking brake
Applying
F Pull the parking brake lever fully up to i
mmobilise your vehicle.
Releasing
F Pull the parking brake lever gently, press t
he release button then lower the lever
fully. When
parking on a slope, direct your w
heels against the pavement, apply the
p
arking brake and engage a gear.
When
the vehicle is being driven,
i
f this warning lamp and the STOP
warning
lamp come on, accompanied
b
y an audible signal and a message in the
m
ultifunction screen, this indicates that the
p
arking brake is still on or has not been
p
roperly
r
eleased.
Page 109 of 404
107
DS3_en_Chap06_conduite_ed01-2014
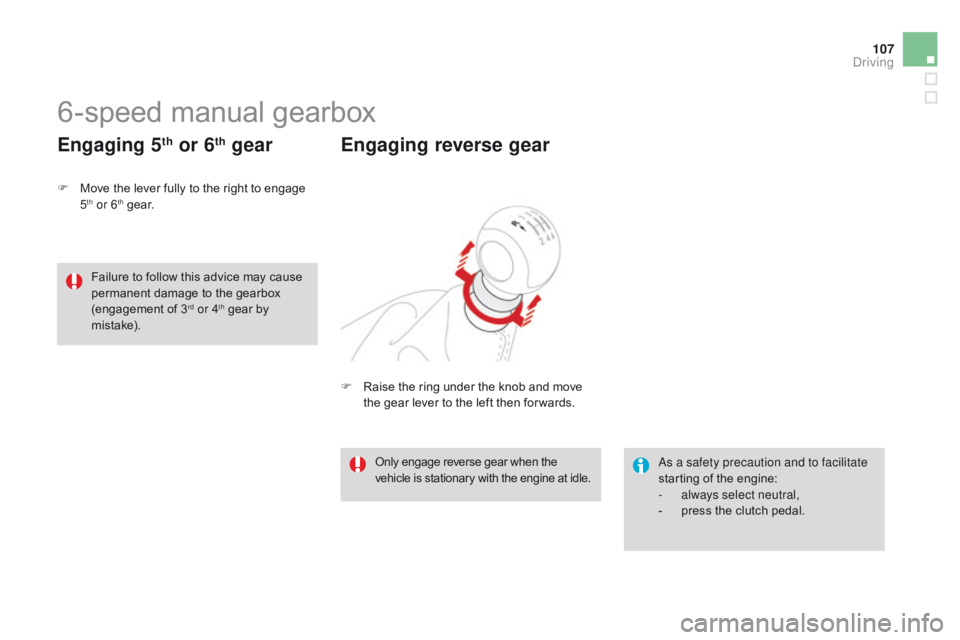
6-speed manual gearbox
F Move the lever fully to the right to engage 5th or 6th ge a r.
Engaging 5th or 6th gear
as a safety precaution and to facilitate
starting
of the engine:
-
a
lways select neutral,
-
p
ress the clutch pedal.Only engage reverse gear when the vehicle is stationary with the engine at idle.
Engaging reverse gear
F Raise the ring under the knob and move t
he gear lever to the left then for wards.
Failure
to
follow
this
advice
may
cause
p
ermanent
damage
to
the
gearbox
(
engagement
o
f
3rd or 4th gear by m
i st a ke).
driving
Page 110 of 404
DS3_en_Chap06_conduite_ed01-2014
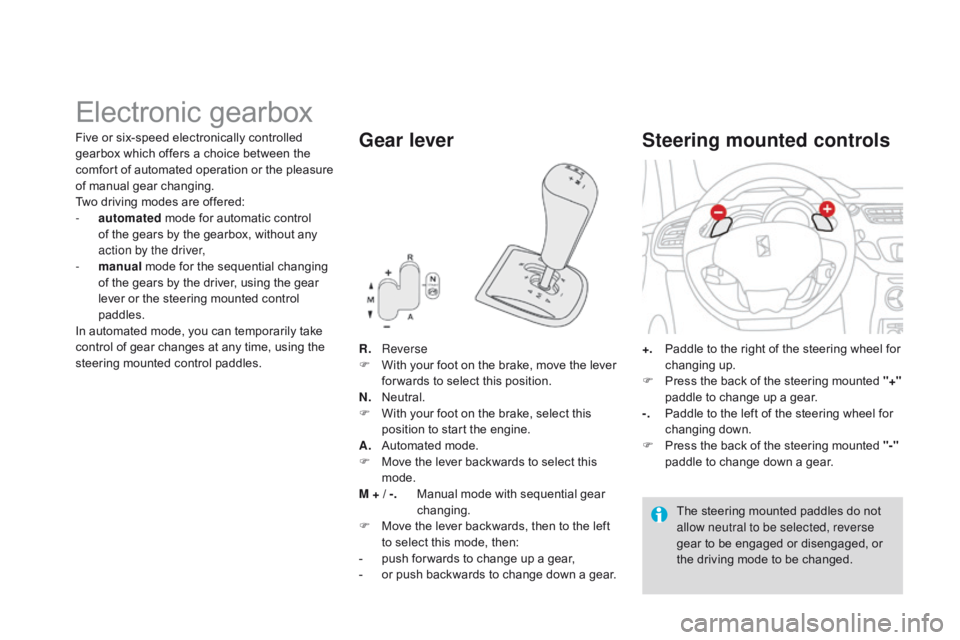
Electronic gearbox
R. Reverse
F W ith your foot on the brake, move the lever
f
or wards to select this position.
N.
N
eutral.
F
W
ith your foot on the brake, select this
p
osition to start the engine.
A.
A
utomated mode.
F
M
ove the lever backwards to select this
m
ode.
M + / -.
M
anual mode with sequential gear
c
hanging.
F
M
ove the lever backwards, then to the left
t
o select this mode, then:
-
p
ush for wards to change up a gear,
-
o
r push backwards to change down a gear.
Gear lever
+. Paddle to the right of the steering wheel for c
hanging u p.
F
P
ress the back of the steering mounted "+"
paddle
to change up a gear.
-.
P
addle to the left of the steering wheel for
c
hanging
d
own.
F
P
ress the back of the steering mounted "-"
paddle
to change down a gear.
Steering mounted controls
The steering mounted paddles do not allow neutral to be selected, reverse
gear
to be engaged or disengaged, or
t
he driving mode to be changed.
Five
or
six-speed
electronically
controlled
g
earbox
which
offers
a
choice
between
the
c
omfort
of
automated
operation
or
the
pleasure
o
f
m
anual
g
ear
c
hanging.
Two
driving
modes
are
offered:
-
a
utomated
mode
for
automatic
control
o
f
the
gears
by
the
gearbox,
without
any
a
ction by the driver,
-
m
anual
mode
for
the
sequential
changing
o
f
the
gears
by
the
driver,
using
the
gear
l
ever
or
the
steering
mounted
control
p
addles.
In
automated
mode,
you
can
temporarily
take
c
ontrol
of
gear
changes
at
any
time,
using
the
s
teering
mounted
control
paddles.