CITROEN DS3 CABRIO DAG 2015 Handbook (in English)
Manufacturer: CITROEN, Model Year: 2015, Model line: DS3 CABRIO DAG, Model: CITROEN DS3 CABRIO DAG 2015Pages: 404, PDF Size: 13.93 MB
Page 71 of 404
69
DS3_en_Chap03_ouvertures_ed01-2014
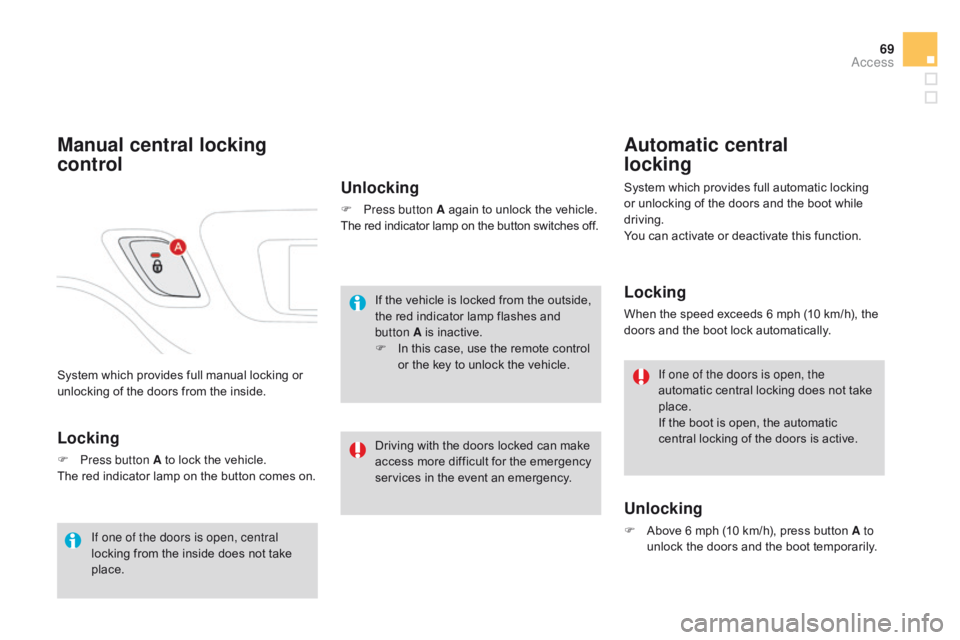
System which provides full manual locking or unlocking of the doors from the inside.
Manual central locking
control
Locking
F Press button A to lock the vehicle.
The red indicator lamp on the button comes on.
Unlocking
F Press button A again to unlock the vehicle.
The red indicator lamp on the button switches off.
If one of the doors is open, central
locking
from
the
inside
does
not
take
p
lace. If
the vehicle is locked from the outside,
t
he red indicator lamp flashes and
b
utton A is inactive.
F
I
n this case, use the remote control
o
r the key to unlock the vehicle.
Automatic central
locking
System which provides full automatic locking or unlocking of the doors and the boot while
d
riving.
You
can activate or deactivate this function.
Locking
When the speed exceeds 6 mph (10 km/h), the doors and the boot lock automatically.
Unlocking
F Above 6 mph (10 km/h), press button A to
unlock the doors and the boot temporarily.
If one of the doors is open, the
automatic
central locking does not take
p
lace.
If the boot is open, the automatic
c
entral locking of the doors is active.
Driving
with
the
doors
locked
can
make
a
ccess
more
difficult
for
the
emergency
s
ervices
in
the
event
an
emergency.
Access
Page 72 of 404
DS3_en_Chap03_ouvertures_ed01-2014
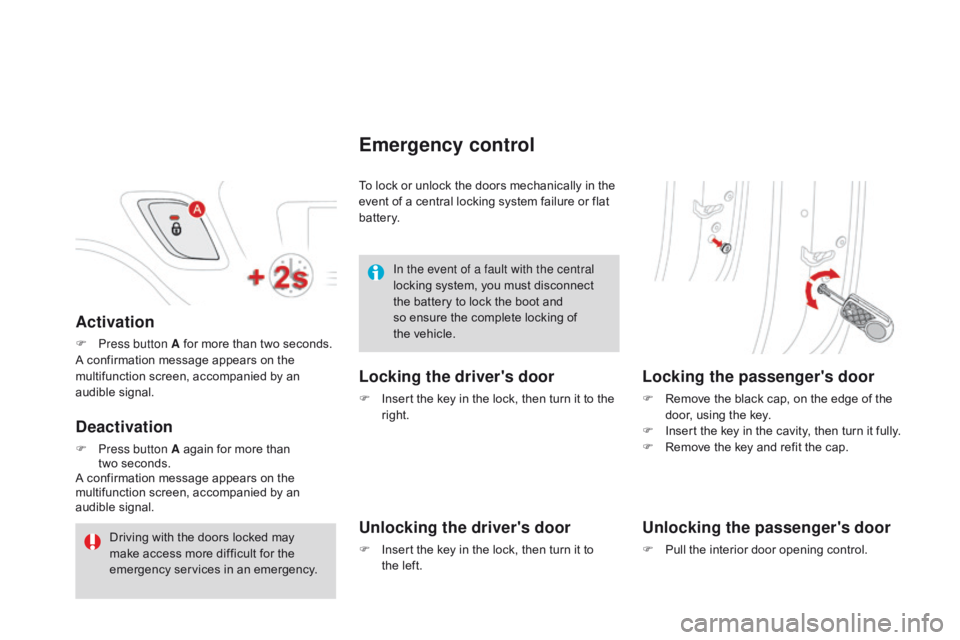
Activation
F Press button A for more than two seconds.
A confirmation message appears on the
m
ultifunction screen, accompanied by an
a
udible
s
ignal.
deactivation
F Press button A again for more than
two seconds.
A
confirmation message appears on the
m
ultifunction screen, accompanied by an
a
udible
s
ignal. To
lock or unlock the doors mechanically in the
e
vent of a central locking system failure or flat
b
attery.
Emergency control
Locking the driver's door
F Insert
the key in the lock, then turn it to the r
ight.
Unlocking the driver's door
F Insert the key in the lock, then turn it to t
he left.
Locking the passenger's door
F Remove the black cap, on the edge of the d
oor, using the key.
F
I
nsert the key in the cavity, then turn it fully.
F
R
emove the key and refit the cap.
Unlocking the passenger's door
F Pull the interior door opening control.
In the event of a fault with the central
locking
system,
you
must
disconnect
t
he
battery
to
lock
the
boot
and
s
o
ensure
the
complete
locking
of
t
he vehicle.
Driving
with
the
doors
locked
may
m
ake
access
more
difficult
for
the
em
ergency
ser
vices
i
n
a
n
em
ergency.
Page 73 of 404
71
DS3_en_Chap03_ouvertures_ed01-2014
boot
Opening
F After unlocking the vehicle using the r
emote control or the key, press the
o
pening control and raise the tailgate.
closing
F Lower the tailgate using the interior grab han
dle.
If
the tailgate is not closed correctly:
-
when the engine is running , this
warning lamp comes on, accompanied b
y a message on the multifunction
s
creen for a few seconds,
- when the vehicle is moving (speed above 6 mph (10 km/h)), this warning lamp comes
o
n, accompanied by an audible signal and
a
message on the multifunction screen for
a
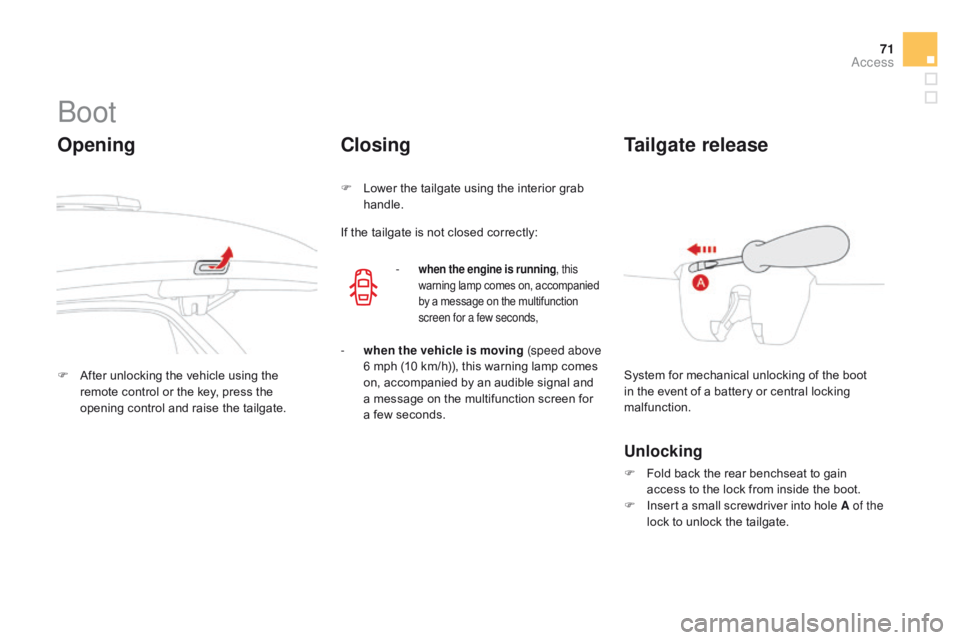
few seconds. System
for mechanical unlocking of the boot
i
n the event of a battery or central locking
m
alfunction.
Tailgate release
Unlocking
F Fold back the rear benchseat to gain a
ccess to the lock from inside the boot.
F
I
nsert a small screwdriver into hole A of the
lock
to unlock the tailgate.
Access
Page 74 of 404
DS3_en_Chap04_confort_ed01-2014
Comfort
This section describes the operation of the heating, ventilation and air conditioning system, the scented air freshener and all of the adjustments
f
or the seats, steering wheel and mirrors, for your comfort and
a
n optimum driving position.
Page 75 of 404
DS3_en_Chap04_confort_ed01-2014
Page 76 of 404
DS3_en_Chap04_confort_ed01-2014
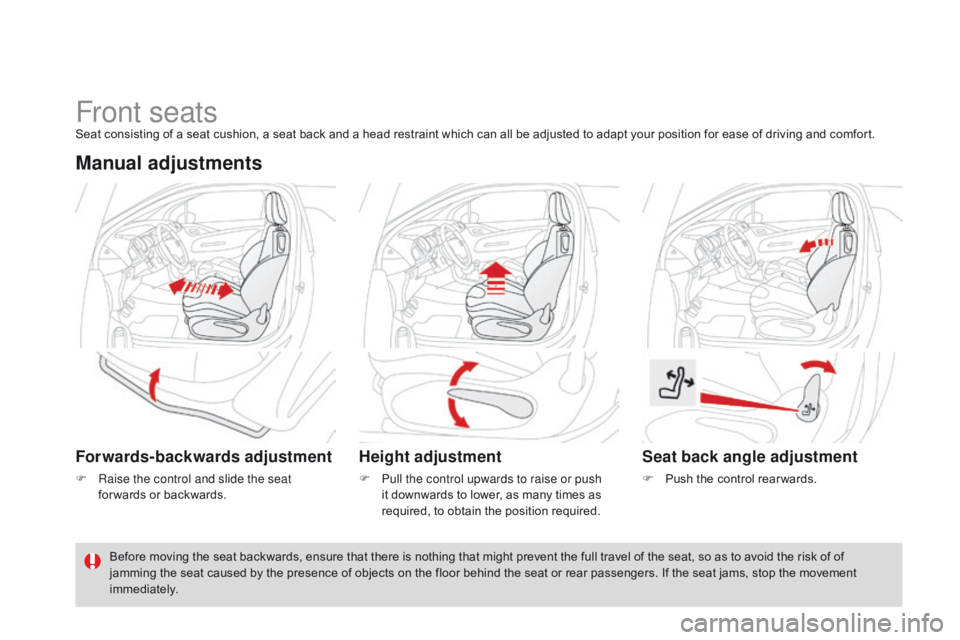
Front seatsSeat consisting of a seat cushion, a seat back and a head restraint which can all be adjusted to adapt your position for ease of driving and comfort.
Manual adjustments
Forwards-backwards adjustment
F Raise the control and slide the seat for wards or backwards.
Height adjustment
F Pull the control upwards to raise or push it downwards to lower, as many times as
r
equired, to obtain the position required.
Seat back angle adjustment
F Push the control rear wards.
Before
moving
the
seat
backwards,
ensure
that
there
is
nothing
that
might
prevent
the
full
travel
of the seat, so as to avoid the risk of of
j
amming
the
seat
caused
by
the
presence
of
objects
on
the
floor
behind
the
seat
or
rear
passengers. If the seat jams, stop the movement
i
mmediately.
Page 77 of 404
75
DS3_en_Chap04_confort_ed01-2014
Additional adjustments
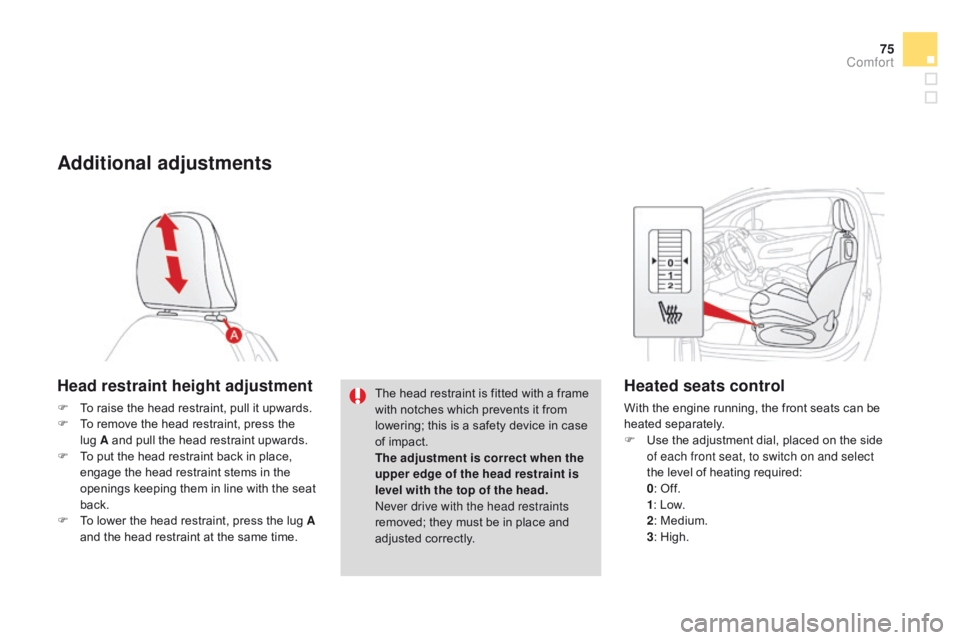
Head restraint height adjustment
F To raise the head restraint, pull it upwards.
F T o remove the head restraint, press the
l
ug A and pull the head restraint upwards.
F
T
o put the head restraint back in place,
e
ngage the head restraint stems in the
o
penings keeping them in line with the seat
b
ack.
F
T
o lower the head restraint, press the lug A
and
the head restraint at the same time.The
head restraint is fitted with a frame w
ith notches which prevents it from
l
owering; this is a safety device in case
o
f impact.
The adjustment is correct when the
upper edge of the head restraint is
level with the top of the head.
Never drive with the head restraints
removed;
they must be in place and
adj
usted
c
orrectly.
Heated seats control
With the engine running, the front seats can be heated s eparately.
F
U
se the adjustment dial, placed on the side
o
f each front seat, to switch on and select
the
level of heating required:
0:
Off.
1:
Low.
2:
Medium.
3:
High.
comfort
Page 78 of 404
DS3_en_Chap04_confort_ed01-2014
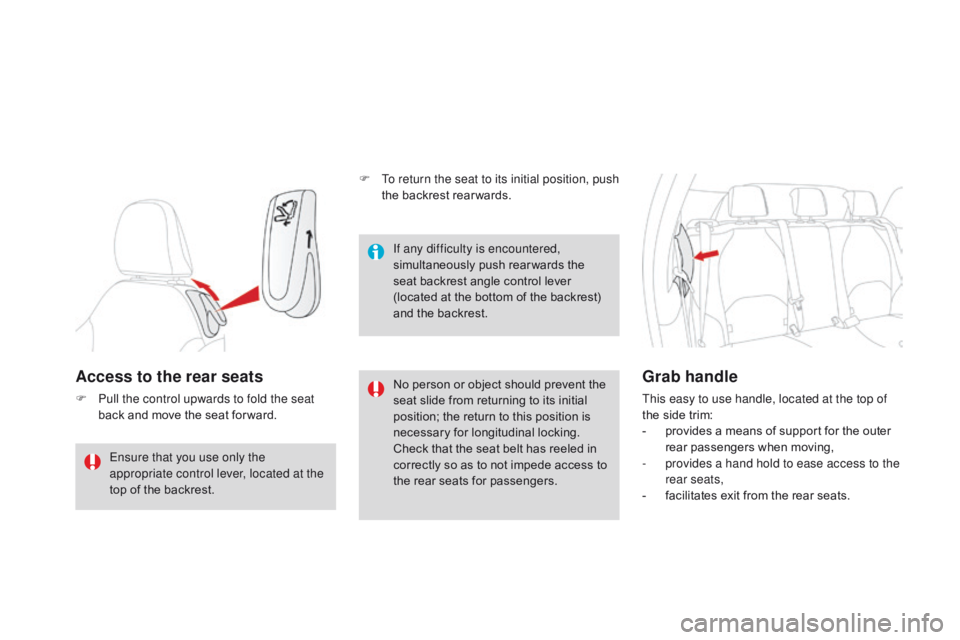
Access to the rear seats
F Pull the control upwards to fold the seat back and move the seat for ward. No
person or object should prevent the s
eat slide from returning to its initial
p
osition; the return to this position is
n
ecessary
fo
r
l
ongitudinal
l
ocking.
Check
that the seat belt has reeled in
c
orrectly so as to not impede access to
t
he rear seats for passengers.
Grab handle
This easy to use handle, located at the top of
the side trim:
-
p
rovides a means of support for the outer
r
ear
p
assengers
w
hen
m
oving,
-
p
rovides a hand hold to ease access to the
rear seats,
-
f
acilitates exit from the rear seats.
If any difficulty is encountered,
simultaneously
p
ush
r
earwards
t
he
s
eat
backrest
angle
control
lever
(
located
at
the
bottom
of
the
backrest)
a
nd
the
backrest.
Ensure that you use only the
appropriate control lever, located at the
top
of
the
backrest. F
T
o return the seat to its initial position, push
the
backrest
rear wards.
Page 79 of 404
77
DS3_en_Chap04_confort_ed01-2014
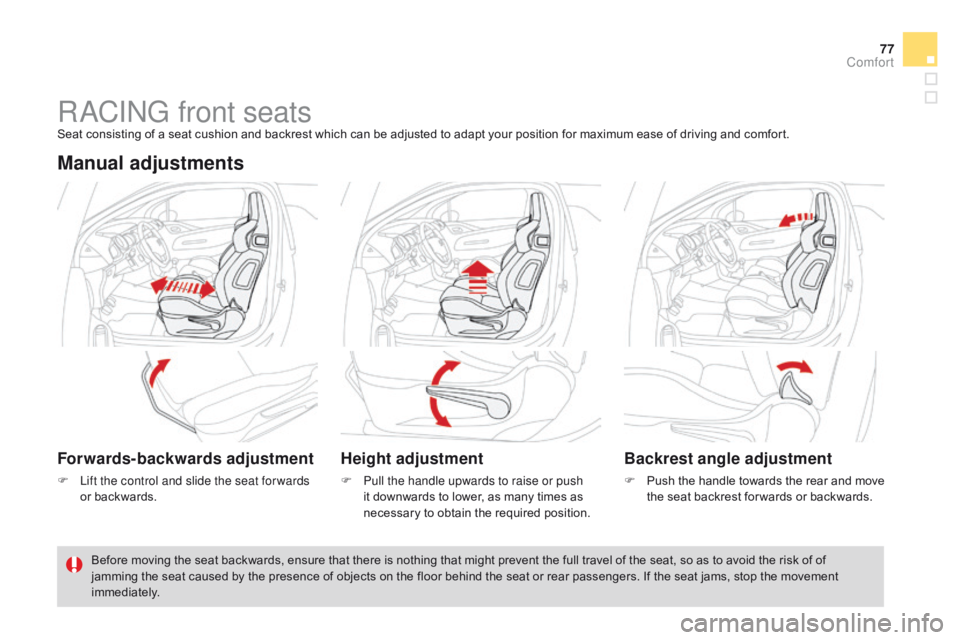
RaCING front seatsSeat consisting of a seat cushion and backrest which can be adjusted to adapt your position for maximum ease of driving and comfort.
Manual adjustments
Forwards-backwards adjustment
F Lift the control and slide the seat for wards or backwards.
Height adjustment
F Pull the handle upwards to raise or push it downwards to lower, as many times as
n
ecessary to obtain the required position.
Backrest angle adjustment
F Push the h andle t owards t he r ear a nd m ove t
he seat backrest for wards or backwards.
Before
moving
the
seat
backwards,
ensure
that
there
is
nothing
that
might
prevent
the
full
travel
of the seat, so as to avoid the risk of of
j
amming
the
seat
caused
by
the
presence
of
objects
on
the
floor
behind
the
seat
or
rear
passengers. If the seat jams, stop the movement
i
mmediately.
comfort
Page 80 of 404
DS3_en_Chap04_confort_ed01-2014
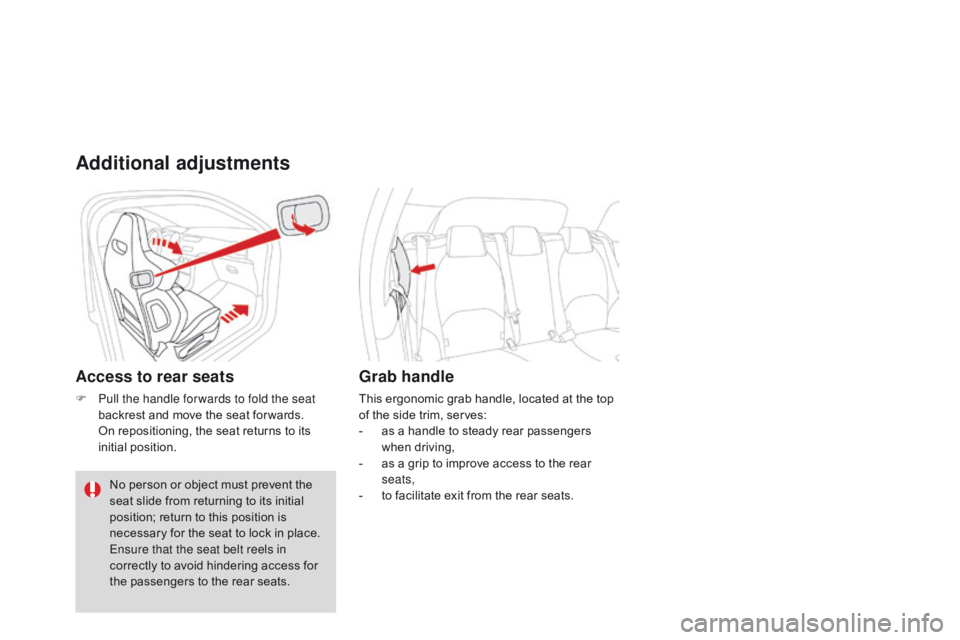
Additional adjustments
Access to rear seats
F Pull the handle for wards to fold the seat backrest and move the seat for wards.
O
n repositioning, the seat returns to its
in
itial
p
osition.
Grab handle
This ergonomic grab handle, located at the top of the side trim, serves:
-
a
s a handle to steady rear passengers
w
hen
d
riving,
-
a
s a grip to improve access to the rear
sea
ts,
-
t
o facilitate exit from the rear seats.
No
person
or
object
must
prevent
the
s
eat
slide
from
returning
to
its
initial
p
osition;
return
to
this
position
is
n
ecessary
for
the
seat
to
lock
in
place.
Ensure that the seat belt reels in
correctly
to
avoid
hindering
access
for
t
he
passengers
to
the
rear
seats.