ESP Citroen DS5 HYBRID4 RHD 2014 1.G Owner's Guide
[x] Cancel search | Manufacturer: CITROEN, Model Year: 2014, Model line: DS5 HYBRID4 RHD, Model: Citroen DS5 HYBRID4 RHD 2014 1.GPages: 382, PDF Size: 14.52 MB
Page 185 of 382
AR
BGНИКОГА НЕ инсталирайте детско столче на седалка с АКТИВИРАНА предна ВЪЗДУШНА ВЪЗГЛАВНИЦ А. Това можеда причини СМЪРТ или СЕРИОЗНО НАРАНЯВАНЕ на детето.
CSNIKDY neumisťujte dětské zádržné zařízení orientované směrem dozadu na sedadlo chráněné AKTIVOVANÝM čelním AIRBAGEM. Hrozí nebezpečí SMRTI DÍTĚTE nebo VÁ ŽNÉHO ZR ANĚNÍ.NIKDY neumisťujte dětské zádržné zařízení orientované směrem dozadu na sedadlo chráněné AKTIVOVANÝM čelním AIRBAGEM. Hrozí nebezpečí SMRTI DÍTĚTE nebo VÁ ŽNÉHO ZR ANĚNÍ.NIKDY neumisťujte dětské zádržné zařízení orientované směrem dozadu na sedadlo chráněné AKTIVOVANÝM čelním AIRBAGEM. Hrozí nebezpečí
DABrug aldrig en bagudvendt barnestol på et sæde der er beskyttet af en aktiv airbag. Død eller alvorlig skade på barnet kan forekomme.
DEVer wenden Sie NIEMALS einen Kindersitz oder Babyschale gegen die Fahr trichtung bei AKTIVIERTEM Airbag, TOD oder ERNSTHAFTE VERLETZUNGEN können die Folge sein.
ELΜη χρησιμοποιείτε ΠΟΤΕ παιδικό κάθισμα με την πλάτη του προς το εμπρός μέρος του αυτοκινήτου, σε μια θέση που προστατεύεται από ΜΕΤΩΠΙΚΟ αερόσακο που είναι ΕΝΕΡΓΟΣ. Αυτό μπορεί να έχει σαν συνέπεια το ΘΑΝΑΤΟ ή το ΣΟΒΑΡΟ ΤΡΑΥΜΑΤΙΣΜΟ του ΠΑΙΔΙΟΥ
ENNEVER use a rear ward facing child restraint on a seat protected by an ACTIVE AIRBAG in front of it, DEATH or SERIOUS INJURY to the CHILD can occur
ESNO INSTALAR NUNCA EL SISTEMA DE RETENCIÓN PAR A NIÑOS DE ESPALDAS AL SENTIDO DE LA CIRCULACIÓN SOBRE UN ASIENTO PROTEGIDO CON UN COJÍN INFLABLE FRONTAL ( AIRBAG ) ACTIVADO. ESTO PUEDE CAUSAR LA MUERTE DEL BEBE O HERIRLO GRAVEMENTE.
ETÄrge kasutage kunagi lapse tur vatooli seljaga sõidusuunas sõiduki istmel mis on kaitstud AKTIVEERITUD TURVAPADJAGA. See võib põhjustada lapsele R ASKEID VIGASTUSI või SURMA.
FIÄLÄ KOSK A AN aseta lapsen tur vaistuinta selkä ajosuuntaan istuimelle, jonka edessä suojana on käyttöön aktivoitu TURVAT Y YNY. Sen laukeaminen voi aiheuttaa LAPSEN KUOLEMAN tai VAK AVAN LOUKK A ANTUMISEN.
FRNE JAMAIS installer de système de retenue pour enfants faisant face vers l’arrière sur un siège protégé par un COUSSIN GONFLABLE frontal ACTIVÉ.Cela peut provoquer la MORT de l’ENFANT ou le BLESSER GR AVEMENT
HRNIK ADA ne postavljati dječju sjedalicu leđima u smjeru vožnje na sjedalo zaštićeno UKLJUČENIM prednjim ZR AČNIM JASTUKOM. To bi moglo uzrokovati SMRT ili TEŠKU OZLJEDU djeteta.NIK ADA ne postavljati dječju sjedalicu leđima u smjeru vožnje na sjedalo zaštićeno UKLJUČENIM prednjim ZR AČNIM JASTUKOM. To bi moglo uzrokovati SMRT ili TEŠKU OZLJEDU djeteta.NIK ADA ne postavljati dječju sjedalicu leđima u smjeru vožnje na sjedalo zaštićeno UKLJUČENIM prednjim ZR AČNIM JASTUKOM. To bi moglo
HUSOHA ne használjon menetiránynak háttal beszerelt gyermekülést olyan ülésen, amely AKTIVÁLT ÁLLAPOTÚ (BEK APCSOLT) FRONTLÉGZSÁKK AL van védve. Ez a gyermek halálát vagy súlyos sérülését okozhatja.
ITNON installare MAI seggiolini per bambini posizionati in senso contrario a quello di marcia su un sedile protetto da un AIRBAG frontale ATTIVATO. Ciò potrebbe provocare la MORTE o FERITE GR AVI al bambino.
LTNIEK ADA neįrenkite vaiko prilaikymo priemonės su atgal atgręžtu vaiku ant sėdynės, kuri saugoma VEIKIANČIOS priekinės ORO PAGALVĖS. Išsiskleidus oro pagalvei vaikas gali būti MIRTINAI arba SUNKIAI TR AUMUOTAS.
183Child safety
Page 198 of 382
Direction indicators
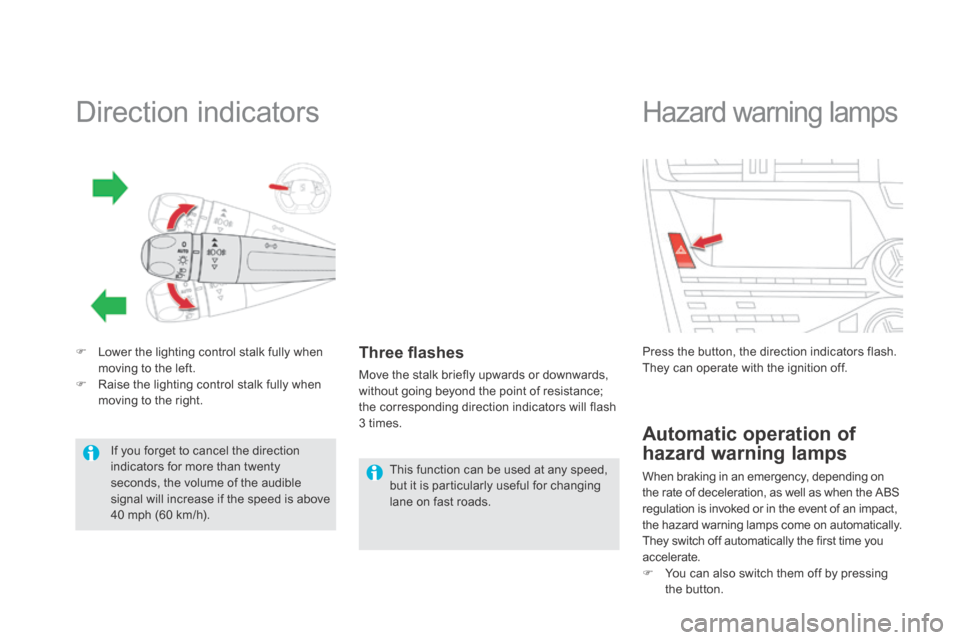
Lower the lighting control stalk fully when moving to the left. Raise the lighting control stalk fully when moving to the right.
Three fl ashes
Move the stalk briefly upwards or downwards, without going beyond the point of resistance; the corresponding direction indicators will flash 3 times.
If you forget to cancel the direction indicators for more than twenty seconds, the volume of the audible signal will increase if the speed is above 40 mph (60 km/h).
Hazard warning lamps
Press the button, the direction indicators flash. They can operate with the ignition off.
Automatic operation of
hazard warning lamps
When braking in an emergency, depending on the rate of deceleration, as well as when the ABS regulation is invoked or in the event of an impact, the hazard warning lamps come on automatically. They switch off automatically the first time you accelerate. You can also switch them off by pressing
the button.
This function can be used at any speed, but it is particularly useful for changing lane on fast roads.
Page 201 of 382
199Safety
Intelligent traction control
system ("Snow motion")
Your vehicle has a system to help driving on snow: intelligent traction control.
This system detects situations of difficult sur face adhesion that could make it difficult to move off or make progress on deep fresh snow or compacted snow. In these situations, the intelligent traction control limits the amount of wheel slip to provide the best traction and trajectory control for your vehicle. In extremely severe conditions (deep snow, mud, ...), when it proves impossible to move off, it may be useful to temporarily deactivate the ESP/ASR systems to allow the wheels to spin freely and so allow movement of the vehicle.
Operation
Anti-lock braking system (ABS) and electronic brake force distribution (EBFD)
In emergency braking, press very firmly without releasing the pressure.
When changing wheels (tyres and rims), make sure that these are approved for your vehicle. Normal operation of the ABS may make itself felt by slight vibrations of the brake pedal.
When this warning lamp comes on, accompanied by an audible signal and a message, it indicates that there is a fault with the ABS, which could cause loss of control of the vehicle when braking.
When this warning lamp comes on, coupled with the STOP warning lamp, accompanied by an audible signal and a message, it indicates that there is a fault with the electronic brake force distribution (EBFD), which could cause loss of control of the vehicle when braking. You must stop as soon as it is safe to do so. In both cases, contact a CITROËN dealer or a qualified workshop. The use of snow tyres is strongly recommended on sur faces offering low levels of adhesion.
Page 205 of 382
203Safety
Front seat belt height adjustment
To adjust the anchorage point, squeeze the control and slide it until you find a notch.
From approximately 12 mph (20 km/h), the warning lamp(s) flash for two minutes accompanied by an audible signal. Once these two minutes have elapsed, the warning lamp(s) remain on until the driver or one or more
passengers fasten their seat belt.
Seat belt not fastened / unfastened warning lamps *
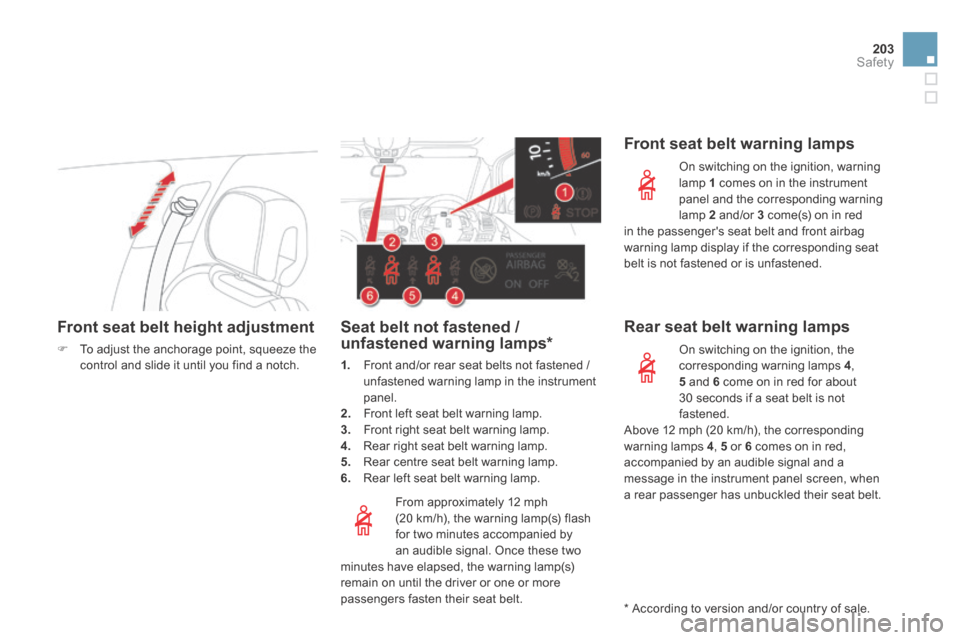
1. Front and/or rear seat belts not fastened / unfastened warning lamp in the instrument panel. 2. Front left seat belt warning lamp. 3. Front right seat belt warning lamp. 4. Rear right seat belt warning lamp. 5. Rear centre seat belt warning lamp. 6. Rear left seat belt warning lamp.
Front seat belt warning lamps
On switching on the ignition, warning lamp 1 comes on in the instrument panel and the corresponding warning lamp 2 and/or 3 come(s) on in red in the passenger's seat belt and front airbag warning lamp display if the corresponding seat belt is not fastened or is unfastened.
Rear seat belt warning lamps
On switching on the ignition, the corresponding warning lamps 4 , 5 and 6 come on in red for about 30 seconds if a seat belt is not fastened.
Above 12 mph (20 km/h), the corresponding warning lamps 4 , 5 or 6 comes on in red, accompanied by an audible signal and a message in the instrument panel screen, when a rear passenger has unbuckled their seat belt.
* According to version and/or country of sale.
Page 209 of 382
207Safety
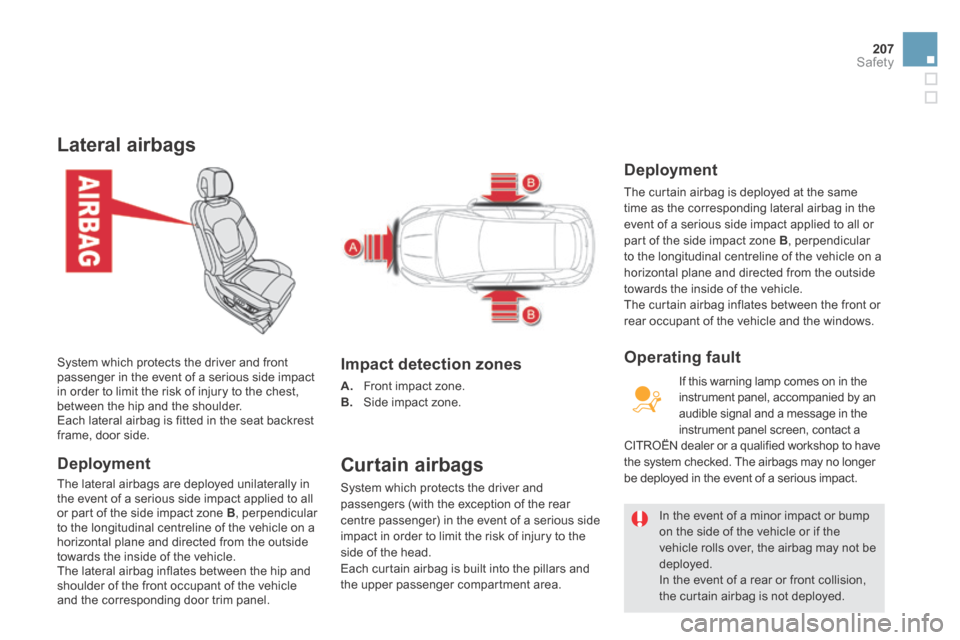
Lateral airbags
Deployment
The lateral airbags are deployed unilaterally in the event of a serious side impact applied to all or part of the side impact zone B , perpendicular to the longitudinal centreline of the vehicle on a horizontal plane and directed from the outside towards the inside of the vehicle. The lateral airbag inflates between the hip and shoulder of the front occupant of the vehicle and the corresponding door trim panel.
System which protects the driver and front passenger in the event of a serious side impact in order to limit the risk of injury to the chest, between the hip and the shoulder. Each lateral airbag is fitted in the seat backrest frame, door side.
Impact detection zones
A. Front impact zone. B. Side impact zone.
Curtain airbags
System which protects the driver and passengers (with the exception of the rear centre passenger) in the event of a serious side impact in order to limit the risk of injury to the side of the head. Each curtain airbag is built into the pillars and the upper passenger compartment area.
In the event of a minor impact or bump on the side of the vehicle or if the vehicle rolls over, the airbag may not be deployed. In the event of a rear or front collision, the curtain airbag is not deployed.
Deployment
The curtain airbag is deployed at the same time as the corresponding lateral airbag in the event of a serious side impact applied to all or part of the side impact zone B , perpendicular to the longitudinal centreline of the vehicle on a horizontal plane and directed from the outside towards the inside of the vehicle. The curtain airbag inflates between the front or rear occupant of the vehicle and the windows.
If this warning lamp comes on in the instrument panel, accompanied by an audible signal and a message in the instrument panel screen, contact a CITROËN dealer or a qualified workshop to have the system checked. The airbags may no longer be deployed in the event of a serious impact.
Operating fault
Page 237 of 382
235Practical information
Changing a fuse Procedure for replacing a failed fuse with a new fuse to rectify a failure of the corresponding function.
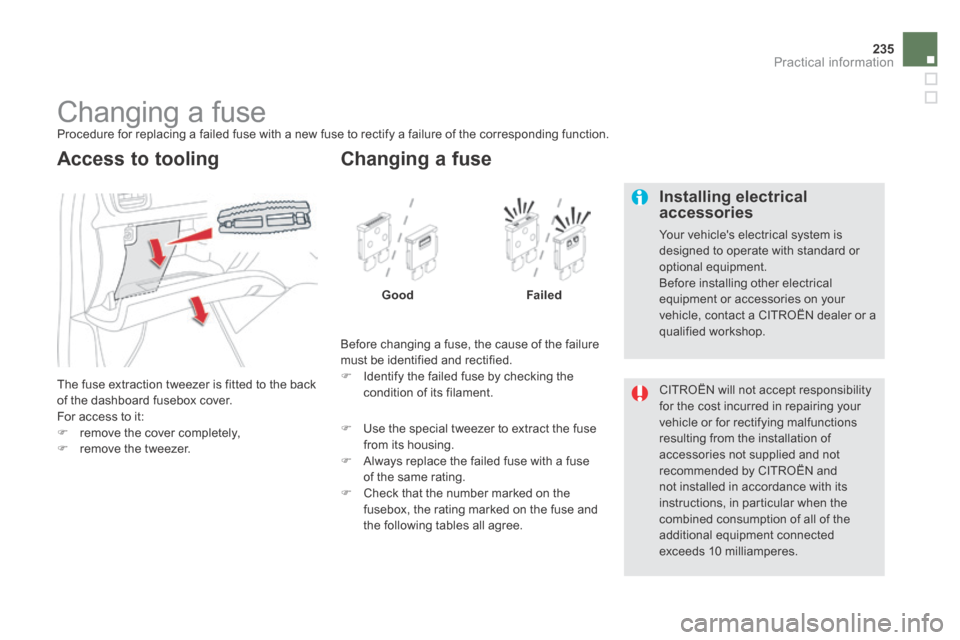
The fuse extraction tweezer is fitted to the back of the dashboard fusebox cover. For access to it: remove the cover completely, remove the tweezer.
Access to tooling
Before changing a fuse, the cause of the failure must be identified and rectified. Identify the failed fuse by checking the condition of its filament.
Changing a fuse
GoodFailed
Use the special tweezer to extract the fuse from its housing. Always replace the failed fuse with a fuse of the same rating. Check that the number marked on the fusebox, the rating marked on the fuse and the following tables all agree.
CITROËN will not accept responsibility for the cost incurred in repairing your vehicle or for rectifying malfunctions
resulting from the installation of accessories not supplied and not recommended by CITROËN and not installed in accordance with its instructions, in particular when the combined consumption of all of the additional equipment connected exceeds 10 milliamperes.
Installing electrical accessories
Your vehicle's electrical system is designed to operate with standard or optional equipment. Before installing other electrical equipment or accessories on your vehicle, contact a CITROËN dealer or a qualified workshop.
Page 239 of 382
237Practical information
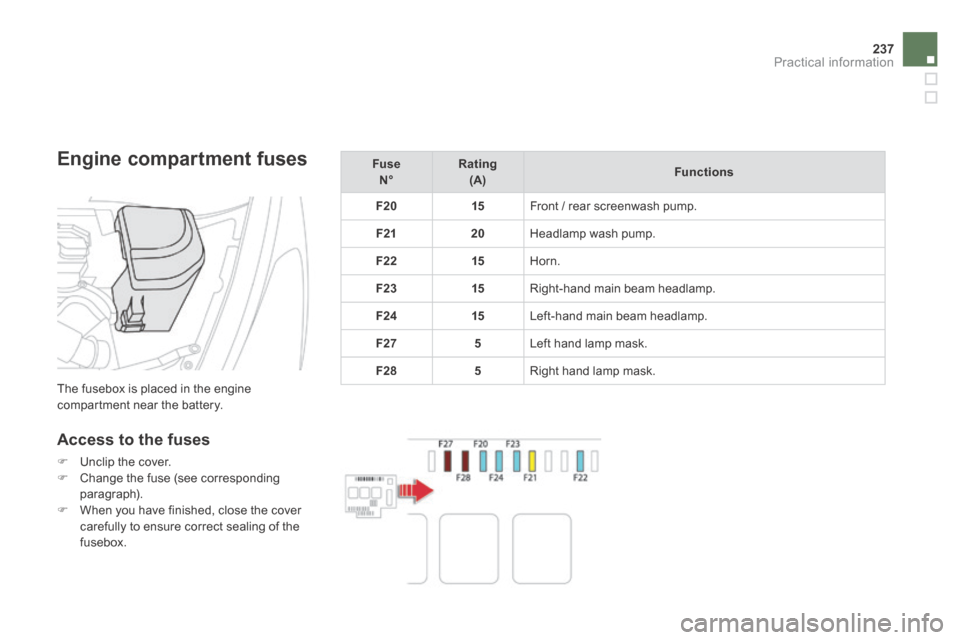
Engine compartment fuses
The fusebox is placed in the engine compartment near the battery.
Access to the fuses
Unclip the cover. Change the fuse (see corresponding paragraph). When you have finished, close the cover carefully to ensure correct sealing of the fusebox.
Fuse N° Rating (A)Functions
F2015 Front / rear screenwash pump.
F2120 Headlamp wash pump.
F2215 Horn.
F2315 Right-hand main beam headlamp.
F2415 Left-hand main beam headlamp.
F275 Left hand lamp mask.
F285 Right hand lamp mask.
Page 242 of 382
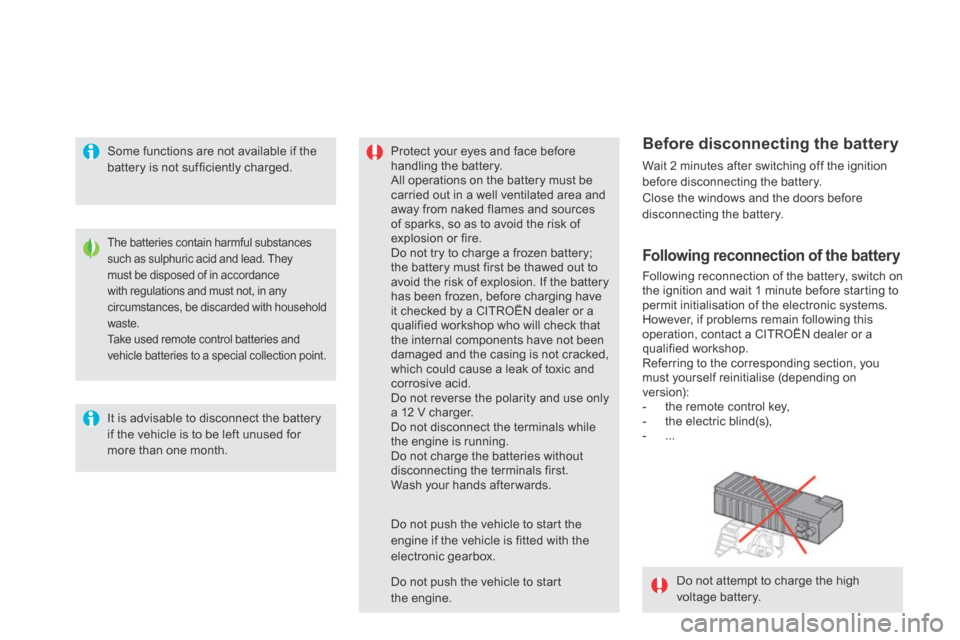
Do not attempt to charge the high
voltage battery.
The batteries contain harmful substances such as sulphuric acid and lead. They must be disposed of in accordance with regulations and must not, in any circumstances, be discarded with household waste. Take used remote control batteries and vehicle batteries to a special collection point.
It is advisable to disconnect the battery
if the vehicle is to be left unused for more than one month.
Protect your eyes and face before handling the battery. All operations on the battery must be carried out in a well ventilated area and away from naked flames and sources of sparks, so as to avoid the risk of explosion or fire. Do not try to charge a frozen battery; the battery must first be thawed out to avoid the risk of explosion. If the battery has been frozen, before charging have it checked by a CITROËN dealer or a qualified workshop who will check that the internal components have not been damaged and the casing is not cracked, which could cause a leak of toxic and corrosive acid. Do not reverse the polarity and use only a 12 V charger. Do not disconnect the terminals while the engine is running. Do not charge the batteries without disconnecting the terminals first. Wash your hands after wards.
Do not push the vehicle to start the engine if the vehicle is fitted with the electronic gearbox.
Before disconnecting the battery
Wait 2 minutes after switching off the ignition before disconnecting the battery. Close the windows and the doors before disconnecting the battery.
Following reconnection of the battery
Following reconnection of the battery, switch on the ignition and wait 1 minute before starting to permit initialisation of the electronic systems. However, if problems remain following this operation, contact a CITROËN dealer or a qualified workshop. Referring to the corresponding section, you must yourself reinitialise (depending on version): - the remote control key, - the electric blind(s), - ...
Do not push the vehicle to start the engine.
Some functions are not available if the battery is not sufficiently charged.
Page 244 of 382
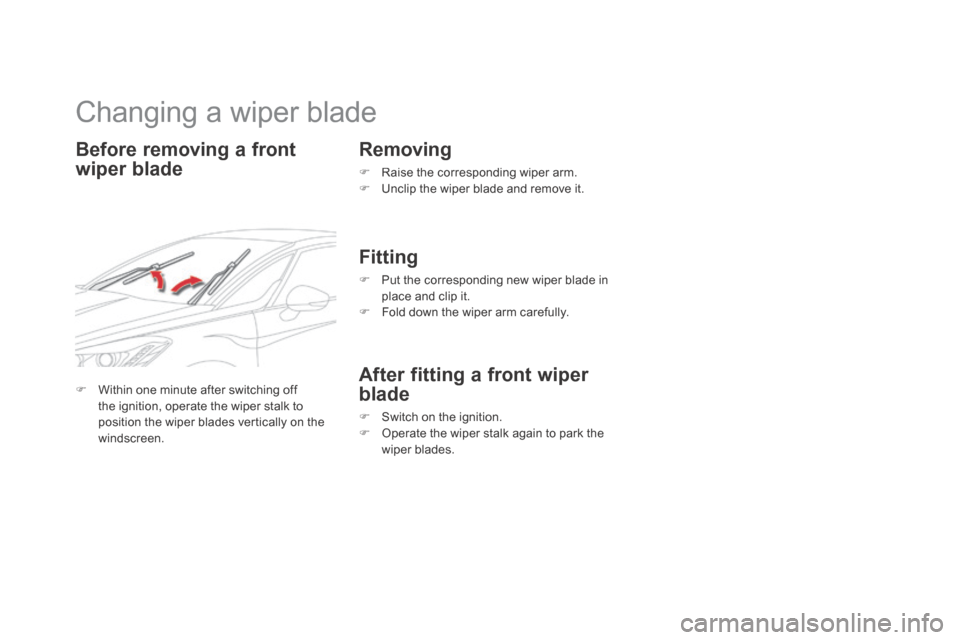
Changing a wiper blade
Before removing a front
wiper blade
Removing
Raise the corresponding wiper arm. Unclip the wiper blade and remove it.
Fitting
Put the corresponding new wiper blade in place and clip it. Fold down the wiper arm carefully.
After fitting a front wiper
blade
Switch on the ignition. Operate the wiper stalk again to park the wiper blades.
Within one minute after switching off the ignition, operate the wiper stalk to position the wiper blades vertically on the windscreen.
Page 257 of 382
255Checks
On vehicles fitted with HDi engines, the fuel system must be primed if you run out of fuel; refer to the corresponding engine compartment view.
Running out of fuel (Diesel)
If the tank on your vehicle is fitted with a misfuel prevention device, refer to the "Misfuel prevention (Diesel)" section.
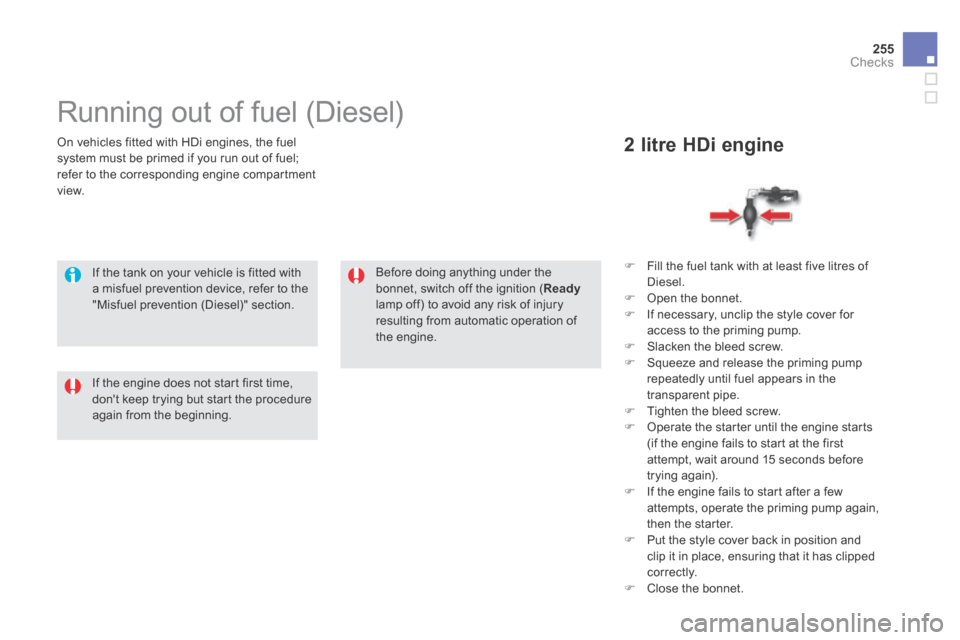
Fill the fuel tank with at least five litres of Diesel. Open the bonnet. If necessary, unclip the style cover for access to the priming pump. Slacken the bleed screw. Squeeze and release the priming pump repeatedly until fuel appears in the transparent pipe. Tighten the bleed screw. Operate the starter until the engine starts (if the engine fails to start at the first attempt, wait around 15 seconds before trying again). If the engine fails to start after a few attempts, operate the priming pump again, then the starter. Put the style cover back in position and clip it in place, ensuring that it has clipped c o r r e c t l y. Close the bonnet.
2 litre HDi engine
If the engine does not start first time, don't keep trying but start the procedure again from the beginning.
Before doing anything under the bonnet, switch off the ignition ( Readylamp off) to avoid any risk of injury resulting from automatic operation of the engine.