Port Citroen GRAND C4 PICASSO 2017 2.G Owner's Manual
[x] Cancel search | Manufacturer: CITROEN, Model Year: 2017, Model line: GRAND C4 PICASSO, Model: Citroen GRAND C4 PICASSO 2017 2.GPages: 527, PDF Size: 12.91 MB
Page 11 of 527
9
C4-Picasso-II_en_Chap00c_eco-conduite_ed02-2016
Optimise the use of your gearbox
With a manual gearbox, move off gently and change up without waiting.
During acceleration change up early.
With an automatic gearbox, give preference to automatic mode and
avoid pressing the accelerator pedal heavily or suddenly.
Control the use of your electrical
equipment
Before moving off, if the passenger compartment is too warm,
ventilate it by opening the windows and air vents before using the air
conditioning.
Above 30 mph (50 km/h), close the windows and leave the air vents
open.
Remember to make use of equipment that can help keep the temperature
in the passenger compartment down (sunroof and window blinds...).
Switch off the air conditioning, unless it has automatic regulation, as
soon as the desired temperature is attained.
Switch off the demisting and defrosting controls, if not automatic.
Switch off the heated seat as soon as possible.
Switch off the headlamps and front foglamps when the ambient light
level does not require their use.
Avoid running the engine before moving off, particularly in winter; your
vehicle will warm up much faster while driving.
As a passenger, if you avoid connecting your multimedia devices
(film, music, video game...), you will contribute towards limiting the
consumption of electrical energy, and so of fuel.
Disconnect your portable devices before leaving the vehicle.
Eco-driving
Eco-driving is a range of everyday practices that allow the motorist to optimise their fuel consumption and CO2 emissions.
Drive smoothly
Maintain a safe distance between vehicles, use engine braking rather
than the brake pedal, and press the accelerator progressively. These
practices contribute towards a reduction in fuel consumption and
CO
2 emissions and also help reduce the background traffic noise.
I
f your vehicle has cruise control, make use of the system at speeds
above 25 mph (40 km/h) when the traffic is flowing well. The gear efficiency indicator invites you to engage the most suitable
gear: as soon as the indication is displayed in the instrument panel,
follow it straight away.
For vehicles fitted with an automatic gearbox, this indicator appears
only in manual mode.
.
Eco-driving
Page 22 of 527
20
C4-Picasso-II_en_Chap01_instruments-bord_ed02-2016
You can modify the appearance of the
instrument panel, by choosing:
-
a c
olour scheme,
-
a d
isplay mode.
Choosing the language
This depends on the setting in the touch
screen.
Certain languages are not available for this
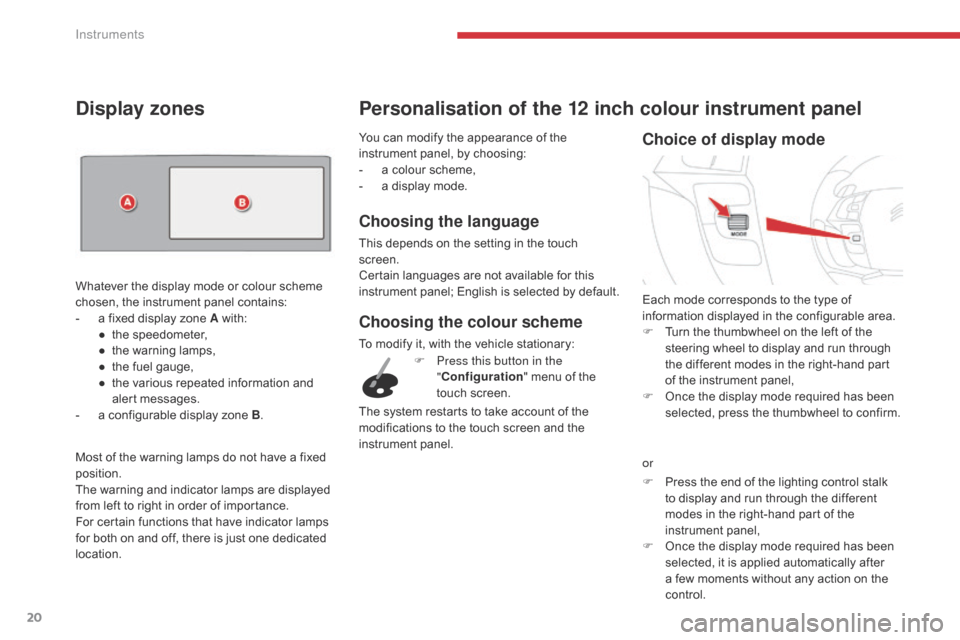
instrument panel; English is selected by default. Each mode corresponds to the type of
information displayed in the configurable area.
F
T
urn the thumbwheel on the left of the
steering wheel to display and run through
the different modes in the right-hand part
of the instrument panel,
F
O
nce the display mode required has been
selected, press the thumbwheel to confirm.
Personalisation of the 12 inch colour instrument panel
Choice of display mode
or
Display zones
Whatever the display mode or colour scheme
chosen, the instrument panel contains:
-
a f
ixed display zone A with:
●
t
he speedometer,
●
t
he warning lamps,
●
t
he fuel gauge,
●
t
he various repeated information and
alert messages.
-
a c
onfigurable display zone B .
Most of the warning lamps do not have a fixed
position.
The warning and indicator lamps are displayed
from left to right in order of importance.
For certain functions that have indicator lamps
for both on and off, there is just one dedicated
location.
Choosing the colour scheme
To modify it, with the vehicle stationary:
F
P
ress the end of the lighting control stalk
to display and run through the different
modes in the right-hand part of the
instrument panel,
F
O
nce the display mode required has been
selected, it is applied automatically after
a few moments without any action on the
control.
F
P
ress this button in the
" Configuration " menu of the
touch screen.
The system restarts to take account of the
modifications to the touch screen and the
instrument panel.
Instruments
Page 63 of 527
61
C4-Picasso-II_en_Chap02_ouvertures_ed02-2016
Manual central locking
Central locking
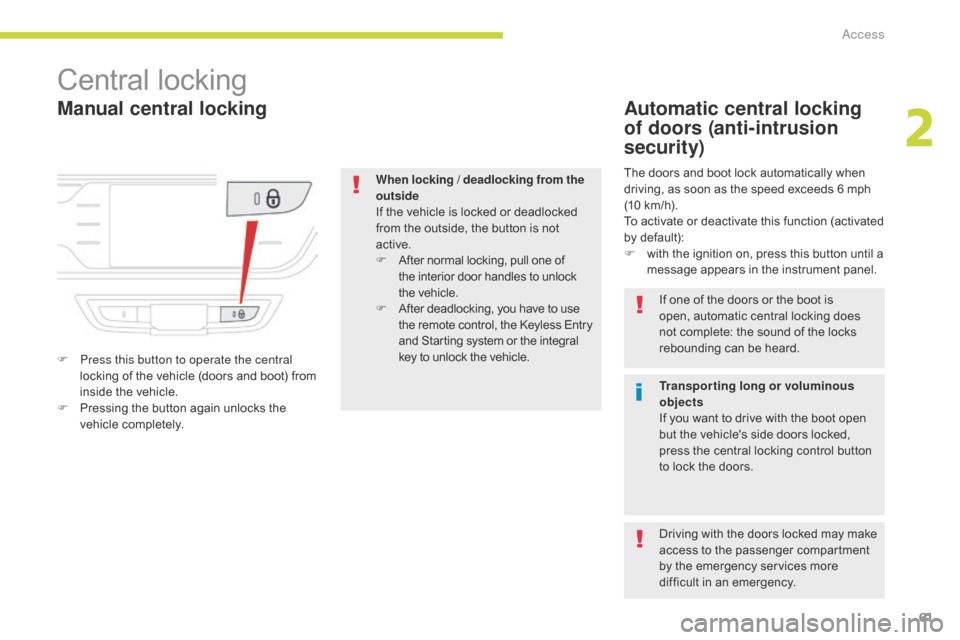
F Press this button to operate the central locking of the vehicle (doors and boot) from
inside the vehicle.
F
P
ressing the button again unlocks the
vehicle completely.
Automatic central locking
of doors (anti-intrusion
security)
The doors and boot lock automatically when
driving, as soon as the speed exceeds 6 mph
(10 km/h).
To activate or deactivate this function (activated
by default):
F
w
ith the ignition on, press this button until a
message appears in the instrument panel.
When locking / deadlocking from the
outside
If the vehicle is locked or deadlocked
from the outside, the button is not
active.
F
A
fter normal locking, pull one of
the interior door handles to unlock
the
vehicle.
F
A
fter deadlocking, you have to use
the remote control, the Keyless Entry
and Starting system or the integral
key to unlock the vehicle. If one of the doors or the boot is
open, automatic central locking does
not complete: the sound of the locks
rebounding can be heard.
Transporting long or voluminous
objects
If you want to drive with the boot open
but the vehicle's side doors locked,
press the central locking control button
to lock the doors.
Driving with the doors locked may make
access to the passenger compartment
by the emergency services more
difficult in an emergency.
2
Access
Page 74 of 527
72
OFF
C4-Picasso-II_en_Chap02_ouvertures_ed02-2016
Locking the vehicle with exterior perimeter
monitoring only
Deactivate the interior volumetric monitoring
to avoid unwanted triggering of the alarm in
certain cases such as:
-
l
eaving a window partially open,
-
w
ashing your vehicle,
-
c
hanging a wheel,
-
t
owing your vehicle,
-
t
ransport on a ferry.
Deactivating the volumetric
monitoring
F Switch off the ignition and within ten seconds press this button
until its indicator lamp is on fixed.
F
G
et out of the vehicle.
F
I
mmediately lock the vehicle using the
remote control or the "Keyless Entry and
Starting" system.
Only the exterior perimeter protection system is
active: the indicator lamp in the button flashes
once per second.
To be effective, this deactivation must be done
every time the ignition is switched off.
In the case of automatic locking of the
vehicle (which occurs after a period
of 30 seconds if a door or the boot is
not opened), the monitoring system is
reactivated automatically.
Deactivation
F Press one of the unlocking buttons on the
remote control:
short press
long press
or
F
U
nlock the vehicle using the "Keyless Entry
and Starting" system.
The monitoring system is deactivated: the
indicator lamp in the button is off and the
direction indicators flash for about 2 seconds.
Reactivating the interior
volumetric monitoring
F Deactivate the exterior perimeter monitoring by unlocking the vehicle using
the remote control or the Keyless Entry and
Starting system.
The indicator lamp in the button goes off.
F
R
eactivate the full alarm system by locking
the vehicle using the remote control or the
"Keyless Entry and Starting" system.
The indicator lamp in the button flashes once
per second again.
Access
Page 82 of 527
80
C4-Picasso-II_en_Chap03_ergonomie-confort_ed02-2016
Additional adjustments
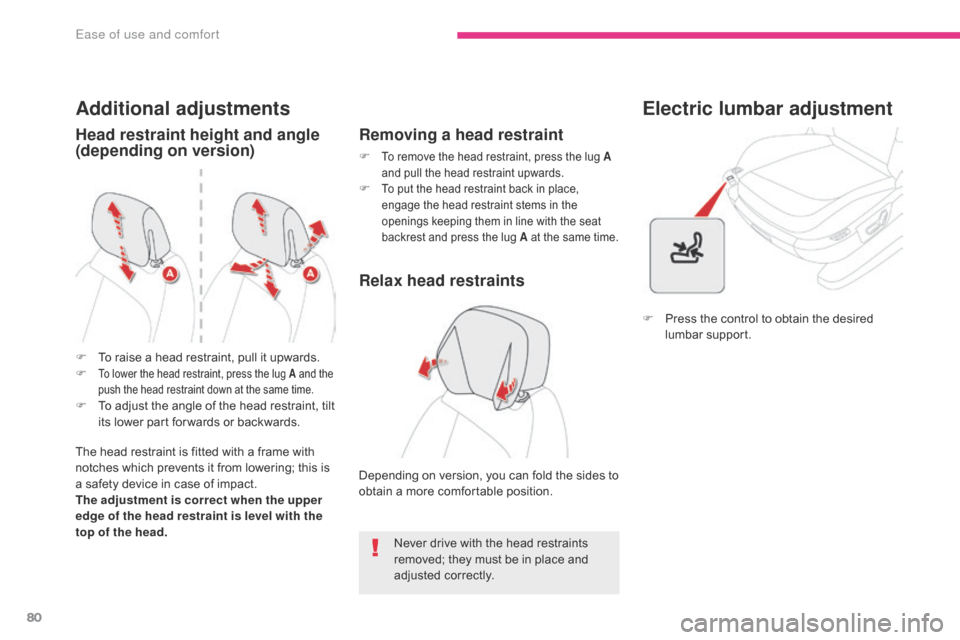
Head restraint height and angle
(depending on version)
The head restraint is fitted with a frame with
notches which prevents it from lowering; this is
a safety device in case of impact.
The adjustment is correct when the upper
edge of the head restraint is level with the
top of the head.Never drive with the head restraints
removed; they must be in place and
adjusted correctly.
F
T
o raise a head restraint, pull it upwards.
F
To lower the head restraint, press the lug A and the
push the head restraint down at the same time.
F To adjust the angle of the head restraint, tilt
its lower part for wards or backwards.
Removing a head restraint
F To remove the head restraint, press the lug A
a nd pull the head restraint upwards.
F To put the head restraint back in place,
engage the head restraint stems in the
openings keeping them in line with the seat
backrest and press the lug A at the same time.
Depending on version, you can fold the sides to
obtain a more comfortable position. F
P
ress the control to obtain the desired
lumbar support.
Electric lumbar adjustment
Relax head restraints
Ease of use and comfort
Page 89 of 527
87
C4-Picasso-II_en_Chap03_ergonomie-confort_ed02-2016
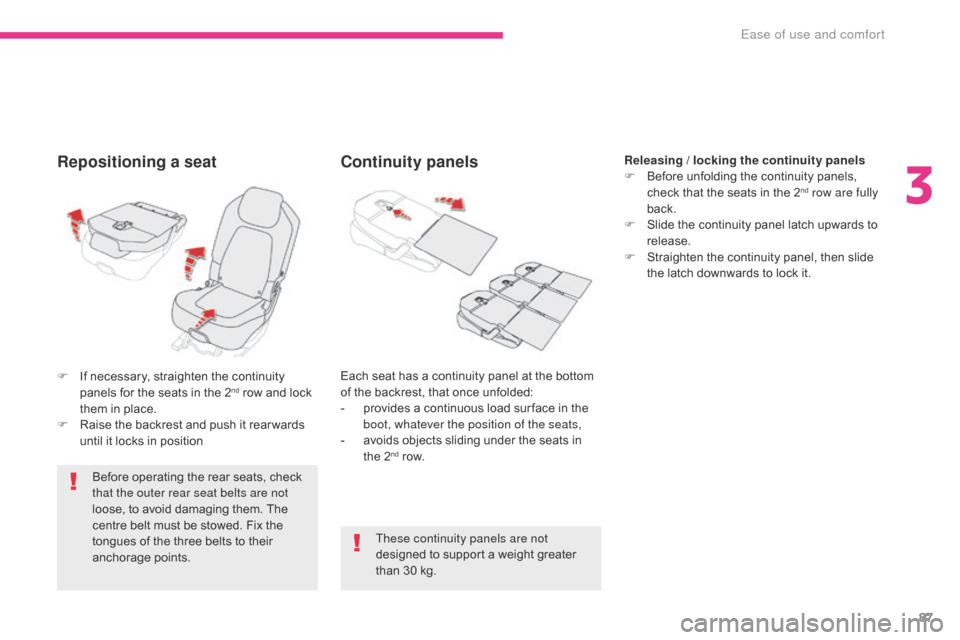
Repositioning a seat
Before operating the rear seats, check
that the outer rear seat belts are not
loose, to avoid damaging them. The
centre belt must be stowed. Fix the
tongues of the three belts to their
anchorage points.
Continuity panels
These continuity panels are not
designed to support a weight greater
than 30 kg.Releasing / locking the continuity panels
F
B
efore unfolding the continuity panels,
check that the seats in the 2
nd row are fully
back.
F
S
lide the continuity panel latch upwards to
release.
F
S
traighten the continuity panel, then slide
the latch downwards to lock it.
F
I
f necessary, straighten the continuity
panels for the seats in the 2
nd row and lock
them in place.
F
R
aise the backrest and push it rear wards
until it locks in position Each seat has a continuity panel at the bottom
of the backrest, that once unfolded:
-
p rovides a continuous load sur face in the
boot, whatever the position of the seats,
-
a
voids objects sliding under the seats in
the 2
nd row.
3
Ease of use and comfort
Page 91 of 527
89
C4-Picasso-II_en_Chap03_ergonomie-confort_ed02-2016
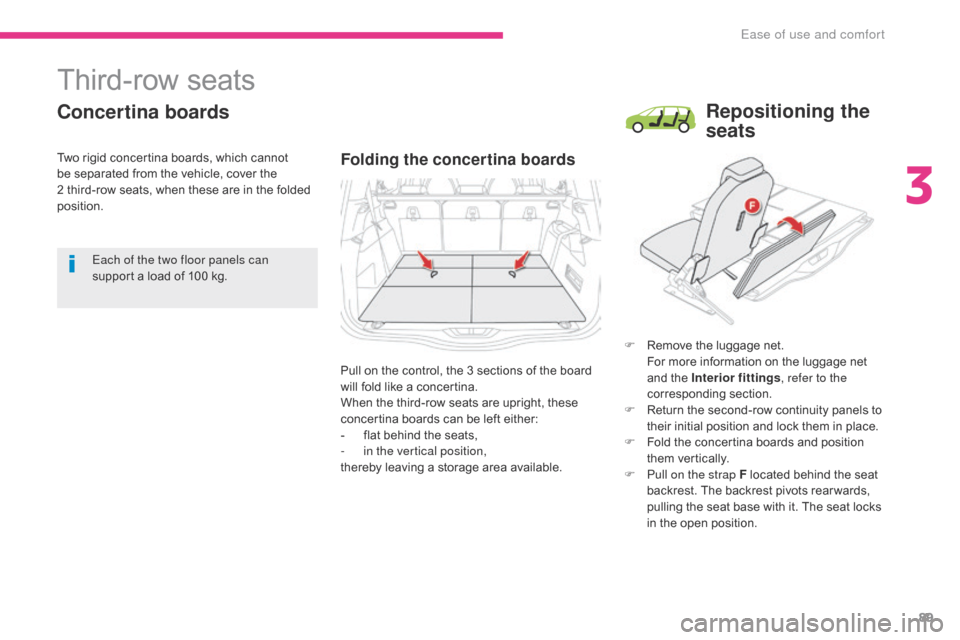
Third-row seats
Concertina boards
Folding the concertina boards
F Remove the luggage net.
F or more information on the luggage net
and the Interior fittings , refer to the
corresponding section.
F
R
eturn the second-row continuity panels to
their initial position and lock them in place.
F
F
old the concertina boards and position
them vertically.
F
P
ull on the strap F located behind the seat
backrest. The backrest pivots rear wards,
pulling the seat base with it. The seat locks
in the open position.
Each of the two floor panels can
support a load of 100 kg.
Pull on the control, the 3 sections of the board
will fold like a concertina.
When the third-row seats are upright, these
concertina boards can be left either:
-
f
lat behind the seats,
-
i
n the vertical position,
thereby leaving a storage area available.
Repositioning the
seats
Two rigid concertina boards, which cannot
be separated from the vehicle, cover the
2
third-row seats, when these are in the folded
position.
3
Ease of use and comfort
Page 111 of 527
109
C4-Picasso-II_en_Chap03_ergonomie-confort_ed02-2016
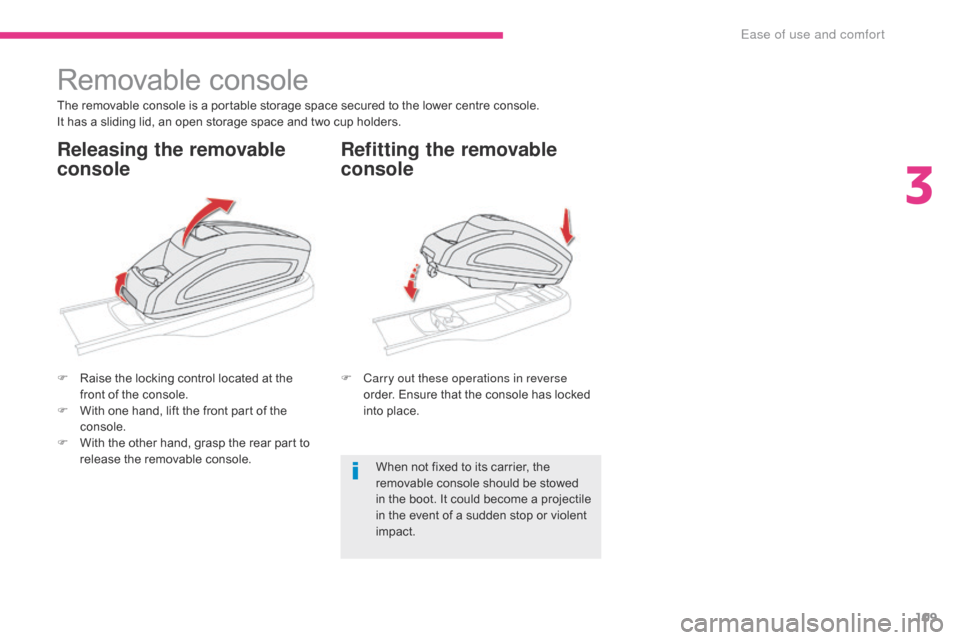
Removable console
The removable console is a portable storage space secured to the lower centre console.
It has a sliding lid, an open storage space and two cup holders.
F
R
aise the locking control located at the
front of the console.
F
W
ith one hand, lift the front part of the
console.
F
W
ith the other hand, grasp the rear part to
release the removable console. F
C
arry out these operations in reverse
order. Ensure that the console has locked
into place.
When not fixed to its carrier, the
removable console should be stowed
in the boot. It could become a projectile
in the event of a sudden stop or violent
impact.
Releasing the removable
console Refitting the removable
console
3
Ease of use and comfort
Page 112 of 527
110
C4-Picasso-II_en_Chap03_ergonomie-confort_ed02-2016
Central storage compartment
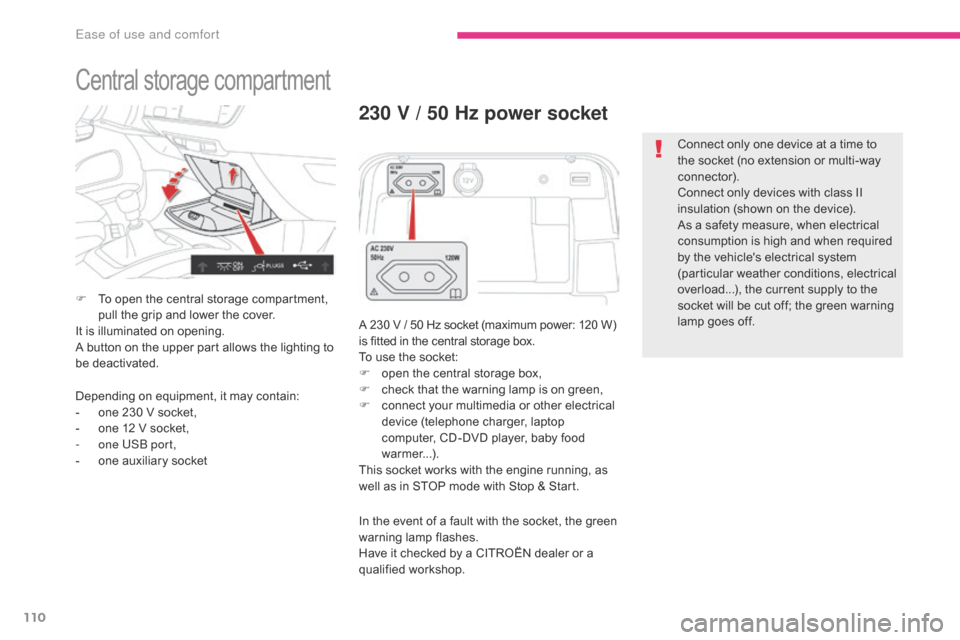
F To open the central storage compartment, pull the grip and lower the cover.
It is illuminated on opening.
A button on the upper part allows the lighting to
be deactivated.
230 V / 50 Hz power socket
A 230 V / 50 Hz socket (maximum power: 120 W)
i s fitted in the central storage box.
To use the socket:
F
o
pen the central storage box,
F
c
heck that the warning lamp is on green,
F
c
onnect your multimedia or other electrical
device (telephone charger, laptop
computer, CD-DVD player, baby food
warmer...).
This socket works with the engine running, as
well as in STOP mode with Stop & Start.
Depending on equipment, it may contain:
-
o
ne 230 V socket,
-
o
ne 12 V socket,
-
o
ne USB port,
-
o
ne auxiliary socket In the event of a fault with the socket, the green
warning lamp flashes.
Have it checked by a CITROËN dealer or a
qualified workshop. Connect only one device at a time to
the socket (no extension or multi-way
connector).
Connect only devices with class II
insulation (shown on the device).
As a safety measure, when electrical
consumption is high and when required
by the vehicle's electrical system
(particular weather conditions, electrical
overload...), the current supply to the
socket will be cut off; the green warning
lamp goes off.
Ease of use and comfort
Page 113 of 527
111
C4-Picasso-II_en_Chap03_ergonomie-confort_ed02-2016
When the USB port is used, the
portable device charges automatically.
A message is displayed if the power
consumption of the portable device
exceeds the current supplied by the
vehicle.
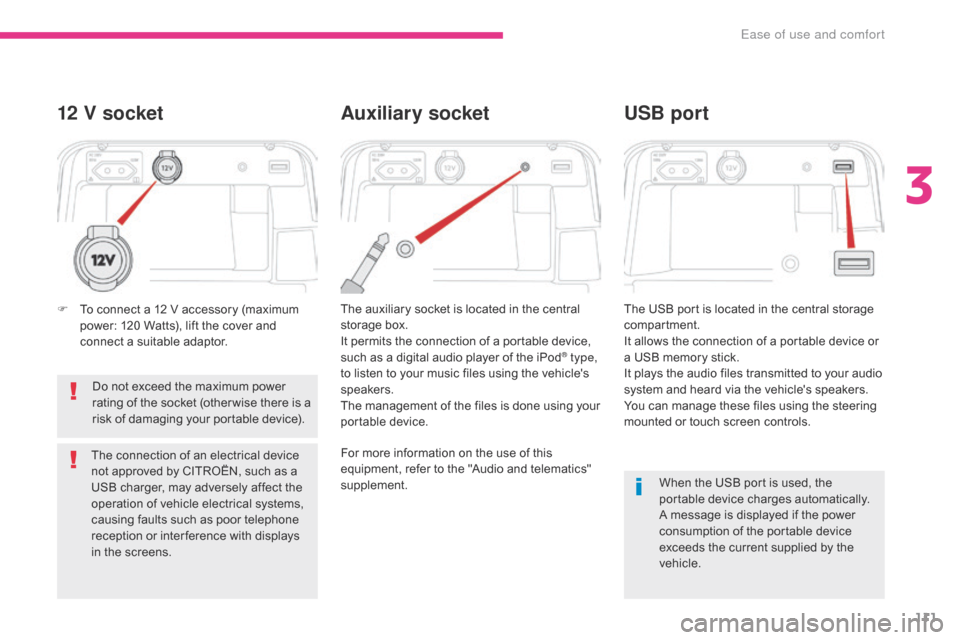
12 V socket
The auxiliary socket is located in the central
storage box.
It permits the connection of a portable device,
such as a digital audio player of the iPod
® type,
to listen to your music files using the vehicle's
speakers.
The management of the files is done using your
portable device. The USB port is located in the central storage
compartment.
It allows the connection of a portable device or
a USB memory stick.
It plays the audio files transmitted to your audio
system and heard via the vehicle's speakers.
You can manage these files using the steering
mounted or touch screen controls.
Auxiliary socket
USB port
For more information on the use of this
equipment, refer to the "Audio and telematics"
supplement.
F
T
o connect a 12 V accessory (maximum
power: 120 Watts), lift the cover and
connect a suitable adaptor.
Do not exceed the maximum power
rating of the socket (other wise there is a
risk of damaging your portable device).
The connection of an electrical device
not approved by CITROËN, such as a
USB charger, may adversely affect the
operation of vehicle electrical systems,
causing faults such as poor telephone
reception or inter ference with displays
in the screens.
3
Ease of use and comfort