Citroen GRAND C4 PICASSO RHD 2016 2.G Owner's Manual
Manufacturer: CITROEN, Model Year: 2016, Model line: GRAND C4 PICASSO RHD, Model: Citroen GRAND C4 PICASSO RHD 2016 2.GPages: 523, PDF Size: 13.63 MB
Page 251 of 523
249
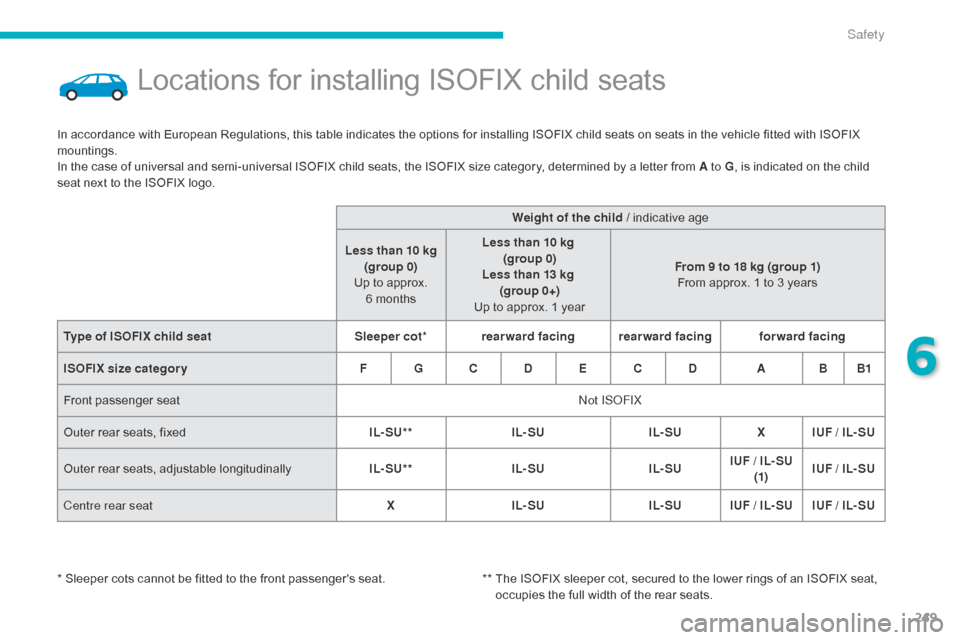
Locations for installing ISOFIX child seats
In accordance with European Regulations, this table indicates the options for installing ISOFIX child seats on seats in the vehicle fitted with ISOFIX mountings.
In
the case of universal and semi-universal ISOFIX child seats, the ISOFIX size category, determined by a letter from A to G,
is indicated on the child
s
eat next to the ISOFIX logo. Weight of the child
/ indicative age
Less than 10 kg (group 0)
Up
to approx.
6 m
onthsLess than 10 kg
(group 0)
Less than 13 kg (group 0+)
Up to approx. 1 yearFrom 9 to 18 kg (group 1)
From
approx. 1 to 3 years
Type of ISOFIX child seat Sleeper cot*rearward facing rearward facing forward facing
ISOFIX size categor y F G C D E C D A B B1
Front
p
assenger
sea
t Not ISOFIX
Outer
rear seats, fixed IL- SU**IL- SUIL- SUX IUF / IL- SU
Outer
r
ear
s
eats,
a
djustable
l
ongitudinallyIL- SU**IL- SUIL- SUIUF / IL- SU
(1) IUF / IL- SU
Centre rear seat XIL- SU IL- SUIUF / IL- SU IUF / IL- SU
*
S
leeper cots cannot be fitted to the front passenger's seat. **
T
he ISOFIX sleeper cot, secured to the lower rings of an ISOFIX seat,
o
ccupies the full width of the rear seats.
6
Safety
Page 252 of 523
250
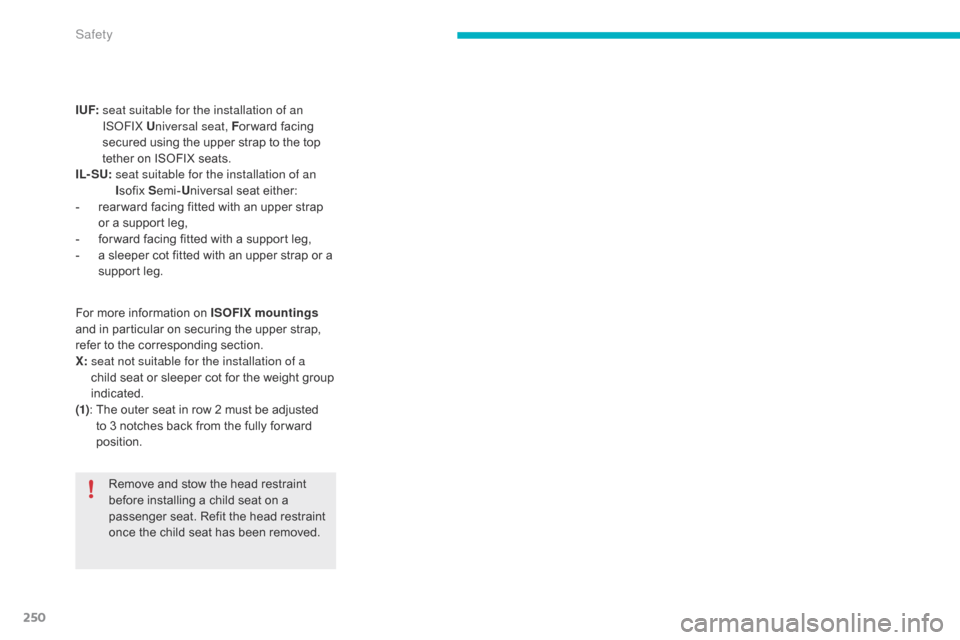
I UF: seat suitable for the installation of an
ISOFIX U niversal seat, F or ward
facing
s
ecured using the upper strap to the top
t
ether on ISOFIX seats.
IL- SU:
s
eat suitable for the installation of an
I sofix
Semi- Universal
sea
t
ei
ther:
-
r
ear ward facing fitted with an upper strap
o
r a support leg,
-
f
or ward facing fitted with a support leg,
-
a
sleeper cot fitted with an upper strap or a
s
upport leg.
Remove
and stow the head restraint
b
efore installing a child seat on a
p
assenger seat. Refit the head restraint
o
nce the child seat has been removed.
For
more information on ISOFIX mountings
and
in particular on securing the upper strap,
r
efer to the corresponding section.
X:
s
eat not suitable for the installation of a
child
seat or sleeper cot for the weight group
i
ndicated.
(1) :
T
he outer seat in row 2 must be adjusted
t
o 3 notches back from the fully for ward
p
osition.
Safety
Page 253 of 523
251
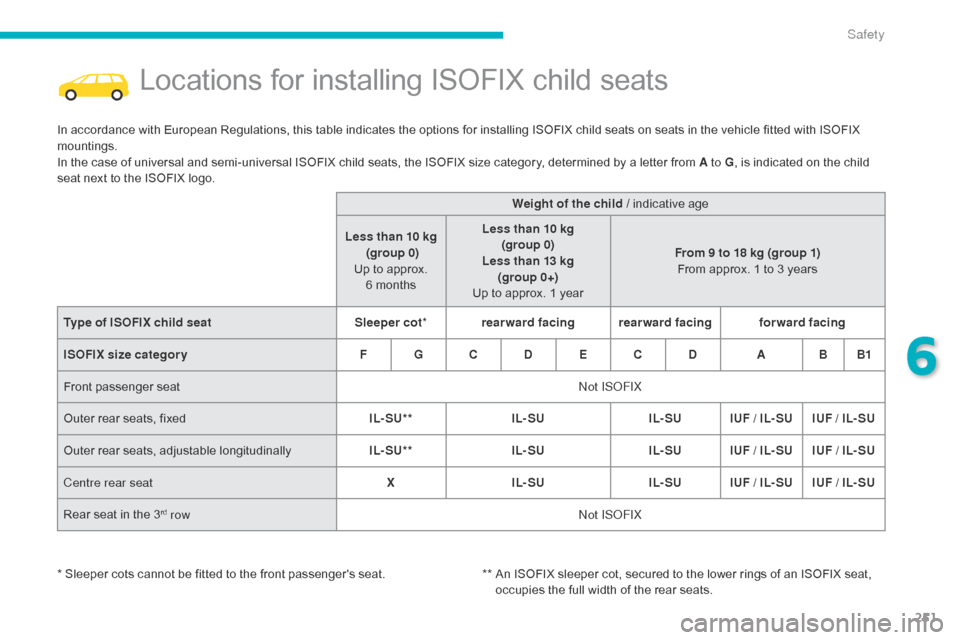
Locations for installing ISOFIX child seats
In accordance with European Regulations, this table indicates the options for installing ISOFIX child seats on seats in the vehicle fitted with ISOFIX mountings.
In
the case of universal and semi-universal ISOFIX child seats, the ISOFIX size category, determined by a letter from A to G,
is indicated on the child
s
eat next to the ISOFIX logo.
*
Sleeper cots cannot be fitted to the front passenger's seat.**
A
n ISOFIX sleeper cot, secured to the lower rings of an ISOFIX seat,
o
ccupies the full width of the rear seats.
Weight of the child
/ indicative age
Less than 10 kg (group 0)
Up
to approx.
6 m
onthsLess than 10 kg
(group 0)
Less than 13 kg (group 0+)
Up
to approx. 1 yearFrom 9 to 18 kg (group 1)
From
approx. 1 to 3 years
Type of ISOFIX child seat Sleeper cot*rearward facing rearward facing forward facing
ISOFIX size categor y F G C D E C D A B B1
Front
p
assenger
sea
t Not ISOFIX
Outer
rear seats, fixed IL- SU**IL- SUIL- SUIUF / IL- SU IUF / IL- SU
Outer
r
ear
s
eats,
a
djustable
l
ongitudinallyIL- SU**IL- SUIL- SUIUF / IL- SU IUF / IL- SU
Centre rear seat XIL- SU IL- SUIUF / IL- SU IUF / IL- SU
Rear
seat in the 3
rd row Not ISOFIX
6
Safety
Page 254 of 523
252
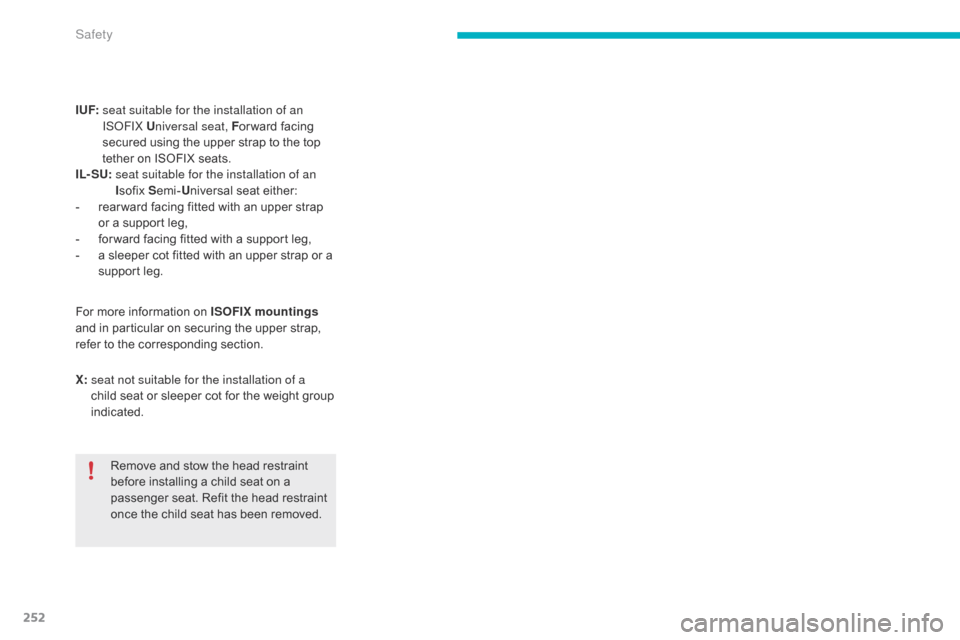
I UF: seat suitable for the installation of an
ISOFIX U niversal seat, F or ward
facing
s
ecured using the upper strap to the top
t
ether on ISOFIX seats.
IL- SU:
s
eat suitable for the installation of an
I sofix
Semi- Universal
sea
t
ei
ther:
-
r
ear ward facing fitted with an upper strap
o
r a support leg,
-
f
or ward facing fitted with a support leg,
-
a
sleeper cot fitted with an upper strap or a
s
upport leg.
Remove
and stow the head restraint
b
efore installing a child seat on a
p
assenger seat. Refit the head restraint
o
nce the child seat has been removed.
For
more information on ISOFIX mountings
and
in particular on securing the upper strap,
r
efer to the corresponding section.
X:
s
eat not suitable for the installation of a
child
seat or sleeper cot for the weight group
i
ndicated.
Safety
Page 255 of 523
253
Child seats
The incorrect installation of a child seat in a vehicle compromises the child's protection in
t
he event of an accident.
Check
that there is no seat belt or seat belt
b
uckle under the child seat as this could
de
stabilise
i
t.
Remember
to fasten the seat belts or the
c
hild seat harnesses keeping the slack in
relation
to the child's body to a minimum,
even
for short journeys.
For
the installation of a child seat using a
s
eat belt, ensure that this is well tensioned
o
n the child seat and that it is holding the
c
hild seat firmly against the seat of your
v
ehicle. If your front passenger seat is
a
djustable, move it for ward if necessary.
At the rear seats, always leave sufficient
space
between the front seat and:
-
a
rear ward facing child seat,
-
t
he feet of a child seated in a for ward
f
acing child seat.
Recommendations
For this, move the front seat for ward and if necessary straighten its backrest.
For
o
ptimum
in
stallation
o
f
t
he
fo
rward
f
acing
c
hild seat, ensure that the back of the child
s
eat is as close as possible to the backrest
o
f the vehicle's seat, or in contact if possible.
The
head restraint must be removed before
i
nstalling a child seat with a backrest on the
p
assenger
sea
t.
Ensure
that the head restraint is stowed or
a
ttached securely so that it is not thrown
a
round the vehicle in the event of sharp
b
raking.
Refit
the head restraint as soon as the child
s
eat is removed.Installing a booster
cushion
As a safety precaution, do not leave:
- o ne or more children alone and
u
nsupervised in a vehicle,
-
a
child or an animal in a vehicle which
i
s exposed to the sun, with the windows
c
losed,
-
t
he keys within reach of children inside
t
he vehicle.
To
prevent accidental opening of the doors,
u
se the child lock.
Take
care not to open the rear windows by
m
ore than one third.
To
protect young children from the rays of
t
he sun, fit side blinds on the rear windows.
The
chest part of the seat belt must be
p
ositioned on the child's shoulder without
t
ouching the neck.
Ensure that the lap part of the seat belt
passes correctly over the child's thighs.
CITROËN recommends the use of a booster
s
eat which has a back, fitted with a seat belt
g
uide at shoulder level.
The
legislation
on
carrying
a
child
on
the
f
ront
passenger
seat
is
specific
to
each
c
ountry.
Refer
to
the
legislation
in
force
in
t
he
country
in
which
you
are
driving.
Deactivate
the
passenger
front
airbag
when
a
rear ward
facing
child
seat
is
installed
on
t
he
f
ront
p
assenger
sea
t.
O
therwise,
t
he
c
hild
would
risk
being
seriously
injured
or
k
illed
if
the
airbag
were
deployed.
Children at the front
6
Safety
Page 256 of 523
254
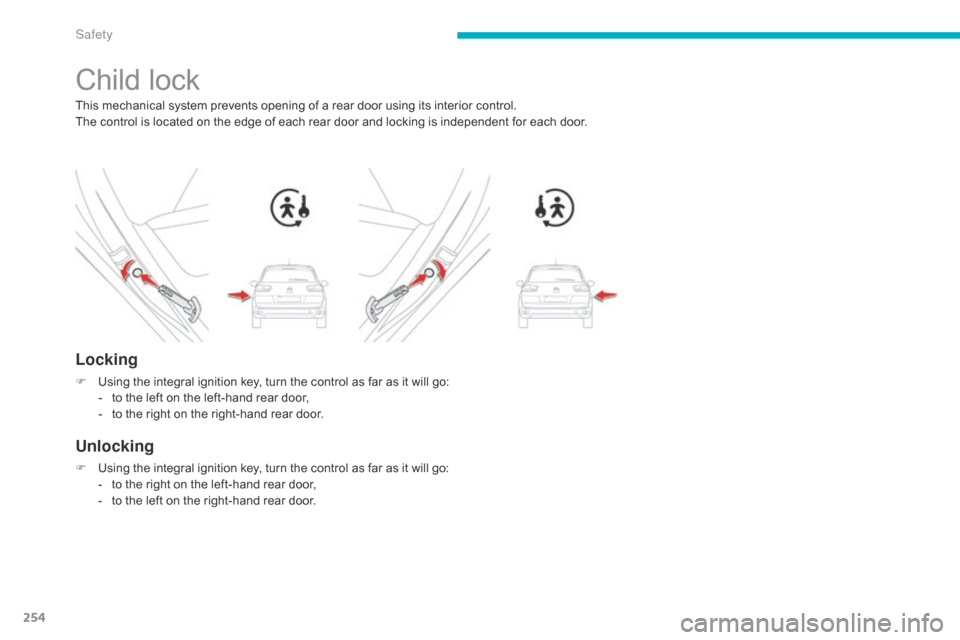
Child lock
This mechanical system prevents opening of a rear door using its interior control.
T he control is located on the edge of each rear door and locking is independent for each door.
Locking
F Using the integral ignition key, turn the control as far as it will go:
- t o the left on the left-hand rear door,
-
t
o the right on the right-hand rear door.
Unlocking
F Using the integral ignition key, turn the control as far as it will go:
- t o the right on the left-hand rear door,
-
t
o the left on the right-hand rear door.
Safety
Page 257 of 523
255
Fuel
Capacity of the tank: approximately 57 litres (petrol) or 55 litres (Diesel).
Low fuel levelRefuelling
When the low fuel level is reached, t
his warning lamp comes on in the
i
nstrument panel, accompanied by an
a
udible warning and a message and
t
he last bar of the fuel gauge comes
o
n in orange.
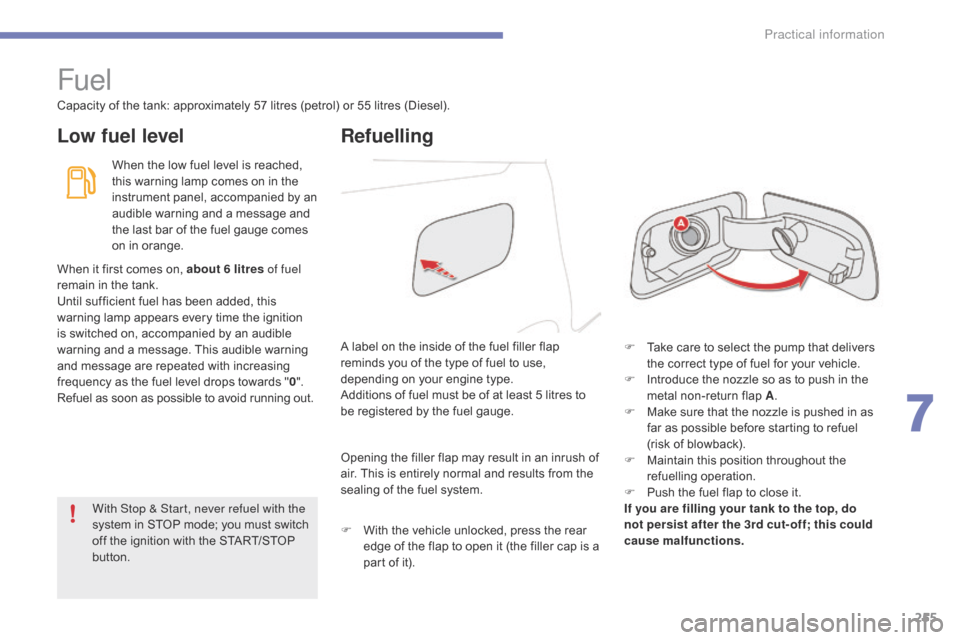
F
T
ake care to select the pump that delivers
t
he correct type of fuel for your vehicle.
F
I
ntroduce the nozzle so as to push in the
m
etal non-return flap A.
F
M
ake sure that the nozzle is pushed in as
f
ar as possible before starting to refuel
(risk
of blowback).
F
M
aintain this position throughout the
r
efuelling
ope
ration.
F
P
ush the fuel flap to close it.
If you are filling your tank to the top, do
not persist after the 3rd cut- off; this could
cause malfunctions.
A
label on the inside of the fuel filler flap
r
eminds you of the type of fuel to use,
d
epending on your engine type.
Additions
of fuel must be of at least 5 litres to
b
e registered by the fuel gauge.
When
it
first comes on, about 6 litres of fuel
remain
in
the tank.
Until
sufficient fuel has been added, this
w
arning
lamp appears every time the ignition
i
s
switched on, accompanied by an audible
w
arning
and a message. This audible warning
a
nd
message are repeated with increasing
f
requency
as the fuel level drops towards "0 ".
Refuel
as
soon as possible to avoid running out.Opening
the filler flap may result in an inrush of
a
ir. This is entirely normal and results from the
s
ealing of the fuel system.
F
W
ith the vehicle unlocked, press the rear
e
dge of the flap to open it (the filler cap is a
p
art of it).
With Stop & Start, never refuel with the
system
in STOP mode; you must switch
o
ff
the ignition with the START/STOP
b
utton.
7
Practical information
Page 258 of 523
256
The petrol or Diesel engine of your vehicle is fitted with a catalytic converter, a device which
h
elps to reduce the level of harmful emissions
i
n the exhaust gases.
For petrol engines, you must use unleaded fuel.The filler neck is narrower, allowing only unleaded petrol nozzles to be introduced.
If you have put in the wrong fuel
for your vehicle, you must have the
fuel tank drained and filled with
the correct fuel before star ting the
engine.
Fuel cut- of f
Your vehicle is equipped with a safety device w hich cuts off the fuel supply in the event of a
collision.
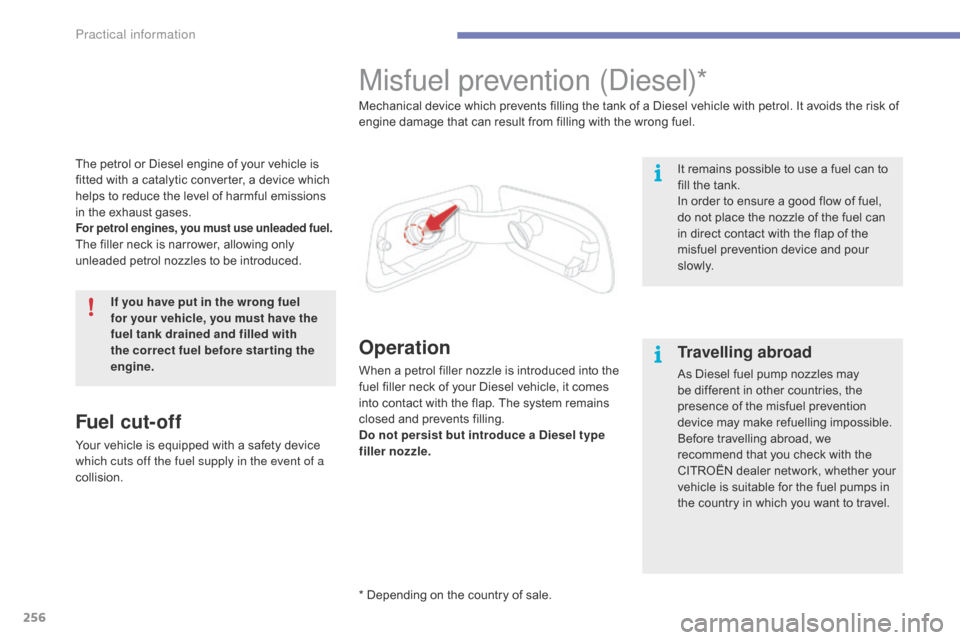
Misfuel prevention (Diesel)*
Operation
When a petrol filler nozzle is introduced into the f uel filler neck of your Diesel vehicle, it comes
i
nto contact with the flap. The system remains
c
losed and prevents filling.
Do not persist but introduce a Diesel type
filler nozzle. Mechanical device which prevents filling the tank of a Diesel vehicle with petrol. It avoids the risk of
e
ngine damage that can result from filling with the wrong fuel.
It remains possible to use a fuel can to
f
ill the tank.
In order to ensure a good flow of fuel,
d
o not place the nozzle of the fuel can
i
n direct contact with the flap of the
m
isfuel prevention device and pour
s
l ow l y.
Travelling abroad
As Diesel fuel pump nozzles may b
e different in other countries, the
p
resence of the misfuel prevention
d
evice may make refuelling impossible.
Before
travelling abroad, we
r
ecommend that you check with the
C
ITROËN dealer network, whether your
v
ehicle is suitable for the fuel pumps in
t
he country in which you want to travel.
* Depending
on
the
country
of
sale.
Practical information
Page 259 of 523
257
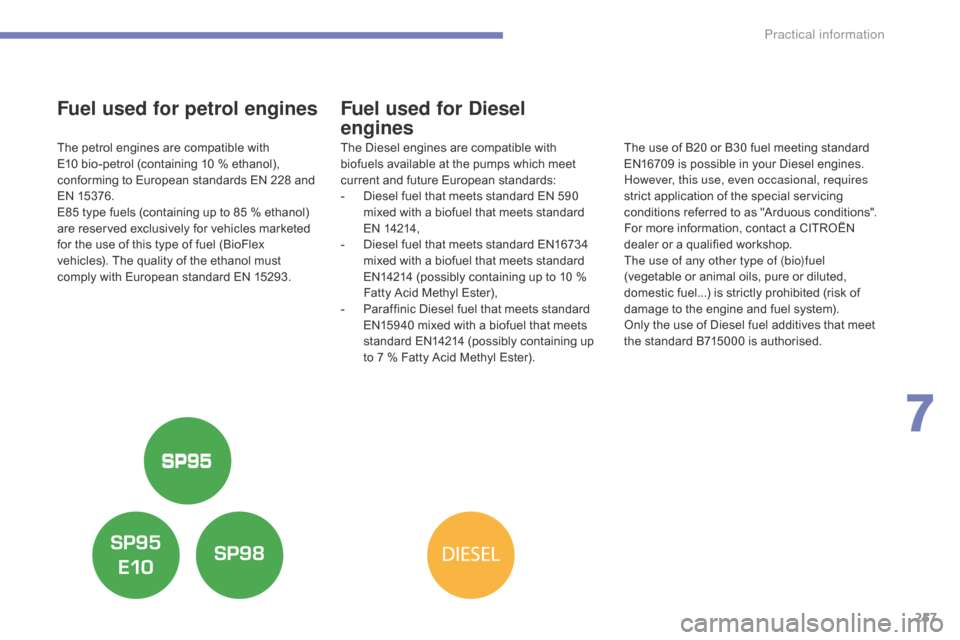
Fuel used for petrol engines
The petrol engines are compatible with E10 bio-petrol (containing 10 % ethanol),
c
onforming to European standards EN 228 and
E
N
1
5376.
E85
type fuels (containing up to 85 % ethanol)
a
re reserved exclusively for vehicles marketed
f
or the use of this type of fuel (BioFlex
v
ehicles). The quality of the ethanol must
c
omply with European standard EN 15293.
Fuel used for Diesel
engines
The Diesel engines are compatible with biofuels available at the pumps which meet
c
urrent and future European standards:
-
D
iesel fuel that meets standard EN 590
m
ixed with a biofuel that meets standard
E
N
14
214,
-
D
iesel fuel that meets standard EN16734
m
ixed with a biofuel that meets standard
E
N14214 (possibly containing up to 10 %
F
atty Acid Methyl Ester),
-
P
araffinic Diesel fuel that meets standard
E
N15940 mixed with a biofuel that meets
s
tandard EN14214 (possibly containing up
t
o 7 % Fatty Acid Methyl Ester).The
use of B20 or B30 fuel meeting standard E
N16709 is possible in your Diesel engines.
H
owever, this use, even occasional, requires
strict
application of the special servicing
c
onditions referred to as "Arduous conditions".
F
or more information, contact a CITROËN
d
ealer or a qualified workshop.
The use of any other type of (bio)fuel
(vegetable
or animal oils, pure or diluted,
d
omestic fuel...) is strictly prohibited (risk of
d
amage to the engine and fuel system).
Only
the use of Diesel fuel additives that meet
t
he standard B715000 is authorised.
7
Practical information
Page 260 of 523
258
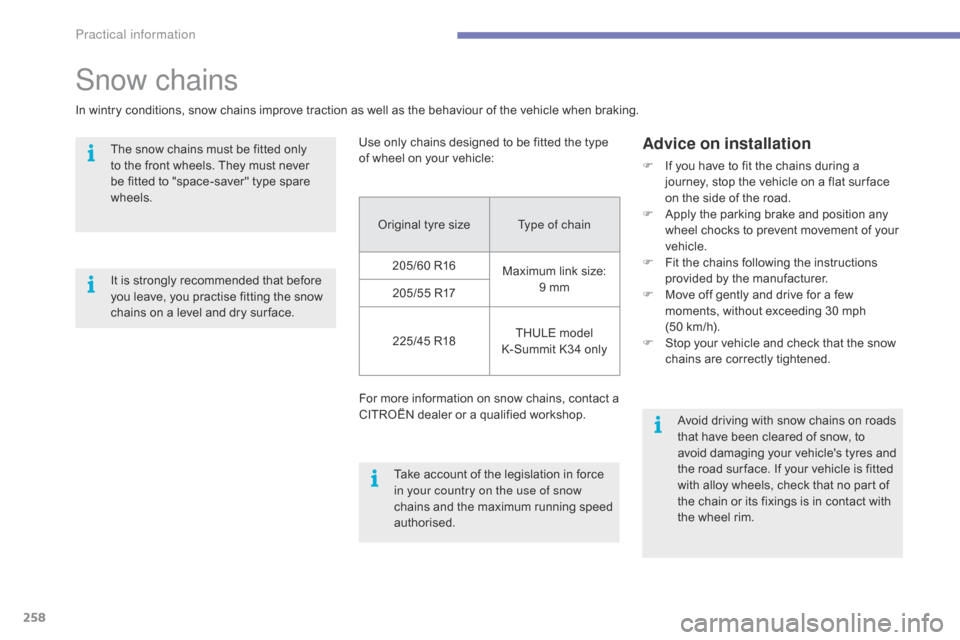
Original tyre sizeT ype of chain
205/60 R16 Maximum
link size:
9
mm
205/55
R17
225/45
R18 THULE
model
K
-Summit K34 only
For
more information on snow chains, contact a
C
ITROËN dealer or a qualified workshop.
Use
only chains designed to be fitted the type
o
f
wheel on your vehicle:
Snow chains
In wintry conditions, snow chains improve traction as well as the behaviour of the vehicle when braking.
T he snow chains must be fitted only
t
o the front wheels. They must never
b
e fitted to "space-saver" type spare
w
heels.
Advice on installation
F If you have to fit the chains during a j
ourney, stop the vehicle on a flat sur face
o
n the side of the road.
F
A
pply the parking brake and position any
w
heel chocks to prevent movement of your
v
ehicle.
F
F
it the chains following the instructions
p
rovided by the manufacturer.
F
M
ove off gently and drive for a few
m
oments, without exceeding 30 mph
(
50 km/h).
F
S
top your vehicle and check that the snow
c
hains are correctly tightened.
Take
account
of
the
legislation
in
force
i
n your country on the use of snow
chains
and
the
maximum
running
speed
a
uthorised. Avoid
driving with snow chains on roads
t
hat have been cleared of snow, to
a
void damaging your vehicle's tyres and
t
he road sur face. If your vehicle is fitted
w
ith alloy wheels, check that no part of
t
he chain or its fixings is in contact with
t
he wheel rim.
It
is
strongly
recommended
that
before
y
ou
leave,
you
practise
fitting
the
snow
c
hains
on
a
level
and
dry
sur face.
Practical information