Citroen JUMPY 2011 2.G Owner's Manual
Manufacturer: CITROEN, Model Year: 2011, Model line: JUMPY, Model: Citroen JUMPY 2011 2.GPages: 260, PDF Size: 9.5 MB
Page 121 of 260

11
9
Changing a wheel
QUICK HEL
P
7
- Lower the vehicle completely by folding
the jack, then remove the jack.
- Tighten the bolts again using the
wheelbrace, tighten them fully without
forcing them.
- Place the wheel to be repaired in
the carrier.
- Secure the carrier on the hook then
raise the carrier using the bolt and the
wheel brace. Check that the wheel and
the carrier are flush against the floor of
the vehicle.
- Remember to close the flap, located on
the sill.
- Store the trim in the vehicle.
Never go underneath the vehicle when
it is supported only by the jack.
Never use a screwdriver in place of
the wheelbrace.
5. FITTING THE SPARE WHEEL
- Position the wheel on the hub and start
tightening the wheel bolts by hand.
- Carry out an initial tightening of the bolts
using the wheelbrace.
Page 122 of 260

Snow screen
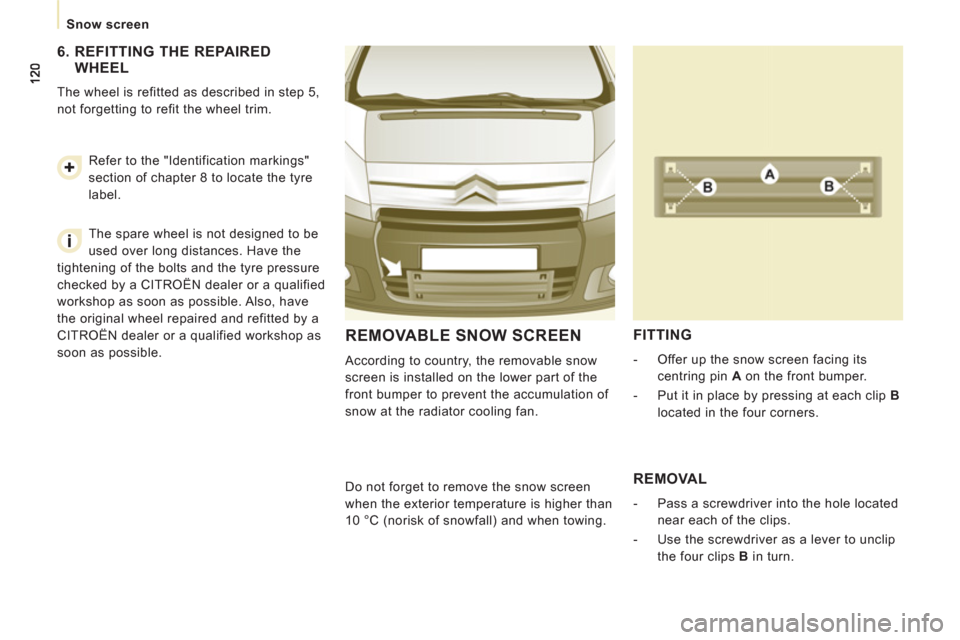
REMOVABLE SNOW SCREEN
According to country, the removable snow
screen is installed on the lower part of the
front bumper to prevent the accumulation of
snow at the radiator cooling fan.
FITTING
- Offer up the snow screen facing its
centring pin A
on the front bumper.
- Put it in place by pressing at each clip B
located in the four corners.
Do not forget to remove
the snow screen
when the exterior temperature is higher than
10 °C (no
risk of snowfall) and when towing.
REMOVAL
- Pass a screwdriver into the hole located
near each of the clips.
- Use the screwdriver as a lever to unclip
the four clips B
in turn.
6. REFITTING THE REPAIRED
WHEEL
The wheel is refitted as described in step 5,
not forgetting to refit the wheel trim.
Refer to the "Identification markings"
section of chapter 8 to locate the tyre
label.
The spare wheel is not designed to be
used over long distances. Have the
tightening of the bolts and the tyre pressure
checked by a CITROËN dealer or a qualified
workshop as soon as possible. Also, have
the original wheel repaired and refitted by a
CITROËN dealer or a qualified workshop as
soon as possible.
Page 123 of 260

12
1
Changing a bulb
QUICK HEL
P
7
CHANGING A BULB
Type A
Entirely glass bulb: pull
gently as it is fitted by
pressure.
Type B
Bayonet bulb: press
on the bulb then turn it
anticlockwise.
Type C
Halogen bulb: release
the retaining spring from
its housing.
TYPES OF BULB
Various types of bulb are installed on your vehicle. To remove them: Halogen bulbs must be changed
after the headlamp has been off for
several minutes (risk of serious burns).
Do not touch the bulb directly with your
fingers, use lint-free cloths.
When each operation has been completed,
check the operation of the lights.
Page 124 of 260

122
Changing a bulb
3.
Direction indicators
Type B
, PY21W - 21W (amber)
- Turn the bulb holder a quarter turn
anticlockwise.
- Remove the bulb by pressing it lightly
while turning it anticlockwise.
- Change the bulb.
- Ensure that the cover is refitted
correctly all the way round to ensure
sealing.
FRONT LAMPS
Open the bonnet. To access the bulbs,
reach behind the headlamp unit.
Carry out the operations in reverse order to
refit each bulb.
1.
Dipped/Main beam headlamps
Type C
, H4 - 55W
- Remove the centre cover by pulling
the flexible rubber tab.
- Disconnect the electrical connector.
- Release the retaining spring.
- Change the bulb taking care to
align the metal part with the slots in
the lamp.
2.
Sidelamps
Type A
, W5W - 5W
- Remove the cover by pulling the
flexible rubber tab.
- Remove the bulb holder fitted by
pressure by pulling the connector.
- Change the bulb.
- Ensure that the cover is refitted
correctly all the way round to ensure
sealing.
4.
Foglamps
Type C
, H1 - 55W
Contact a CITROËN dealer or a qualified
workshop.
Page 125 of 260

12
3
Changing a bulb
QUICK HEL
P
7
DIRECTION INDICATOR SIDE
REPEATER
Type A
, WY5W (amber)
- Push the repeater towards the rear and
disengage it.
- Support the connector and turn the bulb
holder a quarter turn to the left.
- Turn the bulb a quarter turn to the left,
remove it and change it.
- When refitting, engage the repeater
towards the rear and bring it towards
the front.
Front/Rear
Amber coloured bulbs (direction indicators
and side repeaters) must be replaced with
bulbs of identical specification and colour.
COURTESY LAMPS
Type A
, 12 V 5W - 5W
- Unclip the lens by sliding a screwdriver
in the slots on each side of the courtesy
lamp.
- Pull the bulb and change it.
- Clip the lens in its housing and ensure
that it is secured correctly.
High pressure jet washing
When using this type of jet washer
on stubborn dirt, do not persist on the
headlamps, the lamps and their surrounds
to avoid damaging their coating and seals.
Page 126 of 260

124
Changing a bulb
REAR LIGHTS
For further information concerning the bulbs,
refer to the "Types of bulb".
- Identify the faulty bulb then open
the rear doors to 180°. Refer to the
"Accesses" section of chapter 2.
- Remove the two fixing nuts.
Pull the lens block from the outside.
- Holding the light, disconnect the
electrical connector.
- Move aside the 8 tabs then extract the
bulb holder.
- Remove the faulty bulb by pressing it
lightly while turning it anticlockwise.
- Change the bulb.
1.
Brake lights/side lights
Type B
, P21/5W - 21/5W
2.
Direction indicators
Type B
, PY21W - 21W (amber)
3.
Reversing lights
Type B
, P21W - 21W
4.
Fog lamps
Type B
, P21W - 21W When refitting, take care to correctly
reposition:
- the 8 tabs,
- the two white lugs in the two rubber
holes to maintain the sealing of the light,
- the supply wire to avoid trapping it.
Page 127 of 260

125
Changing a bulb
QUICK HEL
P
7
THIRD BRAKE LIGHT
Type A
, W5W - 5W
NUMBER PLATE LIGHTS
Type A
, W5W - 5W
Light located on the inside (tailgate)
- Unscrew the two screws using a Torx
TM
screwdriver with 20 socket.
- Remove the plastic cover.
- Remove the bulb holder moving aside
the two tabs.
- Remove the faulty bulb by pressing it
lightly while turning it anticlockwise.
- Change the bulb.
Type B
, P21W - 21W
With tailgate
- Move aside the plastic lens using a
screwdriver, on the point indicated by
the arrow.
- Change the bulb.
- Replace the plastic lens and press on it.
With hinged doors
- Unclip the interior trim.
- Disconnect the connector by moving
aside its tab.
- Remove the plastic cover.
- Turn the bulb holder a quarter turn
anticlockwise.
- Change the bulb.
Light located on the outside (hinged doors)
- Unscrew the two screws using a Torx TM
screwdriver with 20 socket.
- Remove the light.
- Change the bulb.
Type B
, P21W - 21W
Light on high door
- Remove the screws using an 8 wrench.
- Remove the faulty bulb by pressing it
lightly while turning it anticlockwise.
- Change the bulb.
Page 128 of 260

126
Changing a fuse
CHANGING A FUSE
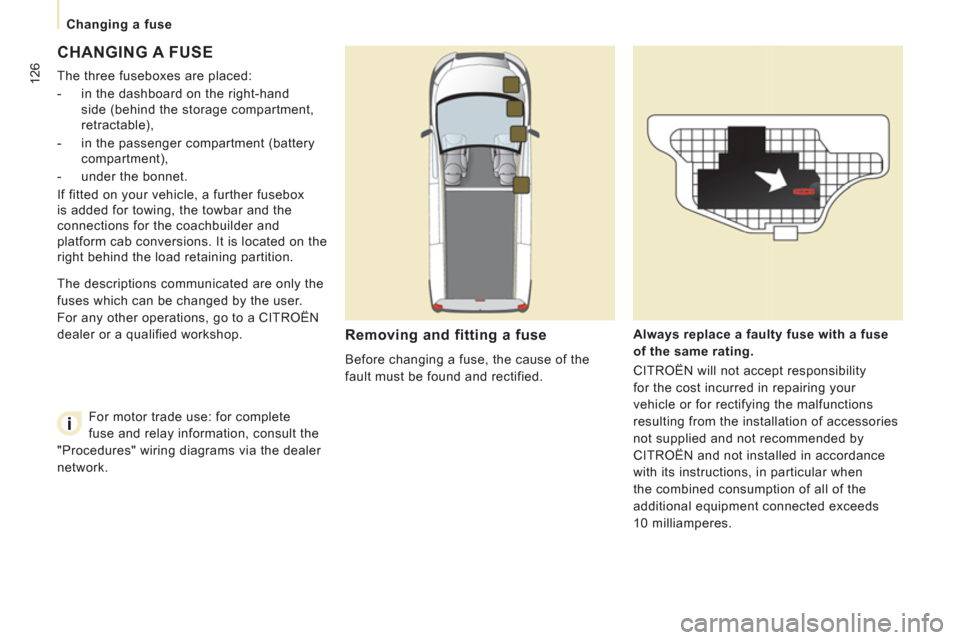
The three fuseboxes are placed:
- in the dashboard on the right-hand
side (behind the storage compartment,
retractable),
- in the passenger compartment (battery
compartment),
- under the bonnet.
If fitted on your vehicle, a further fusebox
is added for towing, the towbar and the
connections for the coachbuilder and
platform cab conversions. It is located on the
right behind the load retaining partition.
Removing and fitting a fuse
Before changing a fuse, the cause of the
fault must be found and rectified.
Always replace a faulty fuse with a fuse
of the same rating.
CITROËN will not accept responsibility
for the cost incurred in repairing your
vehicle or for rectifying the malfunctions
resulting from the installation of accessories
not supplied and not recommended by
CITROËN and not installed in accordance
with its instructions, in particular when
the combined consumption of all of the
additional equipment connected exceeds
10 milliamperes. The descriptions communicated are only the
fuses which can be changed by the user.
For any other operations, go to a CITROËN
dealer or a qualified workshop.
For motor trade use: for complete
fuse and relay information, consult the
"Procedures" wiring diagrams via the dealer
network.
Page 129 of 260

12
7
Changing a fuse
QUICK HEL
P
7
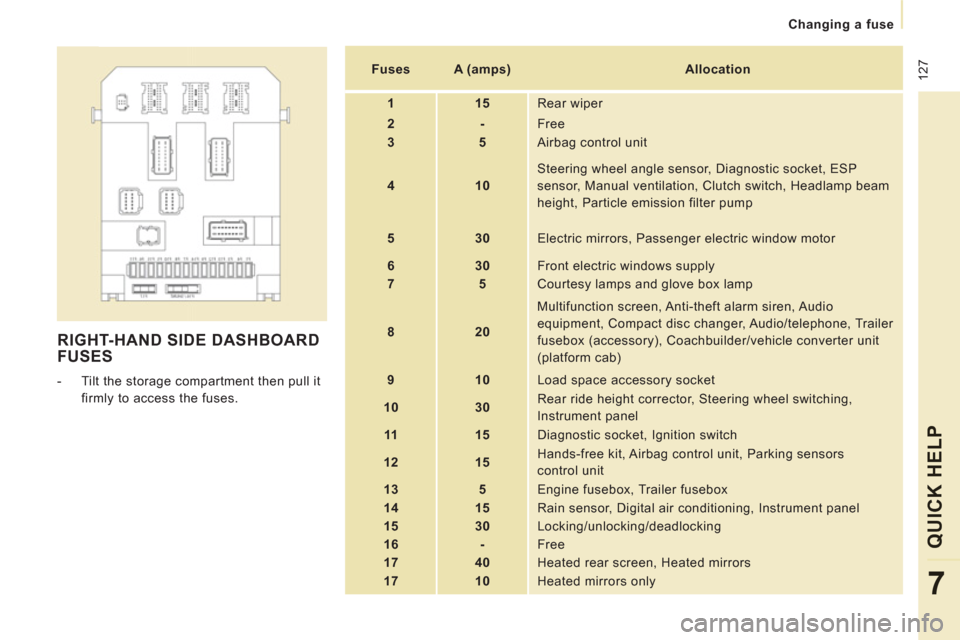
RIGHT-HAND SIDE DASHBOARD
FUSES
- Tilt the storage compartment then pull it
firmly to access the fuses.
Fuses
A (amps)
Allocation
1
15
Rear wiper
2
-
Free
3
5
Airbag control unit
4
10
Steering wheel angle sensor, Diagnostic socket, ESP
sensor, Manual ventilation, Clutch switch, Headlamp beam
height, Particle emission filter pump
5
30
Electric mirrors, Passenger electric window motor
6
30
Front electric windows supply
7
5
Courtesy lamps and glove box lamp
8
20
Multifunction screen, Anti-theft alarm siren, Audio
equipment, Compact disc changer, Audio/telephone, Trailer
fusebox (accessory), Coachbuilder/vehicle converter unit
(platform cab)
9
10
Load space accessory socket
10
30
Rear ride height corrector, Steering wheel switching,
Instrument panel
11
15
Diagnostic socket, Ignition switch
12
15
Hands-free kit, Airbag control unit, Parking sensors
control unit
13
5
Engine fusebox, Trailer fusebox
14
15
Rain sensor, Digital air conditioning, Instrument panel
15
30
Locking/unlocking/deadlocking
16
-
Free
17
40 Heated rear screen, Heated mirrors
17
10
Heated mirrors only
Page 130 of 260

128
Changing a fuse
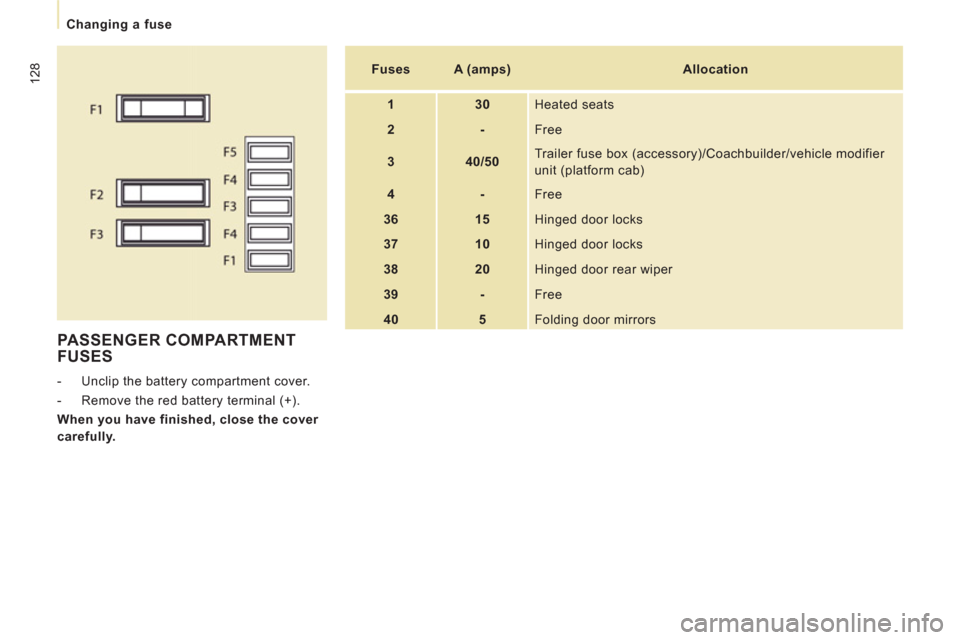
PASSENGER COMPARTMENT
FUSES
- Unclip the battery compartment cover.
- Remove the red battery terminal (+).
When you have finished, close the cover
carefully.
Fuses
A (amps)
Allocation
1
30
Heated seats
2
-
Free
3
40/50
Trailer fuse box (accessory)/Coachbuilder/vehicle modifier
unit (platform cab)
4
-
Free
36
15
Hinged door locks
37
10
Hinged door locks
38
20
Hinged door rear wiper
39
-
Free
40
5
Folding door mirrors