change CITROEN JUMPY 2015 Owner's Manual
[x] Cancel search | Manufacturer: CITROEN, Model Year: 2015, Model line: JUMPY, Model: CITROEN JUMPY 2015Pages: 252, PDF Size: 12.15 MB
Page 117 of 252

11 5
Checks
CHECKS
6
Manual gearbox
Have the level checked in accordance with
the manufacturer's servicing schedule.
Good practice
To check the main levels and certain
components, in accordance with the
manufacturer's servicing schedule, refer to
the pages of the maintenance and warranty
guide which correspond to your vehicle's
engine. Only use products recommended by
CITROËN or products of equivalent
quality and specification.
In order to optimise the operation of units as
important as the braking system, CITROËN
selects and offers specific products.
In order to avoid damaging the electrical
units, high pressure washing to clean the
engine compartment is strictly prohibited.
After washing the vehicle dampness, or in
winter, ice may form on the brake discs and
pads: braking efficiency may be reduced.
Make some light brake applications to dry
and de-ice the brakes.
Bleeding the water contained in the
Diesel filter
If this warning lamp comes on,
bleed the filter. Otherwise bleed
regularly each time the engine oil
is changed.
To evacuate the water, unscrew the bleed
screw located on the end of the transparent
pipe.
Operate until all of the water in the
transparent pipe has been drained out then
tighten the bleed screw.
HDi engines use advanced technology.
Contact a CITROËN or a qualified workshop
for all work on the system. 1.6 litre HDi
2 litre HDi
During this regeneration, you may notice
that the idling speed is higher than normal
and that the cooling fan is running. As
operation of the exhaust emissions controls
may cause the exhaust gas temperature to
reach very high levels, it is recommended
that you do not stop the vehicle over easily
inflammable surfaces (dry grass and leaves,
pine needles, edge of a meadow or forest).
Page 126 of 252

124
Changing a wheel
CHANGING A WHEEL
If your vehicle is equipped with a spare
wheel located underneath the vehicle, follow
these instructions.
1. PARKING THE VEHICLE
- You must ensure that the occupants get out of the vehicle and wait in a safe
location.
- If possible, park the vehicle on level, stable and non-slippery ground.
- Apply the parking brake, switch off the ignition and engage first or reverse gear.
- If available, place a chock under the wheel diagonally opposite the one to be
changed.
On certain types of ground and/or if heavy
loads are being transported, the vehicle
must be raised in order to disengage
the spare wheel from the carrier. Call a
CITROËN dealer or a qualified workshop. If your vehicle is fitted with suspension
with pneumatic height correction,
please deactivate the system. Refer to the
"Rear suspension" section of chapter 3.
2. TOOLS
- If fitted on your vehicle, open the plastic flap located at the rear left of the
vehicle.
- Unscrew the nut then take out the jack and the wheelbrace.
1. Wheelbrace.
2. Jack.
3. Towing eye.
The jack and the tool kit are specific to
your vehicle. Do not use them for other
purposes.
Page 127 of 252
125
Changing a wheel
QUICK HELP
7
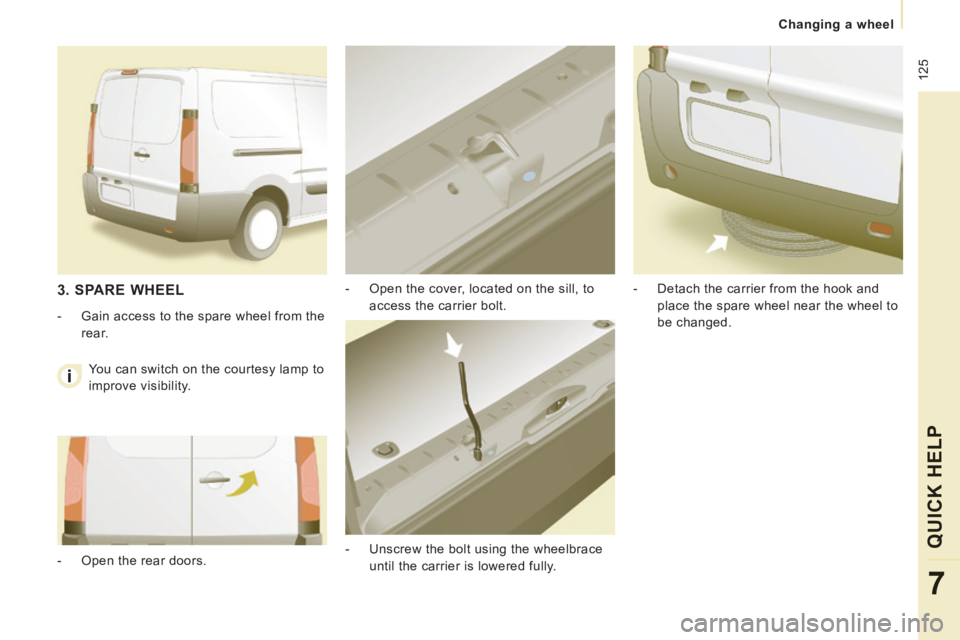
- Open the cover, located on the sill, to access the carrier bolt.
- Unscrew the bolt using the wheelbrace until the carrier is lowered fully. - Detach the carrier from the hook and
place the spare wheel near the wheel to
be changed. 3. SPARE WHEEL
- Gain access to the spare wheel from the rear.
- Open the rear doors. You can switch on the courtesy lamp to
improve visibility.
Page 128 of 252

126
Changing a wheel
4. OPERATING PROCEDURE
- Place the jack in contact with the locating point provided, the one which is
closest to the wheel to be changed.
Ensure that the jack is straight and that the base of the jack is fully in contact
with the ground.
- Extend the jack to lift the wheel clear of the ground.
- Resume and complete the unscrewing of the wheel bolts.
- Remove the bolts and remove the wheel.
- Remove the trim pulling it using the
towing eye.
- Loosen the wheel bolts and start unscrewing them. Do not extend the jack until you have
started unscrewing the bolts on the
wheel to be changed and have placed the
chock under the wheel diagonally opposite.
Page 132 of 252

130
Changing a bulb
CHANGING A BULB
Type A
All glass bulb: pull
gently as it is fitted by
pressure.
Type B
Bayonet bulb: press
on the bulb then turn it
anticlockwise.
Type C
Halogen bulb: release
the retaining spring from
its housing.
TYPES OF BULB
Various types of bulb are installed on your vehicle. To remove them: Halogen bulbs must be changed after
the headlamp has been off for several
minutes (risk of serious burns). Do not touch
the bulb directly with your fingers, use lint-
free cloths.
When each operation has been completed,
check the operation of the lighting.
Page 133 of 252
131
Changing a bulb
QUICK HELP
7
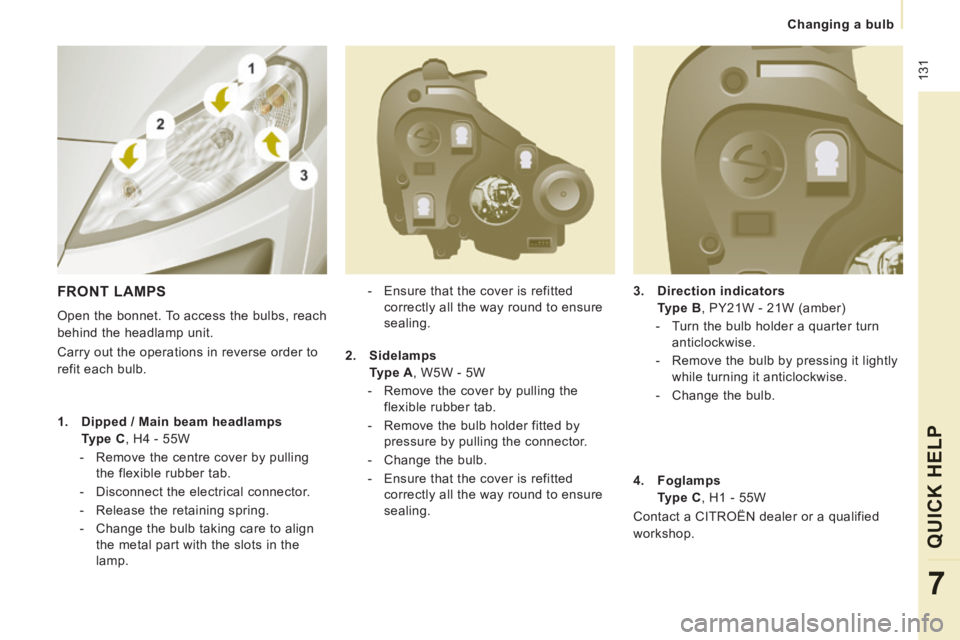
3. Direction indicators
Type B , PY21W - 21W (amber)
- Turn the bulb holder a quarter turn anticlockwise.
- Remove the bulb by pressing it lightly while turning it anticlockwise.
- Change the bulb.
- Ensure that the cover is refitted
correctly all the way round to ensure
sealing. FRONT LAMPS
Open the bonnet. To access the bulbs, reach
behind the headlamp unit.
Carry out the operations in reverse order to
refit each bulb.
1. Dipped / Main beam headlamps
Type C , H4 - 55W
- Remove the centre cover by pulling the flexible rubber tab.
- Disconnect the electrical connector.
- Release the retaining spring.
- Change the bulb taking care to align the metal part with the slots in the
lamp. 2. Sidelamps
Type A , W5W - 5W
- Remove the cover by pulling the flexible rubber tab.
- Remove the bulb holder fitted by pressure by pulling the connector.
- Change the bulb.
- Ensure that the cover is refitted correctly all the way round to ensure
sealing. 4. Foglamps
Type C , H1 - 55W
Contact a CITROËN dealer or a qualified
workshop.
Page 134 of 252

132
Changing a bulb
DIRECTION INDICATOR SIDE
REPEATER
Type A , WY5W - 5W (amber)
- Push the repeater towards the rear and disengage it.
- Support the connector and turn the bulb holder a quarter turn to the left.
- Turn the bulb a quarter turn to the left, remove it and change it.
- When refitting, engage the repeater towards the rear and bring it towards
the front. Front / Rear
Amber coloured bulbs (direction indicators
and side repeaters) must be replaced with
bulbs of identical specification and colour. COURTESY LAMPS
Type A , 12V 5W - 5W
- Unclip the lens by sliding a screwdriver in the slots on each side of the courtesy
lamp.
- Pull the bulb and change it.
- Clip the lens in its housing and ensure that it is secured correctly.
High pressure jet washing
When using this type of jet washer
on stubborn dirt, do not persist on the
headlamps, the lamps and their surrounds to
avoid damaging their coating and seals.
Page 135 of 252
133
Changing a bulb
QUICK HELP
7
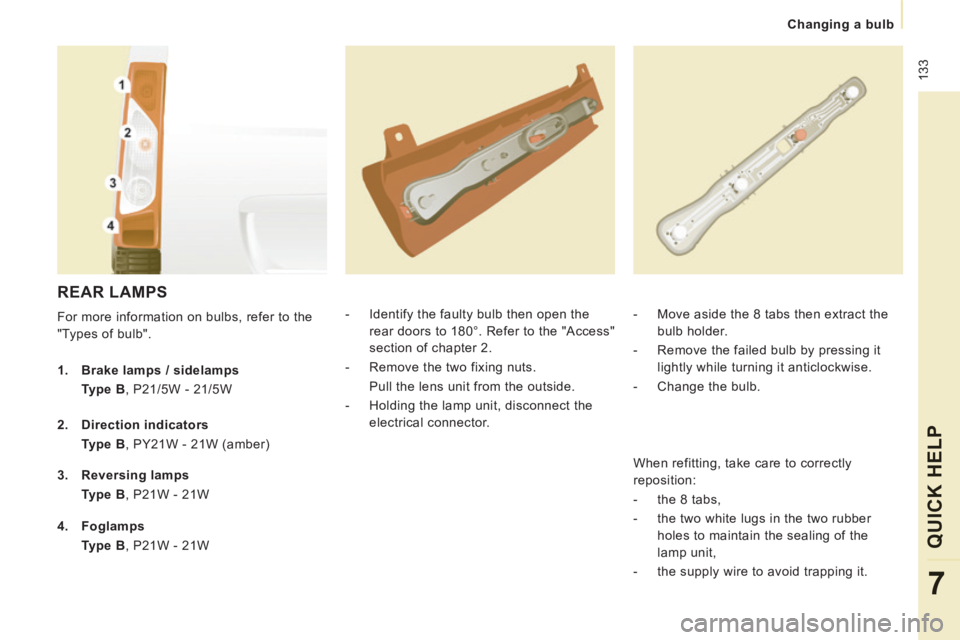
REAR LAMPS
For more information on bulbs, refer to the
"Types of bulb". - Identify the faulty bulb then open the
rear doors to 180°. Refer to the "Access"
section of chapter 2.
- Remove the two fixing nuts.
Pull the lens unit from the outside.
- Holding the lamp unit, disconnect the electrical connector. - Move aside the 8 tabs then extract the
bulb holder.
- Remove the failed bulb by pressing it lightly while turning it anticlockwise.
- Change the bulb.
1. Brake lamps / sidelamps
Type B , P21/5W - 21/5W
2. Direction indicators
Type B , PY21W - 21W (amber)
3. Reversing lamps
Type B , P21W - 21W
4. Foglamps
Type B , P21W - 21W When refitting, take care to correctly
reposition:
- the 8 tabs,
- the two white lugs in the two rubber
holes to maintain the sealing of the
lamp unit,
- the supply wire to avoid trapping it.
Page 136 of 252
134
Changing a bulb
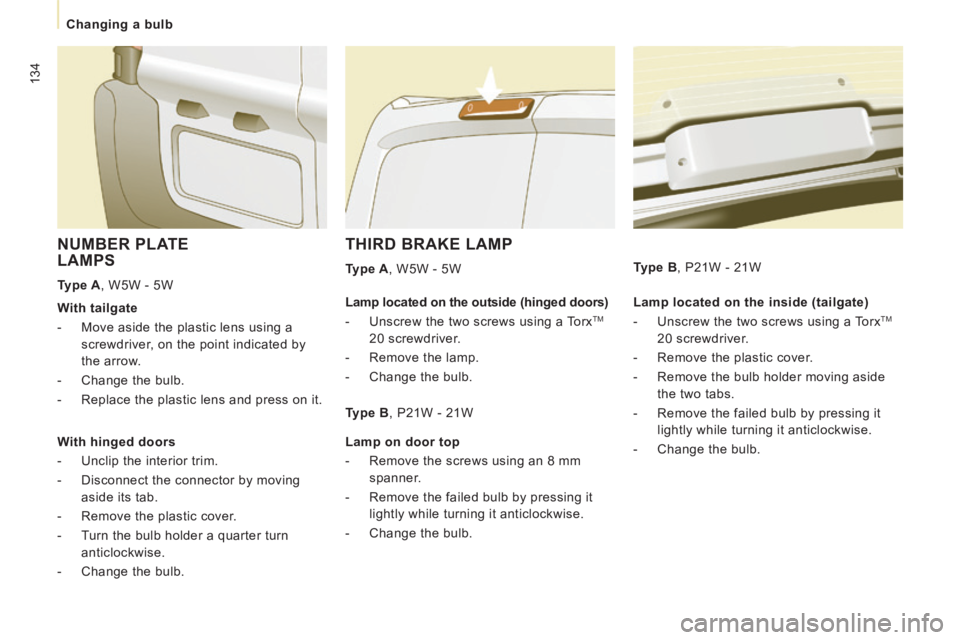
THIRD BRAKE LAMP
Type A , W5W - 5W
NUMBER PLATE LAMPS
Type A , W5W - 5W Lamp located on the inside (tailgate)
- Unscrew the two screws using a Torx
TM
20 screwdriver.
- Remove the plastic cover.
- Remove the bulb holder moving aside the two tabs.
- Remove the failed bulb by pressing it lightly while turning it anticlockwise.
- Change the bulb.
Type B , P21W - 21W
With tailgate
- Move aside the plastic lens using a
screwdriver, on the point indicated by
the arrow.
- Change the bulb.
- Replace the plastic lens and press on it.
With hinged doors
- Unclip the interior trim.
- Disconnect the connector by moving aside its tab.
- Remove the plastic cover.
- Turn the bulb holder a quarter turn anticlockwise.
- Change the bulb. Lamp located on the outside (hinged doors)
- Unscrew the two screws using a Torx TM
20 screwdriver.
- Remove the lamp.
- Change the bulb. Type B , P21W - 21W
Lamp on door top
- Remove the screws using an 8 mm spanner.
- Remove the failed bulb by pressing it lightly while turning it anticlockwise.
- Change the bulb.
Page 137 of 252

135
Changing a fuse
QUICK HELP
7
CHANGING A FUSE
The three fuseboxes are placed:
- in the dashboard on the right-hand side (behind the storage compartments,
retractable),
- in the passenger compartment (battery compartment),
- under the bonnet.
If fitted on your vehicle, a further fusebox
is added for towing, the towbar and the
connections for the coachbuilder and
platform cab conversions. It is located on the
right behind the load retaining partition.
Removing and fitting a fuse
Before changing a fuse, the cause of the
fault must be found and rectified. Always replace a failed fuse with a fuse
of the same rating.
CITROËN will not accept responsibility
for the cost incurred in repairing your
vehicle or for rectifying the malfunctions
resulting from the installation of accessories
not supplied and not recommended by
CITROËN and not installed in accordance
with its instructions, in particular when
the combined consumption of all of the
additional equipment connected exceeds
10 milliamperes.
The descriptions communicated are only the
fuses which can be changed by the user.
For any other operations, go to a CITROËN
dealer or a qualified workshop.
For motor trade use: for complete
fuse and relay information, consult the
"Repair procedure" wiring diagrams via the
dealer network.