CITROEN RELAY 2016 Handbook (in English)
Manufacturer: CITROEN, Model Year: 2016, Model line: RELAY, Model: CITROEN RELAY 2016Pages: 308, PDF Size: 10.98 MB
Page 291 of 308

13
5
Driving safely
SAFETY
Display in the touch screen tablet then in the instrument panel
The display of traffic signs is done in the
following two phases:
- All new recognised traffic signs are
displayed in the touch screen tablet in
the form of a popup for 40 seconds.
- These traffic signs are then displayed in
the instrument panel.
The system can display two traffic signs
(speed limit and no overtaking ) in parallel
in the two dedicated zones of the instrument
panel.
If an additional traffic sign is detected, such
as one for a reduced speed limit when the
road is wet, this is displayed in an empty
window below the corresponding sign.
Additional traffic signs are filtered as follows:
- Signs related to snow or ice are
displayed only if the ambient
temperature is below 3°C.
- Signs related to snow, rain or fog are
displayed only if the wipers are on and
the ambient temperature is below 3°C.
- Signs related to heavy goods vehicles
are only displayed if they apply to
vehicles weighing less than 4 tonnes.
- Signs related to farm vehicles are not
displayed.
Principles
Using the camera located at the top of the
windscreen, this system detects and reads
speed limit and no overtaking traffic signs
and signs that indicate the end of these
restrictions.
Page 292 of 308

14
Driving safely
Activation / Deactivation
The function is set with the MODE button;
in the "Traffic Sign" menu, select "ON"
or "OFF".
Operating limits
The legislation on speed limits is specific to
each country.
The system does not take account of
reduced speed limits in the following cases:
- poor weather (rain, snow),
- atmospheric pollution,
- trailer, caravan,
- driving with snow chains fitted,
- driving with a non-genuine
suspension kit,
- puncture repair using the temporary
repair kit,
- young drivers,
- ...
The system may suffer interference
or not work at all in the following
situations:
- poor visibility (dazzling sun, inadequate
street lighting, falling snow, heavy rain,
dense fog, vehicle too far from the traffic
sign),
- low temperatures and particularly severe
climatic conditions,
- windscreen area ahead of the camera
dirty, misty, frosty, covered with snow,
damaged or masked by a sticker,
- fault with the camera,
- obsolete or incorrect mapping,
- hidden road signs (other vehicles,
vegetation, snow),
- traffic signs that do not conform to the
standard, are damaged or distorted,
- variation of load, placing the camera at a
large angle (the system may not work for
a moment while the camera recalibrates
itself).
Refer to the "Technology on board -
Vehicle configuration" section.
AN. 15JPR.T030
Page 293 of 308

R EL AY
CITROËN
SUPPLEMENT
Page 294 of 308

This document contains the latest updates to the handbook for your vehicle. This information completes or cancels and replaces the information in the handbook. First refer to the handbook for your vehicle.
3. EASE OF USE and COMFORT5. SAFETY
Automatic headlamp dipping 4Traffi c sign recognition 12
4. TECHNOLOGY on BOARD
Vehicle confi guration 6
2. READY TO GO
Instrument panels 1Battery standby system 3
Page 295 of 308

1
2
READY
TO GO
Instruments and controls
1. Speedometer (mph or km/h).
2. Display screen.
3. Fuel gauge.
4. Coolant temperature.
5. Rev counter (rpm or tr/min x 1000).
INSTRUMENT PANELS
Level 1 display screen
In the lower part:
- Time,
- Ambient temperature,
- Miles / kilometres travelled,
- Trip computer (range, fuel
consumption...),
- Headlamp beam height,
- Programmable overspeed warning,
- Cruise control or speed limiter,
- Gear efficiency indicator,
- Stop & Start.
In the upper part:
- Date,
- Service indicator,
- Alert messages,
- System status messages,
- Vehicle configuration.
Instrument panel / Level 1 display screen
Page 296 of 308

2
Instruments and controls
Level 2 display screen
In the left-hand part:
- Time,
- Ambient temperature,
- Alert or state indicators,
- Cruise control or speed limiter.
In the right-hand part:
- Date,
- Service indicator,
- Trip computer (range, fuel
consumption...),
- Alert messages,
- Messages on the state of systems,
- Vehicle configuration,
- Headlamp beam height,
- Miles / kilometres travelled.
Instrument panel / Level 2 display screen
Page 297 of 308

3
2
READY
TO GO
Starting and switching off
BATTERY STANDBY SYSTEM
If the vehicle is not to be used for a
prolonged period, such as for winter storage,
for example, it is strongly recommended that
the battery be placed on standby in order to
protect it and optimise its service life.
To place the battery on standby:
- Switch off the engine ( STOP position).
- Press the red button, then turn the key
to the BATT position.
The battery goes into standby about
7 minutes later.
This time is necessary to:
- Allow the user to get out of the vehicle
and lock the doors with the remote
control.
- Ensure that all of the vehicle's electrical
systems are deactivated.
When the battery is on standby,
access to the vehicle is only possible
by unlocking the vehicle using the key in the
lock barrel in the driver's door.
After placing the battery on standby,
settings (time, date, radio station
presets...) are memorised.
To take the battery out of standby:
- Turn the key to the MAR position.
- Start the engine normally ( AV V position).
Page 298 of 308

4
Steering mounted controls
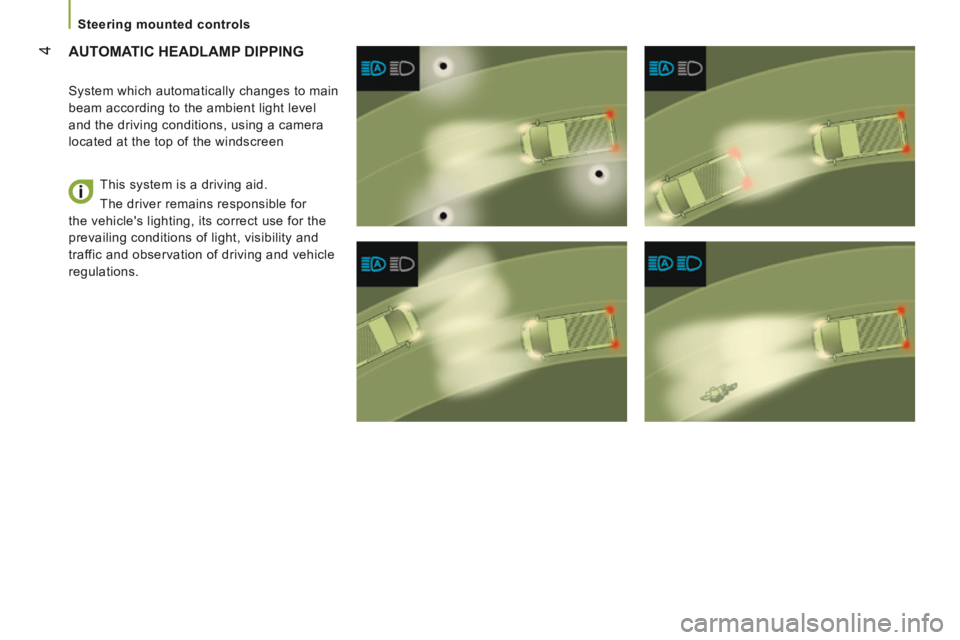
AUTOMATIC HEADLAMP DIPPING
System which automatically changes to main
beam according to the ambient light level
and the driving conditions, using a camera
located at the top of the windscreen
This system is a driving aid.
The driver remains responsible for
the vehicle's lighting, its correct use for the
prevailing conditions of light, visibility and
traffic and observation of driving and vehicle
regulations.
Page 299 of 308

5
3
EASE OF US
E and
COMFORT
Steering mounted controls
Activation
Operation
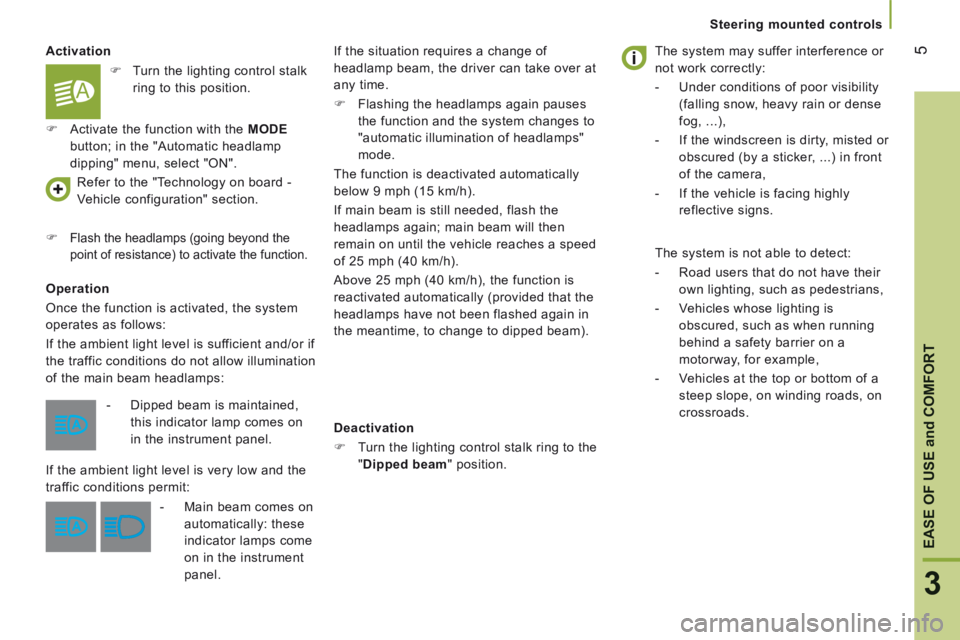
Once the function is activated, the system
operates as follows:
If the ambient light level is sufficient and/or if
the traffic conditions do not allow illumination
of the main beam headlamps:
Refer to the "Technology on board -
Vehicle configuration" section.
Flash the headlamps (going beyond the
point of resistance) to activate the function.
If the situation requires a change of
headlamp beam, the driver can take over at
any time.
Flashing the headlamps again pauses
the function and the system changes to
"automatic illumination of headlamps"
mode.
The function is deactivated automatically
below 9 mph (15 km/h).
If main beam is still needed, flash the
headlamps again; main beam will then
remain on until the vehicle reaches a speed
of 25 mph (40 km/h).
Above 25 mph (40 km/h), the function is
reactivated automatically (provided that the
headlamps have not been flashed again in
the meantime, to change to dipped beam).
Deactivation
Turn the lighting control stalk ring to the
" Dipped beam " position.
The system may suffer interference or
not work correctly:
- Under conditions of poor visibility
(falling snow, heavy rain or dense
fog, ...),
- If the windscreen is dirty, misted or
obscured (by a sticker, ...) in front
of the camera,
- If the vehicle is facing highly
reflective signs.
The system is not able to detect:
- Road users that do not have their
own lighting, such as pedestrians,
- Vehicles whose lighting is
obscured, such as when running
behind a safety barrier on a
motorway, for example,
- Vehicles at the top or bottom of a
steep slope, on winding roads, on
crossroads. - Dipped beam is maintained,
this indicator lamp comes on
in the instrument panel.
If the ambient light level is very low and the
traffic conditions permit:
- Main beam comes on
automatically: these
indicator lamps come
on in the instrument
panel.
Turn the lighting control stalk
ring to this position.
Activate the function with the MODE
button; in the "Automatic headlamp
dipping" menu, select "ON".
Page 300 of 308

6
Vehicle configuration
PERSONALISATION - CONFIGURATION
Using the MODE control panel
This control panel located alongside the
steering wheel provides access to menus for
the personalisation of some of the vehicle
systems.
The corresponding information appears in
the instrument panel screen.
Eleven languages are offered: Brazilian,
Dutch, English, French, German, Italian,
Polish, Portuguese, Russian, Spanish and
Turkish.
You have access to all the menus if your
vehicle is fitted with an audio system.
If your vehicle is fitted with a touch screen
audio system, certain menus are only
accessible using the audio system control
panel.
- scroll down through a menu,
- decrease a value.
This MODE button enables you to:
- access the menus and sub-menus,
- confirm your selections, within a
menu,
- quit the menus.
A long press takes you back to the
home screen.
This button enables you to:
This button enables you to:
- scroll up through a menu,
- increase a value.
As a safety measure, some menus
can only be accessed when the ignition
is off.