CITROEN RELAY 2017 Handbook (in English)
Manufacturer: CITROEN, Model Year: 2017, Model line: RELAY, Model: CITROEN RELAY 2017Pages: 292, PDF Size: 9.04 MB
Page 91 of 292

89
ExtErIOr FIttInGS
Protective grille
Depending on the country of sale, a
protective grille fitted to the inside of
the front bumper provides protection for
underbonnet components against flying
stones...
Very cold conditions protectors
Depending on the country of sale, protective
foam pads are present to avoid the ingress
of cold or snow to the upper part of the
underbonnet.
Located at the edge of each headlamp,
they are fitted to the front panel above the
radiator.
Slide them towards the outisde of the
vehicle to remove them.
Folding foot board
To faciltate the entry and exit of rear
passengers, your vehicle may be fitted with
a foot board, which is deployed on opening
the sliding side door.
3
EASE OF uSE and cOMFOrt
Life on board
Page 92 of 292

90
MIrrOrS
d
oor mirrors
These are divided into two zones:
A - Upper mirror
B - Lower mirror
The mirror glass is spherical in order to
widen the lateral field of vision. Objects
seen in the mirror are in reality closer than
they appear. Therefore, this must be taken
into account in order to assess the distance
correctly.
The shell incorporates the direction indicator
side repeater and the aerials, according to
the equipment available on board (GPS,
GSM, Radio, ...).
Electrical controls
The ignition switch must be in the MAr
position.
T
urn the control to select the mirror zone.
1 Driver's mirror:
A1 - Upper mirror
B1 - Lower mirror
Then move the control in the direction of the
adjustment required.
2 Passenger mirror:
A2 - Upper mirror
B2 - Lower mirror
Then move the control in the direction of the
adjustment required.
rear view mirror
The lever located on the lower edge moves
the mirror into two positions.
For the day position, the lever is pushed.
For the night position to prevent dazzle, pull
the lever towards you.
Electric folding
Press this control.
defrosting the mirrors
Press the rear screen defrosting
button.
Mirrors and windows
Page 93 of 292

91
ELEctrIc WIndOWS
A. d river's electric window
B.
Passenger's electric window Y
ou have two options:Manual operation
Press or pull control switch A/B, without
passing the point of resistance.
The window stops when you release the
control switch.
Automatic operation
Press or pull control switch A , beyond the
point of resistance: the window opens or
closes fully when the control is released.
Pressing the control switch again stops the
movement of the window.
Good practice
Always remove the key from the ignition
when leaving the vehicle, even for a short
time.
If the electric windows meet an obstacle
during operation, you must reverse the
movement of the window. To do this, press
the control switch in question.
When the driver operates the passenger
electric windows, they must ensure that
no one is preventing correct closing of the
windows.
The driver must ensure that the passengers
use the electric windows correctly.
Be particularly aware of children when
operating the windows.
3
EASE OF uSE and cOMFOrt
Mirrors and windows
Page 94 of 292

92PErSOnALISAtIO n - cO n FIG ur At IO n
u
sing the MO d E control panel
This control panel located alongside the
steering wheel provides access to menus for
the personalisation of some of the vehicle
systems.
The corresponding information appears in
the instrument panel screen.
Eleven languages are offered: Brazilian,
Dutch, English, French, German, Italian,
Polish, Portuguese, Russian, Spanish and
Turkish. You have access to all the menus if your
vehicle is fitted with an audio system.
If your vehicle is fitted with a touch screen
audio system, certain menus are only
accessible using the audio system control
panel.
-
scroll down through a menu,
-
decrease a value.
t
his MO d E button enables you to:
-
access the menus and sub-menus,
-
confirm your selections, within a
menu,
-
quit the menus.
A
long press takes you back to the
home screen.
t
his button enables you to:
t
his button enables you to:
-
scroll up through a menu,
-
increase a value.
As a safety measure, some menus can
only be accessed when the ignition is off.
Vehicle configuration
Page 95 of 292

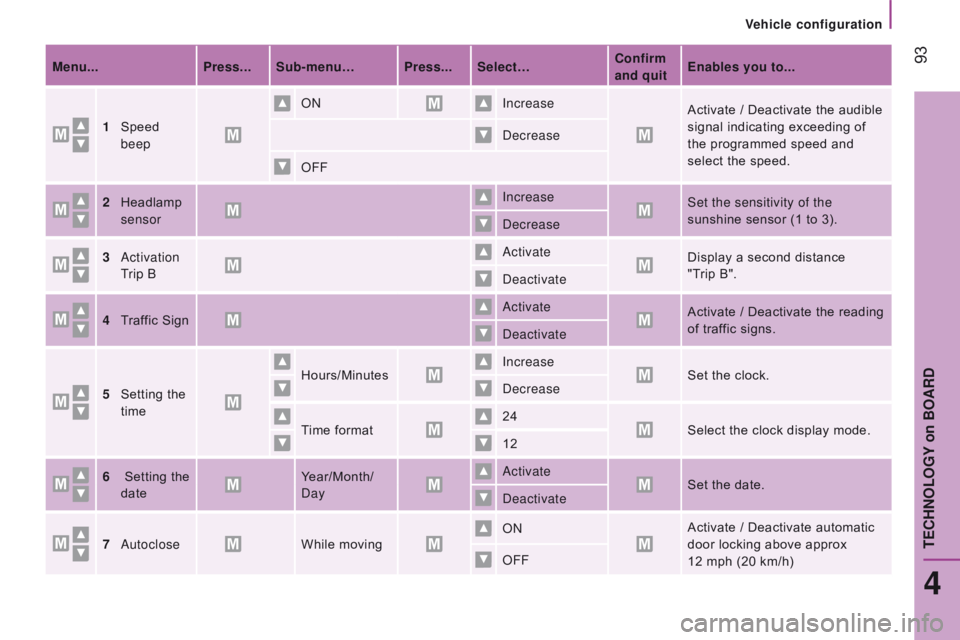
93Menu...Press... Sub-menu… Press... Select…c onfirm
and quit Enables you to...
1
Speed
beep ON
Increase
Activate / Deactivate the audible
signal indicating exceeding of
the programmed speed and
select the speed.
Decrease
OFF
2
Headlamp
sensor Increase
Set the sensitivity of the
sunshine sensor (1 to 3).
Decrease
3
Activation
Trip B Activate
Display a second distance
"Trip B".
Deactivate
4
T
raffic Sign Activate
Activate / Deactivate the reading
of traffic signs.
Deactivate
5
Setting the
time Hours/Minutes
Increase
Set the clock.
Decrease
Time format 24
Select the clock display mode.
12
6
Setting the
date Year/Month/
Day Activate
Set the date.
Deactivate
7
Autoclose While moving ON
Activate / Deactivate automatic
door locking above approx
12
mph (20 km/h)
OFF
4
tEcHnOLOGY on BOArd
Vehicle configuration
Page 96 of 292

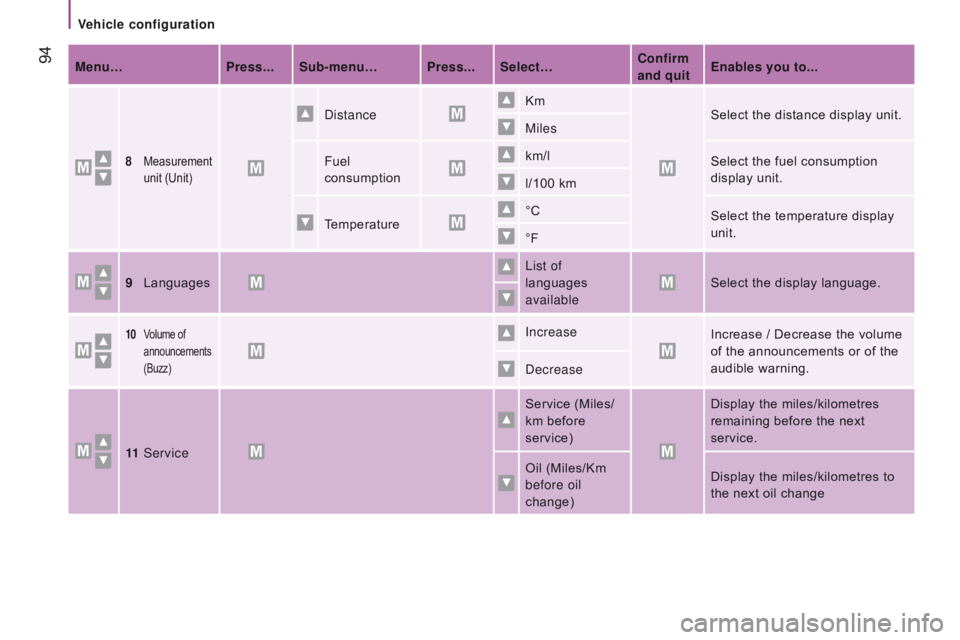
94Menu…Press... Sub-menu… Press... Select…c onfirm
and quit Enables you to...
8 Measurement
unit (Unit)
Distance Km
Select the distance display unit.
Miles
Fuel
consumption km/l
Select the fuel consumption
display unit.
l/100 km
Temperature °C
Select the temperature display
unit.
°F
9
Languages List of
languages
available Select the display language.
10 Volume of
announcements
(Buzz)Increase Increase / Decrease the volume
of the announcements or of the
audible warning.
Decrease
11
Service Service (Miles/
km before
service) Display the miles/kilometres
remaining before the next
service.
Oil (Miles/Km
before oil
change) Display the miles/kilometres to
the next oil change
Vehicle configuration
Page 97 of 292

95Menu…Press... Sub-menu... Press... Select...c onfirm
and quit Allows you to...
12
Daytime
running lampsON Activate / Deactivate daytime
running lamps.
OFF
13
Automatic
headlamp
dipping ON
Activate / Deactivate automatic
headlamp dipping.
OFF
14
Passenger
airbag
(BAG P) ON
Ye s
Activate the passenger airbag.
No
OFF Ye s
Deactivate the passenger airbag.
No
15
Quit menu Quit the menu.
Press the arrow at the bottom to
go to the first menu.
4
tEcHnOLOGY on BOArd
Vehicle configuration
Page 98 of 292

96
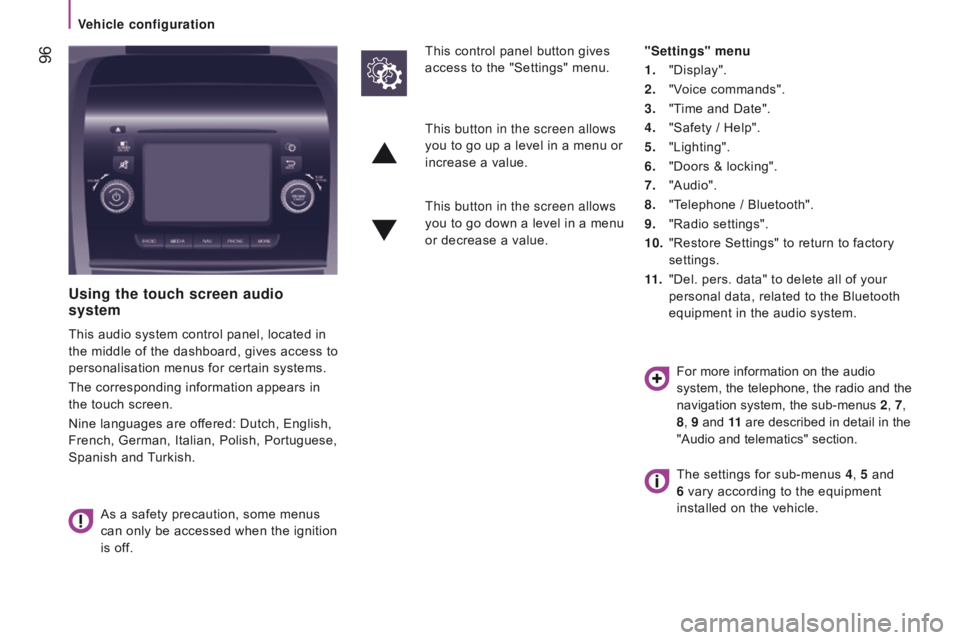
using the touch screen audio
system
This audio system control panel, located in
the middle of the dashboard, gives access to
personalisation menus for certain systems.
The corresponding information appears in
the touch screen.
Nine languages are offered: Dutch, English,
French, German, Italian, Polish, Portuguese,
Spanish and Turkish.
As a safety precaution, some menus
can only be accessed when the ignition
is off. This control panel button gives
access to the "Settings" menu.
"Settings" menu
1.
"Display".
2.
"V
oice commands".
3.
"T
ime and Date".
4.
"Safety / Help".
5.
"Lighting".
6.
"Doors & locking".
7.
"Audio".
8.
"T
elephone / Bluetooth".
9.
"Radio settings".
10.
"Restore Settings" to return to factory
settings.
11 .
"Del. pers. data" to delete all of your
personal data, related to the Bluetooth
equipment in the audio system.
This button in the screen allows
you to go up a level in a menu or
increase a value.
This button in the screen allows
you to go down a level in a menu
or decrease a value.
For more information on the audio
system, the telephone, the radio and the
navigation system, the sub-menus 2, 7,
8 , 9 and 11 are described in detail in the
"Audio and telematics" section.
The settings for sub-menus 4 , 5 and
6 vary according to the equipment
installed on the vehicle.
Vehicle configuration
Page 99 of 292

97From the "Safety / Help" sub menu, you can:
-
select "Parkview Camera", then
"Reversing camera" to activate or
deactivate its use (On, Off),
-
select "Parkview Camera", then
"Camera delay" to activate or deactivate
the maintaining of the display for
10
seconds or up to 11 mph (18 km/h)
(On, Off),
-
select "T
raffic Sign" to activate or
deactivate its use (On, Off),
-
select "Passenger airbag" to activate or
deactivate its use (On, Off).
From the "Lighting" sub-menu, you can:
-
select "Daytime running lamps" to
activate or deactivate their use (On, Off),
-
select "Auto headlamp dipping" to
activate or deactivate its use (On, Off),
-
select "Headlamp sensor" to adjust its
sensitivity (1, 2, 3). From the "Doors & locking" sub-menu,
you
can:
-
select "Autoclose" to activate or
deactivate its use (On, Off).
From the "Display" sub-menu, you can:
-
select "Languages" and choose one of
the languages listed above,
-
select "Units of measurement" to
choose the units for fuel consumption
(l/100
km, mpg), distance (miles, km)
and temperature (°C, °F),
-
select "Display
Trip B" to switch trip B
On or Off in the trip computer.
From the "Time and Date" sub-menu, you
can:
-
select "Adjust time and format" to set the
hour, minutes and seconds and choose
the format (24 h, 12 h with am or pm),
-
select "Adjust Date" to set the day
,
month and year.
To set the time manually, "Synch Time"
must be Off.
4
TECHNOLOGYon BOARD
V
Page 100 of 292

98
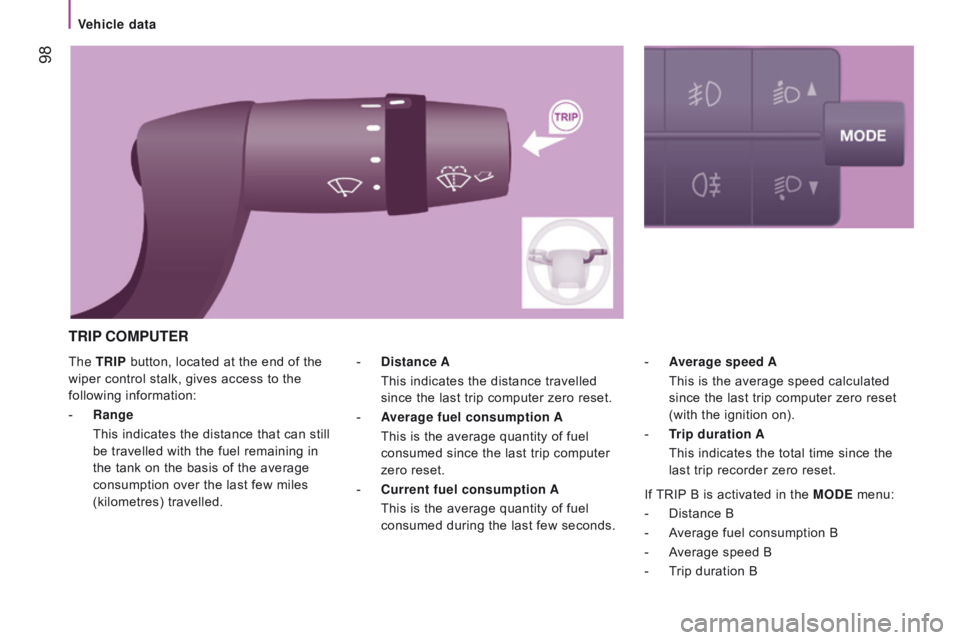
The trIP button, located at the end of the
wiper control stalk, gives access to the
following information:
-
r
ange
This indicates the distance that can still
be travelled with the fuel remaining in
the tank on the basis of the average
consumption over the last few miles
(kilometres) travelled. -
A verage speed A
This is the average speed calculated
since the last trip computer zero reset
(with the ignition on).
-
t
rip
duration A
This indicates the total time since the
last trip recorder zero reset.
-
d istance A
This indicates the distance travelled
since the last trip computer zero reset.
-
A
verage fuel consumption A
This is the average quantity of fuel
consumed since the last trip computer
zero reset.
-
c
urrent fuel consumption A
This is the average quantity of fuel
consumed during the last few seconds.
trIP c OMP ut E r
If TRIP B is activated in the MOdE menu:
-
Distance B
-
A
verage fuel consumption B
-
A
verage speed B
-
T
rip duration B
Vehicle data