change wheel CITROEN RELAY 2020 Handbook (in English)
[x] Cancel search | Manufacturer: CITROEN, Model Year: 2020, Model line: RELAY, Model: CITROEN RELAY 2020Pages: 196, PDF Size: 34.07 MB
Page 78 of 196

76
Driving
simultaneously in the two dedicated areas of the
instrument panel.
If an additional road sign is detected, such
as a reduced speed limit for wet road sign, it
is displayed in an empty window below the
corresponding sign.
Additional signs are filtered as follows:
– Signs for snow or ice only appear if the
outside temperature is below 3°C.
– Signs for snow, rain or fog are only displayed
if the wipers are activated while the outside
temperature is below 3°C.
– Signs concerning heavy goods vehicles are
not displayed if they concern a vehicle weighing
less than 4 tonnes.
– Signs concerning farm equipment are not
displayed.
Signs such as no overtaking go out after about
40 seconds on the instrument panel.
Activation/Deactivation
This function can be set using the MODE button: in the “Traffic Sign” menu, select
“ON” or “OFF”.
For more information on Vehicle
configuration (MODE) , refer to the
corresponding section.
Operating limits
The system does not take account of reduced
speed limits, especially those imposed in the
following cases:
– Poor weather (rain, snow).
– Atmospheric pollution.
– Towing.
– Driving with a space-saver type spare wheel
or snow chains fitted.
– Driving with a non-standard suspension kit.
– Tyre repaired using the temporary puncture
repair kit.
– Young drivers.
The system may not display the speed limit if it
does not detect a speed limit sign within a preset
period and in the following situations:
– Road signs that are obstructed, non-standard,
damaged or bent.
– Obsolete or incorrect maps.
– Road incline causing the sign to be out of the
camera field of vision (on a slope, for example).
– Change in the vehicle load that causes the
camera to tilt significantly (system operation may
temporarily be suspended to enable camera
self-calibration).
Speed limiter
Refer to the General recommendations on the
use of driving and manoeuvring aids .
System which prevents the vehicle
from exceeding the speed
programmed by the driver. The speed is selected when the vehicle is
stationary with the engine running or while
driving with at least 2
nd gear engaged.
The minimum speed to be programmed is 19
mph (30 km/h).
The vehicle responds to the driver's foot
pressure on the accelerator until resistance is felt
in the pedal, which signifies that the vehicle has
reached the programmed speed.
However, depressing the pedal beyond this point
of resistance to the floor allows you to exceed
the programmed speed. To resume use of the
speed limiter, gradually release the pressure
on the accelerator pedal and return below the
programmed speed.
1. Selection of the speed limiter function
2. Activation / deactivation of the function
3. Programming a speed
The selection status of the function and the
programmed speed are visible in the instrument
panel display screen.
Selecting the function
► Turn ring 1 all the way down. The speed
limiter is selected, but is not yet active.
The display indicates OFF and the last
programmed speed.
Programming a speed
A speed can be programmed without activating
the speed limiter but with the engine running.
To memorise a speed higher than the previous
one:
► Move the control upwards (+).
A short press increases the setting by 1 mph
(km/h).
Pressing and holding increases the setting in
steps of 5 mph (km/h).
To memorise a speed lower than the previous
one:
► Move the control downwards (-).
A short press decreases the setting by 1 mph
(km/h).
Pressing and holding decreases the setting in
steps of 5 mph (km/h).
Activation/Deactivation
► Press button 2 to activate the speed limiter.
Page 96 of 196

94
Practical information
► Pull the control located on the side of the
dashboard towards you.
On the outside
► Open the lock using the key.
► Hold towball 4 firmly in one hand; using
the other hand, pull and turn wheel 5 fully in a
clockwise direction; do not release the wheel.
► Extract the towball from the bottom of its
carrier 1.
► Release the wheel; this automatically stops in
the unlocked position (position B).
► Refit the protective plug to the carrier .
► Carefully stow the towball in its bag away
from knocks and dirt.
Maintenance
Correct operation is only possible if the towball
and its carrier are kept clean.
Before cleaning the vehicle with a high-pressure
jet wash, the towball must be removed and the
protective plug fitted to the carrier.
Apply the label provided to a clearly visible area, close to the carrier or in the
boot.
Go to a CITROËN dealer or a qualified
workshop for any work on the towbar system.
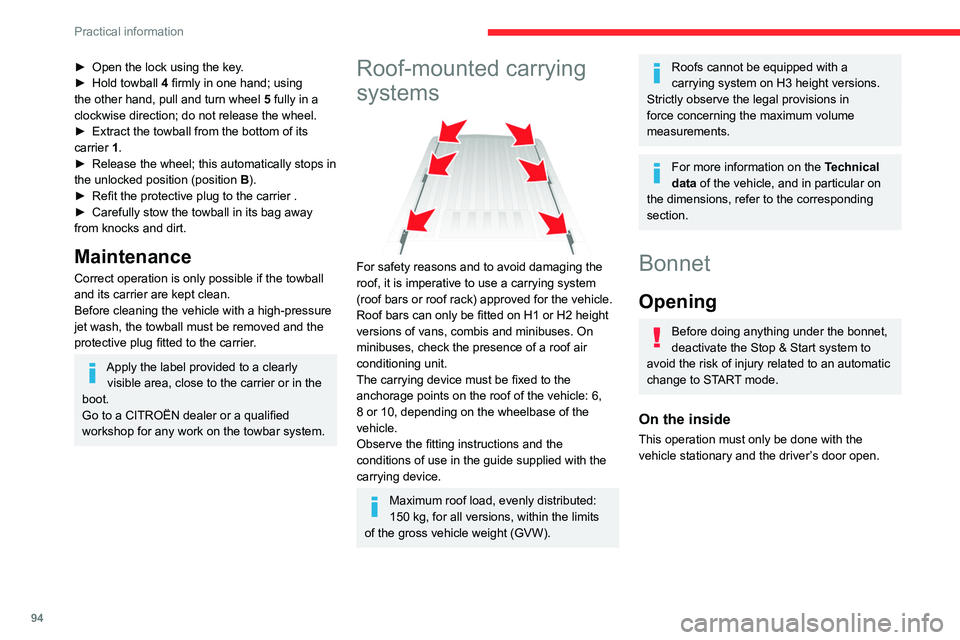
Roof-mounted carrying
systems
For safety reasons and to avoid damaging the
roof, it is imperative to use a carrying system
(roof bars or roof rack) approved for the vehicle.
Roof bars can only be fitted on H1 or H2 height
versions of vans, combis and minibuses. On
minibuses, check the presence of a roof air
conditioning unit.
The carrying device must be fixed to the
anchorage points on the roof of the vehicle: 6,
8 or 10, depending on the wheelbase of the
vehicle.
Observe the fitting instructions and the
conditions of use in the guide supplied with the
carrying device.
Maximum roof load, evenly distributed:
150 kg, for all versions, within the limits
of the gross vehicle weight (GVW).
Roofs cannot be equipped with a
carrying system on H3 height versions.
Strictly observe the legal provisions in
force concerning the maximum volume
measurements.
For more information on the Technical
data of the vehicle, and in particular on
the dimensions, refer to the corresponding
section.
Bonnet
Opening
Before doing anything under the bonnet,
deactivate the Stop & Start system to
avoid the risk of injury related to an automatic
change to START mode.
On the inside
This operation must only be done with the
vehicle stationary and the driver’s door open.
Page 102 of 196

100
Practical information
reading and have an adverse effect on road
holding.
Fitting different tyres on the front and rear axles
can cause the ESC to mistime.
AdBlue® (BlueHDi
engines)
To respect the environment and ensure
compliance with the Euro 6 standard, without
adversely affecting the performance or fuel
consumption of its Diesel engines, CITROËN
has taken the decision to equip its vehicles
with a system that associates SCR (Selective
Catalytic Reduction) with a Diesel Particle Filter
(DPF) for the treatment of exhaust gases.
SCR system
Using a liquid called AdBlue® that contains
urea, a catalytic converter turns up to 85% of
the nitrogen oxides (NOx) into nitrogen and
Brake disc wear
For information on checking brake disc
wear, contact a CITROËN dealer or a
qualified workshop.
Manual parking brake
If you notice excessive brake lever travel
or decreased effectiveness, the parking
brake must be adjusted, even between two
services.
This system must be checked by a CITROËN
dealer or a qualified workshop.
Diesel fuel filter
The Diesel fuel filter is located under the bonnet,
close to the brake fluid reservoir.
If this warning lamp comes on, the filter
must be purged to remove water.
You can also purge the fuel filter regularly, every
time the engine oil is changed.
Bleeding the water in the filter
► Couple a clear hose to the bleed screw
1head.
► Place the other end of the clear hose in a
container.
► Loosen bleed screw 2.
► Switch on the ignition.
► Wait for the scavenge pump to stop.
► Switch off the ignition.
► Tighten bleed screw 2.
► Remove, then drain the clear hose and the
container.
► Start the engine.
► Check that there are no leaks.
HDi engines make use of advanced
technology. Any intervention requires a
special qualification guaranteed by the
CITROËN dealer network or a qualified
workshop .
Wheels and tyres
The inflation pressure of all tyres, including the spare wheel, must be
checked on "cold” tyres.
The pressures indicated on the tyre pressure
label are valid for "cold" tyres. If you have driven
for more than 10 minutes or more than 6 miles
(10 kilometres) at over 31 mph (50 km/h), add
0.3 bar (30 kPa) to the values indicated on the
label.
Under-inflation increases fuel
consumption. Non-compliant tyre
pressure causes premature wear on tyres and
has an adverse effect on the vehicle's road
holding - risk of an accident!
Driving with worn or damaged tyres reduces the
braking and road holding performance of the
vehicle. It is recommended to regularly check the
condition of the tyres (tread and sidewalls) and
wheel rims as well as the presence of the valves.
When the wear indicators no longer appear set
back from the tread, the depth of the grooves is
less than 1.6 mm; it is imperative to replace the
tyres.
Using different size wheels and tyres from those
specified can affect the lifetime of tyres, wheel
rotation, ground clearance, the speedometer
Page 109 of 196

107
In the event of a breakdown
8
► Install extended socket A, wheelbrace D and
wheel bar B on the retaining bolt.
► Turn the assembly anti-clockwise to lower the
wheel.
► Turn to the locking point of the winch,
indicated by the hardening of the manoeuvre and
notch G not visible.
► After unrolling the cable completely, take the
spare wheel out.
With steel wheels:
► Unscrew handle H. ►
Remove caliper I from the outer part of the
steel wheel.
With alloy wheels:
► Unscrew the three fixing bolts K.
► Unscrew handle H.
► Remove bracket J from caliper I.
► Remove the spare wheel and place it near
the wheel to be replaced.
► If possible, place a chock under the wheel
diagonally opposite the wheel to be changed.
3 - Position the jack
Ensure that the jack is stable.
If the ground is slippery or loose, the jack
may collapse - Risk of injury!
Take care to place the jack strictly at jacking point 1 or 2 under the vehicle,
making sure that the jack head is centred at
the contact point on the vehicle. Otherwise,
there is a risk of damage to the vehicle and/or
the jack collapsing.
Make sure that any passengers are safe
(removed, away from the vehicle).
Never put your hands or your head in the
wheel arch.
Page 110 of 196

108
In the event of a breakdown
Never go underneath a vehicle raised
using a jack (use an axle stand).
Do not use:
– The jack for any other purpose than lifting
the vehicle.
– A jack other than the one supplied by the
manufacturer.
The jack must only be used to change a wheel with a damaged or punctured tyre.
The jack does not require any maintenance.
The jack meets European standards, as
defined in the Machinery Directive 2006/42/
CE.
Certain parts of the jack such as the
screw thread or the joints could cause
injury: avoid touching them.
Carefully remove all traces of lubrication
grease.
At the front
► Position the jack C at location 1 provided on
the underbody, near the front wheel.
At the rear
The jack must be located about 60 cm
from the edge of the rear wheel.
► Position the jack C at location 2 in the hole
provided for this purpose.
Special feature with a side footboard
If the vehicle is so equipped, make sure to place
the jack at 45° so that it does not interfere with
the footboard.
4 - Replacing the wheel to
be repaired
► Remove the wheel trim (depending on
version) by levering with screwdriver E.
► Unlock the bolts using wheelbrace D and
wheel bar B.
For more information on Positioning the
jack, refer to the corresponding section.
► Make sure that the jack is stable and
correctly positioned on the underbody.
► Using wheelbrace D and wheel bar B, extend
the jack sufficiently to release the wheel.
To clear the wheel easily, a space of about 2 to 3 cm is needed between the
ground and the tyre.
If the wheel is badly punctured/crushed,
increase the space but do not operate the
jack to its maximum lifting position.
Page 114 of 196

11 2
In the event of a breakdown
If necessary, you can remove the lamp unit:
► Depending on the country of sale, remove
the winter protection foam by sliding it sideways
towards the outside.
► Disconnect the electrical connector by
removing its locking ring.
► Remove the two fixing screws of the lamp
unit.
► Move the lamp unit towards the centre of the
vehicle to extract it from its slides. Pay attention
to the bonnet stay on the left-hand side.
Main beam headlamps
Type D, H7 - 55W
► Remove the cover by pulling on the rubber
tab.
► Disconnect the electrical connector. ►
Release the locking spring by pressing the
central clamp.
► Change the bulb taking care to align the
metal part with the groove on the lamp.
Dipped beam headlamps
Type D, H7 - 55W
► Remove the cover by pulling on the rubber
tab.
► Disconnect the electrical connector.
► Release the locking spring by pressing the
central clamp.
► Change the bulb taking care to align the
metal part with the grooves on the lamp.
Direction indicators
Type A, WY21W - 21W
► Remove the cover by pulling on the rubber
tab.
► Turn the bulb holder a quarter turn
anti-clockwise.
► Change the bulb.
Sidelamps/Daytime running lamps
Type B, W21/5W - 21W and 5W
► Remove the cover by pulling on the rubber
tab.
► Turn the bulb holder a quarter turn
anti-clockwise.
► Change the bulb.
LED daytime running lamps
These light-emitting diodes (LEDs) are used both
as daytime running lamps and as sidelamps.
If your vehicle is equipped with LED daytime
running lamps, contact a CITROËN dealer.
Front foglamps
Type D, H11-55W
► Completely turn the wheel inwards.
Page 115 of 196

11 3
In the event of a breakdown
8
► Remove the screw, located in the wheel arch.
► Remove the protective flap.
► Remove the fixing clip and disconnect the
electrical connector.
► Turn and remove the bulb holder.
► Change the bulb taking care to align the
metal part with the grooves on the lamp.
The replacement of halogen bulbs must be done with the headlamps switched off
a few minutes beforehand (risk of serious
burns). Do not touch the bulb directly with
your fingers; use a lint-free cloth.
When each operation has been completed,
check the operation of the lighting.
Direction indicator side
repeaters
Type A, W16WF - 16W
► Move the glass of the mirror to access the
screws.
► Remove the two fixing screws.
► Pull the bulb holder to release it from the
pins.
► Pull the bulb out and change it.
Left-hand and right-hand
sidelamps
Type A, W5W - 5W
► If fitted on the vehicle (dimension L4), remove
the two fixing screws.
► Pull the bulb holder to release it from the
pins.
► Pull the bulb out and change it.
Courtesy lamps
Type C, 12V 10W - 10W
Page 155 of 196

153
Audio system
11To protect the system, do not use a USB hub.
The system builds playlists (in temporary
memory); this operation can take from a
few seconds to several minutes at the first
connection.
Reduce the number of non-music files and the
number of folders to reduce the waiting time.
The playlists are updated every time the ignition
is switched off or a USB memory stick is
connected. The lists are memorised: if they are
not modified, the subsequent loading time will
be shorter.
USB socket
Located on the central console, this
socket is used only to power and
recharge the connected portable device.
Auxiliary socket (AUX)
Connect a portable device (MP3 player,
etc.) to the auxiliary jack socket using an
audio cable (not supplied).
First adjust the volume on your portable device
(to a high level). Then adjust the volume on your
audio system.
Controls are managed via the portable device.
The functions of the device connected to the
“AUX” socket are managed directly by this
device: it is therefore not possible to change the
track/folder/playlist or manipulate the playback
start/end/pause using the controls on the control
panel or the steering wheel.
Do not leave the cable of your portable device
connected to the “AUX” socket when not in use,
to avoid possible noise from the speakers.
Information and advice
The system supports USB Mass Storage
devices, BlackBerry® devices or Apple® players
via the USB sockets. The adapter cable is not
supplied.
Other devices, not recognised by the system
during connection, must be connected to
the auxiliary socket using a Jack cable (not
supplied).
It is advisable to restrict file names to 20
characters, without using special characters (e.g.
" " ? . ; ù) so as to avoid any reading or display
problems.
Only use USB memory sticks formatted to FAT
32 (File Allocation Table).
To protect the system, do not use a USB hub.
The system does not support the simultaneous connection of two identical
devices (two memory sticks or two
Apple
® players) but it is possible to connect
one memory stick and one Apple® player at
the same time.
It is recommended that you use genuine
Apple® USB cables to guarantee correct
operation.
Connecting Apple® players
Connect the Apple® player to the USB
socket using a suitable cable (not
supplied).
Play starts automatically.
Control is via the audio system.
The classifications available are those of the portable device connected (artists/
albums/types/tracks/playlists/audio books/
podcasts).
The default classification is sorting by artist.
To change the classification used, return to
the first level of the menu and then select the
desired classification (playlists for example)
and confirm to browse the tree to the desired
track.
The audio system software version may not be compatible with the generation of
your Apple
® player.
Page 164 of 196

162
Touch screen audio and telematics system
– Select the desired parameter; the option is
highlighted.
– Loudness.
– Optimise the quality of low volume audio.
– Automatic radio.
– Set the radio when starting up or recover the
active state when the ignition key was last turned
to STOP.
– Radio switch-off delay .
– Set the parameter.
– AUX vol. setting .
– Set the parameters.
USB socket
Insert the USB memory stick or connect
the device to the USB socket in the
central storage space , provided for transferring
data to the system, using a suitable cable (not
supplied).
To protect the system, do not use a USB hub.
The system builds playlists (in temporary
memory); this operation can take from a
few seconds to several minutes at the first
connection.
Reduce the number of non-music files and the
number of folders to reduce the waiting time.
The playlists are updated every time the ignition
is switched off or a USB memory stick is
connected. The lists are memorised: if they are
not modified, the subsequent loading time will
be shorter.
USB socket
Located on the central console, this
socket is used only to power and
recharge the connected portable device.
Auxiliary socket (AUX)
Connect a portable device (MP3 player,
etc.) to the auxiliary jack socket using an
audio cable (not supplied).
First adjust the volume on your portable device
(to a high level). Then adjust the volume on your
audio system.
Controls are managed via the portable device.
The functions of the device connected to the
“AUX” socket are managed directly by this
device: it is therefore not possible to change the
track/folder/playlist or manipulate the playback
start/end/pause using the controls on the control
panel or the steering wheel.
Do not leave the cable of your portable device
connected to the “AUX” socket when not in use,
to avoid possible noise from the speakers.
Selecting the source
Press on "MEDIA".
Select the "Source" tab to show the
rolling display of audio sources.
Select the source.
Use the play settings on the screen.
Press the "Rand." button and/or the
"Repeat" button to activate them, press again to
deactivate them.
Information and advice
The audio system will only play audio files with
".wav", ".wma" and ".mp3" file extensions, at bit
rates between 32 Kbps and 320 Kbps.
For audio files with ".aac", ".m4a", ".m4b" and
".mp4" file extensions, the supported sampling
rates are 8 - 96 kHz.
".m3u" and ".wpl" types are also supported.
The system does not manage devices with a
capacity greater than 64 GB.
It is advisable to restrict file names to 20
characters, without using special characters (e.g.
" " ? . ; ù) so as to avoid any reading or display
problems.
The system supports USB mass storage devices, BlackBerry® devices or Apple®
players via the USB sockets. The adapter
cable is not supplied.
Devices are managed using the audio system
controls.
Other devices, not recognised by the system
during connection, must be connected to
the auxiliary socket using a Jack cable (not
supplied).
Only use USB memory sticks formatted to FAT
32 (File Allocation Table).
To protect the system, do not use a USB hub.
The system does not support the simultaneous connection of two identical
devices (two memory sticks or two
Apple
® players) but it is possible to connect
one memory stick and one Apple® player at
the same time.
It is recommended that you use genuine
Apple® USB cables to guarantee correct
operation.
Bluetooth® Streaming
Streaming allows music files on the telephone to
be played via the vehicle's speakers.
Active the Bluetooth
® function on the device.Press "MEDIA".
If there is a media source active, press
the "Source" button.
Select the "Bluetooth®" media source
then press the "Add device” button.
If no device has yet been paired with the system,
a special page is displayed on the screen.
Select "Yes" to start the pairing procedure, and
then search for the name of the system on the
device.
Select the name of the system on the device
and, when requested by the audio system,
enter the PIN code displayed on the screen of
Page 180 of 196

178
Alphabetical index
Low fuel level 90
Lumbar 27
M
Maintenance, routine 74, 98
Manoeuvring aids (recommendations) 73
Mat 74
Menu 13, 160–161, 163, 166, 168
Menus (audio) 160–161
Mirrors, door 31, 83
O
Oil change 96
Oil consumption 96
OIl, engine 96–98
On-board tools 105–110
Opening the bonnet 94
Overhead storage 38–41
P
Pads, brake 99
Parking brake 68, 100
Player, USB 152–153, 161–162
Port, USB 152–153, 161–162
Pressures, tyres 100
Pre-tensioning seat belts 56
Protecting children 57–59
R
Radar (warnings) 74
Radio 152, 160, 162
Radio, digital (Digital Audio
Broadcasting - DAB) 161
Range, AdBlue® 12, 98
Recovery 122
Regeneration of the particle filter 99
Remote control 20, 66
Replacing bulbs 111
Replacing the air filter 98
Replacing the oil filter 99
Replacing the passenger compartment
filter 98
Resetting the service indicator 10–11
Reversing camera 74
S
Safety, children 57–59
Screen, colour 160
Screen menu map 160–161, 163, 166, 168
Screenwash fluid 97–98
SCR (Selective Catalytic Reduction) 101
Seat belts 55–56
Seat belts, rear 56
Seats, heated 28
Seats, rear 59
Sensors (warnings) 74
Service indicator 10–11
Servicing 10–11, 98
Settings, equipment 13, 18
Sidelamps 46
Snow chains 91
Socket, auxiliary 153, 162
Socket, Jack 153, 162
Sockets, auxiliary 38–41
Speed limiter 76–77
Speed limit recognition 75–76
Speedometer 74
Stability control (ESC) 52
Stability control (ESP) 53
Starting a Diesel engine 91
Station, radio 152, 160
Steering mounted controls, audio 151, 159
Steering wheel adjustment 30
Stop & Start 32, 38, 49, 56, 69–70, 94, 98, 122
Storage 38–41
Sunshine sensor 31
T
Tables of engines 124
Table, writing 38–40
Tank, fuel 90
Technical data 124
Telephone 154, 166–168
Temperature, coolant 11