DAEWOO LACETTI 2004 Service Repair Manual
LACETTI 2004
DAEWOO
DAEWOO
https://www.carmanualsonline.info/img/54/56877/w960_56877-0.png
DAEWOO LACETTI 2004 Service Repair Manual
Trending: seat, run flat, Folding mirrors, horn, audio, power steering fluid, language
Page 2581 of 2643
7–4 FENDER, HOOD, TAILGATE AND TRUNK LID NUBIRA/LACETTI
3. TAILGATE (HATCHBACK)
3–1. REPAIR PROCEDURE
1. Remove the related parts.
S Wiring harness.
S Rear wiper arm and motor.
S Rear window glass.
S Lock set, latch and others.
.
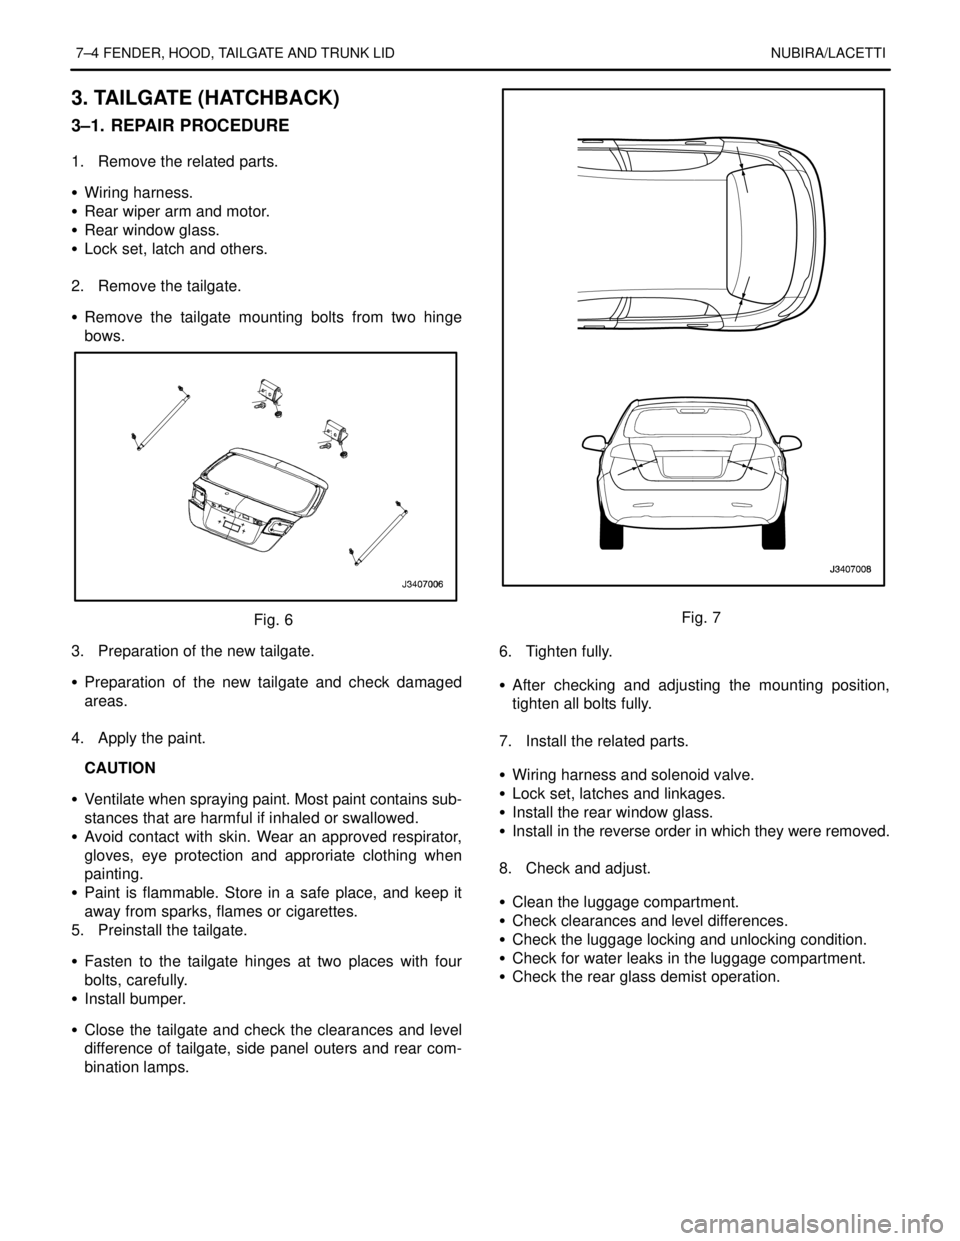
2. Remove the tailgate.
S Remove the tailgate mounting bolts from two hinge
bows.
Fig. 6
3. Preparation of the new tailgate.
S Preparation of the new tailgate and check damaged
areas.
.
4. Apply the paint.
CAUTION
S Ventilate when spraying paint. Most paint contains sub-
stances that are harmful if inhaled or swallowed.
S Avoid contact with skin. Wear an approved respirator,
gloves, eye protection and approriate clothing when
painting.
S Paint is flammable. Store in a safe place, and keep it
away from sparks, flames or cigarettes.
5. Preinstall the tailgate.
S Fasten to the tailgate hinges at two places with four
bolts, carefully.
S Install bumper.
S Close the tailgate and check the clearances and level
difference of tailgate, side panel outers and rear com-
bination lamps.Fig. 7
6. Tighten fully.
S After checking and adjusting the mounting position,
tighten all bolts fully.
.
7. Install the related parts.
S Wiring harness and solenoid valve.
S Lock set, latches and linkages.
S Install the rear window glass.
S Install in the reverse order in which they were removed.
.
8. Check and adjust.
S Clean the luggage compartment.
S Check clearances and level differences.
S Check the luggage locking and unlocking condition.
S Check for water leaks in the luggage compartment.
S Check the rear glass demist operation.
Page 2582 of 2643
NUBIRA/LACETTI FENDER, HOOD, TAILGATE AND TRUNK LID 7–5
4. TRUNK LID (NOTCHBACK)
4–1. REPAIR PROCEDURE
1. Remove the related parts.
S Wiring harness and solenoid valve.
S Lock set, latch set and others.
.
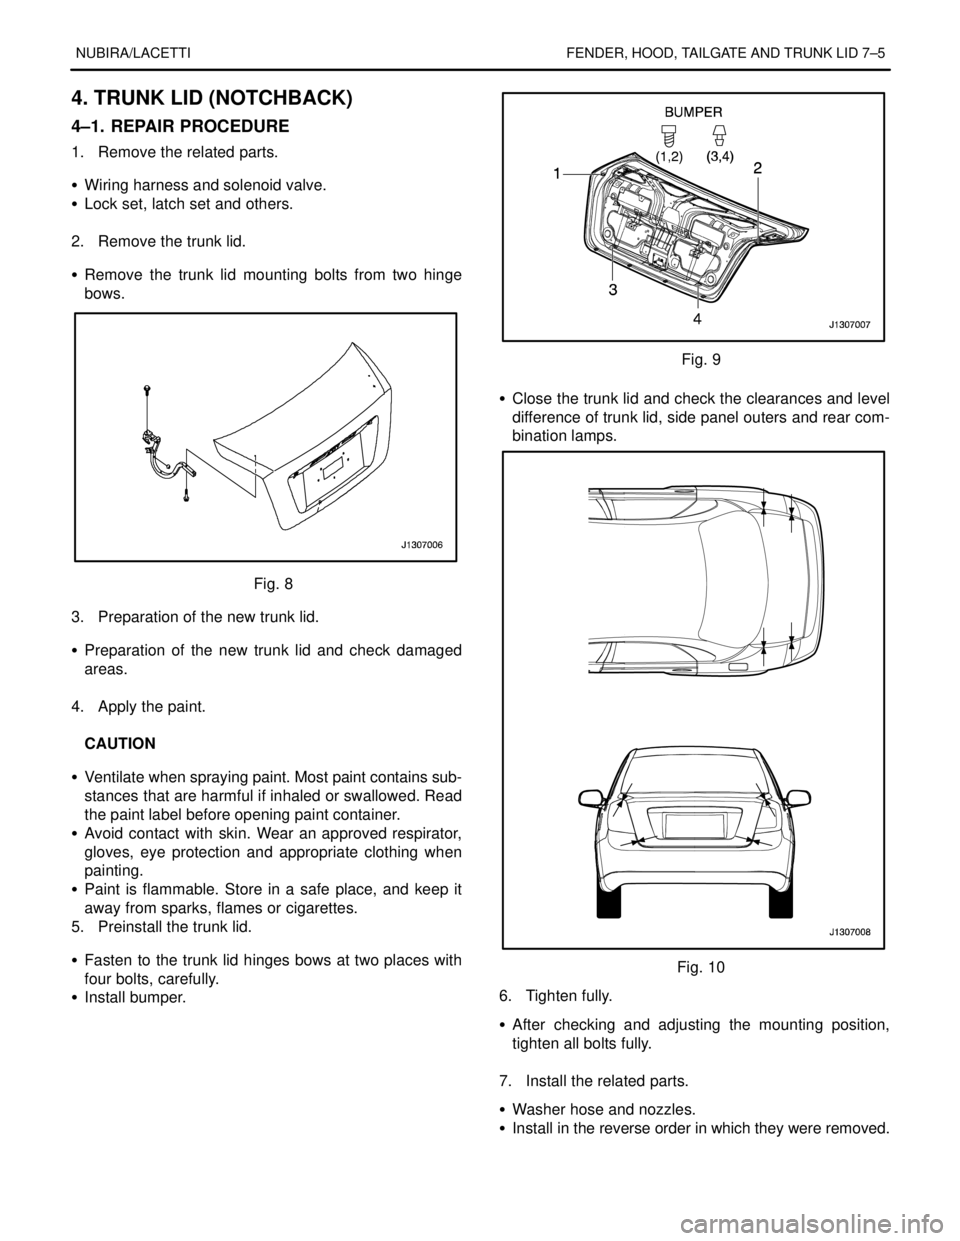
2. Remove the trunk lid.
S Remove the trunk lid mounting bolts from two hinge
bows.
Fig. 8
3. Preparation of the new trunk lid.
S Preparation of the new trunk lid and check damaged
areas.
.
4. Apply the paint.
.
CAUTION
S Ventilate when spraying paint. Most paint contains sub-
stances that are harmful if inhaled or swallowed. Read
the paint label before opening paint container.
S Avoid contact with skin. Wear an approved respirator,
gloves, eye protection and appropriate clothing when
painting.
S Paint is flammable. Store in a safe place, and keep it
away from sparks, flames or cigarettes.
5. Preinstall the trunk lid.
S Fasten to the trunk lid hinges bows at two places with
four bolts, carefully.
S Install bumper.
Fig. 9
S Close the trunk lid and check the clearances and level
difference of trunk lid, side panel outers and rear com-
bination lamps.
Fig. 10
6. Tighten fully.
S After checking and adjusting the mounting position,
tighten all bolts fully.
.
7. Install the related parts.
S Washer hose and nozzles.
S Install in the reverse order in which they were removed.
.
Page 2583 of 2643
7–6 FENDER, HOOD, TAILGATE AND TRUNK LID NUBIRA/LACETTI
8. Check and adjust.
S Check clearances and level differences.
S Check the hood locking and unlocking condition.
S Check spary conditions of washer liquid and adjust
washer spray nozzels on the hood panel.
.
Page 2584 of 2643

NUBIRA/LACETTIBODY DIMENSION 8–1
SECTION 8
BODY DIMENSION
CONTENTS
1. BODY DRAWING 8 – 2. . . . . . . . . . . . . . . . . . . . . . . . . . . . . . . . . . . . . . . . . . . . . . . . . . .
1.1.UNDER BODY8–2 . . . . . . . . . . . . . . . . . . . . . . . . . . . . . . . . . . . . . . . . . . . . . . . . . . . . . . . . . . . . . . . . . . . . . . . . . . . . . . . . .
1.2.FRONT PANEL8–7 . . . . . . . . . . . . . . . . . . . . . . . . . . . . . . . . . . . . . . . . . . . . . . . . . . . . . . . . . . . . . . . . . . . . . . . . . . . . . . . .
1.3.ENGINE ROOM8–8 . . . . . . . . . . . . . . . . . . . . . . . . . . . . . . . . . . . . . . . . . . . . . . . . . . . . . . . . . . . . . . . . . . . . . . . . . . . . . . . .
1.4.BACK PANEL LOWER8–9 . . . . . . . . . . . . . . . . . . . . . . . . . . . . . . . . . . . . . . . . . . . . . . . . . . . . . . . . . . . . . . . . . . . . . . . . .
1.5.SIDE OUTER8–11 . . . . . . . . . . . . . . . . . . . . . . . . . . . . . . . . . . . . . . . . . . . . . . . . . . . . . . . . . . . . . . . . . . . . . . . . . . . . . . . . .
2. REPAIR DRAWING 8 – 13. . . . . . . . . . . . . . . . . . . . . . . . . . . . . . . . . . . . . . . . . . . . . . . .
2.1.FRAME DOOR OPENING8–13 . . . . . . . . . . . . . . . . . . . . . . . . . . . . . . . . . . . . . . . . . . . . . . . . . . . . . . . . . . . . . . . . . . . . . .
2.2.WINDSHIELD AND REAR GLASS8–15 . . . . . . . . . . . . . . . . . . . . . . . . . . . . . . . . . . . . . . . . . . . . . . . . . . . . . . . . . . . . . .
3. GAP CHART 8 – 17. . . . . . . . . . . . . . . . . . . . . . . . . . . . . . . . . . . . . . . . . . . . . . . . . . . . . .
Page 2585 of 2643
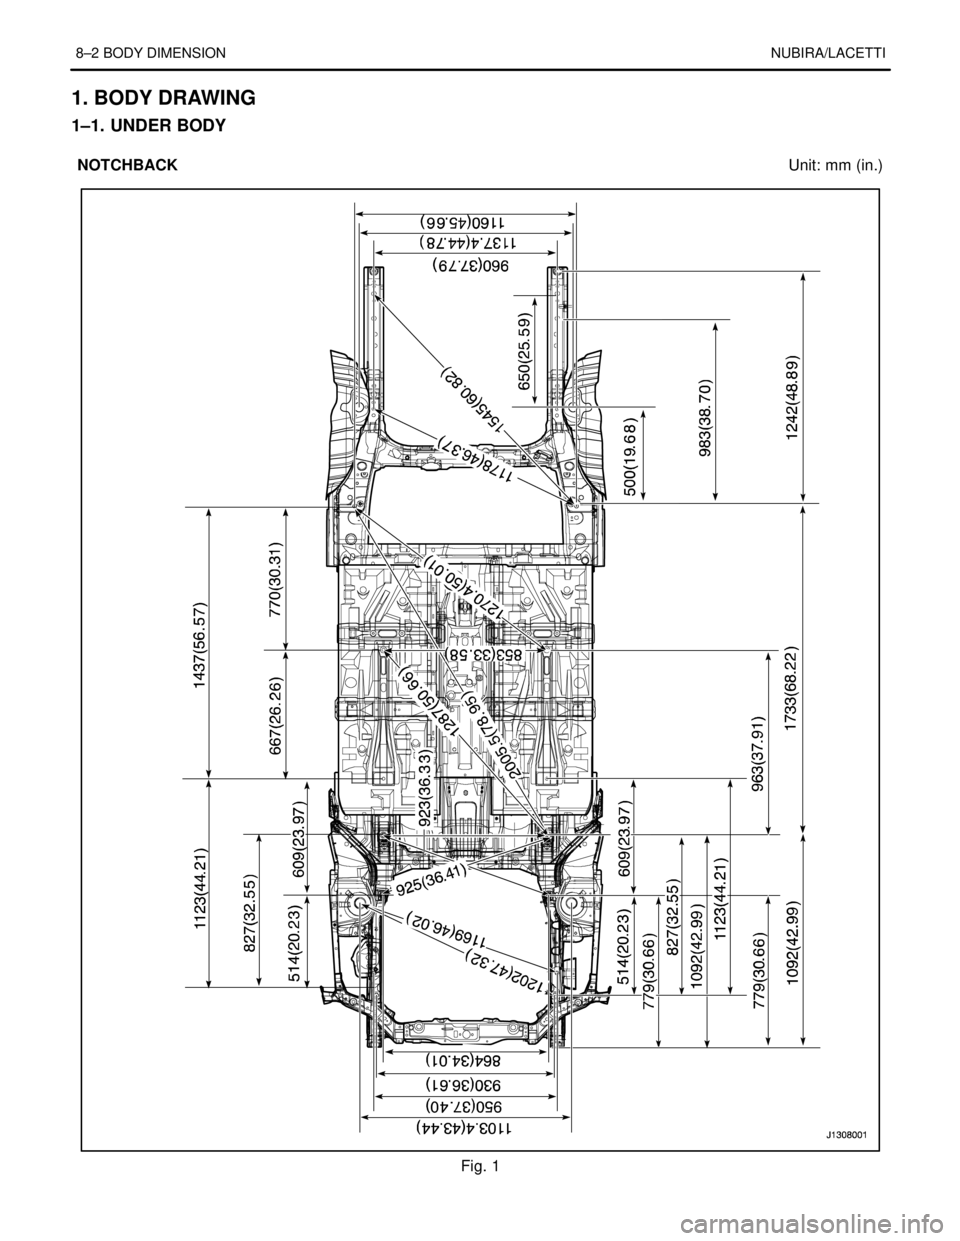
8–2 BODY DIMENSIONNUBIRA/LACETTI
1. BODY DRAWING
1–1. UNDER BODY
NOTCHBACKUnit: mm (in.)
Fig. 1
Page 2586 of 2643
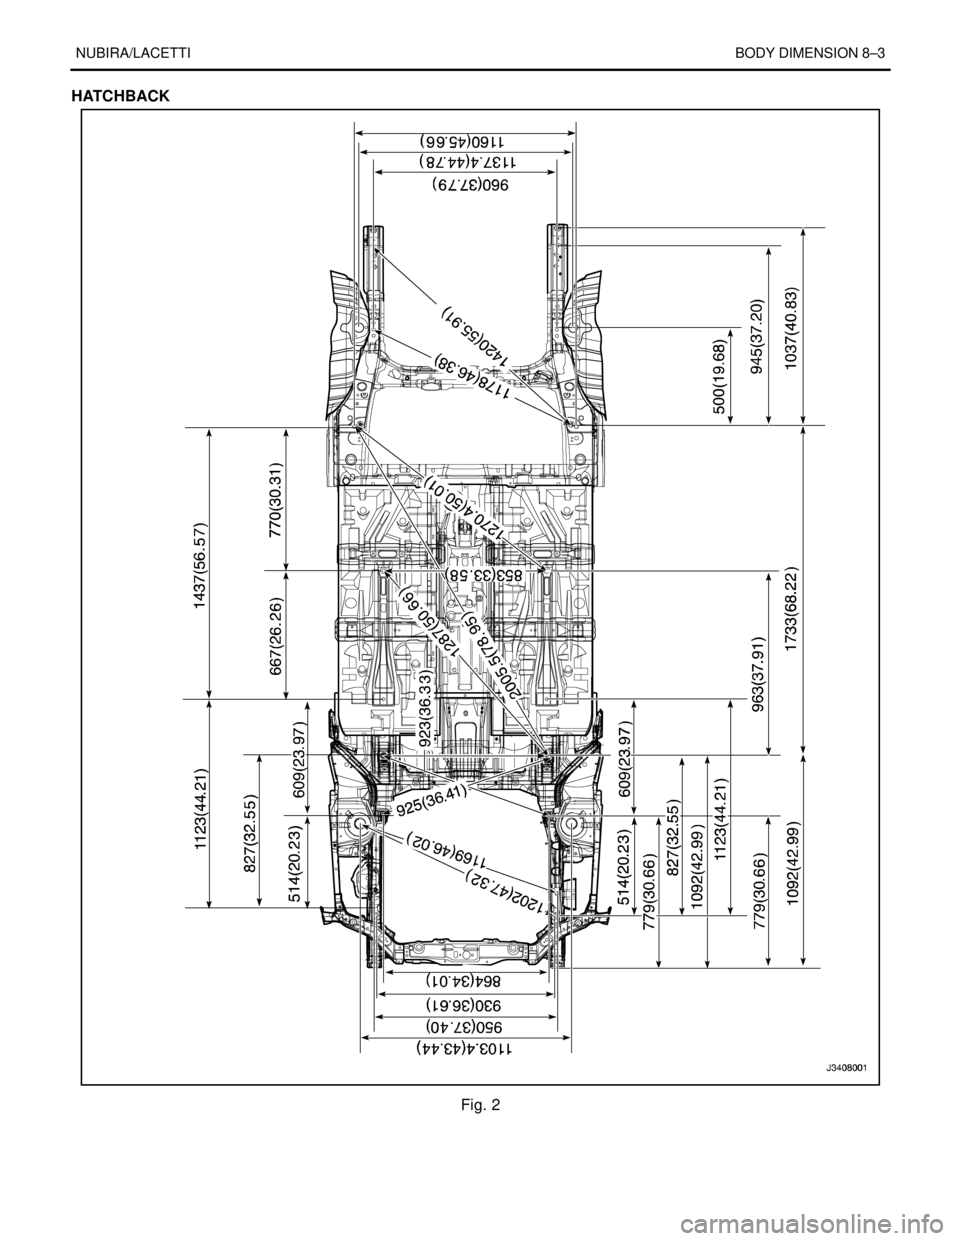
NUBIRA/LACETTIBODY DIMENSION 8–3
HATCHBACK
Fig. 2
Page 2587 of 2643
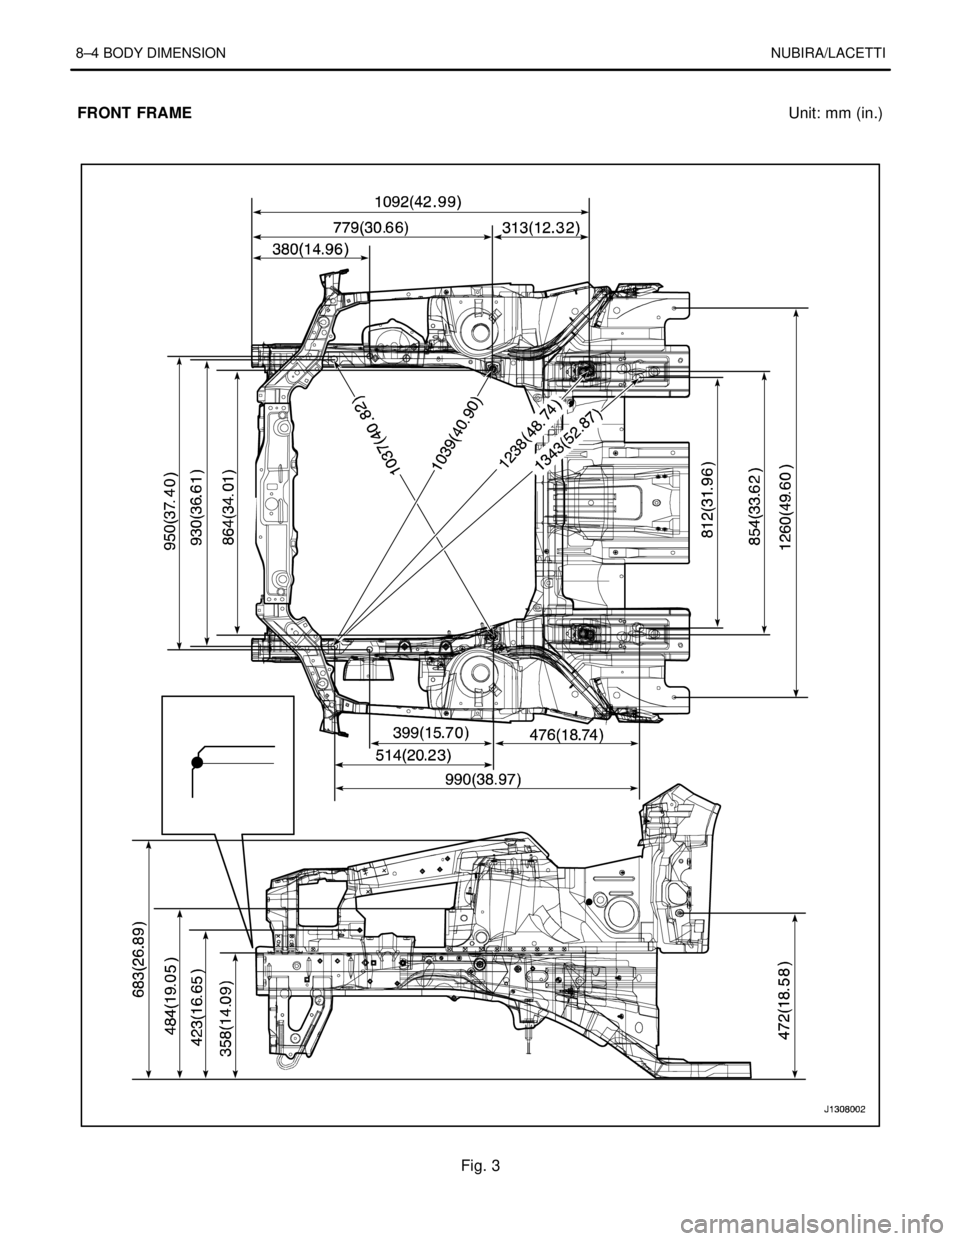
8–4 BODY DIMENSIONNUBIRA/LACETTI
FRONT FRAMEUnit: mm (in.)
Fig. 3
Page 2588 of 2643
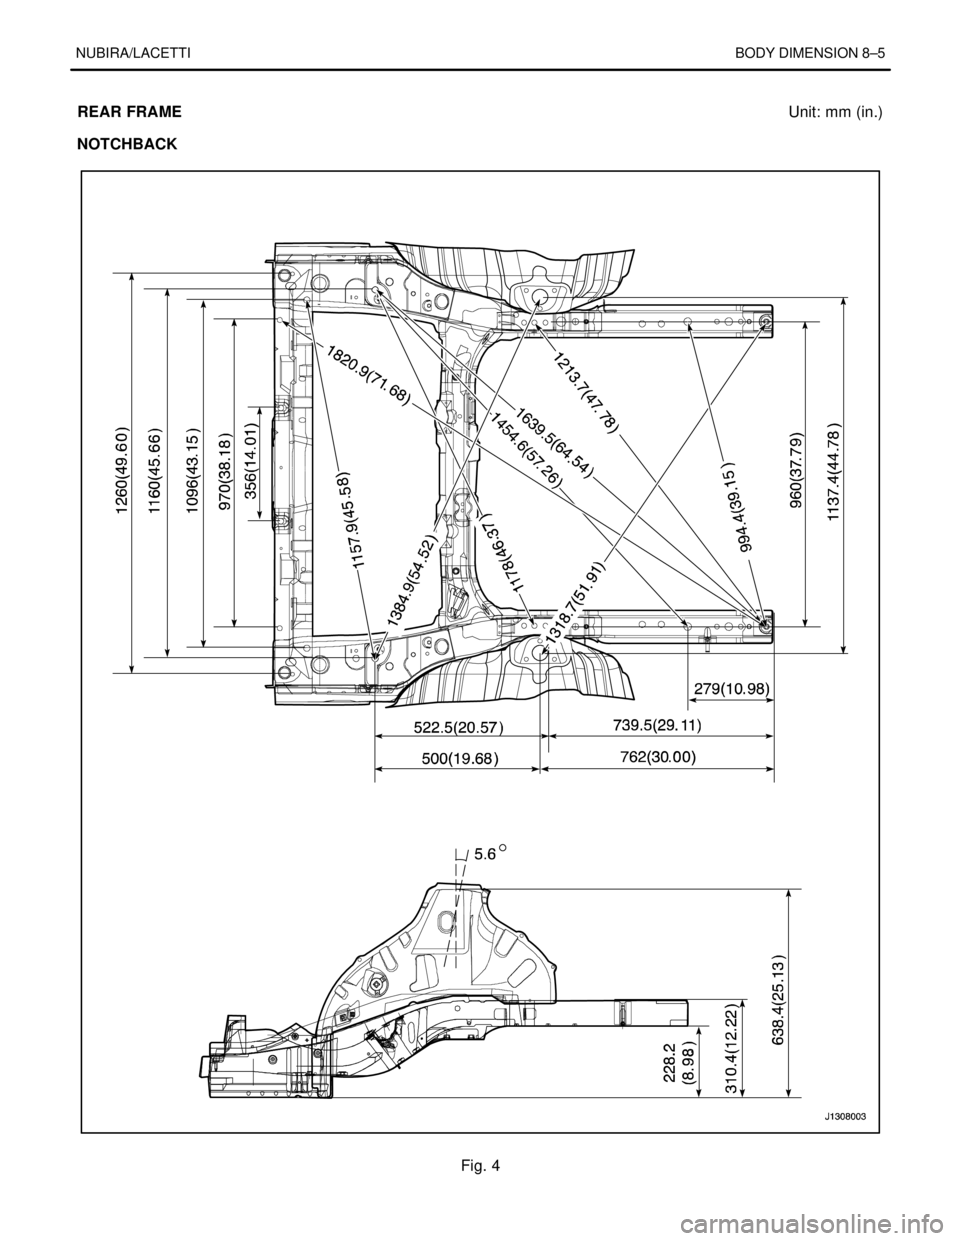
NUBIRA/LACETTIBODY DIMENSION 8–5
REAR FRAMEUnit: mm (in.)
NOTCHBACK
Fig. 4
Page 2589 of 2643
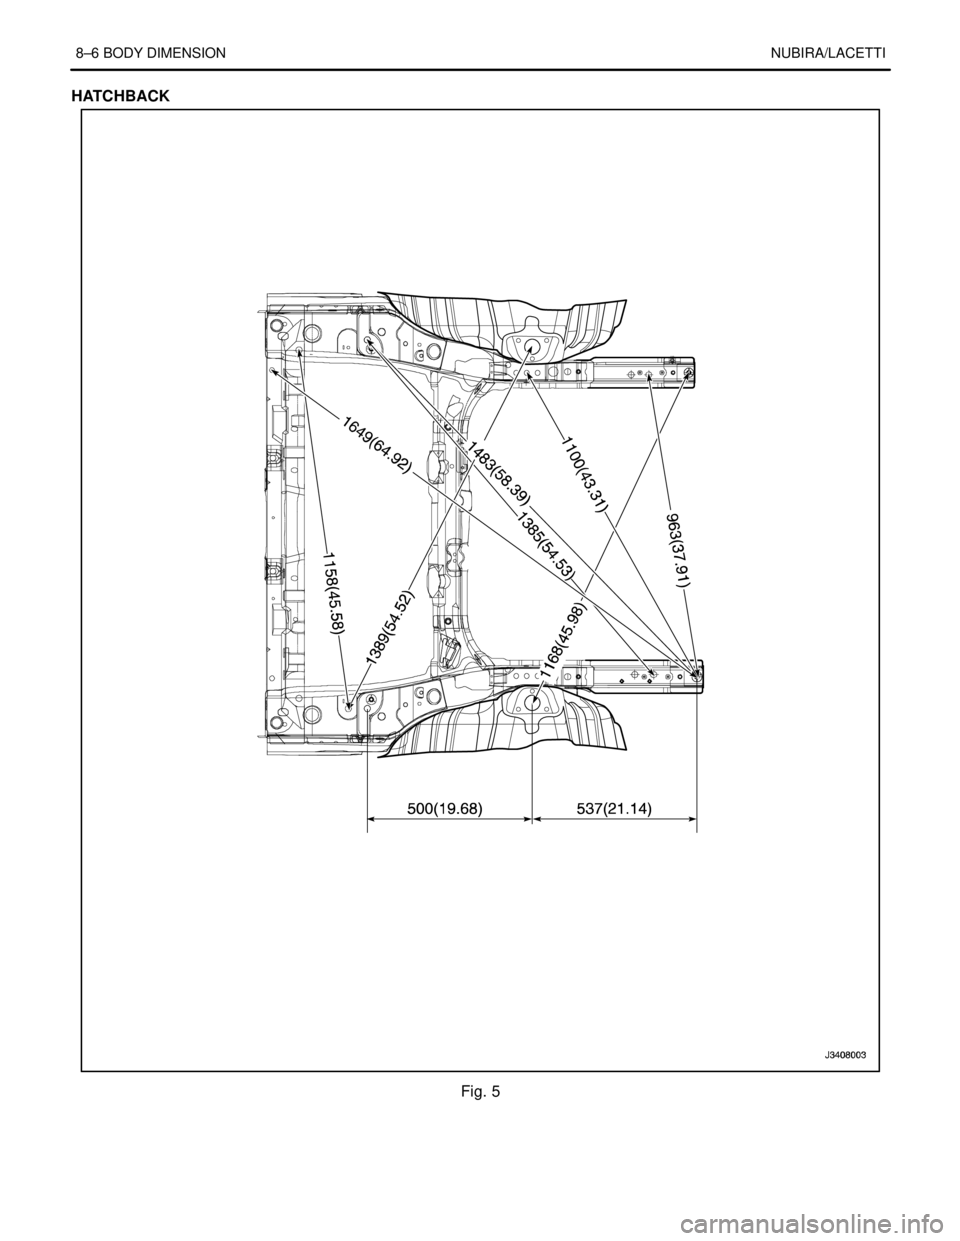
8–6 BODY DIMENSIONNUBIRA/LACETTI
HATCHBACK
Fig. 5
Page 2590 of 2643
NUBIRA/LACETTIBODY DIMENSION 8–7
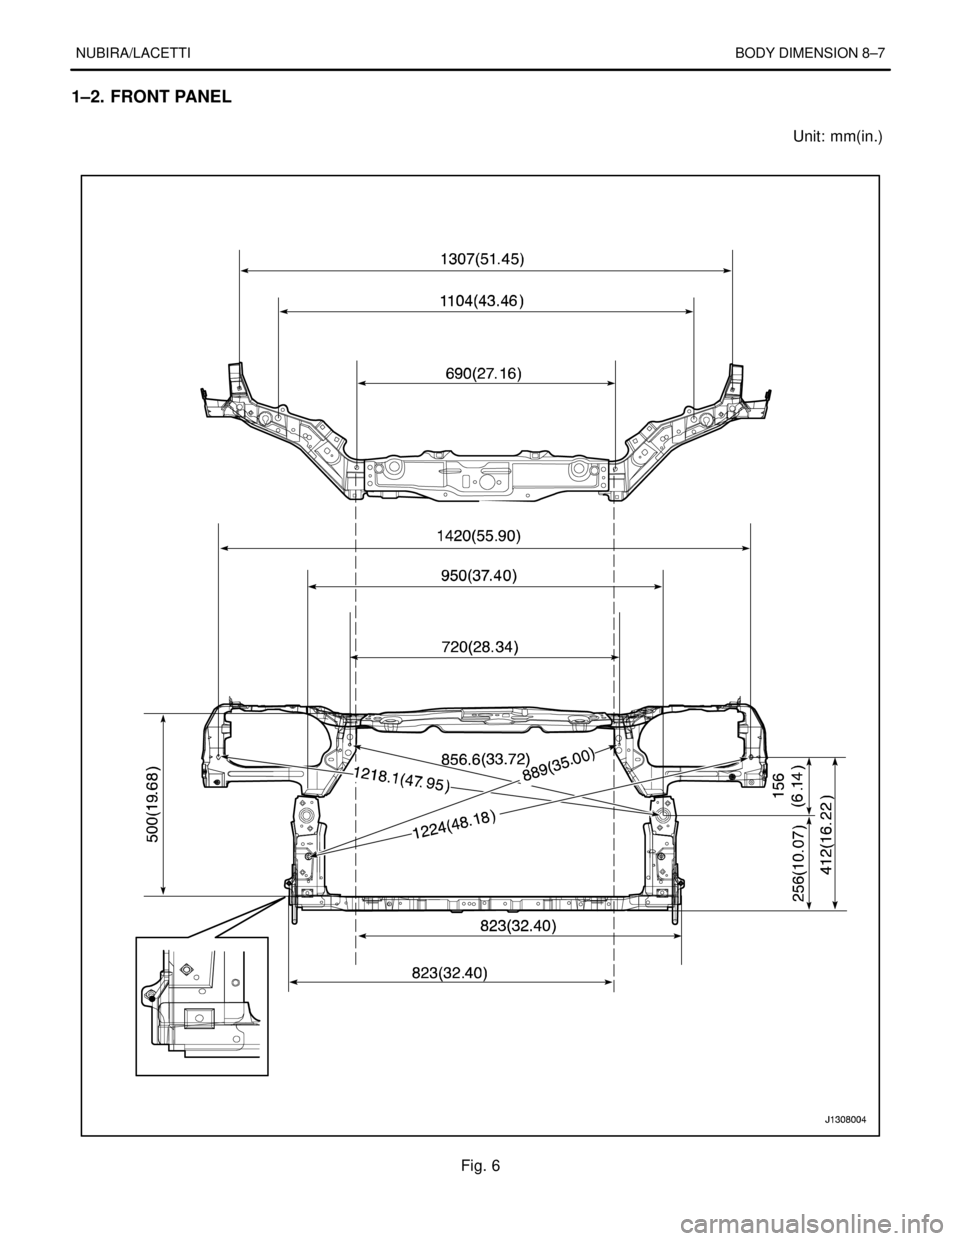
1–2. FRONT PANEL
Unit: mm(in.)
Fig. 6
Trending: heater fan, cooling, hood latch, clock reset, high beam, Mirrors, length


