DAEWOO NUBIRA 2004 Service Repair Manual
NUBIRA 2004
DAEWOO
DAEWOO
https://www.carmanualsonline.info/img/54/56879/w960_56879-0.png
DAEWOO NUBIRA 2004 Service Repair Manual
Trending: fog light bulb, checking oil, airbag off, start stop button, engine e, IMMOBLIZER SYSTEM, door lock
Page 1551 of 2643
5A1 – 202IZF 4 HP 16 AUTOMATIC TRANSAXLE
DAEWOO V–121 BL4
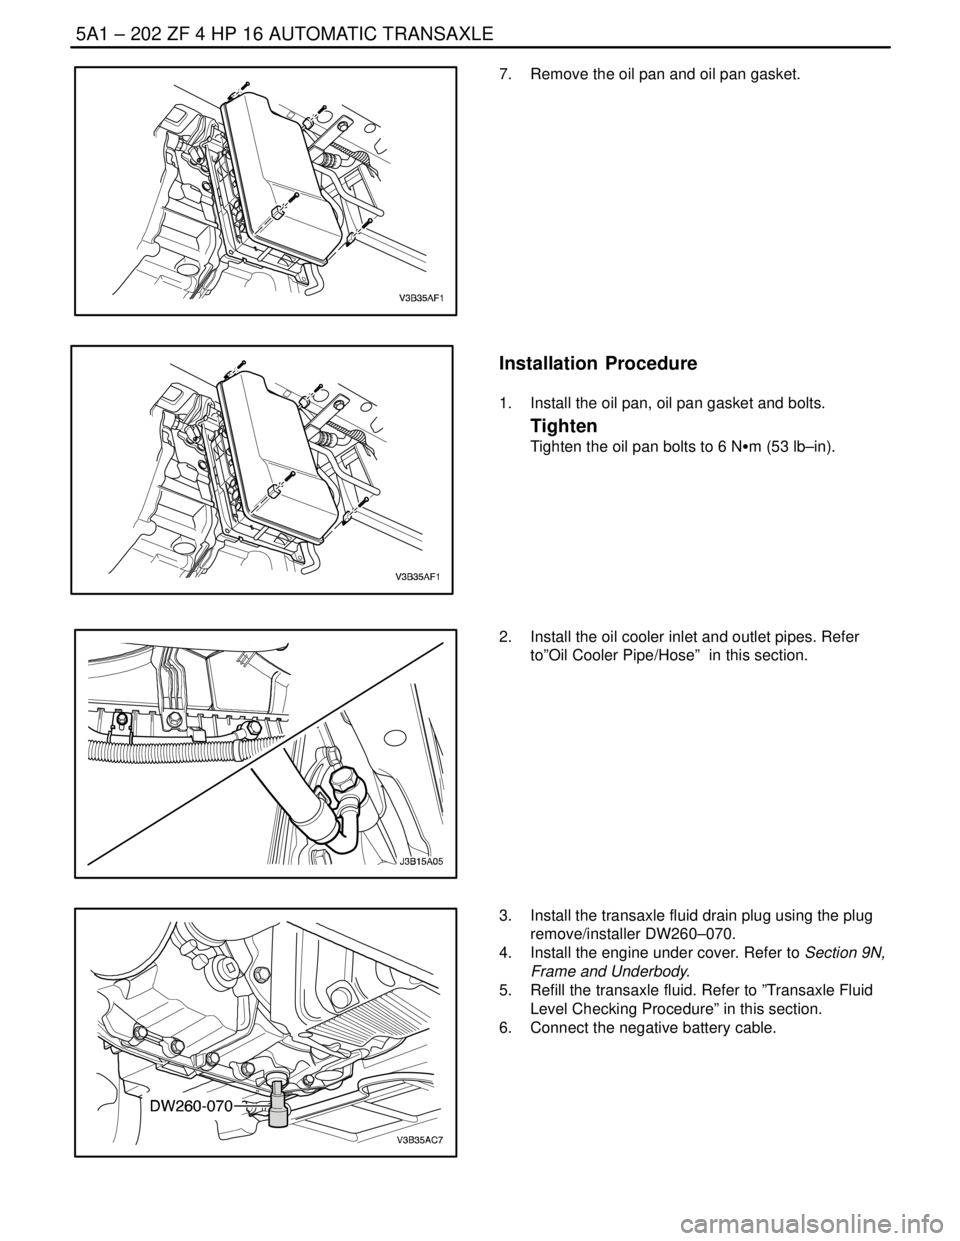
7. Remove the oil pan and oil pan gasket.
Installation Procedure
1. Install the oil pan, oil pan gasket and bolts.
Tighten
Tighten the oil pan bolts to 6 NSm (53 lb–in).
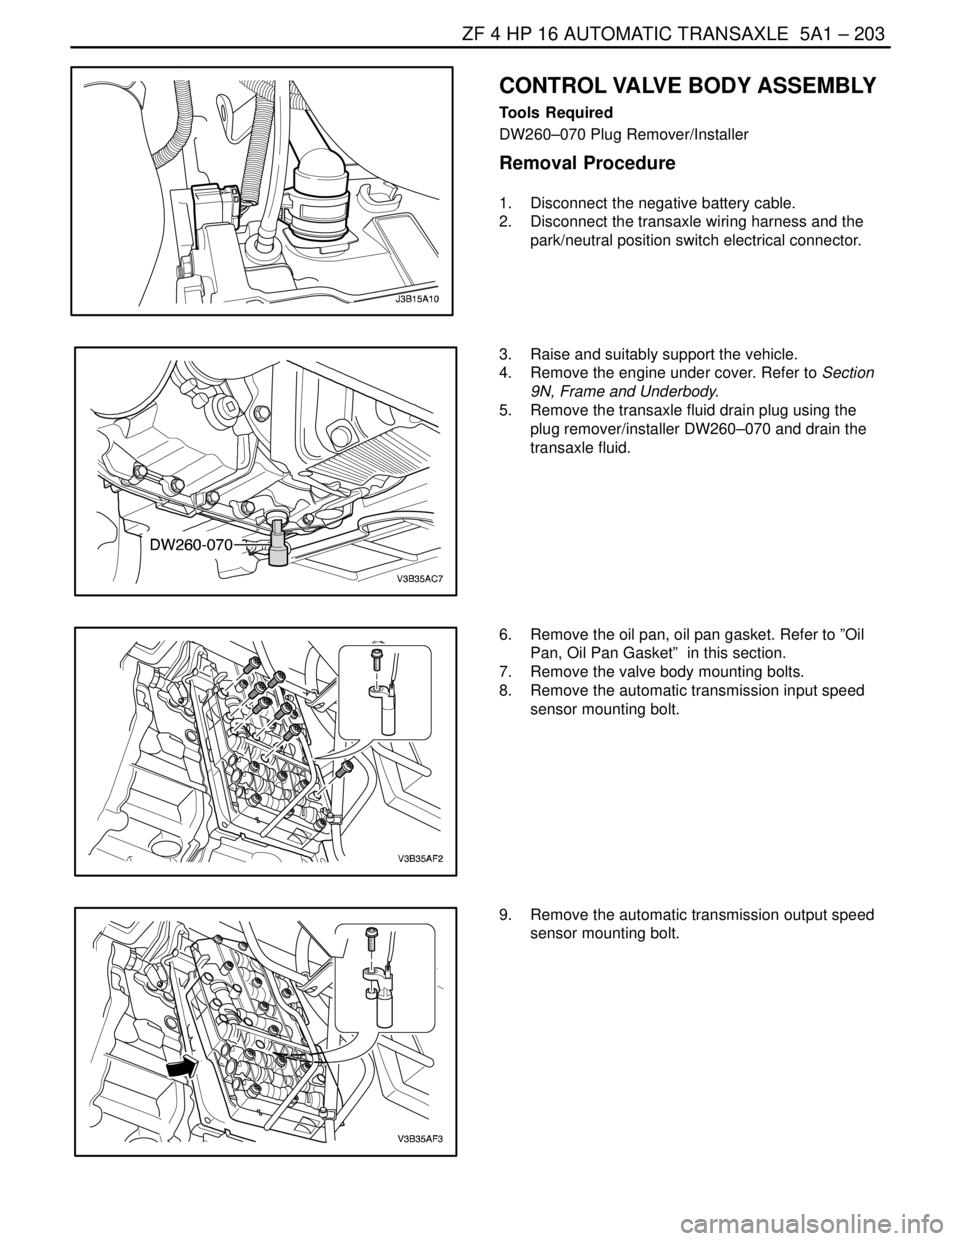
2. Install the oil cooler inlet and outlet pipes. Refer
to”Oil Cooler Pipe/Hose” in this section.
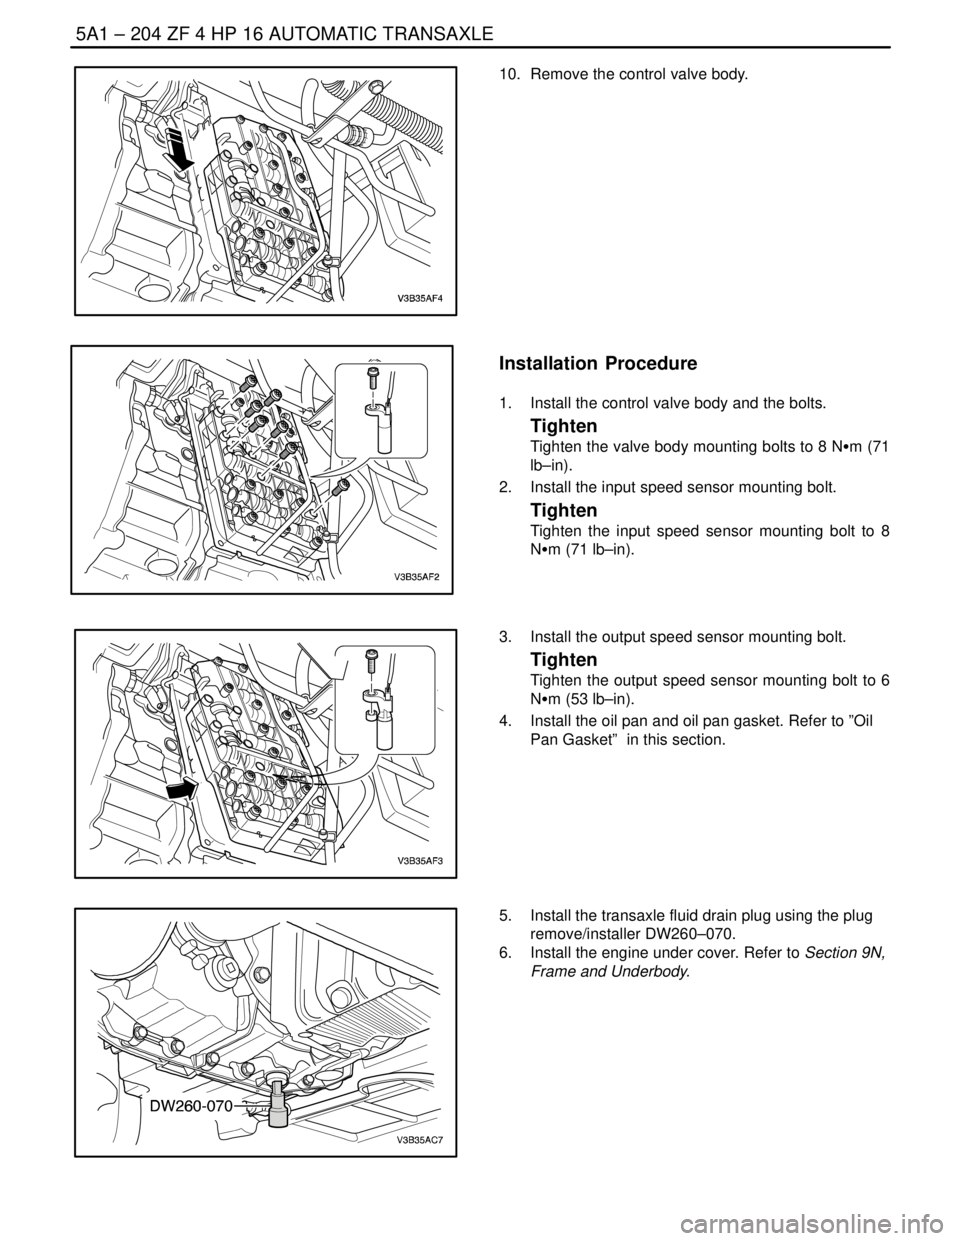
3. Install the transaxle fluid drain plug using the plug
remove/installer DW260–070.
4. Install the engine under cover. Refer to Section 9N,
Frame and Underbody.
5. Refill the transaxle fluid. Refer to ”Transaxle Fluid
Level Checking Procedure” in this section.
6. Connect the negative battery cable.
Page 1552 of 2643
ZF 4 HP 16 AUTOMATIC TRANSAXLE 5A1 – 203
DAEWOO V–121 BL4
CONTROL VALVE BODY ASSEMBLY
Tools Required
DW260–070 Plug Remover/Installer
Removal Procedure
1. Disconnect the negative battery cable.
2. Disconnect the transaxle wiring harness and the
park/neutral position switch electrical connector.
3. Raise and suitably support the vehicle.
4. Remove the engine under cover. Refer to Section
9N, Frame and Underbody.
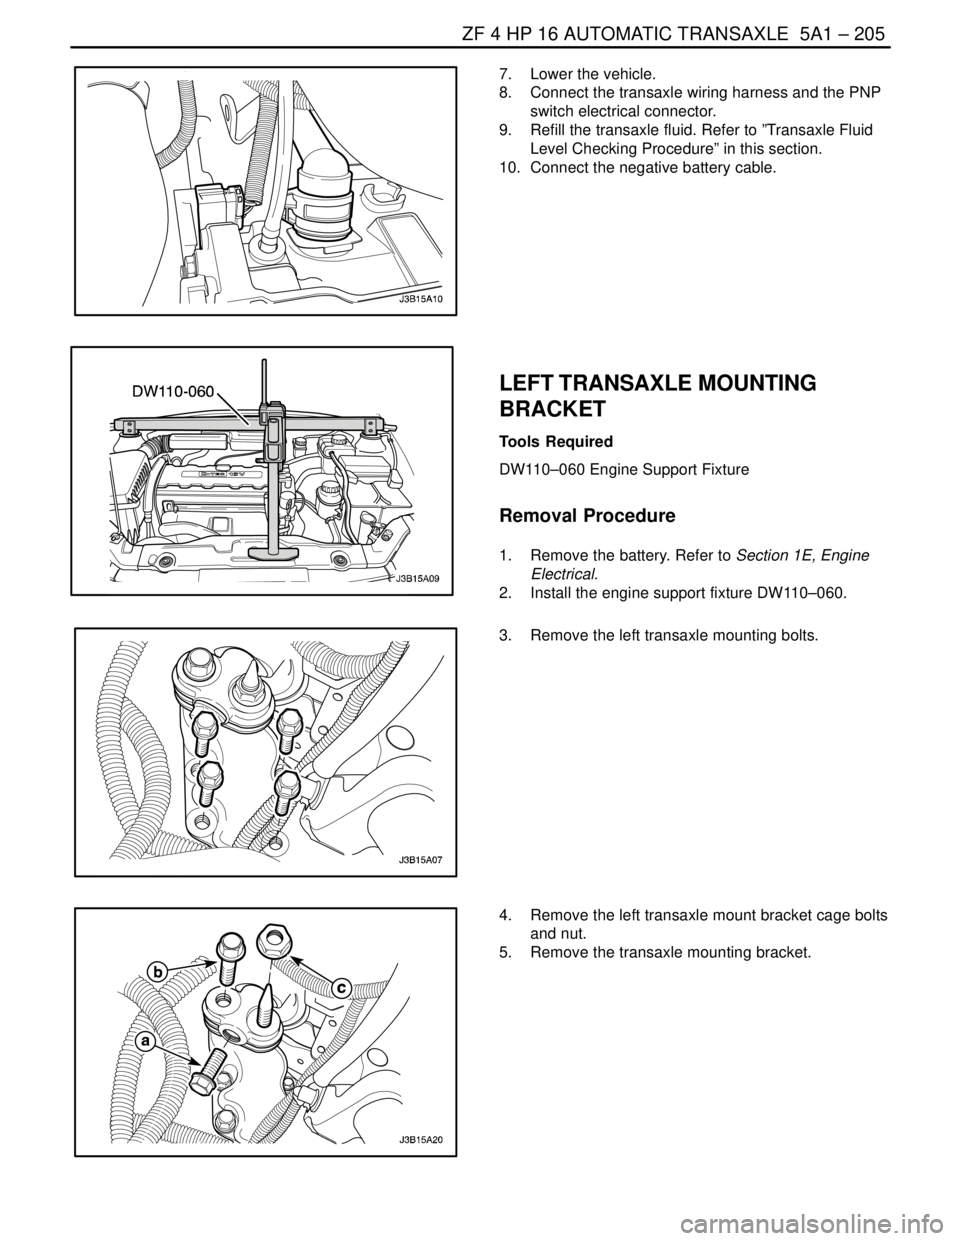
5. Remove the transaxle fluid drain plug using the
plug remover/installer DW260–070 and drain the
transaxle fluid.
6. Remove the oil pan, oil pan gasket. Refer to ”Oil
Pan, Oil Pan Gasket” in this section.
7. Remove the valve body mounting bolts.
8. Remove the automatic transmission input speed
sensor mounting bolt.
9. Remove the automatic transmission output speed
sensor mounting bolt.
Page 1553 of 2643
5A1 – 204IZF 4 HP 16 AUTOMATIC TRANSAXLE
DAEWOO V–121 BL4
10. Remove the control valve body.
Installation Procedure
1. Install the control valve body and the bolts.
Tighten
Tighten the valve body mounting bolts to 8 NSm (71
lb–in).
2. Install the input speed sensor mounting bolt.
Tighten
Tighten the input speed sensor mounting bolt to 8
NSm (71 lb–in).
3. Install the output speed sensor mounting bolt.
Tighten
Tighten the output speed sensor mounting bolt to 6
NSm (53 lb–in).
4. Install the oil pan and oil pan gasket. Refer to ”Oil
Pan Gasket” in this section.
5. Install the transaxle fluid drain plug using the plug
remove/installer DW260–070.
6. Install the engine under cover. Refer to Section 9N,
Frame and Underbody.
Page 1554 of 2643
ZF 4 HP 16 AUTOMATIC TRANSAXLE 5A1 – 205
DAEWOO V–121 BL4
7. Lower the vehicle.
8. Connect the transaxle wiring harness and the PNP
switch electrical connector.
9. Refill the transaxle fluid. Refer to ”Transaxle Fluid
Level Checking Procedure” in this section.
10. Connect the negative battery cable.
LEFT TRANSAXLE MOUNTING
BRACKET
Tools Required
DW110–060 Engine Support Fixture
Removal Procedure
1. Remove the battery. Refer to Section 1E, Engine
Electrical.
2. Install the engine support fixture DW110–060.
3. Remove the left transaxle mounting bolts.
4. Remove the left transaxle mount bracket cage bolts
and nut.
5. Remove the transaxle mounting bracket.
Page 1555 of 2643
5A1 – 206IZF 4 HP 16 AUTOMATIC TRANSAXLE
DAEWOO V–121 BL4
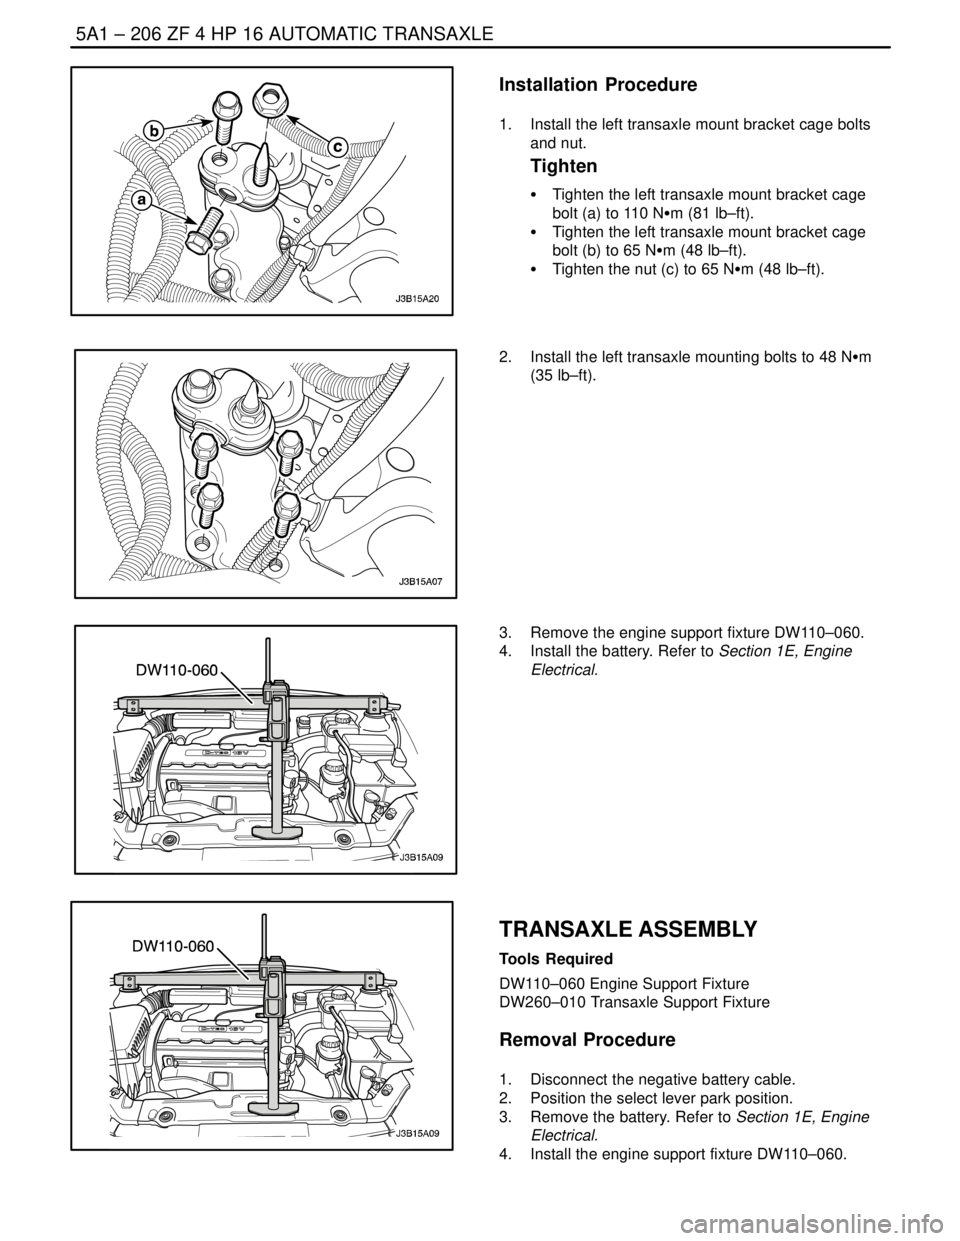
Installation Procedure
1. Install the left transaxle mount bracket cage bolts
and nut.
Tighten
S Tighten the left transaxle mount bracket cage
bolt (a) to 110 NSm (81 lb–ft).
S Tighten the left transaxle mount bracket cage
bolt (b) to 65 NSm (48 lb–ft).
S Tighten the nut (c) to 65 NSm (48 lb–ft).
2. Install the left transaxle mounting bolts to 48 NSm
(35 lb–ft).
3. Remove the engine support fixture DW110–060.
4. Install the battery. Refer to Section 1E, Engine
Electrical.
TRANSAXLE ASSEMBLY
Tools Required
DW110–060 Engine Support Fixture
DW260–010 Transaxle Support Fixture
Removal Procedure
1. Disconnect the negative battery cable.
2. Position the select lever park position.
3. Remove the battery. Refer to Section 1E, Engine
Electrical.
4. Install the engine support fixture DW110–060.
Page 1556 of 2643
ZF 4 HP 16 AUTOMATIC TRANSAXLE 5A1 – 207
DAEWOO V–121 BL4
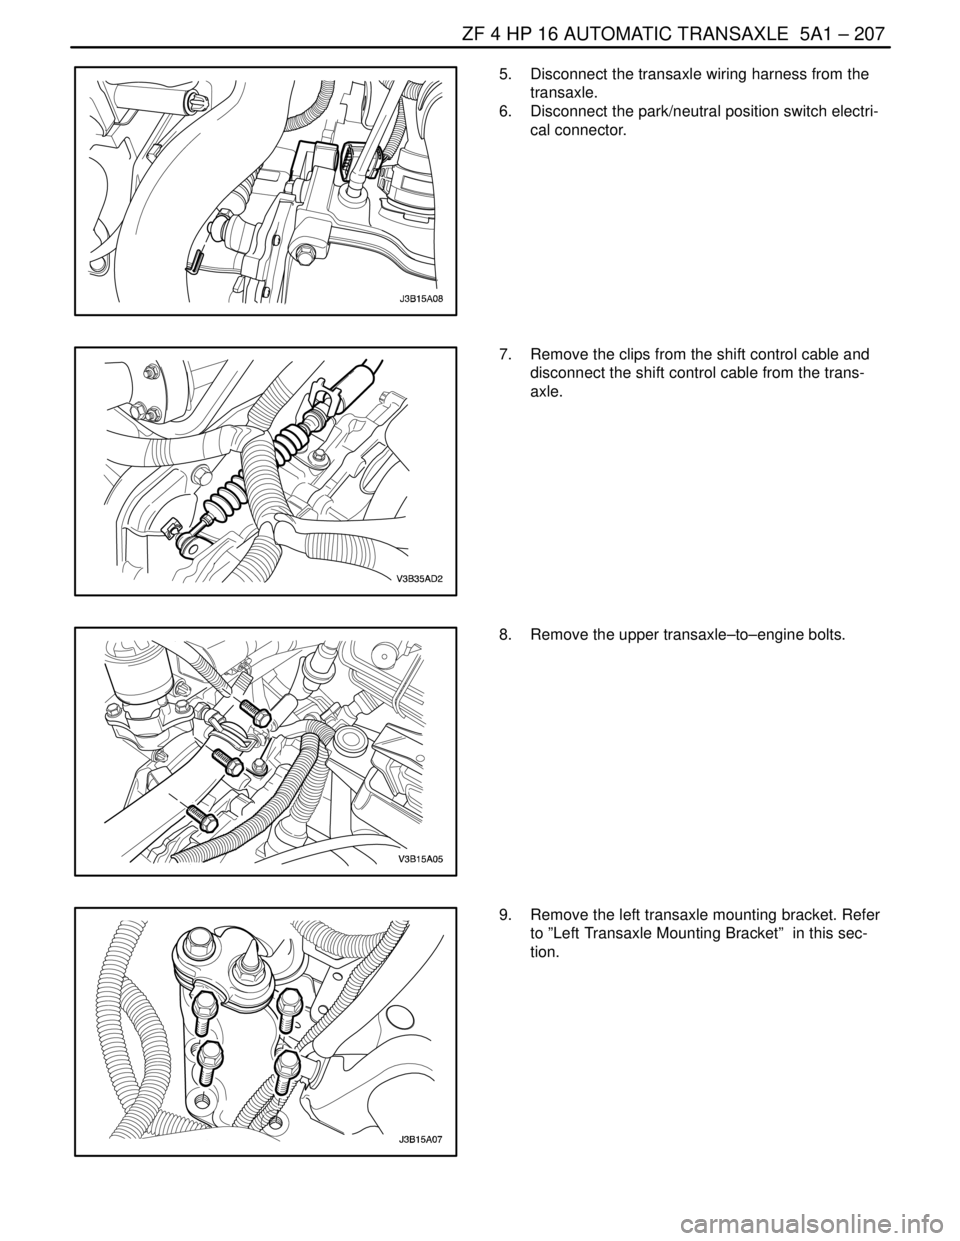
5. Disconnect the transaxle wiring harness from the
transaxle.
6. Disconnect the park/neutral position switch electri-
cal connector.
7. Remove the clips from the shift control cable and
disconnect the shift control cable from the trans-
axle.
8. Remove the upper transaxle–to–engine bolts.
9. Remove the left transaxle mounting bracket. Refer
to ”Left Transaxle Mounting Bracket” in this sec-
tion.
Page 1557 of 2643
5A1 – 208IZF 4 HP 16 AUTOMATIC TRANSAXLE
DAEWOO V–121 BL4
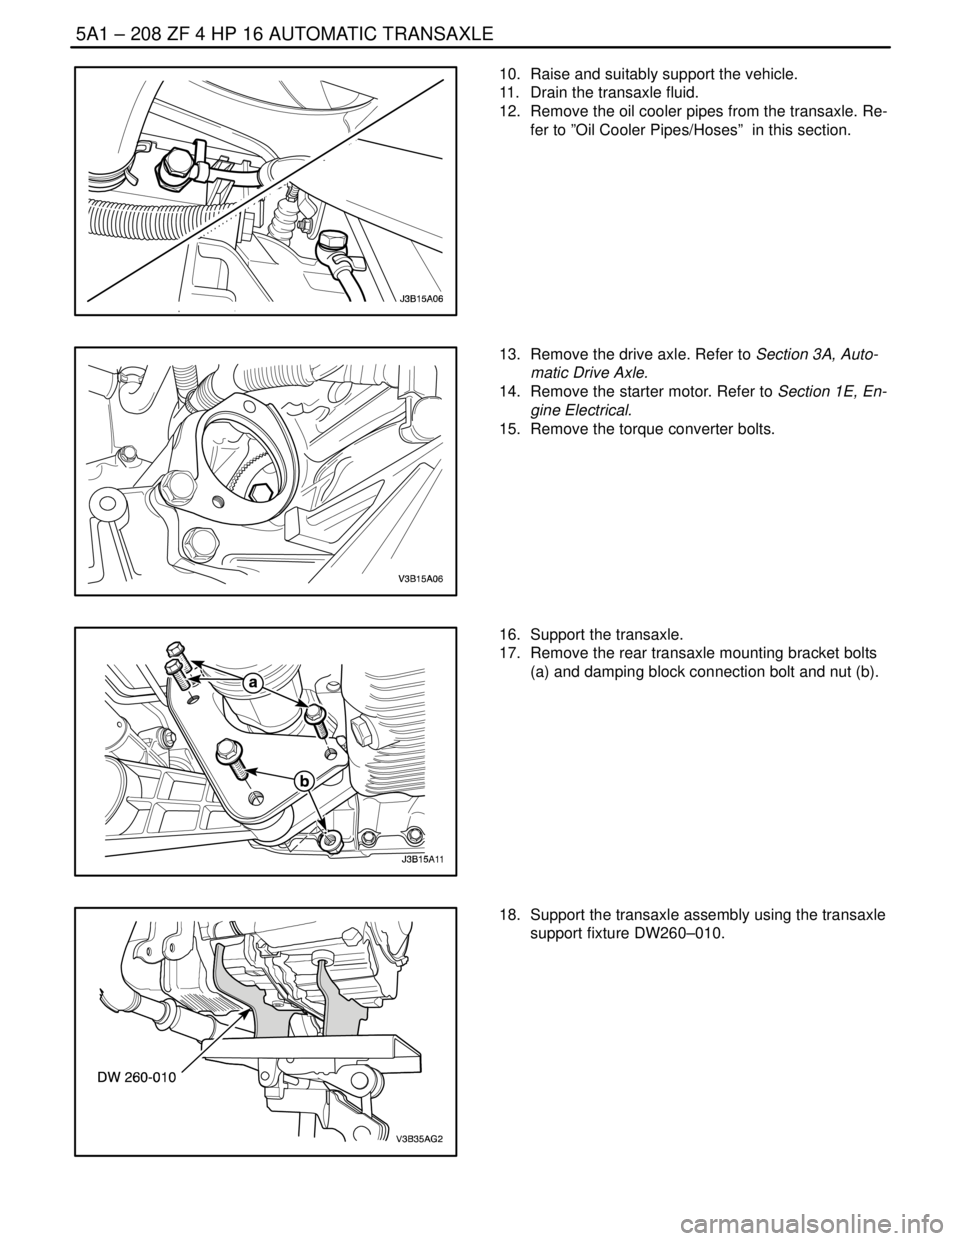
10. Raise and suitably support the vehicle.
11. Drain the transaxle fluid.
12. Remove the oil cooler pipes from the transaxle. Re-
fer to ”Oil Cooler Pipes/Hoses” in this section.
13. Remove the drive axle. Refer to Section 3A, Auto-
matic Drive Axle.
14. Remove the starter motor. Refer to Section 1E, En-
gine Electrical.
15. Remove the torque converter bolts.
16. Support the transaxle.
17. Remove the rear transaxle mounting bracket bolts
(a) and damping block connection bolt and nut (b).
18. Support the transaxle assembly using the transaxle
support fixture DW260–010.
Page 1558 of 2643
ZF 4 HP 16 AUTOMATIC TRANSAXLE 5A1 – 209
DAEWOO V–121 BL4
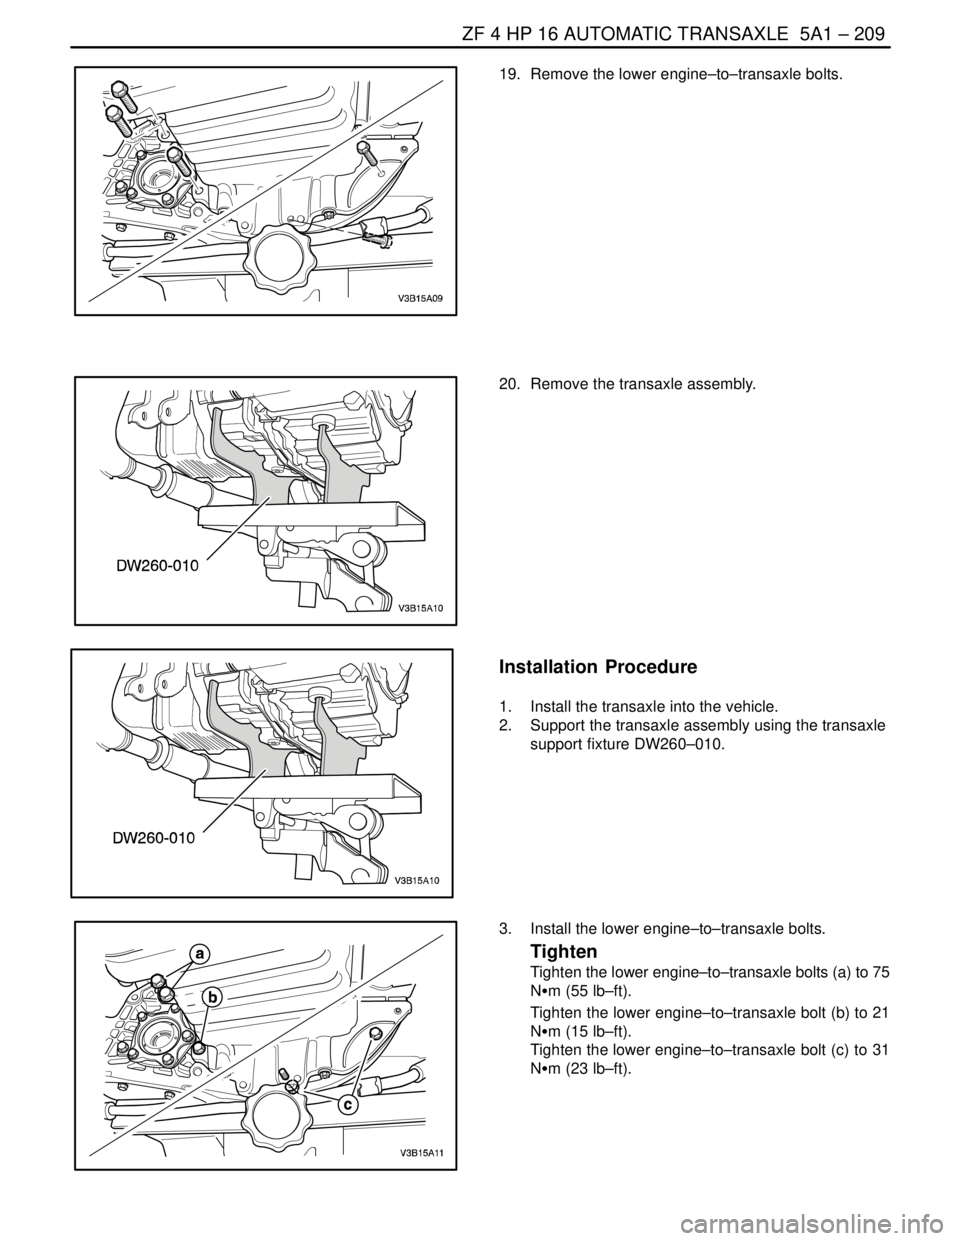
19. Remove the lower engine–to–transaxle bolts.
20. Remove the transaxle assembly.
Installation Procedure
1. Install the transaxle into the vehicle.
2. Support the transaxle assembly using the transaxle
support fixture DW260–010.
3. Install the lower engine–to–transaxle bolts.
Tighten
Tighten the lower engine–to–transaxle bolts (a) to 75
NSm (55 lb–ft).
Tighten the lower engine–to–transaxle bolt (b) to 21
NSm (15 lb–ft).
Tighten the lower engine–to–transaxle bolt (c) to 31
NSm (23 lb–ft).
Page 1559 of 2643
5A1 – 210IZF 4 HP 16 AUTOMATIC TRANSAXLE
DAEWOO V–121 BL4
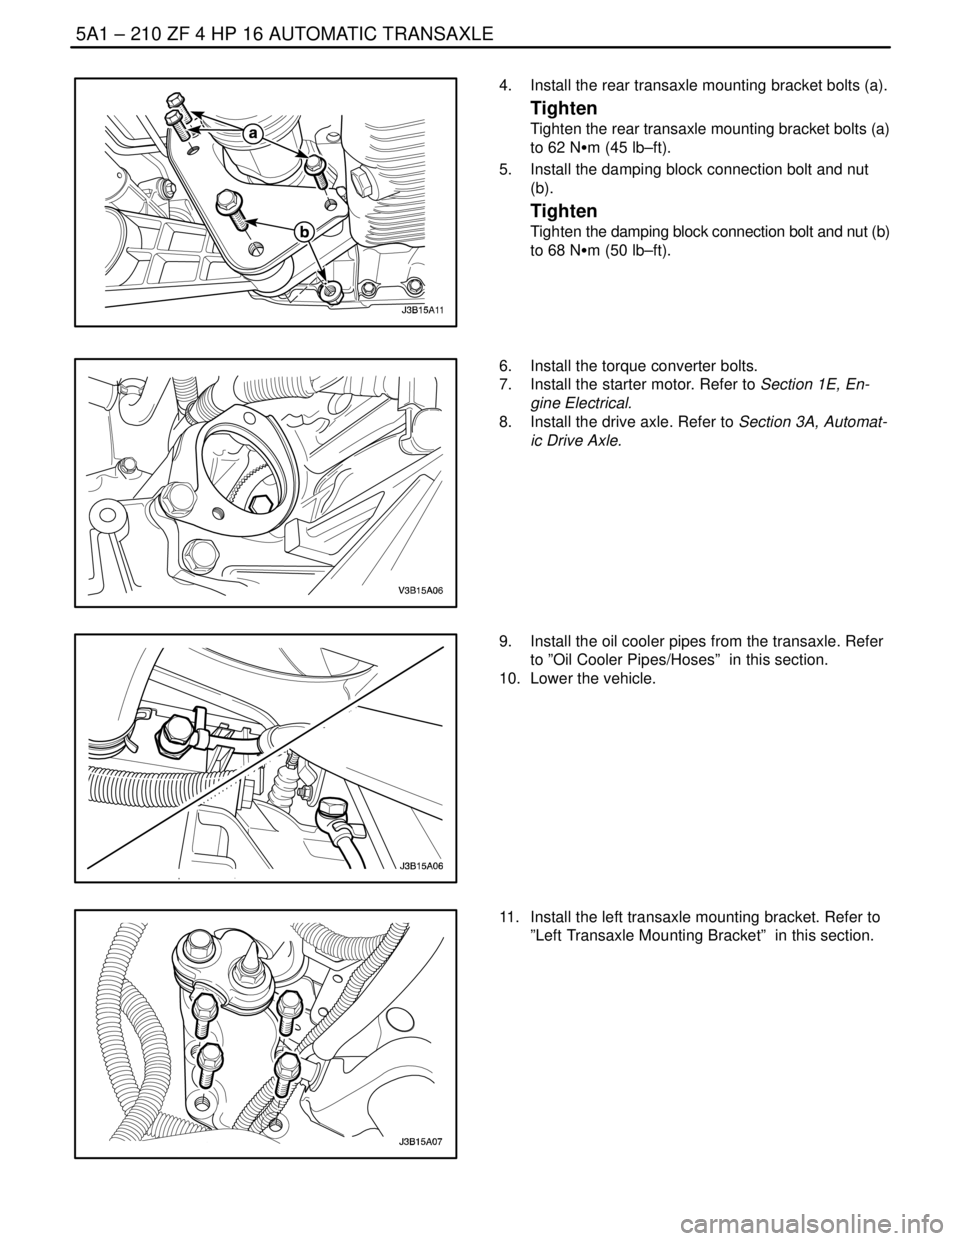
4. Install the rear transaxle mounting bracket bolts (a).
Tighten
Tighten the rear transaxle mounting bracket bolts (a)
to 62 NSm (45 lb–ft).
5. Install the damping block connection bolt and nut
(b).
Tighten
Tighten the damping block connection bolt and nut (b)
to 68 NSm (50 lb–ft).
6. Install the torque converter bolts.
7. Install the starter motor. Refer to Section 1E, En-
gine Electrical.
8. Install the drive axle. Refer to Section 3A, Automat-
ic Drive Axle.
9. Install the oil cooler pipes from the transaxle. Refer
to ”Oil Cooler Pipes/Hoses” in this section.
10. Lower the vehicle.
11. Install the left transaxle mounting bracket. Refer to
”Left Transaxle Mounting Bracket” in this section.
Page 1560 of 2643
ZF 4 HP 16 AUTOMATIC TRANSAXLE 5A1 – 211
DAEWOO V–121 BL4
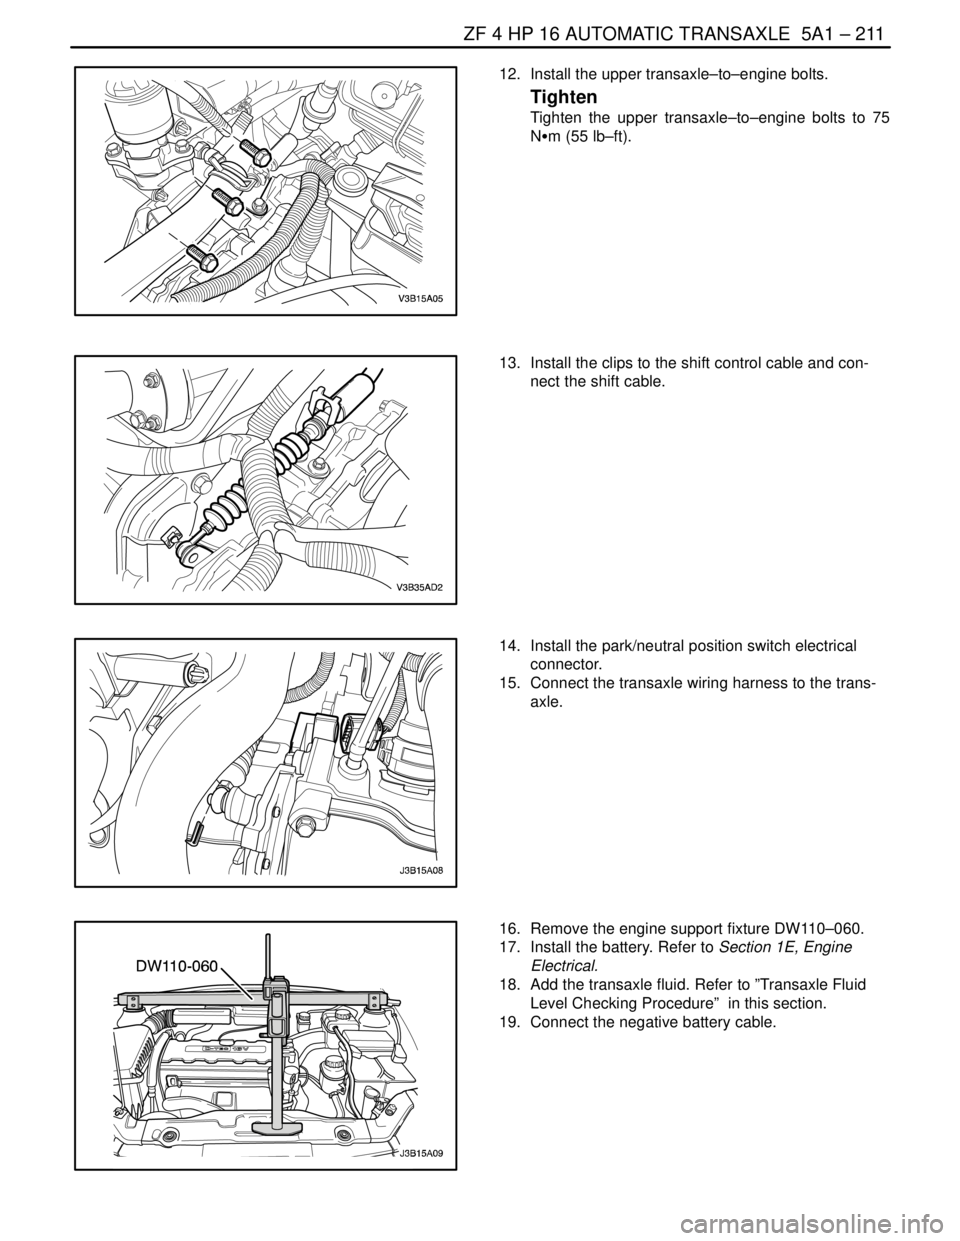
12. Install the upper transaxle–to–engine bolts.
Tighten
Tighten the upper transaxle–to–engine bolts to 75
NSm (55 lb–ft).
13. Install the clips to the shift control cable and con-
nect the shift cable.
14. Install the park/neutral position switch electrical
connector.
15. Connect the transaxle wiring harness to the trans-
axle.
16. Remove the engine support fixture DW110–060.
17. Install the battery. Refer to Section 1E, Engine
Electrical.
18. Add the transaxle fluid. Refer to ”Transaxle Fluid
Level Checking Procedure” in this section.
19. Connect the negative battery cable.
Trending: 4hp16 automatic transaxle, handbrake, trunk, CODED KEY, flat tire, sunroof, compression ratio
