heater DATSUN 210 1979 Owner's Manual
[x] Cancel search | Manufacturer: DATSUN, Model Year: 1979, Model line: 210, Model: DATSUN 210 1979Pages: 548, PDF Size: 28.66 MB
Page 473 of 548
Body
Electdcal
System
INSPECTION
Check
the
following
items
if
blower
motor
fails
to
rotate
FUSE
To
check
for
burned
out
fuse
use
the
same
procedure
as
that
for
ordina
ry
fuses
with
a
circuit
tester
or
test
lamp
BLOWER
MOTOR
POWER
SUPPLY
Disconnect
blower
motor
harness
to
connect
main
harness
2
Connect
one
test
lamp
lead
wire
i
I
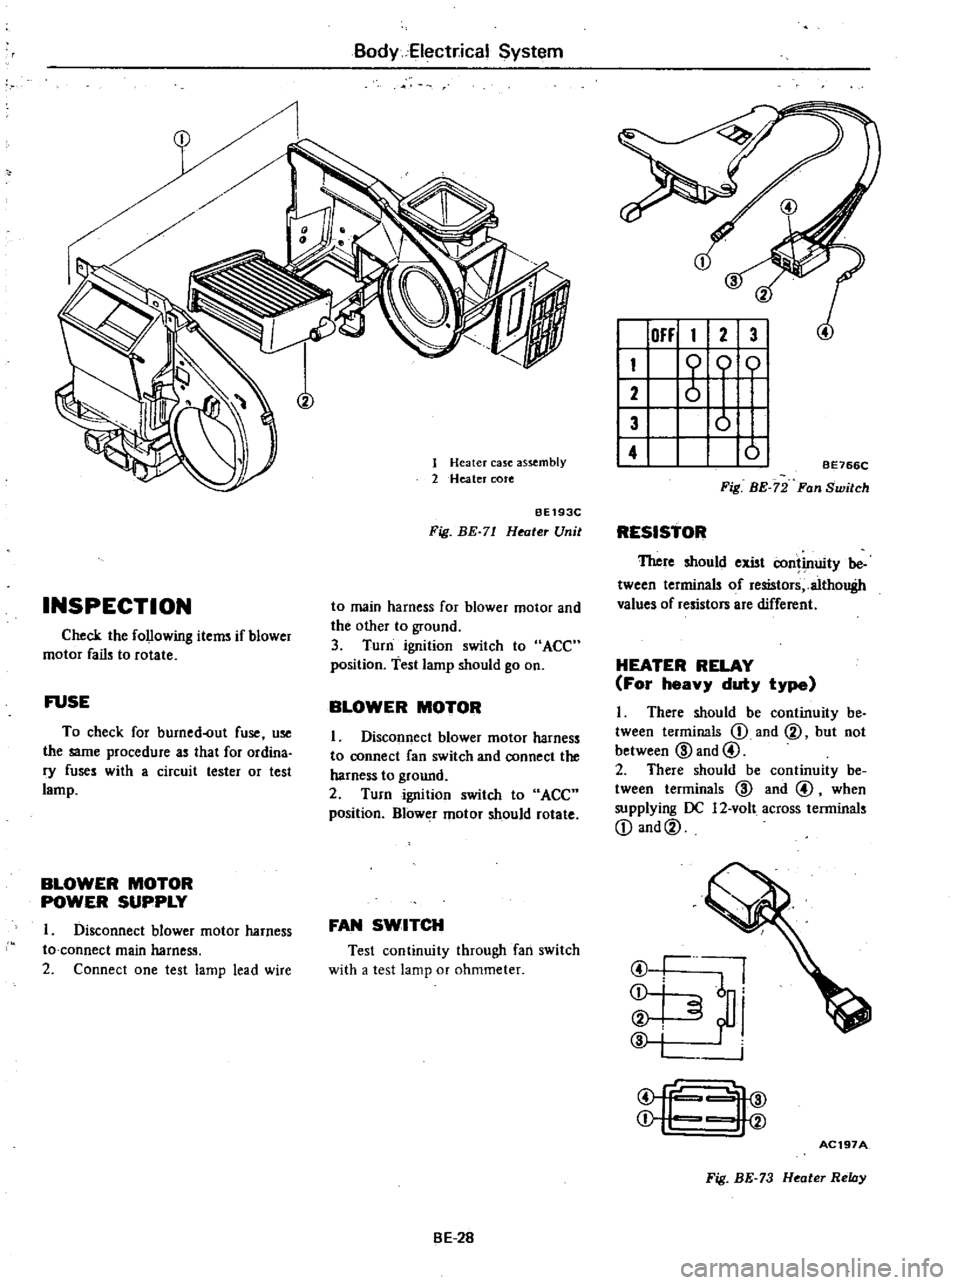
Heater
case
as
mbly
2
Heater
cote
BE193C
Fig
BE
71
Heater
Unit
to
main
harness
for
blower
motor
and
the
other
to
ground
3
Turn
ignition
switch
to
ACC
position
test
lamp
should
go
on
BLOWER
MOTOR
1
Disconnect
blower
motor
harness
to
connect
fan
switch
and
connect
the
harness
to
ground
2
Turn
ignition
switch
to
ACC
position
Blower
motor
should
rotate
FAN
SWITCH
Test
continuity
through
fan
switch
with
a
test
lamp
or
ohmmeter
BE
2B
OFF
1
2
3
I
1
0
01
2
I
3
0
I
4
01
BE766C
Fig
BE
72
Fan
Switch
RESISTOR
TItere
should
exist
continuity
be
tween
terminals
of
resistors
althouBh
values
of
resistors
are
different
HEATER
RELAY
For
heavy
duty
type
I
There
should
be
continuity
be
tween
terminals
D
and
@
but
not
between
@
and
@
2
There
should
be
continuity
be
tween
terminals
@
and
@
when
supplying
OC
12
volt
across
terminals
D
and@
I
@
I
I
j
i
i
@
fc
4@
j
I
V
AC197A
Fig
BE
73
Heater
Relay
Page 475 of 548

WIPER
MOTOR
WINDSHIELD
WASHER
MOTOR
REAR
WIPER
MOTOR
REAR
WINDOW
WASHER
MOTOR
m
w
o
HORN
CIGARETTE
LIGHTER
CLOCK
HAZARD
FLASHER
LAMP
STOP
LAMP
ROOM
LAMP
LUGGAGE
ROOM
LAMP
TAIL
LAMP
CLEARANCE
LAMP
LICENSE
PLATE
LAMP
COMBINATION
METER
LAMP
l
I
ll
6
C
l
ii
en
g
0
o
m
till
oill
l
I
t1
l
CO
l
m
l
m
0
z
t
15A
10A
14
fA
20A
16
T
r
t1
l
t1
l
CO
CO
CJ
CJ
1
1
m
m
0
0
z
z
HEATER
lAIR
CONDITIONER
ENGINE
REVOLUTION
SWITCH
FUEL
CUT
SOLENOID
VACUUM
CUT
SOLENOID
AUTO
CHOKE
HEATER
THROTTLE
OPENER
SOLENOID
TURN
SIGNAL
LAMP
GAUGE
I
FUEL
L
WATER
TEMPERATURE
WARNING
LAMP
BRAKE
CHARGE
OIL
PRESSURE
SEAT
BELT
WARNING
BUZZER
BACK
UP
LAMP
KICKDOWN
SOLENOID
TACHOMETER
REAR
DEFOGGER
f
c
It
1
1
m
g
II
n
a
n
c
It
c
1J
c
CIl
z
G
S
3
OJ
o
Cl
m
CD
In
Ql
Page 478 of 548

m
W
w
t
e
CALIFORNIA
ANO
BATTERY
FU
MOOELS
g
G
II
V
FUSIBLE
LINK
G
uQ
t
WR
NON
cALlFORNIA
ANO
CANAOA
MOOELS
FUSE
BLOCK
ii
I
ll
l
er
0
er
15A
RG
r
I
W
I
0
0
0
0
tl
ij
a
3
Cl
E
0
too
m
a
f
0
II
OFf
I
IST
2ND
I
IAIBICIAIBlc
liB
C
1
I
101
1
10
10
0
5
11101
116
OI66
I
I
I
I
I
I
6
1
0
I
H
I
101010
2
2
12
8
1161616
LIGHTING
SWITCH
rtt
I
Q
l
B
B
I
I
I
8
00
100
2
2
GW
G
y
jl
I
I
g
fi
GY
GY
Ot
I
GW
RG
GW
T
R
cON
INOICATOR
LAMP
IA
TI
r
H
Jl
L
t1
j
GW
RAOIO
ILLUMINATION
LAMP
IrGW
GI
to
GY
r
l
I
3
I
L
HEATER
CONTROL
PANEL
ILLUMINATION
LAMP
I
GWCJ
lOr
GYO
c
I
ASH
TRAY
ILLUMINATION
CJ
LAMP
CLOCK
H
Gya
3
C3
L
INATION
G
J
J
Y
l
B
I
ILLUMINATION
I
CONTROL
UNIT
G
W
INSTRUMENT
HARNESS
COMBINATION
LAMP
r
r
e
i
o
z
lI
OJ
o
Cl
m
CD
0
Ql
CIl
en
l
3
Page 500 of 548

m
ii
I
ll
ic
i
tl
Cl
Ul
0
is
B
w
ii
W
oa
LW
L
CALIFORNIA
ANO
I
d
S
R
FUSIBLE
LINK
o
BATTERY
S
JSt
wGLQ
gWR
NON
GALIFORNIA
ANO
CANAOA
MOOELS
LOC
Off
Ace
ON
Sf
o
0
i
IGNITION
SWITCH
L
B
LN
I
15A
0
0
0
0
o
v
E
FUSE
BLOCK
M
F
i
L
11L1
u
R
1
i
ri
1
w
RESISTOR
BW
Il
BLj
L
lljlj
U6
1
BWY
W
B
8
HEAVY
OUTY
TYPE
Standard
for
Canada
and
option
for
U
S
A
LW
HEATER
MOtOR
IOffl
I
2
3
Kro
lli
H
FAN
SWITCH
ST
ANOARO
TYPE
Z
II
II
a
OJ
o
Cl
m
CD
n
n
Ql
CIl
CJ
l
3
Page 501 of 548

Condition
Insufficient
heating
performance
No
heated
air
discharged
Insufficient
air
flow
to
floor
Insufficient
defrosting
performance
Cold
air
discharged
Insufficient
air
flow
to
defroster
Heated
air
discharged
with
lever
in
VENT
Blower
motor
does
not
run
Control
lever
drags
Outside
air
comes
in
with
fan
in
OFF
Noise
frol11
blower
motor
Body
Electrical
System
Probable
cause
Cooling
water
temperature
too
low
Heater
core
plugged
Insufficient
cooling
water
level
Malfunctioning
air
mix
door
Malfunctioning
water
cock
Blower
motor
speed
too
low
Malfunctioning
floor
door
Refer
to
No
heated
air
discharged
Malfunctioning
hoor
door
or
faulty
seal
Defroster
nozzle
plugged
Leak
at
defroster
duct
lo
nozzle
connection
Water
cock
not
operating
properly
Mode
door
not
operating
properly
or
seal
damaged
Fuse
melted
MOlor
wire
connector
disconnected
Faulty
switch
Faulty
motor
Faultyblower
control
amplifier
Inner
wire
rubbing
against
outer
case
end
Control
cable
bent
excessively
Malfunctioniilg
doors
door
levers
etc
Air
intake
door
not
operating
properly
Control
cable
out
of
adjustment
Loose
bolt
in
blower
motor
BE
56
Corrective
action
Check
thermostat
Rep1ace
as
nece
ry
Clean
Rem
Adjust
control
cable
Adjust
control
cable
Check
motor
terminal
voltage
Repair
poor
connection
and
discontinuity
Replace
motor
if
necessary
Replace
blower
control
amplifier
if
neces
sary
Adjust
control
cable
Adjust
control
cable
Clean
Correcl
Adjust
control
cable
Adjust
control
cable
Correct
cause
and
replace
qrrect
Replace
Check
and
correct
Replace
Adjust
control
cable
Correct
Ch
ck
and
COrrect
Repair
or
replace
Adjust
control
cable
Check
and
tighten
loose
bolts
Page 502 of 548
DATSUN
210
Model
8310
Series
SECTIONAC
AIR
CONDITIONING
CONTENTS
DESCRIPTION
OUTLINE
OF
AIR
CONDITIONER
REFRIGERATION
SYSTEM
AIR
FLOW
VACUUM
SYSTEM
ELECTRICAL
CIRCUIT
GENERAL
SERVICE
REFRIGERANT
R
12
COMPRESSOR
OIL
MAINTENANCE
GENERAL
SERVICE
INSTRUCTIONS
SAFETY
PRECAUTIONS
EVACUATING
AND
CHARGING
SYSTEM
CHECKI
NG
FOR
LEAKS
REFRIGERANT
LEVEL
CHECK
COMPRESSOR
OIL
LEVEL
OHECK
PERFORMANCE
TEST
REFRIGERANT
LEAKS
SERVICE
PROCEDURES
FAST
IDLE
ACTUATOR
IDL
E
PULLEY
AND
COMPRESSOR
DRIVE
BELT
COMPR
ESSOR
CONDENSER
RECEIV
ER
DRIER
REFRIGERANT
LINES
I
COOLING
UNIT
EXPANSION
VALVE
THERMOSTAT
MAIN
RELAY
HEATER
UNIT
WATER
COCK
AC
2
AC
2
AC
3
AC
5
AC
6
AC
7
AC
9
AC
9
AC
9
AC
9
AC
9
AC
9
AC
1
AC14
AC15
AC
17
AC17
AC17
AC18
AC1B
AC19
AC19
AC
20
AC
20
AC
21
ACc21
AC
22
AC
22
AC
23
AC
23
AC
23
BLOWER
MOTOR
RESISTOR
AIR
CONDITIONER
CONTROL
FAN
SWITCH
MICROSWITCH
LOW
PRESSURE
SWITCH
MAGNET
VALVE
FUSE
REPLACEMENT
VACUUM
HOSE
DIAGRAM
WIRING
DIAGRAM
COMPRESSOR
MODEL
SC206
PRELIMINARY
CLEANING
COMPRESSOR
CLUTCH
SHAFT
SEAL
CYLINDER
HEAD
AND
VALVE
PLATE
DISCHARGE
AND
sU
CTiON
CONNECTORS
TROUBLE
DIAGNOSES
AND
CORRECTIONS
AIR
CONDITIONER
DIAGNOSES
BLOWER
MOTOR
DIAGNOSES
COMPRESSOR
DIAGNOSES
COMPRESSOR
CLUTCH
DIAGNOSES
VACUUM
SYSTEM
DIAGNOSES
PERFORMANCE
TEST
DIAGNOSES
PERFORMANCE
CHART
SERVICE
DATA
AND
SPECIFICATIONS
GENERAL
SPECIFICATIONS
INSPECTION
AND
ADJUSTMENT
TIGHTENING
TORQUE
SPECIAL
SERVICE
TOOLS
AC
23
AC
23
AC
23
AC
23
AC23
AC
24
AC
24
AC24
AC
24
AC
25
AC
26
AC
27
AC
27
AC
28
AC30
AC30
AC32
AC
32
AC
33
AC34
AC35
AC36
AC37
AC
41
AC
42
AC
42
AC
42
AC
43
AC
44
Page 503 of 548
Air
Conditioning
DESCRIPTION
OUTLINE
OF
AIR
CONDITIONER
level
and
ventilation
functions
Its
control
system
consists
of
a
mechani
cal
system
using
cables
and
engine
vacuum
and
electric
system
The
component
units
of
the
air
conditioner
are
installed
in
the
engine
and
passenger
compartments
the
compressor
and
condenser
in
the
for
mer
and
the
unit
comprising
the
evaporator
heater
and
blower
and
i
Is
control
in
the
latter
The
units
in
the
passenger
compartment
aTe
summa
rized
as
foUows
Th
ipr
conditio
er
isa
combine4
unit
of
an
evaporator
heater
and
blower
and
provides
heating
and
cool
lng
functions
In
addition
it
has
hi
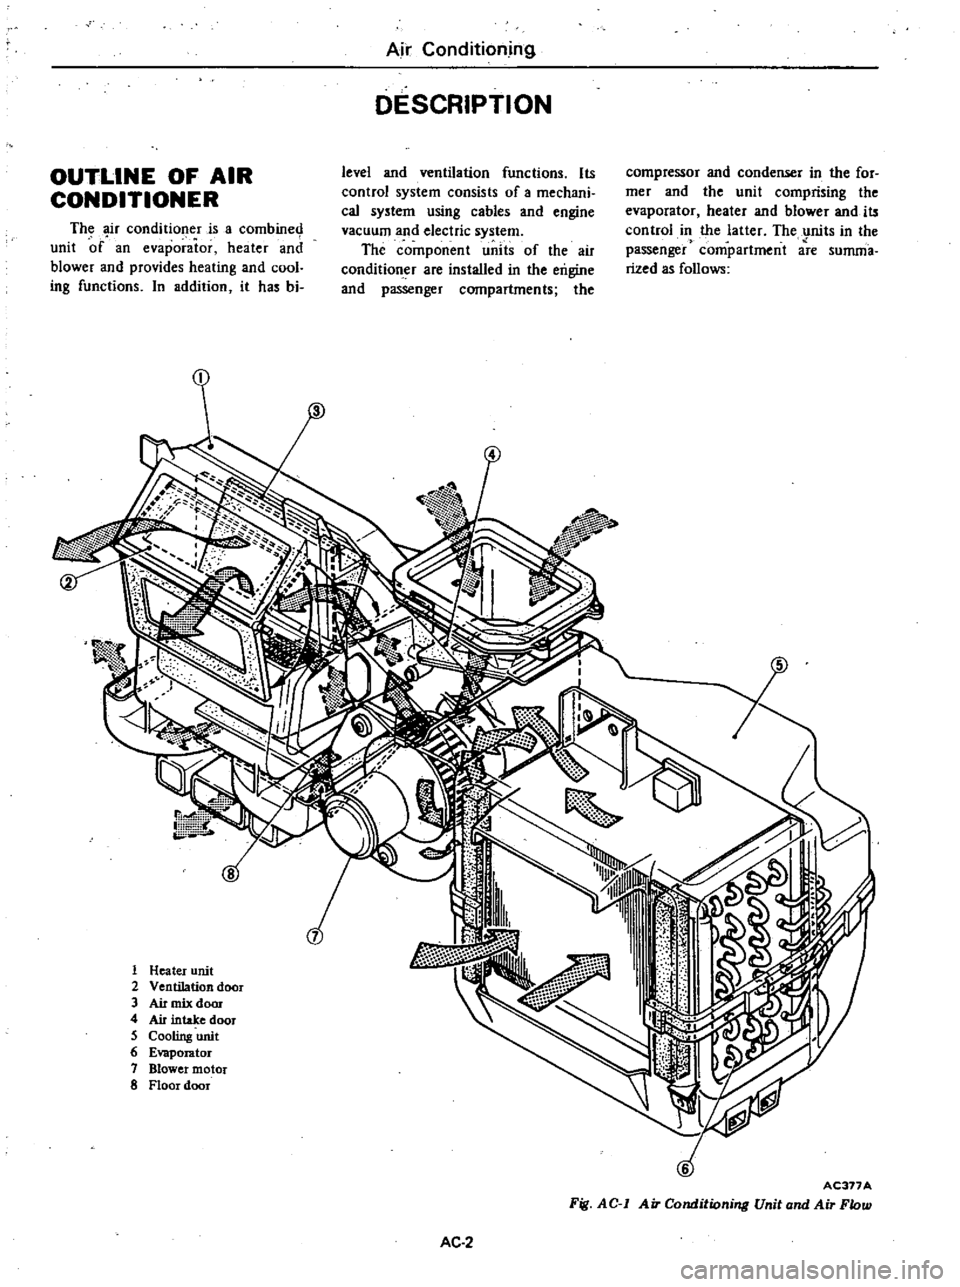
I
1
Heater
unit
2
Ventilation
door
3
Air
mix
dom
4
Air
intake
door
5
Cooling
unit
6
E
r
or
7
Blower
motor
8
Floor
door
AC377A
Fig
AC
1
Air
Conditioning
Unit
and
Air
Flow
AC
2
Page 506 of 548
Air
Conditioning
AIR
FLOW
Air
control
lever
1M
l
r
I
1
all
IC
1T
I
tCliO
ar
afH
7
Sidedefrostcr
duct
Defroster
nozzle
L
Jf
SOd
Fan
switch
1
7
l
t
I
Air
intake
door
r
If
Ftont
seat
flOO
i
f
t
I
J
Heater
outlet
nside
air
l
Front
seat
floor
Evaporator
i
Side
outlet
D
I
I
IIll
91
i
Side
outlet
Center
udet
r2
D
I
Air
control
Air
mix
door
Ventilation
Blower
Compressor
Air
intake
door
and
Floor
door
and
lever
Water
cock
door
motor
F
1
actuator
OFF
OFF
AIC
Inside
air
100
Open
Closed
ON
VENT
Outside
air
100
Open
Closed
OFF
B
L
Outside
air
100
Controlled
by
0
Open
Open
OFF
temperature
ON
HEAT
Outside
air
100
lever
Closed
Open
OFF
DEF
Outside
air
100
Closed
0
Open
OFF
REC
HEAT
Inside
air
100
Closed
Open
OFF
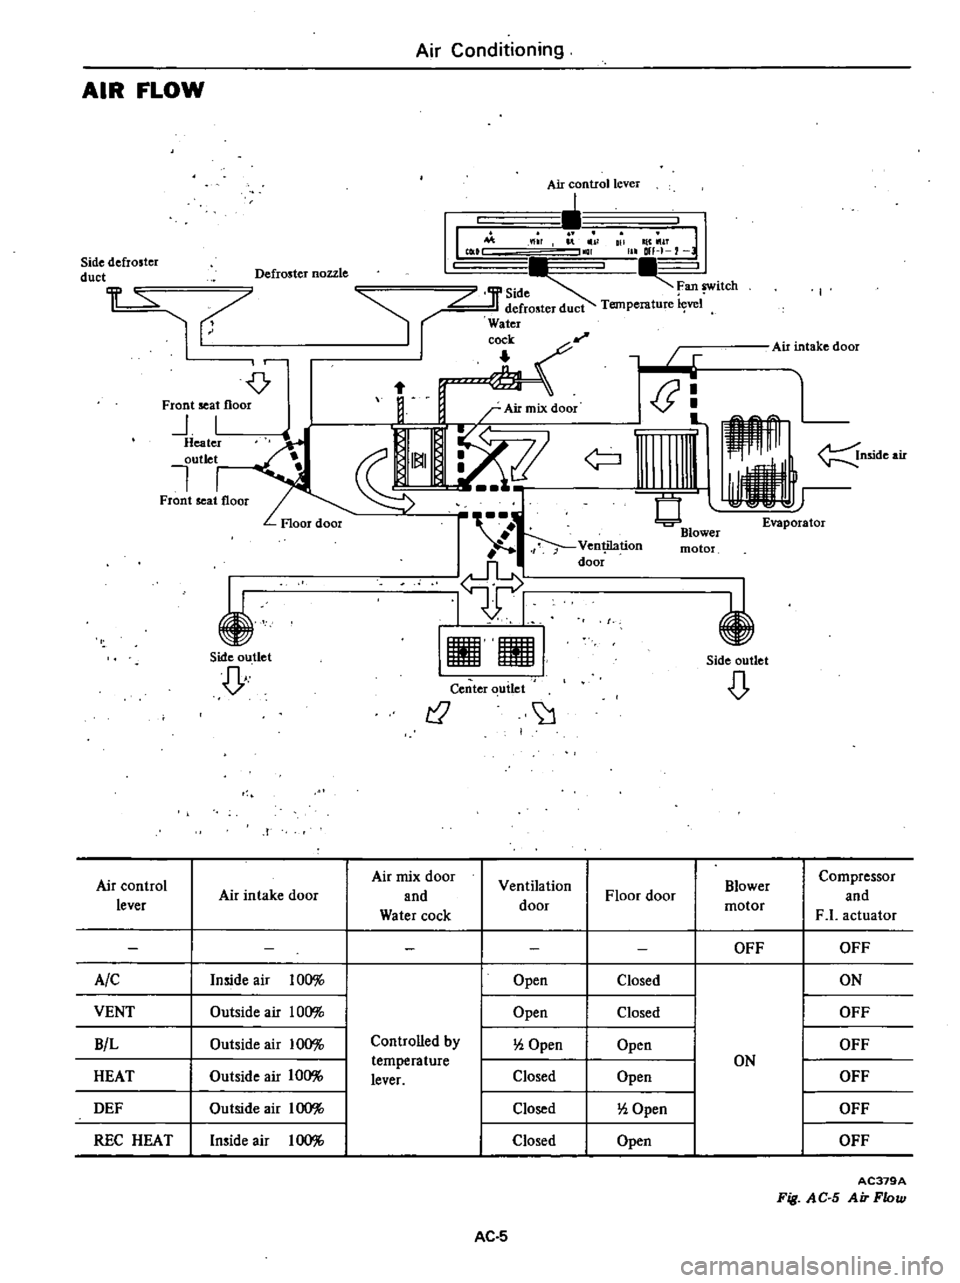
AC379A
Fig
AC
S
Air
Flow
AC
5
Page 523 of 548
to
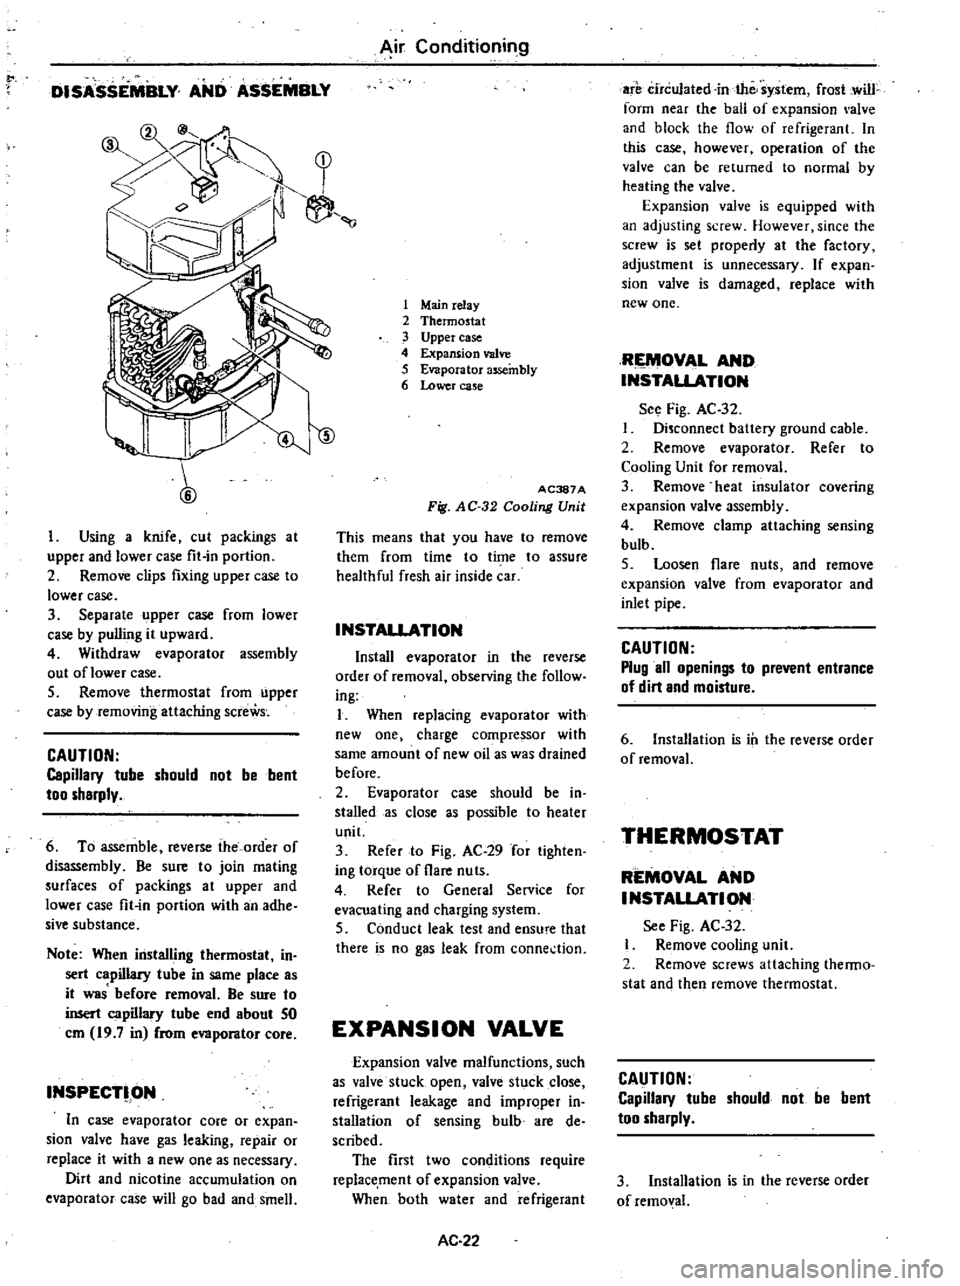
DISASSEMBLY
AND
ASSEMBLY
y
1
7
1
r
II
l
1
Using
a
knife
cut
packings
at
upper
and
lower
case
fit
in
portion
2
Remove
clips
fixing
upper
case
to
lower
case
3
Separate
upper
case
from
lower
case
by
pulling
it
upward
4
Withdraw
evaporator
assembly
out
oflower
case
5
Remove
thermostat
from
upper
case
by
removing
attaching
screWs
CAUTION
Capillary
tube
should
not
be
bent
too
sharply
6
To
assemble
reverse
the
order
of
disassembly
Be
sure
to
join
mating
surfaces
of
packings
at
upper
and
lower
case
fit
in
portion
with
an
adhe
sive
substance
Note
When
installing
thermostat
in
sert
capillary
tube
in
same
place
as
it
was
before
removal
Be
sure
to
insert
capillary
tube
end
about
50
em
19
7
in
from
evaporator
core
INSPECT
ON
In
case
evaporator
core
or
expan
sion
valve
have
gas
leaking
repair
or
replace
it
with
a
new
one
as
necessary
Dirt
and
nicotine
accumulation
on
evaporator
case
will
go
b
d
and
smell
Air
Conditioning
1
Mainrelay
2
Thermostat
3
Upper
case
4
Expansion
valve
5
Evaporator
assembly
6
Lower
case
ID
AC387A
Fig
AC
32
Cooling
Unit
This
means
that
you
have
to
remove
them
from
time
to
time
to
assure
healthful
fresh
air
inside
car
INSTAllATION
Install
evaporator
in
the
reverse
order
of
removal
observing
the
follow
ing
I
When
replacing
evaporator
with
new
one
charge
compressor
with
same
amount
of
new
oil
as
was
drained
before
2
Evaporator
case
should
be
in
stalled
as
close
s
possible
to
heater
unit
3
Refer
to
Fig
AC
29
for
tighten
ing
torque
of
flare
nuts
4
Refer
to
General
Service
for
evacuating
and
charging
system
5
Conduct
leak
test
and
ensu
e
that
there
is
no
gas
leak
from
conne
tion
EXPANSION
VALVE
Expansion
valve
malfunctions
such
as
valve
stuck
open
valve
stuck
close
refrigerant
leakage
and
improper
in
stall
tion
of
sensing
bulb
are
de
scribed
The
first
two
conditions
require
replacement
of
expansion
valve
When
both
water
and
refrigerant
AC
22
are
circulated
in
the
system
frost
cwill
form
near
the
ball
of
expansion
alve
and
block
the
flow
of
refrigerant
In
this
case
however
operation
of
the
valve
can
be
returned
to
normal
by
heating
the
valve
Expansion
valve
is
equipped
with
an
adjusting
screw
However
since
the
screw
is
set
properly
at
the
factory
adjustment
is
unnecessary
If
expan
sion
valve
is
damaged
replace
with
new
one
RIEMOV
L
AND
INSTALlATION
See
Fig
AC
32
Disconnect
baltery
ground
cable
2
Remove
ev
porator
Refer
to
Cooling
Unit
for
removal
3
Remove
heat
insulator
covering
expansion
valve
assembly
4
Remove
clamp
attaching
sensing
bulb
5
Loosen
flare
nuts
and
remove
expansion
valve
from
evaporator
and
inlet
pipe
CAUTION
Plug
all
openings
to
prevent
entrance
of
dirt
and
moisture
6
Installation
is
ill
the
reverse
order
of
removal
THERMOSTAT
REMOVAL
AND
INSTALlATION
See
Fig
AC
32
Remove
cooling
unit
2
Remove
screws
attaching
thenno
stat
and
then
remove
thermostat
CAUTION
Capillary
tube
should
not
be
bent
too
sharply
3
Installation
is
in
the
reverse
order
of
removal
Page 524 of 548
Note
When
installing
thermostat
in
sert
capillary
tube
in
same
place
as
it
was
before
removal
Be
sure
to
insert
capillary
tube
end
about
SO
em
19
7
in
from
evaporator
core
INSPECTION
1
Test
continuity
between
two
switch
terminals
with
test
lamp
or
ohmmerter
Continuity
should
exist
2
With
capillary
tube
end
dipped
into
ice
salt
water
maintained
to
I
oc
300
F
test
continuity
between
two
switch
terminals
Continuity
should
not
exist
3
If
switch
is
found
damaged
re
place
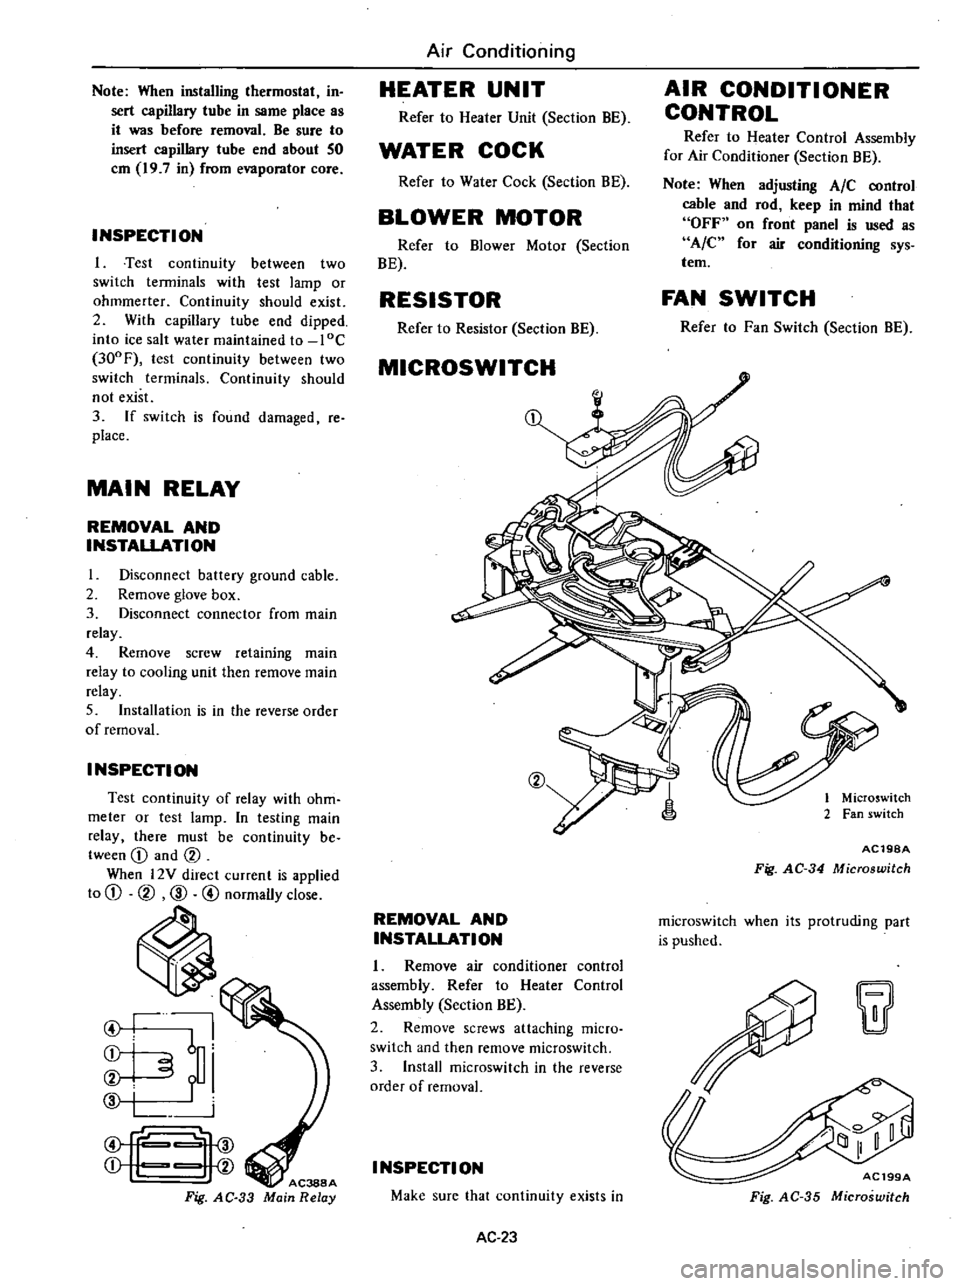
MAIN
RELAY
REMOVAL
AND
INSTALLATION
I
Disconnect
battery
ground
cable
2
Remove
glove
box
3
Disconnect
connector
from
main
relay
4
Remove
screw
retaining
main
relay
to
cooling
unit
then
remove
main
relay
5
Installation
is
in
the
reverse
order
of
removal
INSPECTION
Test
continuity
of
relay
with
ohm
meter
or
test
lamp
In
testing
main
relay
there
must
be
continuity
be
tween
CD
and
CV
When
l2Y
direct
current
is
applied
to
CD
CV
CID
@
normally
close
ti
I
I
6
i
i
f
i
f
Fig
AC
33
Air
Conditioning
HEATER
UNIT
Refer
to
Heater
Unit
Section
BE
WATER
COCK
Refer
to
Water
Cock
Section
BE
BLOWER
MOTOR
Refer
to
Blower
Motor
Section
BE
RESISTOR
Refer
to
Resistor
Section
BE
MICROSWITCH
CV
REMOVAL
AND
INSTALLATION
1
Remove
air
conditioner
control
assembly
Refer
to
Heater
Control
Assembly
Section
BE
2
Remove
screws
attaching
micro
switch
and
then
remove
rnicroswitch
3
Install
rnicroswitch
in
the
reverse
order
of
removal
I
NSPECTI
ON
Make
sure
that
continuity
exists
in
AC
23
AIR
CONDITIONER
CONTROL
Refer
to
Heater
Control
Assembly
for
Air
Conditioner
Section
BE
Note
When
adjusting
AIC
control
cable
and
rod
keep
in
mind
that
OFF
on
front
panel
is
used
as
A
C
for
air
conditioning
sys
tem
FAN
SWITCH
Refer
to
Fan
Switch
Section
BE
1
Microswitch
2
Fan
switch
AC19SA
Fig
AC
34
Microswitch
rnicroswitch
when
its
protruding
part
is
pushed
w
AC199A
Fig
AC
35
Microswitch