heater DATSUN 210 1979 User Guide
[x] Cancel search | Manufacturer: DATSUN, Model Year: 1979, Model line: 210, Model: DATSUN 210 1979Pages: 548, PDF Size: 28.66 MB
Page 199 of 548

REMOVAL
It
is
much
easier
to
remove
engine
and
transmission
as
a
single
unit
than
to
remove
alone
After
removal
engine
can
be
separated
from
the
transmission
assembly
WARNING
a
Place
wheel
chocks
in
fronl
of
front
wheels
and
in
rear
of
rear
wheels
b
Be
sure
to
hoist
engine
in
a
safe
manner
c
You
should
not
remove
engine
until
exhaust
system
has
com
pletely
cooled
off
Otherwise
you
may
burn
your
self
and
or
fire
may
break
out
in
fuel
line
Note
Fender
coven
should
be
used
to
protect
car
body
1
Disconnect
battery
ground
cable
from
battery
terminal
and
fusible
link
at
wire
connector
2
Remove
hood
as
follows
CAUTION
Have
an
assistant
help
you
so
as
to
prevent
damage
to
body
I
Mark
hood
hinge
locations
on
hood
to
facilitate
reinstallation
2
Support
hood
by
ltand
and
re
move
bolts
securing
it
to
hood
hinge
being
careful
not
to
let
hood
slip
when
bolts
are
removed
See
Fig
ER
2
3
Remove
hood
from
hood
hinge
f
Il
I
BF133A
Fig
ER
2
Removing
Hood
Remove
under
cover
Drain
radiator
coolant
and
engine
3
4
oil
5
Disconnect
upper
and
lower
hoses
from
radiator
and
disconnect
oil
cooler
hoses
automatic
transmission
only
6
Remove
four
bolts
securing
radia
Engine
Removal
Installation
tor
to
body
and
detach
radiator
after
removing
radiator
shroud
7
Remove
air
cleaner
assembly
from
carburetor
as
follows
1
Remove
fresh
air
duct
from
air
cleaner
2
Remove
hot
air
duct
from
air
cleaner
3
Loosen
air
cleaner
band
bolt
4
Disconnect
air
cleaner
to
air
pump
hose
at
air
cleaner
5
Disconnect
air
cleaner
ta
rocker
cover
hose
at
rocker
cover
6
Disconnect
air
cleaner
to
A
B
valve
hose
at
air
cleaner
7
Disconnect
air
cleaner
to
related
vacuum
hoses
at
air
cleaner
8
Disconnect
accelerator
control
wire
from
carburetor
9
Disconnect
the
following
cables
wires
and
hoses
Wire
to
auto
choke
heater
Wire
to
throttle
opener
cut
solenoid
or
throttle
switch
Wire
to
fuel
cut
solenoid
Wire
to
vacuum
switching
valve
High
tension
cable
between
igni
tion
coil
and
distributor
Battery
cable
to
starter
motor
Wire
to
distributor
Wire
to
thermal
transmitter
Wire
to
alternator
Engine
ground
cable
oil
pressure
switch
and
engine
harness
No
2
See
Fig
ER
3
o
1
Ground
cable
2
Engine
harness
No
2
3
Oil
pressure
switch
Fig
ER
3
EA368
Disconnecting
Cable
and
Wire
Fuel
hose
at
fuel
pump
and
fuel
return
hose
at
connection
Air
pump
air
cleaner
hose
Carbon
canister
hoses
Heater
inlet
and
outlet
hoses
if
so
equipped
ER
3
Vacuum
hose
of
brake
booster
at
intake
manifold
Air
conditioner
equipped
model
10
Remove
compressor
belt
To
remove
loosen
idler
pulley
nut
and
adjusting
bolt
1
Remove
air
pump
2
Remove
compressor
retaining
bolts
and
move
compressor
toward
fender
to
facilitate
removal
of
engine
Nole
Never
discharge
gas
from
com
pressor
while
work
is
being
per
formed
II
Compressor
EA478
Fig
ER
4
Location
of
Air
Compressor
3
Disconnect
vacuum
hose
of
air
conditioner
from
connector
of
intake
manifold
4
Remove
F
i
C
D
actuator
from
bracket
II
Remove
clutch
operating
cylin
der
from
clutch
housing
manual
trans
mission
only
dJ
Tightening
torque
Clutch
operating
cylinder
E
A3
to
clutch
housing
3
1
to
4
1
kg
22
to
30
ft
lbl
Fig
ER
5
Removing
Clutch
Operating
Cylinder
Page 440 of 548
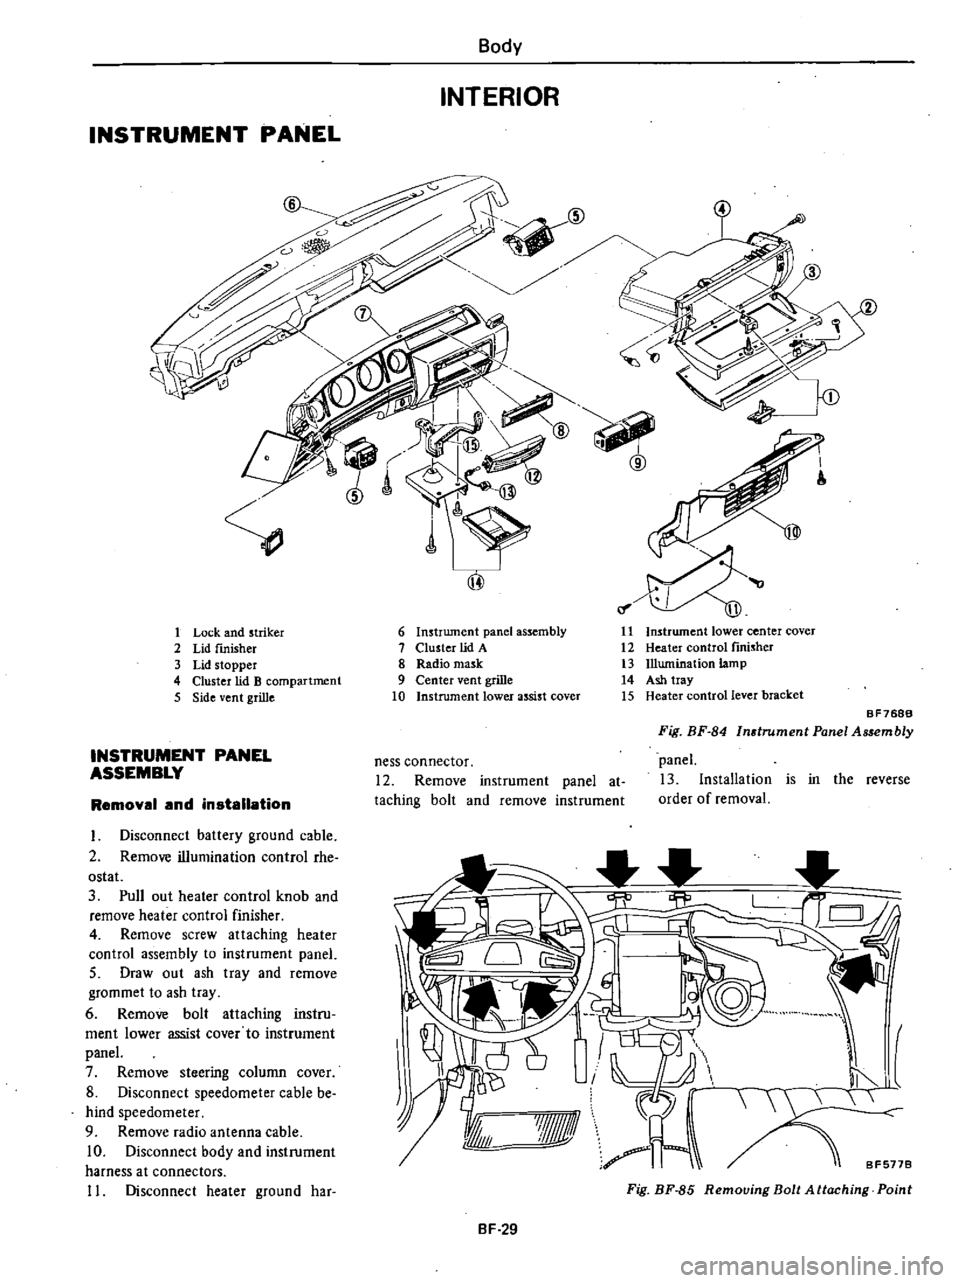
INSTRUMENT
PANEL
Body
INTERIOR
1
Lock
and
striker
2
Lid
fInisher
3
Lid
stopper
4
Cluster
lid
B
compartment
5
Side
vent
grille
INSTRUMENT
PANEL
ASSEMBLY
Removal
and
installation
I
Disconnect
battery
ground
cable
2
Remove
illumination
control
rhe
ostat
3
Pull
out
heater
control
knob
and
remove
heater
control
finisher
4
Remove
screw
attaching
heater
control
assembly
to
instrument
panel
5
Draw
out
ash
tray
and
remove
grommet
to
ash
tray
6
Remove
bolt
attaching
instru
ment
lower
assist
cover
to
instrument
panel
7
Remove
steering
column
cover
8
Disconnect
speedometer
cable
be
hind
speedometer
9
Remove
radio
antenna
cable
10
Disconnect
body
and
instrument
harness
at
connectors
11
Disconnect
heater
ground
har
6
Instrument
panel
assembly
7
Cluster
lid
A
8
Radio
mask
9
Center
vent
grille
10
Instrument
lower
assist
cover
11
Instrument
lower
center
cover
12
Heater
control
fInisher
13
Illumination
lamp
14
Ash
tray
15
Heater
control
lever
bracket
ness
connector
12
Remove
instrument
panel
at
taching
bolt
and
remove
instrument
BF768B
Fig
BF
84
Instrument
Panel
Assembly
panel
13
Installation
is
in
the
reverse
order
of
removal
I
I
I
8F5778
7Jf1ll
A
Fig
BF
85
Removing
Bolt
Attaching
Point
BF
29
Page 441 of 548
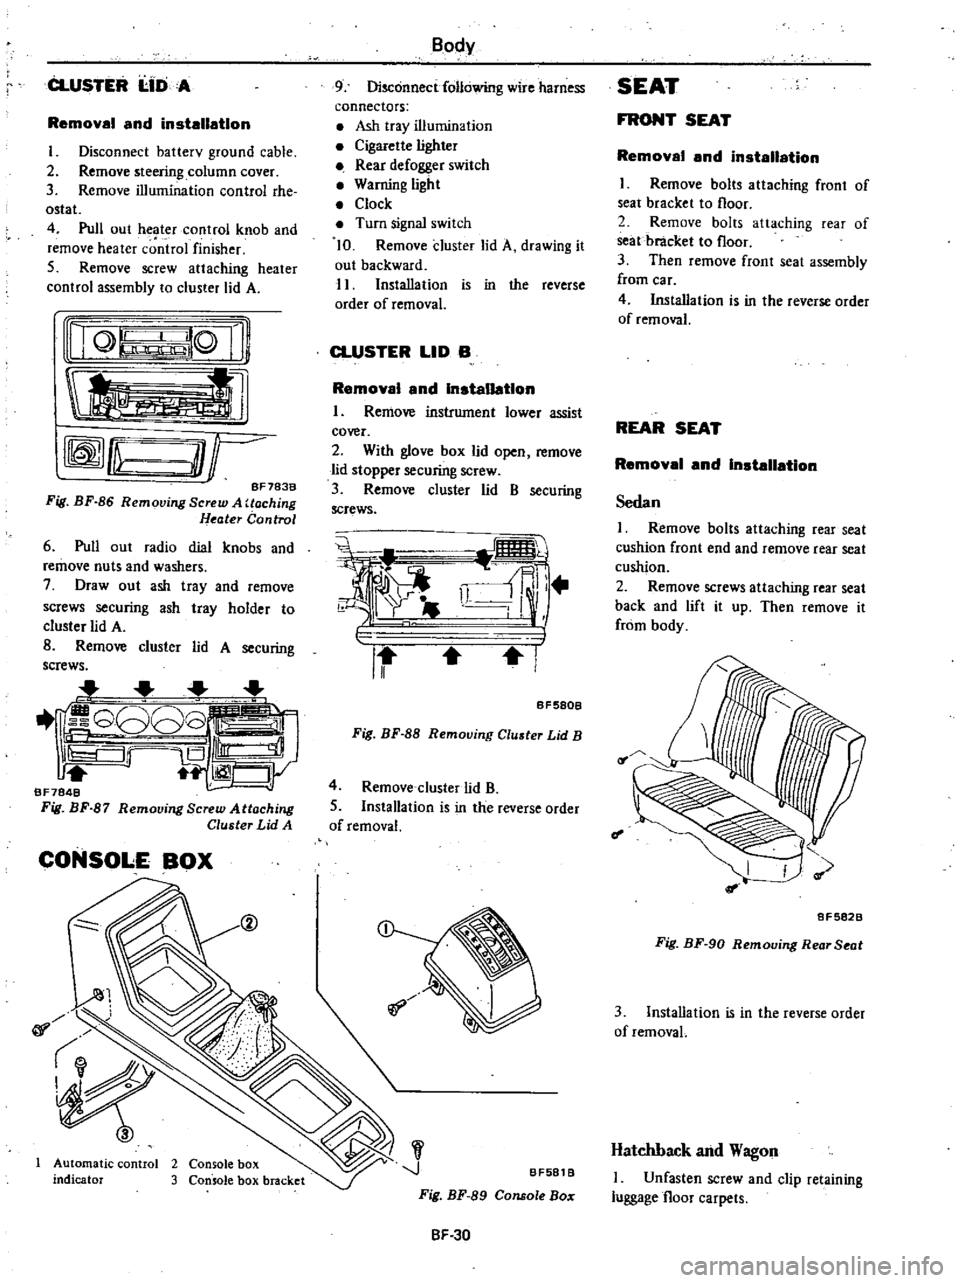
CLUSTER
I
IDA
Removal
and
installation
I
Disconnect
batterv
ground
cable
2
Remove
steering
column
cover
3
Remove
illumination
control
rhe
ostat
4
Pull
out
heater
control
knob
and
remove
heater
c
ntrol
finisher
5
Remove
screw
attaching
heater
control
assembly
to
cluster
lid
A
nQ
lQ
Ii
tl
rffmfLu
O
r
BF783B
Fig
BF
86
Removing
Screw
A
Uoching
Heater
Control
6
Pull
out
radio
dial
knobs
and
remove
nuts
and
washers
7
Draw
out
ash
tray
and
remove
screws
securing
ash
tray
holder
to
cluster
lid
A
B
Remove
cluster
lid
A
securing
screws
1
G808
iS
Ill
1
CJy
BF7848
Fig
BF
87
Remooing
Screw
Attaching
Cluster
Lid
A
CONSOLE
BOX
@
01
Automatic
control
2
Console
box
indicator
3
Console
box
bracket
Body
9
Disconnect
following
wire
harness
connectors
Ash
tray
illumination
Cigarette
lighter
Rear
defogger
switch
Warning
light
Clock
Turn
signal
switch
10
Remove
cluster
lid
A
drawing
it
out
backward
11
Installation
is
in
the
reverse
order
of
removal
CLUSTER
LID
B
Removal
and
Installation
I
Remove
instrument
lower
assist
cover
2
With
glove
box
lid
open
remove
lid
stopper
securing
screw
3
Remove
cluster
lid
B
securing
screws
i
i
ll
r
II
I
BF580B
Fig
BF
88
Removing
Cluster
Lid
B
4
Remove
cluster
lid
B
5
Installation
is
in
the
reverse
order
of
removal
J
BF581
B
Fig
BF
89
Console
Bo
SF
30
SEAT
FRONT
SEAT
Removal
and
installation
I
Remove
bolts
attaching
front
of
seat
bracket
to
floor
2
Remove
bolts
attaching
rear
of
seat
bracket
to
floor
3
Then
remove
front
seat
assembly
from
car
4
Installation
is
in
the
reverse
order
of
removal
REAR
SEAT
Removal
and
Installation
Sedan
I
Remove
bolts
attaching
rear
seat
cushion
front
end
and
remove
rear
seat
cushion
2
Remove
screws
attaching
rear
seat
back
and
lift
it
up
Then
remove
it
from
body
f
I
8F5828
Fig
BF
90
Removing
Rear
Seat
3
Installation
is
in
the
reverse
order
of
removaL
Hatchback
and
Wagon
I
Unfasten
screw
and
clip
retaining
luggage
floor
carpets
Page 446 of 548
DATSUN
210
Model
8310
Series
SECTIONBE
BODY
ELECTRICAL
SYSTEM
CONTENTS
BODY
ELECTRICAL
WIRING
DESCRIPTION
FUSE
AND
FUSIBLE
LINK
WIRING
WIRING
HARNESS
LOCATION
OF
ELECTRICAL
UNIT
ELECTRICAL
UNIT
OF
LIGHTING
SYSTEM
BULB
SPECIFICATIONS
REMOVAL
AND
INSTALLATION
For
lamp
IGNITION
SWITCH
COMBINATION
SWITCH
ILLUMINATION
CONTROL
UNIT
AIMING
ADJUSTMENT
ELECTRICAL
UNIT
OF
SIGNAL
SYSTEM
BE
12
TURN
SIGNAL
SWITCH
BE
12
HORN
RELAY
BE
12
HAZARD
SWITCH
BE
12
STOP
LAMP
SWITCH
BE
12
BACK
UP
LAMP
SWITCH
BE
12
DOOR
SWITCH
BE
12
METERS
AND
GAUGES
BE
13
COMBINATION
METER
BE
13
TACHOMETER
BE
14
FUEL
LEVEL
AND
WATER
TEMPERATURE
INDICATOR
SYSTEM
BE
14
WARNING
SYSTEM
BE
15
CHARGE
WARNING
SYSTEM
BE
15
BRAKE
WARNING
SYSTEM
BE
15
BE
2
BE
2
BE
2
BE
4
BE
5
BE
8
BE
9
BE
9
BE
10
BE
10
BE
10
BE
11
BE
11
OIL
PRESSURE
WARNING
SYSTEM
SEAT
BELT
WARNING
SYSTEM
ELECTRICAL
ACCESSORIES
WINDSHIELD
WIPER
AND
WASHER
REAR
WINDOW
WIPER
AND
WASHER
CIGARETTE
LIGHTER
RADIO
CLOCK
REAR
WINDOW
DEFOGGER
STARTING
SYSTEM
For
automatic
transmission
models
HEATER
DESCRIPTION
AIR
FLOW
REMOVAL
AND
INSTALLATION
ADJUSTING
HEATER
CONTROL
DISASSEMBLY
AND
ASSEMBLY
OF
HEATER
UNIT
INSPECTION
WIRING
DIAGRAMS
AND
TROUBLE
DIAGNOSES
ELECTRICAL
SYSTEM
BLOCK
DIAGRAM
FUSE
BLOCK
CIRCUIT
SUPPLY
ROUTING
LIGHTING
SYSTEM
SIGNAL
SYSTEM
METERS
AND
GAUGES
WARNING
SYSTEM
ELECTRICAL
ACCESSORY
SYSTEM
HEATER
BE
15
BE
15
BE
17
BE
17
BE
18
BE
20
BE
20
BE
21
BE
21
BE
23
BE
23
BE
23
BE
24
BE
26
BE
27
BE
27
BE
28
BE
29
BE
29
BE
30
BE
31
BE
36
BE
41
BE
44
BE
4B
BE
55
Page 450 of 548
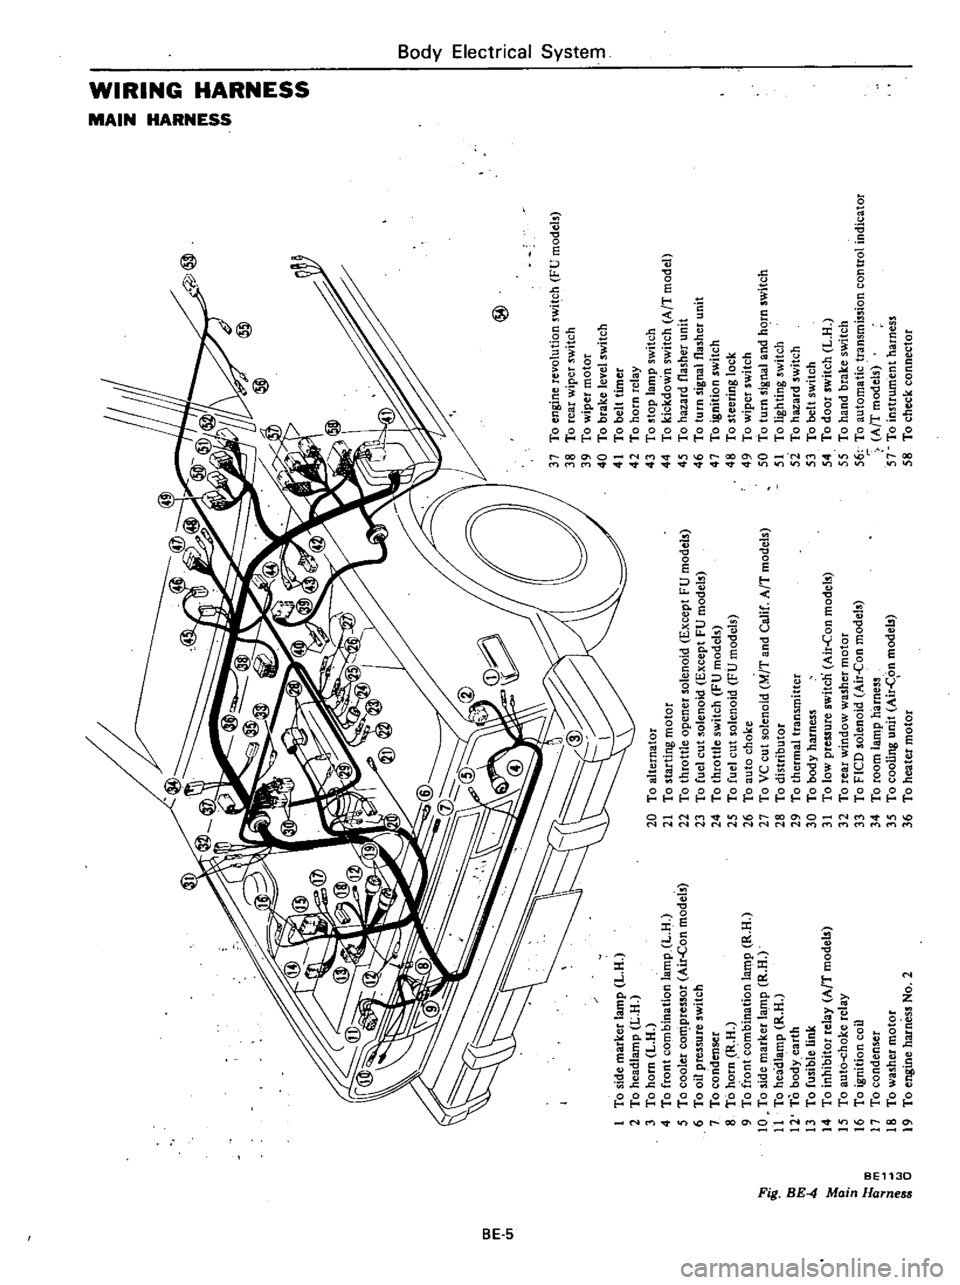
m
c
n
to
l
l
I
g
iF
0
1
To
side
marker
lamp
L
H
2
To
headlamp
L
H
3
To
horn
L
H
4
To
front
combination
lamp
L
H
5
To
cooler
co
pressor
Air
Con
models
6
To
oil
pressure
switch
7
To
condenser
8
To
horn
R
H
9
To
front
combination
la
t11p
R
H
10
To
side
marker
lamp
R
H
11
To
headlamp
R
H
12
To
body
earth
13
To
fusible
link
14
To
inhibitor
relay
AfT
model
15
To
aut6
choke
relay
16
To
ignition
coil
17
To
condenser
18
To
washer
motor
19
To
engine
harness
No
2
@
20
To
alternator
21
To
starting
motor
22
To
throttle
opener
solenoid
Except
FU
models
23
To
fuel
cut
solenoid
Except
FU
models
24
To
throttle
switch
FU
models
25
To
fuel
cut
solenoid
FU
models
26
To
auto
choke
27
To
VC
cut
solenoid
M
T
and
Calif
AfT
models
28
To
distributor
29
To
thermal
transmitter
30
To
body
harness
31
To
low
pressure
switcn
Air
Con
models
32
To
rear
window
washer
motor
33
To
FICO
solenoid
Air
Con
models
34
To
room
lamp
harness
35
To
cooling
unit
Air
C
on
models
36
To
heater
motor
37
To
engine
revolution
switch
FU
models
38
To
rear
wiper
switch
39
To
wiper
motor
40
To
brake
level
switch
41
To
belt
timer
42
To
horn
relay
43
To
stop
lamp
switch
44
To
kickdown
switch
AfT
model
45
To
hazard
flasher
unit
46
To
turn
signal
flasher
unit
47
To
ignition
switch
48
To
steering
lock
49
To
wiper
switch
50
To
turn
signal
and
hC
rn
switch
51
To
lighting
switch
5i
To
hazard
switch
53
To
belt
switch
54
To
door
switch
L
H
55
To
hand
brake
switch
56
To
automatic
transmission
control
indicator
AfT
models
57
To
instrument
harness
58
To
check
connector
I
0
i
a
z
Z
G
z
tIl
tIl
a
Z
Il
I
to
o
Co
m
16
n
n
OJ
1
3
Page 454 of 548
Body
Electrical
System
ELECTRICAL
UNIT
OF
LIGHTING
SYSTEM
CAUTION
Before
starting
to
work
on
any
part
of
electrical
system
disconnect
battery
ground
cable
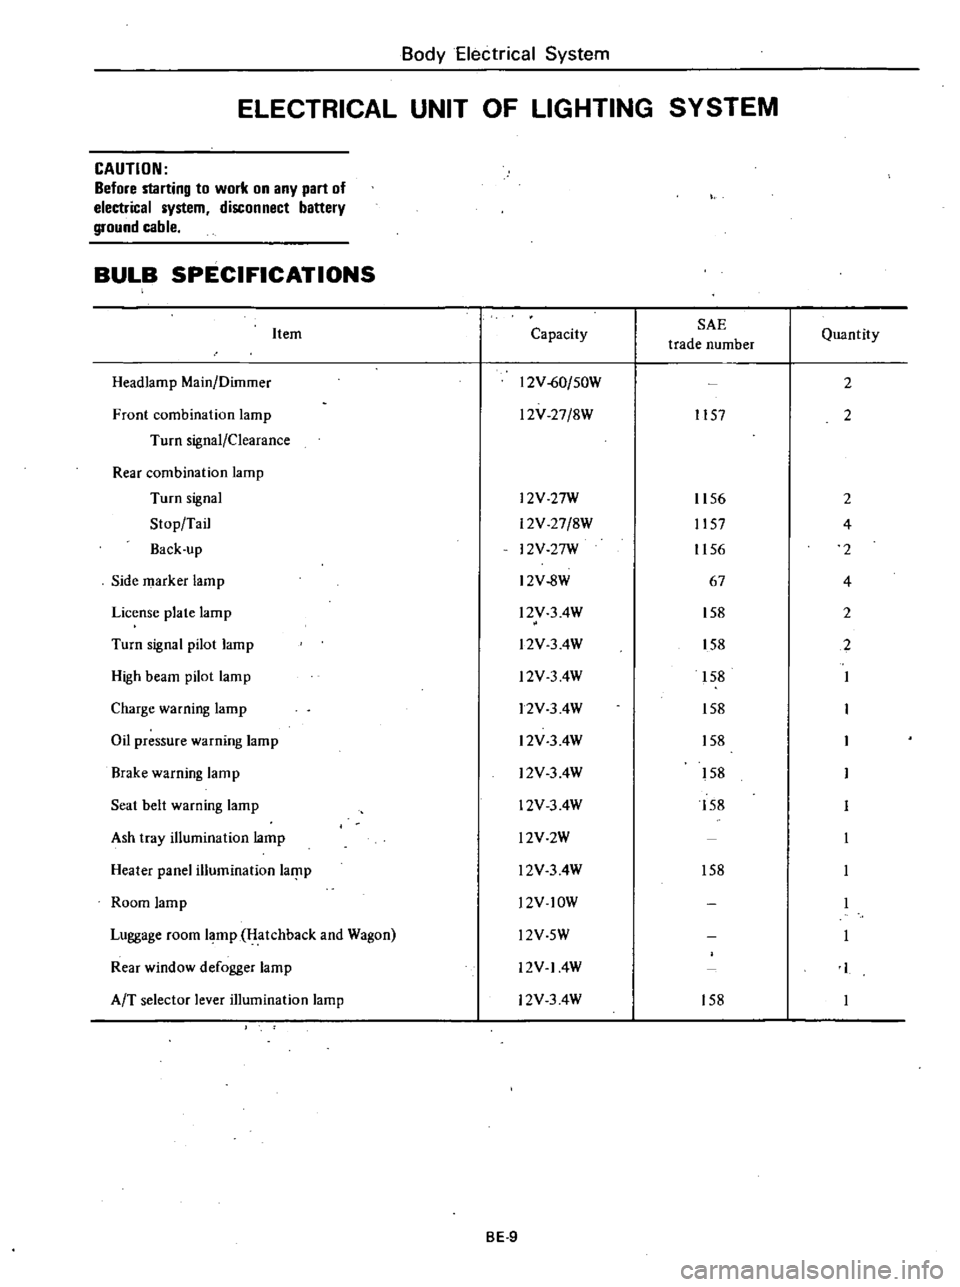
BULB
SPECIFICATIONS
Item
Headlamp
Main
Dilnmer
Front
combination
lamp
Turn
signal
Clearance
Rear
combination
lamp
Turn
signal
Stop
Tail
Back
up
Side
marker
lamp
License
plate
lamp
Turn
signal
pilot
lamp
High
beam
pilot
lamp
Charge
warning
lamp
Oil
pressure
warning
lamp
Brake
warning
lamp
Seat
belt
warning
lamp
Ash
tray
illumination
lamp
Heater
panel
illumination
laf
lp
Room
lamp
Luggage
room
lamp
Hatchback
and
Wagon
Rear
window
defogger
lamp
AfT
selector
lever
illumination
lamp
Capacity
SAE
trade
number
12V
60
50W
l2V
27
8W
1157
l2V
27W
12V
27
8W
12V
27W
12V
8W
l2V
3
4W
l2V
3
4W
l2V
3
4W
12V
3
4W
12V
3
4W
12V
3
4W
12V
3
4W
l2V2W
l2V
3
4W
l2V
lOW
Quantity
2
2
1156
2
1157
4
1156
2
67
4
158
2
158
2
158
158
158
158
158
158
l2V
5W
12V
14W
12V
3
4W
158
BE
9
Page 468 of 548
Body
Electrical
System
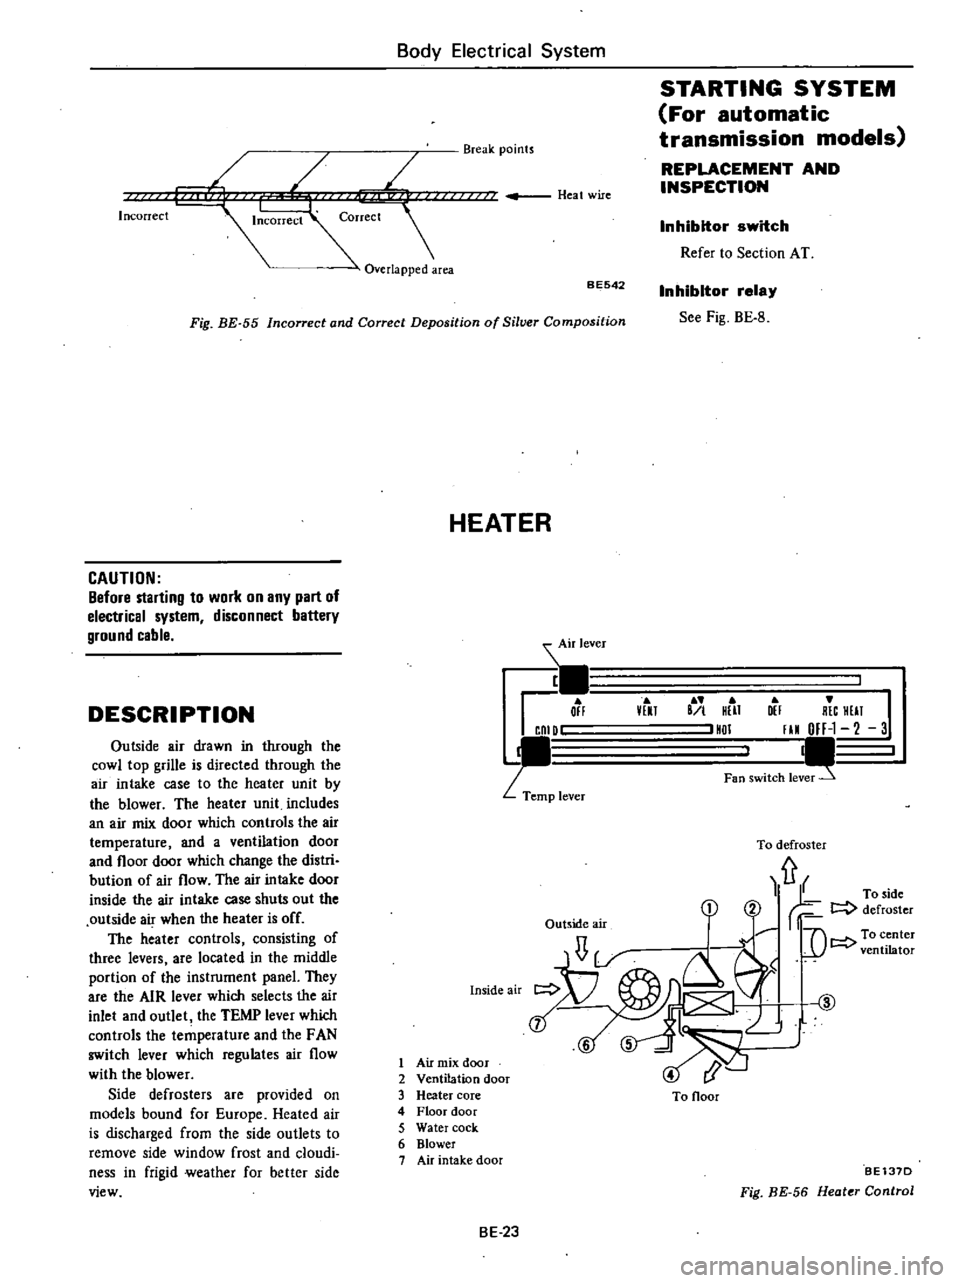
Incorrect
Overlapped
area
Hea
t
wire
STARTING
SYSTEM
For
automatic
transmission
models
REPLACEMENT
AND
INSPECTION
Break
points
Inhibitor
switch
Refer
to
Section
AT
BE542
Inhibitor
relay
See
Fig
BE
B
Fig
BE
55
Incorrect
and
Correct
Deposition
of
Silver
Composition
HEATER
CAUTION
Before
starting
to
work
on
any
part
of
electrical
system
disconnect
battery
ground
cable
DESCRIPTION
Air
lever
1
Off
CnID
p
lever
lEU
B
I
HUT
HDI
DEI
R
C
HUT
I
III
OFF
1
2
3
I
Fan
switch
lev
Outside
air
drawn
in
through
the
cowl
top
grille
is
directed
through
the
air
intake
case
to
the
heater
unit
by
the
blower
The
heater
unit
includes
an
air
mix
door
which
controls
the
air
temperature
and
a
ventilation
door
and
floor
door
which
change
the
distri
bution
of
air
flow
The
air
intake
door
inside
the
air
intake
case
shuts
out
the
outside
air
when
the
heater
is
off
The
heater
controls
consisting
of
three
levers
are
located
in
the
middle
portion
of
the
instrument
panel
They
are
the
AIR
lever
which
selects
the
air
inlet
and
outlet
the
TEMP
lever
which
controls
the
temperature
and
the
FAN
switch
lever
which
regulates
air
flow
with
the
blower
Side
defrosters
are
provided
on
models
bound
for
Europe
Heated
air
is
discharged
from
the
side
outlets
to
remove
side
window
frost
and
cloudi
ness
in
frigid
weather
for
better
side
view
Inside
air
To
defroster
fr
1
rf
To
side
r
2
t
defroster
1
U
C
D
i
LJ
t
@
6
5
Outside
air
1
Air
mix
door
2
Ventilation
door
3
Heater
core
4
Floor
door
5
Water
cock
6
Blower
7
Air
intake
door
To
Ooor
BE137D
Fig
BE
56
Heater
Control
BE
23
Page 469 of 548
Body
Electrical
System
t
to
liP
1
ill
1
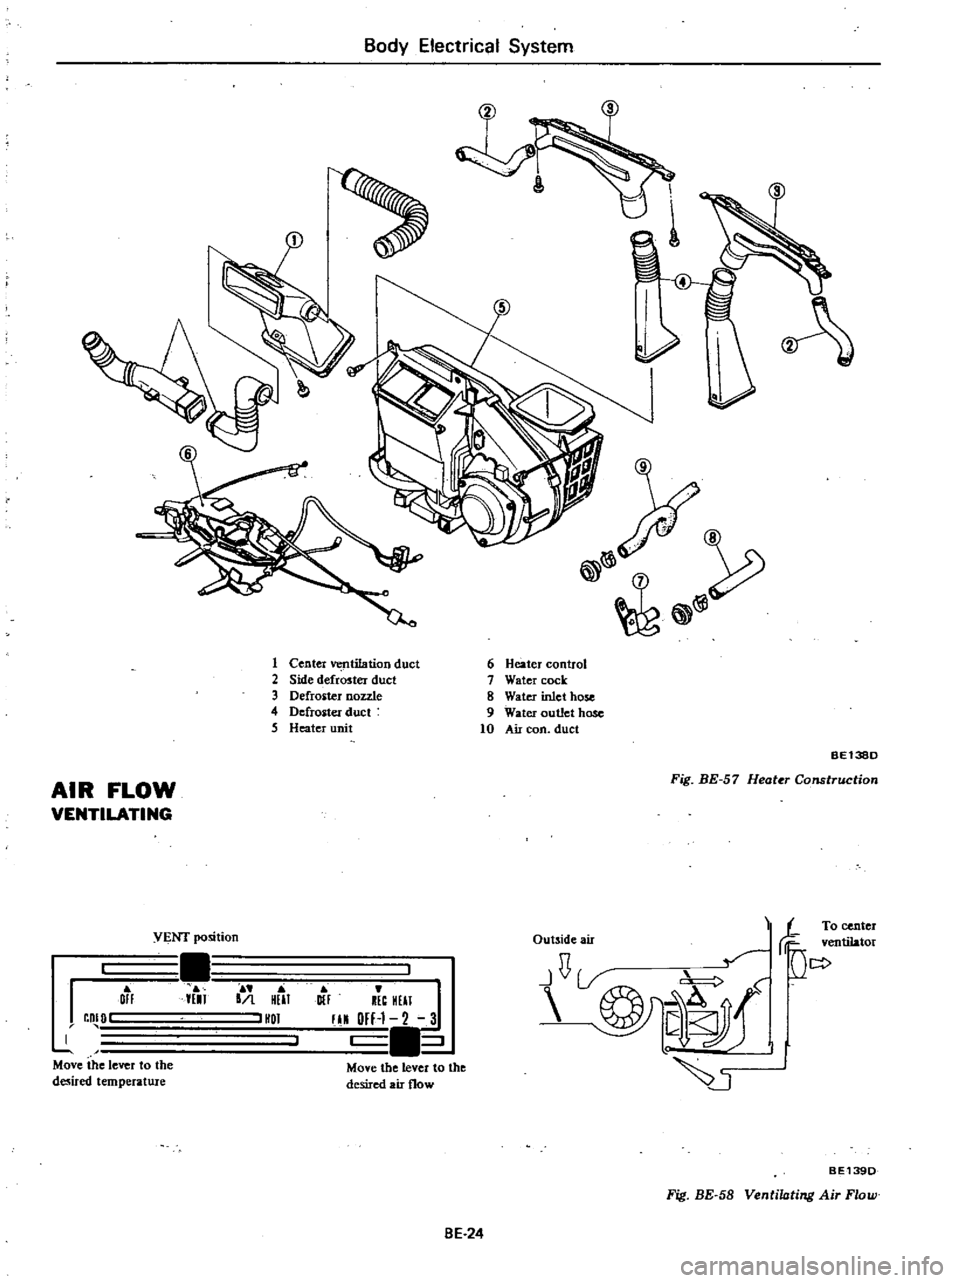
Center
V
t
fltilation
duct
2
Side
defroster
duct
3
Defroster
nozzle
4
Defroster
duct
5
Heater
unit
6
Heater
control
7
Water
cock
8
Water
inlet
hose
9
Water
outlet
hose
10
Air
con
duct
BEl38D
AIR
FLOW
VENTILATING
Fig
BE
57
Heater
Construction
I
Off
COlD
r
IUl
1
1
HUT
HOl
y
OIF
HEC
HEll
fll
OFl
l
2
3
J
Move
the
lever
to
the
desired
air
flow
i
To
center
Duwde
air
ventilator
J
U
V
D
ir
VENT
position
Move
the
lever
to
the
desired
temperature
BEl39D
Fig
BE
58
VentiIDting
Air
Flow
BE
24
Page 471 of 548
REMOVAL
AND
INSTALLATION
HEATER
CONTROL
SEMBLY
I
Disconnect
battery
ground
cable
2
Pull
off
control
lever
knobs
3
Remove
cllJs
r
lid
A
4
Remove
defroster
ducts
5
Disconnect
door
control
cables
and
rod
at
each
door
Body
Electrical
System
6
Disconnectharness
tonnec1or
7
Remove
heater
control
assembly
with
bracket
from
instrument
panel
by
loosening
attaching
screw
8
Install
heater
control
assembly
in
the
reverse
order
of
removal
After
installing
heater
oontrol
assembly
oon
trol
cables
and
rod
must
be
adjusted
by
referring
to
Adjusting
Heater
Con
trol
HEATER
UNIT
I
Disconnect
battery
ground
cable
2
Drain
engine
coolant
3
Remove
package
tray
with
brack
et
if
equipped
4
Remove
console
box
if
equipped
5
Remove
cluster
lid
A
6
Remove
heater
control
assembly
7
Remove
radio
receiver
8
On
air
conditioner
equipped
models
disconnect
cooler
ducts
at
heater
unit
side
9
Remove
center
ventilator
duct
10
Disconnect
blower
motor
har
ness
connector
II
Disconnect
inlet
of
wat
r
cock
and
outlet
of
heater
core
hoses
by
loosening
hose
clamps
12
Remove
heater
unit
after
re
moving
heater
unit
retaining
bolts
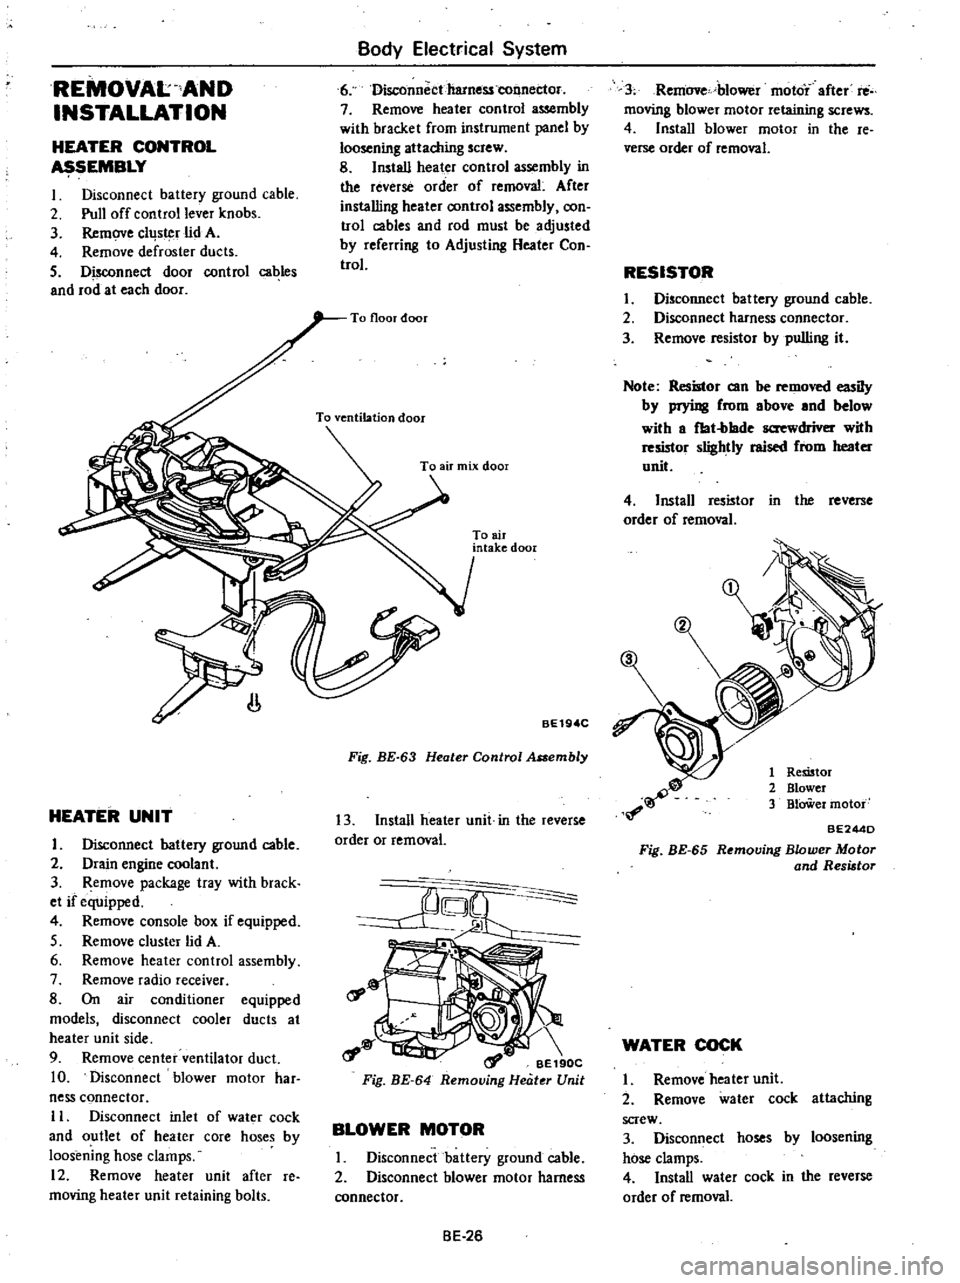
To
air
intake
door
BE19
C
Fig
BE
63
Heater
Control
Assembly
13
Install
heater
unit
in
the
reverse
order
or
removal
rf
o
t
a
1
BE190C
Fig
BE
64
Removing
Heater
Unit
BLOWER
MOTOR
I
Disconnect
battery
ground
cable
2
Disconnect
blower
motor
harness
connector
BE
26
3
Remove
blower
moto
after
rti
moving
blower
motor
retaining
screws
4
Install
blower
motor
in
the
re
verse
order
of
removal
RESISTOR
I
Disconnect
battery
ground
cable
2
Disconnect
harness
connector
3
Remove
resistor
by
pulling
it
Note
Resistor
can
be
removed
iIy
by
prying
from
above
and
below
with
a
fbt
blade
screwdriver
with
resmor
slightly
raised
from
heater
unit
4
Install
resistor
in
the
reverse
order
of
removal
1
Remtor
2
Blower
3
BlOWer
motor
BE244D
Fig
BE
65
Removing
Blower
Motor
and
Resistor
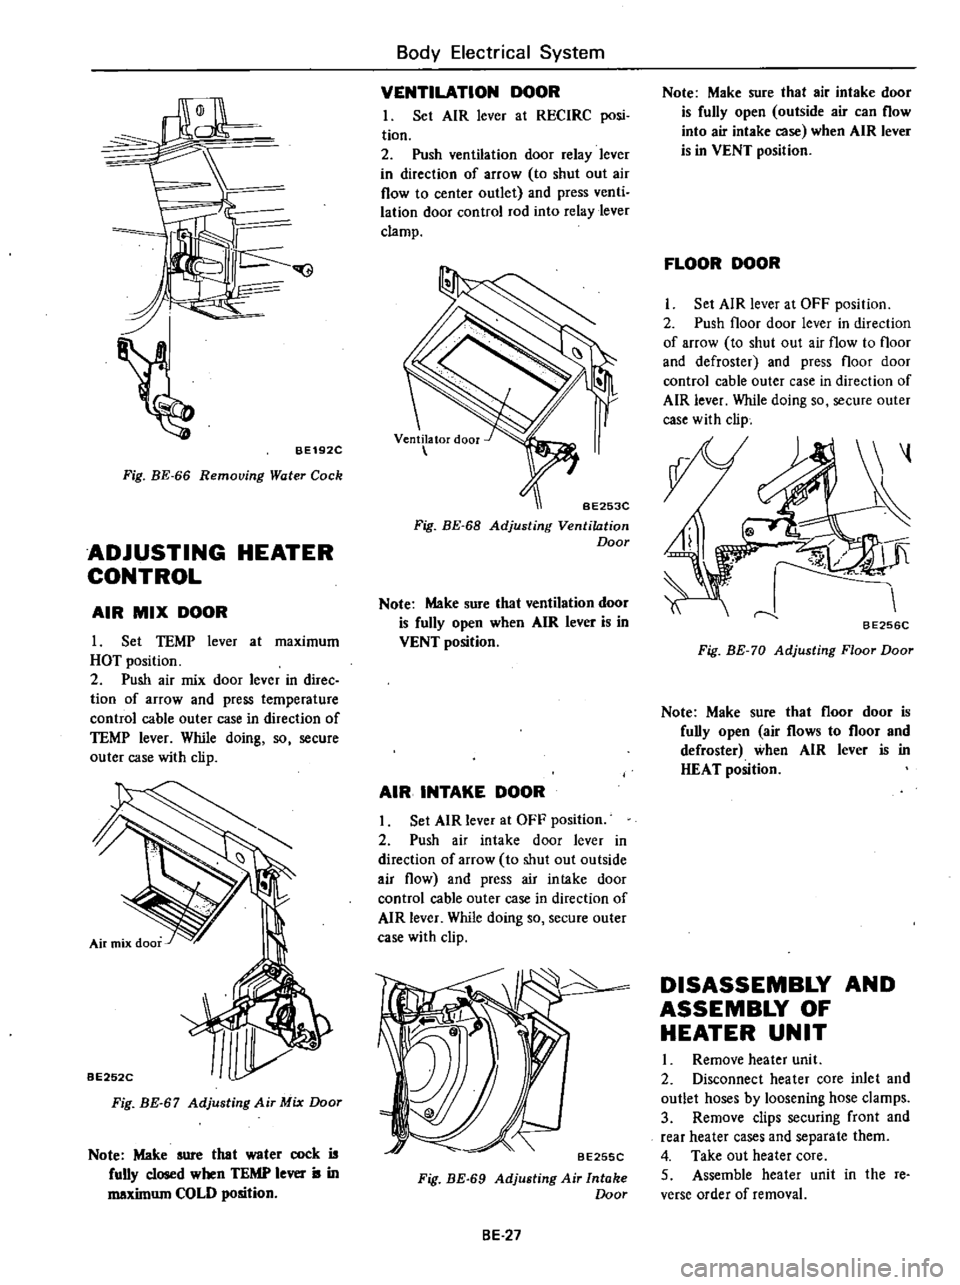
WATER
COCK
I
Remove
heater
unit
2
Remove
water
cock
attaching
screw
3
Disconnect
hoses
by
loosening
hose
clamps
4
Install
water
cock
in
the
reverse
order
of
removal
Page 472 of 548
IJi
Ir
c
r
I
BE192C
Fig
BE
66
Removing
Water
Cock
ADJUSTING
HEATER
CONTROL
AIR
MIX
DOOR
I
Set
TEMP
lever
at
maximum
HOT
position
2
Push
air
mix
door
lever
in
direc
tion
of
arrow
and
press
temperature
control
cable
outer
case
in
direction
of
TEMP
lever
While
doing
so
secure
outer
case
with
clip
BE252C
Fig
BE
67
Adjusting
Air
Mix
Door
Note
Make
sure
that
water
cock
is
fully
closed
when
TEMP
lever
is
in
maxilnum
COLD
position
Body
Electrical
System
VENTILATION
DOOR
I
Set
AIR
lever
at
RECIRC
posi
tion
2
Push
ventilation
door
relay
lever
in
direction
of
arrow
to
shut
out
air
flow
to
center
outlet
and
press
venti
lation
door
control
rod
into
relay
lever
clamp
BE253C
Fig
BE
68
Adjusting
Ventilation
Door
Note
Make
sure
that
ventilation
door
is
fully
open
when
AIR
lever
is
in
VENT
position
AIR
INTAKE
DOOR
Set
AIR
lever
at
OFF
position
2
Push
air
intake
door
lever
in
direction
of
arrow
to
shut
out
outside
air
flow
and
press
air
intake
door
control
cable
outer
case
in
direction
of
AIR
lever
While
doing
so
secure
outer
case
with
clip
BE255C
Fig
BE
69
Adjusting
Air
Intake
Door
BE
27
Note
Make
sure
that
air
intake
door
is
fully
open
outside
air
can
flow
into
air
intake
case
when
AIR
lever
is
in
VENT
position
FLOOR
DOOR
Set
AIR
lever
at
OFF
position
2
Push
floor
door
lever
in
direction
of
arrow
to
shut
out
air
flow
to
floor
and
defroster
and
press
floor
door
control
cable
outer
case
in
direction
of
AIR
lever
While
doing
so
secure
outer
case
with
clip
BE256C
Fig
BE
70
Adjusting
Floor
Door
Note
Make
sure
that
floor
door
is
fully
open
air
flows
to
floor
and
defroster
when
AIR
lever
is
in
HEAT
position
DISASSEMBLY
AND
ASSEMBLY
OF
HEATER
UNIT
Remove
heater
uni
t
2
Disconnect
heater
core
inlet
and
outlet
hoses
by
loosening
hose
clamps
3
Remove
clips
securing
front
and
rear
heater
cases
and
separate
them
4
Take
out
heater
core
5
Assemble
heater
unit
in
the
re
verse
order
of
removal