maintenance DATSUN 210 1979 Owner's Manual
[x] Cancel search | Manufacturer: DATSUN, Model Year: 1979, Model line: 210, Model: DATSUN 210 1979Pages: 548, PDF Size: 28.66 MB
Page 467 of 548

B6
Y
Electrica
System
f
EIIII
I
I
I
11111111
111
777
Rea
window
1
j
glass
W
777
n
1
r7
U
u
T
t
I
I
I
j
T
cD
t
ID
3
BE537
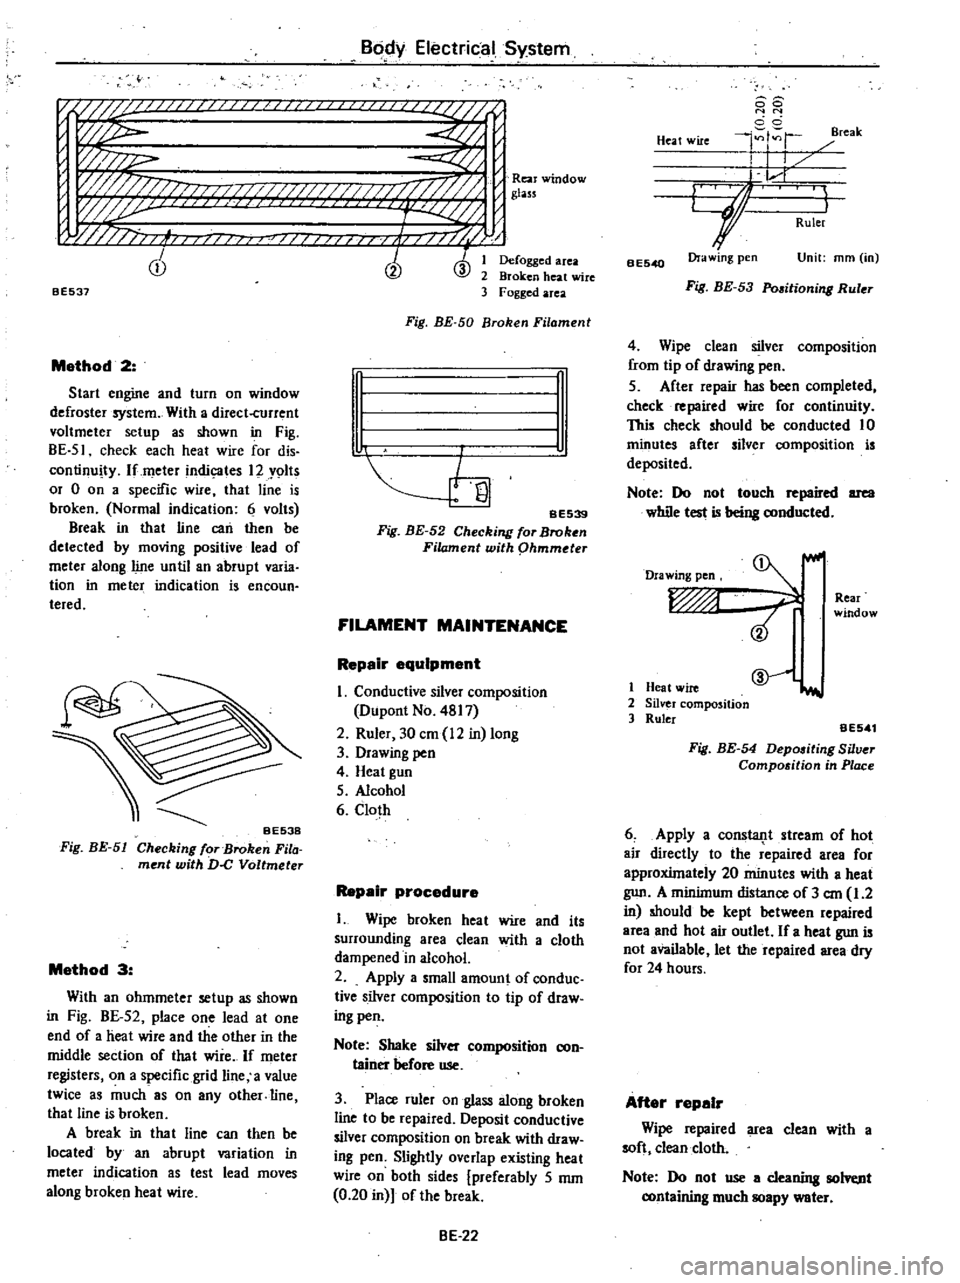
Method
2
Start
engine
and
turn
on
window
defroster
system
With
a
direct
current
voltmeter
setup
as
shown
in
Fig
BE
51
check
each
heat
wire
for
dis
continuity
lfmeter
indic
ates
12
Y9lts
or
0
on
a
specific
wire
that
line
is
broken
Normal
indication
6
volts
Break
in
that
line
can
then
be
detected
by
moving
positive
lead
of
meter
along
line
until
an
abrupt
varia
tion
in
meter
indication
is
encoun
teredo
Fig
BE
51
Method
3
With
an
ohmmeter
setup
as
shown
in
Fig
BE
52
place
one
lead
at
one
end
of
a
heat
wire
and
the
other
in
the
middle
section
of
that
wire
If
meter
registers
on
a
specific
grid
line
a
value
twice
as
much
8S
on
any
other
line
that
line
is
broken
A
break
in
tha
t
line
can
then
be
located
by
an
abrupt
variation
in
meter
indication
as
test
lead
moves
along
broken
heat
wire
Defogged
area
Broken
heat
wire
Fogged
area
Fig
BE
50
Broken
Filament
n
I
I
SE539
Fig
BE
52
Checking
for
Broken
Filament
with
phmmder
FILAMENT
MAINTENANCE
Repair
equipment
I
Conductive
silver
composition
Dupont
No
4817
2
Ruler
30
em
12
in
long
3
Drawing
pen
4
Heat
gun
5
Alcohol
6
Cloth
Repair
procedure
I
Wipe
broken
heat
wire
and
its
surrounding
area
clean
with
a
cloth
dampened
in
alcohol
2
Apply
a
small
amount
of
conduc
tive
silver
composition
to
tip
of
draw
ing
pen
Note
Shake
silver
composition
con
tainer
before
use
3
Place
ruler
on
glass
along
broken
line
to
be
repaired
Deposit
conductive
silver
composition
on
break
with
draw
ing
pen
Slightly
overlap
existing
heat
wire
on
both
sides
preferably
5
mm
0
20
in
of
the
break
BE
22
88
N
N
cci
4
r
reak
Heat
wire
I
I
L
r
GJ
I
Ruler
BE540
Ora
wing
pen
Unit
mm
in
Fig
BE
53
Pmitioning
Ruler
4
Wipe
clean
silver
composition
from
tip
of
drawing
pen
5
After
repair
has
been
completed
check
repaired
wire
for
continuity
This
check
should
be
conducted
10
minutes
after
silver
composition
is
deposited
Note
Do
not
touch
repaired
area
while
test
is
being
conducted
Drawing
pen
Rear
window
1
Heat
wire
2
Silver
composition
3
Ruler
@
iI
aE541
Fig
BE
54
Depositing
Silver
Compo
ition
in
Place
6
Apply
a
consla11t
stream
of
hot
air
directly
to
the
repaired
area
for
approxUnately
20
minutes
with
a
heat
gun
A
minilnum
distance
of
3
em
1
2
in
should
be
kept
between
repaired
area
and
hot
air
outlet
If
a
heat
gun
is
not
available
let
the
repaired
area
dry
for
24
hours
After
repair
Wipe
repaired
area
clean
with
a
soft
clean
cloth
Note
Do
not
use
a
cleaning
solvt
nt
containing
much
soapy
water
Page 502 of 548

DATSUN
210
Model
8310
Series
SECTIONAC
AIR
CONDITIONING
CONTENTS
DESCRIPTION
OUTLINE
OF
AIR
CONDITIONER
REFRIGERATION
SYSTEM
AIR
FLOW
VACUUM
SYSTEM
ELECTRICAL
CIRCUIT
GENERAL
SERVICE
REFRIGERANT
R
12
COMPRESSOR
OIL
MAINTENANCE
GENERAL
SERVICE
INSTRUCTIONS
SAFETY
PRECAUTIONS
EVACUATING
AND
CHARGING
SYSTEM
CHECKI
NG
FOR
LEAKS
REFRIGERANT
LEVEL
CHECK
COMPRESSOR
OIL
LEVEL
OHECK
PERFORMANCE
TEST
REFRIGERANT
LEAKS
SERVICE
PROCEDURES
FAST
IDLE
ACTUATOR
IDL
E
PULLEY
AND
COMPRESSOR
DRIVE
BELT
COMPR
ESSOR
CONDENSER
RECEIV
ER
DRIER
REFRIGERANT
LINES
I
COOLING
UNIT
EXPANSION
VALVE
THERMOSTAT
MAIN
RELAY
HEATER
UNIT
WATER
COCK
AC
2
AC
2
AC
3
AC
5
AC
6
AC
7
AC
9
AC
9
AC
9
AC
9
AC
9
AC
9
AC
1
AC14
AC15
AC
17
AC17
AC17
AC18
AC1B
AC19
AC19
AC
20
AC
20
AC
21
ACc21
AC
22
AC
22
AC
23
AC
23
AC
23
BLOWER
MOTOR
RESISTOR
AIR
CONDITIONER
CONTROL
FAN
SWITCH
MICROSWITCH
LOW
PRESSURE
SWITCH
MAGNET
VALVE
FUSE
REPLACEMENT
VACUUM
HOSE
DIAGRAM
WIRING
DIAGRAM
COMPRESSOR
MODEL
SC206
PRELIMINARY
CLEANING
COMPRESSOR
CLUTCH
SHAFT
SEAL
CYLINDER
HEAD
AND
VALVE
PLATE
DISCHARGE
AND
sU
CTiON
CONNECTORS
TROUBLE
DIAGNOSES
AND
CORRECTIONS
AIR
CONDITIONER
DIAGNOSES
BLOWER
MOTOR
DIAGNOSES
COMPRESSOR
DIAGNOSES
COMPRESSOR
CLUTCH
DIAGNOSES
VACUUM
SYSTEM
DIAGNOSES
PERFORMANCE
TEST
DIAGNOSES
PERFORMANCE
CHART
SERVICE
DATA
AND
SPECIFICATIONS
GENERAL
SPECIFICATIONS
INSPECTION
AND
ADJUSTMENT
TIGHTENING
TORQUE
SPECIAL
SERVICE
TOOLS
AC
23
AC
23
AC
23
AC
23
AC23
AC
24
AC
24
AC24
AC
24
AC
25
AC
26
AC
27
AC
27
AC
28
AC30
AC30
AC32
AC
32
AC
33
AC34
AC35
AC36
AC37
AC
41
AC
42
AC
42
AC
42
AC
43
AC
44
Page 510 of 548

REFRIGERANT
R
12
The
refrigerant
used
in
the
air
conditioner
is
generally
called
Re
frigerant
12
R
12
No
other
refrig
erant
than
the
above
refrigerant
should
be
used
Note
Exercise
care
when
handling
re
frigerant
as
it
is
stored
under
high
pressure
COMPRESSOR
OIL
The
SUNISO
5GS
refrig
ration
lubricant
should
be
used
to
assure
the
successful
compressor
operation
Use
of
oils
other
than
recommended
or
mixing
of
the
oil
with
other
oils
would
cause
chemical
reaction
or
lead
to
lowered
viscosity
or
deficient
lubrica
tion
The
oil
absorbs
moisture
as
it
con
tacts
the
air
This
points
out
the
need
for
care
not
to
expose
it
to
atmos
phere
for
an
extended
period
of
time
MAINTENANCE
The
following
checks
and
main
tenance
are
especially
important
to
the
air
conditioner
I
Check
refrigerant
level
2
Check
refrigerant
leaks
3
Check
compressor
drive
belt
for
proper
deflection
4
Even
in
the
off
season
turn
the
compressor
for
10
minutes
at
least
once
a
month
by
running
the
engine
at
1
500
rpm
GENERAL
SERVICE
INSTRUCTIONS
If
dirt
water
or
air
enters
the
air
conditioner
system
it
will
be
seriously
affected
Be
sure
to
observe
the
following
I
Always
keep
the
working
place
clean
and
dry
and
free
from
dirt
and
Air
Conditioning
GENERAL
SERVICE
dust
Wipe
water
off
from
the
line
fittings
with
a
clean
cloth
before
dis
connecting
2
Have
all
necessary
tools
in
prepar
ation
beforehand
and
have
tools
clean
and
dry
3
Handling
plug
when
the
system
line
is
disconnected
4
Handling
compressor
oil
For
details
refer
to
each
descrip
tion
in
this
manual
SAFETY
PRECAUTIONS
WARNING
1
Since
direct
contact
of
the
liquid
refrigerant
with
your
skin
will
cause
frostbite
always
be
carelul
when
handling
the
refrigerant
Always
wear
goggles
to
protect
your
eyes
when
working
around
the
system
2
The
refrigerant
service
container
has
a
safe
strength
However
if
handled
incorrectly
it
will
ex
plode
Therelore
always
follow
the
instructions
On
the
label
In
particular
never
store
it
in
a
hot
location
above
520e
1260F
or
drop
it
from
a
high
height
3
The
refrigerant
gas
is
odorless
and
colorless
and
breathing
may
become
difficult
due
to
the
lack
of
oxygen
Since
the
relrigerant
gas
is
heavier
than
air
and
will
lay
close
to
the
floor
be
espe
cially
careful
when
handling
it
in
small
confined
spaces
4
The
refrigerant
itself
is
nonflam
mable
However
a
toxic
gas
phosgene
gas
is
produced
when
it
contacu
fire
and
special
care
is
therefore
required
when
check
ing
for
leaks
in
the
system
with
a
halide
torch
5
Do
not
steam
clean
On
the
sys
tem
especially
condenser
since
excessively
high
pressure
will
build
up
in
the
system
resulting
in
explosion
of
the
system
The
above
precautions
are
essen
tial
in
handling
of
Refrigerant
12
and
their
strict
observation
AC
9
requires
sufficient
training
Therefore
it
is
of
first
impor
tance
that
any
other
personnel
than
a
well
trained
serviceman
should
not
be
allowed
to
handle
the
refrigerant
EVACUATING
AND
CHARGING
SYSTEM
During
servicing
use
caution
to
keep
air
from
getting
into
refrigerant
When
air
enters
the
system
all
refriger
ant
must
be
evacuated
from
system
prior
to
charging
new
refrigerant
Air
in
refrigerant
has
the
following
delete
rious
effects
1
Since
the
condensation
tempera
ture
of
the
air
is
extremely
low
the
air
will
not
be
condensed
when
refrigerant
gas
is
condensed
in
the
condenser
and
the
air
will
thus
remain
in
gaseous
fonn
Consequently
the
effective
thermal
transmission
area
of
condenser
for
refrigerant
gas
will
be
reduced
and
refrigerant
gas
to
be
condensed
will
be
reduced
The
pressure
rise
will
become
proportional
to
the
volume
of
the
air
in
system
2
When
air
and
refrigerant
are
r
tixed
in
system
a
chemical
reaction
will
be
produced
and
hydrochloric
acid
which
will
adversely
affect
the
aluminum
copper
iron
and
other
materials
in
system
may
be
generated
HANDLING
MANIFOLD
GAUGE
The
pressure
at
the
high
and
low
sides
of
system
should
be
measured
when
evacuating
and
charging
refrig
erant
and
when
diagnosing
trouble
in
the
system
The
manifold
gauge
is
used
for
these
purposes
A
manifold
gauge
has
two
pressure
gauges
a
low
pressure
gauge
and
a
high
pressure
gauge
These
gauges
are
connected
to
the
high
and
low
side
service
valves
of
system
through
flexible
charging
hoses
The
construction
of
manifold
gauge
is