wheel DATSUN 210 1979 Owner's Manual
[x] Cancel search | Manufacturer: DATSUN, Model Year: 1979, Model line: 210, Model: DATSUN 210 1979Pages: 548, PDF Size: 28.66 MB
Page 318 of 548
Propeller
Shaft
Differential
Carrier
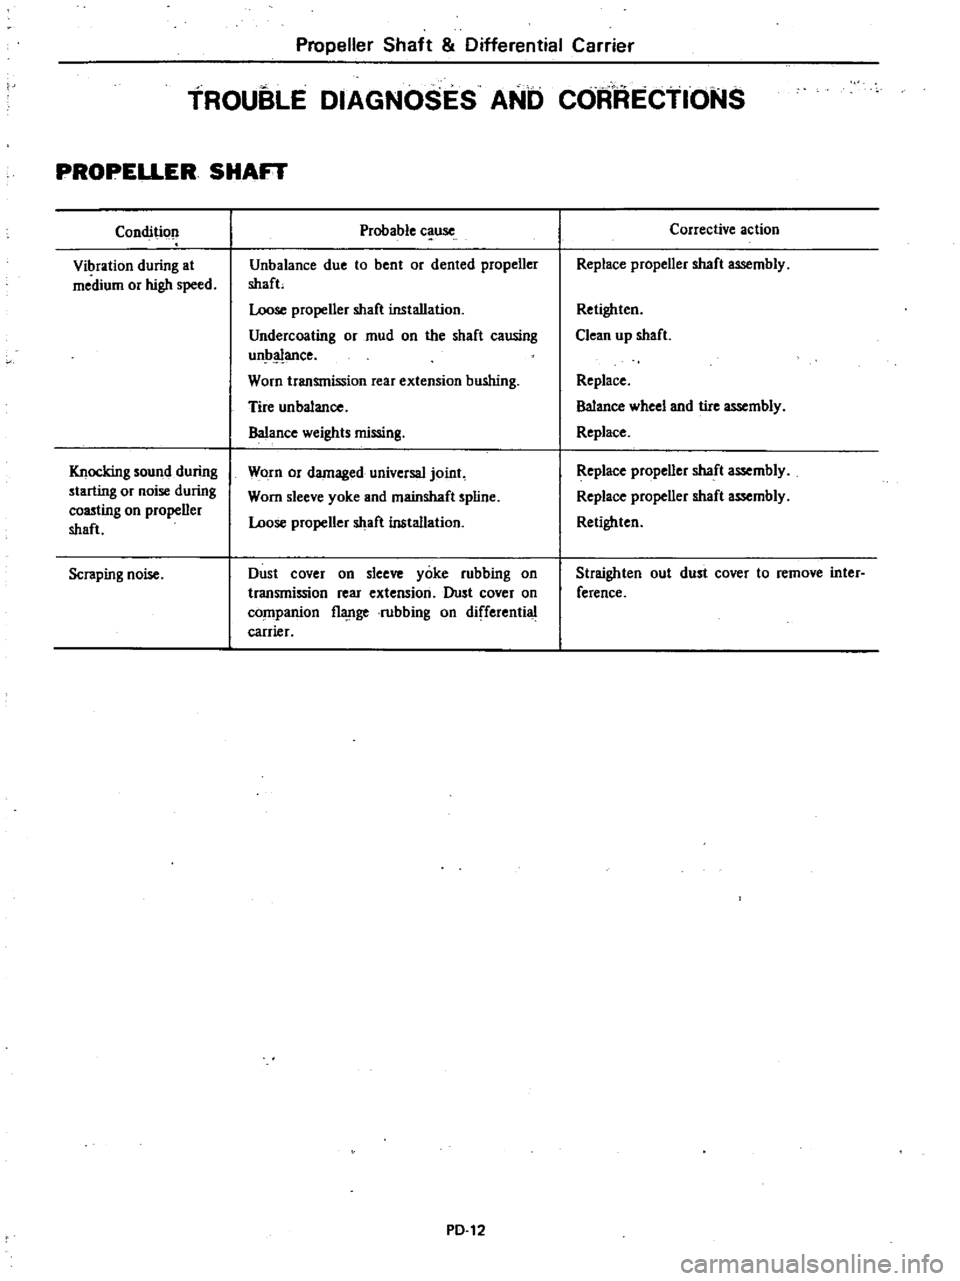
TROUBLE
DIAGNOSES
AND
CORRECTIONS
PROPELLER
SHAFT
Condition
Vibration
during
at
medium
or
high
speed
Knocking
sound
during
starting
or
noise
during
coasting
on
propeller
shaft
Scraping
noise
Probable
cause
Unbalance
due
to
bent
or
dented
propeller
shafL
Loose
propeller
shaft
installation
Undercoating
or
mud
on
the
shaft
causing
unb
ance
Worn
transmission
rear
extension
bushing
Tire
unbalance
Balance
weights
missing
Worn
or
damaged
universal
joint
Worn
sleeve
yoke
and
meinshaft
spline
Loose
propeller
shaft
installation
Dust
cover
on
sleeve
yoke
rubbing
on
transmission
rear
extension
Dust
cover
on
companion
flange
rubbing
on
differential
carrier
PD
12
Corrective
action
Replace
propener
shaft
assembly
Retighten
Clean
up
shaft
Replace
Balance
wheel
and
tire
assembly
Replace
Replace
propeller
shaft
assembly
Replace
propeller
shaft
assembly
Retighten
Straighten
out
dust
cover
to
remove
inter
ference
Page 319 of 548
Propeller
Shaft
Differential
Carrier
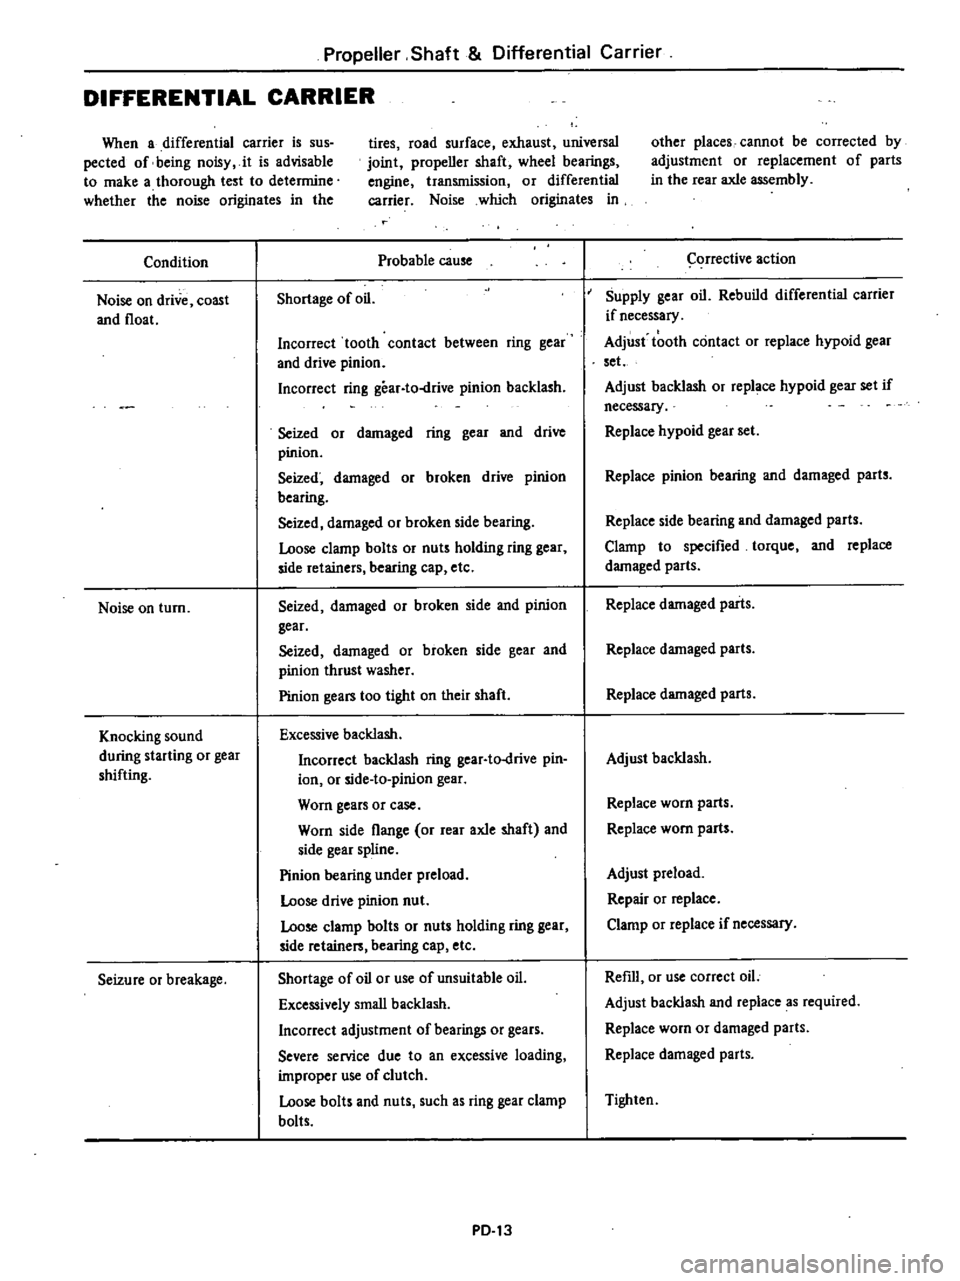
DIFFERENTIAL
CARRIER
When
a
differential
carrier
is
sus
pected
of
being
noisy
it
is
advisable
to
make
a
thorough
test
to
determine
whether
the
noise
originates
in
the
tires
road
surface
exhaust
universal
joint
propeller
shaft
wheel
bearings
engine
transmission
or
differential
carrier
Noise
which
originates
in
Condition
Noise
on
drive
coast
and
float
Noise
on
turn
Knocking
sound
during
starting
or
gear
shifting
Seizure
or
breakage
Probable
cause
Shortage
of
oil
Incorrect
tooth
contact
between
ring
gear
and
drive
pinion
Incorrect
ring
gear
to
drive
pinion
backlash
Seized
or
damaged
ring
gear
and
drive
pinion
Seized
damaged
or
broken
drive
pinion
bearing
Seized
damaged
or
broken
side
bearing
Loose
clamp
bolts
or
nuts
holding
ring
gear
side
retainers
bearing
cap
etc
Seized
damaged
or
broken
side
and
pinion
gear
Seized
damaged
or
broken
side
gear
and
pinion
thrust
washer
Pinion
gears
too
tight
on
their
shaft
Excessive
backlash
Incorrect
backlash
ring
gear
to
drive
pin
ion
or
side
ta
pinion
gear
Worn
gears
or
case
Worn
side
flange
or
rear
axle
shaft
and
side
gear
spline
Pinion
bearing
under
preload
Loose
drive
pinion
nut
Loose
clamp
bolts
or
nuts
holding
ring
gear
side
retainers
bearing
cap
etc
Shortage
of
oil
or
use
of
unsuitable
oil
Excessively
small
backlash
Incorrect
adjustment
of
bearings
or
gears
Severe
service
due
to
an
excessive
loading
improper
use
of
clutch
Loose
bolts
and
nuts
such
as
ring
gear
clamp
bolts
PD
13
other
places
cannot
be
corrected
by
adjustment
or
replacement
of
parts
in
the
rear
axle
assembly
orrective
action
Supply
gear
oil
Rebuild
differential
carrier
if
necessary
Adjust
tooth
contact
or
replace
hypoid
gear
set
Adjust
backlash
or
replace
hypoid
gear
set
if
necessary
Replace
hypoid
gear
set
Replace
pinion
bearing
and
damaged
parts
Replace
side
bearing
and
damaged
parts
Clamp
to
specified
torque
and
replace
damaged
parts
Replace
damaged
parts
Replace
damaged
parts
Replace
damaged
parts
Adjust
backlash
Replace
worn
parts
Replace
worn
parts
Adjust
preload
Repair
or
replace
Clamp
or
replace
if
necessary
Refill
or
use
correct
oil
Adjust
backlash
and
replace
as
required
Replace
worn
or
damaged
parts
Replace
damaged
parts
Tighten
Page 324 of 548
Front
Axle
Front
Suspension
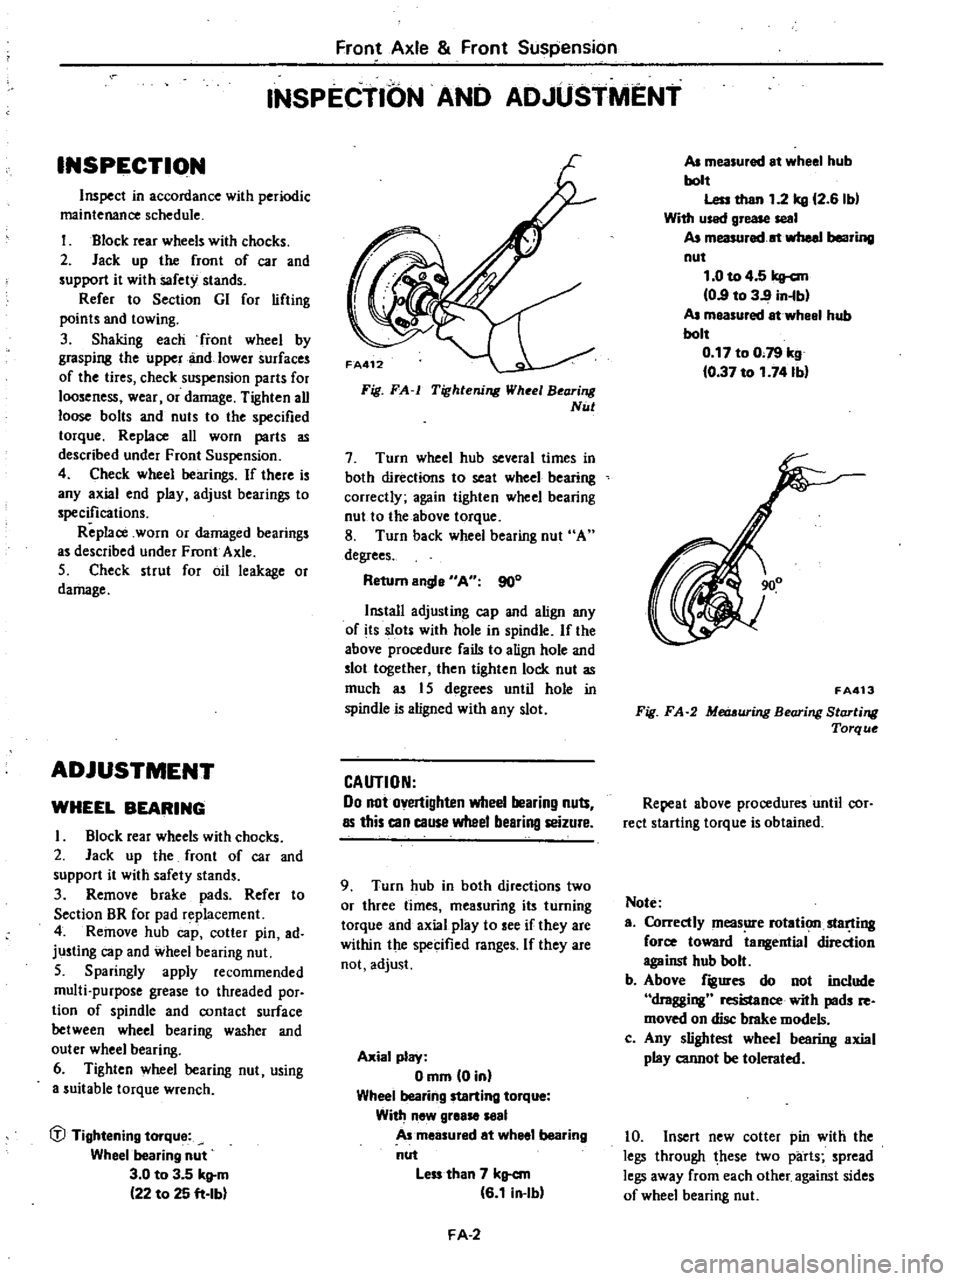
INSPECTION
AND
ADJUSTIVIENT
INSPECTION
Inspect
in
accordance
with
periodic
maintenance
schedule
Block
rear
wheels
with
chocks
2
Jack
up
the
front
of
car
and
support
it
with
safety
stands
Refer
to
Section
GI
for
lifting
points
and
towing
3
Shaking
each
fiont
wheel
by
grasping
the
upper
and
lower
surfaces
of
the
tires
check
suspension
parts
for
looseness
wear
or
damage
Tighten
aU
loose
bolts
and
nuts
to
the
specified
torque
Replace
all
worn
parts
as
described
under
Front
Suspension
4
Check
wheel
bearings
If
there
is
any
axial
end
play
adjust
bearings
to
specifications
Replace
worn
or
damaged
bearings
as
described
under
Front
Axle
S
Check
strut
for
oil
leakage
or
damage
ADJUSTMENT
WHEEL
BEARING
Block
rear
wheels
with
chocks
2
Jack
up
the
front
of
car
and
support
it
with
safety
stands
3
Remove
brake
pads
Refer
to
Section
BR
for
pad
replacement
4
Remove
hub
cap
cotter
pin
ad
justing
cap
and
wheel
bearing
nut
S
Sparingly
apply
recommended
multi
purpose
grease
to
threaded
por
tion
of
spindle
and
contact
surface
between
wheel
bearing
washer
and
outer
wheel
bearing
6
Tighten
wheel
bearing
nut
using
a
suitable
torque
wrench
P
Tightening
torque
Wheel
bearing
nut
3
0
to
3
5
kll
m
22
to
25
ft
Ibl
Fig
FA
Tighlening
Wheel
Bearing
Nul
7
Turn
wheel
hub
several
times
in
both
directions
to
seat
wheel
bearing
correctly
again
tighten
wheel
bearing
nut
to
the
above
torque
8
Turn
back
wheel
bearing
nut
A
degrees
Return
engle
AU
900
Install
adjusting
cap
and
align
any
of
its
slots
with
hole
in
spindle
If
the
above
procedure
fails
to
align
hole
and
slot
together
then
tighten
lock
nut
as
much
as
I
S
degrees
until
hole
in
spindle
is
aligned
with
eny
slot
CAUTION
00
not
overtighten
wheel
bearing
nuts
as
this
can
cause
wheel
bearing
seizure
9
Turn
hub
in
both
directions
two
or
three
times
measuring
its
turning
torque
and
axial
play
to
ee
if
they
are
within
the
specified
range
If
they
are
not
adjust
Axial
play
Omm
Din
Wheel
bealing
starting
torque
With
new
gleaS8
l8al
A
measured
et
wheel
bearing
nut
less
than
7
kg
cm
G
1
in
Ibl
FA
2
AJ
measuled
et
wheel
hub
bolt
Less
then
1
2
kg
12
G
Ibl
With
u
ed
gr
seal
AJ
measured
at
wheel
bealing
nut
1
0
to
4
5
kg
cm
0
9
to
3
9
in
b
AJ
measuled
at
wheel
hub
bolt
0
17
to
0
79
kg
0
37
to
1
741bl
FA413
Fig
FA
2
Metr
uring
Bearing
Starting
Torq
ue
Repeat
above
procedures
until
cor
rect
starting
torque
is
obtained
Note
a
Correctly
meas
e
rotation
slar
ting
force
toward
tangential
direction
against
hub
bolt
b
Above
figures
do
not
include
dragging
resistance
with
pads
re
moved
on
disc
brake
models
c
Any
slightest
wheel
bearing
axial
play
cannot
be
tolerated
10
Insert
new
cotter
pin
with
the
legs
through
hese
two
parts
spread
legs
away
from
each
other
against
sides
of
wheel
bearing
nut
Page 325 of 548
Fig
FA
3
Installing
Coller
Pin
II
Install
hub
cap
with
new
Q
ring
and
wheel
WHEEL
ALIGNMENT
Correct
front
wheel
alignment
as
sures
proper
car
handling
characteris
tics
and
minimum
steering
effort
with
the
least
amount
of
tire
wear
Before
adjusting
front
wheel
alignment
be
sure
to
make
preliminary
inspection
of
front
end
parts
Tire
pressure
and
balance
Wheel
bearings
and
wheel
bearing
nuts
Steering
gear
play
Steering
gear
housing
loose
at
frame
Steering
linkage
and
connections
Shock
absorber
operation
If
wrong
repair
or
replace
the
damaged
portion
or
parts
When
using
equipment
for
front
wheel
alignment
inspection
follow
the
instructions
furnished
with
equipment
Note
Inspection
should
be
made
with
the
car
set
Ievel
and
at
curb
weight
Cember
end
caster
Camber
and
caster
are
preset
at
factory
and
cannot
be
adjusted
The
car
requires
only
toe
in
and
car
posture
adjustment
Note
If
camber
or
caster
alignment
is
not
within
specifications
check
as
sociated
parts
Repair
or
replace
as
necessary
Front
Axle
Front
Suspension
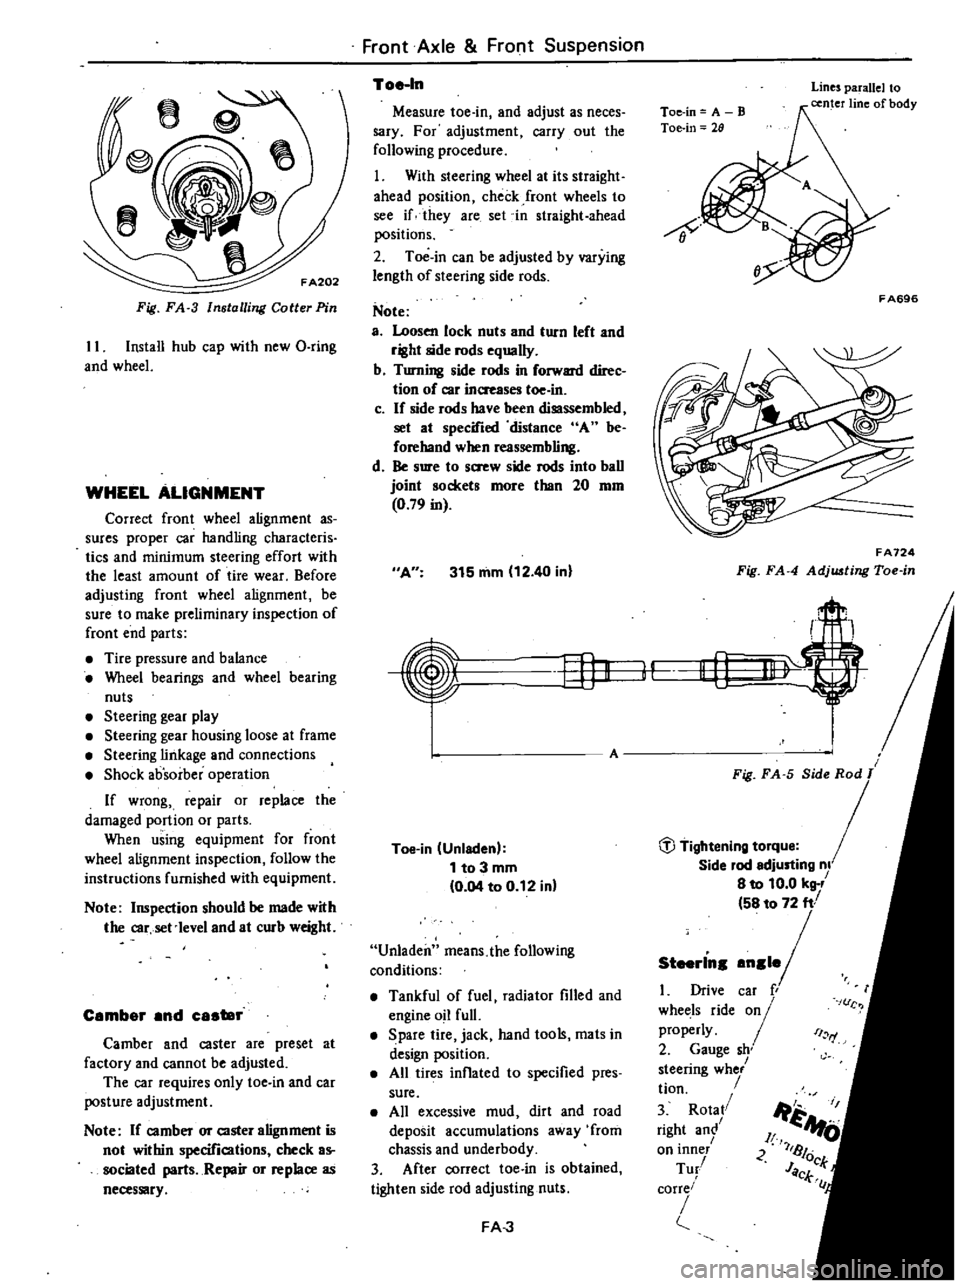
Toe
In
Measure
toe
in
and
adjust
as
neces
sary
For
adjustment
carry
out
the
following
procedure
1
With
steering
wheel
at
its
straight
ahead
position
check
front
wheels
to
see
if
they
are
set
in
straight
ahead
positions
2
Toe
in
can
be
adjusted
by
varying
length
of
steering
side
rods
Note
a
Loosen
lock
nuts
and
turn
left
and
right
side
rods
equally
b
Turning
side
rods
in
forward
direc
tion
of
car
inaeases
toe
in
c
If
side
rods
have
been
disassembled
set
at
specified
distance
A
be
forehand
when
reassembling
d
Be
sure
to
s
w
side
rods
into
ball
joint
sockets
more
than
20
mm
0
79
in
A
315
mm
12
40
in
EfJK
Toe
in
Unladen
1
to
3
mm
0
04
to
0
12
in
Unladen
means
the
following
conditions
Tankful
of
fuel
radiator
filled
and
engine
oil
full
Spare
tire
jack
hand
tools
mats
in
design
position
All
tires
inflated
to
specified
pres
sure
All
excessive
mud
dirt
and
road
deposit
accumulations
away
from
chassis
and
underbody
3
After
correct
toe
in
is
obtained
tighten
side
rod
adjusting
nuts
FA
J
Toe
in
A
B
Toe
in
28
Lines
parallel
to
center
line
of
body
8
F
A696
FA724
Fig
FA
4
Adj
ting
Toe
in
r
II
Li
1
t
Fig
FA
5
Side
Rod
T
Side
lod
edjusting
nl
8
to
10
0
kg
58
to
72
ft
1
Drive
caf
r
whet
ls
ride
01
properly
2
Gauge
sh
steenng
whe
tion
3
Rota
right
an
on
lOner
Tu
corre
i
I
rf
c
Ji
1
A
JI
U
2
7181
JOck
CL
C
Page 326 of 548
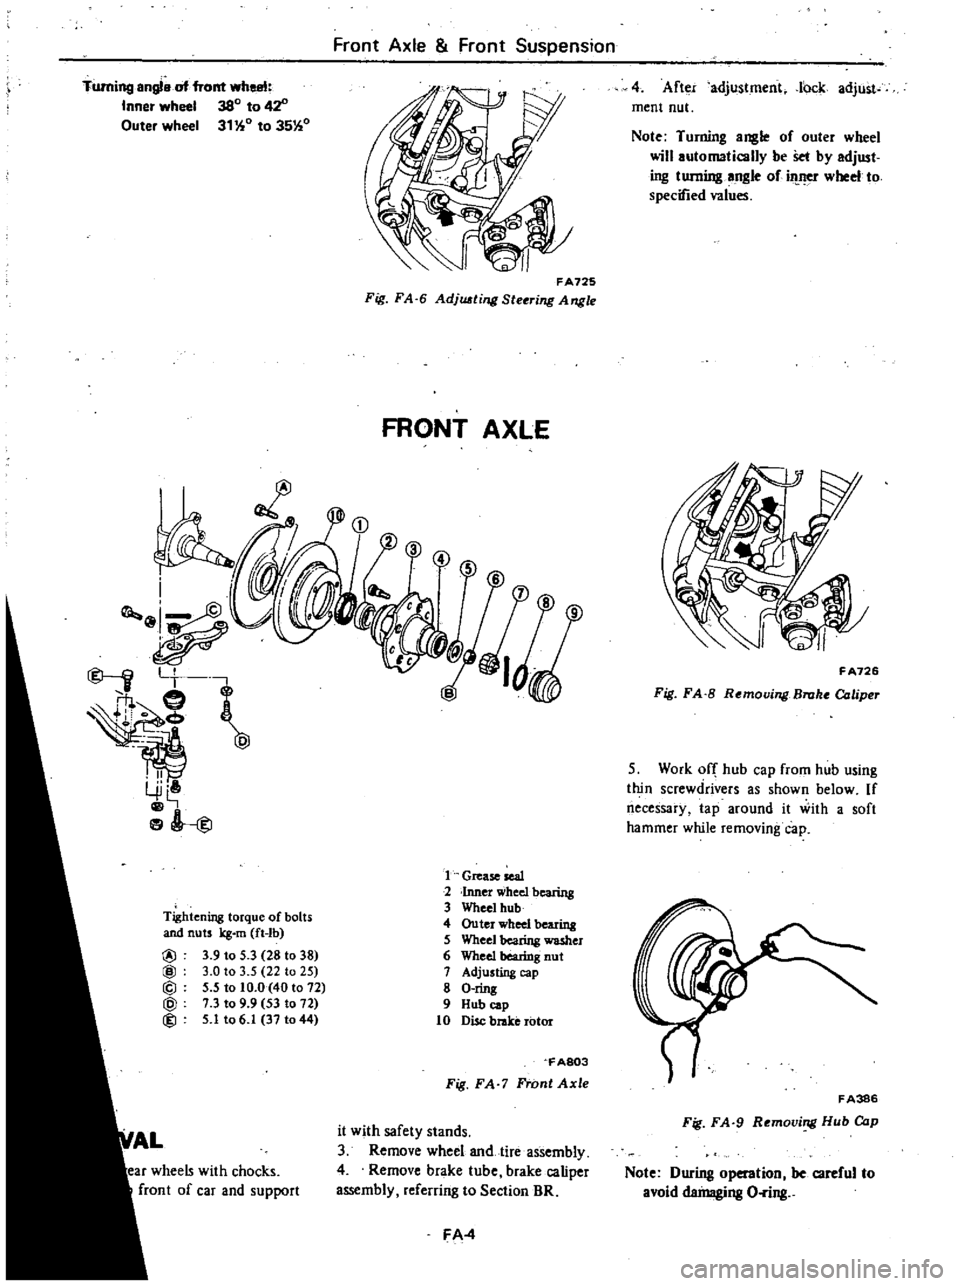
Turning
engie
of
front
wheel
Inner
wheel
380
to
42
Outel
wheel
31
0
to
35
0
Tightening
torque
of
bolts
and
nuts
kg
m
ft
lb
@
3
9
to
5
3
28
to
38
@
3
0
to
3
5
22
to
25
@
5
5
to
10
0
40
to
72
@
7
3
to
9
9
53
to
72
@
5
1
to
6
1
371044
ear
wheels
with
chocks
fron
t
of
car
and
support
Front
Axle
Front
Suspension
FA125
Fig
FA
6
AdjU
ting
Steering
Angle
FRONT
AXLE
1
Grease
seal
2
Inner
wbeel
bearin
3
Wheel
hub
4
Outer
wheel
bearins
5
Wheel
bearing
washer
6
Wheel
bearing
nut
7
Adjusting
cap
8
O
ring
9
Hub
cap
10
Disc
brake
rotor
FA803
Fig
FA
7
Front
Axle
it
with
safety
stands
3
Remove
wheel
and
tire
assembly
4
Remove
brake
tube
brake
caliper
assembly
referring
to
Section
DR
FA
4
4
After
adjustment
l
ck
adju
ment
nut
Note
Turning
angle
of
outer
wheel
will
automatically
be
Set
by
adjust
ing
turning
angle
ofin
f
U
wheel
to
specified
values
FA726
Fig
FA
8
RemouingBroke
Caliper
5
Work
off
hub
cap
from
hub
using
t
n
screwdrivers
as
shown
below
If
necessary
tap
around
it
with
a
soft
hammer
while
removing
cap
F
A386
Fig
FA
9
Remouing
Hub
Cap
Note
During
operation
be
careful
to
avoid
deinaging
O
ring
Page 327 of 548
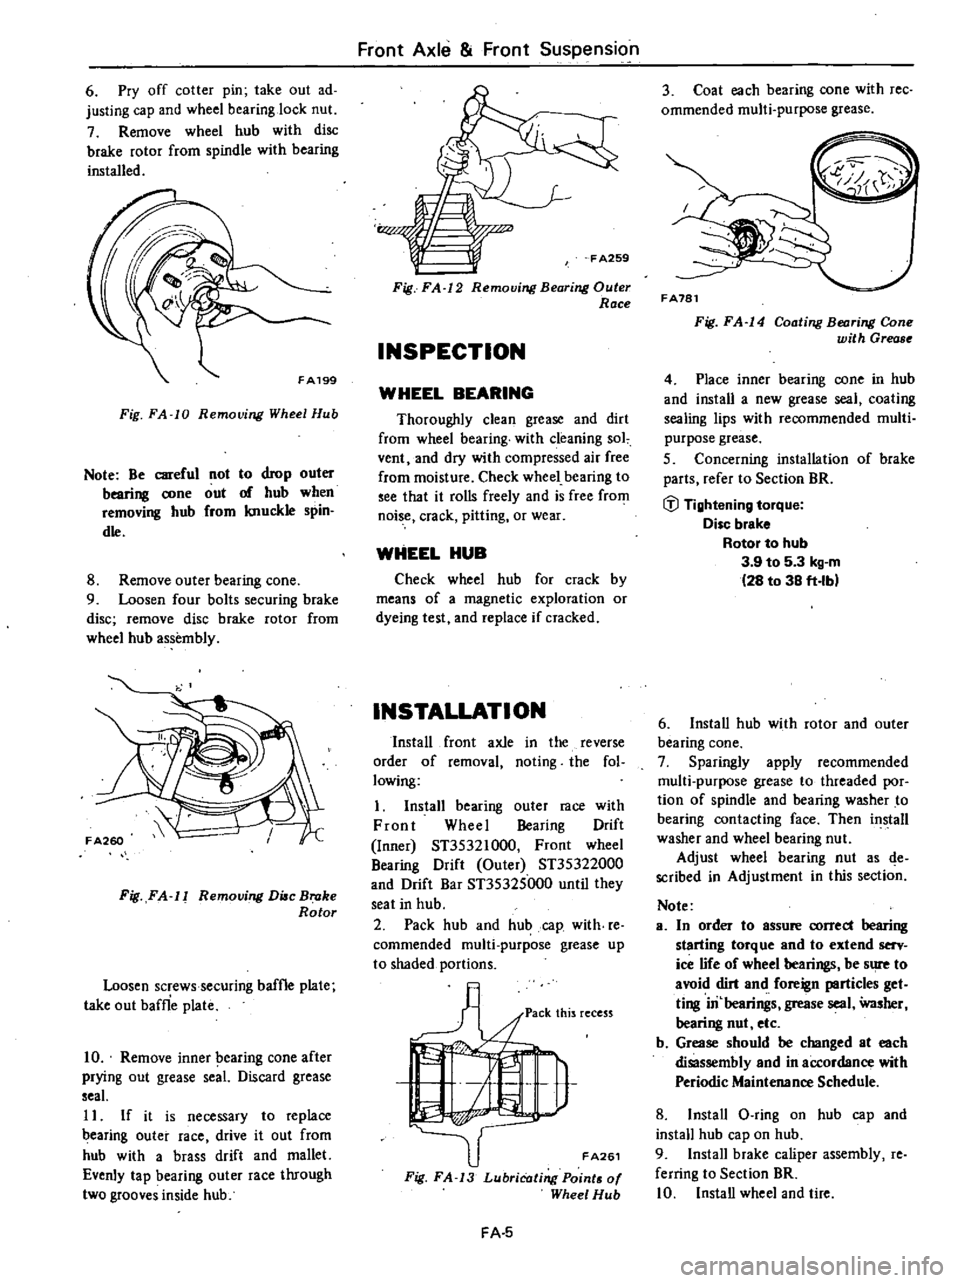
6
Pry
off
cotter
pin
take
out
ad
justing
cap
and
wheel
bearing
lock
nut
7
Remove
wheel
hub
with
disc
brake
rotor
from
spindle
with
bearing
installed
FA199
Fig
FA
10
Removing
Wheel
Hub
Note
Be
careful
not
to
drop
outer
bearing
DOne
out
of
hub
when
removing
hub
from
knuckle
spin
dle
8
Remove
outer
bearing
cone
9
Loosen
four
bolts
securing
brake
disc
remove
disc
brake
rotor
from
wheel
hub
assembly
Fig
FA
11
Removing
Due
Broke
Rotor
Loosen
screws
securing
baffle
plate
take
out
baffle
plate
10
Remove
inner
earing
cone
after
prying
out
grease
seaL
Discard
grease
seaL
11
If
it
is
necessary
to
replace
earing
outer
race
drive
it
out
from
hub
with
a
brass
drift
and
mallet
Evenly
tap
bearing
outer
race
through
two
grooves
inside
hub
Front
Axle
Front
Suspension
Fig
FA
12
Removing
Bearing
Outer
Race
INSPECTION
WHEEL
BEARING
Thoroughly
clean
grease
and
dirt
from
wheel
bearing
with
cleaning
sol
vent
and
dry
with
compressed
air
free
from
moisture
Check
wheel
bearing
to
see
that
it
rolls
freely
and
is
free
from
noise
crack
pitting
or
wear
WHEEL
HUB
Check
wheel
hub
for
crack
by
means
of
a
magnetic
exploration
or
dyeing
test
and
replace
if
cracked
INSTALLATION
Install
front
axle
in
the
reverse
order
of
removal
noting
the
fol
lowing
I
Install
bearing
outer
race
with
Front
Wheel
Bearing
Drift
Inner
ST35321000
Front
wheel
Bearing
Drift
Outer
ST35322000
and
Drift
Bar
ST35325000
until
they
seat
in
hub
2
Pack
hub
and
hub
cap
with
re
commended
multi
purpose
grease
up
to
shaded
portions
fA261
Fig
FA
13
LubriCating
Points
of
Wheel
Hub
FA
5
3
Coat
each
bearing
DOne
with
rec
ommended
multi
purpose
grease
FA781
Fig
FA
14
Coating
Bearing
Cone
with
Grease
4
Place
inner
bearing
cone
in
hub
and
install
a
new
grease
seal
coating
sealing
lips
with
recommended
multi
purpose
grease
5
Concerning
installation
of
brake
parts
refer
to
Section
BR
i
l
Tightening
tOlque
Disc
brake
Rotor
to
hub
3
9
to
5
3
kg
m
28
to
38
ft
lbl
6
Install
hub
with
rotor
and
outer
bearing
cone
7
Sparingly
apply
recommended
multi
purpose
grease
to
threaded
por
tion
of
spindle
and
bearing
washer
to
bearing
contacting
face
Then
install
washer
and
wheel
bearing
nut
Adjust
wheel
bearing
nut
as
de
scribed
in
Adjustment
in
this
section
Note
a
In
order
to
assure
DOrrect
bearing
starting
torque
and
to
extend
serv
ice
nfe
of
wheel
bearings
be
sure
to
avoid
dirt
and
foreign
particles
get
ting
iIi
bearings
grease
seal
Washer
bearing
nut
etc
b
Grease
should
be
changed
at
each
disassembly
end
in
aa
ordance
with
Periodic
Maintenance
Schedule
8
Install
O
ring
on
hub
cap
and
install
hub
cap
on
hub
9
Install
brake
caliper
assembly
re
ferring
to
Section
BR
10
Install
wheel
and
lire
Page 332 of 548

wheels
2
Remove
splaahboard
if
necessary
3
Back
off
nut
securing
tension
rod
to
bracket
and
remove
bolts
which
secure
tension
rod
to
lower
arm
Tension
rod
can
then
be
taken
out
4
Remove
nuts
securing
stabilizer
bar
to
connecting
rod
Note
Two
wrenches
are
n
1
in
this
B
5
Remove
bolts
and
nuts
securing
stabilizer
bar
bracket
in
position
Stabilizer
bar
can
then
be
iaken
o
t
CV
3
@
I
Lower
ann
5
Tension
rod
2
Stabilizer
bar
bracket
connecting
rod
6
Tension
rod
3
Stabilizer
bar
4
Stabilizer
bar
bracket
FA129
Fig
FA
31
Removing
Tension
Rod
and
Stabilizer
Bar
INSPECTION
I
Check
tension
rod
and
stabilizer
bar
for
evidence
of
deformation
or
cracks
if
necessary
replace
2
Check
rubber
parts
such
as
ten
sion
rod
and
stabilizer
bar
bushings
to
be
sure
they
are
not
deteriorated
or
cracked
if
1ecessary
replace
INSTAllATION
Install
tension
rod
and
stabilizer
bar
in
tJ
1e
reverse
order
of
removal
noting
the
following
I
Be
sure
stabilizer
bar
is
not
closer
to
either
side
but
is
located
at
the
middle
If
stabilizer
bar
is
new
use
the
following
procedure
to
center
the
stabilizer
bar
Position
arm
with
white
paipt
mark
toward
left
side
of
car
Front
Axle
Front
Suspension
Set
slabillz
rliar
mount
bushingS
So
that
outer
side
of
stabilizer
bar
bushing
is
brought
into
inner
side
of
marking
e
o
I
19
e
1
Marking
2
Bushing
3
Marking
4
While
painting
5
Marking
0
A
F
A667
Fig
FA
32
Centering
8lDbilize
Bar
2
Chec
to
be
sure
that
tension
rod
bushing
is
propelly
centered
in
its
seat
3
Be
sure
that
tension
rod
bracket
bolt
is
correctly
torqued
Note
a
Noting
direction
of
tension
rod
bushing
properly
center
bushing
in
tension
rod
bushing
washer
Fig
FA
33
Direclion
of
Tension
Rod
BUlhing
b
After
installation
make
sure
mini
mum
clearances
between
tension
rods
end
stabilizer
bar
are
equal
on
both
sides
c
Closely
observe
torq
ue
specification
when
tightening
tension
rod
bracket
retaining
bolts
d
First
tighten
tension
rod
on
bracket
side
to
specified
torque
setting
then
install
the
other
end
on
lower
arm
fJ
Tightening
tOlque
Tension
rod
bushing
installation
nut
4
5
to
5
11rg
33
to
37
ft
lbl
FA
10
Tension
rOd
to
Lower
ann
5
1
to
6
1
kg
m
137
to
44
ft
Ibl
Tension
rod
bracket
to
body
3
2
to
4
3
kg
m
23
to
31
ft
Ibl
Stabilizer
bar
bleck
t
1
6to2
11rg
112
to
15
ft
lbl
Stabilizel
bel
connecting
rod
1
6
to
2
1
kg
m
12
to
15
ft
lbl
LOWER
ARM
AND
LOWER
BALL
JOINT
The
lower
ann
is
connected
to
the
suspension
member
through
a
rubber
bwhing
end
to
the
strut
through
a
ball
joint
The
lower
ball
joint
is
assembled
at
the
factory
and
cannot
be
disassem
bled
REMOVAL
1
Block
rear
wheels
with
chocks
2
Jack
up
front
of
car
and
support
it
with
safety
stands
remove
wheel
3
Remove
splashboard
4
Separate
knuckle
arm
from
strut
5
Pry
colter
pin
off
and
separate
side
rod
fromknilckle
arm
using
Ball
Joint
Remover
HT72520000
FA661
Fig
FA
34
Remoliing8ideRod
Ball
Joint
6
Remove
tension
rod
and
stabilizer
bar
from
lower
ann
7
Remove
bolt
connecting
lower
ann
to
suspension
crossmember
Page 335 of 548
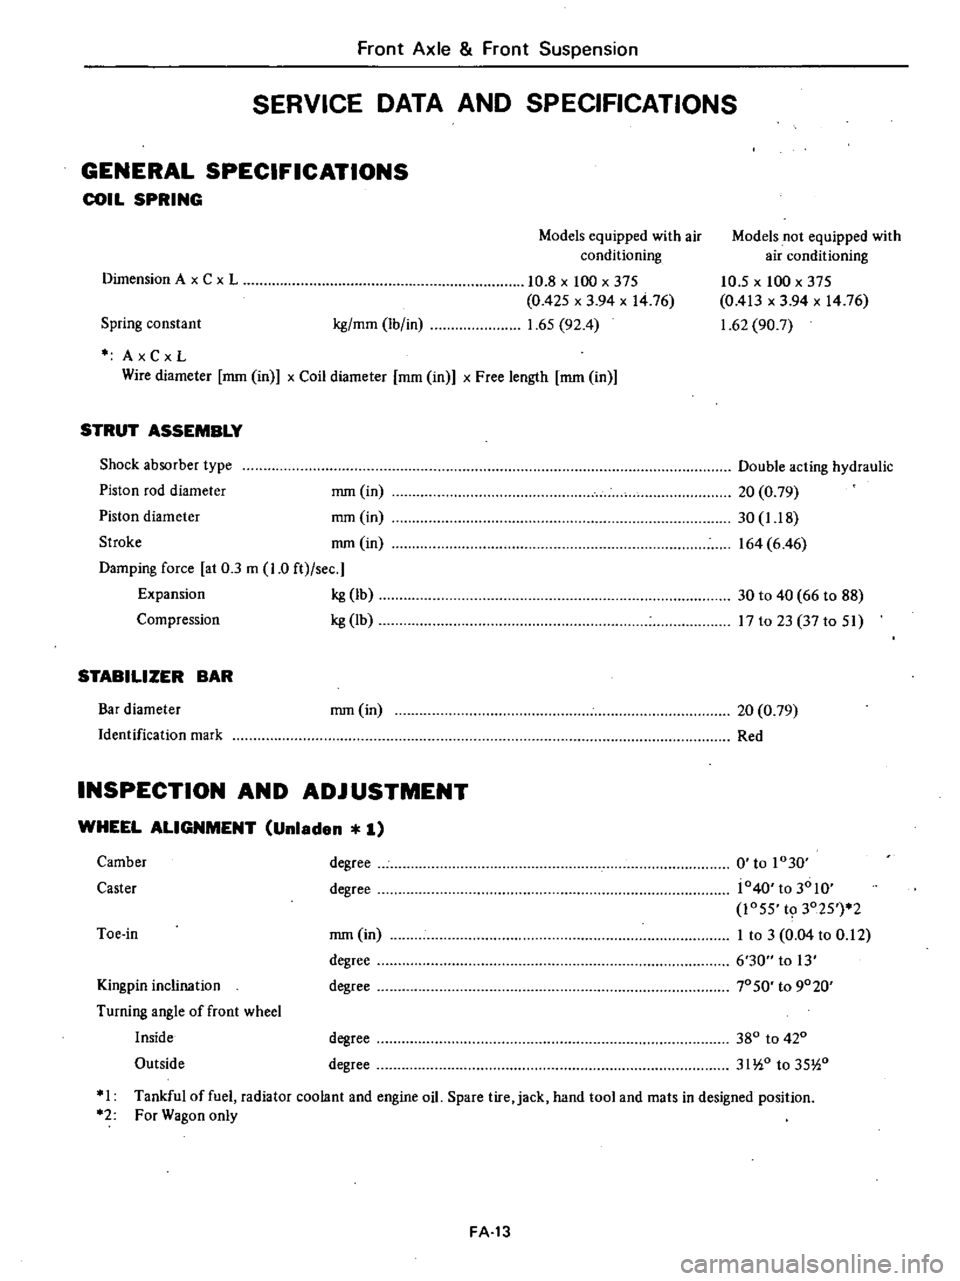
Front
Axle
Front
Suspension
SERVICE
DATA
AND
SPECIFICATIONS
GENERAL
SPECIFICATIONS
COIL
SPRING
Models
equipped
with
air
conditioning
Models
not
equipped
with
air
conditioning
10
5
x
100
x
375
0
413
x
3
94
x
1476
1
62
90
7
Spring
constant
kg
mm
Ib
in
10
8
x
100
x
375
0
425
x
3
94
x
1476
1
65
92
4
Dimension
A
x
C
x
L
AxCxL
Wire
diameter
mm
in
x
Coil
diameter
mm
in
x
Free
length
mm
in
STRUT
ASSEMBLY
Shock
absorber
type
Piston
rod
diameter
mm
in
Piston
diameter
mm
in
Stroke
nun
in
Damping
force
at
0
3
m
1
0
ft
sec
Expansion
kg
Ib
Compression
kg
Ib
Double
acting
hydraulic
20
0
79
30
1
18
164
6
46
30
to
40
66
to
88
17
to
23
37
to
51
STABILIZER
BAR
Bar
diameter
Identification
mark
mm
in
20
0
79
Red
INSPECTION
AND
ADJUSTMENT
WHEEL
ALIGNMENT
Unladen
1
Kingpin
inclination
Turning
angle
of
front
wheel
Inside
Outside
mm
in
degree
degree
0
to
1030
j040
to
3010
1055
t9
3025
2
I
to
3
0
04
to
0
12
6
30
to
13
70
SO
to
9020
Camber
Caster
degree
degree
Toe
in
degree
degree
380
to
420
31
io
to
35
i0
I
Tankful
of
fuel
radiator
coolant
and
engine
oil
Spare
tire
jack
hand
tool
and
mats
in
designed
position
2
For
Wagon
only
FA
13
Page 336 of 548

WHEEL
BEARING
Wheel
bearing
axial
play
Wheel
bearing
nut
tightening
torque
Return
angle
Rotation
starting
torque
With
new
grease
seal
With
used
grease
seal
At
wheel
hub
bolt
With
new
grease
seal
With
used
grease
seal
SUSPENSIONBA
JOINT
Turning
torque
New
parts
Used
parts
TIGHTENIN
TORQUE
LOWERBAl
L
JOINT
Ball
joint
socket
to
lower
arm
Ball
joint
to
knuckle
arm
Stud
nut
STRUT
Steering
knuckle
arm
to
strut
Strut
to
hoodledge
Piston
rod
self
locking
nut
Gland
packing
DISC
BRAKE
Rotor
to
hub
SIDE
ROD
Side
rod
ball
jOIDt
to
knuckle
arm
LOWER
ARM
Lower
arm
bolt
nut
Side
rod
adjusting
nut
TENSION
ROD
Tension
rod
bushing
installation
nut
Tension
rod
to
lower
arm
Tension
rod
bracket
to
body
Frpn
Axle
Front
Suspension
mm
in
0
0
kg
m
ft
lb
degree
3
0
to
3
5
22
to
25
900
kg
cm
in
lbr
kg
em
in
Ib
Less
than
7
0
6
1
1
0
to
4
5
0
9
to
3
9
kg
lb
kg
lb
Less
than
1
2
2
6
0
1
7
to
0
79
0
37
to
1
74
kg
cm
in
Ib
kg
cm
in
Ib
40
to
100
35
to
87
More
than
20
17
kg
m
ft
Ib
5
1
to
6
1
37
to
44
5
5
to
10
0
40
to
72
7
3
to
9
9
53
to
72
2
5
to
3
5
18
to
25
6
0
to
7
5
43
to
54
8
0
to
11
0
58
to
80
3
9
to
5
3
28
to
38
3
0
to
7
0
22
to
51
3
9
to
5
0
2810
36
8
0
to
10
0
58
to
72
4
5
to
5
1
33
to
37
5
1
to
6
1
37
to
44
3
2
to
4
3
23
to
31
FA
14
Page 338 of 548
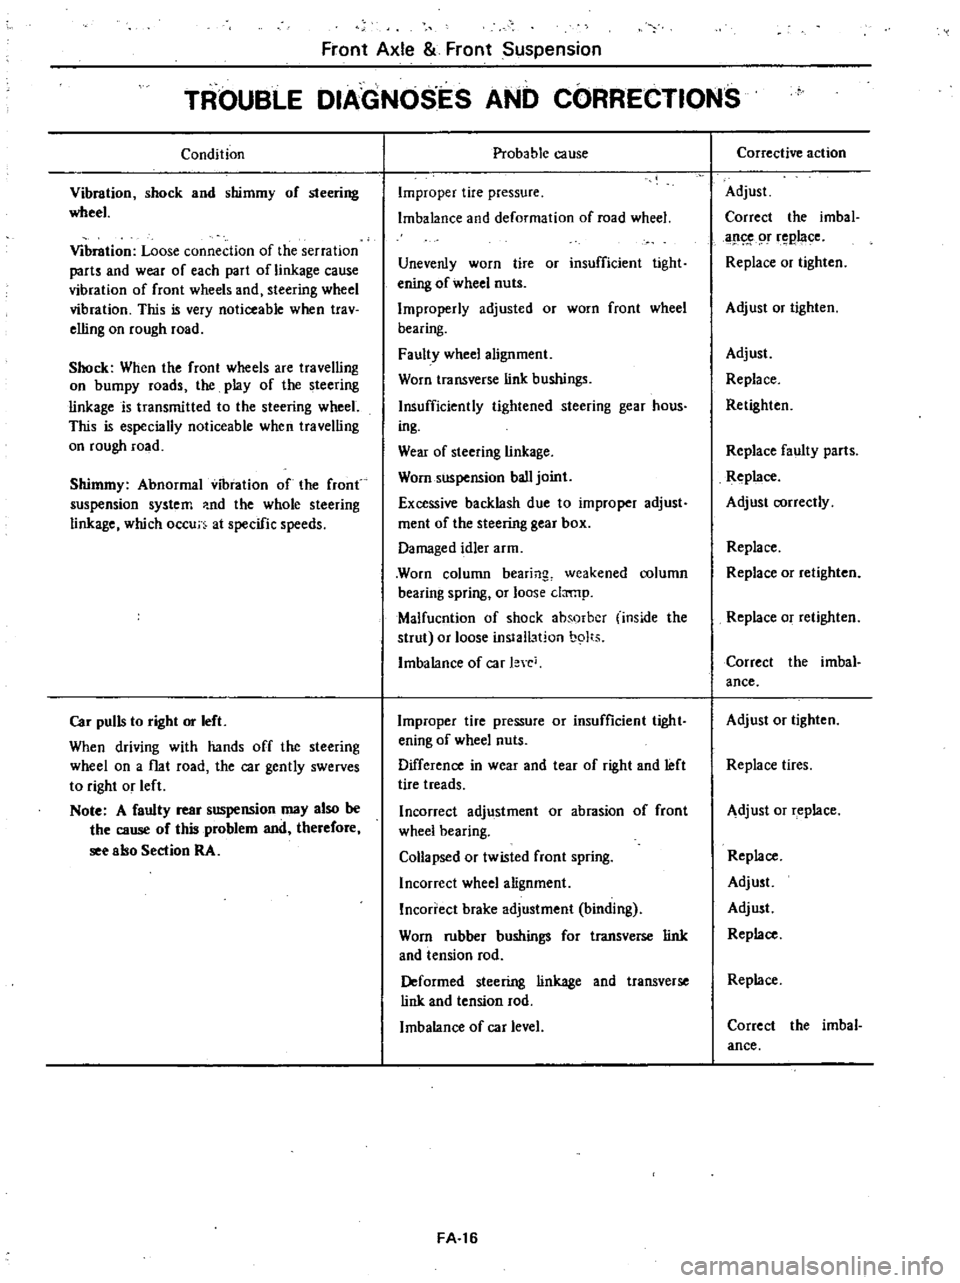
Front
Axle
Front
Suspension
TROUBLE
DIAGNOSES
AND
CORRECTIONS
Condition
Vibration
shock
and
shimmy
of
steering
wheel
Vibration
Loose
connection
of
the
serration
parts
and
wear
of
each
part
of
linkage
cause
vibration
of
front
wheels
and
steering
wheel
vibration
This
is
very
noticeable
when
trav
elling
on
rough
road
Shock
When
the
front
wheels
are
travelling
on
bumpy
roads
the
play
of
the
steering
linkage
is
transmitted
to
the
steering
wheel
This
is
especially
noticeable
when
travelling
on
rough
road
Shimmy
Abnormal
vibration
of
the
front
suspension
system
nd
the
whole
steering
linkage
which
occu
at
specific
speeds
Car
pulls
to
right
or
left
When
driving
with
hands
off
the
steering
wheel
on
a
flat
road
the
car
gently
swerves
to
right
or
left
Note
A
faulty
rear
suspension
may
also
be
the
cause
of
this
problem
and
therefore
see
ebo
Section
RA
Proba
b
Ie
ca
use
Improper
tire
pressure
Imbalance
and
deformation
of
road
wheel
Unevenly
worn
tire
or
insufficient
tight
ening
of
wheel
nuts
Improperly
adjusted
or
worn
front
wheel
bearing
Faulty
wheel
alignment
Worn
transverse
link
bushings
Insufficiently
tightened
steering
gear
hous
ing
Wear
of
steering
linkage
Worn
suspension
ball
joint
Excessive
backlash
due
to
improper
adjust
ment
of
the
steering
gear
box
Damaged
idler
arm
Worn
column
bearing
weakened
column
bearing
spring
or
loose
drmp
Malfucntion
of
shock
absorber
inside
the
strut
or
loose
install3t
on
b9
t5
Imbalance
of
car
l
e
Improper
tire
pressure
or
insufficient
tight
ening
of
wheel
nuts
Difference
in
wear
and
tear
of
right
and
left
tire
treads
Incorrect
adjustment
or
abrasion
of
front
wheel
bearing
Collapsed
or
twisted
front
spring
Incorrect
wheel
alignment
Incorrect
brake
adjustment
binding
Worn
rubber
bushings
for
transverse
link
and
tension
rod
Deformed
steering
linkage
and
transverse
link
and
tension
rod
Imbalance
of
car
level
FA
16
Corrective
action
Adjust
Correct
the
imbal
ap
9f
r
B4I
e
Replace
or
tighten
Adjust
or
tighten
Adjust
Replace
Retighten
Replace
faulty
parts
Replace
Adjust
correctly
Replace
Replace
or
retighten
Replace
or
retighten
Correct
the
imbal
ance
Adjust
or
tighten
Replace
tires
Adjust
or
replace
Replace
Adjust
Adjust
Replace
Replace
Correct
the
imbal
ance