jacking points DATSUN 210 1979 Service Manual
[x] Cancel search | Manufacturer: DATSUN, Model Year: 1979, Model line: 210, Model: DATSUN 210 1979Pages: 548, PDF Size: 28.66 MB
Page 13 of 548

General
Information
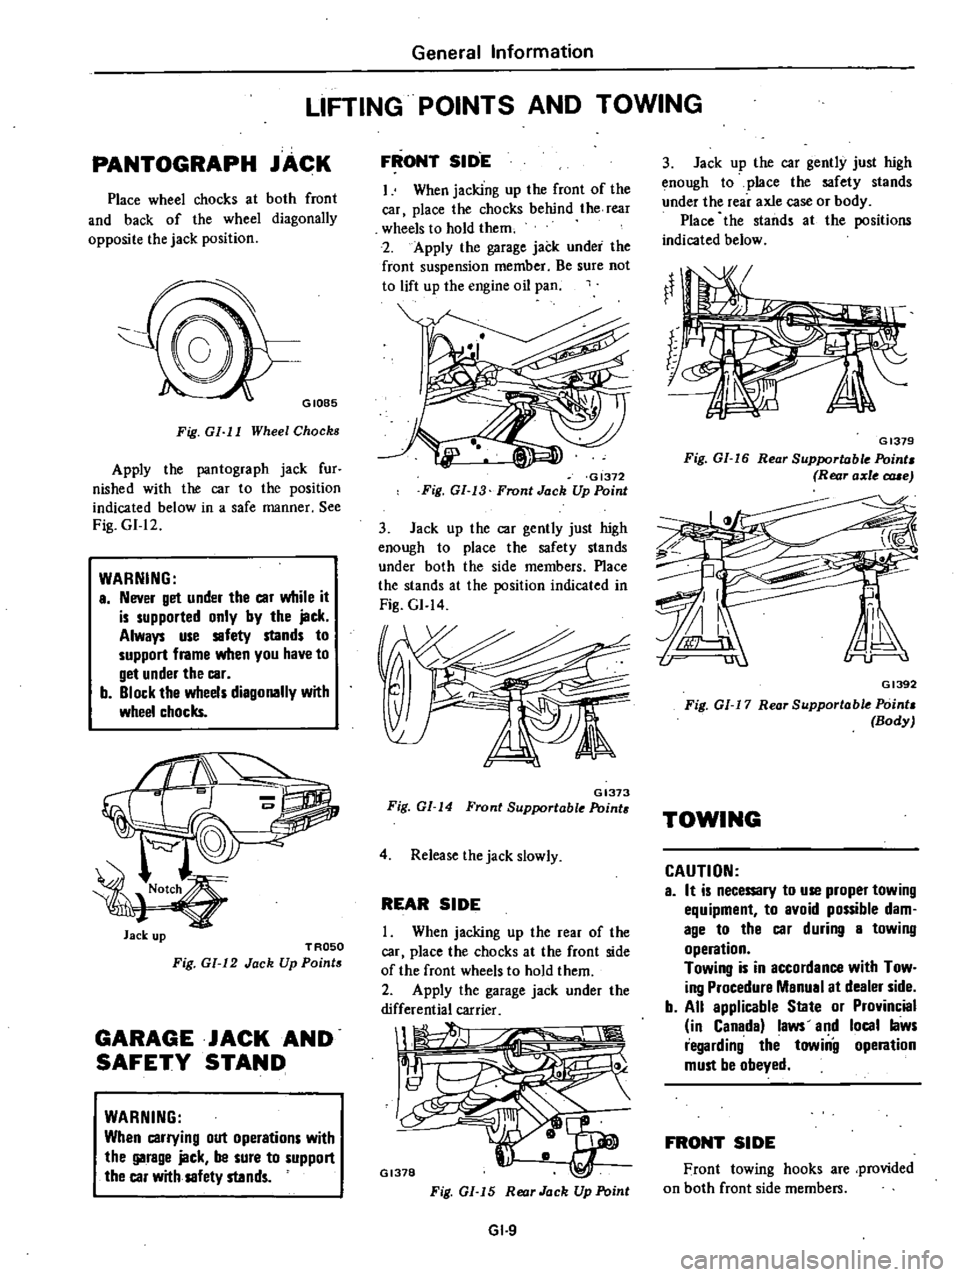
LIFTING
POINTS
AND
TOWING
PANTOGRAPH
JACK
Place
wheel
chocks
at
both
front
and
back
of
the
wheel
diagonally
opposite
the
jack
position
GIOB5
Fig
GI
I
I
Wheel
Chocks
Apply
the
pantograph
jack
fur
nished
with
the
car
to
the
position
indicated
below
in
a
safe
manner
See
Fig
GI
12
WARNING
a
Never
get
under
the
car
while
it
is
supported
only
by
the
jack
Always
use
safety
stands
to
support
frame
when
you
have
to
get
under
the
car
b
Block
the
wheels
diagonally
with
wheel
chocks
Jack
up
TROSO
Fig
GI
12
Jack
Up
Points
GARAGE
JACK
AND
SAFETY
STAND
WARNING
When
carrying
out
operations
with
the
garage
jack
be
sure
to
support
the
car
with
safety
stands
FRONT
SID
E
I
When
jacking
up
the
front
of
the
car
place
the
chocks
behind
the
rear
wheels
to
hold
them
2
Apply
the
garage
jack
under
the
front
suspension
member
Be
sure
not
to
lift
up
the
engine
oil
pan
GI372
Fig
GI
13
Front
Jack
Up
Point
3
Jack
up
the
car
gently
just
high
enough
to
place
the
safety
stands
under
both
the
side
members
Place
the
stands
at
the
position
indicated
in
Fig
GI
14
GI373
Fig
GI
14
Front
Supportable
Point
4
Release
the
jack
slowly
REAR
SIDE
When
jacking
up
the
rear
of
the
car
place
the
chocks
at
the
front
side
of
the
front
wheels
to
hold
them
2
Apply
the
garage
jack
under
the
differential
carrier
1
1
Il
GI378
Fig
GI
15
Rear
Jack
Up
Point
GI
9
3
Jack
up
the
car
gently
just
high
enough
to
place
the
safety
stands
under
the
rear
axle
case
or
body
Place
the
stands
at
the
positions
indicated
below
GI379
Fig
GI
16
Rear
Supportable
Point
Rear
axle
c
rue
GI392
Fig
01
17
Rear
Supportable
Point
Body
TOWING
CAUTION
a
It
is
necemry
to
use
proper
towing
equipment
to
avoid
possible
dam
age
to
the
car
during
a
towing
operation
Towing
is
in
accordance
with
Tow
ing
Procedure
Manual
at
dealer
side
b
All
applicable
State
or
Provincial
in
Canada
laws
and
local
laws
regarding
the
towiilg
operation
must
be
obeyed
FRONT
SIDE
Front
towing
hooks
are
provided
on
both
front
side
members
Page 378 of 548

t
MAINTEN
NCE
TIRE
INFLATION
Correct
tire
pressure
is
very
impor
tant
for
steering
ease
and
riding
com
fort
Correct
pressure
also
makes
for
a
quieter
ride
and
extends
tire
life
If
all
tires
are
inspected
frequently
and
maintained
at
correct
pressure
any
sharp
objects
in
tread
can
be
quickiy
detected
nd
abnormal
wear
which
invites
serious
problems
can
be
avoided
After
inflating
tires
valves
should
be
checked
for
leakage
Without
valve
caps
leakage
will
occur
due
to
dirt
and
water
resulting
in
underinflation
Ac
cordingly
whenever
tire
pressure
is
checked
be
sure
to
tighten
vaive
caps
firmly
by
hand
JW
Sri
in
1
II
I
i
I
1
I
1
1
I
I
I
II
I
I
I
i
M
I
l
1
14
nl
01
I
II
Toe
in
or
toe
out
wear
I
J
I
I
p
rt
i
Ilnl
lll
11111
IllIlI
Shoulder
wear
Toe
in
or
toe
out
wear
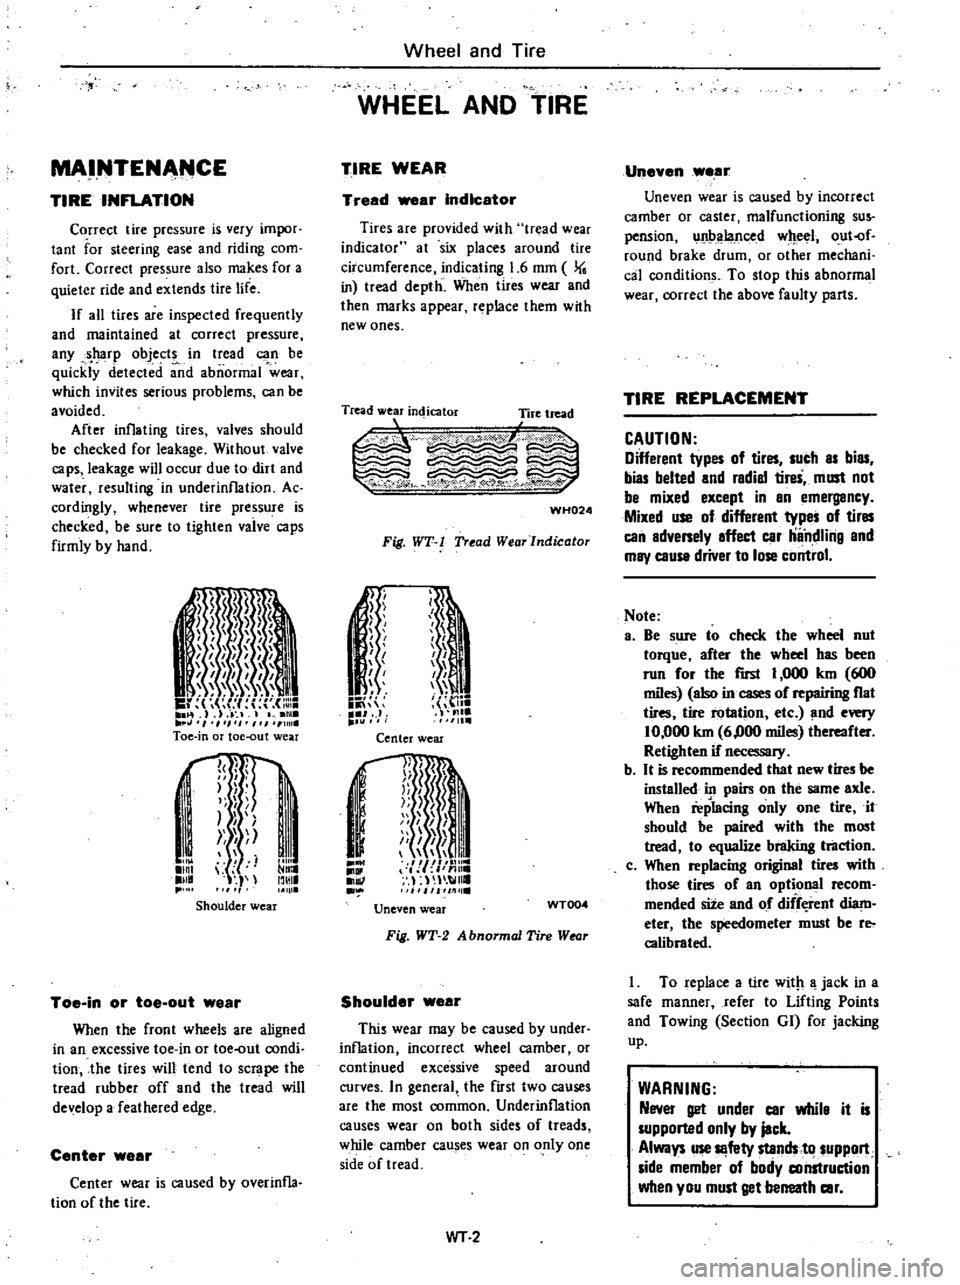
When
the
front
wheels
are
aligned
in
an
excessive
toe
in
or
toe
out
condi
tion
the
tires
will
tend
to
scrape
the
tread
rubber
off
and
the
tread
will
de
elop
a
feathered
edge
Center
wear
Center
wear
is
caused
by
overinfla
tion
of
the
tire
Wheel
and
Tire
WHEEL
AND
TIRE
TIRE
WEAR
Tread
ar
Indicator
Tires
are
provided
with
tr
lad
wear
indicator
at
six
places
around
tire
circumference
indicating
1
6
mm
J
in
tread
depth
When
tires
wear
and
then
marks
appear
replace
them
wtth
new
ones
Tread
wear
indicator
Tire
tread
L
1
c
WH024
Fig
WT
l
Tread
WearJndicator
n
1
ii
J
J
f
J
I
h
I
me
1111
Center
wear
j
I
1II
mnr
I
j
n
Ii
Ii
i
I
Jil
111
lie
Uneven
wear
WT004
Fig
WT
2
A
bnormal
Tire
Wtor
Shoulder
wear
This
wear
may
be
caused
by
under
inflation
incorrect
wheel
camber
or
continued
excessive
speed
around
curves
In
general
the
first
two
causes
are
the
most
common
Underinflation
causes
wear
on
both
sides
of
treads
while
camber
causes
wear
on
only
one
side
of
tread
WT
2
Uneven
wear
Uneven
wear
is
caused
by
incorrect
camber
or
caster
malfunctioning
sus
pension
unbalanced
wheel
out
of
round
brake
drum
or
other
mechani
cal
conditions
To
stop
this
abnormal
wear
correct
the
above
faulty
parts
TIRE
REPLACEMENT
CAUTION
Different
types
of
tires
sucb
as
bias
bias
belted
and
radial
tireS
must
not
be
mixed
except
in
an
emergancy
Mixed
use
of
different
types
of
tires
can
adversely
affect
car
ilndlilig
and
may
cause
driver
to
lose
control
Note
a
Be
sure
to
check
the
wheel
nut
torque
after
the
wheel
has
been
run
for
the
rust
I
000
km
600
miles
also
in
cases
of
repairing
fiat
tires
tire
rotation
etc
and
every
10
000
km
6
000
miles
thereafter
Retighten
if
necessary
b
It
is
recommended
that
new
tires
be
installed
in
pairs
on
the
same
axle
When
replacing
only
one
tire
it
should
be
paired
with
the
most
tread
to
equalize
braking
tl1lction
c
When
replacing
original
tires
with
those
tires
of
an
optional
recom
mended
site
and
of
diff
rent
diam
eter
the
speedometer
must
be
reo
calibrated
I
To
replace
a
tire
with
a
jack
in
a
safe
manner
refer
to
Lifting
Points
and
Towing
Section
GI
for
jacking
up
WARNING
Never
get
under
car
whila
it
is
supported
only
by
jack
Always
use
Il
fety
stands
to
suppon
side
member
of
body
construction
when
you
must
get
berreatb
car