width DATSUN 210 1979 Service Manual
[x] Cancel search | Manufacturer: DATSUN, Model Year: 1979, Model line: 210, Model: DATSUN 210 1979Pages: 548, PDF Size: 28.66 MB
Page 43 of 548
VALVE
GUIDE
Measure
the
clearance
between
valve
guide
and
valve
stern
If
the
clearance
exceeds
the
specified
limit
replace
the
worn
parts
or
both
valve
and
valve
guide
In
this
case
it
is
essential
to
determine
if
such
a
clear
ance
has
been
caused
by
a
worn
or
bent
valve
stem
or
by
a
worn
valve
guide
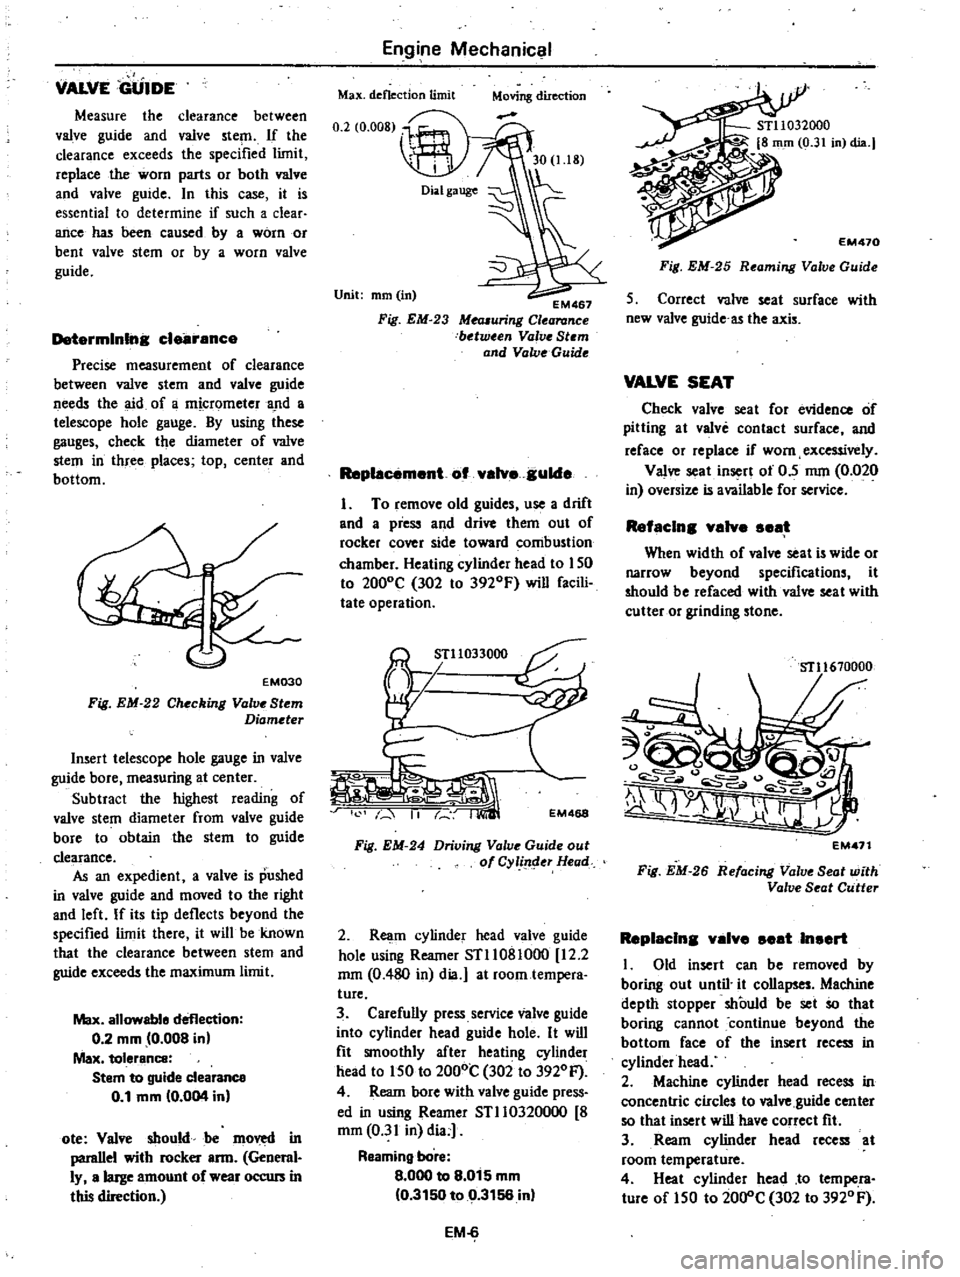
Determining
clearance
Precise
measurement
of
clearance
between
valve
stem
and
valve
guide
needs
the
aid
of
a
micrometer
and
a
telescope
hole
gauge
By
using
these
gauges
check
the
diameter
of
valve
stem
in
three
places
top
center
and
bottom
EM030
Fig
EM
22
Checking
Valve
Stem
Diameter
Insert
telescope
hole
gauge
in
valve
guide
bore
measuring
at
center
Subtract
the
highest
reading
of
valve
stem
diameter
from
valve
guide
bore
to
obtain
the
stem
to
guide
clearance
As
an
expedient
a
valve
is
pushed
in
valve
guide
and
moved
to
the
right
and
left
If
its
tip
deflects
beyond
the
specified
limit
there
it
will
be
known
that
the
clearance
between
stem
and
guide
exceeds
the
maximum
limit
Max
allowabl
deflection
0
2
mm
0
008
in
Max
tolerance
Stem
to
guide
clearance
0
1
mm
10
004
in
ote
Valve
sbould
be
moved
in
paraIlel
with
rocker
ann
General
ly
a
large
amount
of
wear
occurs
in
this
direction
Engine
Mechanical
Max
deflection
limit
Unit
mm
in
EM467
Mea6uring
Clearance
between
Valve
Stem
and
Valve
Guide
Fig
EM
23
Replacement
of
valve
julde
I
To
remove
old
guides
use
a
drift
and
a
pie
and
drive
them
out
of
rocker
cover
side
toward
combustion
chamber
Heating
cylinder
head
to
I
SO
to
200
C
302
to
392
F
will
facili
tate
operation
T11033000
EM468
1
II
Fig
EM
24
Driving
Valve
Guide
out
of
Cylinder
Head
2
Ream
cylinder
head
valve
guide
hole
using
Reamer
STlI081000
12
2
mrn
0
480
in
dia
at
room
tempera
ture
3
Carefully
press
service
Valve
guide
into
cylinder
head
guide
hole
It
will
fit
smoothly
after
heating
cylinder
head
to
ISO
to
200
302
to
392
F
4
Ream
bore
with
valve
guide
press
ed
in
using
Reamer
STll0320000
8
mm
0
31
in
dia
Reaming
bore
8
000
to
8
015
mm
0
3150
to
0
3156
in
EM
6
EM470
Fig
EM
25
Reaming
Valve
Guide
5
Correct
va1ve
seat
surface
with
new
valve
guide
as
the
axis
VALVE
SEAT
Check
valve
seat
for
evidence
of
pitting
at
valve
contact
surface
and
reface
or
replace
if
worn
excessively
Valve
seat
insert
of
0
5
mm
0
020
in
oversize
is
available
for
service
Refaclng
valve
seat
When
width
of
valve
seat
is
wide
or
narrow
beyond
specifications
it
should
be
refaced
with
valve
seat
with
cutter
or
grinding
stone
iIT11670000
EM411
Fig
EM
26
Refacing
Valve
Seat
with
Valve
Seat
Cutter
Replaclna
valve
seat
Insert
I
Old
insert
can
be
removed
by
boring
out
until
it
collapses
Machine
depth
stopper
should
be
set
So
that
boring
cannot
continue
beyond
the
bottom
face
of
the
insert
recess
in
cylinderhead
2
Machine
cylinder
head
recess
in
concentric
circles
to
valve
guide
center
so
that
insert
will
have
correct
fit
3
Ream
cylinder
head
recess
at
room
temperature
4
Heat
cylinder
head
to
tempera
ture
of
150
to
200
C
302
to
3920F
Page 47 of 548
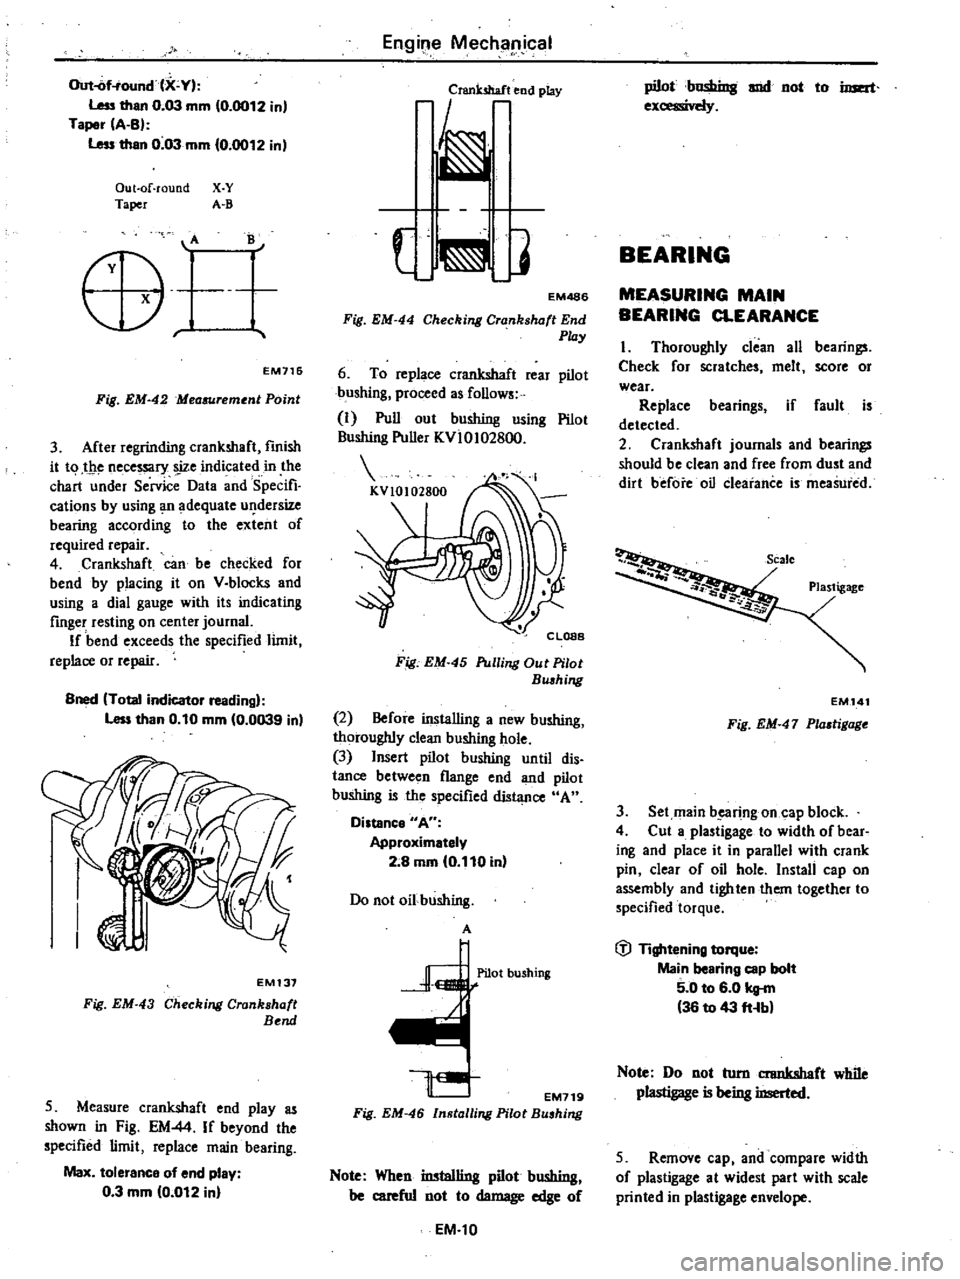
Out
of
ound
X
Y
Less
than
0
03
mm
10
0012
in
Taper
A
B
Less
than
0
03
mm
0
0012
in
Out
of
round
X
Y
Taper
A
B
B
o
r
EM716
Fig
EM
42
Mea6Urement
Point
3
After
regrinding
crankshaft
fmish
it
t
1
t
1e
necessary
s
ize
indicated
in
the
chart
under
Service
Data
and
Specifi
cations
by
using
Ill
adequate
u
dersize
bearing
according
to
the
extent
of
required
repair
4
Crankshaft
can
be
checked
for
bend
by
placing
it
on
V
blocks
and
using
a
dial
gauge
with
its
indicating
finger
resting
on
center
journal
If
bend
exceeds
the
specified
limit
replace
or
repair
Bned
Total
indicator
reading
Less
than
0
10
mm
0
0039
in
EM137
Fig
EM
43
Checking
Crankshaft
Bend
5
Measure
crankshaft
end
play
as
shown
in
Fig
EM
44
If
beyond
the
specified
limit
replace
main
bearing
Max
tolerance
of
end
play
0
3
mm
10
012
in
Engil
e
Mechllpjcal
Crsnk5haf
end
play
EM486
Fig
EM
44
Checking
Crankshaft
End
Play
6
To
replace
crankshaft
rear
pilot
bushing
proceed
as
follows
1
Pull
out
bushing
using
Pilot
Bushing
Puller
KvloI02800
Fig
EM
45
Pulling
Out
Pilot
Bushing
2
Before
installing
a
new
bushing
thoroughly
clean
bushing
hole
3
Insert
pilot
bushing
until
dis
tance
between
flange
end
and
pilot
bushing
is
the
specified
diJ1l
nce
A
Distance
A
Approximetely
2
8
mm
0
110
in
Do
not
oil
bushing
A
Pilot
bushing
EM719
Fig
EM
46
Installing
Pilot
Bushing
Note
When
installing
pilot
bushing
be
careful
not
to
damage
edge
of
EM
l0
pilot
C
snd
not
to
imat
1
1
1
BEARING
MEASURING
MAIN
BEARING
CLEARANCE
I
Thoroughly
clean
all
bearings
Check
for
scratches
melt
score
or
wear
Replace
bearings
if
fault
is
detected
2
Crankshaft
journals
and
bearings
should
be
clean
and
free
from
dust
and
dirt
before
oil
Clearance
is
meaSured
Plastigage
EM
141
Fig
EM
47
Plastigage
3
Set
main
b
e1lfing
on
cap
block
4
Cut
a
plastigage
to
width
of
bear
ing
and
place
it
in
parallel
with
crank
pin
clear
of
oil
hole
Install
cap
on
assembly
and
tighten
them
together
to
specified
torque
fj
Tightening
torque
Main
bearing
cop
bolt
5
0
to
6
0
kg
m
36
to
43
fHb
Note
Do
not
turn
crankshaft
while
plastigage
is
being
inserted
5
Remove
cap
and
compare
width
of
plastigage
at
widest
part
with
scale
printed
in
plastigage
envelope
Page 311 of 548
they
are
worn
damaged
or
otherwise
faulty
and
how
they
are
affected
Re
pair
or
replace
all
faulty
parts
which
ever
is
necessary
1
Check
gear
teeth
for
scoring
cracking
or
chipping
and
make
sure
that
tooth
contact
pattern
indicates
correct
meshing
depth
If
any
fault
is
evident
replace
parts
as
required
Note
Drive
pinion
and
ring
gear
are
supplied
for
replacement
as
a
set
therefore
should
either
part
be
damaged
replece
as
a
set
2
Check
pinion
shaft
and
pinion
mates
for
scores
and
signs
of
wear
and
replace
as
required
F
oUow
the
same
procedure
for
side
gear
and
their
seats
on
differential
case
3
Inspect
all
bearing
races
and
roU
ers
for
scoring
chipping
or
evidence
of
excessive
wear
They
should
be
in
tiptop
condition
such
as
not
worn
and
with
mirror
like
surfaces
Replace
if
there
is
a
shadow
of
doubt
on
their
efficiency
as
an
incorrect
bearing
op
eration
may
result
in
noises
and
gear
seizure
4
Inspect
thrust
washer
faces
SmaU
faults
can
be
corrected
with
sand
paper
If
pinion
mate
to
de
gear
backlash
exceeds
specified
value
re
place
thrust
washers
Pinion
mate
to
side
gear
backlash
0
10
to
0
20
mm
0
0039
to
0
0079
in
5
Inspect
gear
carrier
and
differ
ential
case
for
cracks
or
distortion
If
either
condition
is
evident
replace
Jaulty
parts
6
As
a
general
rule
oil
seal
should
be
replaced
at
each
disassembly
ASSEMBLY
AND
ADJUSTMENT
Assembly
can
be
done
in
the
reverse
order
of
disassembly
The
foUowing
directions
for
adjustment
and
usage
of
special
tools
enable
to
obtain
a
perfect
differential
operation
Propeller
Shaft
Differential
Carrier
PRECAUTIONS
IN
REASSEMBLY
I
Arrange
shims
washers
and
the
like
to
install
them
correctly
2
Thoroughly
clean
the
surfaces
on
which
shims
washers
bearings
and
bearing
caps
are
installed
3
Apply
gear
oil
when
installing
bearings
4
Pack
grease
cavity
between
lips
when
fitting
oil
seal
ASSEMBLY
OF
DIFFERENTIAL
CASE
1
Assemble
pinion
mates
side
gears
and
thrust
washers
in
differential
case
2
Fit
pinion
shaft
to
differential
case
so
that
it
meets
lock
pin
hole
3
Adjust
pinion
mate
to
ide
gear
backlash
or
the
clearance
between
the
rear
face
of
side
gear
and
thrust
washer
to
the
specified
value
by
selecting
side
gear
thrust
washer
Pinion
mate
to
side
gear
backlash
0
10
to
0
20
mm
10
0039
to
0
0079
in
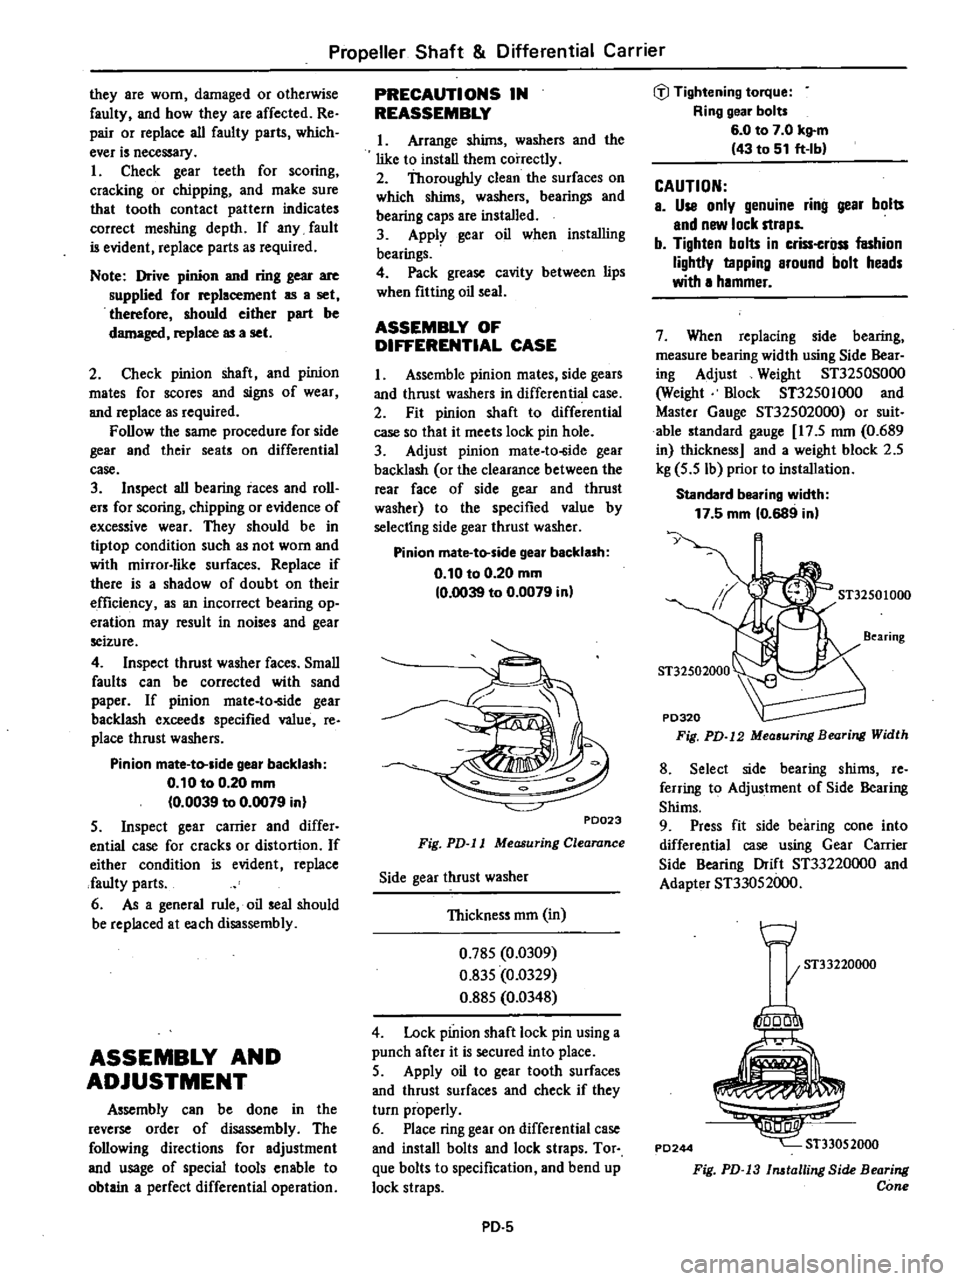
PD023
Fig
PD
l1
Measuring
Clearance
Side
gear
thrust
washer
Thickness
mm
in
0
785
0
0309
0
835
0
0329
0
885
0
0348
4
Lock
pinion
shaft
lock
pin
using
a
punch
after
it
is
secured
into
place
5
Apply
oil
to
gear
tooth
surfaces
and
thrust
surfaces
and
check
if
they
turn
properly
6
Place
ring
gear
on
differential
case
and
install
bolts
and
lock
straps
Tor
que
bolts
to
specification
and
bend
up
lock
straps
PO
5
tiJ
Tightening
torque
Ring
gear
bolt
6
0
to
7
0
kg
m
43
to
51
ft
Ib
CAUTION
e
Use
only
genuine
ring
gear
bolts
end
new
lock
straps
b
Tighten
bolts
in
criss
crilss
fashion
lightly
tapping
around
bolt
heads
with
a
hammer
7
When
replacing
side
bearing
measure
bearing
width
using
Side
Bear
ing
Adjust
Weight
ST3250S000
Weight
mock
ST3250
I
000
and
Master
Gauge
ST325020oo
or
suit
able
standard
gauge
17
5
nun
0
689
in
thickness
and
a
weight
block
2
5
kg
5
5
Ib
prior
to
installation
Standald
bearing
width
17
5
mm
10
689
in
y
ST32501000
8
Select
side
bearing
shims
re
ferring
to
Adjustment
of
Side
Bearing
Shims
9
Press
fit
side
bearing
cone
into
differential
case
using
Gear
Carrier
Side
Bearing
Drift
ST33220oo0
and
Adapter
ST33052000
w
I
ST33220000
PD244
1000
ST33052000
Fig
PD
13
lnatalling
Side
Bearing
Cone
Page 313 of 548
drive
pinion
arid
lubricate
pinion
rear
bearing
with
gear
oil
4
Insert
companion
flange
into
oil
seal
and
hold
it
firmly
against
pinion
front
bearing
cone
From
the
rear
of
the
gear
carrier
insert
drive
pinion
into
companion
flange
5
Ascertain
that
threaded
portion
of
drive
pinion
and
new
drive
p
ion
nut
are
free
from
oil
or
grease
6
Holding
companion
flange
with
Drive
Pinion
Flange
Wrench
STJ1530000
tighten
nut
and
then
pull
drive
pinion
into
front
bearing
cone
and
into
flange
As
drive
pinion
is
pulled
into
front
bearing
cone
drive
pinion
end
play
is
reduced
While
there
is
still
end
play
in
drive
pinion
companion
flange
and
cone
will
be
fell
to
bottom
out
This
indicates
that
bearing
cone
and
com
panion
flange
have
bottomed
on
col
lap
ible
spacer
From
this
point
a
much
greater
torque
must
be
applied
to
turn
pinion
nut
since
spacer
must
be
collapsed
Also
from
this
point
nut
hould
be
tightened
very
slowly
and
drive
pinion
end
play
checked
often
0
that
pinion
bearing
preload
does
not
exceed
the
limits
When
the
drive
pinion
end
play
has
been
eliminated
the
specified
preload
i
being
approached
CAUTION
00
not
decrease
preload
by
loosen
ing
pinion
nut
This
will
remove
compression
between
pinion
front
end
rear
bearing
cones
and
collapsibla
spacer
and
may
permit
front
bear
ing
cone
to
turn
on
drive
pinion
Moreover
nut
becomes
loose
7
Turn
drive
pinion
in
both
direc
lions
several
times
to
set
bearing
rollers
Then
adjust
bearing
preload
to
specification
using
Preload
Gauge
STJ127S000
iil
Tightening
tOlque
Pinion
nut
14
to
30
kg
m
101
to
217
ft
lb
D
iY8
pinion
preload
with
oil
seal
6
0
to
8
0
kg
cm
5
2
to
6
9
in
Ib
Propeller
Shaft
Differential
Carrier
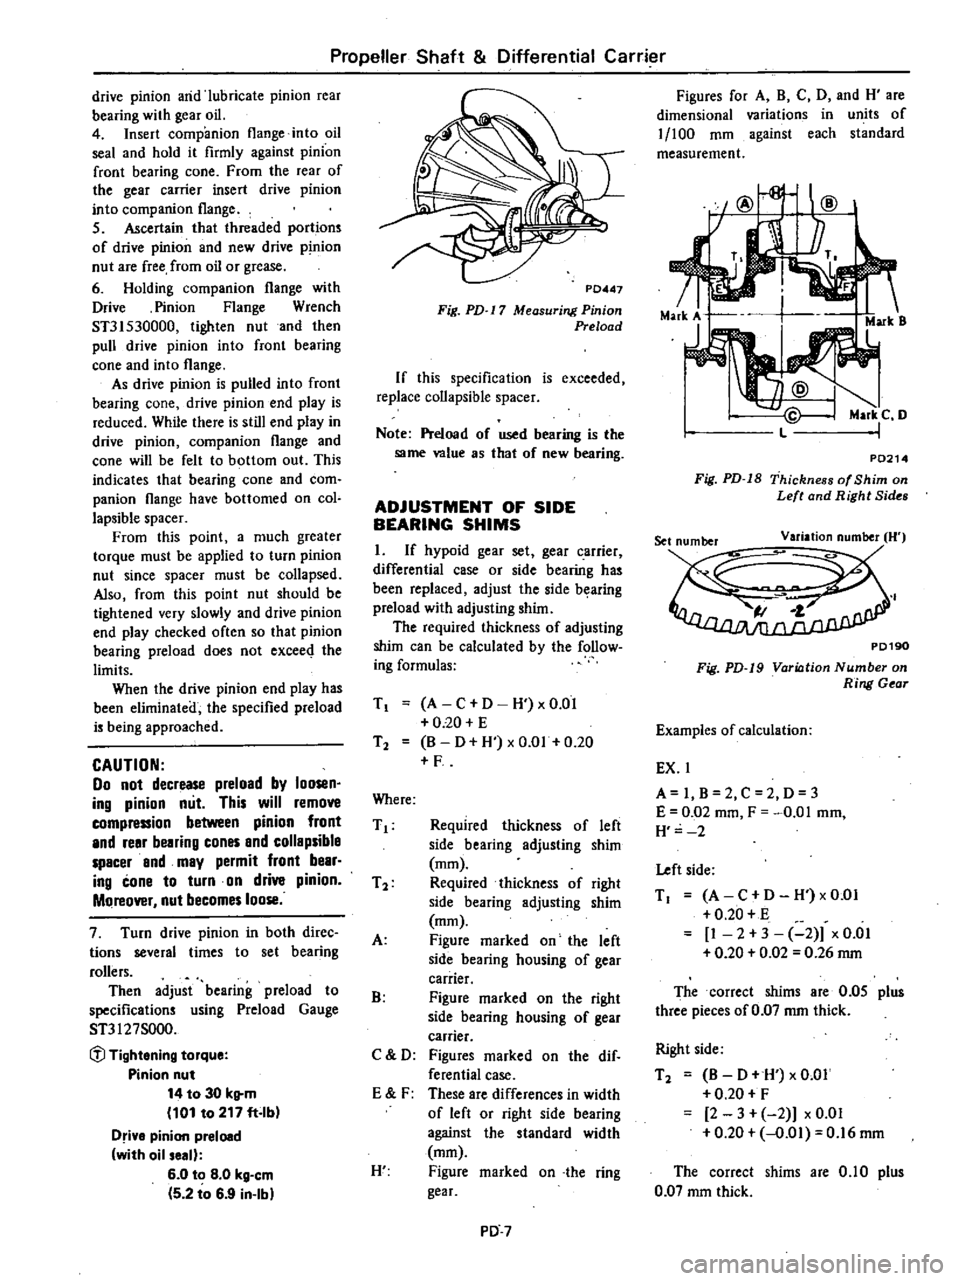
P0447
Fig
PD
17
Measuring
Pinion
Preload
If
this
specification
is
exceeded
replace
collapsible
spacer
Note
Preload
of
used
bearing
is
the
same
value
as
that
of
new
bearing
ADJUSTMENT
OF
SIDE
BEARING
SHIMS
I
If
hypoid
gear
set
gear
carrier
differential
case
or
side
bearing
ha
been
replaced
adjust
the
ide
bearing
preload
with
adjusting
him
The
required
thickness
of
adjusting
shim
can
be
calculated
by
the
follow
ing
formulas
T
A
C
D
H
xO
OI
020
E
T2
B
D
H
xO
Ol
0
20
F
Where
T
Required
thickness
of
left
side
bearing
adjusting
shim
mm
T
2
Required
thickness
of
right
side
bearing
adjusting
shim
mm
A
Figure
marked
on
the
left
side
bearing
housing
of
gear
carrier
B
Figure
marked
on
the
right
side
bearing
housing
of
gear
carrier
C
D
Figures
marked
on
the
dif
ferential
case
E
F
These
are
differences
in
width
of
left
or
right
side
bearing
against
the
tandard
width
mm
H
Figure
marked
on
the
ring
gear
PD
7
Figures
for
A
B
C
D
and
H
are
dimensional
variations
in
units
of
1
100
mm
against
each
standard
measurement
F
MarkS
MarkC
D
L
P0214
Fig
PD
18
Thickness
of
Shim
on
Left
and
Right
Sides
PD190
Fig
PD
19
Variation
Number
on
Ring
Gear
Examples
of
calculation
EX
1
A
I
B
2
C
2
D
3
E
0
02
mm
F
0
01
mm
H
2
Left
side
T
A
C
D
H
xO
OI
0
20
E
I
2
3
2
x
0
01
0
20
0
02
0
26
rnm
The
correct
shims
are
0
05
plus
three
pieces
of
0
07
mm
thick
Right
side
T2
B
D
W
xO
QI
0
20
F
2
3
2
x
0
01
0
20
0
01
0
16
mm
The
correct
shims
are
0
10
plus
0
07
mm
thick
Page 317 of 548
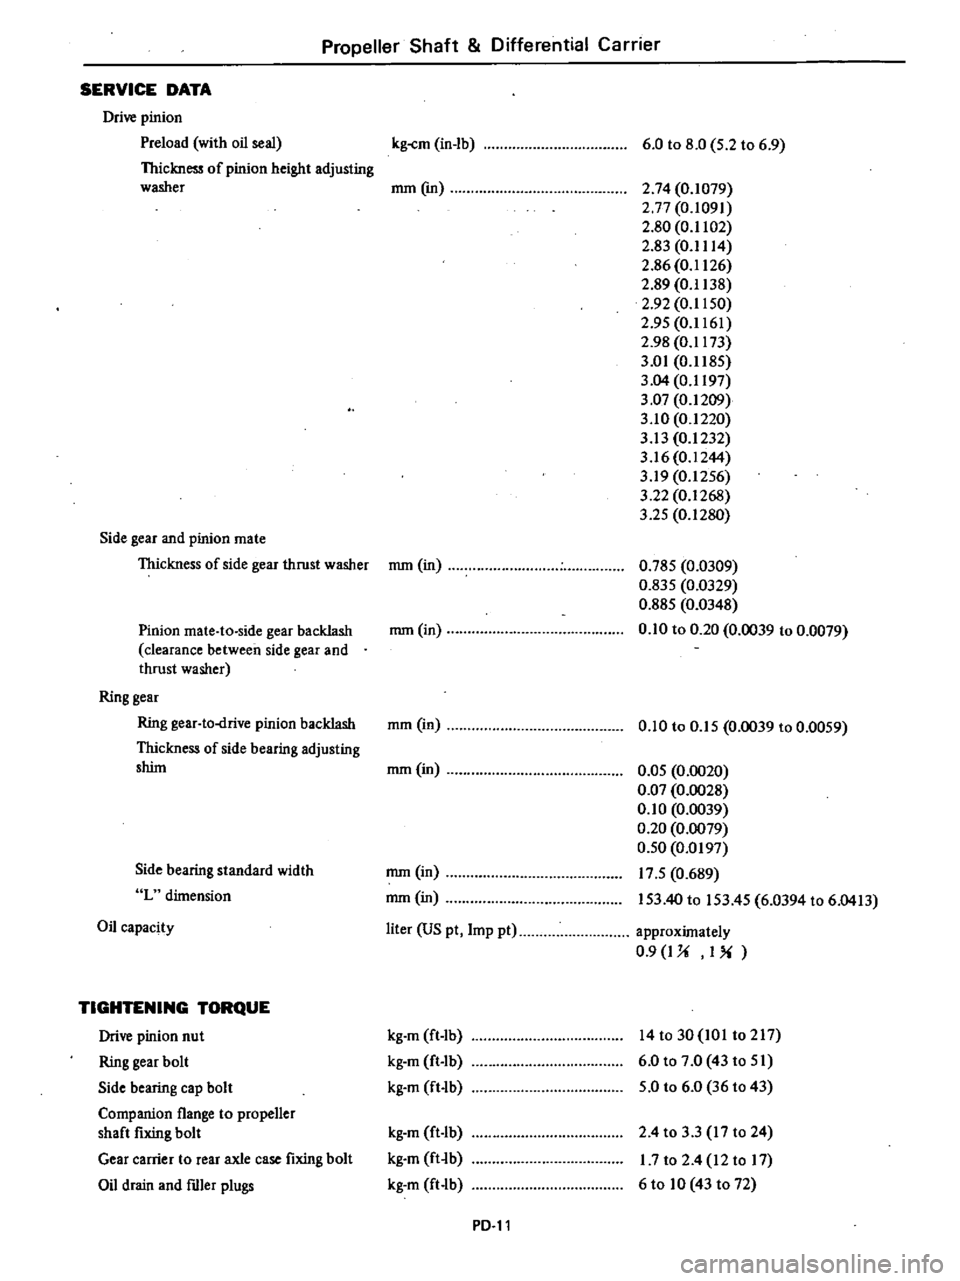
Propeller
Shaft
Differential
Carrier
SERVICE
DATA
Drive
pinion
Preload
with
oil
seal
Thickness
of
pinion
height
adjusting
washer
Side
gear
and
pinion
mate
Thickness
of
side
gear
thrust
washer
Pinion
mate
to
side
gear
backlash
clearance
between
side
gear
and
thrust
washer
Ring
gear
Ring
gear
to
drive
pinion
backlash
Thickness
of
side
bearing
adjusting
shint
Side
bearing
standard
width
L
dimension
Oil
capacity
TIGHTENING
TORQUE
Drive
pinion
nut
Ring
gear
bolt
Side
bearing
cap
bolt
Companion
flange
to
propener
shaft
fixing
bolt
Gear
carrier
to
rear
axle
case
fixing
bolt
Oil
drain
and
ftller
plugs
kg
cm
in
lb
6
0
to
8
0
5
2
to
6
9
mm
em
2
74
0
1079
2
77
0
1091
2
80
0
1102
2
g3
0
1114
2
86
0
1126
2
89
0
1138
2
92
0
1150
2
95
0
1161
2
98
0
1173
3
01
0
1185
3
04
0
1197
3
07
0
1209
3
10
0
1220
3
13
0
1232
3
16
0
1244
3
19
0
1256
3
22
0
1268
3
25
0
1280
mm
in
0
785
0
0309
0
835
0
0329
0
885
0
0348
0
10
to
0
20
0
0039
to
0
0079
mmOn
mm
in
0
10
to
0
15
0
0039
to
0
0059
mm
in
0
05
0
0020
0
Q7
0
0028
0
10
0
0039
0
20
0
0079
0
50
0
0197
17
5
0
689
153
40
to
153
45
6
0394
to
6
0413
mm
in
mm
in
liter
US
pt
Imp
pt
approximately
0
9
I
U
I
kg
m
ft
Ib
kg
m
ft
Ib
kg
m
ft
lb
14to30
IOI
t0217
6
0
to
7
0
43
to
51
5
0
to
6
0
36
to
43
kg
m
ft
Ib
kg
m
ft
b
kg
m
ft
lb
2
4
to
3
3
17
to
24
1
7
to
2
4
12
to
17
6
to
10
43
to
72
PD
ll
Page 346 of 548
V
CD
l
t
177t
ID
@
A
5
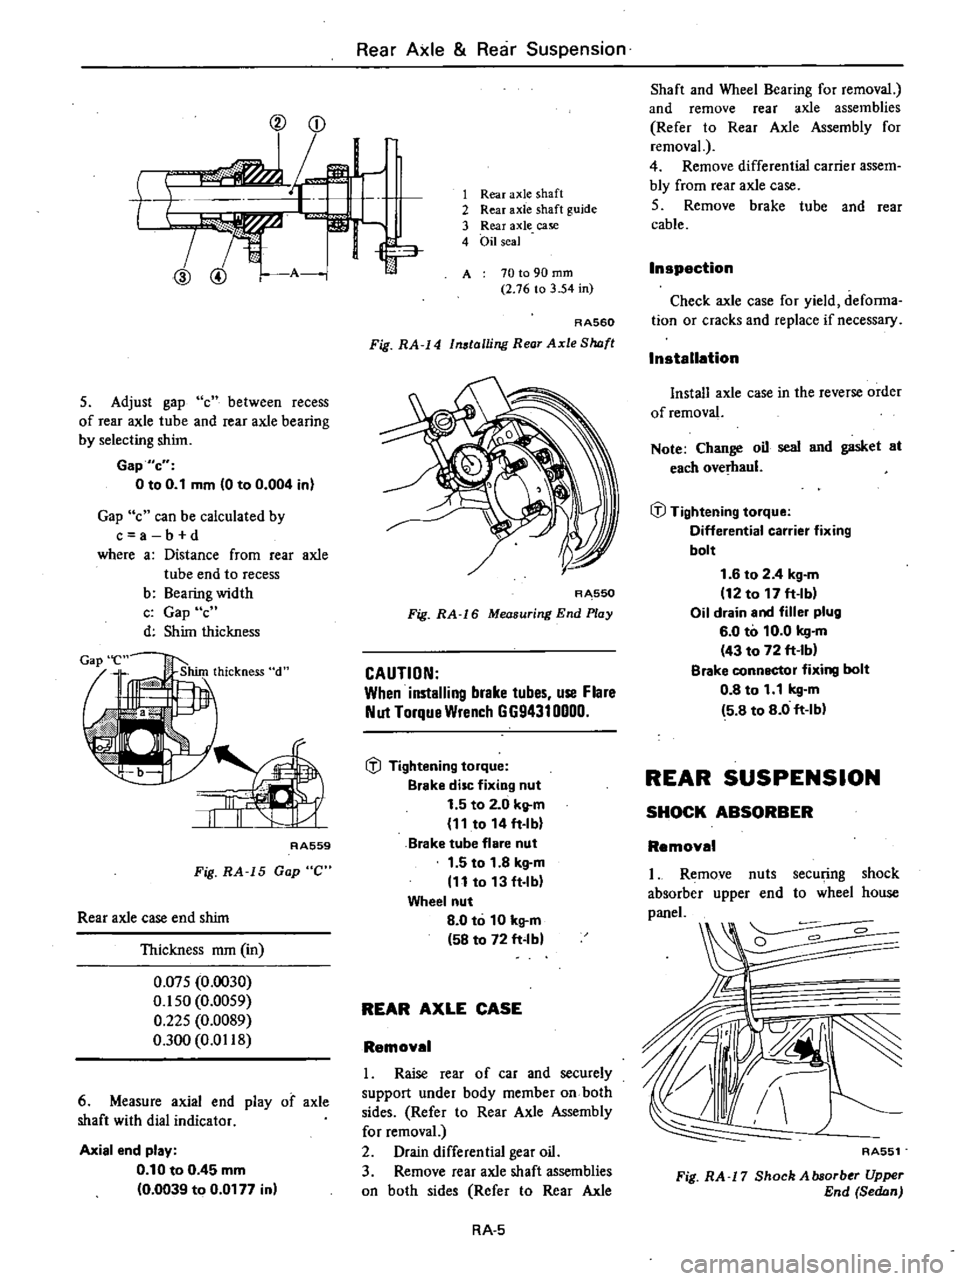
Adjust
gap
c
between
recess
of
rear
axle
tube
and
rear
axle
bearing
by
selecting
shinto
Gap
e
o
to
0
1
mm
0
to
0
004
in
Gap
c
can
be
calculated
by
c
a
b
d
where
a
Distance
from
rear
axle
tube
end
to
recess
b
Bearing
width
c
Gap
c
d
Shint
thickness
RA559
Fig
RA
15
Gap
C
Rear
axle
case
end
shim
Thickness
mm
in
om5
0
0030
0
1
50
0
0059
0
225
0
0089
0
300
0
0118
6
Measure
axial
end
play
of
axle
shaft
with
dial
indicator
Axial
end
plav
0
10
to
0
45
mm
0
0039
to
0
0177
in
Rear
Axle
Rear
Suspension
1
Rear
axle
shaft
2
Rear
axle
shaft
guide
3
Rear
axle
case
4
Oil
seal
I
ill
A
70
to
90
mm
2
76
to
3
54
in
A
A560
Fig
RA
14
Installing
Rear
Axle
Slwft
R
550
Fig
RA
16
Measuring
End
Play
CAUTION
When
installing
brake
1ubes
use
Flare
Nul
Torque
Wrench
GG94310000
ifl
Tightening
torque
Brake
disc
fixing
nut
1
5
to
2
0
kg
m
11
to
14
ft
lb
Brake
tube
flare
nut
1
5
to
1
8
kg
m
11
to
13
ft
lb
Wheel
nut
8
0
to
10
kg
m
58
to
72
ft
lb
REAR
AXLE
CASE
Remove
I
Raise
rear
of
car
and
securely
support
under
body
member
on
both
sides
Refer
to
Rear
Axle
Assembly
for
removal
2
Drain
differential
gear
oil
3
Remove
rear
axle
shaft
assemblies
on
both
sides
Refer
to
Rear
Axle
RA
5
Shaft
and
Wheel
Bearing
for
removal
and
remove
rear
axle
assemblies
Refer
to
Rear
Axle
Assembly
for
removal
4
Remove
differential
carrier
assem
bly
from
rear
axle
case
5
Remove
brake
tube
and
rear
cable
Inspection
Check
axle
case
for
yield
deforma
tion
or
cracks
and
replace
if
necessary
Installetion
Install
axle
case
in
the
reverse
order
of
removal
Note
Change
oil
seal
and
gasket
at
each
ove
haul
ifl
Tightening
tOlque
Differential
carrier
fixing
bolt
1
6
to
2
4
kg
m
12
to
17
ft
lbl
Oil
drain
and
filler
plug
6
0
to
10
0
kg
m
43
to
72
ft
lbl
Blake
connector
fixing
bolt
0
8
to
1
1
kg
m
5
8
to
8
0
ft
Ibl
REAR
SUSPENSION
SHOCK
ABSORBER
Removal
1
Remove
nuts
secu
ng
shock
absorber
upper
end
to
wheel
house
paneL
RA551
Fig
RA
17
Shock
Absorber
Upper
End
Sedan
Page 370 of 548
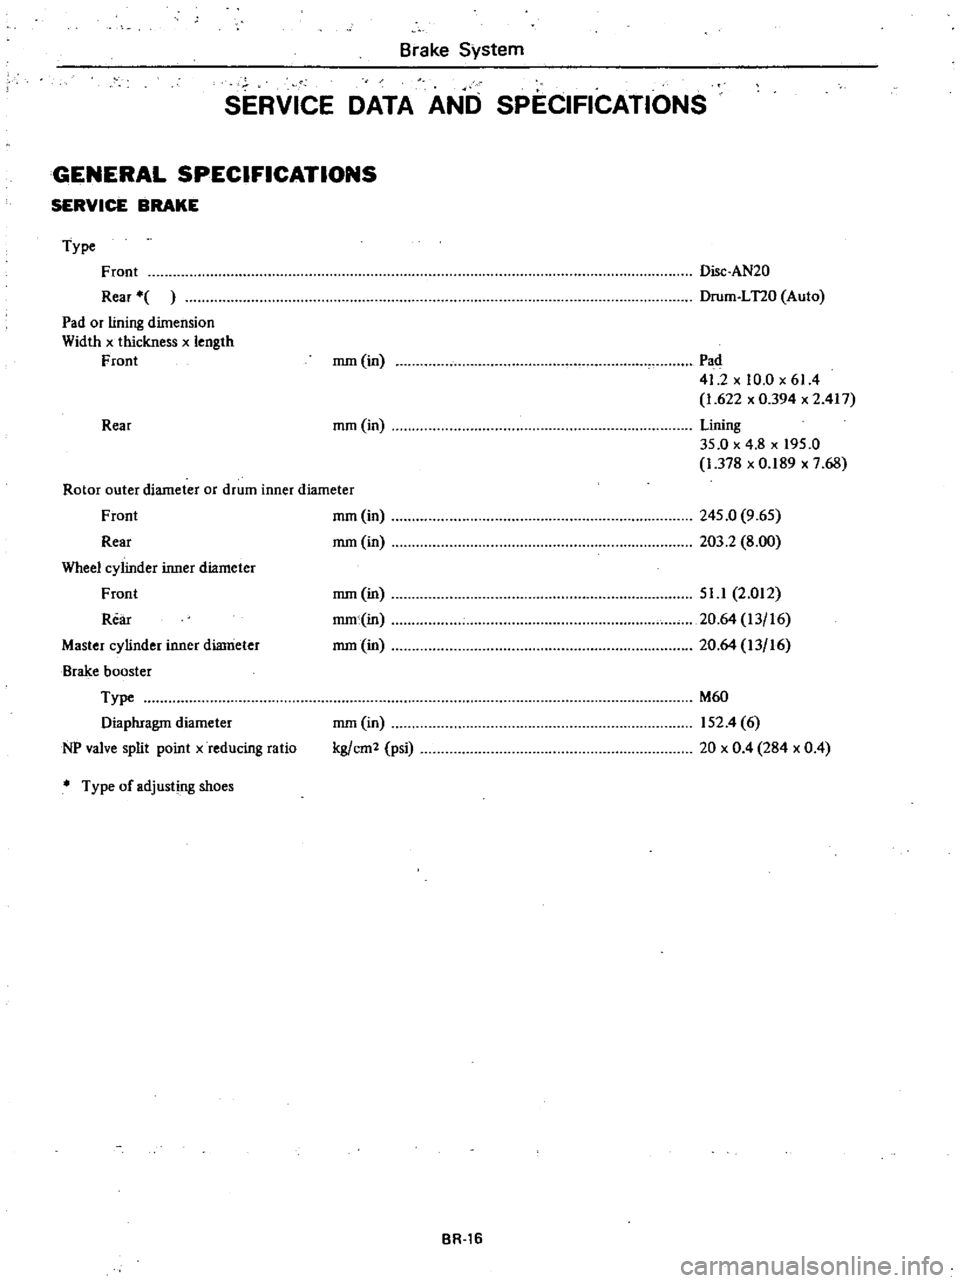
Brake
System
SERVICE
DATA
AND
SPECIFICATIONS
GENERAL
SPECIFICATIONS
SERVICE
BRAKE
Type
Front
Rear
Pad
or
lining
dimension
Width
x
thickness
x
length
Front
Rear
Disc
AN20
Drum
LT20
Auto
rnm
in
Pad
41
2
x
10
0
x
61
4
1
622
x
0394
x
2
417
Lining
35
0
x
4
8
x
195
0
1
378
x
0
189
x
7
68
mm
in
Rotor
outer
diameter
or
drum
inner
diameter
Front
Rear
Wheel
cylinder
inner
diameter
Front
Rear
Master
cylinder
inner
diameter
Brake
booster
Type
Diaphragm
diameter
NP
valve
split
point
x
reducing
ratio
Type
of
adjusting
shoes
rnm
in
rnm
in
245
0
9
65
203
2
8
00
rnm
in
mm
in
rnm
in
51
1
2
012
20
64
13
16
20
64
13
16
mm
in
kg
cm
2
psi
M60
152
4
6
20
x
0
4
284
x
0
4
BR
16