DATSUN 510 1968 Service Owner's Guide
Manufacturer: DATSUN, Model Year: 1968, Model line: 510, Model: DATSUN 510 1968Pages: 252, PDF Size: 12.2 MB
Page 31 of 252
26
CHAPTER
FOUR
2
Check
all
belts
hoses
and
fuellmes
Replace
If
reqUIred
Check
the
tensIon
of
the
belts
for
the
au
pump
and
the
alternator
Adjust
as
re
qUIred
Normal
deflection
of
the
belts
when
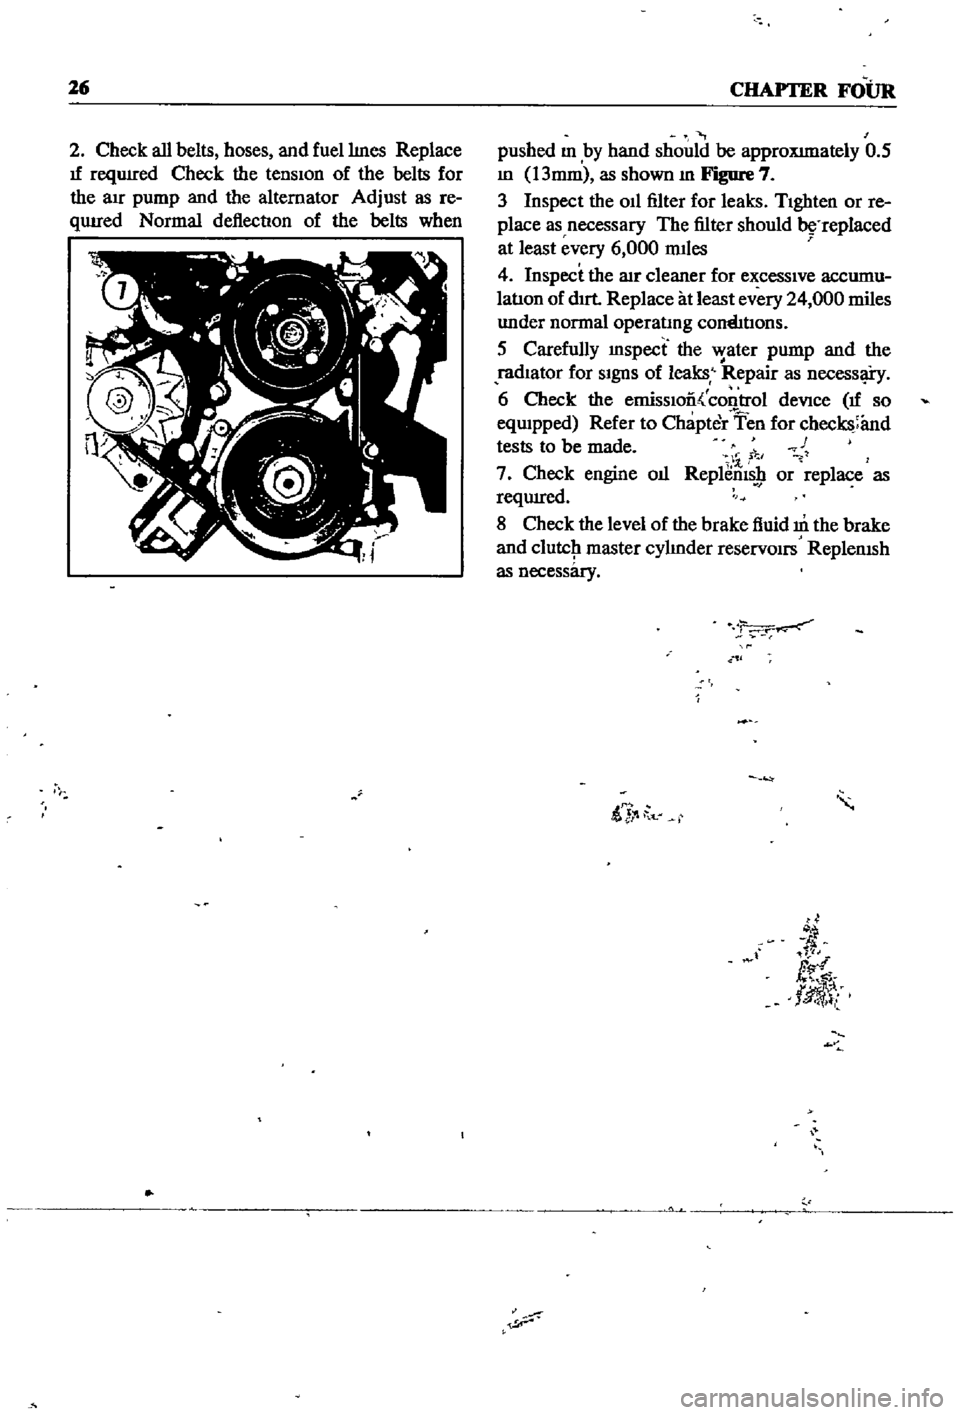
pushed
m
by
hand
should
be
approXImately
0
5
m
13mm
as
shown
m
Figure
7
3
Inspect
the
011
filter
for
leaks
TIghten
or
re
place
as
necessary
The
filter
should
replaced
at
least
every
6
000
mIles
4
Inspect
the
lIlr
cleaner
for
excessIve
accumu
latIon
of
dIrt
Replace
at
least
every
24
000
miles
under
normal
operatmg
cornhtIons
5
Carefully
mspect
the
water
pump
and
the
radIator
for
SIgnS
of
leaks
Repair
as
necessl
i
y
6
Check
the
emissIoo
control
deVice
If
so
eqwpped
Refer
to
Chapter
Ten
for
checks
and
tests
to
be
made
c
1
7
Check
engine
oIl
Replems
9
or
replace
as
reqUIred
8
Check
the
level
of
the
brake
fluid
m
the
brake
and
clutcJ1
master
cylmder
reservOirs
ReplenISh
as
necessary
ii
t
d
fl
tlJ
l
Page 32 of 252
f
CH
APTER
FIVE
I
f
I
t
p
ENGINE
LUBRICATION
SYSTEM
i
k
i
DESCRIPTION
The
Datsun
L16
engme
uses
a
pressure
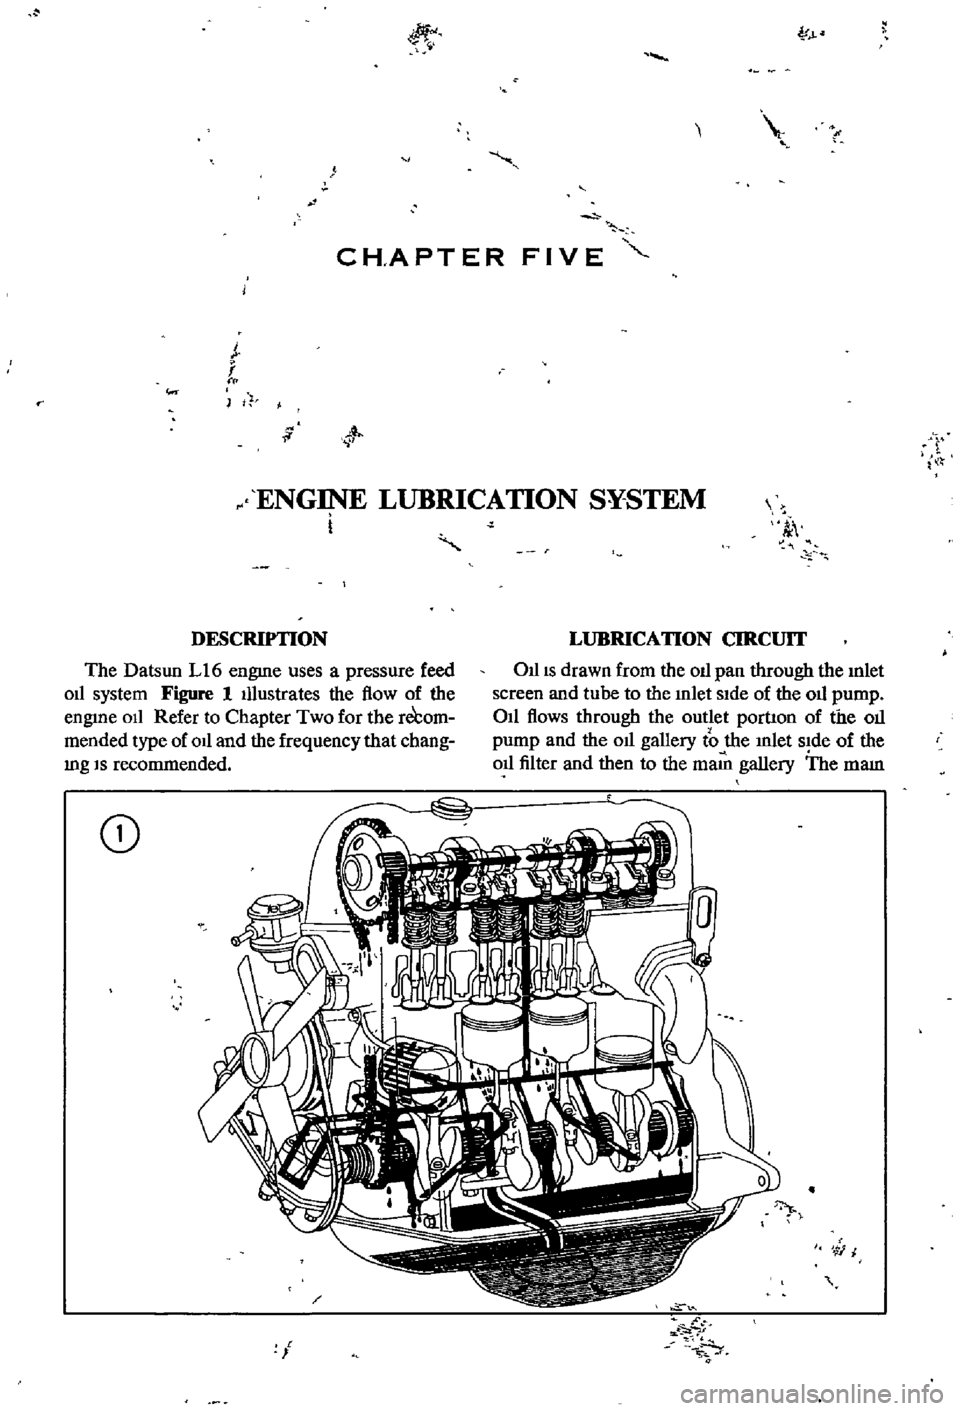
feed
011
system
Figure
1
Illustrates
the
flow
of
the
engine
011
Refer
to
Chapter
Two
for
the
re
om
mended
type
of
011
and
the
frequency
that
chang
mg
IS
recommended
LUBRICATION
CIRCUIT
OlliS
drawn
from
the
011
pan
through
the
mlet
screen
and
tube
to
the
mlet
side
of
the
011
pump
011
flows
through
the
outlet
portIon
of
the
011
pump
and
the
011
gallery
to
the
mlet
side
of
the
011
filter
and
then
to
the
maID
gallery
The
mam
CD
N
4
r
I
Page 33 of 252
28
CHAPTER
FIVE
011
gallery
supphes
011
to
the
crankshaft
mam
beanngs
Dnlled
passages
m
the
crankshaft
direct
oil
from
the
mam
bearings
to
the
con
nectmg
rod
beanngs
011
mJected
from
jet
holes
in
the
connectIng
rods
IS
directed
to
the
cylmder
walls
and
piston
pins
0U
dlstnbuted
from
the
mam
gallery
enters
the
cham
tensioner
The
pad
IS
held
against
the
cham
by
011
pressure
and
spnng
tension
The
tmung
chain
receives
011
through
the
Jet
located
near
It
LubncatIon
IS
supphed
to
the
cyhnder
head
mam
011
gallery
through
the
crankshaft
center
beanngs
Camshaft
beanngs
on
the
cyhnder
head
are
fed
directly
from
the
cyhnder
head
mam
gallery
The
rocker
arms
and
valves
are
lubncated
intermittently
by
the
camshaft
011
gallery
and
the
small
channel
at
the
base
CIrcle
portIon
of
each
cam
OllIS
supphed
to
the
cam
shaft
011
gallery
through
the
No
2
and
No
3
camshaft
bearings
OIL
PUMP
The
011
pump
IS
mstalled
m
the
bottom
of
the
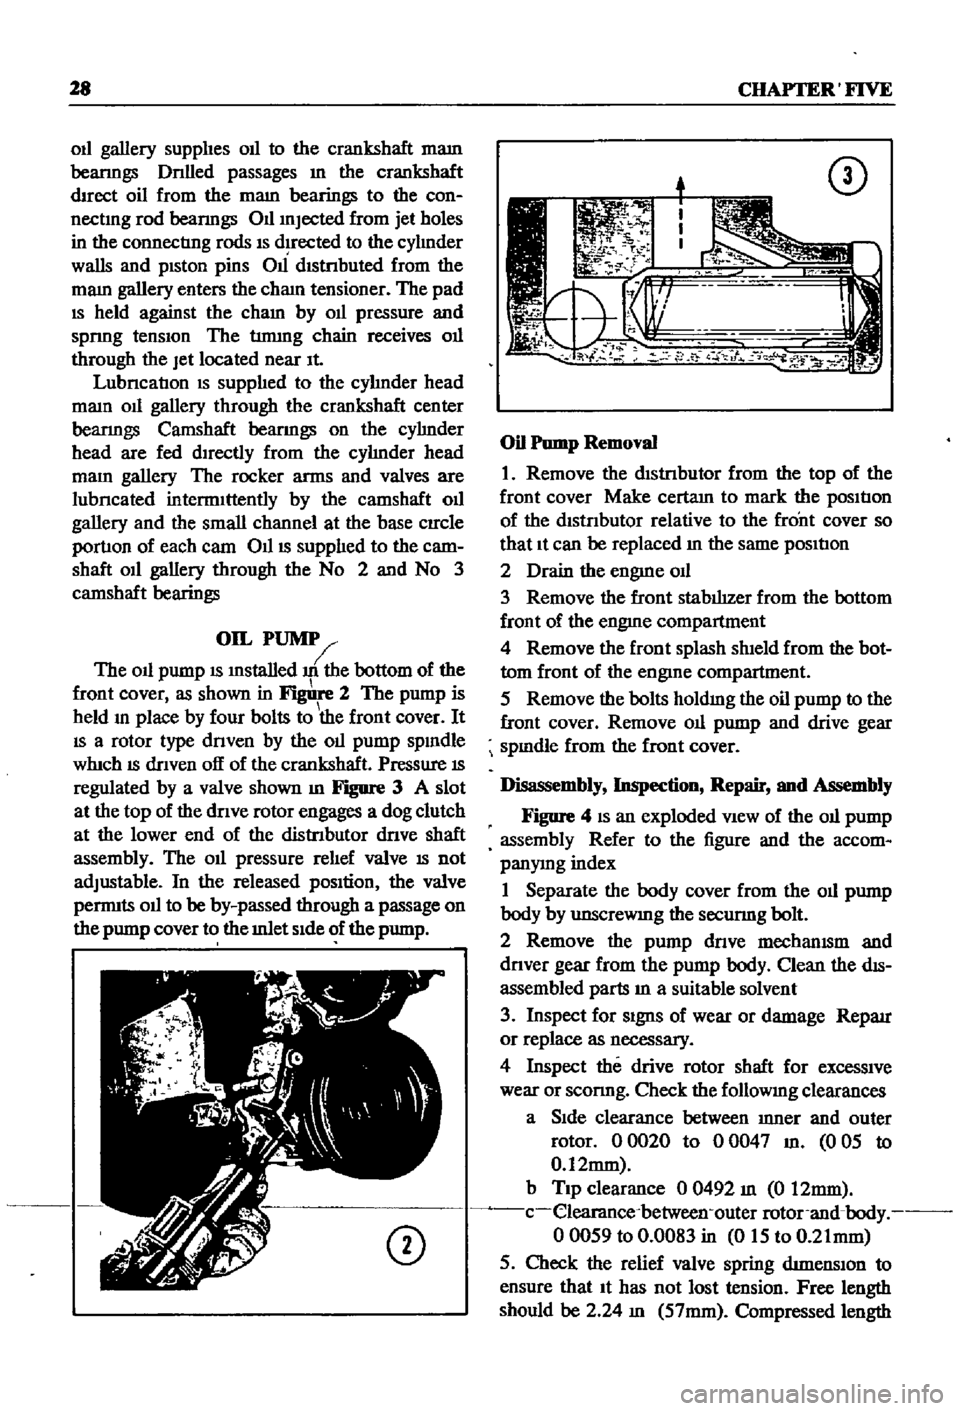
front
cover
as
shown
in
2
The
pump
is
held
m
place
by
four
bolts
to
the
front
cover
It
IS
a
rotor
type
dnven
by
the
011
pump
spmdle
whIch
IS
dnven
off
of
the
crankshaft
Pressure
IS
regulated
by
a
valve
shown
m
Figure
3
A
slot
at
the
top
of
the
dnve
rotor
engages
a
dog
clutch
at
the
lower
end
of
the
distnbutor
dnve
shaft
assembly
The
011
pressure
rehef
valve
IS
not
adjustable
In
the
released
pOSition
the
valve
pernnts
011
to
be
by
passed
through
a
passage
on
the
pump
cover
to
the
mlet
Side
of
the
pump
CD
CD
Oil
Pump
Removal
1
Remove
the
dIStnbutor
from
the
top
of
the
front
cover
Make
certam
to
mark
the
posItIon
of
the
dtstnbutor
relative
to
the
front
cover
so
that
It
can
be
replaced
m
the
same
posItIon
2
Drain
the
engme
od
3
Remove
the
front
stabIhzer
from
the
bottom
front
of
the
engme
compartment
4
Remove
the
front
splash
shIeld
from
the
bot
tom
front
of
the
engine
compartment
5
Remove
the
bolts
holdmg
the
oil
pump
to
the
front
cover
Remove
011
pump
and
drive
gear
spmdle
from
the
front
cover
Disassembly
Inspection
Repair
and
Assembly
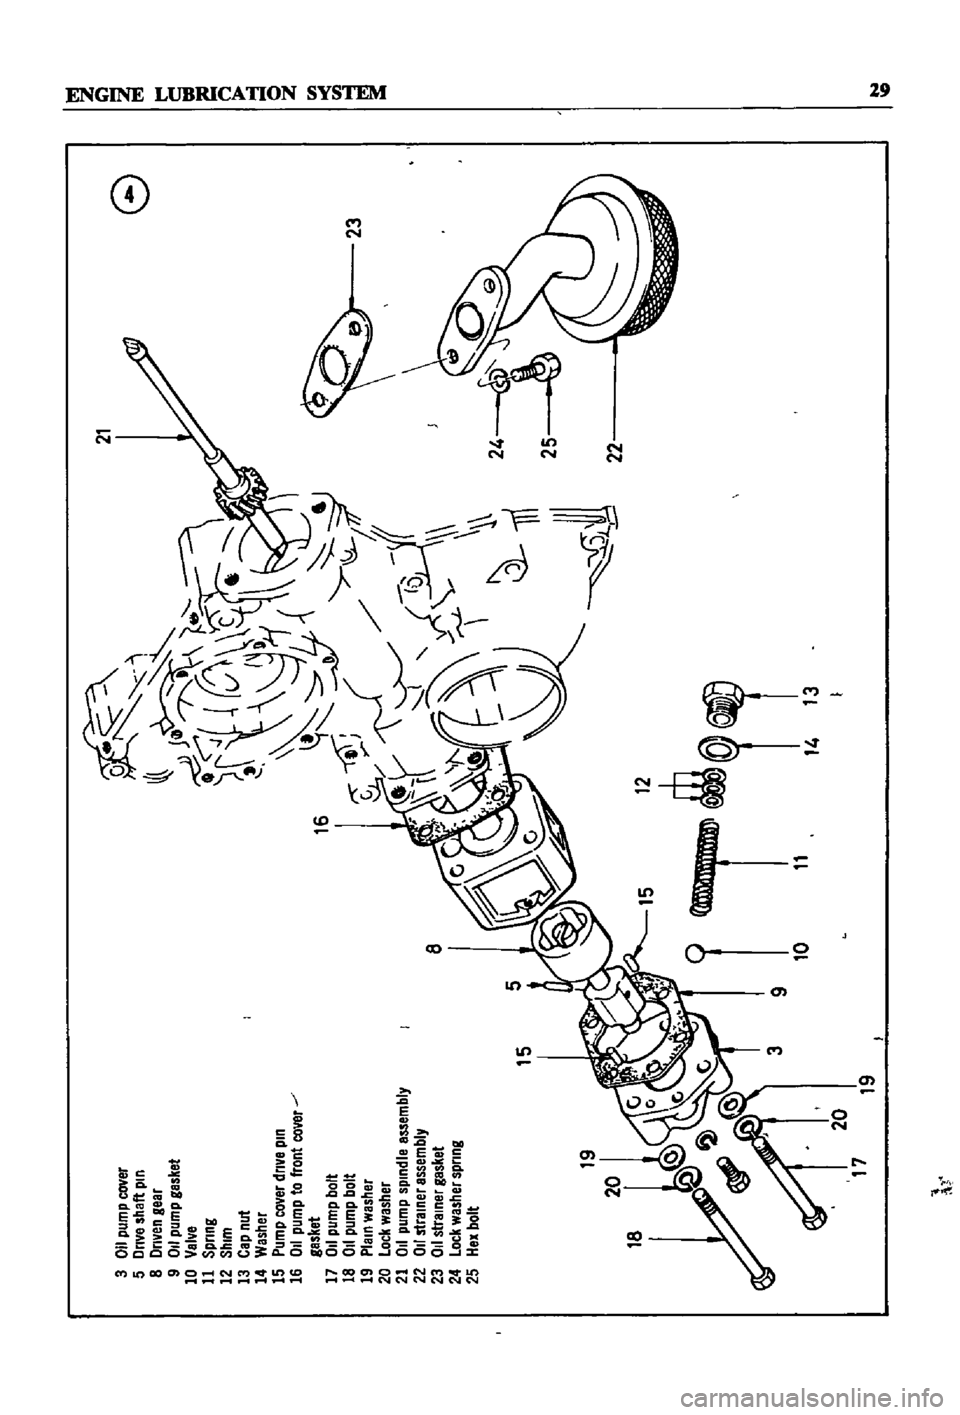
Figure
4
IS
an
exploded
VIew
of
the
011
pump
assembly
Refer
to
the
figure
and
the
accom
panymg
index
1
Separate
the
body
cover
from
the
011
pump
body
by
unscreWIng
the
secunng
bolt
2
Remove
the
pump
dnve
mechamsm
and
dnver
gear
from
the
pump
body
Clean
the
dIS
assembled
parts
m
a
suitable
solvent
3
Inspect
for
Signs
of
wear
or
damage
Reparr
or
replace
as
necessary
4
Inspect
the
drive
rotor
shaft
for
excessive
wear
or
sconng
Check
the
followmg
clearances
a
Side
clearance
between
mner
and
outer
rotor
00020
to
00047
m
005
to
0
12mm
b
Tip
clearance
0
0492
m
0
12mm
c
elearance
between
outer
rotor
and
body
00059
to
0
0083
in
015
to
0
21mm
5
Check
the
relief
valve
spring
dtmenslOn
to
ensure
that
It
has
not
lost
tension
Free
length
should
be
2
24
m
57mm
Compressed
length
Page 34 of 252
21
G
3
011
pum
p
cover
5
Drive
shaft
pin
8
Driven
gear
9
011
pump
gasket
10
Valve
11
Spring
12
Shim
13
Cap
nut
14
Washer
15
Pump
cover
drive
pin
16
011
pump
to
front
cover
gasket
17
011
pump
bolt
18
011
pump
bolt
19
Plain
washar
20
Lock
washer
21
011
pump
spindle
assembly
22
011
strainer
assembly
23
011
strainer
gasket
24
Lock
washer
spring
25
Hax
bolt
8
18
12
I
T
10
11
14
13
19
I
t
l
o
z
N
0
Page 35 of 252
30
CHAPTER
FIVE
should
be
1
54
m
39mm
If
the
spnng
tension
is
accurate
the
rehef
valve
should
open
at
54
0
to
59
7
lb
1m
3
8
to
4
2
kg
cm
6
Reassemble
the
oil
pump
Make
certain
all
gaskets
are
mounted
flat
to
avoid
leaks
7
Install
the
dnve
spindle
and
the
oil
pump
to
the
front
cover
8
Install
the
distnbutor
in
the
same
relative
locallon
from
which
it
was
removed
If
the
num
ber
1
cyhnder
was
at
top
dead
center
on
the
compression
stroke
the
punch
mark
on
the
dnve
spindle
should
face
toward
the
front
of
the
engine
9
Install
the
front
splash
shield
and
the
front
stablhzer
10
Insert
the
drain
plug
in
the
pan
and
refill
the
engme
11
Oil
pressure
at
idle
should
be
142
to
17
1
lb
lin
1
0
to
1
2
kg
cm
12
Tlghtenmg
torque
values
for
the
oil
pump
mounting
bolts
is
10
8
to
152ft
lb
1
5
to
2
1
kg
m
and
21
69
to
25
31
ft
lb
3
0
to
25
kg
m
for
the
release
valve
cap
nut
Oil
Filter
The
oil
filter
is
mounted
on
the
nght
hand
side
of
the
cyhnder
block
It
IS
a
cartndge
type
with
built
m
gasket
and
threads
onto
the
mounting
spindle
The
filter
should
be
replaced
every
6
000
miles
as
follows
1
Dram
the
engme
oil
Walt
10
15
minutes
before
removmg
oil
filter
to
allow
It
to
dram
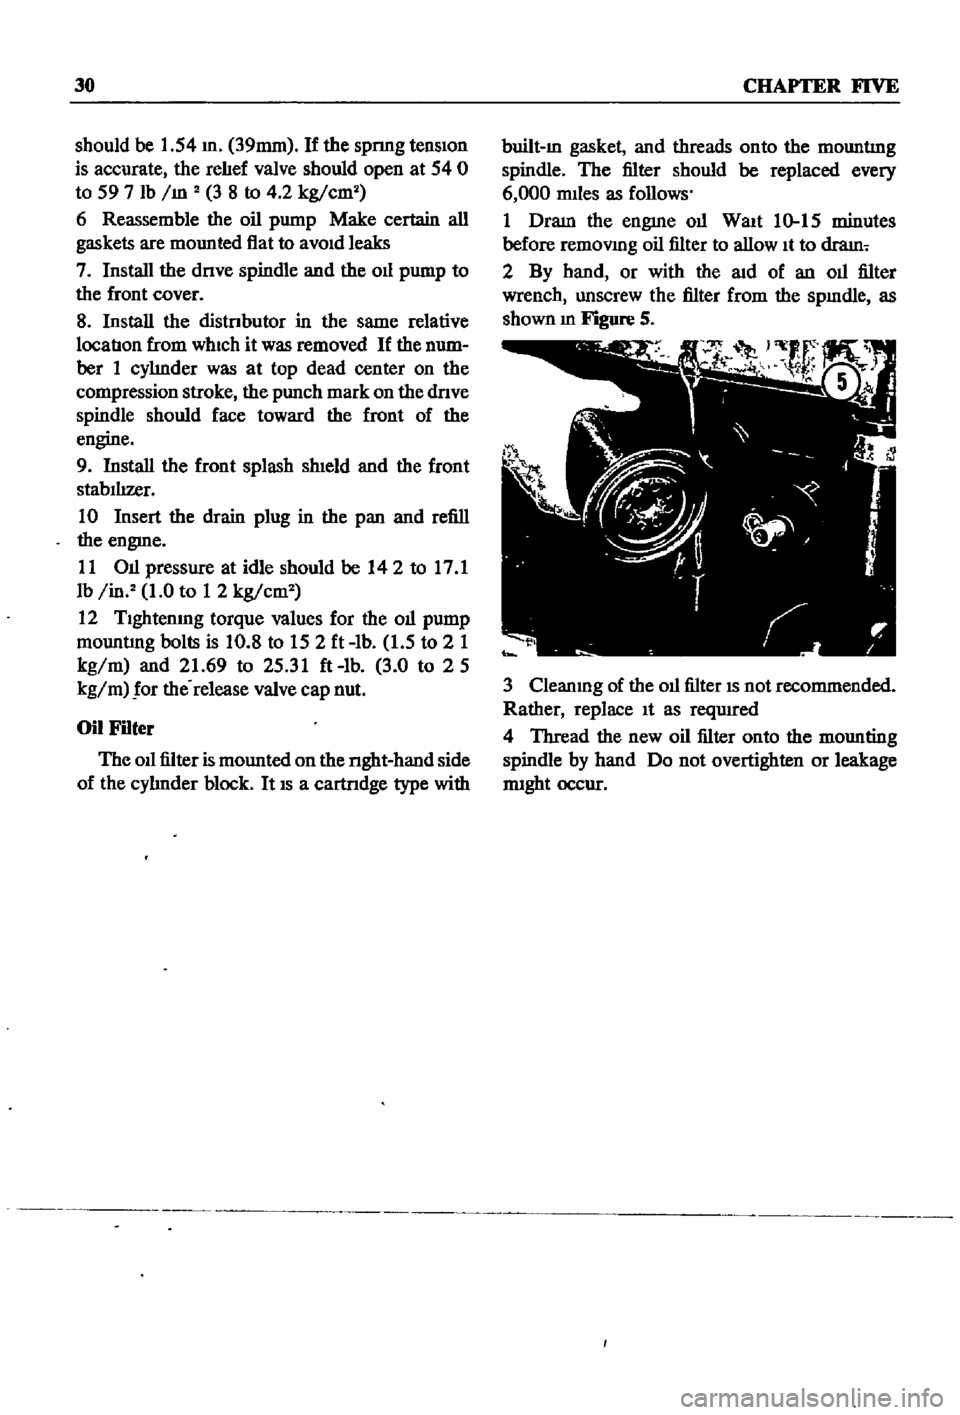
2
By
hand
or
with
the
aid
of
an
oil
filter
wrench
unscrew
the
filter
from
the
spmdle
as
shown
m
Figure
S
3
Cleanmg
of
the
oil
filter
IS
not
recommended
Rather
replace
It
as
reqUIred
4
Thread
the
new
oil
filter
onto
the
mounting
spindle
by
hand
Do
not
overtighten
or
leakage
nught
occur
Page 36 of 252
CHAPTER
SIX
ENGINE
Datsun
510
and
521
veJucles
use
the
L16
engme
Over
the
years
the
deSign
remamed
essentIally
the
same
with
nunor
changes
made
to
accommodate
drlIerent
elIDSSlon
control
de
VIces
The
Ll6
IS
a
four
cylmder
overhead
cam
shaft
engme
With
a
97
3
cubic
mch
1595cc
dISplacement
Cylmder
bore
IS
3
2677
in
83mm
stroke
IS
2
9016
m
73
7mm
Output
IS
96
horsepower
1972
mode1s
92
horse
power
at
5
600
rpm
Compression
ratIo
is
8
5
to
1
Equipment
includes
a
single
two
barrel
Hltaclu
carburetor
an
HItachi
alternator
an
HItachi
starter
motor
and
either
a
smgle
point
or
dual
pomt
distnbutor
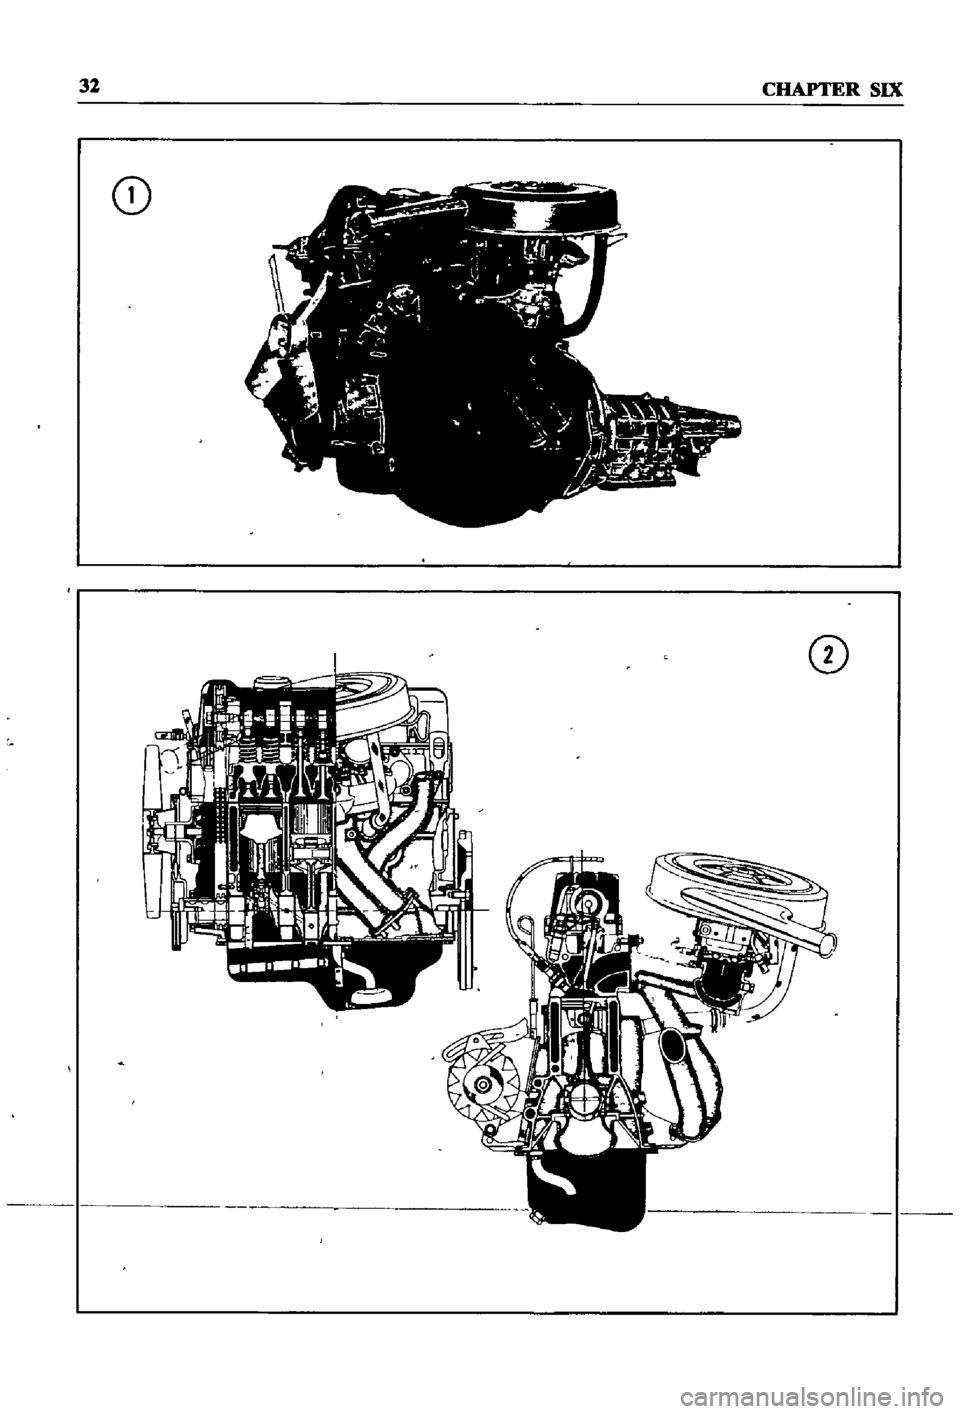
Figure
1
next
page
IS
an
overall
view
of
the
engme
Figure
2
next
page
is
a
sectIonal
view
The
following
para
graphs
describe
and
illustrate
the
major
com
ponents
of
the
engine
and
provide
detaIled
InStructIons
on
the
removal
disassembly
inspec
tIon
reparr
and
reassembly
of
the
engine
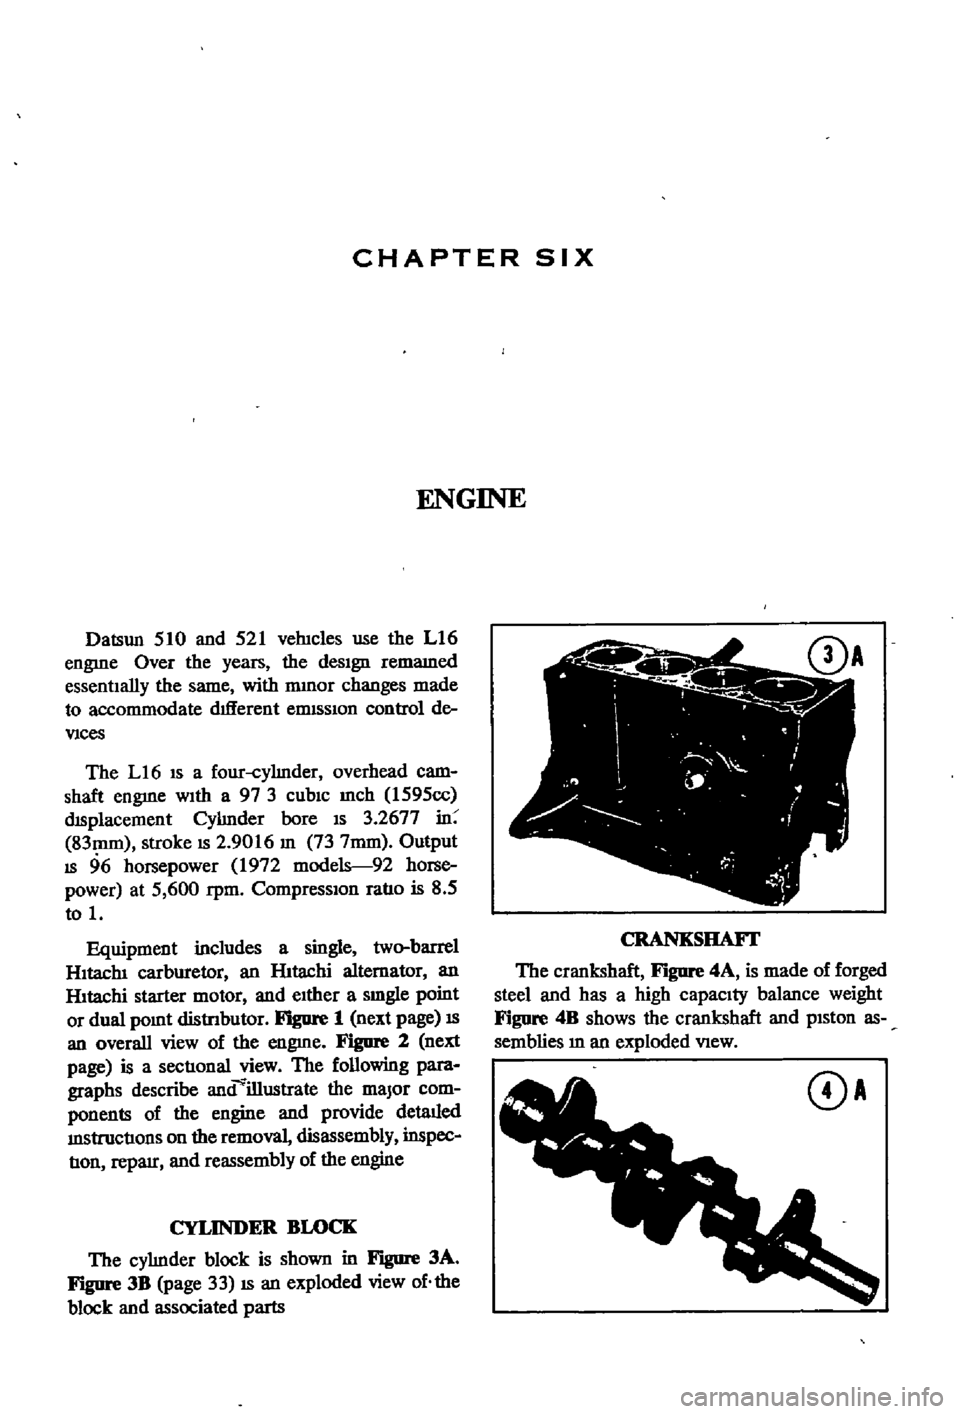
CYLINDER
BLOCK
The
cylmder
block
is
shown
in
Figure
3A
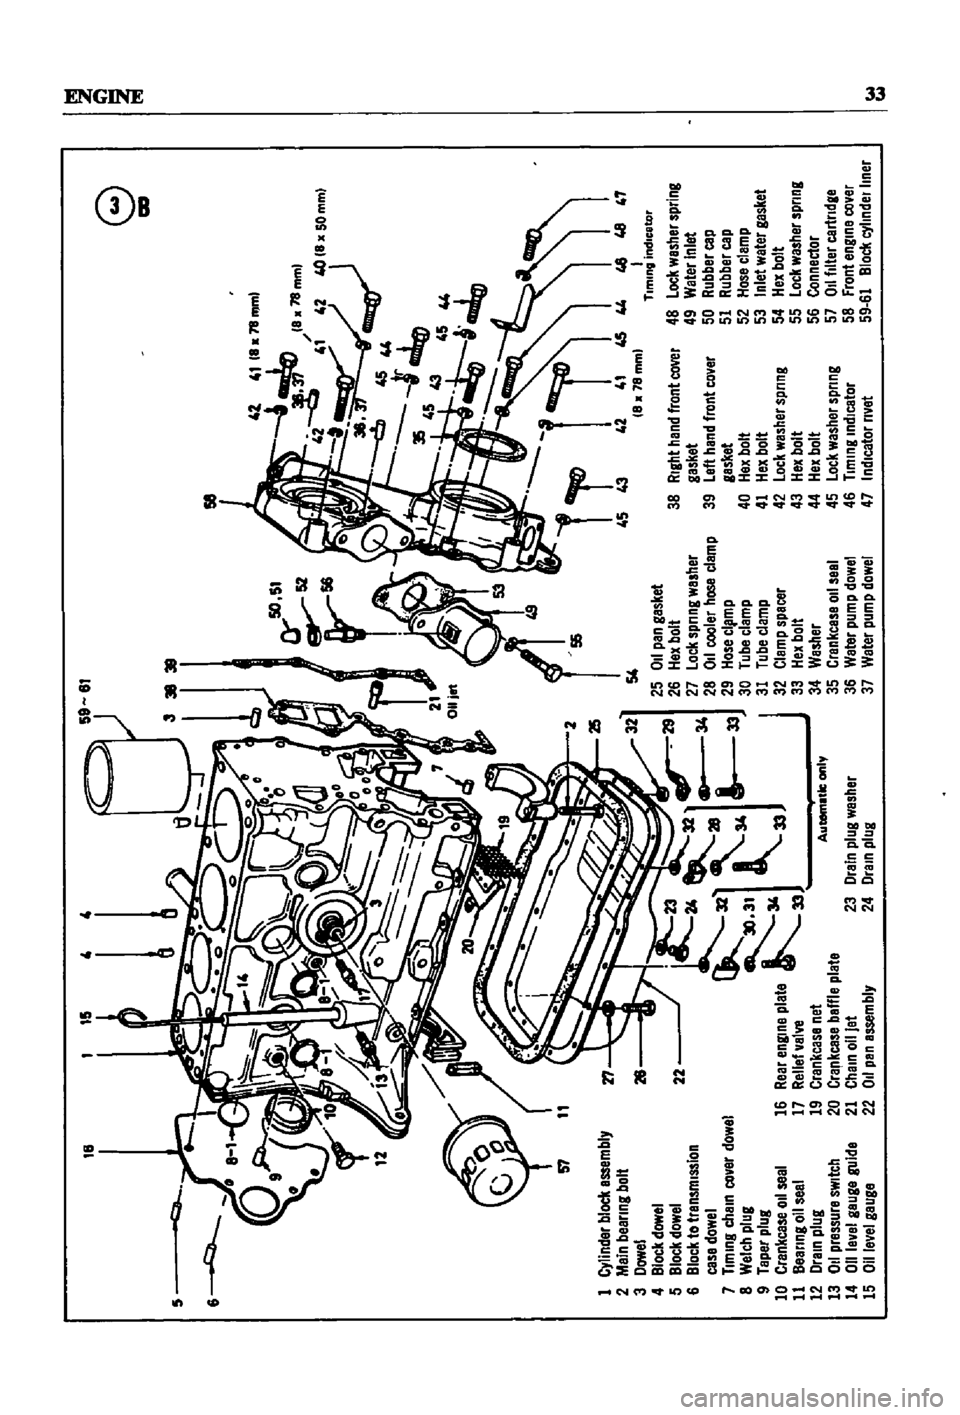
Figure
3B
page
33
IS
an
exploded
view
of
the
block
and
associated
parts
CRANKSHAFI
The
crankshaft
F
JgUre
4A
is
made
of
forged
steel
and
has
a
high
capacity
balance
weight
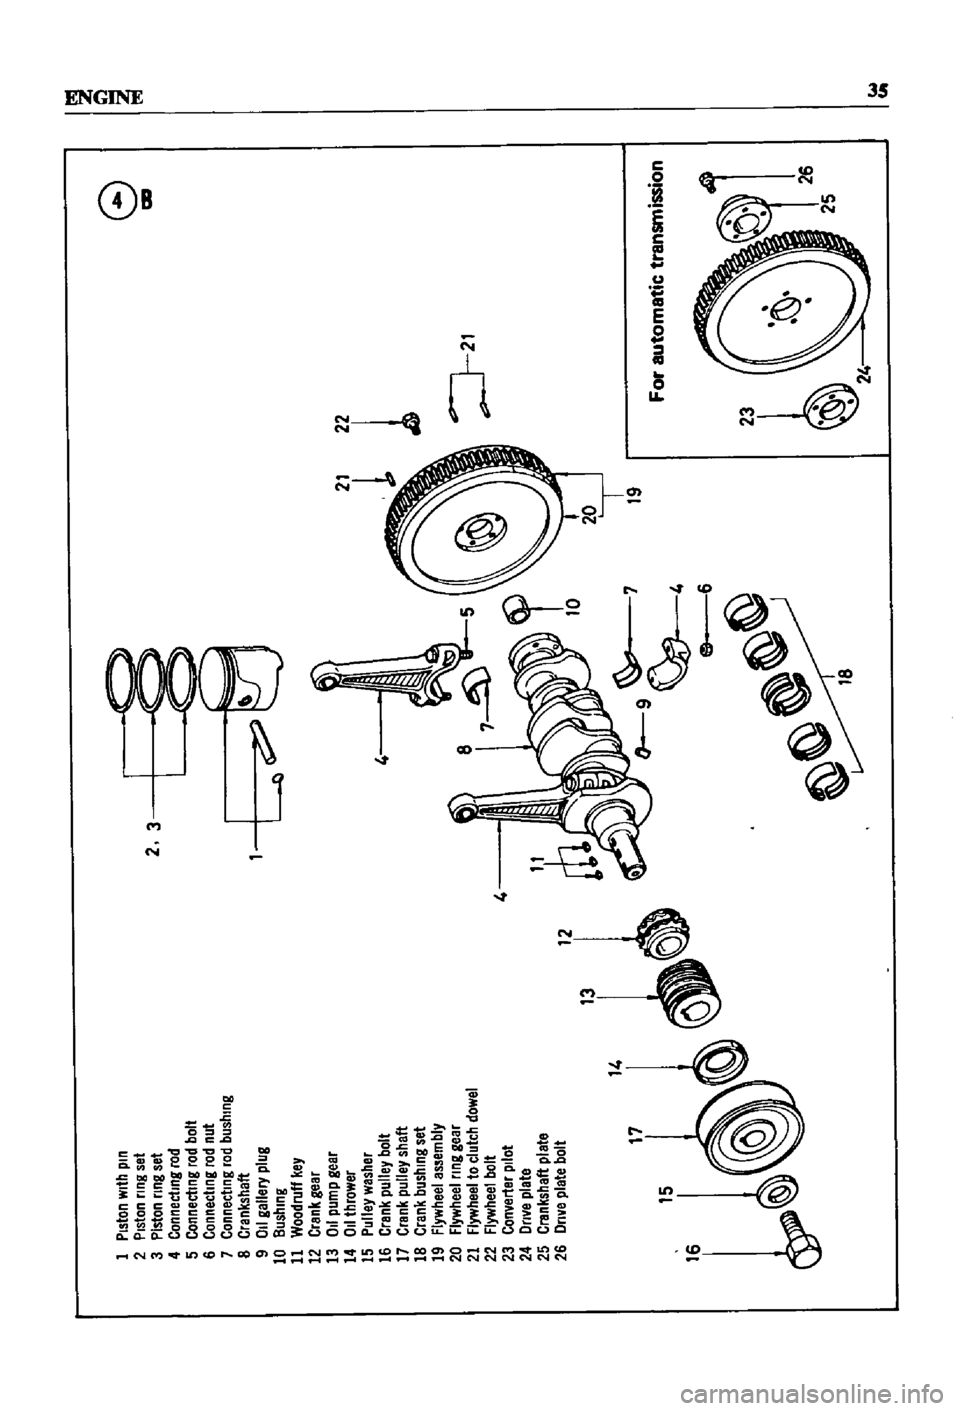
Figure
4B
shows
the
crankshaft
and
pISton
as
semblies
m
an
exploded
VIew
DA
Page 37 of 252
32
CHAPTER
SIX
CD
CD
Page 38 of 252
4l
4111a
78
mml
la78mml
42
4
42
4OIla50mml
t
4544
i
35
45
lIq
D
1
43
45
44
6
1i
45
43
42
41
45
44
46
46
47
8
78mml
I
Tlmmg
Indicator
48
lock
washer
spring
49
Water
Inlet
50
Rubber
cap
51
Rubber
cap
52
Hosa
clamp
53
Inlet
watar
gasket
54
Hex
bolt
55
lock
washer
spring
56
Connector
57
011
filter
cartndge
58
front
engme
cover
59
61
Bloel
cyllndelllner
18
15
58
57
1
Cylinder
block
assembly
2
Main
beanng
bolt
3
Dowel
4
Block
dowel
5
Block
dowel
6
Block
to
transmIssIon
case
dowel
7
Tlmmg
chaIn
covar
dowel
8
Welch
plug
9
Taper
plug
10
Crankcase
011
seal
11
Bearing
011
seal
12
Drain
plug
13
011
pressure
sWitch
14
011
level
gauge
guide
15
Oll
evel
gauga
r1
26
54
25
011
pan
gasket
26
Hax
bolt
27
lock
Sprl
ng
washer
28
011
cooler
hose
clamp
29
Hose
cl
mp
30
Tube
clamp
31
Tube
clamp
32
Clamp
spacer
33
Hex
bolt
34
Washer
35
Crankcase
011
seel
36
Waler
pump
dowel
37
Water
pump
dowel
38
RIght
hand
front
caver
gasket
39
left
hand
front
cover
gasket
40
Hex
bolt
41
Hex
bolt
42
lock
washer
spnng
43
Hex
bolt
44
Hex
bolt
45
Lock
washer
spring
46
Tlmmg
Indicator
47
IndIcator
rivet
22
16
23
Drain
plug
washer
24
Dram
plug
e
l
lIlI
1M
1M
Page 39 of 252
34
CHAPTER
SIX
Figure
4B
shows
the
crankshaft
and
piston
as
semblIes
m
an
exploded
VIew
PISTONS
AND
CONNECTING
RODS
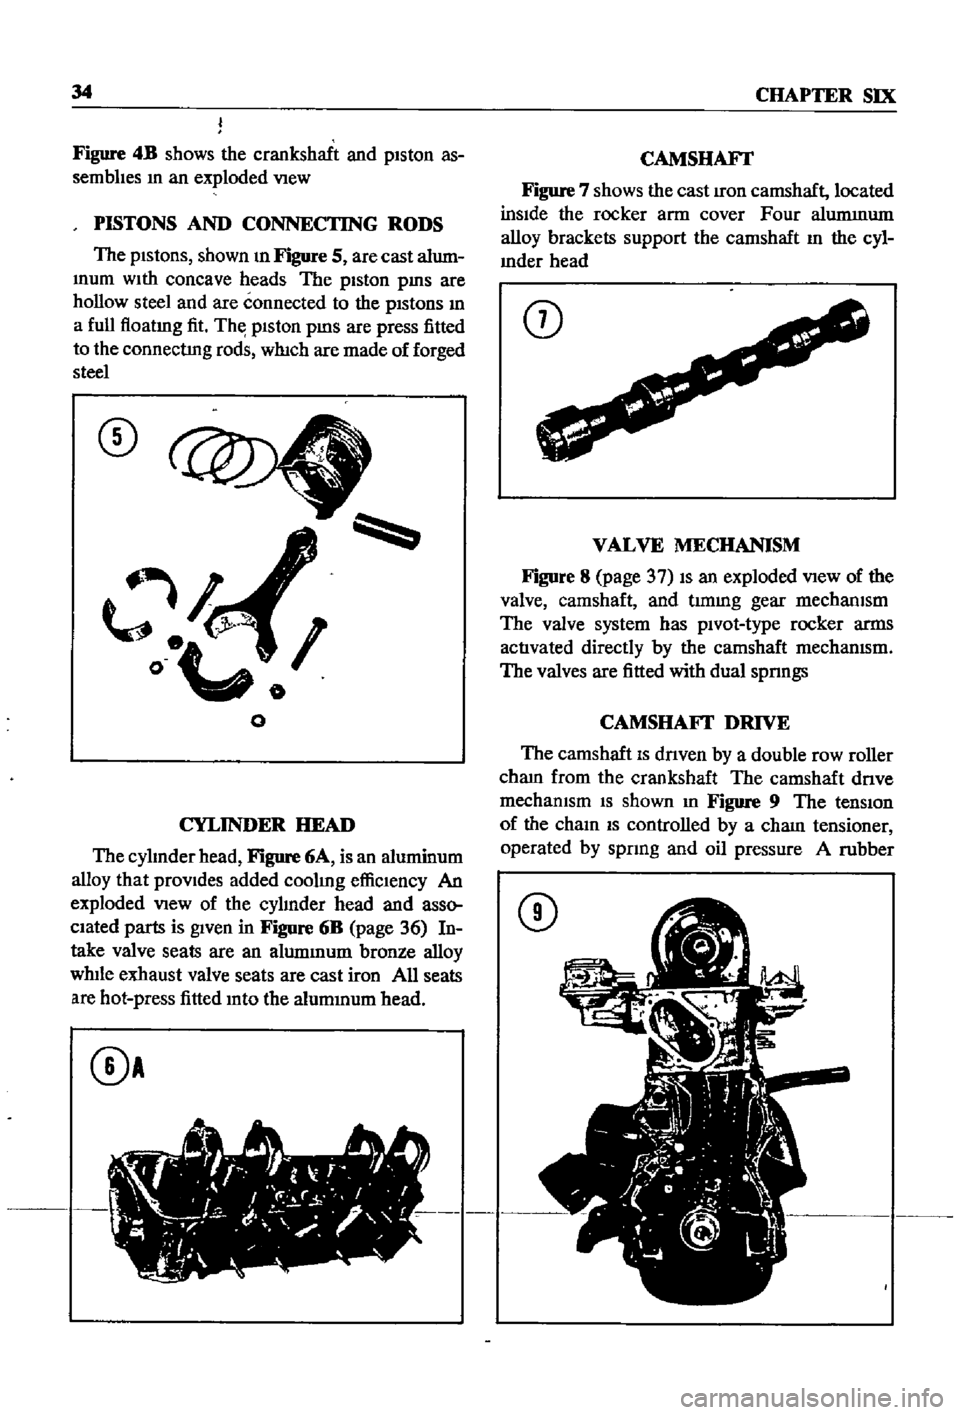
The
pistons
shown
m
Figure
5
are
cast
alum
mum
With
concave
heads
The
piston
pms
are
hollow
steel
and
are
connected
to
the
pistons
m
a
full
floatmg
fit
Th
piston
pms
are
press
fitted
to
the
connectIng
rods
which
are
made
of
forged
steel
CD
l
o
o
o
CYLINDER
HEAD
The
cylInder
head
Figure
6A
is
an
aluminum
alloy
that
provides
added
coolmg
effiCiency
An
exploded
VIew
of
the
cylInder
head
and
asso
ciated
parts
is
given
in
Figure
6B
page
36
In
take
valve
seats
are
an
alummum
bronze
alloy
while
exhaust
valve
seats
are
cast
iron
All
seats
are
hot
press
fitted
mto
the
alummum
head
0A
CAMSHAFr
Figure
7
shows
the
cast
Iron
camshaft
located
inSide
the
rocker
arm
cover
Four
alummum
alloy
brackets
support
the
camshaft
m
the
cyl
mder
head
CD
VALVE
MECHANISM
Figure
8
page
37
IS
an
exploded
VIew
of
the
valve
camshaft
and
t1mmg
gear
mechanism
The
valve
system
has
pivot
type
rocker
arms
activated
directly
by
the
camshaft
mechanIsm
The
valves
are
fitted
with
dual
spnngs
CAMSHAFI
DRIVE
The
camshaft
IS
dnven
by
a
double
row
roller
cham
from
the
crankshaft
The
camshaft
dnve
mechanIsm
IS
shown
m
Figure
9
The
tensIOn
of
the
cham
IS
controlled
by
a
cham
tensioner
operated
by
spnng
and
oil
pressure
A
rubber
CD
Page 40 of 252
I
Piston
with
pin
2
Piston
nng
set
3
Piston
nng
set
4
Connecting
rod
5
Connecting
rod
bolt
6
Connecting
rod
nut
7
Connecting
rod
bushing
8
Crankshaft
9
011
gallery
plug
10
Bushing
11
Woodruff
key
12
Crank
gear
13
011
pump
gear
14
OJlthrower
15
Pulley
washer
16
Crank
pulley
bolt
17
Crank
pulley
shaft
18
Crank
bushing
set
19
Flywheel
assembly
20
Flywheel
nng
gear
21
Flywheel
to
clutch
dowel
22
Flywheel
bolt
4
23
Converter
pilot
24
Dnve
plate
25
Crankshaft
plate
26
Dnve
plate
bolt
13
I
14
17
15
2
3
l
L
4
8
9
6
19
1
J
21
2
24
8
ICD
I
For
automatic
transmission
W
lit