differential DATSUN B110 1973 Service User Guide
[x] Cancel search | Manufacturer: DATSUN, Model Year: 1973, Model line: B110, Model: DATSUN B110 1973Pages: 513, PDF Size: 28.74 MB
Page 79 of 513
CHASSIS
7
Turn
drive
pinion
in
both
directions
several
times
to
set
bearing
rollers
And
adjust
bearing
preload
to
specifi
cations
Drive
pinion
bearing
preload
with
oil
seal
7
to
9
kg
cm
6
1
to
7
8
in
1b
At
companion
flange
bolt
hole
2
25
to
2
95
kg
4
96
to
6
50
1b
Pinion
nut
tightening
torque
12
to
17
kg
m
86
8
to
122
9
ft
1b
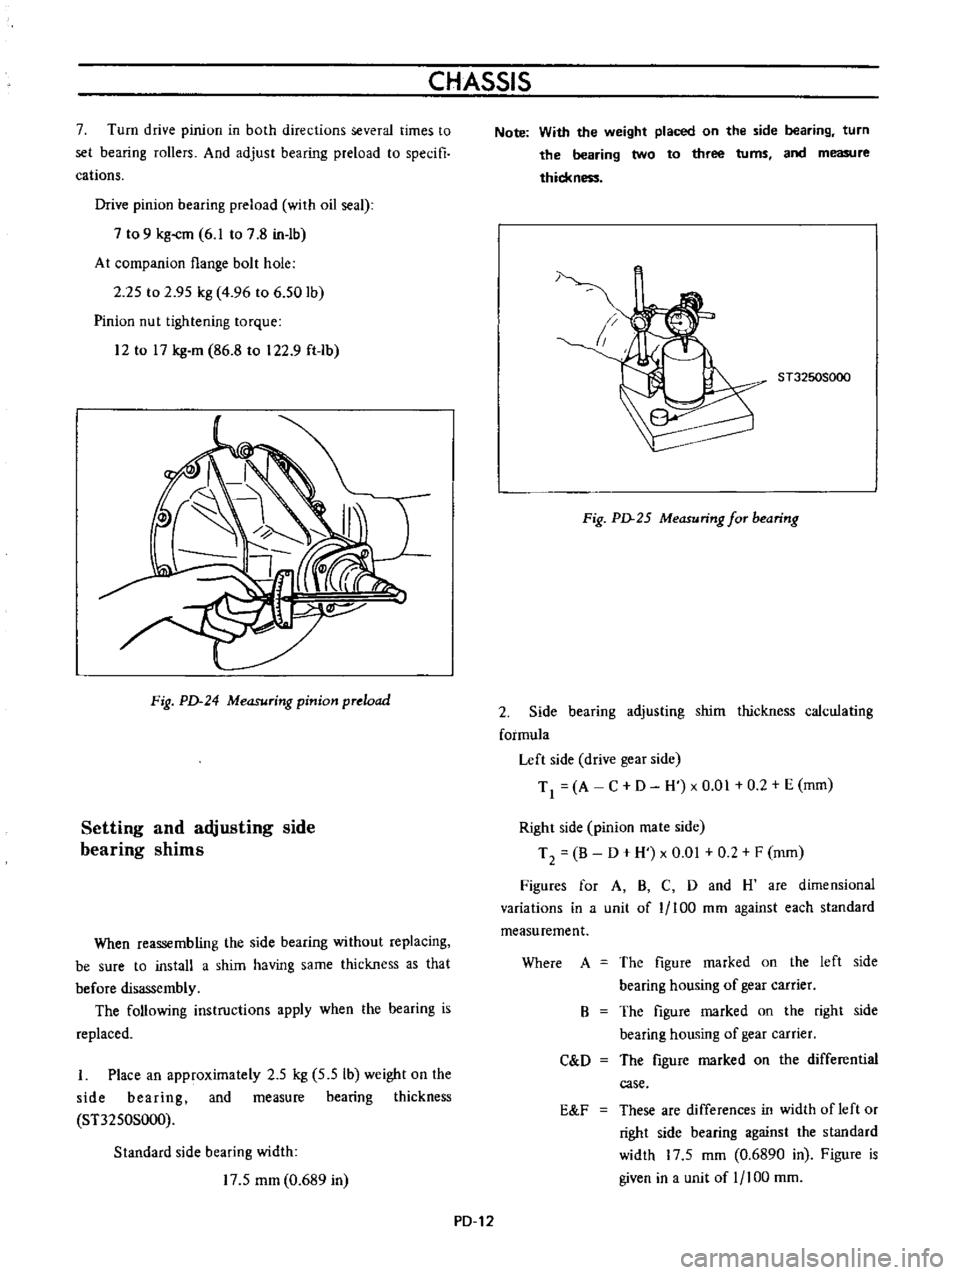
Fig
PD
24
Measuring
pinion
preload
Setting
and
adjusting
side
bearing
shims
When
reassembling
the
side
bearing
without
replacing
be
sure
to
install
a
shim
having
same
thickness
as
that
before
disassembly
The
following
instructions
apply
when
the
hearing
is
replaced
I
Place
an
approximately
2
5
kg
5
5
Ib
weight
on
the
side
bearing
and
measure
bearing
thickness
ST3250S000
Standard
side
bearing
width
17
5
mm
0
689
in
Note
With
the
weight
placed
on
the
side
bearing
turn
the
bearing
two
to
three
turns
and
measure
thickn
1
ST3250S000
Fig
PD
25
Measuring
for
bearing
2
Side
bearing
adjusting
shim
thickness
calculating
formula
Left
side
drive
gear
side
Tl
A
C
D
H
xO
01
0
2
E
mm
Right
side
pinion
mate
side
T
2
B
D
H
x
0
01
0
2
F
mm
Figures
for
A
B
C
D
and
H
are
dimensional
variations
in
a
unit
of
1
100
mm
against
each
standard
measurement
Where
A
The
figure
marked
on
the
left
side
bearing
housing
of
gear
carrier
The
figure
marked
on
the
right
side
bearing
housing
of
gear
carrier
The
figure
marked
on
the
differential
case
B
C
D
E
F
These
are
differences
in
width
of
left
or
right
side
bearing
against
the
standard
width
17
5
mm
0
6890
in
Figure
is
given
in
a
unit
of
1
100
mm
PD
12
Page 80 of 513
PROPELLER
SHAFT
DIFFERENTIAL
CARRIER
C
DMark
Unit
mm
in
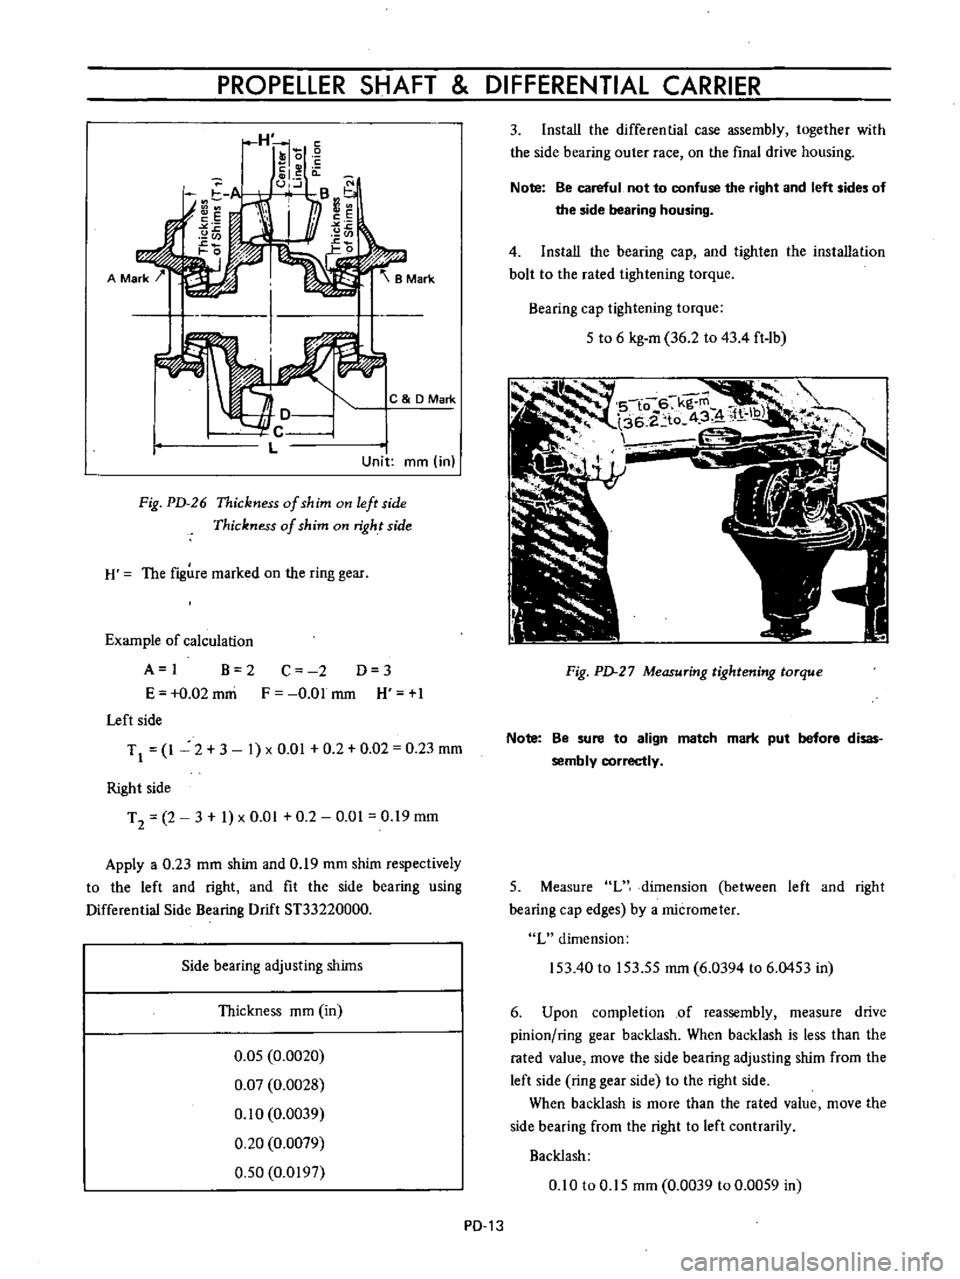
Fig
PD
26
Thickness
of
shim
on
left
side
Thickness
of
shim
on
right
side
H
The
figure
marked
on
the
ring
gear
Example
of
calculation
A
I
B
2
E
0
02
mni
Left
side
C
2
D
3
F
O
Olmm
H
1
TJ
1
2
3
1
xO
01
0
2
0
02
0
23
mm
Right
side
T
2
2
3
1
x
0
01
0
2
0
01
0
19
mm
Apply
a
0
23
mm
shim
and
0
19
mm
shim
respectively
to
the
left
and
right
and
fit
the
side
bearing
using
Differential
Side
Bearing
Drift
ST33220000
Side
bearing
adjusting
shims
Thickness
mm
in
0
05
0
0020
0
07
0
0028
0
10
0
0039
0
20
0
0079
0
50
0
0197
PD
13
3
Install
the
differential
case
assembly
together
with
the
side
bearing
outer
race
on
the
final
drive
housing
Note
Be
careful
not
to
confuse
the
right
and
left
sides
of
the
side
bearing
housing
4
Install
the
bearing
cap
and
tighten
the
installation
bolt
to
the
rated
tightening
torque
Bearing
cap
tightening
torque
5
to
6
kg
m
36
2
to
43
4
ft
1b
Fig
PD
27
Measuring
tightening
torque
Note
Be
sure
to
align
match
mark
put
before
disas
sembly
correctly
5
Measure
L
dimension
between
left
and
right
bearing
cap
edges
by
a
micrometer
L
dimension
153
40
to
153
55
mm
6
0394
to
6
0453
in
6
Upon
completion
of
reassembly
measure
drive
pinion
ring
gear
backlash
When
backlash
is
less
than
the
rated
value
move
the
side
bearing
adjusting
shim
from
the
left
side
ring
gear
side
to
the
right
side
When
backlash
is
more
than
the
rated
value
move
the
side
bearing
from
the
right
to
left
contrarily
Backlash
0
10
to
0
15
mm
0
0039
to
0
0059
in
Page 81 of 513
CHASSIS
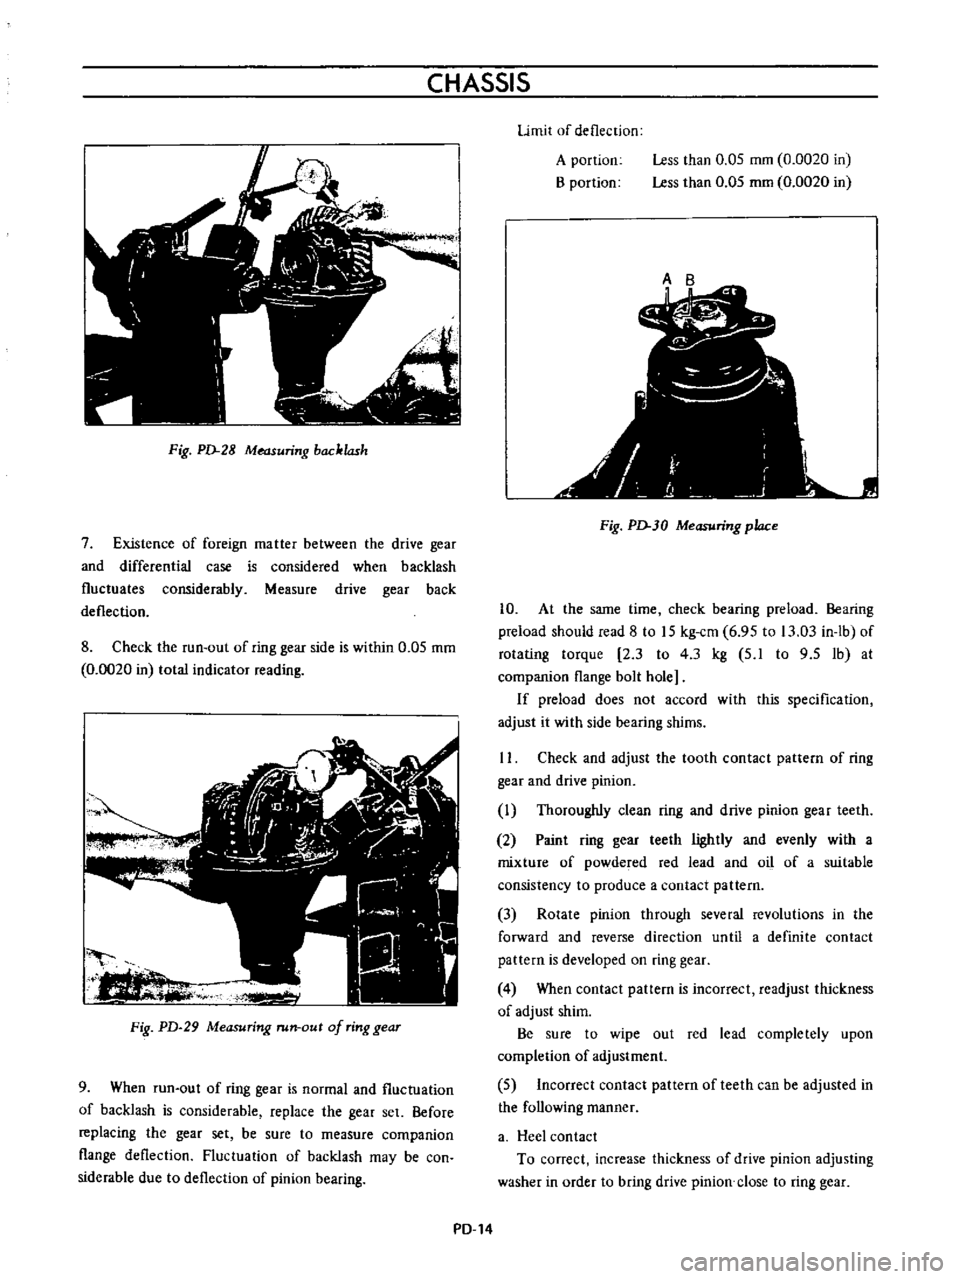
Fig
PD
28
Measuring
backlash
7
Existence
of
foreign
matter
between
the
drive
gear
and
differential
case
is
considered
when
backlash
fluctuates
considerably
Measure
drive
gear
back
deflection
8
Check
the
run
out
of
ring
gear
side
is
within
0
05
mm
0
0020
in
total
indicator
reading
ot
Fig
PD
29
Measuring
run
out
of
ring
gear
9
When
run
out
of
ring
gear
is
normal
and
fluctuation
of
backlash
is
considerable
replace
the
gear
set
Before
replacing
the
gear
set
be
sure
to
measure
companion
flange
deflection
Fluctuation
of
backlash
may
be
con
siderable
due
to
deflection
of
pinion
bearing
Limit
of
deflection
A
portioo
B
portion
Less
than
0
05
mm
0
0020
in
Less
than
0
05
mm
0
0020
in
Ct
r
r
f
1
I
f
i
r
I
oj
j
12
r
Fig
PD
30
Measuring
place
10
At
the
same
time
check
bearing
preload
Bearing
preload
should
read
8
to
15
kg
cm
6
95
to
13
03
in
lb
of
rotating
torque
2
3
to
4
3
kg
5
1
to
9
5
1b
at
companion
flange
bolt
hole
If
preload
does
not
accord
with
this
specification
adjust
it
with
side
bearing
shims
II
Check
and
adjust
the
tooth
contact
pattern
of
ring
gear
and
drive
pinion
I
Thoroughly
clean
ring
and
drive
pinion
gear
teeth
2
Paint
ring
gear
teeth
lightly
and
evenly
with
a
mixture
of
powdered
red
lead
and
oil
of
a
suitable
consistency
to
produce
a
contact
pattern
3
Rorate
pinion
through
several
revolutions
in
the
forward
and
reverse
direction
until
a
definite
contact
pattern
is
developed
on
ring
gear
4
When
contact
pattern
is
incorrect
readjust
thickness
of
adjust
shim
Be
sure
to
wipe
out
red
lead
completely
upon
completion
of
adjustment
5
Incorrect
contact
pattern
of
teeth
can
be
adjusted
in
the
following
manner
a
Heel
contact
To
correct
increase
thickness
of
drive
pinion
adjusting
washer
in
order
to
bring
drive
pinion
close
to
ring
gear
PD
14
Page 82 of 513
PROPELLER
SHAFT
DIFFERENTIAL
CARRIER
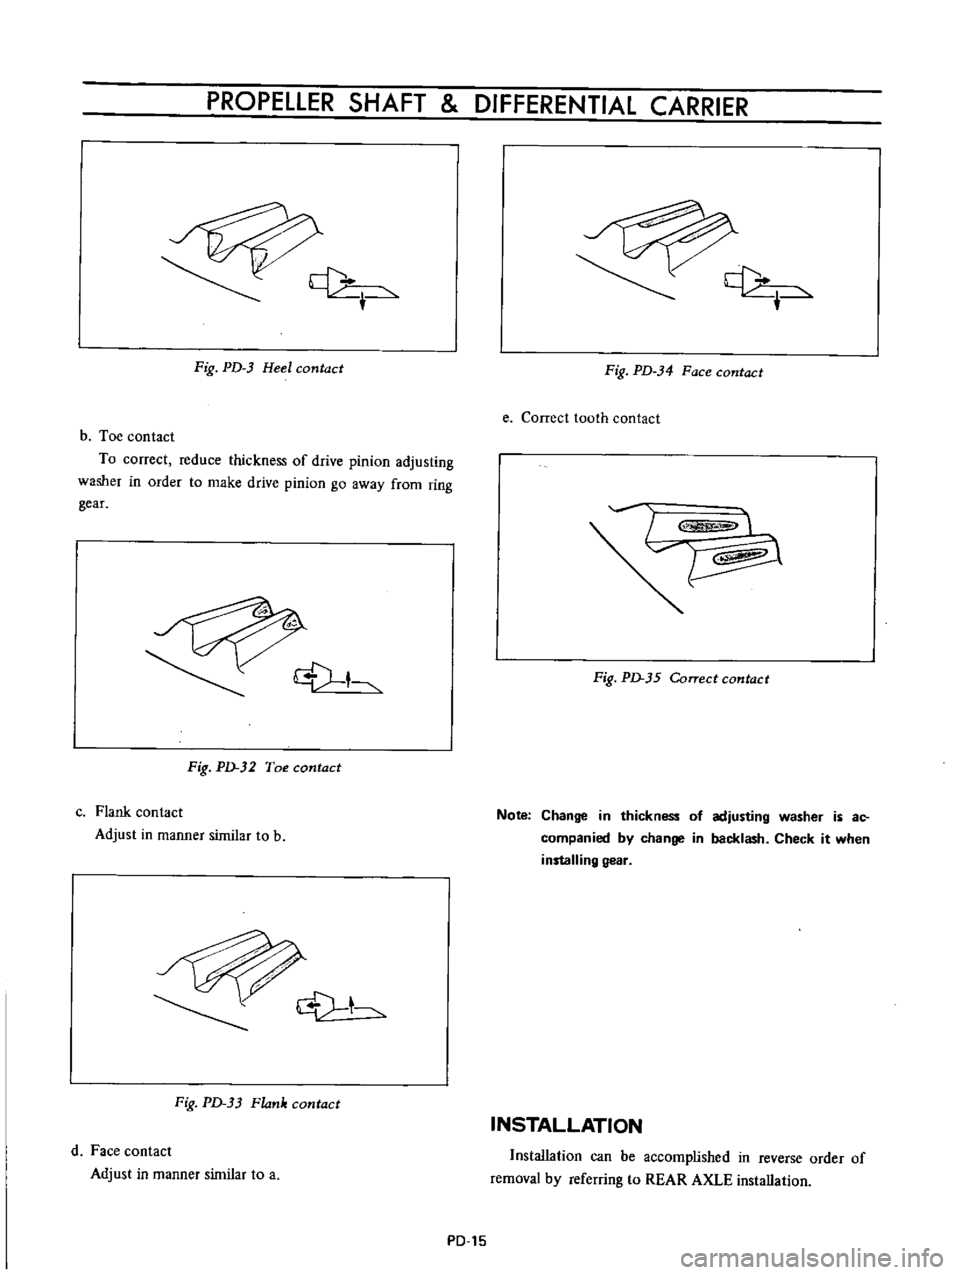
Fig
PD
J
Heel
contact
Fig
PD
34
Face
contact
e
Correct
tooth
contact
b
Toe
contact
To
correct
reduce
thickness
of
drive
pinion
adjusting
washer
in
order
to
make
drive
pinion
go
away
from
ring
gear
L
a
Fig
PD
35
Correct
contact
Fig
PD
J2
Toe
contact
c
Flank
contact
Adjust
in
manner
similar
to
b
Note
Change
in
thickness
of
adjusting
washer
is
ac
companied
by
change
in
backlash
Check
it
when
installing
gear
t
Fig
PD
3J
Flank
contact
INSTALLATION
d
Face
contact
Adjust
in
manner
similar
to
a
Installation
can
be
accomplished
in
reverse
order
of
removal
by
referring
to
REAR
AXLE
installation
PO
15
Page 84 of 513
PROPELLER
SHAFT
DIFFERENTIAL
CARRIER
Incorrect
adjustment
of
bearings
or
gears
Severe
service
due
to
an
excessive
loading
improper
use
of
clutch
Loosened
bolts
and
nuts
such
as
ring
gear
clamp
bolts
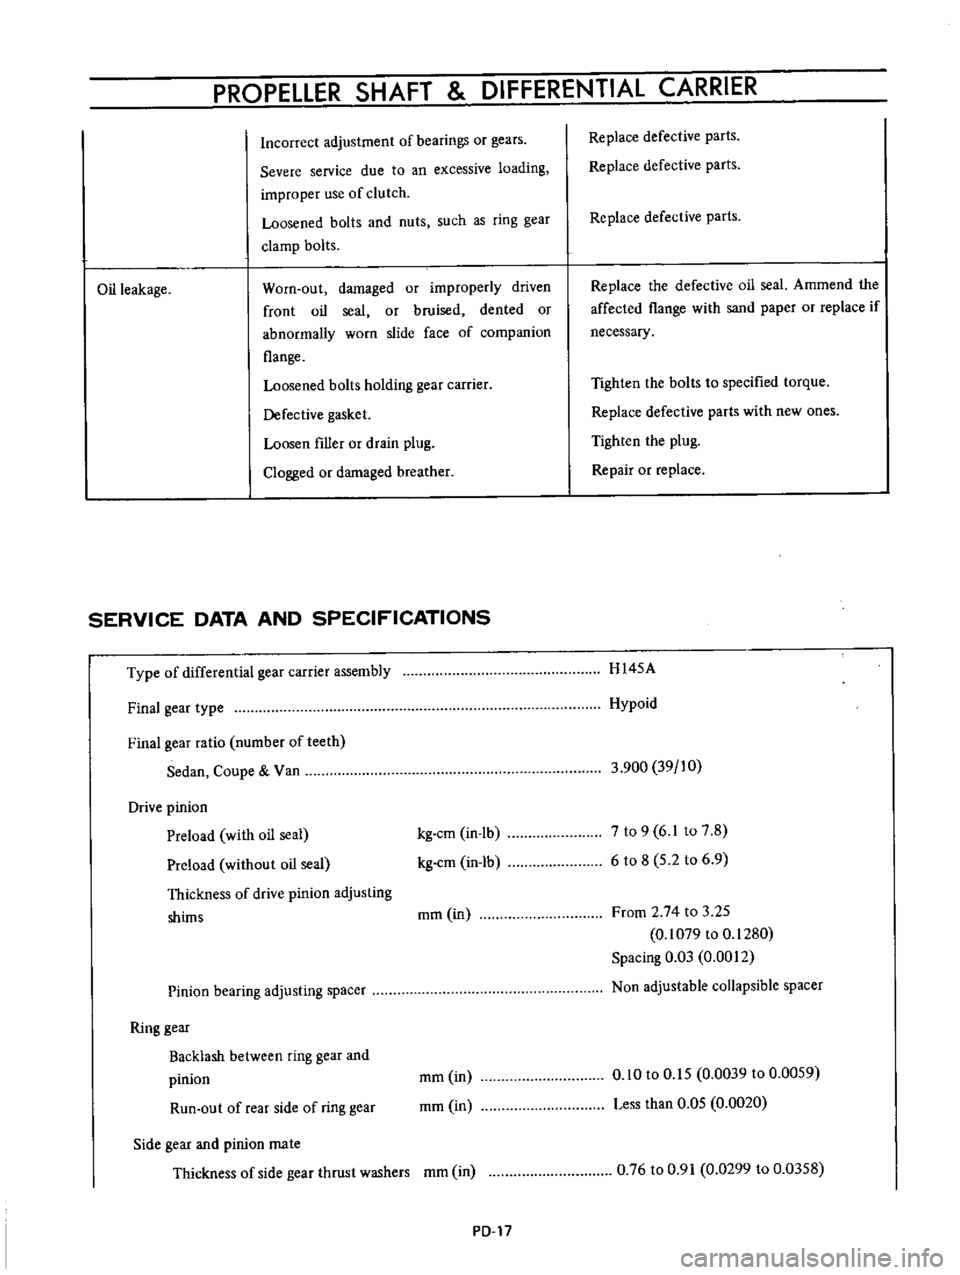
Oil
leakage
Worn
out
damaged
or
improperly
driven
front
oil
seal
or
bruised
dented
or
abnormally
worn
slide
face
of
companion
flange
Loosened
bolts
holding
gear
carrier
Defective
gasket
Loosen
filler
or
drain
plug
Clogged
or
damaged
breather
SERVICE
DATA
AND
SPECIFICATIONS
Type
of
differential
gear
carrier
assembly
Final
gear
type
Final
gear
ratio
number
of
teeth
Sedan
Coupe
Van
Drive
pinion
Preload
with
oil
seal
Preload
without
oil
seal
Thickness
of
drive
pinion
adjusting
shims
kg
cm
in
lb
kg
cm
in
lb
mm
in
Pinion
bearing
adjusting
spacer
Ring
gear
Backlash
between
ring
gear
and
pinion
Run
out
of
rear
side
of
ring
gear
mm
in
mm
in
Side
gear
and
pinion
mate
Thickness
of
side
gear
thrust
washers
mm
in
PD
17
Replace
defective
parts
Replace
defective
parts
Replace
defective
parts
Replace
the
defective
oil
seal
Ammend
the
affected
flange
with
sand
paper
or
replace
if
necessary
Tighten
the
bolts
to
specified
torque
Replace
defective
parts
with
new
ones
Tighten
the
plug
Repair
or
replace
H145A
Hypoid
3
900
39
10
7
to
9
6
1
to
7
8
6
to
8
5
2
to
6
9
From
2
74
to
3
25
0
1079
to
0
1280
Spacing
0
Q3
0
0012
Non
adjustable
collapsible
spacer
0
10
to
0
15
0
0039
to
0
0059
Less
than
0
05
0
0020
0
76
to
0
91
0
0299
to
0
0358
Page 85 of 513
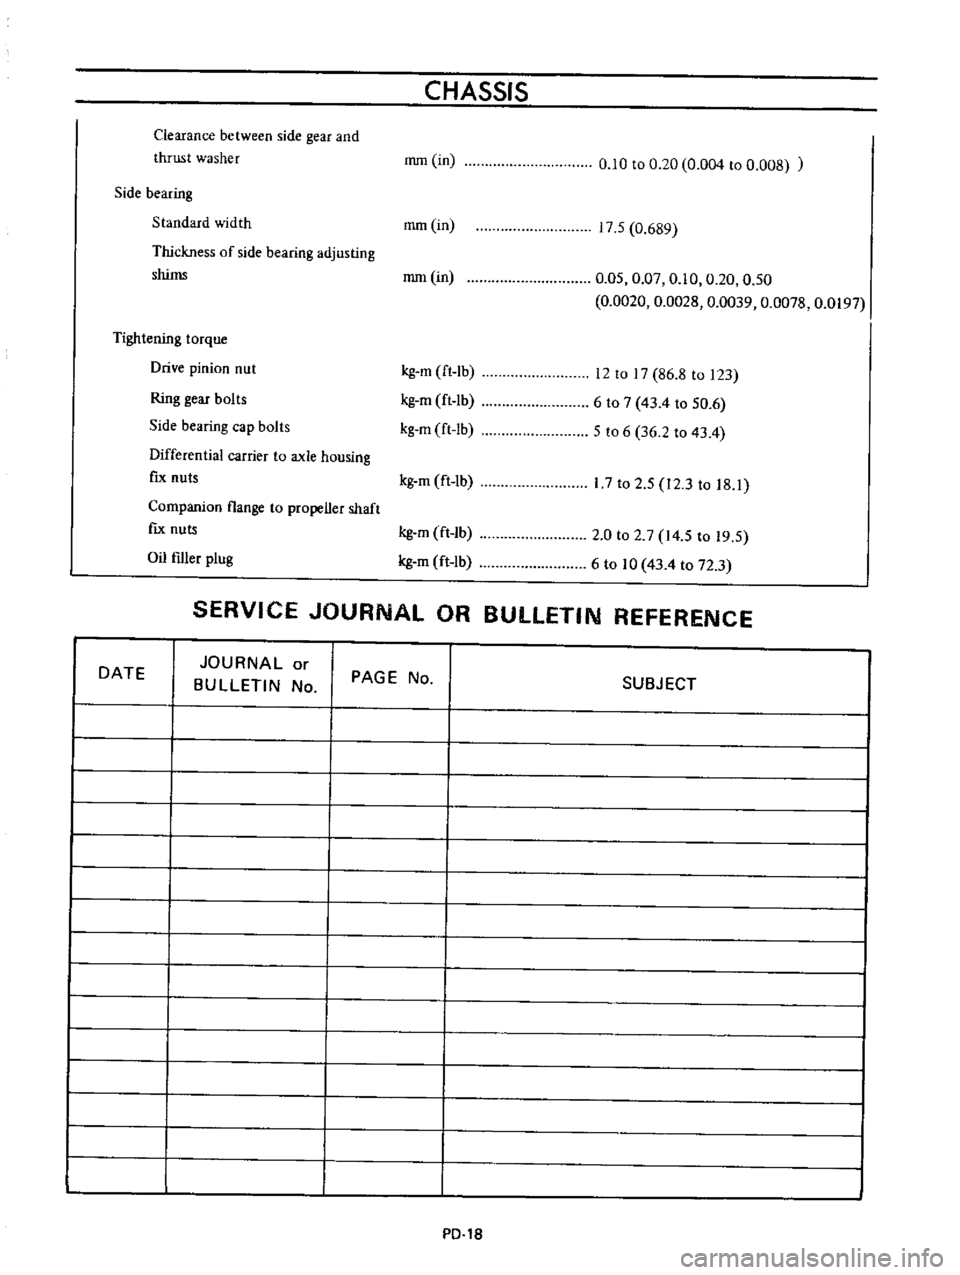
Clearance
between
side
gear
and
thrust
washer
CHASSIS
rrun
in
0
10
to
0
20
0
004
to
0
008
Side
bearing
Standard
width
rom
in
Thickness
of
side
bearing
adjusting
shims
rom
in
Tightening
torque
Drive
pinion
nut
Ring
gear
bolts
Side
bearing
cap
bolts
Differential
carrier
to
axle
housing
fIx
nuts
Companion
flange
to
propeller
shaft
fIx
nuts
Oil
filler
plug
17
5
0
689
0
05
0
07
0
10
0
20
0
50
0
0020
0
0028
0
0039
0
0078
0
0197
kg
m
ft
lb
kg
m
ft
lb
kg
m
ft
lb
12
to
17
86
8
to
123
6
to
7
43
4
to
50
6
5
to
6
36
2
to
43
4
kg
m
ft
1b
17
to
2
5
12
3
to
18
1
kg
m
ft
lb
kg
m
ft
lb
2
0
to
2
7
14
5
to
19
5
6
to
10
43
4
to
72
3
SERVICE
JOURNAL
OR
BULLETIN
REFERENCE
DATE
JOURNAL
or
BULLETIN
No
I
I
I
I
PAGE
No
SUBJECT
PO
1S
Page 122 of 513
REAR
AXLE
REAR
SUSPENSION
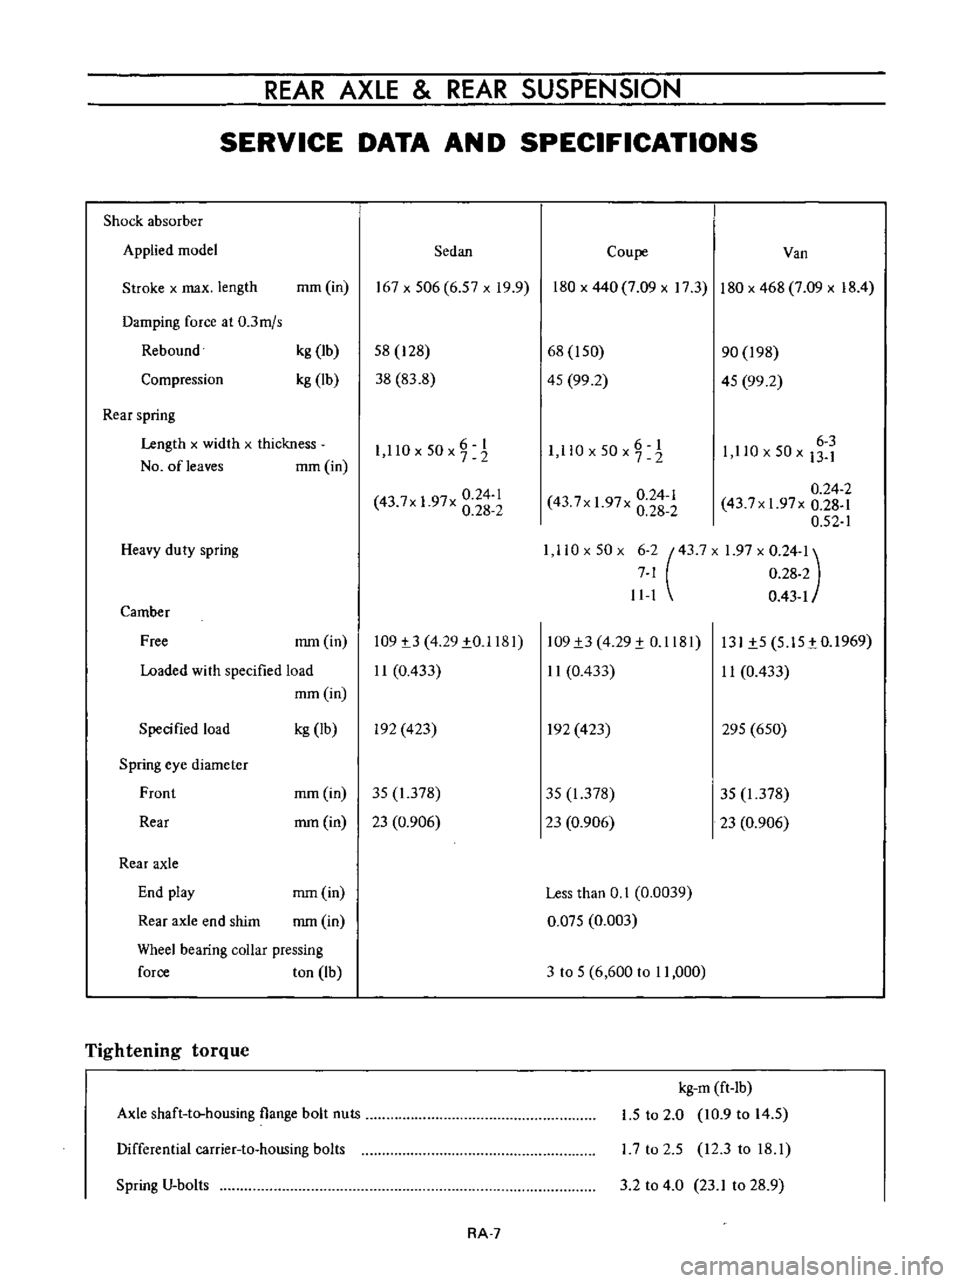
SERVICE
DATA
AN
D
SPECIFICATIONS
Shock
absorber
Applied
model
Sedan
Coupe
Van
Stroke
x
max
length
mm
in
167x506
6
57xI9
9
180
x
440
7
09
x
17
3
180
x
468
7
09
x
18
4
Damping
force
at
0
3mjs
Rebound
Compression
kg
Ib
kg
lb
58
128
38
83
8
68
I
50
45
99
2
90
198
45
99
2
Rear
spring
Length
x
widlh
x
thickness
NO
ofleaves
mm
in
6
I
1
llOx50x72
O
6
1
I
ll
x50x7
2
6
3
1
110
x
50
x
13
1
0
24
1
43
7x
1
97x
0
28
2
0
24
2
43
7xI
97x
0
28
1
0
52
1
1
110x50x
6
2
43
7X
1
97
x
0
24
1
7
1
0
28
2
11
1
0
43
1
0
24
1
43
7x
1
97x
0
28
2
Heavy
duty
spring
Camber
Free
mm
in
109
t3
4
29
1
0
1181
11
0
433
109
1
3
4
29
1
0
1181
11
0
433
131
1
5
5
15
tO
1969
11
0
433
Loaded
wi
th
specified
load
mm
in
Specified
load
kg
Ib
In
423
In
423
295
650
Spring
eye
diameter
Front
mm
in
35
1
378
35
1
378
35
1
378
Rear
mm
in
23
0
906
23
0
906
23
0
906
Rear
axle
End
play
mm
in
Less
than
0
1
0
0039
Rear
axle
end
shim
mm
in
0
Q75
0
003
Wheel
bearing
coUar
pressing
force
ton
Ib
3
to
5
6
600
to
11
000
Tightening
torque
Axle
shaft
to
housing
flange
bolt
nuts
kg
m
ft
lb
1
5
to
2
0
10
9
to
14
5
L7
to
2
5
12
3
to
18
1
Differential
carrier
to
housing
bolts
Spring
V
bolts
3
2
to
4
0
23
1
to
28
9
RA
7
Page 125 of 513
DESCRIPTION
BRAKE
PEDAL
Removal
Inspection
Reinstallation
TANDEM
MASTER
CYLINDER
Removal
Disassembly
Inspection
Reassembly
Reinstallation
SINGLE
MASTER
CYLINDER
Removal
and
disassembly
Inspection
Reassembly
and
reinstallation
BRAKE
LINE
Removal
Inspection
Reinstallation
Brake
line
pressure
differential
warning
light
switch
FRONT
DRUM
BRAKE
cr
I
1
0
I
I
CD
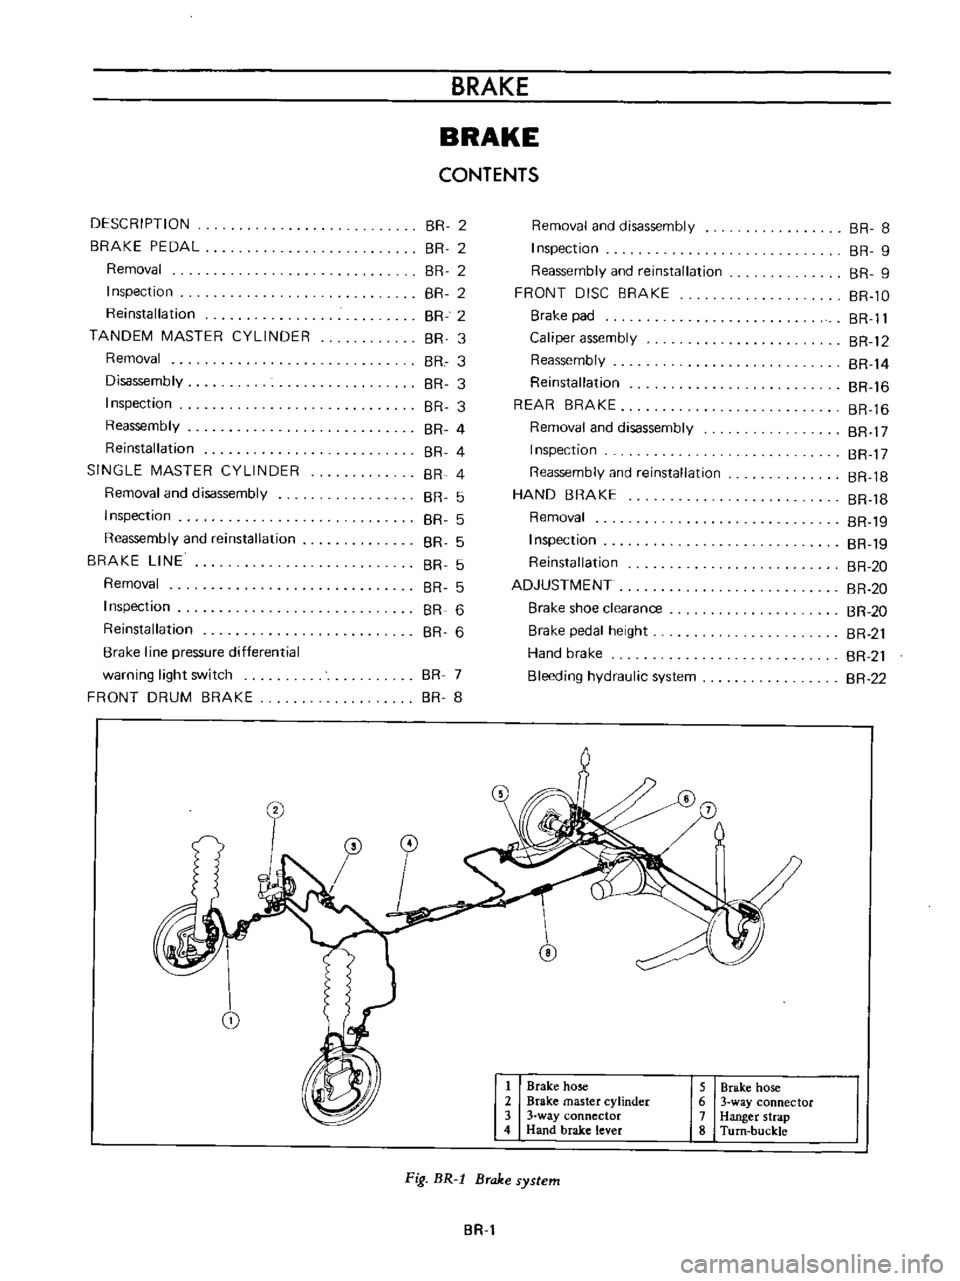
BRAKE
BRAKE
CONTENTS
BR
2
BR
2
BR
2
BR
2
BR
2
BR
3
BR
3
BR
3
BR
3
BR
4
BR
4
BR
4
BR
5
BR
5
BR
5
BR
5
BR
5
BR
6
BR
6
BR
7
BR
8
Removal
and
disassembly
Inspection
Reassembly
and
reinstallation
FRONT
DISC
BRAKE
Brake
pad
Caliper
assembly
Reassembly
Reinstallation
REAR
BRAKE
Removal
and
disassembly
Inspection
Reassembly
and
reinstallation
HAND
8RAKE
Removal
Inspection
Reinstallation
ADJUSTMENT
Brake
shoe
clearance
Brake
pedal
height
Hand
brake
Bleeding
hydraulic
system
@
7
o
i
1
Brake
hose
2
Brake
master
cylinder
3
3
way
connector
4
Hand
brake
lever
5
Brake
hose
6
3
way
connector
7
Hanger
strap
8
Turn
buckle
Fig
BR
l
Brake
system
BR
BR
8
BR
9
BR
9
BR
lO
BR
Il
BR
12
BR
14
BR
16
BR
16
BR
17
BR
17
BR
18
BR
18
BR
19
BR
19
BR
20
BR
20
BR
20
BR
21
BR
21
BR
22
Page 131 of 513
Tightening
torque
3
way
connector
1
5
to
1
8
kg
m
10
8
to
13
0
ft
lh
1
5
to
1
8
kg
m
10
8
to
13
0
ft
lh
1
5
to
1
8
kg
m
10
8
to
13
0
ft
lb
0
7
to
0
9
kg
m
5
1
to
6
5
ft
1b
Master
cylinder
Brake
hose
Air
bleeder
5
Fill
the
master
cylinder
brake
fluid
reservoir
with
brake
fluid
and
perform
air
bleeding
complele1y
Note
a
Do
not
use
brake
fluid
other
than
specified
b
The
specified
brake
fluid
is
used
for
both
single
and
tandem
type
master
cylinders
6
Upon
completion
of
air
bleeding
make
sure
that
the
brake
operates
correctly
and
check
the
brake
tube
and
hose
connectors
for
fluid
leaking
Fully
depress
the
brake
pedal
continue
to
depress
the
brake
pedal
for
several
seconds
and
make
sure
that
no
brake
fluid
leaks
from
any
part
of
the
brake
line
Replace
defective
part
if
required
Brake
line
pressure
differential
warning
light
switch
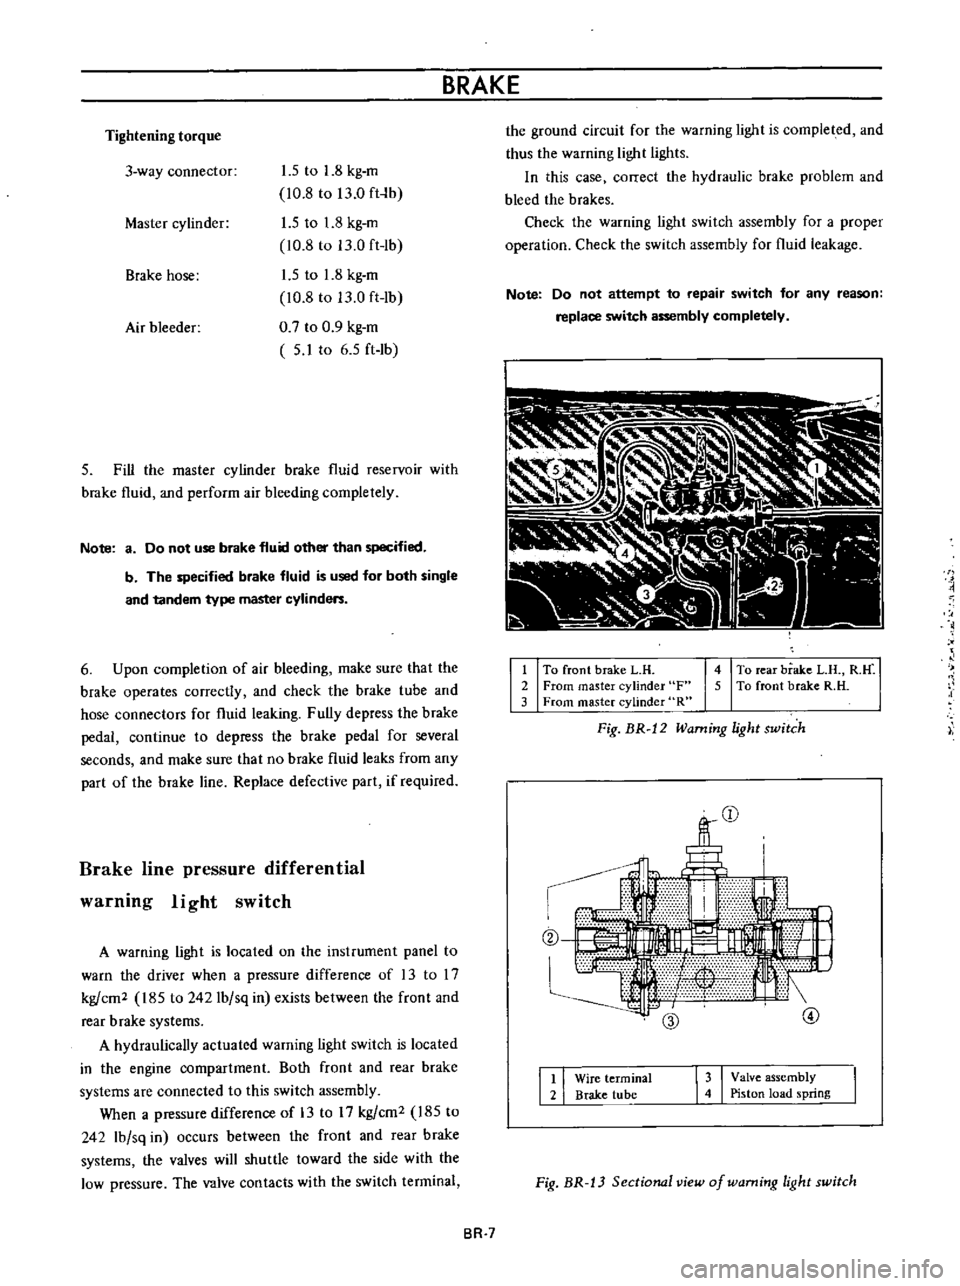
A
warning
light
is
located
on
the
instrument
panel
to
warn
the
driver
when
a
pressure
difference
of
13
to
17
kg
cm2
185
to
2421bJsq
in
exists
between
the
front
and
rear
b
rake
systems
A
hydraulically
actuated
warning
light
switch
is
located
in
the
engine
compartment
Both
front
and
rear
brake
systems
are
connected
to
this
switch
assembly
When
a
pressure
difference
of
13
to
17
kgJcm2
185
to
242
lbJsq
in
occurs
between
the
front
and
rear
brake
systems
the
valves
will
shuttle
toward
the
side
with
the
low
pressure
The
valve
contacts
with
the
switch
terminal
BRAKE
the
ground
circuit
for
the
warning
light
is
completed
and
thus
the
warning
light
lights
In
this
case
correct
the
hydraulic
brake
problem
and
bleed
the
brakes
Check
the
warning
light
switch
assembly
for
a
proper
operation
Check
the
switch
assembly
for
fluid
leakage
Note
Do
not
attempt
to
repair
switch
for
any
reason
replace
switch
assembly
completely
1
To
front
brake
L
H
2
From
master
cylinder
F
3
From
master
cylinder
R
4
To
rear
brake
L
B
R
M
5
To
front
brake
R
H
Fig
BR
12
Warning
light
switch
r
I
@
I
I
3
I
Valve
assembly
4
Piston
load
spring
Wire
terminal
Brake
tube
Fig
BR
13
Sectional
view
of
warning
light
switch
BR
7
Page 256 of 513
BODY
ElECTRICAL
When
the
ignition
switch
is
set
to
ON
the
ignition
wa
rning
circuit
is
closed
and
current
flows
flows
from
the
ignition
switch
to
the
warning
lamp
bulb
and
ground
through
the
regulator
When
the
engine
is
started
and
the
generator
comes
into
operation
the
generator
output
current
opposes
the
current
flowing
from
the
warning
lamp
in
effect
it
breaks
the
warning
circuit
ground
connection
and
the
lamp
goes
out
l
r
hffi
u
z
Ignition
switch
I
Q
6
I
0
c
M
1
E
8
ca
i
L
g
PI
lot
c
P
I
j
co
rt
0
relay
E
0
5
y
y
1
N
N
3
Alternator
Regulator
Fig
BE
41
Circuit
of
ignition
warning
system
HAND
BRAKE
WARNING
LAMP
This
lamp
functions
both
hand
brake
warning
larnp
and
BULB
SPECIFICATIONS
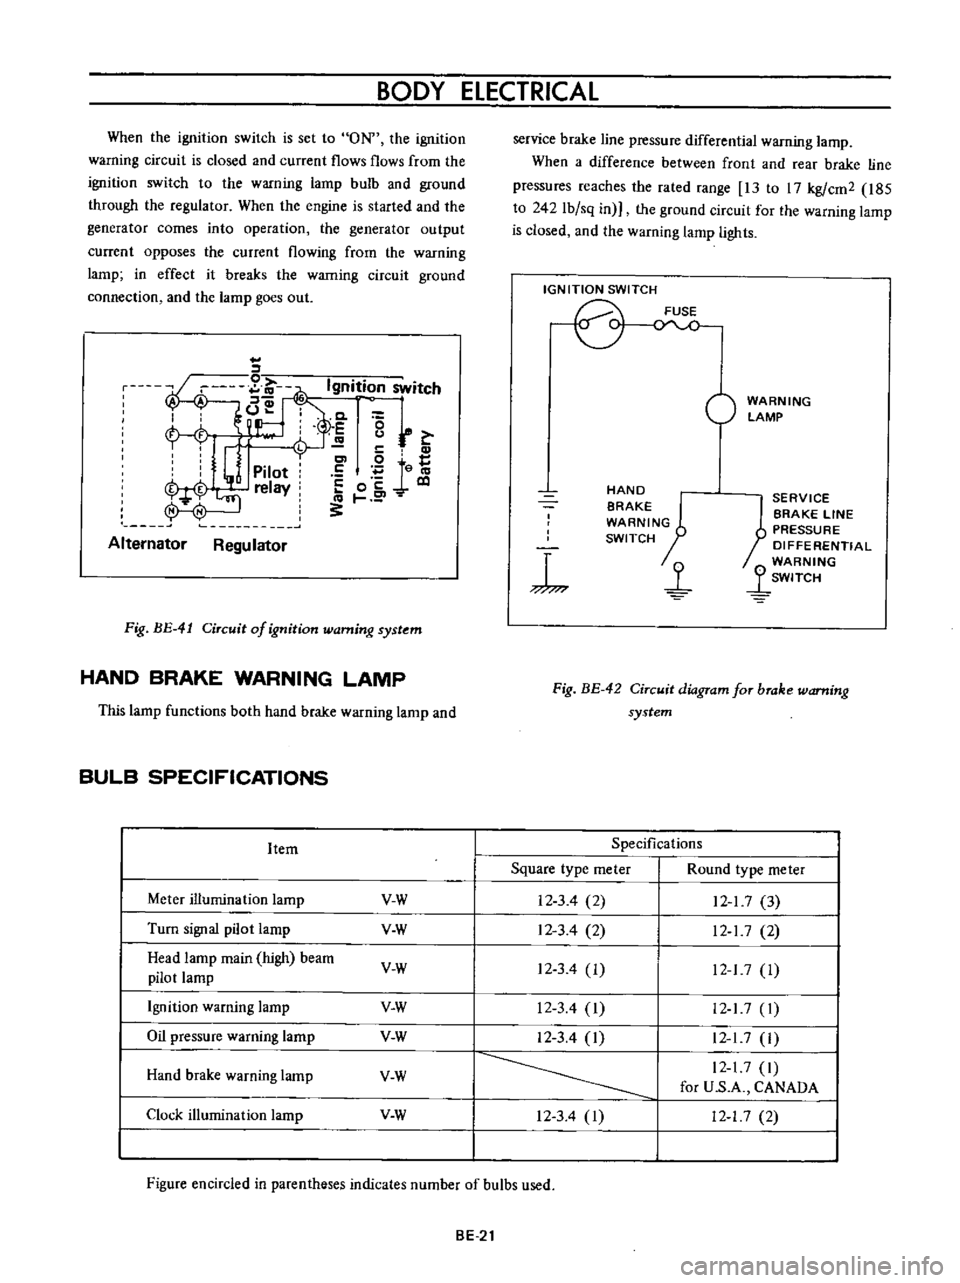
service
brake
line
pressure
differential
warning
lamp
When
a
difference
between
front
and
rear
brake
line
pressures
reaches
the
rated
range
13
to
17
kgfcm2
185
to
242
lb
sq
in
the
ground
circuit
for
the
warning
lamp
is
closed
and
the
warning
lamp
lights
IGNITION
SWITCH
WARNING
LAMP
L
E
WARNING
SWITCH
1
SERVICE
BRAKE
LINE
PRESSU
R
E
DIFFERENTIAL
WARNING
J
SWITCH
Fig
BE
42
Circuit
diagram
for
brake
warning
system
tern
Specifications
Square
type
meter
Round
type
meter
Meter
illumination
larnp
VoW
12
3
4
2
12
1
7
3
Turn
signal
pilot
lamp
VoW
12
3
4
2
12
1
7
2
Head
lamp
main
high
beam
VoW
12
3
4
I
12
17
1
pilot
lamp
Ignition
warning
lamp
VoW
123
4
I
12
17
1
Oil
pressure
warning
lamp
VoW
12
3
4
1
12
1
7
1
Hand
brake
warning
lamp
VoW
12
1
7
1
for
U
S
A
CANADA
Clock
illumination
lamp
VoW
123
4
I
12
17
2
Figure
encircled
in
parentheses
indicates
number
of
bulbs
used
BE
21