check oil DATSUN PICK-UP 1977 Service Manual
[x] Cancel search | Manufacturer: DATSUN, Model Year: 1977, Model line: PICK-UP, Model: DATSUN PICK-UP 1977Pages: 537, PDF Size: 35.48 MB
Page 386 of 537
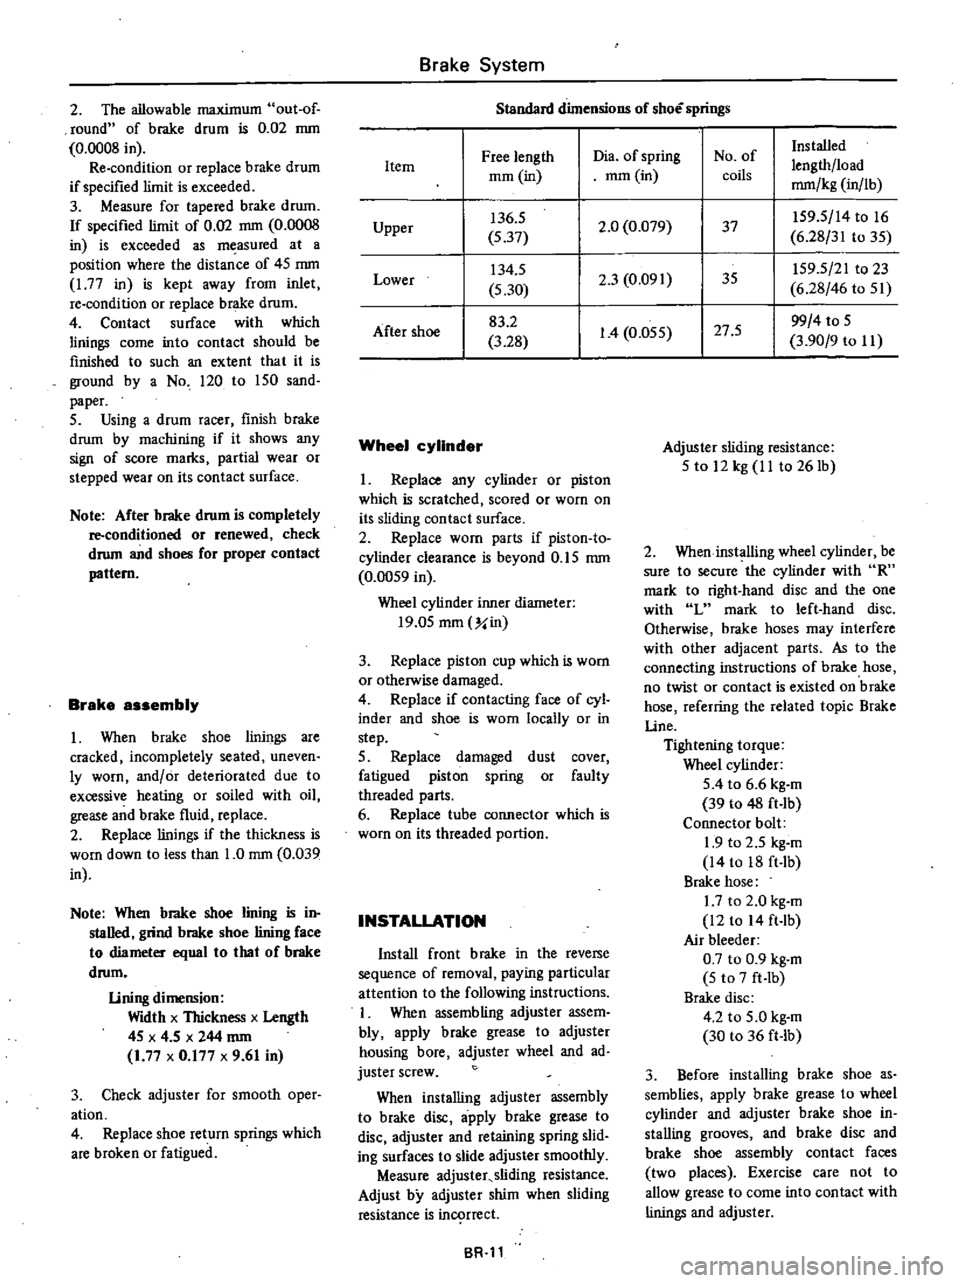
2
The
allowable
maximum
out
of
round
of
brake
drum
is
0
02
mm
0
0008
in
Re
condition
or
replace
brake
drum
if
specified
limit
is
exceeded
3
Measure
for
tapered
brake
drum
If
specified
limit
of
0
02
mm
0
0008
in
is
exceeded
as
measured
at
a
position
where
the
distance
of
4S
mm
177
in
is
kept
away
from
inlet
re
condition
or
replace
brake
drum
4
Contact
surface
with
which
linings
come
into
contact
should
be
finished
to
such
an
extent
that
it
is
ground
by
a
No
120
to
150
sand
paper
S
Using
a
drum
racer
finish
brake
drum
by
machining
if
it
shows
any
sign
of
score
marks
partial
wear
or
stepped
wear
on
its
contact
surface
Note
After
brake
drum
is
completely
re
conditioned
or
renewed
check
drum
and
shoes
for
proper
contact
pattern
Brake
assembly
I
When
brake
shoe
linings
are
cracked
incompletely
seated
uneven
Iy
worn
andlor
deteriorated
due
to
excessive
heating
or
soiled
with
oil
grease
and
brake
fluid
replace
2
Replace
linings
if
the
thickness
is
worn
down
to
less
than
1
0
mm
0
039
in
Note
When
brake
shoe
lining
is
in
stalled
grind
brake
shoe
lining
face
to
diameter
equal
to
that
of
brake
drum
lining
dimension
Width
x
Thickness
x
Length
4S
x
4
S
x
244
mm
1
77
x
0
177
x
9
61
in
3
Check
adjuster
for
smooth
oper
ation
4
Replace
shoe
return
springs
which
are
broken
or
fatigued
Brake
System
Standard
dimensions
of
shoe
springs
Free
length
Dia
of
spring
No
of
Installed
Item
lengthlload
mOl
in
mOl
in
coils
mm
kg
in
lb
Upper
136
5
2
0
0
079
37
IS9
S
14
to
16
S
37
6
28
31
to
3S
Lower
134
S
2
3
0
091
35
IS9
5
21
to
23
5
30
6
28
46
to
Sl
After
shoe
83
2
1
4
O
OSS
27
S
99
4
to
S
3
28
3
90
9
to
II
Wheel
cylinder
I
Replace
any
cylinder
or
piston
which
is
scratched
scored
or
worn
on
its
sliding
contact
surface
2
Replace
worn
parts
if
piston
to
cylinder
clearance
is
beyond
O
IS
mm
0
OOS9
in
Wheel
cylinder
inner
diameter
19
0S
mOl
Y
in
3
Replace
piston
cup
which
is
worn
or
otherwise
damaged
4
Replace
if
contacting
face
of
cyl
inder
and
shoe
is
worn
locally
or
in
step
S
Replace
damaged
dust
cover
fatigued
piston
spring
or
faulty
threaded
parts
6
Replace
tube
connector
which
is
worn
on
its
threaded
portion
INSTALLATION
Install
front
brake
in
the
reverse
sequence
of
removal
paying
particular
attention
to
the
following
instructions
I
When
assembling
adjuster
assem
bly
apply
brake
grease
to
adjuster
housing
bore
adjuster
wheel
and
ad
juster
screw
When
installing
adjuster
assembly
to
brake
disc
apply
brake
grease
to
disc
adjuster
and
retaining
spring
slid
ing
surfaces
to
slide
adjuster
smoothly
Measure
adjuster
sliding
resistance
Adjust
by
adjuster
shim
when
sliding
resistance
is
in
rrect
BR
ll
Adjuster
sliding
resistance
S
to
12
kg
II
to
261b
2
When
installing
wheel
cylinder
be
sure
to
secure
the
cylinder
with
R
mark
to
right
hand
disc
and
the
one
with
L
mark
to
left
hand
disc
Otherwise
brake
hoses
may
interfere
with
other
adjacent
parts
As
to
the
connecting
instructions
of
brake
hose
no
twist
or
contact
is
existed
on
brake
hose
referring
the
related
topic
Brake
line
Tightening
torque
Wheel
cylinder
SA
to
6
6
kg
m
39
to
48
ft
lb
Connector
bolt
1
9
to
2
5
kg
m
14
to
18
ft
Ib
Brake
hose
1
7
to
2
0
kg
m
12
to
14
ft
lb
Air
bleeder
0
7
to
0
9
kg
m
5
to
7
ft
Ib
Brake
disc
4
2
to
S
O
kg
m
30
to
36
ft
lb
3
Before
installing
brake
shoe
as
semblies
apply
brake
grease
to
wheel
cylinder
and
adjuster
brake
shoe
in
stalling
grooves
and
brake
disc
and
brake
shoe
assembly
contact
faces
two
places
Exercise
care
not
to
allow
grease
to
come
into
contact
with
linings
and
adjuster
Page 388 of 537
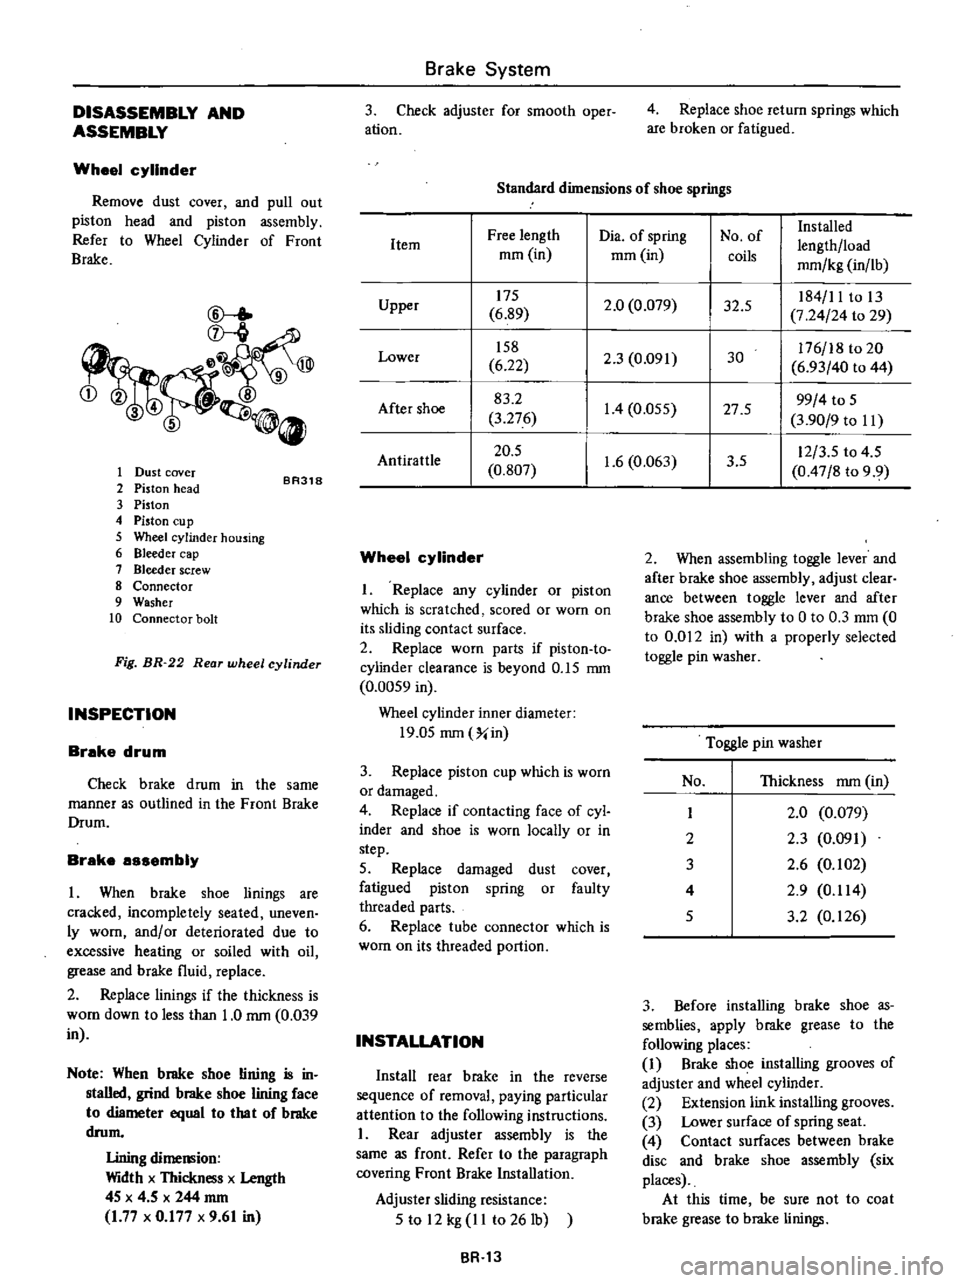
DISASSEMBLY
AND
ASSEMBLY
Wheel
cylinder
Remove
dust
cover
and
pull
out
piston
head
and
piston
assembly
Refer
to
Wheel
Cylinder
of
Front
Brake
CD
l
ID
345
0
1
Dust
cover
2
Piston
head
3
Piston
4
Piston
Cll
p
5
Wheel
cylinder
housing
6
Bleeder
cap
7
Bleeder
screw
8
Connector
9
Washer
10
Connector
bolt
BR318
Fig
BR
22
Rear
wheel
cylinder
INSPECTION
Brake
drum
Check
brake
drum
in
the
same
manner
as
outlined
in
the
Front
Brake
Drum
Brake
assembly
I
When
brake
shoe
linings
are
cracked
incompletely
seated
uneven
ly
worn
andlor
deteriorated
due
to
excessive
heating
or
soiled
with
oil
grease
and
brake
fluid
replace
2
Replace
linings
if
the
thickness
is
WOol
down
to
less
than
1
0
rom
0
039
in
Note
When
brake
shoe
lining
is
in
stalled
grind
brake
shoe
lining
face
to
diameter
equal
10
lha
I
of
brake
drom
Lining
dimemion
Width
x
Thickness
x
Length
4S
x
4
5
x
244
rom
1
77
x
0
177
x
9
61
in
Brake
System
3
Check
adjuster
for
smooth
oper
ation
4
Replace
shoe
return
springs
which
are
broken
or
fatigued
Standard
dimensions
of
shoe
springs
Dia
of
spring
No
of
Installed
Free
length
lengthlload
Item
mOl
in
mOl
in
coils
mmlkg
in
lb
175
2
0
0
079
32
5
184
11
to
13
Upper
6
89
7
24
24
to
29
158
2
3
0
091
30
176
18
to
20
Lower
6
22
6
93
40
to
44
83
2
1
4
0
055
27
5
99
4
to
S
After
shoe
3
276
3
90
9
to
II
20
5
1
6
0
063
3
5
12
3
S
to
4
5
AntiratUe
0
807
0
47
8
to
9
9
Wheel
cylinder
I
Replace
any
cylinder
or
piston
which
is
scratched
scored
or
worn
on
its
sliding
contact
surface
2
Replace
worn
parts
if
piston
to
cylinder
clearance
is
beyond
O
IS
rom
0
00S9
in
Wheel
cylinder
inner
diameter
19
0S
rom
Xin
3
Replace
piston
cup
which
is
worn
or
damaged
4
Replace
if
contacting
face
of
cyl
inder
and
shoe
is
worn
locally
or
in
step
5
Replace
damaged
dust
cover
fatigued
piston
spring
or
faulty
threaded
parts
6
Replace
tube
connector
which
is
worn
on
its
threaded
portion
INSTALLATION
Install
rear
brake
in
the
reverse
sequence
of
removal
paying
particular
attention
to
the
following
instructions
I
Rear
adjuster
assembly
is
the
same
as
front
Refer
to
the
paragraph
covering
Front
Brake
Installation
Adjuster
sliding
resistance
S
to
12
kg
II
to
261b
BR
13
2
When
assembling
toggle
lever
and
after
brake
shoe
assembly
adjust
clear
ance
between
toggle
lever
and
after
brake
shoe
assembly
to
0
to
0
3
mOl
0
to
0
012
in
with
a
properly
selected
toggle
pin
washer
Toggle
pin
washer
No
Thickness
rom
in
I
2
0
0
079
2
2
3
0
091
3
2
6
0
102
4
2
9
0
114
S
3
2
0
126
3
Before
installing
brake
shoe
as
semblies
apply
brake
grease
to
the
following
places
1
Brake
shoe
installing
grooves
of
adjuster
and
wheel
cylinder
2
Extension
link
installing
grooves
3
Lower
surface
of
spring
seat
4
Contact
surfaces
between
brake
disc
and
brake
shoe
assembly
six
places
At
this
time
be
sure
not
to
coat
brake
grease
to
brake
linings
Page 390 of 537
Probable
cause
I
Air
leakago
at
check
valve
2
Air
leakage
a
t
push
rod
seal
3
Air
leakage
between
valve
body
and
seal
4
Air
leakage
at
valve
plunger
seat
5
Damaged
piping
or
joints
2
Fifteen
seconds
after
engine
is
stopped
and
brake
fully
applied
ob
serve
the
rate
of
drop
in
air
pressure
registered
by
vacuum
gauge
Probable
cause
1
Air
leakage
at
check
valve
2
Damaged
diaphragm
3
Reaction
disc
dropped
off
4
Air
leakage
at
and
valve
body
poppet
assembly
seat
Note
When
replacement
of
any
part
is
required
be
sure
to
renew
Master
Vac
as
an
assembly
Inspecting
check
valve
Remove
clip
and
disconnect
hoses
at
connections
The
check
valve
can
now
be
removed
yr
BA3
Fig
BR
26
Location
of
check
valve
2
Using
a
Master
Vac
tester
apply
a
vacuum
pressure
of
200
mmHg
7
87
inHg
to
the
port
of
check
valve
on
the
Master
Vac
side
If
a
pressure
drop
of
10
mmHg
0
39
inHg
is
exceeded
in
1
I
I
17
I
f
I
I
I
Z
I
I
y1
I
I
I
7
I
I
I
I
I
I
I
I
I
I
y1
II
I
I
I
I
I
I
I
L
I
L
5
to
15
20
25
30
35
40
45
50
55
60
22
44
66
88
110
132
Pedal
operating
force
kg
lb
BR772
Fig
BR
28
Performance
curves
of
Master
Vac
Brake
System
Corrective
action
Replace
check
valve
Replace
seal
Repair
or
replace
faulty
partes
Repair
or
replace
seat
Repair
or
replace
If
a
pressure
drop
of
25
mmHg
0
98
inHg
is
exceeded
refer
to
the
following
chart
to
determine
the
cause
of
failure
Corrective
action
Replace
check
valve
Replace
Reinstall
and
check
push
rod
for
proper
turn
Replace
faulty
part
s
15
seconds
replace
check
valve
with
a
new
one
3
When
pressure
is
applied
to
the
Master
Vac
side
of
check
valve
and
valve
does
not
open
replace
check
valve
with
a
new
one
120
I
7IG
110
1
560
100
I
420
i
90
1
280
I
u
80
1
140
70
1
000
II
60
850
0
0
5
a
50
710
40
570
30
430
20
280
10
140
BR
15
1
I
Manifold
side
Master
Yac
side
1
Spring
2
Valve
BA289
Fig
BR
27
Sectional
view
of
check
valve
Operating
test
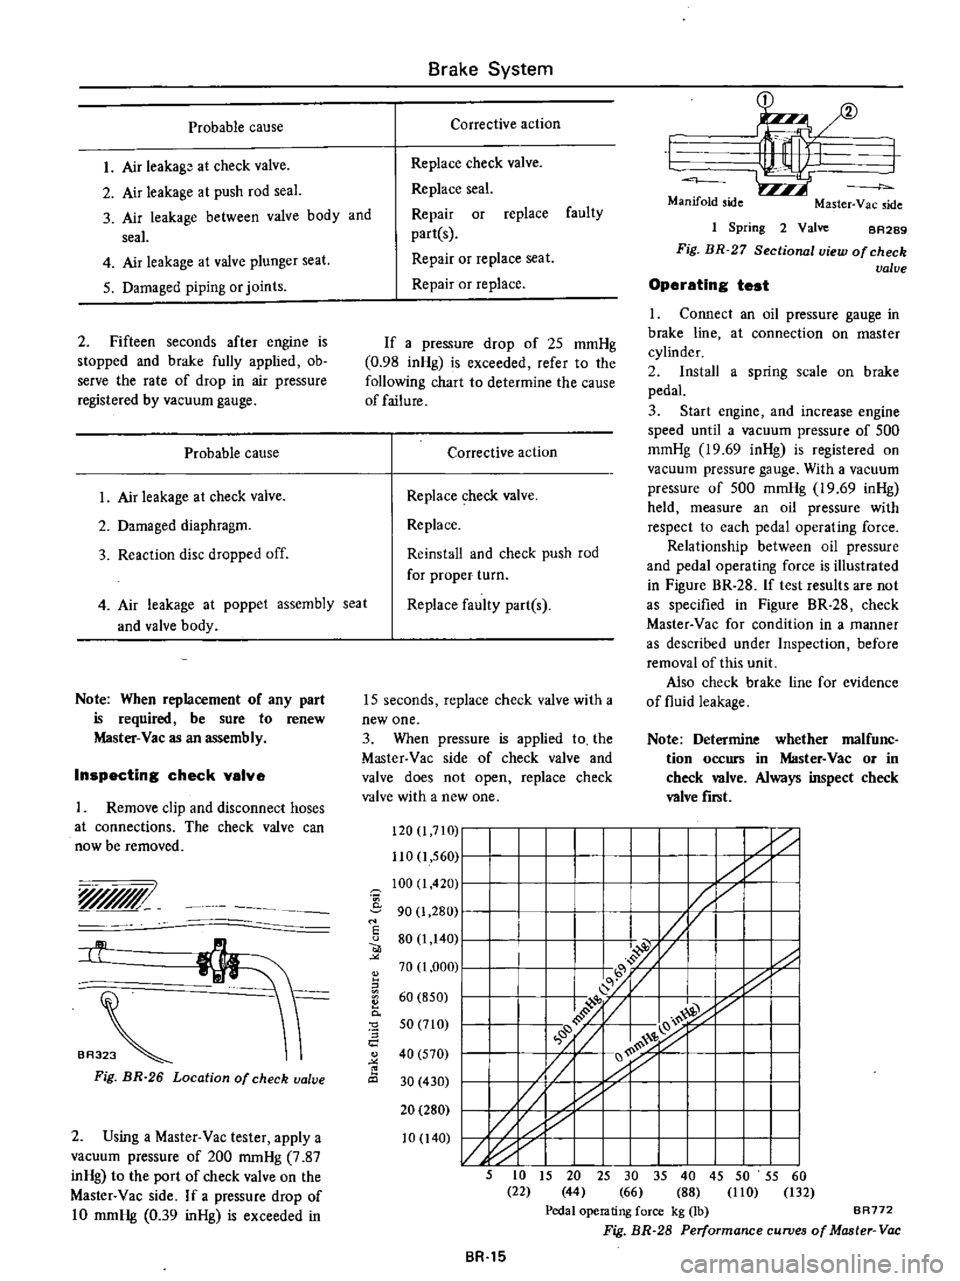
1
Connect
an
oil
pressure
gauge
in
brake
line
at
connection
on
master
cylinder
2
Install
a
spring
scale
on
brake
pedal
3
Start
engine
and
increase
engine
speed
until
a
vacuum
pressure
of
500
mmHg
19
69
inHg
is
registered
on
vacuum
pressure
gauge
With
a
vacuum
pressure
of
500
mmHg
19
69
inHg
held
measure
an
oil
pressure
with
respect
to
each
pedal
operating
force
Relationship
between
oil
pressure
and
pedal
operating
force
is
illustrated
in
Figure
BR
28
If
test
results
are
not
as
specified
in
Figure
BR
28
check
Master
Vac
for
condition
in
a
manner
as
described
under
Inspection
before
removal
of
this
unit
Also
check
brake
line
for
evidence
of
fluid
leakage
Note
Determine
whether
malfunc
tion
occurs
in
Master
Vac
or
in
check
valve
Always
inspect
check
valve
fiTlit
Page 392 of 537

BA1Bl
Fig
BR
36
Remouing
ualue
operating
rod
assembly
4
Withdraw
reaction
disc
BA286
Fig
BR
37
Remouing
reaction
disc
Front
shell
seal
I
Detach
flange
from
front
shell
assembly
BR287
g
Fig
BR
38
Removing
lange
2
Withdraw
front
seal
assembly
INSPECTION
I
Check
poppet
assembly
for
condi
tion
If
it
shows
evidence
of
wear
or
damage
replace
it
and
valve
operating
rod
assembly
2
Check
other
component
parts
for
condition
If
any
part
shows
evidence
of
wear
or
damage
replace
it
with
a
new
one
Brake
System
ASSEMBLY
AND
ADJUSTMENT
Assemble
in
the
reverse
sequence
of
disassembly
Rear
shell
seal
1
Apply
a
coating
of
Master
Vac
grease
to
the
sealing
surface
and
lip
of
seal
and
install
that
seal
in
rear
shell
with
the
use
of
Master
Vac
Oil
Seal
Retainer
Drift
ST08060000
Fig
BR
39
Installing
oil
seal
Note
Referring
to
Figure
BR
40
in
stall
seal
in
place
by
properly
aligning
the
pawl
of
special
tool
with
seal
hole
Adjustment
is
cor
rect
when
specified
length
at
A
is
obtained
Length
A
6
7
to
7
Omm
0
264
to
0
276
in
BA1S5
Fig
BR
40
Length
at
A
Diaphragm
plate
I
Apply
a
thin
coating
of
grease
to
the
sliding
contact
portion
on
the
periphery
of
plunger
assembly
BR
17
1
SR1S6
Fig
BR
41
Requiring
grease
place
2
Install
plunger
assembly
and
silencer
in
diaphragm
plate
and
lightly
push
plunger
stop
key
in
place
Note
Diaphragm
plate
is
made
of
bakelite
Exercise
care
in
instaJJing
plunger
assembly
not
to
damage
diaphragm
plate
BROB3
Fig
BR
42
Inserting
stop
key
3
Before
installing
diaphragm
into
position
apply
a
thin
coating
of
mica
power
to
it
except
outer
diameter
and
seating
portion
with
which
shell
comes
into
contact
4
Before
installing
reaction
disc
in
place
on
diaphragm
plate
apply
a
thin
coating
of
Master
Vac
grease
Front
shell
seal
Before
installing
front
shell
seal
as
sembly
apply
a
coating
of
Master
Vac
grease
to
the
inner
wall
of
seal
and
front
sheU
with
which
seal
comes
into
contact
Final
sssembly
Apply
thin
coating
of
Master
Vac
grease
to
the
outer
edges
of
diaphragm
with
which
rear
and
front
shells
come
into
contact
before
instaIling
dia
phragm
in
position
2
Before
installing
push
rod
assem
bly
in
place
apply
a
coating
of
Master
Vac
grease
to
the
sliding
con
tact
surface
of
diaphragm
plate
Page 397 of 537
Condition
Excessive
pedal
travel
Spongy
pedal
Poor
braking
effect
Brakes
drag
Brake
Syst
em
TROUBLE
DIAGNOSES
AND
CORRECTIONS
Probable
cause
Low
brake
1uid
level
or
empty
master
cylinder
reservoir
Leakage
in
master
cylinder
Deteriorated
check
valve
Air
in
system
Faulty
brake
adjustment
Low
1uid
level
in
master
cylinder
Air
in
system
Faulty
brake
adjustment
Reservoir
filler
cap
vent
hole
clogged
Swollen
hose
due
to
deterioration
or
use
of
poor
quality
hose
Distorted
brake
shoes
or
excessively
worn
or
cracked
brake
drum
Soft
or
swollen
caliper
seals
Use
of
a
brake
1uid
with
too
low
boiling
point
Fluid
leakage
in
brake
lines
Low
brake
1uid
level
or
empty
master
cylinder
reservoir
Air
in
brake
lines
Excessive
shoe
ta
drum
clearance
Grease
oil
mud
or
water
on
linings
or
pads
Deterioration
of
linings
or
pads
Local
fit
of
linings
or
pads
Linings
or
pads
excessively
worn
Master
cylinder
or
wheel
cylinders
in
poor
condition
Binding
mechanical
linkage
at
brake
pedal
and
shoes
Clogged
brake
lines
Incorrect
adjustment
of
wheel
bearings
Improper
shoe
t
drum
clearance
Weak
shoe
return
springs
No
free
travel
in
brake
shoe
return
BR
22
Corrective
action
Fill
and
bleed
as
necessary
Test
for
source
of
leakage
by
examining
all
lines
connec
tions
and
wheel
cylinder
Overhaul
master
cylinder
Replace
check
valve
and
bleed
system
Bleed
system
Adjust
shoe
to
drum
clearance
Inspect
auto
adjuster
operation
Top
with
1uid
and
inspect
for
leakage
Correct
as
necessary
Adjust
shoe
to
drum
clearance
Inspect
aut
adjuster
operation
Clean
and
bleed
system
Replace
hose
and
bleed
system
Replace
faulty
parts
Drain
hydraulic
system
flush
with
alcohol
and
replace
all
seals
Replace
with
specified
brake
1uid
and
bleed
system
Check
master
cylinder
pIpIng
and
wheel
cylinder
for
leaks
and
repair
Fill
and
bleed
as
necessary
Bleed
system
Adjust
Clean
brake
mechanism
and
check
for
cause
of
problem
Replace
linings
or
pads
Replace
Shave
or
replace
Replace
Repair
or
replace
Free
up
as
required
Check
and
clean
Adjust
or
repair
Adjust
Replace
Adjust
pedal
height
Page 398 of 537

Condition
Brake
chatters
Brake
squeals
Pedal
pulsates
Brakes
fade
Brakes
drag
Unbalanced
brakes
Brake
System
Probable
cause
Groove
or
out
of
round
brake
drum
Loose
or
bent
brake
disc
Distorted
brake
shoes
or
pads
Grease
or
brake
fluid
on
linings
Dirty
or
scored
brake
drums
Distorted
brake
shoes
or
bent
support
plate
Weak
or
broken
brake
shoe
retaining
spring
or
return
spring
Glazed
or
contaminated
brake
lining
Out
of
round
or
off
center
drum
Brake
fluid
has
too
low
boiling
point
Use
of
improper
linings
or
brake
linings
are
contaminated
Brake
drums
are
out
of
round
Hydraulic
connections
master
cylinder
and
wheel
cylinders
are
corroded
or
damaged
Bleed
screw
is
open
Pedal
linkage
is
binding
or
push
rod
adjust
ment
is
too
long
Master
cylinder
compensator
part
is
ob
structed
Seized
master
cylinder
piston
Poor
shoe
condition
Poor
wheel
cylinder
condition
Deformation
of
piston
cups
Hand
brake
will
not
return
Clogged
master
cylinder
return
port
Improper
tire
inflation
Improper
adjustment
of
shoe
to
drum
clear
anee
Grease
oil
mud
or
water
on
linings
or
pads
Mud
in
brake
drum
Deterioration
of
linings
or
pads
Excessive
wear
of
linings
or
pads
BR
23
Corrective
action
Grind
or
replace
as
required
Tighten
support
plate
bolts
to
specified
torque
or
replace
plate
Replace
as
necessary
Replace
linings
Blowout
assembly
with
compressed
air
or
refinish
drum
Replace
faulty
unit
Replace
if
faulty
Cam
ground
lining
to
eliminate
glaze
If
it
doesn
t
replace
linings
Turn
drum
or
replace
as
necessary
Drain
and
fill
system
with
approved
fluid
Replace
linings
Repair
or
replace
as
necessary
Repair
as
necessary
Close
screw
and
bleed
system
Lubricate
linkage
check
pedal
return
spring
for
condition
and
adjust
push
rod
as
neces
sary
Blowout
foreign
matter
with
compressed
air
Disassemble
master
cylinder
and
replace
piston
Bleed
system
Clean
and
repair
Repair
or
replace
Replace
Check
and
repair
Clean
Inflate
to
correct
pressure
Readjust
Clean
brake
mechanism
and
check
for
cause
of
problem
Replace
linings
or
pads
Clean
Replace
Replace
Page 410 of 537
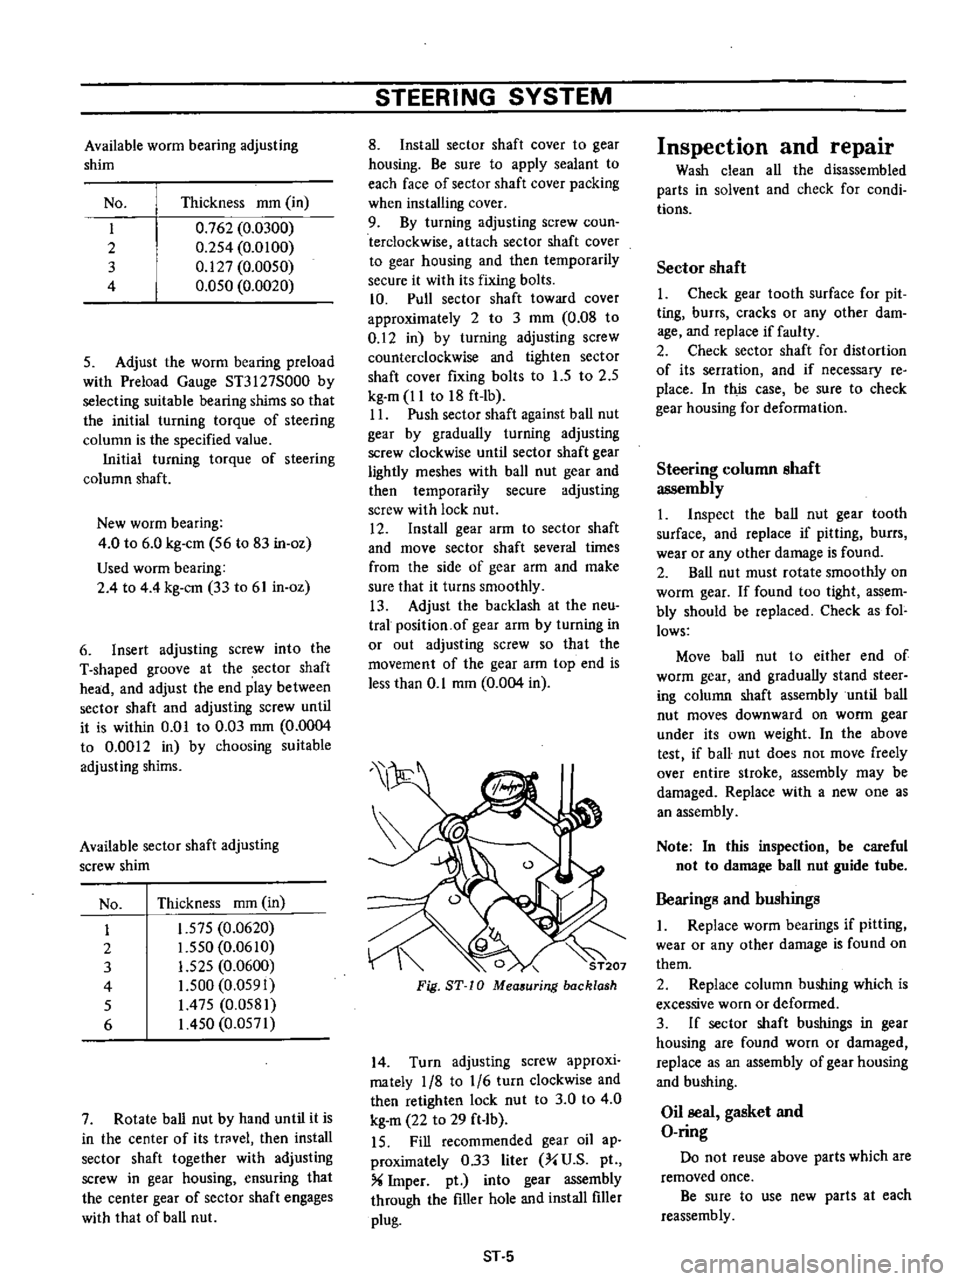
Available
worm
bearing
adjusting
shim
No
Thickness
mOl
in
I
0
762
0
0300
2
0
2S4
0
0100
3
0
127
0
0050
4
O
OSO
0
0020
5
Adjust
the
worm
bearing
preload
with
Preload
Gauge
ST3127S000
by
selecting
suitable
bearing
shims
so
that
the
initial
turning
torque
of
steering
column
is
the
specified
value
Initial
turning
torque
of
steering
column
shaft
New
worm
bearing
4
0
to
6
0
kg
em
S6
to
83
in
oz
Used
worm
bearing
2
4
to
4
4
kg
em
33
to
61
in
oz
6
Insert
adjusting
screw
into
the
T
shaped
groove
at
the
sector
shaft
head
and
adjust
the
end
play
between
sector
shaft
and
adjusting
screw
until
it
is
within
0
01
to
0
03
mm
0
0004
to
0
0012
in
by
choosing
suitable
adjusting
shims
Available
sector
shaft
adjusting
screw
shim
No
Thickness
mOl
in
I
1
57S
0
0620
2
1
550
0
0610
3
1
525
0
0600
4
I
S00
0
OS91
S
1
475
0
0581
6
I
4S0
0
0571
7
Rotate
ball
nut
by
hand
until
it
is
in
the
center
of
its
trovel
then
install
sector
shaft
together
with
adjusting
screw
in
gear
housing
ensuring
that
the
center
gear
of
sector
shaft
engages
with
that
of
ball
nut
STEERING
SYSTEM
8
Install
sector
shaft
cover
to
gear
housing
Be
sure
to
apply
sealant
to
each
face
of
sector
shaft
cover
packing
when
installing
cover
9
By
turning
adjusting
screw
coun
terclockwise
attach
sector
shaft
cover
to
gear
housing
and
then
temporarily
secure
it
with
its
fixing
bolts
10
Pull
sector
shaft
toward
cover
approximately
2
to
3
mOl
0
08
to
0
12
in
by
turning
adjusting
screw
counterclockwise
and
tighten
sector
shaft
cover
fixing
bolts
to
l
S
to
2
5
kg
m
11
to
18
ft
Ib
II
Push
sector
shaft
against
ball
nut
gear
by
gradually
turning
adjusting
screw
clockwise
until
sector
shaft
gear
lightly
meshes
with
ball
nut
gear
and
then
temporarily
secure
adjusting
screw
with
lock
nut
12
Install
gear
arm
to
sector
shaft
and
move
sector
shaft
several
times
from
the
side
of
gear
arm
and
make
sure
that
it
turns
smoothly
13
Adjust
the
backlash
at
the
neu
tral
position
of
gear
arm
by
turning
in
or
out
adjusting
screw
so
that
the
movement
of
the
gear
arm
top
end
is
less
than
0
1
mOl
0
004
in
0
ST207
Fig
ST
10
Mea
uring
backlash
14
Turn
adjusting
screw
approxi
mately
1
8
to
1
6
turn
clockwise
and
then
retighten
lock
nut
to
3
0
to
4
0
kg
m
22
to
29
ft
Ib
IS
Fill
recommended
gear
oil
ap
proximately
0
33
liter
X
U
S
pI
X
Imper
pt
into
gear
assembly
through
the
filler
hole
and
install
filler
plug
ST
5
Inspection
and
repair
Wash
clean
all
the
disassembled
parts
in
solvent
and
check
for
condi
tions
Sector
shaft
1
Check
gear
tooth
surface
for
pit
ting
burrs
cracks
or
any
other
dam
age
and
replace
if
faulty
2
Check
sector
shaft
for
distortion
of
its
serration
and
if
necessary
re
place
In
this
case
be
sure
to
check
gear
housing
for
deformation
Steering
column
shaft
assembly
1
Inspect
the
ball
nut
gear
tooth
surface
and
replace
if
pitting
burrs
wear
or
any
other
damage
is
found
2
Ball
nut
must
rotate
smootWy
on
worm
gear
If
found
too
tight
assem
bly
should
be
replaced
Check
as
fol
lows
Move
ball
nut
to
either
end
of
worm
gear
and
gradually
stand
steer
ing
column
shaft
assembly
until
ball
nut
moves
downward
on
worm
gear
under
its
own
weight
In
the
above
test
if
ball
nut
does
no
move
freely
over
entire
stroke
assembly
may
be
damaged
Replace
with
a
new
one
as
an
assembly
Note
In
this
inspection
be
careful
not
to
dama
e
ball
nut
guide
tube
Bearings
and
bushings
I
Replace
worm
bearings
if
pitting
wear
or
any
other
damage
is
found
on
them
2
Repiace
column
bushing
which
is
excessive
worn
or
deformed
3
If
sector
shaft
bushings
in
gear
housing
are
found
worn
or
damaged
replace
as
an
assembly
of
gear
housing
and
bushing
Oil
seal
gasket
and
O
ring
Do
not
reuse
above
parts
which
are
removed
once
Be
sure
to
use
new
parts
at
each
reassembly
Page 465 of 537
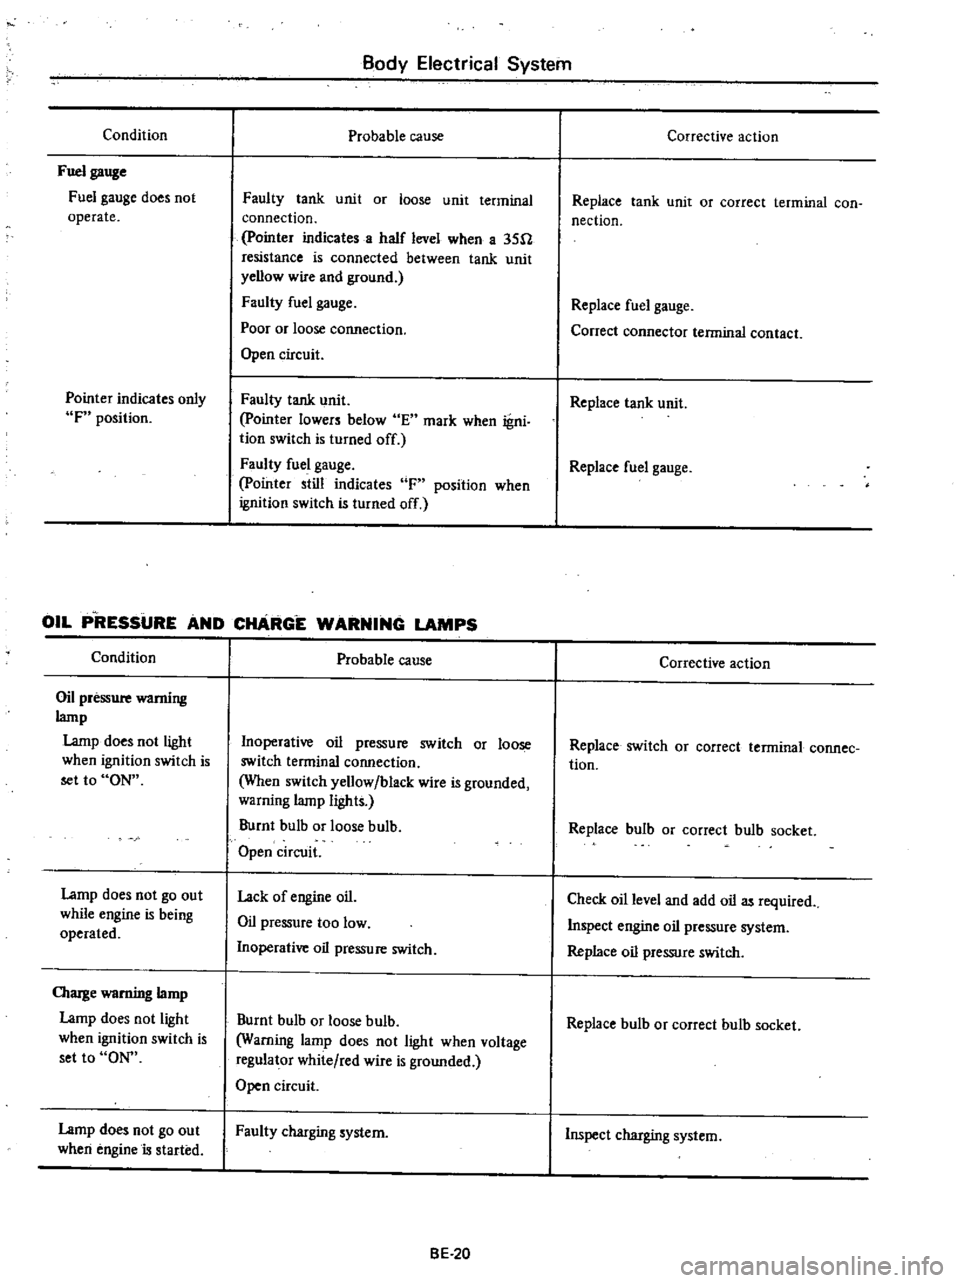
Condition
Fuel
gauge
Fuel
gauge
does
not
operate
Pointer
indicates
only
F
position
Body
Electrical
System
Probable
cause
Faulty
tank
unit
or
loose
unit
terminal
connection
pointer
indicates
a
half
level
when
a
35U
resistance
is
connected
between
tank
unit
yellow
wire
and
ground
Faulty
fuel
gauge
Poor
or
loose
cormection
Open
circuit
Faulty
tank
unit
pointer
lowers
below
E
mark
when
igni
tion
switch
Is
turned
off
Faulty
fuel
gauge
pointer
still
indicates
F
position
when
ignition
switch
is
turned
off
OIL
P
RESSURE
AND
CHARGE
WARNING
LAMPS
Condition
Oil
pressure
wamiug
lamp
Lamp
does
not
light
when
ignition
switch
is
set
to
ON
Lamp
does
not
go
out
while
engine
is
being
operated
OIarge
warning
lamp
Lamp
does
not
light
when
ignition
switch
is
set
to
ON
Lamp
does
not
go
out
when
engine
is
started
Probable
cause
Inoperative
oil
pressure
switch
or
loose
switch
terminal
connection
When
switch
yellow
black
wire
is
grounded
warning
lamp
lights
Burnt
bulb
or
loose
bulb
Open
circuit
Lack
of
engine
oil
Oil
pressure
too
low
Inoperative
oil
pressure
switch
Burnt
bulb
or
loose
bulb
Warning
lamp
does
not
light
when
voltage
regulator
white
red
wire
is
grounded
Open
circuit
Faulty
charging
system
BE
20
Corrective
action
Replace
tank
unit
or
correct
terminal
con
nection
Replace
fuel
gauge
Conect
connector
terminal
contact
Replace
tank
unit
Replace
fuel
gauge
Corrective
action
Replace
switch
OJ
correct
terminal
connee
tion
Replace
bulb
or
correct
bulb
socket
Check
oil
level
and
add
oil
as
required
Inspect
engine
oil
pressure
system
Replace
oil
pressure
switch
Replace
bulb
or
correct
bulb
socket
Inspect
charging
system
Page 480 of 537
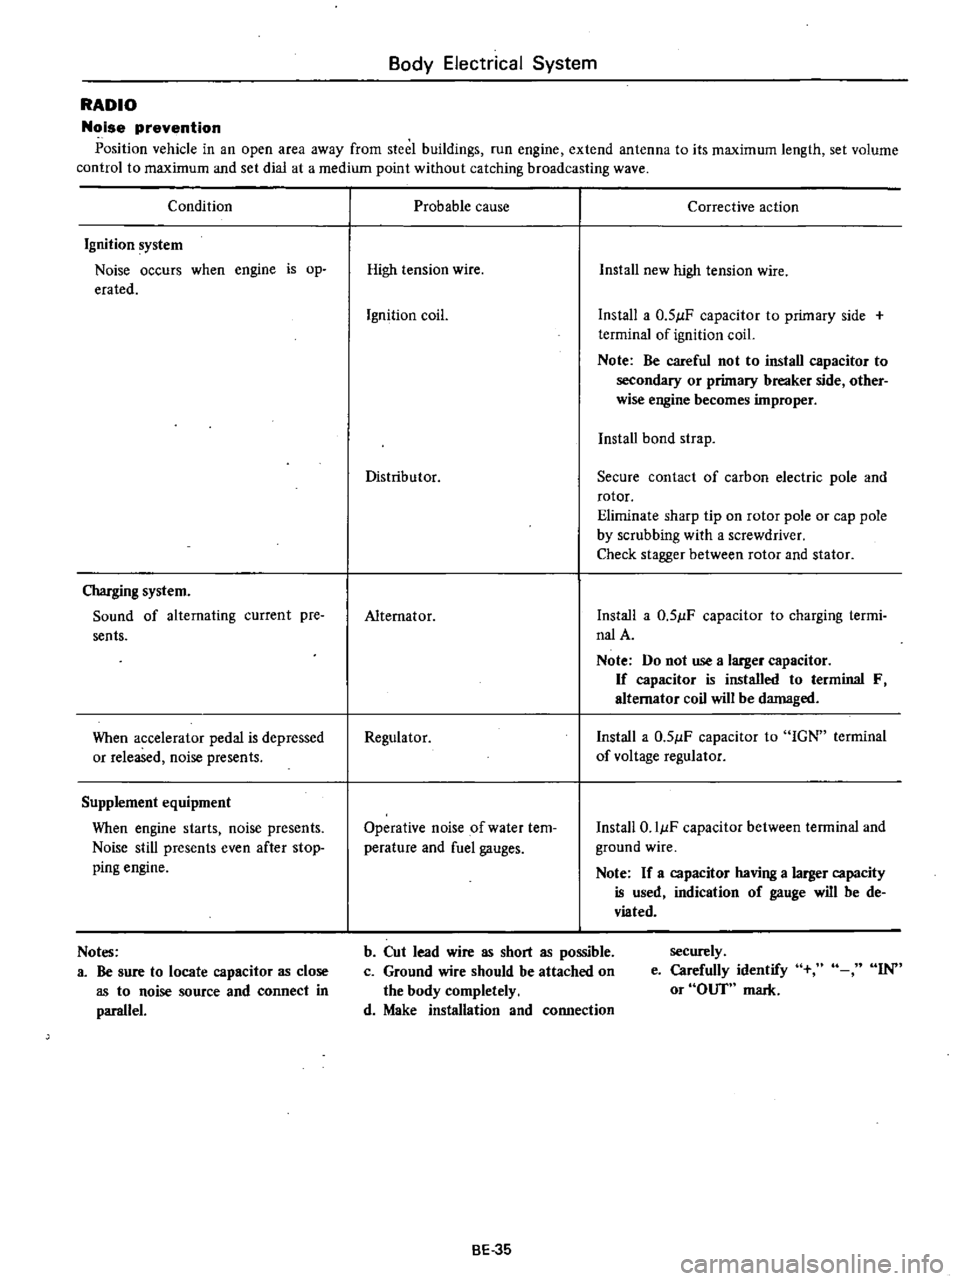
Body
Electrical
System
RADIO
Noise
prevention
Position
vehicle
in
an
open
area
away
from
steel
buildings
run
engine
extend
antenna
to
its
maximum
length
set
volume
control
to
maximum
and
set
dial
at
a
medium
point
without
catching
broadcasting
wave
Condition
Ignition
system
Noise
occurs
when
engine
is
op
erated
Charging
system
Sound
of
alternating
current
pre
sents
When
accelerator
pedal
is
depressed
or
released
noise
presents
Supplement
equipment
When
engine
starts
noise
presents
Noise
still
presents
even
after
stop
ping
engine
Notes
a
Be
sure
to
locate
capacitor
as
close
as
to
noise
source
and
connect
in
parallel
Probable
cause
Corrective
action
High
tension
wire
Install
new
high
tension
wire
Ignition
coil
Install
a
0
51lF
capacitor
to
primary
side
terminal
of
ignition
coil
Note
Be
careful
not
to
install
capacitor
to
secondary
or
primary
breaker
side
other
wise
engine
becomes
improper
Install
bond
strap
Distributor
Secure
contact
of
carbon
electric
pole
and
rotor
Eliminate
sharp
tip
on
rotor
pole
or
cap
pole
by
scrubbing
with
a
screwdriver
Check
stagger
between
rotor
and
stator
Alternator
Install
a
0
51lF
capacitor
to
charging
termi
nalA
Note
Do
not
use
a
larger
capacitor
If
capacitor
is
installed
to
terminal
F
alternator
coil
will
be
damaged
Regulator
Install
a
0
51lF
capacitor
to
IGN
terminal
of
voltage
regulator
Operative
noise
of
water
tem
perature
and
fuel
gauges
Install
O
IIlF
capacitor
between
terminal
and
ground
wire
Note
If
a
capacitor
having
a
larger
capacity
is
used
indication
of
gauge
will
be
de
viated
b
Cut
lead
wire
as
short
as
possible
c
Ground
wire
should
be
attached
on
the
body
completely
d
Make
installation
and
connection
securely
e
Carefully
identify
or
OUT
mark
IN
BE
35
Page 481 of 537

CD
m
Cl
@
D
@
I
j
1
To
instrument
harness
IS
To
battery
30
To
check
connector
2
To
full
transistor
amplifier
16
To
fusible
link
3t
To
headlamp
L
U
type
2
California
models
only
17
To
engine
harness
No
2
32
To
sido
marker
lamp
L
B
3
To
hood
switch
18
To
alternator
33
To
front
combination
lamp
L
H
4
To
engine
compartment
lamp
1
9
To
front
combination
lamp
R
n
34
To
horn
Low
ll
l
S
To
washer
motor
20
To
headlamp
R
H
type
2
3S
To
horn
High
l
l
0
6
To
auto
choke
heater
relay
1
To
side
marker
lamp
R
n
36
To
B
C
D
D
cut
olenoid
California
models
7
To
detector
dri
e
counter
22
To
headlamp
R
B
type
1
only
Non
Califunia
model
except
for
Canada
23
To
ground
37
To
block
tcrminal
distributor
California
8
To
ignition
relay
California
models
only
i4
To
thermal
transmitter
models
only
9
To
floor
sensor
relay
California
modeb
only
is
To
distributor
Non
California
models
only
38
To
ignition
coil
Non
California
models
only
n
10
To
inhibitor
relay
A
T
only
26
To
8
C
D
D
cut
solenoid
Non
California
39
To
condenser
t
II
To
head
lamp
relay
models
only
40
To
ignition
coil
and
resistor
@
12
To
horn
relay
27
To
fuel
cut
solenoid
California
models
only
OJ
v
m
13
To
voltage
regulator
28
To
auto
choke
heater
g
e
14
To
cooler
cable
29
To
headlamp
L
R
type
1
OJ
to
o
Q
m
r0
C
1
i
Ql
CIl
Il
l
3