clock DATSUN PICK-UP 1977 Owner's Manual
[x] Cancel search | Manufacturer: DATSUN, Model Year: 1977, Model line: PICK-UP, Model: DATSUN PICK-UP 1977Pages: 537, PDF Size: 35.48 MB
Page 379 of 537
Brake
System
SERVICE
BRAKE
CONTENTS
BRAKE
PEDAL
REMOVAL
INSPECTION
INSTAllATION
MASTER
CYLINDER
REMOVAL
DISASSEMBl
Y
AND
ASSEMBLY
INSPECTION
INSTAllATION
BRAKE
LINE
REMOVAL
INSPECTION
INSTAllATION
N
L
S
V
DESCRIPTION
N
L
S
V
TEST
FRONT
BRAKE
BR
4
BR
4
BR
4
BR
4
BR
5
BR
5
BR
6
BR
6
BR
5
BR
7
BR
B
BR
B
BR
B
BR
9
BR
9
BR
9
BR
lO
BRAKE
PEDAL
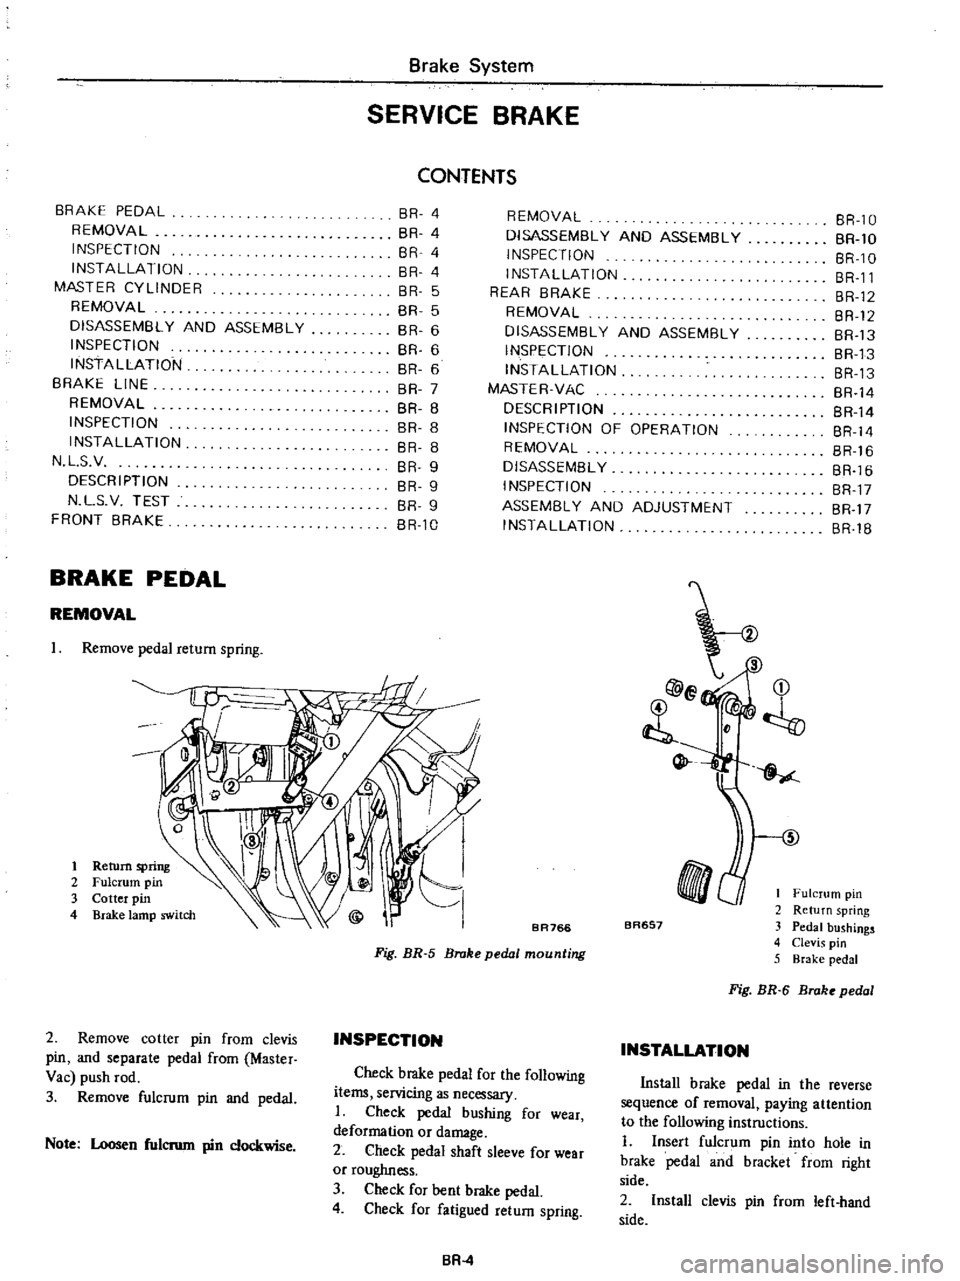
REMOVAL
Remove
pedal
return
spring
I
2
3
4
REMOVAL
DISASSEMBl
Y
AND
ASSEMBLY
INSPECTION
INSTAllATION
REAR
BRAKE
REMOVAL
DISASSEMBLY
AND
ASSEMBLY
INSPECTION
INSTAllATION
MASTER
VAC
DESCRIPTION
INSPECTION
OF
OPERATION
REMOVAL
DISASSEMBLY
INSPECTION
ASSEMBl
Y
AND
ADJUSTMENT
INSTAllATION
BR
lO
BR
1O
BR
lO
BR
ll
BR
12
BR
12
BR
13
BR
13
BR
13
BR
14
BR
14
BR
14
BR
16
BR
16
BR
17
BR
17
BR
IB
b
i
t
I
Fulcrum
pin
2
Return
spring
3
Pedal
bushings
4
Clevis
pin
5
Brake
pedal
5
BR766
BR657
Fig
BR
5
Broke
pedal
mounting
2
Remove
cotter
pin
from
clevis
pin
and
separate
pedal
from
Master
Vac
push
rod
3
Remove
fulcrum
pin
and
pedal
INSPECTION
Fig
BR
6
Broke
pedal
INSTALLATION
Check
brake
pedal
for
the
following
items
servicing
as
necessary
I
Check
pedal
bushing
for
wear
deformation
or
damage
2
Check
pedal
shaft
sleeve
for
wear
or
roughness
3
Check
for
bent
brake
pedal
4
Check
for
fatigued
return
spring
Note
Loosen
fulcnun
pin
clockwise
Install
b
rake
pedal
in
the
reverse
sequence
of
removal
paying
attention
to
the
following
instructions
1
Insert
fulcrum
pin
into
hole
in
brake
pedal
and
bracket
from
right
side
2
Install
clevis
pin
from
left
hand
side
BA
4
Page 393 of 537
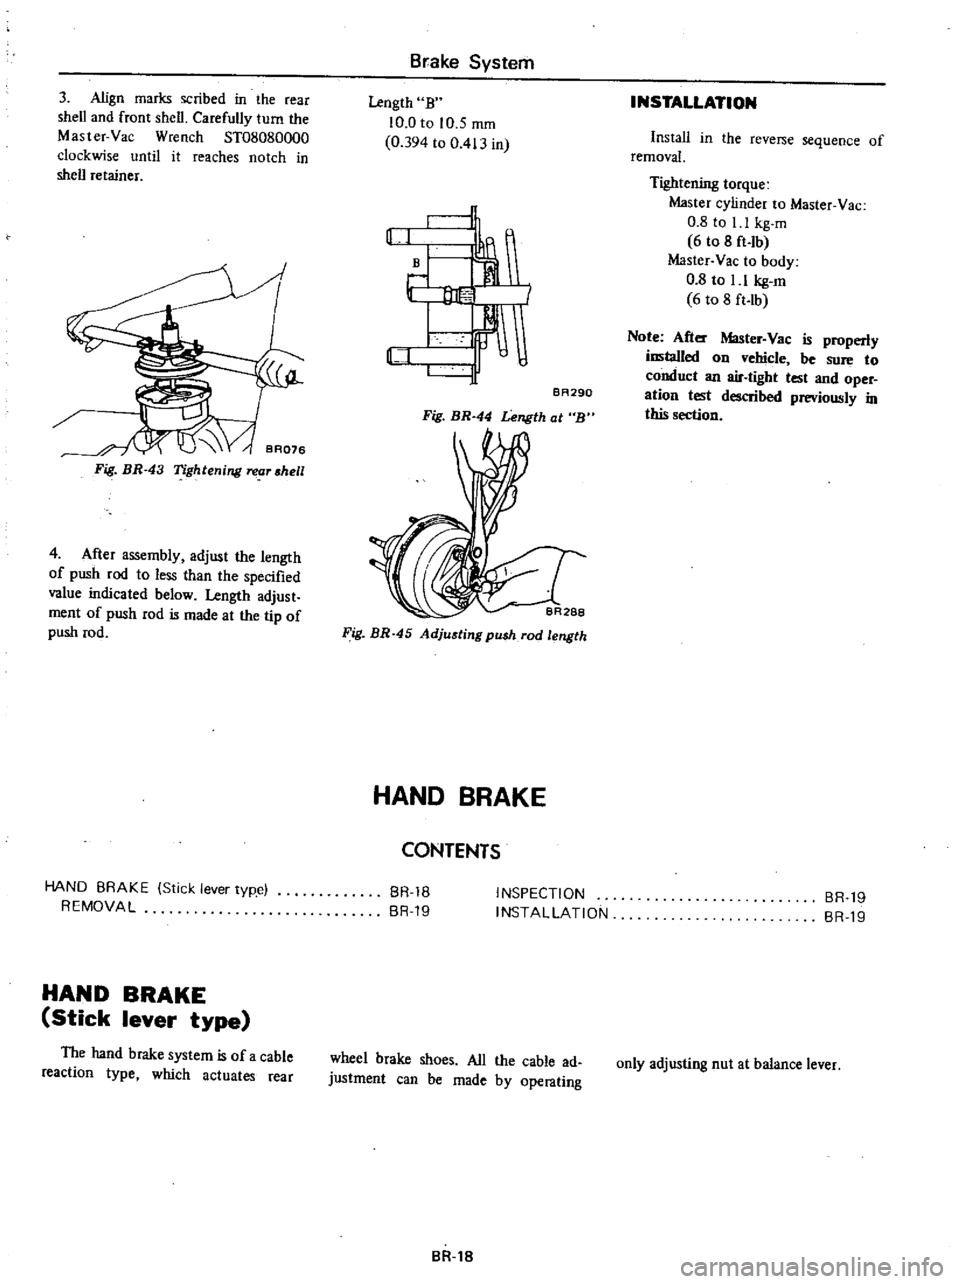
3
Align
marks
scribed
in
the
rear
shell
and
front
shell
Carefully
turn
the
Master
Vac
Wrench
ST08080000
clockwise
until
it
reaches
notch
in
shell
retainer
Fig
BR
43
Tightenilll
reor
shell
4
After
assembly
adjust
the
length
of
push
rod
to
less
than
the
specified
value
indicated
below
Length
adjust
ment
of
push
rod
is
made
at
the
tip
of
push
rod
HAND
BRAKE
Stick
lever
typ
e
REMOVAL
HAND
BRAKE
Stick
lever
type
The
hand
brake
system
is
of
a
cable
reaction
type
which
actuates
rear
Brake
System
Length
B
10
0
to
10
5
mID
0
394
to
0
413
in
rl
J
BA290
Fig
BR
44
Lelll
th
at
B
Fig
BR
45
Adjusting
push
rod
length
HAND
BRAKE
CONTENTS
BR
18
BR
19
INSPECTION
INSTALLATION
wheel
brake
shoes
All
the
cable
ad
justment
can
be
made
by
operating
BR
18
INSTALLATION
Install
in
the
reverse
sequence
of
removal
Tightening
torque
Master
cylinder
to
Master
Vac
0
8
to
I
1
kg
m
6
to
8
ft
lb
Master
Vac
to
body
0
8
to
1
1
kg
m
6
to
8
ft
Ib
Note
After
Master
Vac
is
properly
installed
on
vehicle
be
sure
to
conduct
an
air
tight
test
and
oper
ation
test
described
previously
in
this
section
BR
19
BR
19
only
adjusting
nut
at
balance
lever
Page 403 of 537
Center
This
wear
is
caused
by
overinflation
of
the
tire
The
inflation
pressure
must
be
kept
at
the
specified
value
Shoulder
The
wear
may
be
caused
by
under
inflation
incorrect
wheel
camber
or
continuous
high
speed
driving
on
curves
In
general
the
former
two
causes
are
common
Underinflation
wear
occurs
on
both
sides
of
treads
d
I
Ii
Toe
in
or
toe
out
wear
nf
I
Underinnation
wear
TIRE
ROTATION
Tires
wear
unevenly
and
become
unbalanced
according
to
running
dis
tance
Uneven
tire
wear
often
results
in
tire
noise
which
is
attributed
to
rear
axle
gears
bearing
etc
Meanwhile
the
front
tires
tend
to
wear
unevenly
because
of
improperly
aligned
front
wheel
Accordingly
to
equalize
tire
wear
it
is
necessary
to
rotate
tires
peri
odically
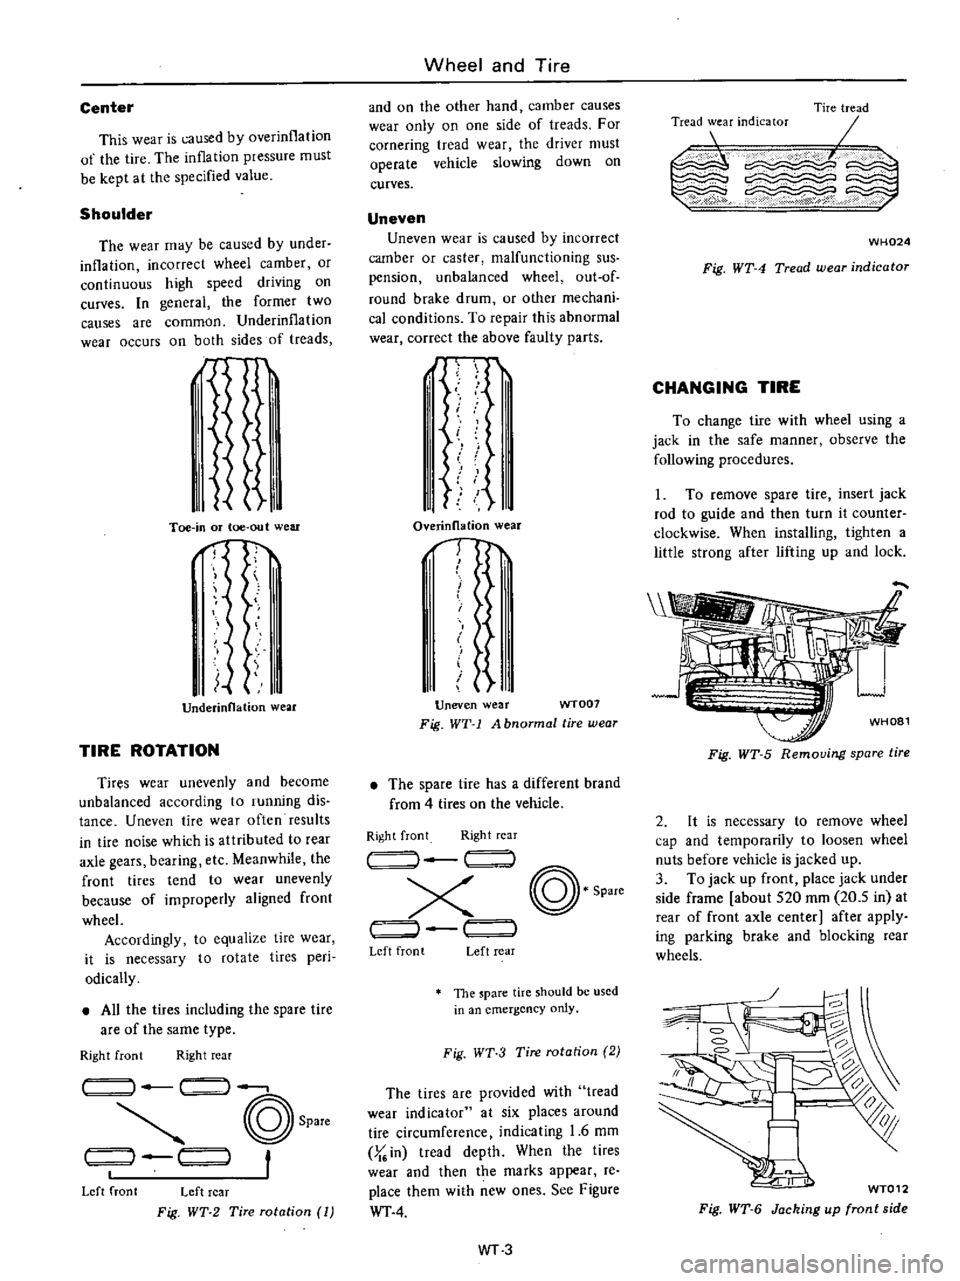
All
the
tires
including
the
spare
tire
are
of
the
same
type
Right
front
Right
rear
14
1
I
@
Spare
t
t
1
1
Left
front
Left
rear
Fig
WT
2
Tire
rotation
1
Wheel
and
Tire
and
on
the
other
hand
camber
causes
wear
only
on
one
side
of
treads
For
cornering
tread
wear
the
driver
must
operate
vehicle
slowing
down
on
curves
Uneven
Uneven
wear
is
caused
by
incorrect
camber
or
caster
malfunctioning
sus
pension
unbalanced
wheel
out
of
round
brake
drum
or
other
mechani
cal
conditions
To
repair
this
abnormal
wear
correct
the
above
faulty
parts
J
I
II
i
11
I
1
Overinllation
wear
1
I
I
t
Uneven
wear
WT007
Fig
WT
1
A
bnormal
tire
wear
The
spare
lire
has
a
different
brand
from
4
tires
on
the
vehicle
Right
front
Right
rear
I
@
Spare
x
J
r
Left
front
Left
rear
The
pare
tire
should
be
used
in
an
emergency
only
Fig
WT
3
Tire
rotation
2
The
tires
are
provided
with
tread
wear
indicator
at
six
places
around
tire
circumference
indicating
1
6
mm
J
in
tread
depth
When
the
tires
wear
and
then
the
marks
appear
re
place
them
with
new
ones
See
Figure
WT
4
WT3
Tire
tread
0E
I
Tread
wear
indicator
c
WH024
Fig
WT
4
Tread
wear
indicator
CHANGING
TIRE
To
change
tire
with
wheel
using
a
jack
in
the
safe
manner
observe
the
following
procedures
1
To
remove
spare
tire
insert
jack
rod
to
guide
and
then
turn
it
counter
clockwise
When
installing
lighten
a
little
strong
after
lifting
up
and
lock
Fig
WT
5
Removing
spare
tire
2
It
is
necessary
to
remove
wheel
cap
and
temporarily
to
loosen
wheel
nuts
before
vehicle
is
jacked
up
3
To
jack
up
front
place
jack
under
side
frame
about
S20
mOl
20
5
in
at
rear
of
front
axle
center
after
apply
ing
parking
brake
and
blocking
rear
wheels
g
1
WT012
Fig
WT
6
Jacking
up
front
side
Page 409 of 537
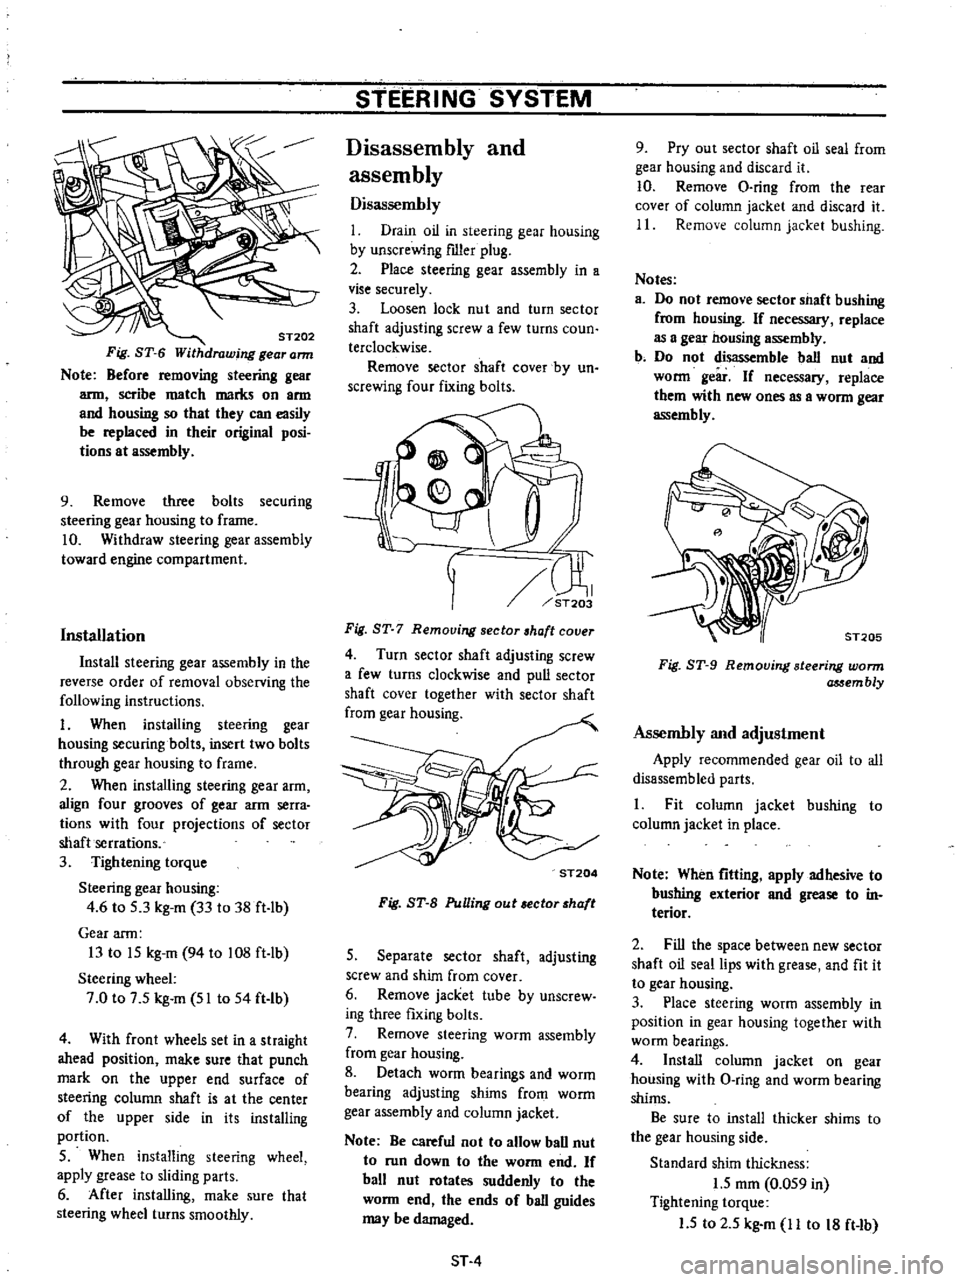
ST202
Fig
ST
6
Withdrawing
gear
ann
Note
Before
removing
steering
gear
arm
scribe
match
marks
on
arm
and
housing
so
that
they
can
easily
be
replaced
in
their
original
posi
tions
at
assembly
9
Remove
three
bolts
securing
steering
gear
housing
to
frame
10
Withdraw
steering
gear
assembly
toward
engine
compartment
Installation
Install
steering
gear
assembly
in
the
reverse
order
of
removal
observing
the
following
instructions
I
When
installing
steering
gear
housing
securing
bolts
insert
two
bolts
through
gear
housing
to
frame
2
When
installing
steering
gear
arm
align
four
grooves
of
gear
arm
serra
tions
with
four
projections
of
sector
shaft
serrations
3
Tightening
torque
Steering
gear
housing
4
6
to
S
3
kg
m
33
to
38
ft
lb
Gear
arm
13
to
IS
kg
m
94
to
108
ft
lb
Steering
wheel
7
0
to
7
S
kg
m
51
to
54
ft
Ib
4
With
front
wheels
set
in
a
straight
ahead
position
make
sure
that
punch
mark
on
the
upper
end
surface
of
steering
column
shaft
is
at
the
center
of
the
upper
side
in
its
installing
portion
S
When
installing
steering
wheel
apply
grease
to
sliding
parts
6
After
installing
make
sure
that
steering
wheel
turns
smoothly
STEERING
SYSTEM
Disassembly
and
assembly
Disassembly
I
Drain
oil
in
steering
gear
housing
by
unscrewing
fIller
plug
2
Place
steering
gear
assembly
in
a
vise
securely
3
Loosen
lock
nut
and
turn
sector
shaft
adjusting
screw
a
few
turns
coun
terclockwise
Remove
sector
shaft
cover
by
un
screwing
four
fixing
bolts
rn
ST203
Fig
ST
7
Remouing
sector
haft
couer
4
Turn
sector
shaft
adjusting
screw
a
few
turns
clockwise
and
pull
sector
shaft
cover
together
with
sector
shaft
from
gear
housing
ST204
Fig
ST
B
PuUing
out
ector
haft
S
Separate
sector
shaft
adjusting
screw
and
shim
from
cover
6
Remove
jacket
tube
by
unscrew
ing
three
fixing
bolts
7
Remove
steering
worm
assembly
from
gear
housing
8
Detach
worm
bearings
and
worm
bearing
adjusting
shims
from
worm
gear
assembly
and
column
jacket
Note
Be
careful
not
to
allow
ball
nut
to
run
down
to
the
worm
end
If
ball
nut
rotates
suddenly
to
the
worm
end
the
ends
of
ball
guides
may
be
damaged
ST
4
9
Pry
out
sector
shaft
oil
seal
from
gear
housing
and
discard
it
10
Remove
O
ring
from
the
rear
cover
of
column
jacket
and
discard
it
11
Remove
column
jacket
bushing
Notes
a
Do
not
remove
sector
shaft
bushing
from
housing
If
necessary
replace
as
a
gea2
nousing
assembly
b
Do
not
disassemble
ball
nut
and
worm
geir
If
necessary
replace
them
with
new
ones
as
a
worm
gear
assembly
Fig
ST
9
Removing
steering
worm
assem
bly
Assembly
and
adjustment
Apply
recommended
gear
oil
to
all
disassembled
parts
1
Fit
column
jacket
bushing
to
column
jacket
in
place
Note
When
fitting
apply
adhesive
to
bushing
exterior
and
grease
to
in
terior
2
Fill
the
space
between
new
sector
shaft
oil
seal
lips
with
grease
and
fit
it
to
gear
housing
3
Place
steering
worm
assembly
in
position
in
gear
housing
together
with
worm
bearings
4
Install
column
jacket
on
gear
housing
with
O
ring
and
worm
bearing
shims
Be
sure
to
install
thicker
shims
to
the
gear
housing
side
Standard
shim
thickness
1
5
mOl
0
OS9
in
Tightening
torque
1
5
to
2
S
kg
m
11
to
18
ft
Ib
Page 410 of 537
Available
worm
bearing
adjusting
shim
No
Thickness
mOl
in
I
0
762
0
0300
2
0
2S4
0
0100
3
0
127
0
0050
4
O
OSO
0
0020
5
Adjust
the
worm
bearing
preload
with
Preload
Gauge
ST3127S000
by
selecting
suitable
bearing
shims
so
that
the
initial
turning
torque
of
steering
column
is
the
specified
value
Initial
turning
torque
of
steering
column
shaft
New
worm
bearing
4
0
to
6
0
kg
em
S6
to
83
in
oz
Used
worm
bearing
2
4
to
4
4
kg
em
33
to
61
in
oz
6
Insert
adjusting
screw
into
the
T
shaped
groove
at
the
sector
shaft
head
and
adjust
the
end
play
between
sector
shaft
and
adjusting
screw
until
it
is
within
0
01
to
0
03
mm
0
0004
to
0
0012
in
by
choosing
suitable
adjusting
shims
Available
sector
shaft
adjusting
screw
shim
No
Thickness
mOl
in
I
1
57S
0
0620
2
1
550
0
0610
3
1
525
0
0600
4
I
S00
0
OS91
S
1
475
0
0581
6
I
4S0
0
0571
7
Rotate
ball
nut
by
hand
until
it
is
in
the
center
of
its
trovel
then
install
sector
shaft
together
with
adjusting
screw
in
gear
housing
ensuring
that
the
center
gear
of
sector
shaft
engages
with
that
of
ball
nut
STEERING
SYSTEM
8
Install
sector
shaft
cover
to
gear
housing
Be
sure
to
apply
sealant
to
each
face
of
sector
shaft
cover
packing
when
installing
cover
9
By
turning
adjusting
screw
coun
terclockwise
attach
sector
shaft
cover
to
gear
housing
and
then
temporarily
secure
it
with
its
fixing
bolts
10
Pull
sector
shaft
toward
cover
approximately
2
to
3
mOl
0
08
to
0
12
in
by
turning
adjusting
screw
counterclockwise
and
tighten
sector
shaft
cover
fixing
bolts
to
l
S
to
2
5
kg
m
11
to
18
ft
Ib
II
Push
sector
shaft
against
ball
nut
gear
by
gradually
turning
adjusting
screw
clockwise
until
sector
shaft
gear
lightly
meshes
with
ball
nut
gear
and
then
temporarily
secure
adjusting
screw
with
lock
nut
12
Install
gear
arm
to
sector
shaft
and
move
sector
shaft
several
times
from
the
side
of
gear
arm
and
make
sure
that
it
turns
smoothly
13
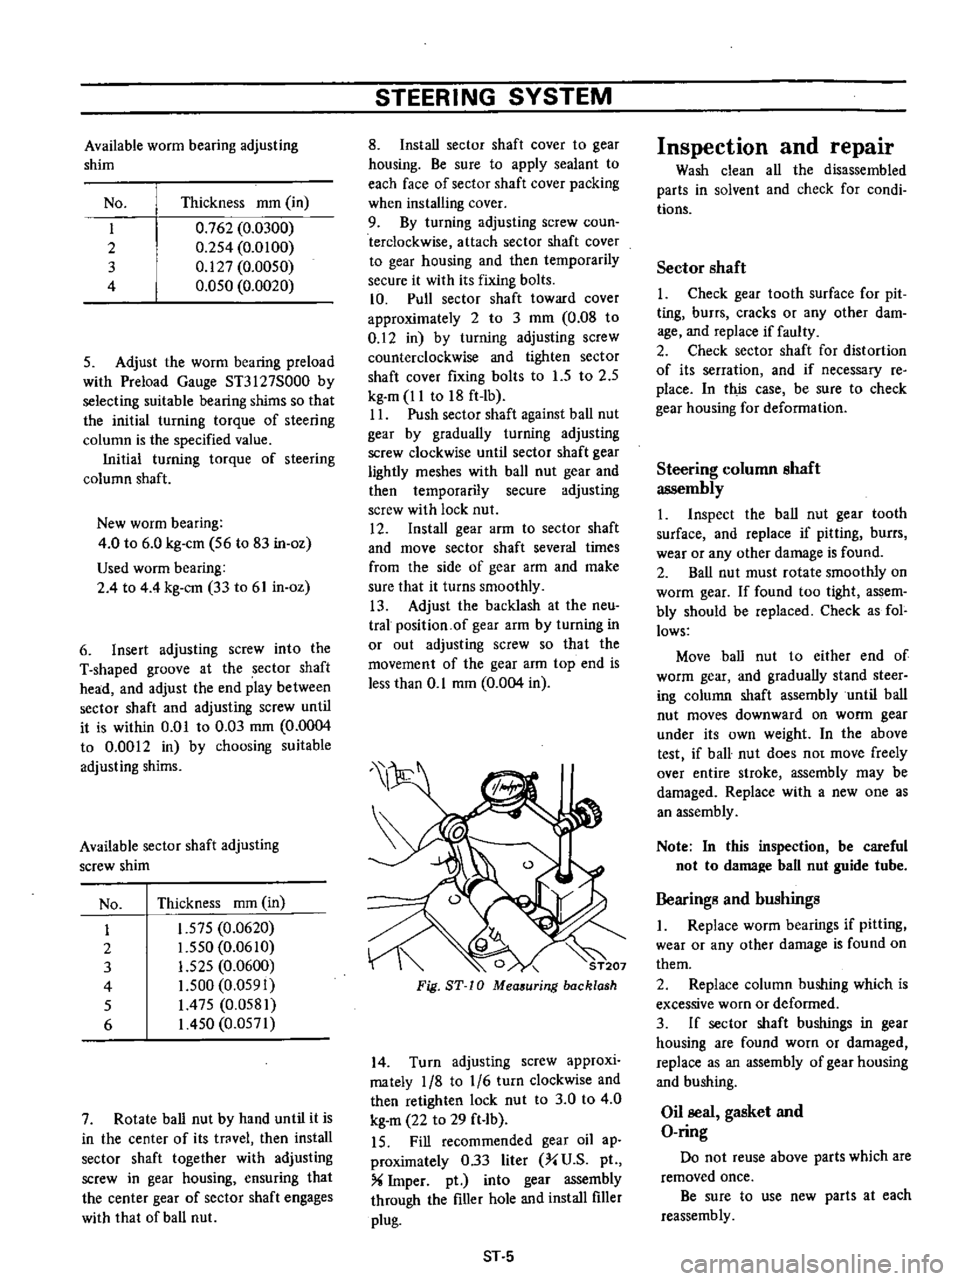
Adjust
the
backlash
at
the
neu
tral
position
of
gear
arm
by
turning
in
or
out
adjusting
screw
so
that
the
movement
of
the
gear
arm
top
end
is
less
than
0
1
mOl
0
004
in
0
ST207
Fig
ST
10
Mea
uring
backlash
14
Turn
adjusting
screw
approxi
mately
1
8
to
1
6
turn
clockwise
and
then
retighten
lock
nut
to
3
0
to
4
0
kg
m
22
to
29
ft
Ib
IS
Fill
recommended
gear
oil
ap
proximately
0
33
liter
X
U
S
pI
X
Imper
pt
into
gear
assembly
through
the
filler
hole
and
install
filler
plug
ST
5
Inspection
and
repair
Wash
clean
all
the
disassembled
parts
in
solvent
and
check
for
condi
tions
Sector
shaft
1
Check
gear
tooth
surface
for
pit
ting
burrs
cracks
or
any
other
dam
age
and
replace
if
faulty
2
Check
sector
shaft
for
distortion
of
its
serration
and
if
necessary
re
place
In
this
case
be
sure
to
check
gear
housing
for
deformation
Steering
column
shaft
assembly
1
Inspect
the
ball
nut
gear
tooth
surface
and
replace
if
pitting
burrs
wear
or
any
other
damage
is
found
2
Ball
nut
must
rotate
smootWy
on
worm
gear
If
found
too
tight
assem
bly
should
be
replaced
Check
as
fol
lows
Move
ball
nut
to
either
end
of
worm
gear
and
gradually
stand
steer
ing
column
shaft
assembly
until
ball
nut
moves
downward
on
worm
gear
under
its
own
weight
In
the
above
test
if
ball
nut
does
no
move
freely
over
entire
stroke
assembly
may
be
damaged
Replace
with
a
new
one
as
an
assembly
Note
In
this
inspection
be
careful
not
to
dama
e
ball
nut
guide
tube
Bearings
and
bushings
I
Replace
worm
bearings
if
pitting
wear
or
any
other
damage
is
found
on
them
2
Repiace
column
bushing
which
is
excessive
worn
or
deformed
3
If
sector
shaft
bushings
in
gear
housing
are
found
worn
or
damaged
replace
as
an
assembly
of
gear
housing
and
bushing
Oil
seal
gasket
and
O
ring
Do
not
reuse
above
parts
which
are
removed
once
Be
sure
to
use
new
parts
at
each
reassembly
Page 420 of 537
Detail
A
Detail
D
REMOVAL
Engine
Control
Fuel
Exhaust
Systems
Detail
Bn
4
Detail
e
@
Detail
E
B
Fuel
tank
See
Figure
FE
a
I
Disconnect
battery
ground
cable
2
Remove
drain
plug
and
receive
the
remaining
fuel
into
a
suitable
container
3
Disconnect
filler
tube
fro
filler
hose
4
Remove
fuel
tank
securing
bolts
5
Disconnect
two
ventilation
hoses
fuel
return
hose
and
fuel
outlet
hose
from
fuel
tank
6
Disconnect
fuel
tank
gauge
unit
wires
at
connector
7
Remove
fuel
tank
Note
Plug
hose
and
tube
opening
l
to
prevent
entry
of
dust
or
dirt
while
removing
ReservoIr
tank
1
Disconnect
battery
ground
cable
2
Disconnect
two
ventilation
hoses
evaporation
hose
and
breather
hose
3
Remove
reservoir
tank
securing
bolts
and
remove
tank
with
protector
Note
Plug
hose
and
tube
opening
l
to
prevent
entry
of
dust
or
dirt
while
removing
Fuel
tank
gauge
unit
Disconnect
battery
ground
cable
2
Disconnect
wires
from
fuel
tank
gauge
unit
3
Remove
fuel
tank
For
details
refer
to
fuel
tank
removal
4
Unit
gauge
is
a
bayonet
type
and
can
be
removed
by
turning
it
counter
clockwise
with
screwdriver
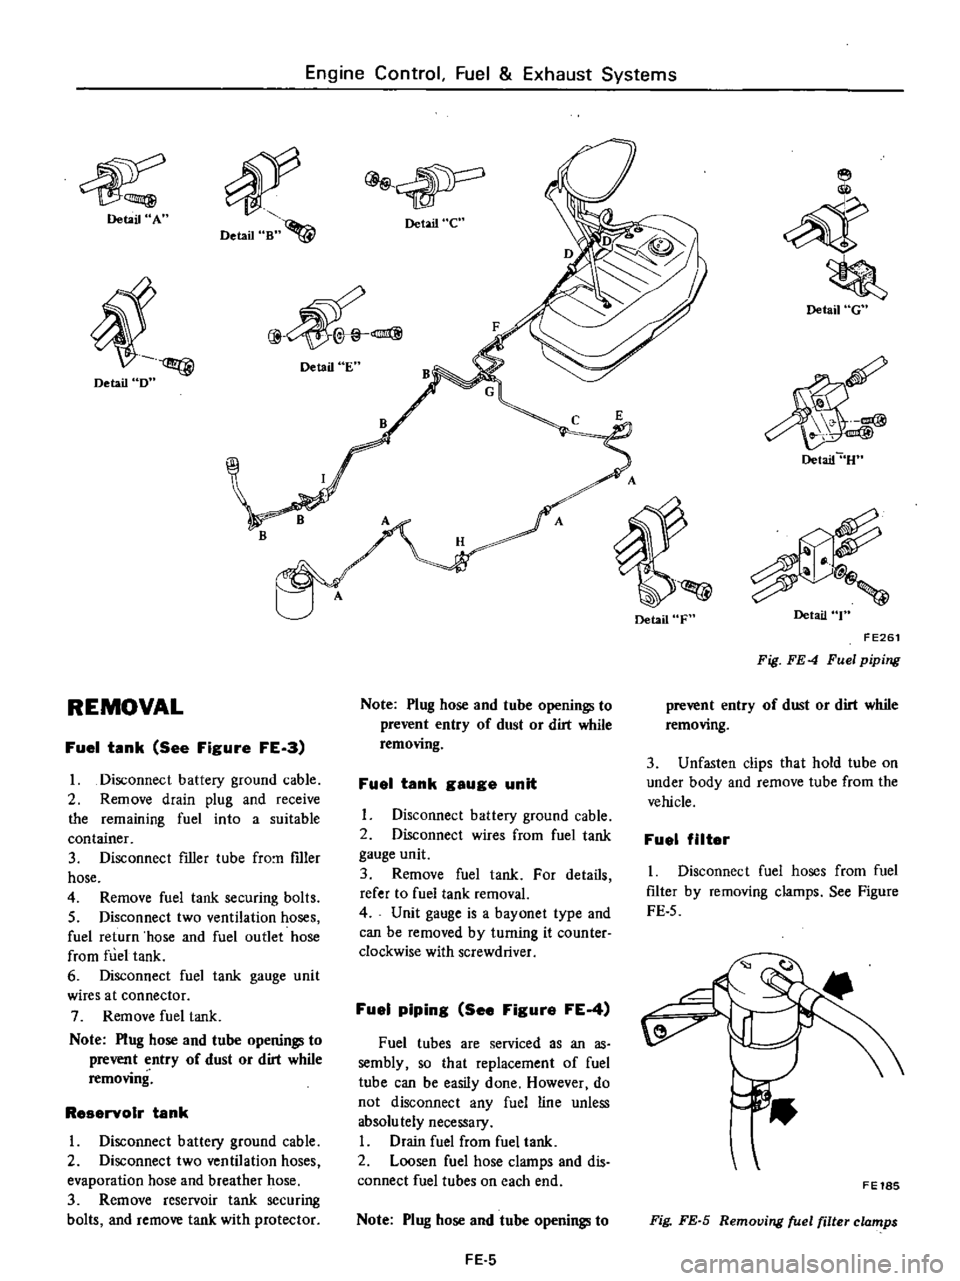
Fuel
piping
See
Figure
FE
4
Fuel
tubes
are
serviced
as
an
as
sembly
so
that
replacement
of
fuel
tube
can
be
easily
done
However
do
not
disconnect
any
fuel
line
unless
absolu
tely
necessary
I
Drain
fuel
from
fuel
tank
2
Loosen
fuel
hose
clamps
and
dis
connect
fuel
tubes
on
each
end
Note
Plug
hose
and
tube
openings
to
FE
5
Detail
F
Detail
G
Detail
U
Detail
T
FE261
Fig
FE
4
Fuel
piping
prevent
entry
of
dust
or
dirt
while
removing
3
Unfasten
clips
that
hold
tube
on
under
body
and
remove
tube
from
the
vehicle
Fuel
filter
I
Disconnect
fuel
hoses
from
fuel
filter
by
removing
clamps
See
Figure
FE
5
FE18S
Fig
FE
S
Removing
fuel
filter
clamps
Page 434 of 537
REMOVAL
AND
INSTALLATION
I
Remove
hood
lock
male
by
re
moving
two
attaching
bolts
2
To
remove
hood
lock
female
first
remove
radiator
grille
Back
off
two
bolts
securing
hood
lock
female
in
position
Hood
lock
female
can
now
be
taken
out
3
Remove
two
bolts
attaching
hood
lock
handle
assembly
to
dash
side
paneL
Disconnect
cable
at
hood
lock
female
and
remove
cable
clamps
Pull
cable
out
into
cab
4
To
install
hood
lock
male
and
female
reverse
removal
procedure
Mter
installation
check
to
insure
that
they
are
properly
aligned
5
To
install
hood
lock
handle
as
sembly
reverse
steps
observing
the
following
notes
I
Check
to
be
certain
that
cable
clamps
are
tight
and
secure
2
Install
hood
lock
handle
bracket
in
place
by
using
two
of
four
holes
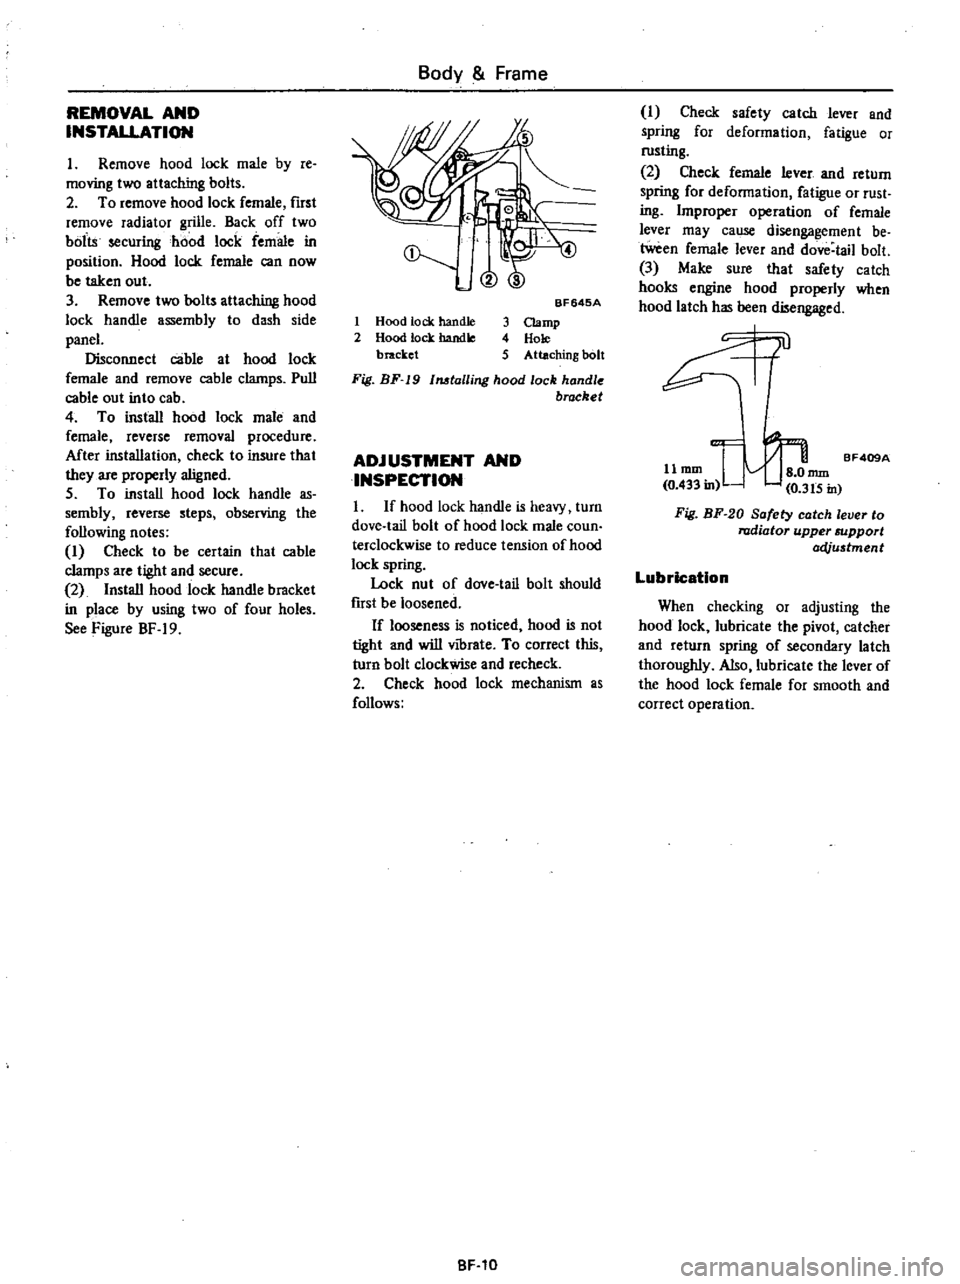
See
Figure
BF
19
Body
Frame
@
1
Hood
tock
handle
2
Hood
lock
handle
bracket
BF645A
3
Clamp
4
Hole
5
Attaching
bolt
Fig
BF
19
1MtalIing
hood
lock
handle
brocket
ADJUSTMENT
AND
INSPECTION
I
If
hood
lock
handle
is
heavy
turn
dove
tail
bolt
of
hood
lock
male
coun
terclockwise
to
reduce
tension
of
hood
lock
spring
Lock
nut
of
dove
tail
bolt
should
fust
be
loosened
If
looseness
is
noticed
hood
is
not
tight
and
will
vibrate
To
correct
this
turn
bolt
clockwise
and
recheck
2
Check
hood
lock
mechanism
as
follows
BF
10
I
Check
safety
catch
lever
and
spring
for
deformation
fatigue
or
rusting
2
Check
female
lever
and
return
spring
for
deformation
fatigue
or
rust
ing
Improper
operation
of
female
lever
may
cause
disengagement
be
tween
female
lever
and
dove
tail
bolt
3
Make
sure
that
safety
catch
hooks
engine
hood
properly
when
hood
latch
has
been
disengaged
0l
11
mm
I
nun
BF409A
0
433
in
0
3t5
in
Fig
BF
20
Safety
catch
lever
to
radiator
upper
support
acVu5tment
Lubrication
When
checking
or
adjusting
the
hood
lock
lubricate
the
pivot
catcher
and
return
spring
of
secondary
latch
thoroughly
Also
lubricate
the
lever
of
the
hood
lock
female
for
smooth
and
correct
operation
Page 450 of 537
Body
Electrical
System
Room
lamp
and
engine
compartment
lamp
system
FUSE
BLOC
K
C
J
QA
C
J
CJ
CJ
CJ
1
100
I
2
I
I
t1
Wf
t
fi
FUSIBLE
LINK
ROOM
LAMP
t
I
6
I
II
lA
FUSE
o
C
1
BATTERY
I
I
DOOR
SWITCH
L
H
l
ENGINE
ROOM
LAMP
I
0
I
1
HOOD
SWITCt
f
I
c
I
DOOR
SWITCHIR
H
l
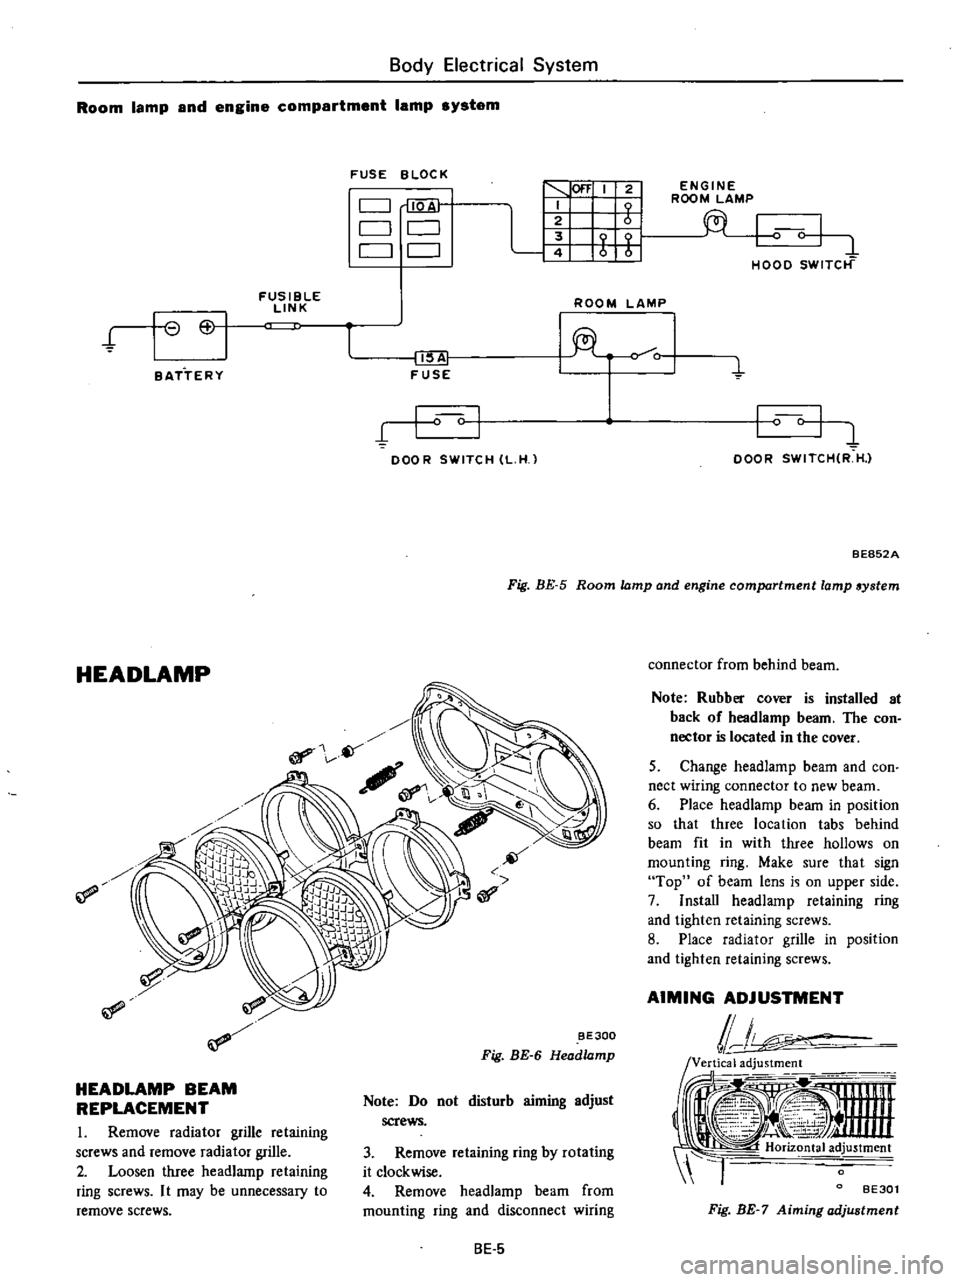
Fig
BE
5
Room
lamp
and
engine
compartment
lamp
system
BE852A
HEADLAMP
if
BE300
Fig
BE
6
Head
amp
HEADLAMP
BEAM
REPLACEMENT
I
Remove
radiator
grille
retaining
screws
and
remove
radiator
grille
2
Loosen
three
headlamp
retaining
ring
screws
I
t
may
be
unnecessary
to
remove
screws
Note
Do
not
disturb
aiming
adjust
screws
3
Remove
retaining
ring
by
rotating
it
clockwise
4
Remove
headlamp
beam
from
mounting
ring
and
disconnect
wiring
8E
5
connector
from
behind
beam
Note
Rubber
cover
is
installed
at
back
of
headlamp
beam
The
con
nector
is
located
in
the
cover
5
Change
headlamp
beam
and
con
nect
wiring
connector
to
new
beam
6
Place
headlamp
beam
in
position
so
that
three
location
tabs
behind
beam
fit
in
with
three
hollows
on
mounting
ring
Make
sure
that
sign
Top
of
beam
lens
i
i
on
upper
side
7
Install
headlamp
retaining
ring
and
tighten
retaining
screws
8
Place
radIator
grille
in
position
and
tighten
retaining
screws
AIMING
ADJUSTMENT
lJ
ii
i
tooi
1
Ji
Y
4
nnn
4
I
Horiz
tal
ad
justment
l
BE30l
Fig
BE
7
Aiming
adjustment
Page 452 of 537
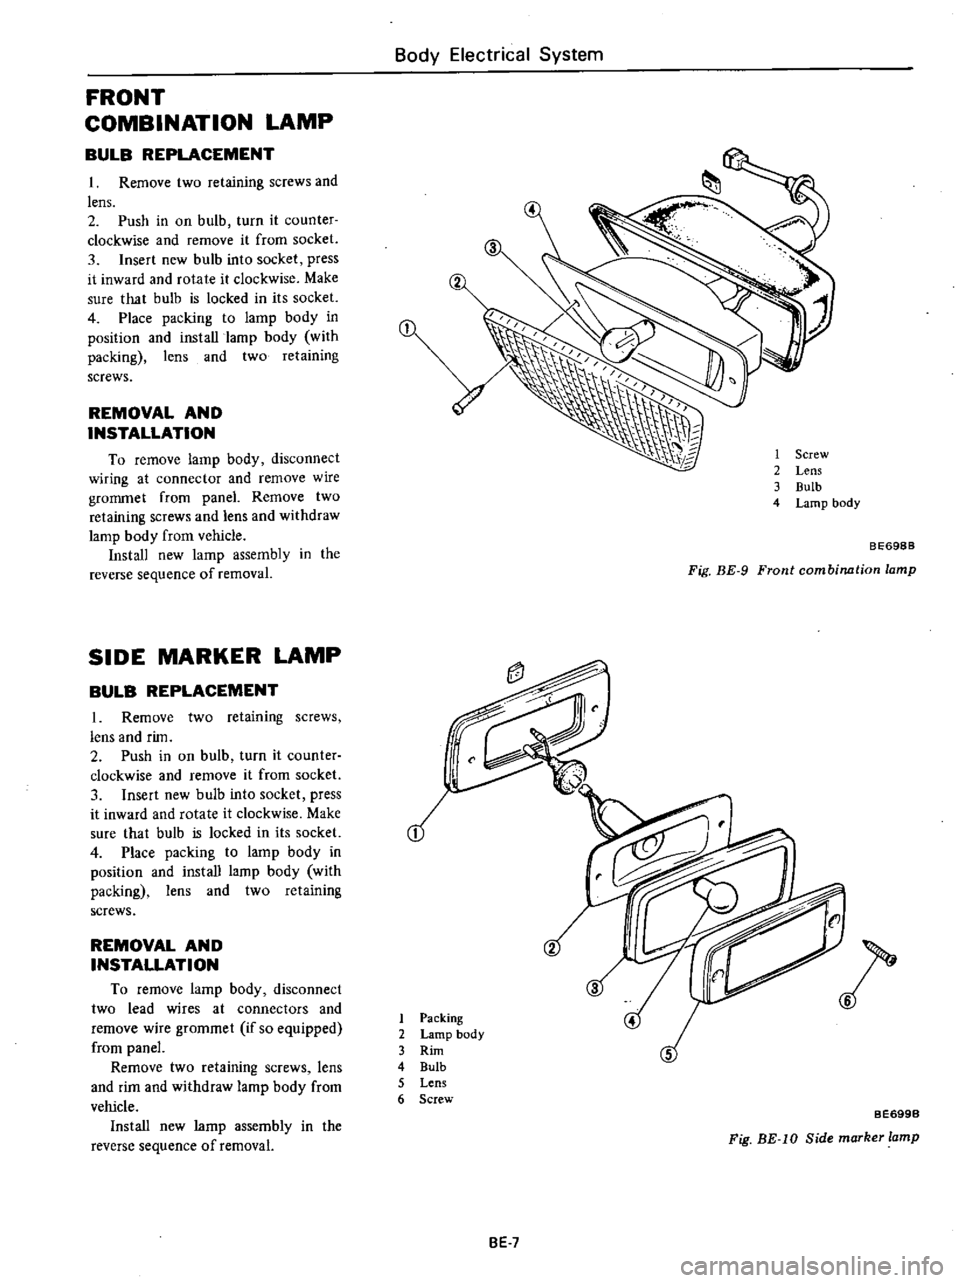
FRONT
COMBINATION
LAMP
BULB
REPLACEMENT
1
Remove
two
retaining
screws
and
lens
2
Push
in
on
bulb
turn
it
counter
clockwise
and
remove
it
from
socket
3
Insert
new
bulb
into
socket
press
it
inward
and
rotate
it
clockwise
Make
sure
that
bulb
is
locked
in
its
socket
4
Place
packing
to
lamp
body
in
position
and
install
lamp
body
with
packing
lens
and
two
retaining
screws
REMOVAL
AND
INSTALLATION
To
remove
lamp
body
disconnect
wiring
at
connector
and
remove
wire
grommet
from
panel
Remove
two
retaining
screws
and
lens
and
withdraw
lamp
body
from
vehicle
Install
new
lamp
assembly
in
the
reverse
sequence
of
removal
SIDE
MARKER
LAMP
BULB
REPLACEMENT
1
Remove
two
retaining
screws
lens
and
rim
2
Push
in
on
bulb
turn
it
counter
clockwise
and
remove
it
from
socket
3
Insert
new
bulb
into
socket
press
it
inward
and
rotate
it
clockwise
Make
sure
that
bulb
is
locked
in
its
socket
4
Place
packing
to
lamp
body
in
position
and
install
lamp
body
with
packing
lens
and
two
retaining
screws
REMOVAL
AND
INSTALLATION
To
remove
lamp
body
disconnect
two
lead
wires
at
connectors
and
remove
wire
grommet
if
so
equipped
from
panel
Remove
two
retaining
screws
lens
and
rim
and
withdraw
lamp
body
from
vehicle
Install
new
lamp
assembly
in
the
reverse
sequence
of
removal
Body
Electrical
System
1
Screw
2
Lens
3
Bulb
4
Lamp
body
BE698B
Fig
BE
9
Front
combinntion
lamp
2
1
Packing
2
Lamp
body
3
Rim
4
Bulb
5
Lens
6
Screw
5
BE699B
Fig
BE
IO
Side
marker
lamp
BE
7
Page 453 of 537
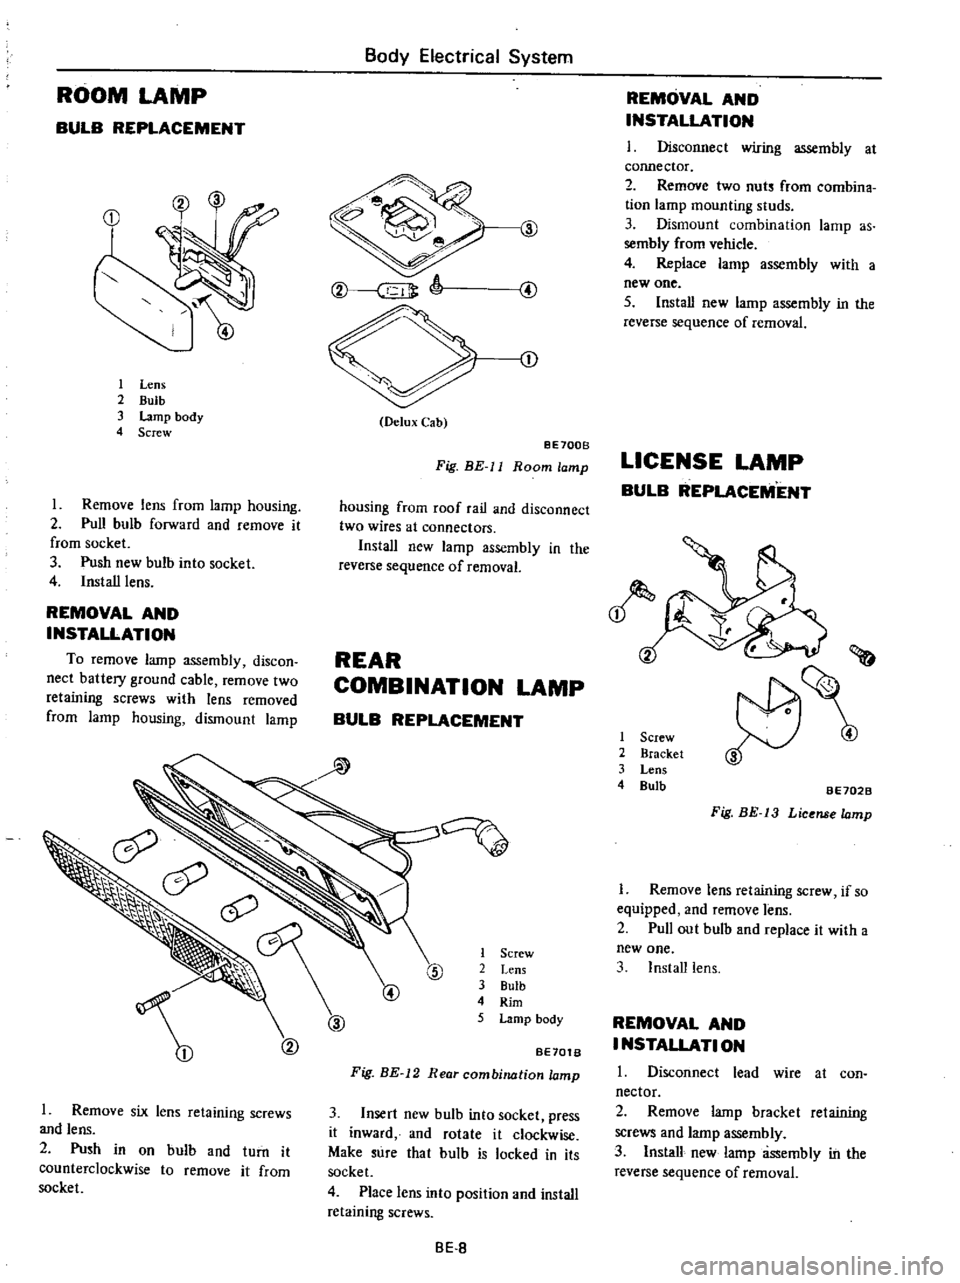
ROOM
LAMP
BULB
REPLACEMENT
1
Lens
2
Bulb
3
Lamp
body
4
Screw
Remove
lens
from
lamp
housing
2
Pull
bulb
forward
and
remove
it
from
socket
3
Push
new
bulb
into
socket
4
Install
lens
REMOVAL
AND
INSTALLATION
To
remove
lamp
assembly
discon
nect
battery
ground
cable
remove
two
retaining
screws
with
lens
removed
from
lamp
housing
dismount
lamp
1
Remove
six
lens
retaining
screws
and
lens
2
Push
in
on
bulb
and
turn
it
counterclockwise
to
remove
it
from
socket
Body
Electrical
System
J
CD
O
lux
Cab
8E700B
Fig
HE
ll
Room
lamp
housing
from
roof
rail
and
disconnect
two
wires
at
connectors
Install
new
lamp
assembly
in
the
reverse
sequence
of
removal
REAR
COMBINATION
LAMP
BULB
REPLACEMENT
1
Screw
2
Lens
3
Bulb
4
Rim
5
Lamp
body
@
BE70tB
Fig
BE
12
Rear
combination
lamp
3
Insert
new
bulb
into
socket
press
it
inward
and
rotate
it
clockwise
Make
sure
that
bulb
is
locked
in
its
socket
4
Place
lens
into
position
and
install
retaining
screws
8E
8
REMOVAL
AND
INSTALLATION
I
Disconnect
wiring
assembly
at
cormector
2
Remove
two
nuts
from
combina
tion
lamp
mounting
studs
3
Dismount
combination
lamp
as
sembly
from
vehicle
4
Replace
lamp
assembly
with
a
new
one
5
Install
new
lamp
assembly
in
the
reverse
sequence
of
removal
LICENSE
LAMP
BULB
REPLACEMENT
1
Screw
2
Bracket
3
Lens
4
Bulb
i
J
BE702B
Fig
HE
13
License
Iomp
1
Remove
lens
retaining
screw
if
so
equipped
and
remove
lens
2
Pull
out
bulb
and
replace
it
with
a
new
one
3
Install
lens
REMOVAL
AND
I
NSTALlATI
ON
1
Disconnect
lead
wire
at
con
nector
2
Remove
lamp
bracket
retaining
screws
and
lamp
assembly
3
Install
new
lamp
assembly
in
the
reverse
sequence
of
removal