radiator DATSUN PICK-UP 1977 Owner's Manual
[x] Cancel search | Manufacturer: DATSUN, Model Year: 1977, Model line: PICK-UP, Model: DATSUN PICK-UP 1977Pages: 537, PDF Size: 35.48 MB
Page 451 of 537

To
adjust
vertical
aim
use
adjusting
screw
on
upper
side
of
headlamp
and
to
adjust
horizontal
aim
use
adjusting
screw
on
side
of
head
lamp
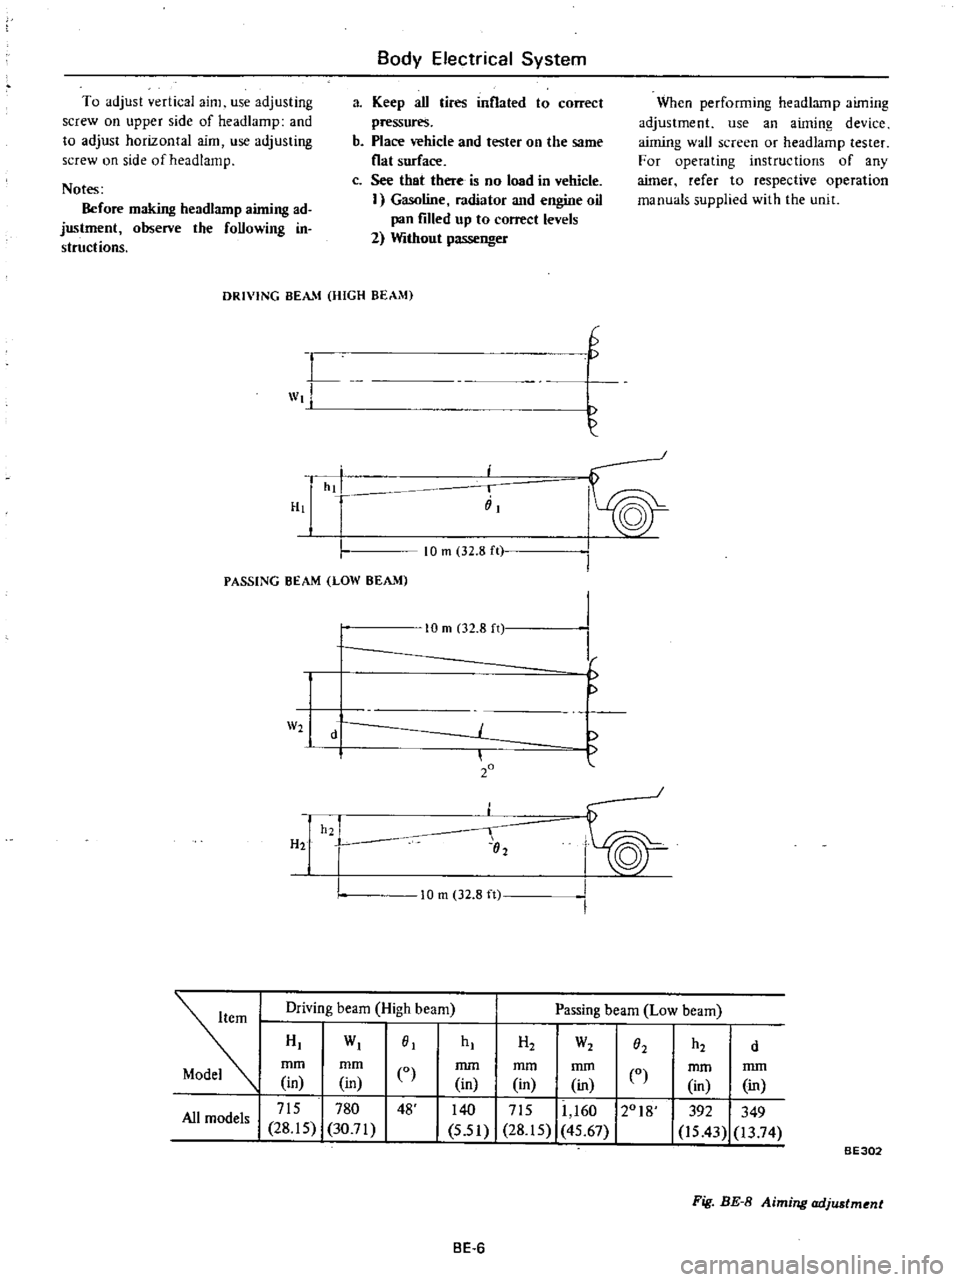
Notes
Before
making
headlarnp
aiming
ad
justment
observe
the
foUowing
in
structions
Body
Electrical
System
a
Keep
aU
tires
inflated
to
correct
pressures
b
Place
vehicle
and
tester
on
the
same
flat
surface
c
See
that
there
is
no
load
in
vehicle
I
Gasoline
radiator
and
engine
oil
pan
filled
up
to
correct
levels
2
Without
passenger
When
performing
headlamp
aiming
adjustment
use
an
aiming
device
aiming
wall
screen
or
headlamp
tester
For
operating
instructions
of
any
aimer
refer
to
respective
operation
manuals
supplied
with
the
unit
DRIVING
BEAM
HIGH
BEAM
L
wt
H
G
hi
i
iiI
PASSING
BEAM
LOW
BEAM
10
m
32
8
ft
W2
H2
10
m
02
8
n
d
20
h2
I
02
I
I
f
10
m
32
8
ft
Driving
beam
High
beam
Passing
beam
Low
beam
HI
WI
01
mm
mm
CO
in
in
I
715
780
48
All
models
28
15
30
71
hI
H2
W2
h2
O2
d
mm
mm
mm
in
in
in
0
140
I
715
11
160
12018
5
51
28
15
45
67
mm
mm
in
in
392
349
is
43
13
74
BE302
Fig
BE
8
Aiming
adjustment
BE
6
Page 491 of 537

OUTLINE
OF
AIR
CONDITIONER
REFRIGERATION
SYSTEM
CONDENSER
COMPRESSOR
RECEIVER
DRYER
COOLING
UNIT
ELECTRICAL
CIRCUIT
OUTLINE
OF
AIR
CONDITIONER
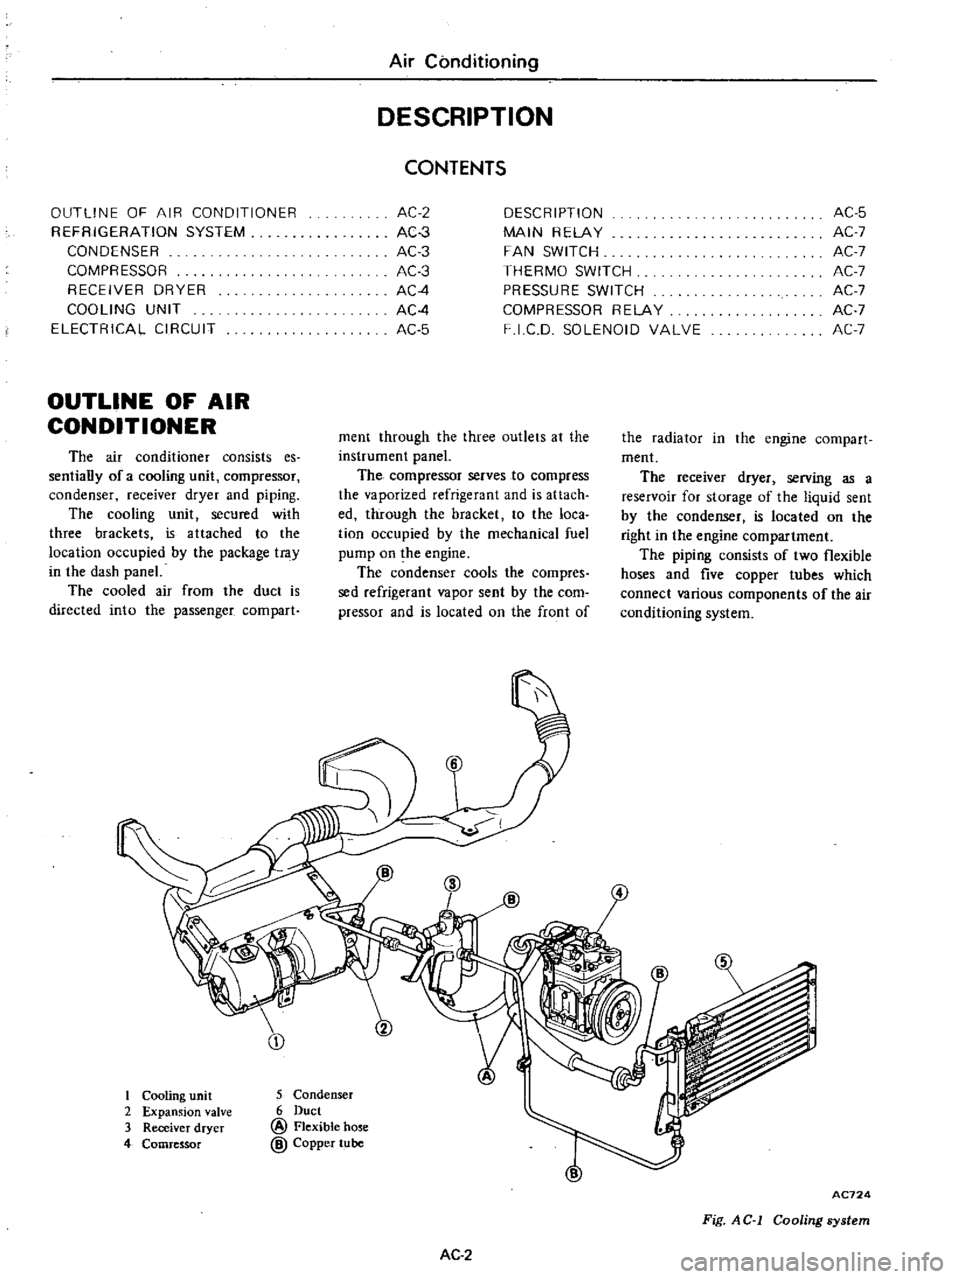
The
air
conditioner
consists
es
sentially
of
a
cooling
unit
compressor
condenser
receiver
dryer
and
piping
The
cooling
unit
secured
with
three
brackets
is
a
ttached
to
the
location
occupied
by
the
package
tray
in
the
dash
panel
The
cooled
air
from
the
duct
is
directed
into
the
passenger
compart
Air
Conditioning
DESCRIPTION
CONTENTS
AC
2
AC3
AC
3
AC3
AC4
AC4
AC
5
DESCRIPTION
MAIN
RELAY
FAN
SWITCH
THERMO
SWITCH
PRESSURE
SWITCH
COMPRESSOR
RELAY
F
I
C
D
SOLENOID
VALVE
AC
5
AC
7
AC
7
AC
7
AC
7
AC
7
AC
7
ment
through
the
three
outlets
at
the
instrument
panel
The
compressor
serves
to
compress
the
vaporized
refrigerant
and
is
attach
ed
through
the
bracket
to
the
loca
tion
occupied
by
the
mechanical
fuel
pump
on
the
engine
The
condenser
cools
the
compres
sed
refrigerant
vapor
sent
by
the
com
pressor
and
is
located
on
the
front
of
the
radiator
in
the
engine
compart
ment
The
receiver
dryer
serving
as
a
reservoir
for
storage
of
the
liquid
sent
by
the
condenser
is
located
on
the
right
in
the
engine
compartment
The
piping
consists
of
two
flexible
hoses
and
five
copper
tubes
which
connect
various
components
of
the
air
conditioning
system
I
Cooling
unit
2
Expansion
valve
3
Receiver
dryer
4
Comressor
5
Condenser
6
Duct
@
Flexible
hose
@
Copper
tube
AC
2
AC724
Fig
AC
1
Cooling
system
Page 492 of 537

REFRIGERATION
SYSTEM
If
you
were
to
paint
your
finger
with
alcohol
your
finger
would
feel
cold
This
is
because
the
liquid
alcohol
takes
heat
away
from
your
finger
while
it
evaporates
If
a
quickly
evapo
rating
liquid
such
as
alcoliol
is
placed
in
a
container
inside
a
box
the
tem
f
Outside
air
U
Condenser
J6G1
i
i
1
1
t1
1
ilill
I
I
J
JJ
LlJ
i
l
7
U
Receiver
dryer
h
w
t
CONDENSER
The
condenser
is
installed
to
the
front
of
the
radiator
The
heated
and
compressed
refrigerant
gas
from
the
Air
Conditioning
perature
inside
the
box
will
drop
This
is
because
the
alcohol
is
evaporated
absorbing
the
heat
from
the
air
insidc
the
box
If
the
gaseous
alcohol
is
collected
and
cooled
with
cold
water
it
will
be
changed
back
into
a
liquid
by
absorption
of
its
heat
by
the
cold
water
The
cooler
operates
on
this
princi
Compressor
t
q
ttLJ
IrJ
Evaporator
It
J
1
J
f
9
d
lUr
I
Expansion
valve
V7777
J
High
pressure
lLLLLL
l
gas
I
I
High
pressure
liquid
t
u
compressor
condenses
to
a
liquid
by
being
cooled
by
air
passing
between
the
fins
of
the
condenser
1
GJ
7
vlmnn
iii
plI
d1i
1il
Ac459
Fig
AC
3
Condenser
AC3
pIe
The
liquid
used
is
the
refrigerant
R
12
The
heat
inside
the
passenger
compartment
is
absorbed
by
changing
the
refrigerant
from
a
liquid
to
a
gas
and
then
dissipated
to
the
outside
by
changing
the
refrigerant
from
a
gas
back
to
a
liquid
The
refrigeration
system
is
shown
in
Figure
AC
2
Low
pressurt
liquid
1
I
L2
Low
pressure
gas
Inside
air
li
r
L
Blower
motor
AC458
Fig
AC
2
Refrigeration
cycle
COMPRESSOR
The
compressor
is
installed
to
the
side
of
the
engine
and
is
driven
by
crank
pulley
through
a
belt
The
refrig
erant
gas
leaving
the
evaporator
is
forced
out
to
the
condenser
by
com
pressor
and
the
low
pressure
refrig
erant
gas
is
compressed
to
a
high
pressure
and
high
temperature
The
driving
force
is
transmitted
by
an
electrical
clutch
Because
engine
rpm
is
very
low
during
idling
the
clutch
will
not
transmit
the
driving
force
thus
ensuring
smooth
engine
idling
Page 518 of 537

INSPECTION
Evaporator
Check
evaporator
for
leakage
or
damage
If
damaged
replace
Expansion
valve
Check
expansion
valve
for
leakage
or
clogging
If
clogged
clean
filter
in
expansion
valve
If
damaged
replace
RECEIVER
DRYER
AND
PIPING
REMOVAL
AND
INSTAUATION
Receiver
dryer
I
Disconnect
battery
ground
cable
2
Discharge
system
Refer
to
Dis
charging
System
under
General
Service
section
3
Disconnect
compressor
lead
wire
at
connector
4
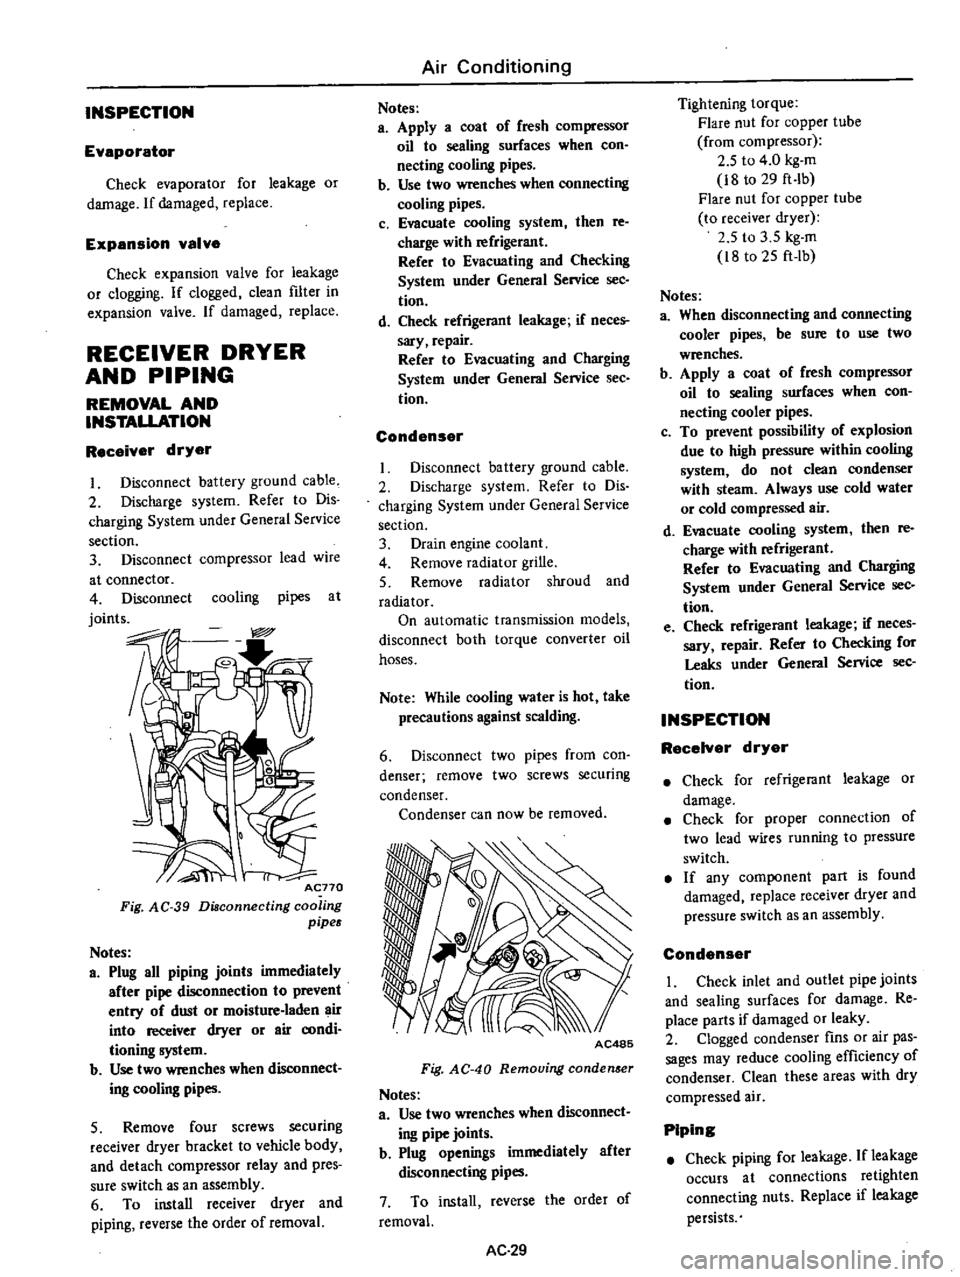
Disconnect
cooling
pipes
at
joints
Acno
Fig
AC
39
Diaconnecting
coo
ing
pipes
Notes
a
Plug
all
piping
joints
immediately
after
pipe
disconnection
to
prevent
entry
of
dust
or
moisture
laden
air
into
receiver
dryer
or
air
aJOdi
tioning
system
b
Use
two
wrenches
when
dIsconnect
ing
cooling
pipes
5
Remove
four
screws
securing
receiver
dryer
bracket
to
vehicle
body
and
detach
compressor
relay
and
pres
sure
switch
as
an
assembly
6
To
install
receiver
dryer
and
piping
reverse
the
order
of
removal
Air
Conditioning
Notes
a
Apply
a
coat
of
fresh
compressor
oil
to
sealing
surfaces
when
con
necting
cooling
pipes
b
Use
two
wrenches
when
connecting
cooling
pipes
c
Evacuate
cooling
system
then
re
charge
with
refrigerant
Refer
to
Evacuating
and
Checking
System
under
General
Service
sec
tion
d
Check
refrigerant
leakage
if
neces
sary
repair
Refer
to
Evacuating
and
Charging
System
under
General
Service
See
tion
Condenser
Disconnect
battery
ground
cable
2
Discharge
system
Refer
to
Dis
charging
System
under
General
Service
section
3
Drain
engine
coolant
4
Remove
radiator
grille
5
Remove
radiator
shroud
and
radiator
On
automatic
transmission
models
disconnect
both
torque
converter
oil
hoses
Note
While
cooling
water
is
hot
take
precautions
against
scalding
6
Disconnect
two
pipes
from
con
denser
remove
two
screws
securing
condenser
Condenser
can
now
be
removed
AC485
Fig
AC
40
Removing
conden
er
Notes
a
Use
two
wrenches
when
disconnect
ing
pipe
joints
b
Plug
openings
immediately
after
disconnecting
pipes
7
To
install
reverse
the
order
of
removal
AC
29
Tightening
torque
Flare
nut
for
copper
tube
from
compressor
2
5
to
4
0
kg
m
i8
to
29
ft
Ib
Flare
nut
for
copper
tube
to
receiver
dryer
2
5
to
3
5
kg
m
i8
to
25
ft
lb
Notes
a
When
disconnecting
and
connecting
cooler
pipes
be
sure
to
use
two
wrenches
b
Apply
a
coat
of
fresh
compressor
oil
to
sealing
surfaces
when
con
necting
cooler
pipes
c
To
prevent
possibility
of
explosion
due
to
high
pressure
within
cooling
system
do
not
clean
condenser
with
steam
Always
use
cold
water
or
cold
compressed
air
d
Evacuate
cooling
system
then
re
charge
with
refrigerant
Refer
to
Evacuating
and
Charging
System
under
General
Service
sec
tion
e
Check
refrigerant
leakage
if
neces
sary
repair
Refer
to
Checking
for
Leaks
under
General
Service
sec
tion
INSPECTION
RecelYer
dryer
Check
for
refrigerant
leakage
or
damage
Check
for
proper
connection
of
two
lead
wires
running
to
pressure
switch
If
any
component
part
is
found
damaged
replace
receiver
dryer
and
pressure
switch
as
an
assembly
Condenser
I
Check
inlet
and
outlet
pipe
joints
and
sealing
surfaces
for
damage
Re
place
parts
if
damaged
or
leaky
2
Clogged
condenser
fins
or
air
pas
sages
may
reduce
cooling
efficiency
of
condenser
Clean
these
areas
with
dry
compressed
air
Piping
Check
piping
for
leakage
If
leakage
occurs
at
connections
retighten
connecting
nuts
Replace
if
leakage
persists