fuel DATSUN PICK-UP 1977 Manual Online
[x] Cancel search | Manufacturer: DATSUN, Model Year: 1977, Model line: PICK-UP, Model: DATSUN PICK-UP 1977Pages: 537, PDF Size: 35.48 MB
Page 423 of 537

Engine
Control
Fuel
Exhaust
Systems
REMOVAL
Non
California
models
I
Remove
exhaust
tube
U
bolt
clamp
2
Break
sealant
off
at
front
tube
to
main
muffler
connectio
n
3
Remove
rear
tube
mounting
bolt
and
remove
muffler
assembly
with
rear
tube
4
Remove
front
tube
heat
insulator
5
Remove
nuts
securing
front
tube
to
exhaust
manifold
and
remove
front
tube
mounting
bolts
Then
detach
front
tube
When
disconnecting
the
exhaust
tube
connections
pay
attention
to
the
following
point
I
Break
old
se
lant
off
at
t
1e
connection
by
lightly
tapping
around
the
tube
witlJ
a
hammer
and
twisting
muffler
See
Figures
FE
7
and
FE
8
2
Using
a
rubber
hammer
tap
on
the
front
end
of
muffler
while
pushing
it
toward
rear
The
mumer
assembly
can
then
be
taken
out
See
Figure
FE
9
FE187
Fig
FE
7
Breaking
Bealant
FEl88
Fig
FE
8
Twisting
muffler
ijl
4
FE189
Fig
FE
9
Tapping
muffler
with
Q
rubber
hammer
California
models
I
Remove
all
heat
insulators
2
Remove
exhaust
tube
U
bolt
clamp
3
Break
sealant
off
at
center
tube
to
main
muffler
connection
4
Remove
rear
tube
mounting
bolt
and
remove
muffler
assembly
with
rear
tube
5
Remove
bolts
securing
catalytic
converter
to
center
tube
and
remove
center
tube
mounting
bolts
Then
detach
center
tube
6
Remove
bolts
and
nuts
securing
catalytic
converter
to
front
tube
and
detach
catalytic
converter
7
Remove
nuts
securing
front
tube
to
exhaust
manifold
and
remove
front
tube
mounting
bolts
Then
detach
front
tube
INSPECTION
I
Check
muffler
and
tubes
for
cracks
Qr
damage
Replace
any
part
that
is
damaged
beyond
limits
2
Replace
bracket
and
mounting
insulator
that
are
cracked
fatigued
or
sweated
FE
8
INSTALLATION
Install
the
exhaust
system
assembly
in
reverse
order
of
removal
Observe
the
following
Notes
a
Insert
front
tube
until
it
touches
emboss
b
When
there
is
110
clearance
between
front
tube
and
floor
or
propeUer
shaft
turn
tube
along
center
line
of
tube
in
the
manifold
connecting
unit
and
obtain
proper
clearance
c
Check
all
tube
connections
for
ex
haust
gas
leaks
and
entire
system
for
unusual
noises
with
engine
running
d
After
installation
check
that
mounting
brackets
and
mounting
rubbers
are
free
from
undue
stress
If
any
of
the
above
parts
is
not
installed
properly
excessive
noises
or
vibrations
may
be
transmitted
to
the
vehicle
body
e
Tightening
torque
Exhaust
manifold
to
front
tube
nut
1
9
to
2
5
kg
m
14
to
18
ft
lb
U
bolt
securing
nut
1
9
to
2
1
kg
m
14
to
15
ft
lb
Mounting
bracket
bolt
1
0
to
1
2
kg
m
710
9
ft
lb
Front
tube
mounting
bracket
bolt
california
models
1
9
to
2
1
kg
m
14
to
15
ft
lb
Catalytic
converter
to
front
and
center
tube
bolt
California
models
3
2
to
4
3
kg
m
23
to
31
ft
Ib
If
exhaust
tubes
are
separated
at
connection
t
renew
muffler
assembly
etc
use
the
Genuine
Nissan
Sealant
Exhaust
Sealant
Kit
20720
N2225
or
equivalent
See
Figure
FE
IO
to
eliminate
gas
leakage
at
the
joint
Be
sure
to
observe
the
following
Page 424 of 537

Engine
Control
Fuel
Exhaust
Systems
I
Wipe
clean
all
the
contact
por
tions
of
tube
joints
allow
them
to
dry
thoroughly
2
Temporarily
mount
in
place
muffler
assembly
as
an
assembled
unit
on
the
vehicle
3
Insert
front
tube
until
it
touches
emboss
m
b
nlfrnnjj
mm
lJ
Ij
@L
J
FE263
Fig
FE
ll
Exhawt
tube
connection
4
Torque
nut
securing
the
male
and
female
tubes
at
the
connection
Tightening
torque
is
1
6
to
2
0
kg
m
12
to
14
ft
lb
5
Squeeze
approximately
5
CC
0
31
cu
in
of
sealant
into
injection
from
sealant
tube
See
Figure
FE
12
Sealant
tube
polyethylene
Injector
Fig
FE
IO
Exhaust
sealant
kit
Be
sure
to
place
cap
back
to
sealant
tube
since
sealant
will
dry
Approximately
5
cc
0
31
Cll
in
FE1l1
Fig
FE
12
Squeezing
sealant
to
injec
tor
6
Position
nozzle
of
injector
to
the
guide
and
press
it
there
firmly
Inject
sealant
slowly
until
sealant
begins
to
flow
out
of
the
slit
of
tube
This
indicates
that
the
bead
requires
no
further
sealant
Excessive
sealant
can
cause
a
clogged
tube
See
Figure
FE
13
After
injecting
wash
injector
thoroughly
in
clean
water
to
remove
all
traces
of
sealant
FE191
Fig
FE
13
Injecting
sealant
FE
9
7
Start
engine
and
let
it
idle
slowly
for
ten
minutes
minimum
to
hilfden
sealant
with
the
heat
of
exhaust
gas
8
Check
the
condition
of
sealant
before
driving
the
vehicle
It
is
also
essential
that
the
vehicle
should
not
be
accelerated
sharply
for
20
to
30
minutes
subsequent
to
this
operation
Noles
a
The
sealant
should
be
used
within
guaranty
term
indicated
on
the
kit
case
b
Exposure
of
sealant
to
the
skin
may
cause
a
rash
Wash
sealant
off
the
skin
with
water
c
Do
not
keep
the
sealant
tube
in
a
place
where
the
ambient
tempera
ture
is
above
400C
I040F
A
sealant
hardened
above
4QoC
I040F
cannot
be
used
The
most
suitable
storage
temperature
is
from
15
to
350C
59
to
950F
If
sealant
becomes
hardened
because
of
low
temperatures
wann
the
sealant
tube
with
lukewarm
water
until
the
sealant
is
softened
Do
not
warm
tube
at
a
temperature
over
400C
1040F
for
a
long
time
d
Thoroughly
read
the
instruction
sheet
furnished
with
the
kit
before
using
the
sealant
i
Page 428 of 537
CAB
BODY
Body
Frame
Ist
mounting
2nd
mounting
1
Bolt
2
Plain
washer
3
Rubber
washer
4
Upper
rubber
5
Bottom
rubber
6
Plain
w
er
7
Upper
washer
8
Lower
washer
1st
mounting
REMOVAL
AND
INSTALLATION
Remove
battery
from
engine
compartment
2
Disconnect
oil
cooler
hoses
from
radiator
automatic
transmission
model
only
3
Disconnect
air
conditioner
tubes
from
condenser
if
so
equipped
4
Drain
water
from
cooling
system
completely
and
remove
radiator
and
condenser
if
so
equipped
5
Remove
engine
hood
from
hood
hinges
after
scribing
hood
for
rein
stallation
6
Remove
bumper
stay
from
frame
and
remove
front
bumper
7
Remove
radiator
grille
8
With
the
aid
of
Steering
Wheel
Puller
ST27
180001
remove
steering
wheel
from
steering
shaft
9
Remove
steering
gear
arm
from
steering
sector
shaft
using
suitable
puller
10
Remove
screws
securing
steering
shaft
dust
seat
and
insulator
in
posi
tion
2nd
mounting
3rd
mounting
II
Remove
steering
gear
housing
from
frame
and
pull
it
out
into
engine
compartment
12
Disconnect
speedometer
cable
at
transmission
1
3
Disconnect
carbon
canister
hoses
between
canister
to
vacuum
gallery
and
canister
to
intake
manifold
at
canister
14
Disconnect
air
pump
to
air
pump
air
cleaner
hose
at
air
cleaner
15
Disconnect
air
conditioner
hoses
from
compressor
if
so
equipped
16
Disconnect
air
cleaner
duct
from
body
17
Disconnect
Master
Vac
vacuum
hose
at
intake
manifold
18
Remove
snap
ring
and
control
lever
pin
from
transmission
striking
guide
and
remove
control
lever
19
Disconnect
fuel
hoses
at
fuel
strainer
20
Disconnect
fuel
return
hose
and
evaporation
hose
at
connectors
21
Disconnect
brake
and
clutch
tubes
from
each
master
cylinder
22
Remove
all
clips
securing
fuel
tubes
brake
tubes
and
clutch
tube
at
cab
body
BF
4
BF472A
Unit
mm
in
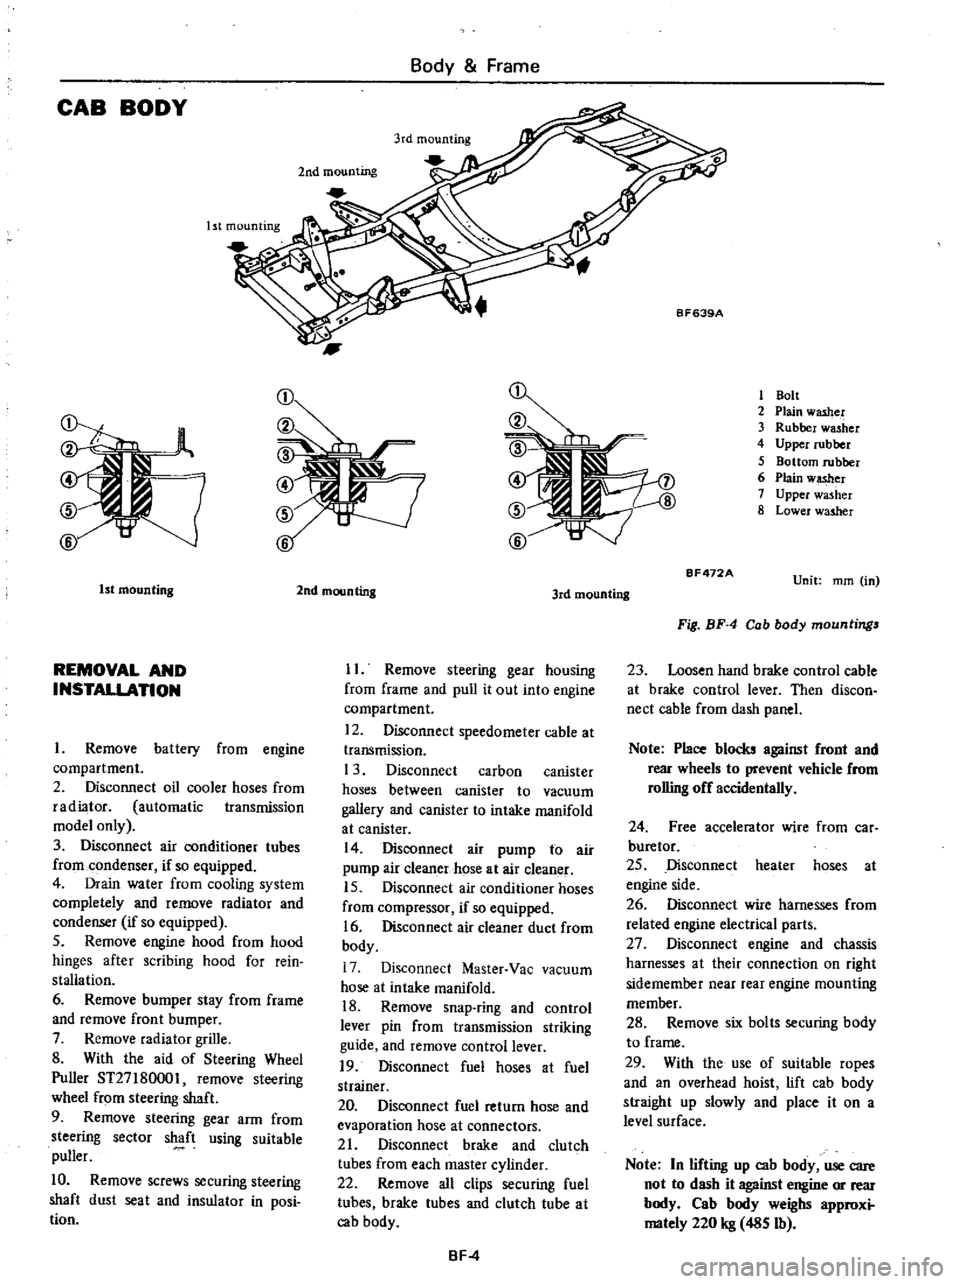
Fig
BF
4
Cab
body
mountings
23
Loosen
hand
brake
control
cable
at
brake
control
lever
Then
discon
nect
cable
from
dash
panel
Note
Place
blocks
against
front
and
rear
wheels
to
prevent
vehicle
from
rolling
off
accidentally
24
Free
accelerator
wire
from
car
buretor
25
Disconnect
heater
hoses
at
engine
side
26
Disconnect
wire
harnesses
from
related
engine
electrical
parts
27
Disconnect
engine
and
chassis
harnesses
at
their
connection
on
right
sidemember
near
rear
engine
mounting
member
28
Remove
six
bolts
securing
body
to
frame
29
With
the
use
of
suitable
ropes
and
an
overhead
hoist
lift
cab
body
straight
up
slowly
and
place
it
on
a
level
surface
Note
In
lifting
up
cab
body
use
care
not
to
dash
it
against
engine
or
rear
body
Cab
body
weighs
approxi
mately
220
kg
485
Ib
Page 429 of 537
Body
Frame
30
For
installation
reverse
above
steps
However
observe
the
following
instructions
i
If
the
cab
body
is
to
be
replaced
note
position
and
location
of
insula
tors
and
washers
used
See
Figure
BF
4
2
Adjust
hand
brake
stroke
pro
perly
3
Air
bleed
brake
and
clutch
system
thorougWy
Cab
body
to
frame
mounting
bolt
torque
1
6
to
2
2
kg
m
12
to
16
ft
Ib
o
i
k
q
1Q
j
b
crru
V
J
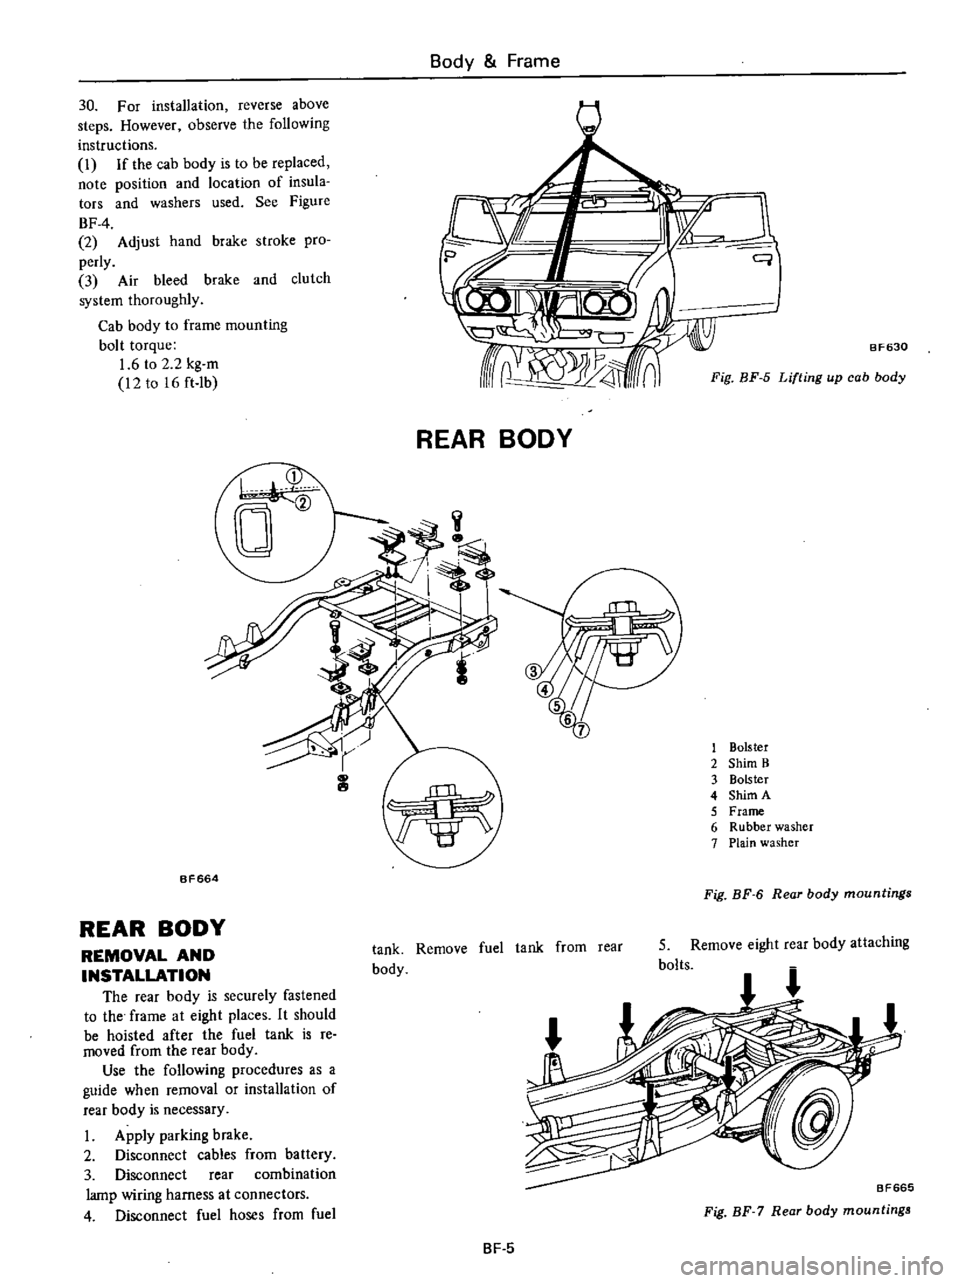
8F630
rr
1
4
n
Fig
BF
5
Lifting
up
cab
body
REAR
BODY
1
Bolster
2
Shim
B
3
Bolster
4
Shim
A
5
Frame
6
Rubber
washer
7
Plain
washer
BF664
Fig
BF
6
Rear
body
mountings
REAR
BODY
REMOVAL
AND
INSTALLATION
The
rear
body
is
securely
fastened
to
the
frame
at
eight
places
It
should
be
hoisted
after
the
fuel
tank
is
re
moved
from
the
rear
body
Use
the
following
procedures
as
a
guide
when
removal
or
installation
of
rear
body
is
necessary
I
Apply
parking
brake
2
Disconnect
cables
from
battery
3
Disconnect
rear
combination
lamp
wiring
harness
at
connectors
4
Disconnect
fuel
hoses
from
fuel
tank
Remove
fuel
tank
from
rear
body
5
Remove
eight
rear
body
attaching
bolts
BF665
Fig
BF
7
Rear
body
mountings
BF
5
Page 459 of 537

Body
Electrical
System
METERS
AND
GAUGES
COMBINATION
METER
COMBINATION
METER
CIRCUIT
DIAGRAM
REMOVAL
AND
INSTALLATION
SPEEDOMETER
REMOVAL
AND
INSTALLATION
ODOMETER
SWITCH
REMOVAL
AND
INSTALLATION
FUEL
GAUGE
AND
WATER
TEMPERATURE
GAUGE
DESCRIPTION
REMOVAL
AND
INSTALLATION
OIL
PRESSURE
WARNING
LAMP
DESCRIPTION
01
L
PRESSURE
SWITCH
COMBINATION
METER
COMBINATION
METER
CIRCUIT
DIAGRAM
@
BE6828
CONTENTS
BE
14
BE
14
BE
16
BE
16
BE
16
BE
16
8E
16
BE
16
BE
16
BE
16
8E
17
BE
17
BE
17
Turn
signal
indicator
lamp
L
H
OIL
0
BEAM
BE
14
Meter
illumination
lamps
M
T
only
9
9
Turn
sq
nal
indicator
lamp
lL
J
R
H
Tj
O
iJ
I
l
g
r
i
o
I
l8
J
CHARGE
WARNING
LAMP
DESCRIPTION
HAND
BRAKE
WARNING
LAMP
DESCRIPTION
HAND
BRAKE
SWITCH
METER
ILLUMINATION
INDICATOR
AND
WARNING
BULBS
REMOVAL
AND
INSTALLATION
8ULB
SPECIFICATIONS
TROUBLE
DIAGNOSES
AND
CORRECTIONS
SPEEDOMETER
WATER
TEMPERATURE
AND
FUEL
GAUGES
OIL
PRESSURE
AND
CHARGE
WARNING
LAMPS
Voltage
regulator
TEMP
FUEL
CHG
0
BRK
C
I
Speedometer
2
Thermometer
3
Fuel
meter
4
Tachometer
Option
5
Cluster
lid
6
Speedometer
cable
7
Speed
switch
amplifier
Manual
transmission
only
BE
17
BE
17
BE
18
BE
18
8E
18
8E
18
BE
18
BE
18
BE
18
BE
18
BE
19
BE
20
Q
Speed
switch
BE856A
Fig
BE
21
Ci1
Cuit
diagram
of
combination
meter
Page 460 of 537

Body
Electrical
System
Circuit
diagram
of
combination
meter
system
BATTERY
r
G
0
J
J
Z2
lIa
I
LlJ
I
Z
J
Z
a
z
J
z
Z
i
g
o
a
I
LlJ
I
ll
B
S
M
D
LIGHT
i
i
RELAY
i2i
mm
S
FROM
J
e
AMP
l1
l1
J
J
00
LlJLlJ
z
z
B
COO
CUT
n
SOLENOID
i
OIL
f
PRESSURE
SWITCH
THERMAL
a
TRANSMITTER
I
FUSIBLE
r
LINK
IGNITION
SWITCH
0
1
lOA
I
g
KG
lOA
r
I
15A
t
15A
i
7
5a
z
u
a
a
I
04LlJ
l1
J
o
02
u
3
FUEL
TANK
J
VOLTAGE
REGULATOR
HAND
BRAKE
SWITCH
J
Jon
0
j
Z
a
l
I
I
I
l
ll
Z
ll
Z
LlJ
LlJ
J
a
J
a
I
I
I
I
1
1
Zza
a
00
a
a
LlJLlJ
ll
ll
a
a
HAZARD
FLASHER
UNIT
L
J
HAZAR
D
SWITCH
I
OFF
ONI
l
I
I
I
2
I
I
3
I
14
61
I
5
6
16
9
I
76
I
FLASHER
UNIT
CJ
TO
LIGHT
IOFF
RELAY
B
l
TERMINAL
I
I
I
LIGHT
SWITCH
21
X
X
BEB57
A
Fig
BE
22
Circuit
diagram
of
combination
meter
ayatt
m
TURN
SIGNAL
SWITCH
I
L
RI
lFLA
I
IR
R
I
IR
L
I
IF
R
u
I
IF
L
u
I
FROM
L1GHT
RELAY
DIMMER
SWITCH
BE
15
Page 461 of 537
REMOVAL
AND
INSTALLATION
I
Disconnect
battery
ground
cable
2
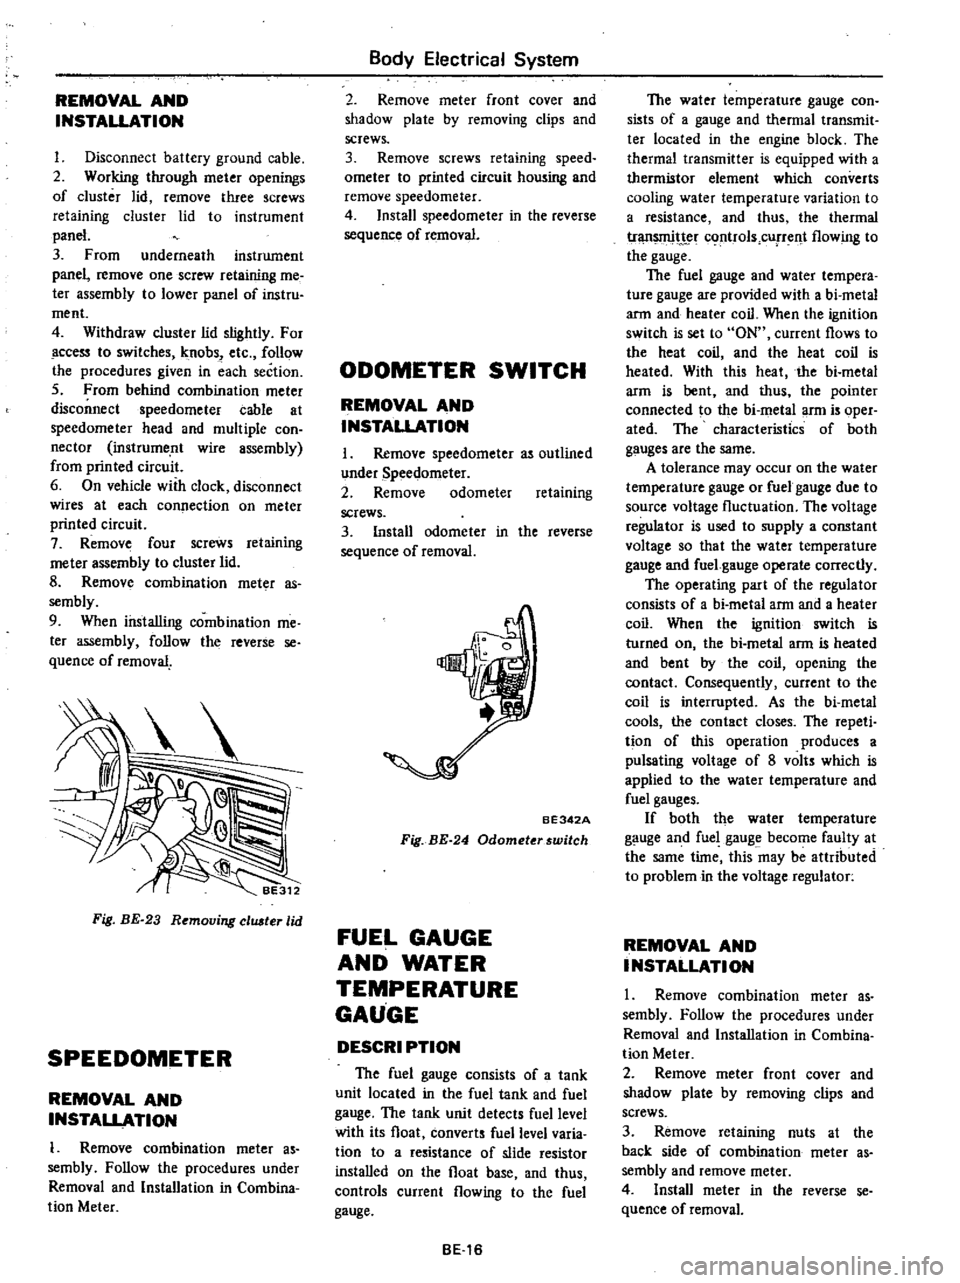
Working
through
meter
openings
of
cluster
lid
remove
three
screws
retaining
cluster
lid
to
instrument
panel
3
From
underneath
instrument
panel
remove
one
screw
retaining
me
ter
assembly
to
lower
panel
of
instru
ment
4
Withdraw
cluster
lid
slightly
For
ccess
to
switches
knobs
etc
follow
the
procedures
given
in
each
section
5
From
behind
combination
meter
disconnect
speedometer
cable
at
speedometer
head
and
multiple
con
nector
instrume
nt
wire
assembly
from
printed
circuit
6
On
vehicle
with
clock
disconnect
wires
at
each
connection
on
meter
printed
circuit
7
Remove
four
screws
retaining
me
ter
assembly
to
cluster
lid
8
Remov
combination
meter
as
sembly
9
When
installing
combination
me
ter
assembly
follow
the
reverse
se
quence
of
removal
Fig
BE
23
Removing
eluster
lid
SPEEDOMETER
REMOVAL
AND
INSTALLATION
1
Remove
combination
meter
as
sembly
Follow
the
procedures
under
Removal
and
Installation
in
Combina
tion
Meter
Body
Electrical
System
2
Remove
meter
front
cover
and
shadow
plate
by
removing
clips
and
screws
3
Remove
screws
retaining
speed
ometer
to
printed
circuit
housing
and
remove
speedometer
4
Install
speedometer
in
the
reverse
sequence
of
removal
ODOMETER
SWITCH
REMOVAL
AND
INSTALLATION
I
Remove
speedometer
as
outlined
under
Speedometer
2
Remove
odometer
retaining
screws
3
Install
odometer
in
the
reverse
sequence
of
removal
BE342A
Fig
BE
24
Odometerswitch
FUEL
GAUGE
AND
WATER
TEMPERATURE
GAUGE
DESCRI
PTION
The
fuel
gauge
consists
of
a
tank
unit
located
in
the
fuel
tank
and
fuel
gauge
The
tank
unit
detects
fuel
level
with
its
float
converts
fuel
level
varia
tion
to
a
resistance
of
slide
resistor
installed
on
the
float
base
and
thus
controls
current
flowing
to
the
fuel
gauge
BE16
The
water
temperature
gauge
con
sists
of
a
gauge
and
thermal
transmit
ter
located
in
the
engine
block
The
thermal
transmitter
is
equipped
with
a
thermistor
element
which
converts
cooling
water
temperature
variation
to
a
resistance
and
thus
the
thermal
tr
t
c
rtrols
cUfTent
flowing
to
the
gauge
The
fuel
gauge
and
water
tempera
ture
gauge
are
provided
with
a
bi
metal
arm
and
heater
coil
When
the
ignition
switch
is
set
to
ON
current
flows
to
the
heat
coil
and
the
heat
coil
is
heated
With
this
heat
the
bi
metal
arm
is
bent
and
thus
the
pointer
connected
to
the
bi
metal
arm
is
oper
ated
The
characteristics
of
both
gauges
are
the
same
A
tolerance
may
occur
on
the
water
temperature
gauge
or
fuel
gauge
due
to
source
voltage
fluctuation
The
voltage
regulator
is
used
to
supply
a
constant
voltage
so
that
the
water
temperature
gauge
and
fuel
gauge
operate
correctly
The
operating
part
of
the
regulator
consists
of
a
bi
metal
arm
and
a
heater
coil
When
the
ignition
switch
is
turned
on
the
bi
metal
arm
is
heated
and
bent
by
the
coil
opening
the
contact
Consequently
current
to
the
coil
is
interrupted
As
the
bi
metal
cools
the
contact
closes
The
repeti
tion
of
this
operation
produces
a
pulsating
voltage
of
8
volts
which
is
applied
to
the
water
temperature
and
fuel
gauges
If
both
the
water
temperature
gauge
and
fuel
gauge
become
faulty
at
the
same
time
this
may
be
attributed
to
problem
in
the
voltage
regulator
REMOVAL
AND
INSTALLATION
1
Remove
combination
meter
as
sembly
Follow
the
procedures
under
Removal
and
Installation
in
Combina
tion
Meter
2
Remove
meter
front
cover
and
shadow
plate
by
removing
clips
and
screws
3
Remove
retaining
nuts
at
the
back
side
of
combination
meter
as
sembly
and
remove
meter
4
Install
meter
in
the
reverse
se
quence
of
removal
Page 462 of 537
Fuse
M
Body
Electrical
System
YR
Meter
voltage
regulator
Water
temperature
gauge
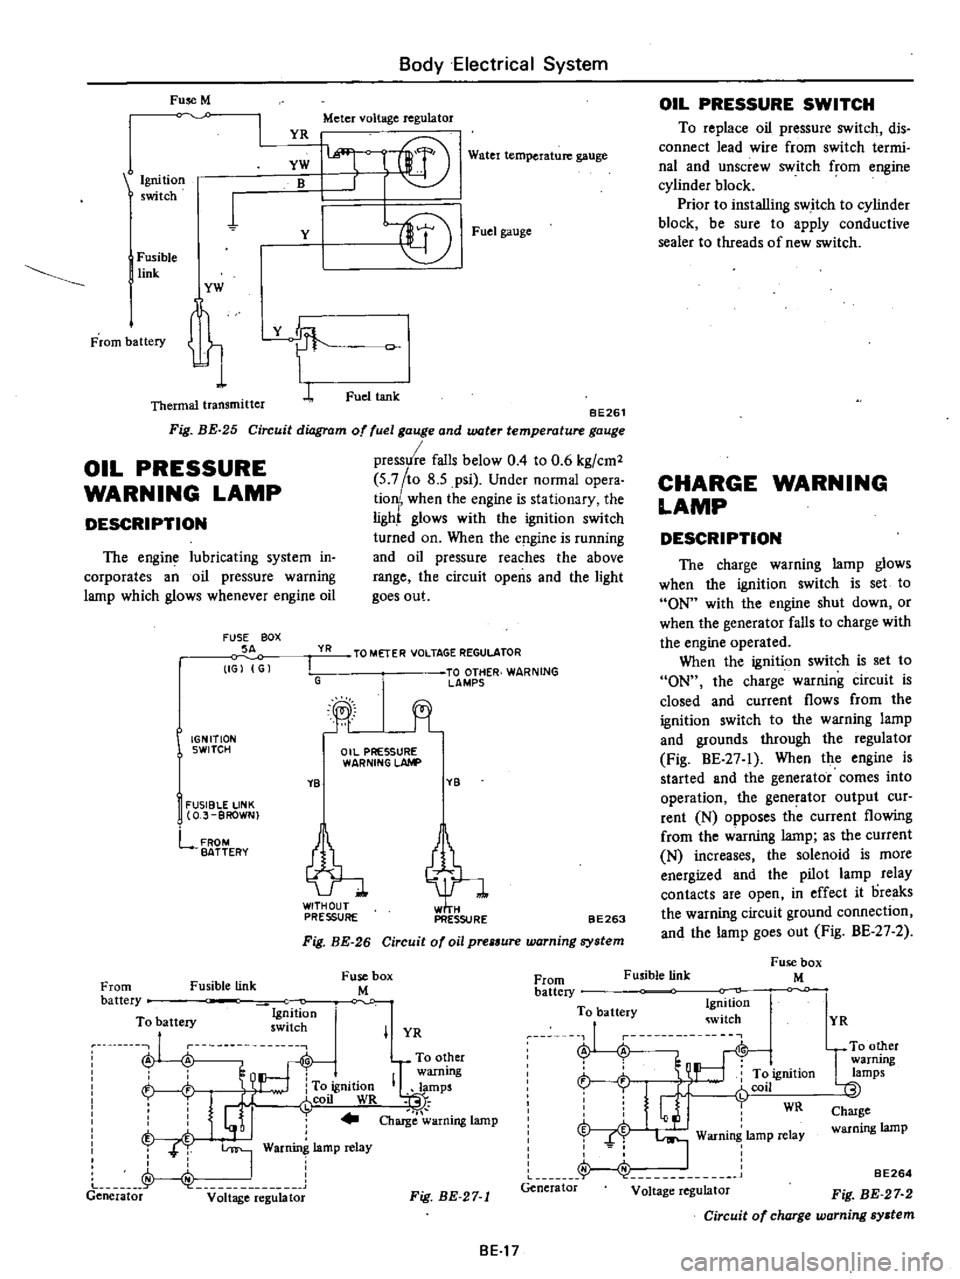
BE261
Circuit
diagram
of
fuel
gauge
and
water
temperature
gauge
pressure
falls
below
0
4
to
0
6
kg
cm2
5
7
to
8
5
psi
Under
normal
opera
tion
when
the
engine
is
stationary
the
ligh
glows
with
the
ignition
switch
turned
on
When
the
e
gine
is
running
and
oil
pressure
reaches
the
above
range
the
circuit
opens
and
the
light
goes
out
Ignition
switch
YW
B
1
Y
I
Fusible
link
YW
t
Thermal
transmitter
L
Fig
BE
25
OIL
PRESSURE
WARNING
LAMP
DESCRIPTION
The
engine
lubricating
system
in
corporates
an
oil
pressure
warning
lamp
which
glows
whenever
engine
oil
FUSE
BOX
SA
IGJ
G
YR
I
G
IGNITION
SWITCH
YB
I
FUSIBLE
LINK
O
J
BROWN
lffi
l
f
r@
Fuel
gauge
Fuel
tank
TO
METER
VOLTAGE
REGULATOR
TO
OTHER
WARNING
lAMPS
jt
Oil
PRESSURE
WARNING
LAhlP
YB
tl
PRESSURE
PRESSURE
FROM
BATTERY
BE263
Fig
BE
26
Circuit
of
oil
prelSure
warning
system
Fusible
link
Fuse
box
M
OIL
PRESSURE
SWITCH
To
replace
oil
pressure
switch
dis
connect
lead
wire
from
switch
termi
nal
and
unscrew
switch
from
engine
cylinder
block
Prior
to
installing
switch
to
cylinder
block
be
sure
to
apply
conductive
sealer
to
threads
of
new
switch
CHARGE
WARNING
LAMP
DESCRIPTION
The
charge
warning
lamp
glows
when
the
ignition
switch
is
set
to
ON
with
the
engine
shut
down
or
when
the
generator
falls
to
charge
with
the
engine
operated
When
the
ignition
switch
is
set
to
ON
the
charge
warning
circuit
is
closed
and
current
flows
from
the
ignition
switch
to
the
warning
lamp
and
grounds
through
the
regulator
Fig
BE
27
1
When
the
engine
is
started
and
the
generator
comes
into
operation
the
generator
output
cur
rent
N
opposes
th
current
flowing
from
the
warning
lamp
as
the
current
N
increases
the
solenoid
is
more
energized
and
the
pilot
lamp
relay
contacts
are
open
in
effect
it
oreaks
the
warning
circuit
ground
connection
and
the
lamp
goes
out
Fig
BE
27
2
Fusible
link
Fuse
box
M
From
battery
To
battery
Ig
ition
ru
nu
swllch
A
A
To
other
warning
h
To
ignition
IQlamps
i
J
r
coil
WR
t
I
j
Charge
warning
lamp
T
T
I
War
lamp
relay
J
I
Generator
v
it
ge
e
g
bt
From
battery
To
battery
Ignition
witch
J
i
L
r
t
ft
ignition
r
Glj
fCOil
WR
f
I
Warning
lamp
relay
Generator
Voltage
regulator
I
YR
Fig
BE
27
1
BE17
YR
UTO
other
warrung
lamps
Charge
warning
lamp
BE264
Fig
BE
27
2
Circuit
of
charge
warning
system
Page 464 of 537
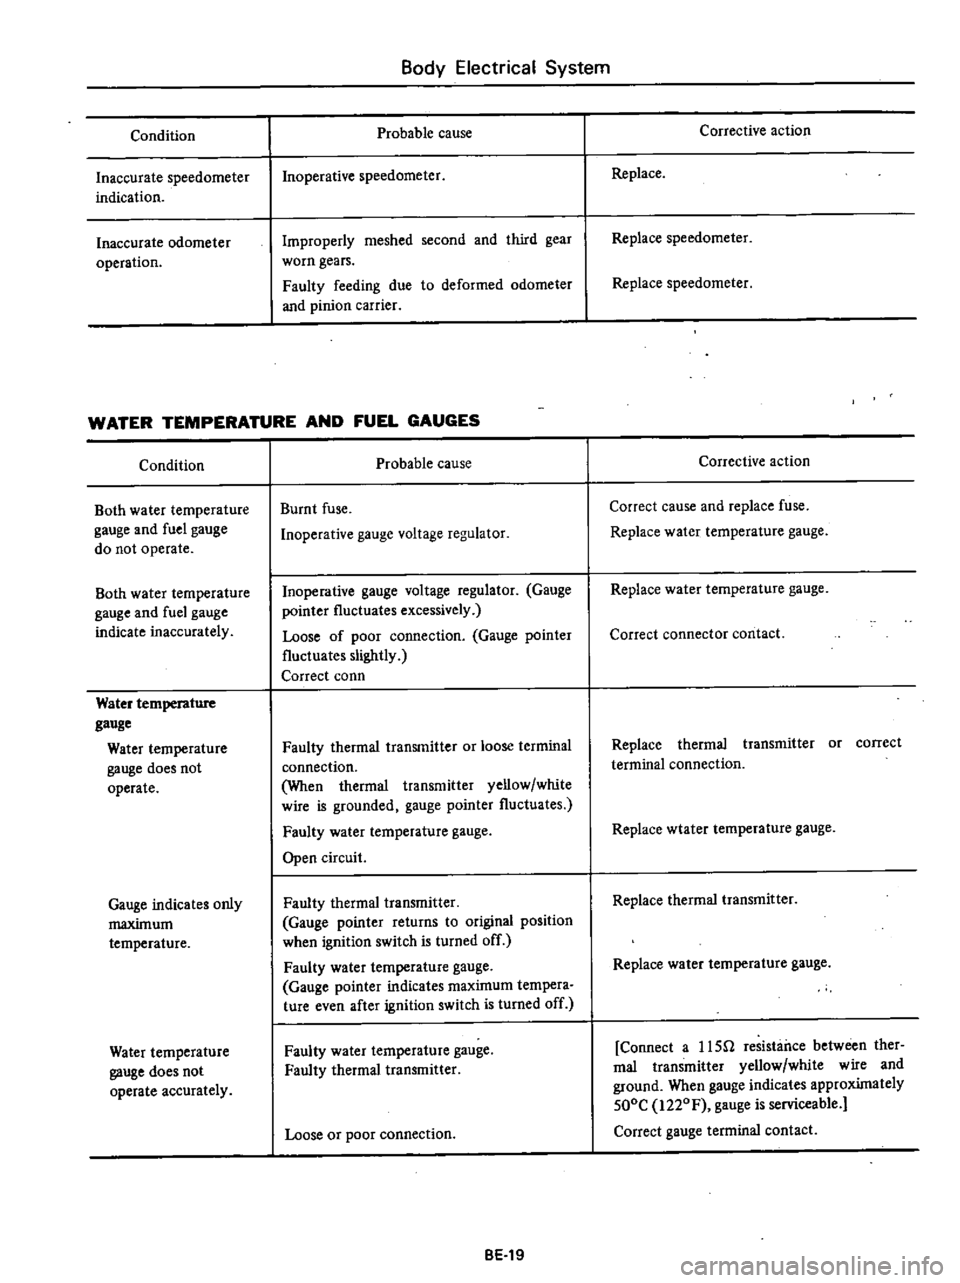
Condition
Inaccurate
speedometer
indication
Inaccurate
odometer
operation
Body
Electrical
System
Probable
cause
Inoperative
speedometer
Improperly
meshed
second
and
third
gear
worn
gears
Faulty
feeding
due
to
deformed
odometer
and
pinion
carrier
WATER
TEMPERATURE
AND
FUEL
GAUGES
Condition
Both
water
temperature
gauge
and
fuel
gauge
do
not
operate
Both
water
temperature
gauge
and
fuel
gauge
indicate
inaccurately
Water
temperature
gauge
Water
temperature
gauge
does
not
operate
Gauge
indicates
only
maximum
temperature
Water
temperature
gauge
does
not
operate
accurately
Probable
cause
Burnt
fuse
Inoperative
gauge
voltage
regulator
Inoperative
gauge
voltage
regulator
Gauge
pointer
fluctuates
excessively
Loose
of
poor
connection
Gauge
pointer
fluctuates
slightly
Correct
conn
Faulty
thermal
transmitter
or
loose
terminal
connection
When
thermal
transmitter
yellow
white
wire
is
grounded
gauge
pointer
fluctuates
Faulty
water
temperature
gauge
Open
circuit
Faulty
thermal
transmitter
Gauge
pointer
returns
to
original
position
when
ignition
switch
is
turned
off
Faulty
water
temperature
gauge
Gauge
pointer
indicates
maximum
tempera
ture
even
after
ignition
switch
is
turned
off
Faulty
water
temperature
gauge
Faulty
thermal
transmitter
Loose
or
poor
connection
BE
19
Corrective
action
Replace
Replace
speedometer
Replace
speedometer
Corrective
action
Correct
cause
and
replace
fuse
Replace
water
temperature
gauge
Replace
water
temperature
gauge
Correct
connector
contact
Replace
thermal
transmitter
or
correct
terminal
connection
Replace
wtater
temperature
gauge
Replace
thermal
transmitter
Replace
water
temperature
gauge
Connect
a
usn
resistance
between
ther
mal
transmitter
yellow
white
wire
and
ground
When
gauge
indicates
approximately
500C
i220F
gauge
is
serviceable
Correct
gauge
terminal
contact
Page 465 of 537
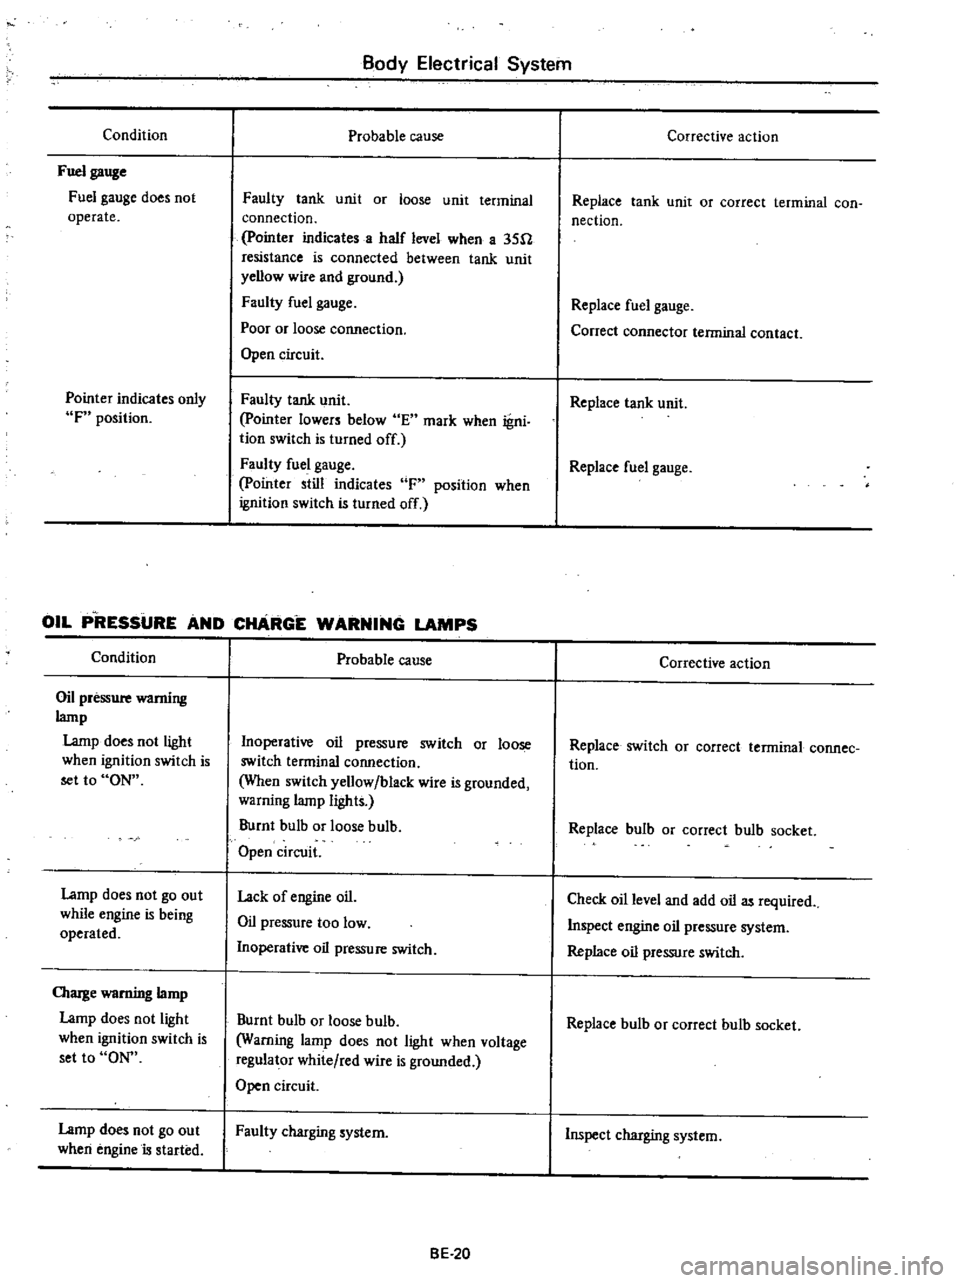
Condition
Fuel
gauge
Fuel
gauge
does
not
operate
Pointer
indicates
only
F
position
Body
Electrical
System
Probable
cause
Faulty
tank
unit
or
loose
unit
terminal
connection
pointer
indicates
a
half
level
when
a
35U
resistance
is
connected
between
tank
unit
yellow
wire
and
ground
Faulty
fuel
gauge
Poor
or
loose
cormection
Open
circuit
Faulty
tank
unit
pointer
lowers
below
E
mark
when
igni
tion
switch
Is
turned
off
Faulty
fuel
gauge
pointer
still
indicates
F
position
when
ignition
switch
is
turned
off
OIL
P
RESSURE
AND
CHARGE
WARNING
LAMPS
Condition
Oil
pressure
wamiug
lamp
Lamp
does
not
light
when
ignition
switch
is
set
to
ON
Lamp
does
not
go
out
while
engine
is
being
operated
OIarge
warning
lamp
Lamp
does
not
light
when
ignition
switch
is
set
to
ON
Lamp
does
not
go
out
when
engine
is
started
Probable
cause
Inoperative
oil
pressure
switch
or
loose
switch
terminal
connection
When
switch
yellow
black
wire
is
grounded
warning
lamp
lights
Burnt
bulb
or
loose
bulb
Open
circuit
Lack
of
engine
oil
Oil
pressure
too
low
Inoperative
oil
pressure
switch
Burnt
bulb
or
loose
bulb
Warning
lamp
does
not
light
when
voltage
regulator
white
red
wire
is
grounded
Open
circuit
Faulty
charging
system
BE
20
Corrective
action
Replace
tank
unit
or
correct
terminal
con
nection
Replace
fuel
gauge
Conect
connector
terminal
contact
Replace
tank
unit
Replace
fuel
gauge
Corrective
action
Replace
switch
OJ
correct
terminal
connee
tion
Replace
bulb
or
correct
bulb
socket
Check
oil
level
and
add
oil
as
required
Inspect
engine
oil
pressure
system
Replace
oil
pressure
switch
Replace
bulb
or
correct
bulb
socket
Inspect
charging
system