relay DATSUN PICK-UP 1977 Service Manual
[x] Cancel search | Manufacturer: DATSUN, Model Year: 1977, Model line: PICK-UP, Model: DATSUN PICK-UP 1977Pages: 537, PDF Size: 35.48 MB
Page 29 of 537
OPERATI
NG
PRESSURE
OF
BOOST
CONTROLLED
DECELERATION
DEVICE
B
C
D
D
ADJUSTMENT
CHECKING
a
C
D
D
CIRCUIT
WITH
FUNCTION
TEST
CONNECTOR
Manual
transmission
models
I
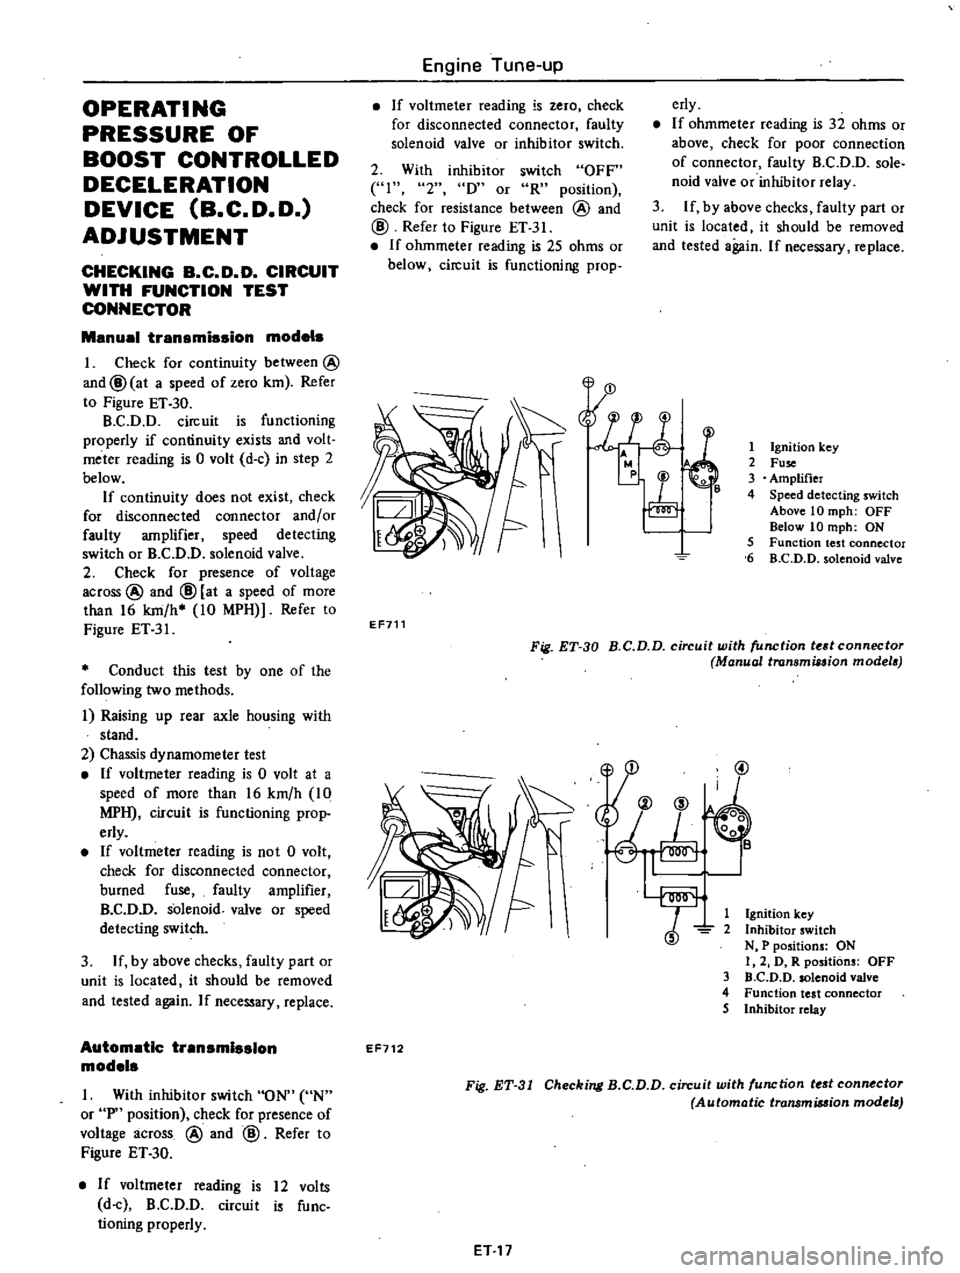
Check
for
continuity
between
@
and@
at
a
speed
of
zero
km
Refer
to
Figure
ET
30
B
C
D
D
circuit
is
functioning
properly
if
continuity
exists
and
volt
meter
reading
is
0
volt
d
c
in
step
2
below
If
continuity
does
not
exist
check
for
disconnected
connector
and
or
faulty
amplifier
speed
detecting
switch
or
B
C
D
D
solenoid
valve
2
Check
for
presence
of
voltage
across
@
and
@
at
a
speed
of
more
than
16
km
h
10
MPH
Refer
to
Figure
ET
31
Conduct
this
test
by
one
of
the
following
two
methods
i
Raising
up
rear
axle
housing
with
stand
2
Chassis
dynamometer
test
If
voltmeter
reading
is
0
volt
at
a
speed
of
more
than
16
km
h
10
MPH
circuit
is
functioning
prop
erly
If
voltmeter
reading
is
not
0
volt
check
for
disconnected
connector
burned
fuse
faulty
amplifier
B
C
D
D
solenoid
valve
or
speed
detecting
switch
3
If
by
above
checks
faulty
part
or
unit
is
located
it
should
be
removed
and
tested
again
If
necessary
replace
Automatic
transmission
models
I
With
inhibitor
switch
ON
UN
or
P
position
check
for
presence
of
voltage
across
@
and
@
Refer
to
Figure
ET
30
If
voltmeter
reading
is
12
volts
d
c
B
C
D
D
circuit
is
func
tioning
properly
Engine
Tune
up
If
voltmeter
reading
is
zero
check
for
disconnected
connector
faulty
solenoid
valve
or
inhibitor
switch
erly
If
ohmmeter
reading
is
32
ohms
or
above
check
for
poor
connection
of
connector
faulty
B
C
D
D
sole
noid
valve
or
inhibitor
relay
3
If
by
above
checks
faulty
part
or
unit
is
located
it
should
be
removed
and
tested
again
If
necessary
replace
2
With
inhibitor
switch
OFF
41
2
D
or
R
position
check
for
resistance
between
@
and
@
Refer
to
Figure
ET
31
If
ohmmeter
reading
is
25
ohms
or
below
circuit
is
functioning
prop
l
E
r
1
Ignition
key
2
Fuse
3
Amplifier
4
Speed
detecting
switch
Above
10
mph
OFF
Below
10
mph
ON
5
Function
test
connector
6
B
C
D
D
solenoid
valve
EF711
Fig
ET
30
B
C
D
D
circuit
with
function
tedconnectoT
Manual
transmission
modela
@
1
Ignition
key
2
Inhibitor
switch
N
P
positions
ON
I
2
D
R
positions
OFF
3
D
C
D
D
solenoid
valve
4
Function
test
connector
5
Inhibitor
relay
EF712
Fig
ET
31
Checking
B
C
D
D
circuit
with
function
tf
st
connf
ctor
Automatic
transmiMion
modtla
ET
17
Page 36 of 537
Replace
bulb
if
bulb
is
burned
ou
t
If
bulb
is
not
burned
trace
wireis
back
to
ignition
switch
Repair
or
replace
if
necessary
2
Be
sure
that
floor
temperature
is
cool
below
800C
1760F
before
carrying
out
the
following
procedure
1
Remove
rear
seat
2
Ignition
switch
is
turned
to
the
Temperature
sensing
switch
Temperature
warning
lamp
Contact
close
Off
Contact
open
On
Note
Avoid
heating
floor
tempera
ture
sensing
switch
directly
If
lamp
does
not
glow
check
floor
temperature
sensing
switch
connector
for
continuity
with
a
circuit
tester
If
continuity
should
exist
after
heated
surrounding
areas
of
floor
tern
rv
wnTP
sen
cinq
S
Vitch
reolace
tem
perature
sensing
switch
If
continuity
does
not
exist
trace
the
wiring
back
to
relay
or
check
the
following
step
3
Repair
or
replace
wire
s
if
necessary
Note
The
floor
temperature
sensing
switch
may
be
heated
through
the
floor
by
a
proper
heater
3
Turn
ignition
switch
to
the
IG
position
anf
disconnect
floor
temper
ature
sensing
connector
The
lamp
should
remain
on
If
not
check
floor
4
0
3
UJ
GJO
Engine
Tune
up
IGU
position
3
Ensure
that
floor
tem
perature
warning
lamp
goes
out
4
Heat
surrounding
areas
of
floor
temperature
sensing
switch
with
a
proper
heater
to
ensure
that
floor
temperature
warning
lamp
glows
when
floor
is
heated
to
lh
specifications
as
shown
in
the
table
below
Floor
temperature
Below
1050C
22IOF
Above
1050C
2210F
temperature
relay
for
continuity
with
a
circuit
tester
Referring
to
the
following
floor
temperature
relay
if
relay
is
normal
trace
wire
s
back
to
ignition
switch
Repair
faulty
wiring
Floor
temperature
rela
To
check
floor
temperature
relay
remove
it
and
proceed
as
follows
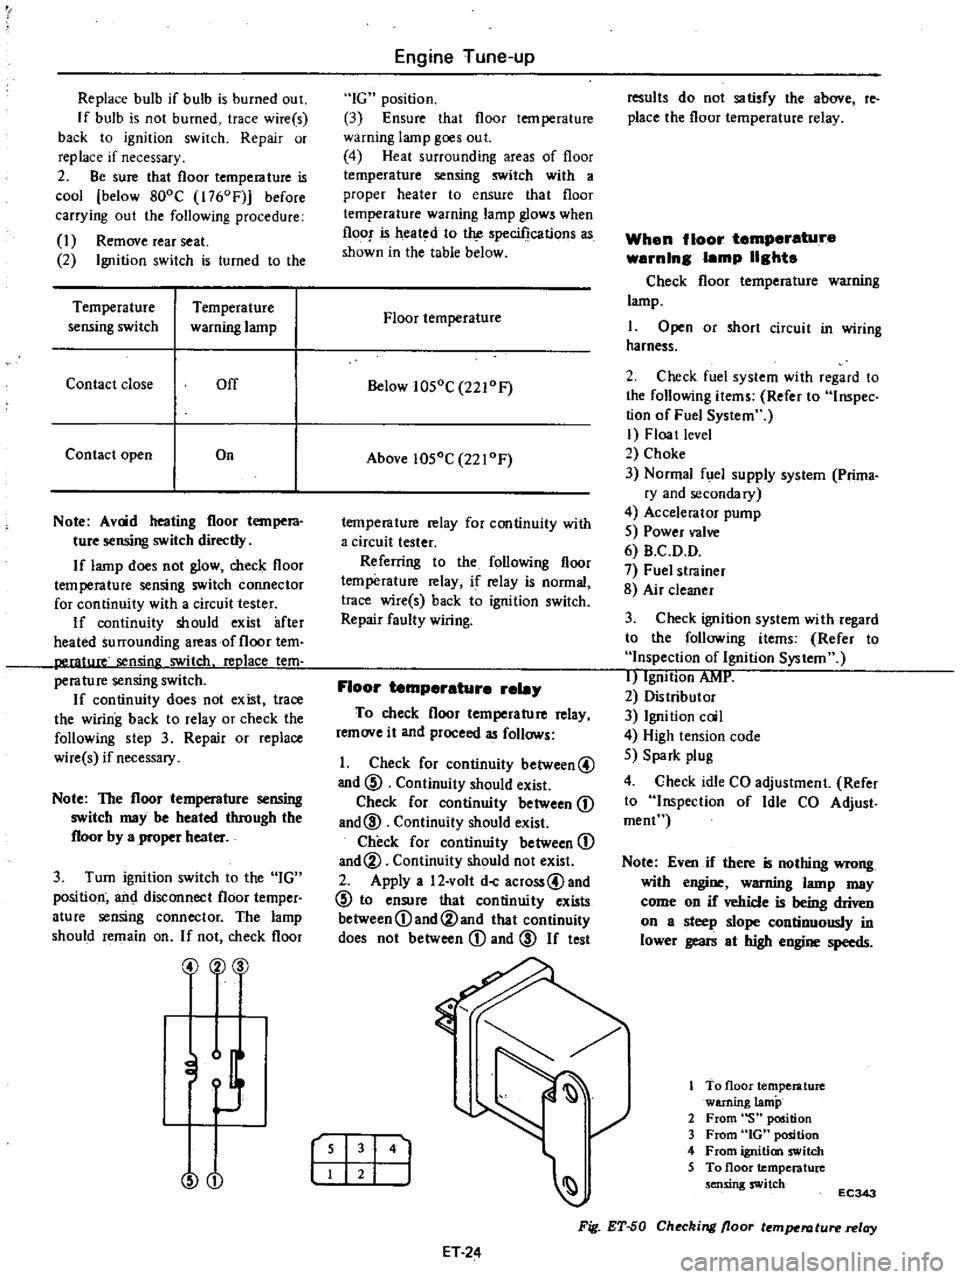
1
Check
for
continuity
between@
and
@
Continuity
should
exist
Check
for
continuity
between
D
and@
Continuity
should
exist
Check
for
continuity
between
D
and@
Continuity
should
not
exist
2
Apply
a
12
volt
doC
across@and
@
to
ensure
that
continuity
exists
between
D
and@and
that
continuity
does
not
between
D
and
@
If
test
r
I
141
ET
24
results
do
not
satisfy
the
above
reo
place
the
floor
temperature
relay
When
floor
temperature
warnln8
lamp
118hts
Check
floor
temperature
warning
lamp
I
Open
or
short
circuit
in
wiring
harness
2
Check
fuel
system
with
regard
to
the
following
items
Refer
to
Inspec
tion
of
Fuel
System
I
Floa
t
level
2
Choke
3
Normal
fuel
supply
system
Prima
ry
and
secondary
4
Accelerator
pump
5
Power
valve
6
B
C
D
D
7
Fuel
strainer
8
Air
cleaner
3
Check
ignition
system
with
regard
to
the
following
items
Refer
to
Inspection
of
Ignition
System
I
IgnItion
AMI
2
Distributor
3
Ignition
coil
4
High
tension
code
5
Spark
plug
4
Check
idle
CO
adjustment
Refer
to
Inspection
of
Idle
CO
Adjust
roeoC
Note
Even
if
there
is
nothing
wrong
with
engine
warning
lamp
may
come
on
if
vehicle
is
being
driven
on
a
steep
slope
continuously
in
lower
gears
at
high
engine
speeds
To
floor
temperature
warning
lamp
2
From
S
position
3
From
GOt
position
4
From
ignition
switch
5
To
floor
temperature
sensing
switch
EC343
Fig
ET
50
Checking
floor
temperature
relay
Page 116 of 537
ELECTRIC
AUTOMATIC
CHOKE
An
electric
heater
wanns
a
bi
metal
interconnected
to
the
choke
valve
and
controls
the
position
of
choke
valve
and
throttle
valve
in
accordance
with
the
time
elapsed
the
warm
up
condi
tion
of
the
engine
and
the
outside
ambient
temperature
When
outside
ambient
temperature
is
above
operating
temperature
the
automatic
choke
control
serves
to
fur
ther
reduce
exhaust
gasemission
during
warm
up
by
automatically
selecting
one
of
the
two
choke
opera
tion
modes
fast
acting
or
slow
acting
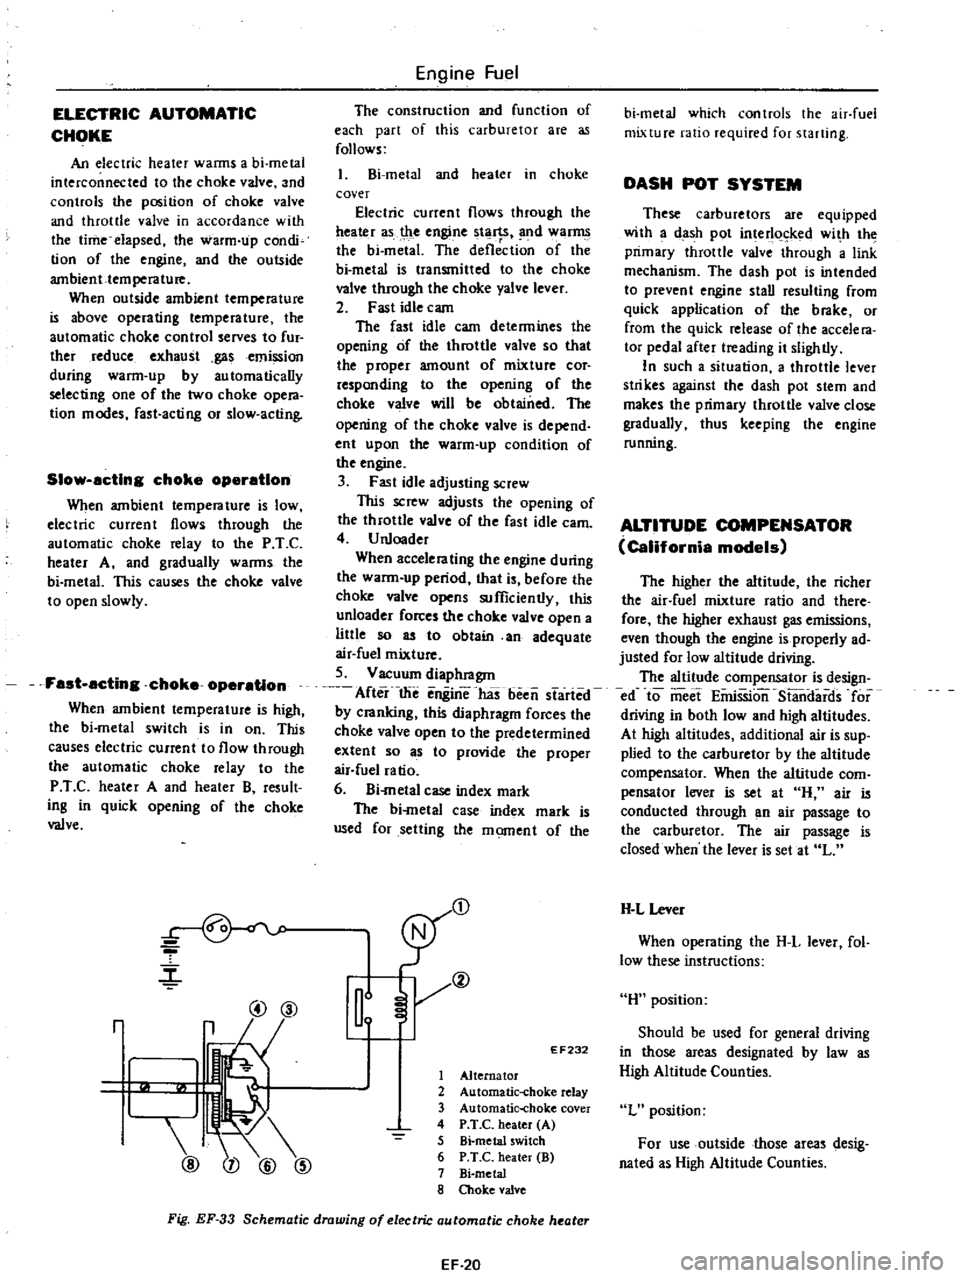
Slow
acting
choke
operation
When
ambient
temperature
is
low
electric
current
flows
through
the
automatic
choke
relay
to
the
P
T
C
heater
A
and
gradually
warms
the
bi
metal
This
causes
the
choke
valve
to
open
slowly
Fast
acting
choke
operation
When
ambient
temperature
is
high
the
bi
metal
switch
is
in
on
This
causes
electric
current
to
flow
through
the
automatic
choke
relay
to
the
P
T
C
heater
A
and
heater
B
result
ing
in
quick
opening
of
the
choke
valve
r
@@
r
@
Engine
Fuel
The
construction
and
function
of
each
part
of
this
carburetor
are
as
follows
l
Bi
metal
and
heater
in
choke
cover
Electric
current
flows
through
the
ttea
r
as
t
le
engine
tl
1
SI
nd
war
the
bi
metal
The
deflection
of
the
bi
metal
is
transmitted
to
the
choke
valve
through
the
choke
yalve
lever
2
Fast
idle
cam
The
fast
idle
cam
determines
the
opening
of
the
throttle
valve
so
that
the
proper
amount
of
mixture
cor
responding
to
the
opening
of
the
choke
valve
will
be
obtained
The
opening
of
the
choke
valve
is
depend
ent
upon
the
warm
up
condition
of
the
engine
3
Fast
idle
adjusting
screw
This
screw
adjusts
the
opening
of
the
throttle
valve
of
the
fast
idle
earn
4
U
nloader
When
accelerating
the
engine
during
the
warm
up
period
that
is
before
the
choke
valve
opens
sufficiently
this
unloader
forces
the
choke
valve
open
a
liUle
so
as
to
obtain
an
adequate
air
fuel
mixture
5
Vacuum
diaphragm
After
the
enginThas
been
started
by
cranking
this
diaphragm
forces
the
choke
valve
open
to
the
predetermined
extent
so
as
to
provide
the
proper
air
fuel
ratio
6
Bi
metal
case
index
mark
The
bi
metal
case
index
mark
is
used
for
setting
the
moment
of
the
D
Il
EF232
1
Alternator
2
Automatic
choke
relay
3
Automatic
choke
cover
4
P
T
C
heater
A
5
Bi
metal
switch
6
P
T
C
heater
B
7
Bi
metal
8
Choke
valve
Fig
EF
33
Schematic
drawing
of
electric
automatic
choke
heater
EF
20
bi
metal
which
controls
the
air
fuel
mixture
ratio
required
for
starting
DASH
POT
SYSTEM
These
carburetors
are
equipped
with
a
dash
pot
interl
ked
wi
h
the
primary
throttle
valve
through
a
link
mechanism
The
dash
pot
is
intended
to
prevent
engine
stall
resulting
from
quick
application
of
the
brake
or
from
the
quick
release
of
the
accele
ra
tor
pedal
after
treading
it
slightly
In
such
a
situation
a
throttle
lever
strikes
against
the
dash
pot
stem
and
makes
the
primary
throttle
valve
close
gradually
thus
keeping
the
engine
running
ALTITUDE
COMPENSATOR
California
models
The
higher
the
altitude
the
richer
the
air
fuel
mixture
ratio
and
there
fore
the
higher
exhaust
gas
emissions
even
though
the
engine
is
properly
ad
justed
for
low
altitude
driving
The
altitude
compensator
is
design
ed
to
meet
EiiriSSion
S13ndards
for
driving
in
both
low
and
high
altitudes
At
high
altitudes
additional
air
is
sup
plied
to
the
carburetor
by
the
altitude
compensator
When
the
altitude
com
pensator
lever
is
set
at
H
air
is
conducted
through
an
air
passage
to
the
carburetor
The
air
passage
is
closed
when
the
lever
is
set
at
L
H
L
Lever
When
operating
the
H
L
lever
fol
low
these
instructions
H
position
Should
be
used
for
general
driving
in
those
areas
designated
by
law
as
High
Altitude
Counties
L
position
For
use
outside
those
areas
desig
nated
as
High
Altitude
Counties
Page 120 of 537

ELECTRIC
AUTOMATIC
CHOKE
Checklna
automatic
choke
heater
circuit
with
function
test
connector
Caution
Do
not
altach
test
leads
of
a
circuit
tester
to
those
other
than
designated
Refer
to
figure
Ef
43
I
With
engine
not
running
check
for
continuity
between
A
and
B
as
shown
in
figure
Ef
43
If
continuity
exists
heater
is
func
tioning
properly
If
continuity
d
s
not
exist
check
for
disconnected
connector
or
open
P
T
e
heater
circuit
2
With
engine
running
at
idle
check
for
presence
of
voltage
across
A
and
B
as
shown
in
figure
EF
43
If
voltmeter
reading
is
12
volts
d
c
heater
circuit
is
functioning
properly
If
vohmeter
reading
is
zero
check
for
disconnected
connector
open
circuit
or
faulty
automatic
choke
relay
3
Replace
faulty
parts
J
j
N
j
EF710
1
ignition
key
2
Automatic
choke
relay
Engine
stop
OFF
Engine
start
ON
3
Automatic
choke
heateI
4
Function
test
connector
5
Altema
tor
Fig
EF
43
Checking
oulomalic
choke
heater
circuit
with
fu
nc
non
led
connector
Engine
Fuel
Automatic
choke
I
Before
starting
engine
fully
de
press
al
celerator
pedaJ
to
ensure
that
choke
valve
doses
properly
Push
choke
valve
with
a
finger
and
heck
for
binding
3
Check
0
be
sure
that
bi
rnetal
cover
index
mark
is
set
at
the
cen
leT
of
choke
housing
index
mark
a
s
shown
in
Figure
EF
44
Note
Do
not
set
b
metal
cover
index
mark
at
any
position
except
the
center
of
choke
housing
index
marl
tE
jL
J
Thermostat
cover
Bi
metal
chamber
2
Thermostat
housing
3
Groove
ET034
Fig
EF
44
Bi
metol
tting
4
Check
automatic
choke
heater
source
wiring
for
proper
connection
then
start
engine
5
After
warming
up
the
engine
see
that
choke
valve
is
fully
open
6
If
automatic
choke
heater
source
wiring
is
normal
and
choke
valve
does
not
operate
after
warm
up
replace
hi
metal
co
t
er
Automatic
choke
relay
I
Remove
automatic
choke
relay
Auto
choke
heater
relay
EF278
Fig
EF
45
Location
of
automatic
choke
relay
EF
24
2
Make
an
operational
check
of
automatic
choke
relay
as
shown
in
Figure
EF
46
Apply
2
volts
d
c
across
termi
nals
I
and
3
to
ensure
that
i
ontinuity
exists
between
terminals
2
and
4
Check
t
lal
continuity
does
not
exist
between
terminals
2
and
4
when
no
voltage
is
applied
across
them
If
results
satisfies
the
above
automatic
choke
relay
is
functioning
properly
if
not
replace
choke
relay
1
2
3
y
4
EF723
Fig
EF
46
Checking
automatic
choke
relay
Automatic
choke
heater
I
Measure
resistance
of
choke
heater
as
shown
in
figure
EF
47
spe
ified
re
s
an
ce
is
3
7
to
8
9
ohms
F
EF261
Fig
EF
47
Automatic
choke
heater
check
2
If
measured
value
is
not
within
the
specification
replace
bi
metal
cover
INTERLOCK
OPENING
OF
PRIMARY
AND
SECONDARY
THROTnE
VALVE
Figure
EF
48
shows
primary
throt
tie
valve
opened
SO
When
primary
throtlle
valve
is
opened
50
the
adjust
plate
integrated
with
throttle
valve
is
in
contact
with
return
plate
at
A
Page 122 of 537
AUtomatic
trailamlsalon
modela
I
With
inhibitor
switch
ON
UN
or
P
position
check
for
presence
of
voltage
across
A
and
B
Refer
to
Figure
EF
51
If
voltmeter
ading
is
12
volts
d
c
B
C
D
O
circuit
is
func
tioning
properly
If
vol
tmeter
ading
is
zero
check
for
disconnected
connector
faulty
solenoid
valve
m
inhibitor
switch
2
With
inhibitor
switch
OFF
HI
2
IY
or
oR
position
Engine
Fuel
check
for
resistance
between
A
and
B
Refer
to
Figure
EF
51
If
ohmmeter
reading
is
25
ohms
or
below
circuit
is
functioning
prop
erly
If
ohmmeter
reading
is
32
ohms
or
above
check
for
poor
connection
of
connec
or
faulty
B
C
D
D
sole
noid
valve
or
inhibitor
relay
3
If
by
above
checks
faulty
part
or
unit
is
located
it
should
be
moved
and
tested
again
If
necessary
replace
yu
@
@
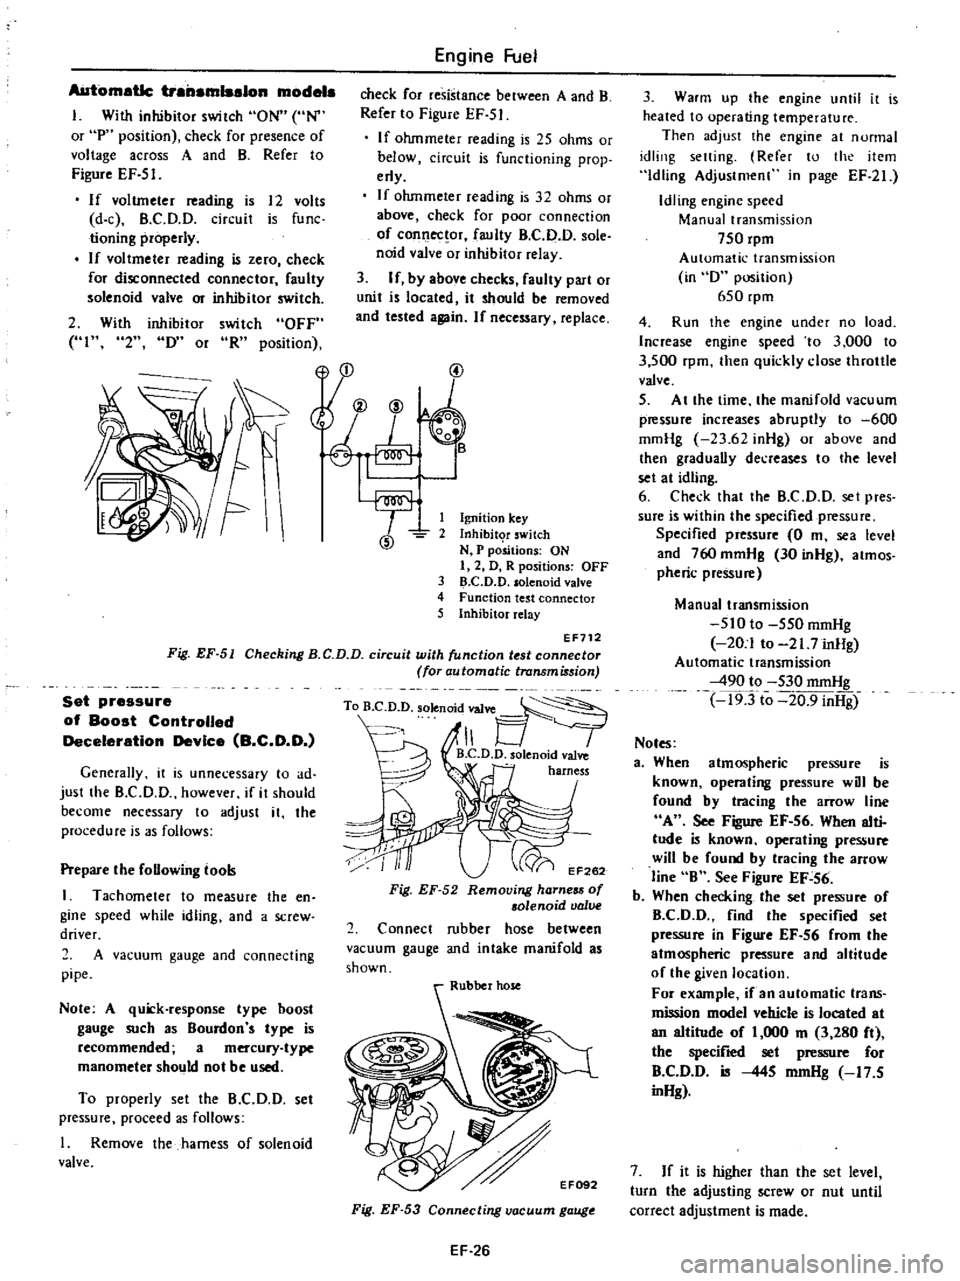
1
Ignition
key
2
Inhibit
T
switch
N
P
positions
ON
I
2
D
R
positions
OFF
3
D
C
D
D
solenoid
valve
4
Function
test
connector
5
Inhibitor
relay
EF712
Fig
EF
51
Checking
B
C
D
D
circuit
with
unction
t
st
connector
for
automatic
transmi
sion
Set
pressure
of
Boost
Controlled
Deceleration
Device
B
C
D
O
Generally
it
is
unnecessary
to
ad
just
the
B
CD
D
however
if
it
should
become
necessary
to
adjust
it
the
procedure
is
3S
follows
Prepare
the
foUowing
tool
I
Tachometer
to
measure
the
en
gine
speed
while
idling
and
a
screw
driver
2
A
vacuum
gauge
and
connecting
pipe
Note
A
quick
response
type
hoost
gauge
such
as
Bourdon
s
type
is
recommended
a
mercury
type
manometer
should
not
be
used
To
properly
set
the
B
C
D
D
set
pressure
proceed
as
follows
I
Remove
the
harness
of
solenoid
valve
To
B
D
D
solenoid
valve
1
B
C
D
D
olenoid
valve
harness
EF262
Fig
EF
52
Removing
harness
of
solenoid
valve
2
Connect
rubber
hose
between
vacuum
gauge
and
intake
manifold
as
shown
Fig
EF
53
Connecting
vacuum
gauge
EF
26
3
Warm
up
the
engine
until
it
is
heated
to
operating
temperature
Then
adjust
the
engine
at
nunnal
idling
setting
Refer
to
the
item
Idling
Adjustmenl
in
page
EF
21
Idling
engine
speed
Manual
transmission
750
rpm
Automatic
transmission
in
D
position
650
rpm
4
Run
the
engine
under
no
load
Increase
engine
speed
to
3
000
to
3
500
rpm
then
quickly
close
throttle
valve
5
At
the
time
the
manifold
vacuum
p
ssure
increases
abruptly
to
600
mmHg
23
62
inHg
or
above
and
then
graduaUy
decreases
to
the
level
set
at
idling
6
Check
that
the
B
C
D
D
set
pres
sure
is
within
the
specified
pressure
Specified
pressure
0
m
sea
level
and
760
mmHg
30
inHg
atmos
pheric
pressu
Manual
transmission
510
to
550
mmHg
20
1
to
21
7
inHg
Automatic
transmission
490
to
530
mmHg
19Tto
20
9
inHg
Notes
a
When
atmospheric
pressure
is
known
operating
pressure
will
be
found
by
tracing
the
arrow
line
A
See
Figure
EF
56
When
alti
tude
is
known
operating
pressure
will
be
found
by
tracing
the
arrow
line
B
See
Figu
EF
56
b
When
checking
the
set
pressu
of
B
CD
D
find
the
specified
set
pressu
in
Figure
EF
56
from
the
atmospheric
pressure
and
altitude
of
the
given
location
For
example
if
an
automatic
trans
mission
model
vehicle
is
located
at
an
altitude
of
1
000
m
3
280
ft
the
specified
set
p
ssu
for
B
C
D
D
is
445
mmHg
17
5
inHg
7
If
it
is
higher
than
the
set
level
turn
the
adjusting
screw
or
nut
until
correct
adjustment
is
made
Page 125 of 537
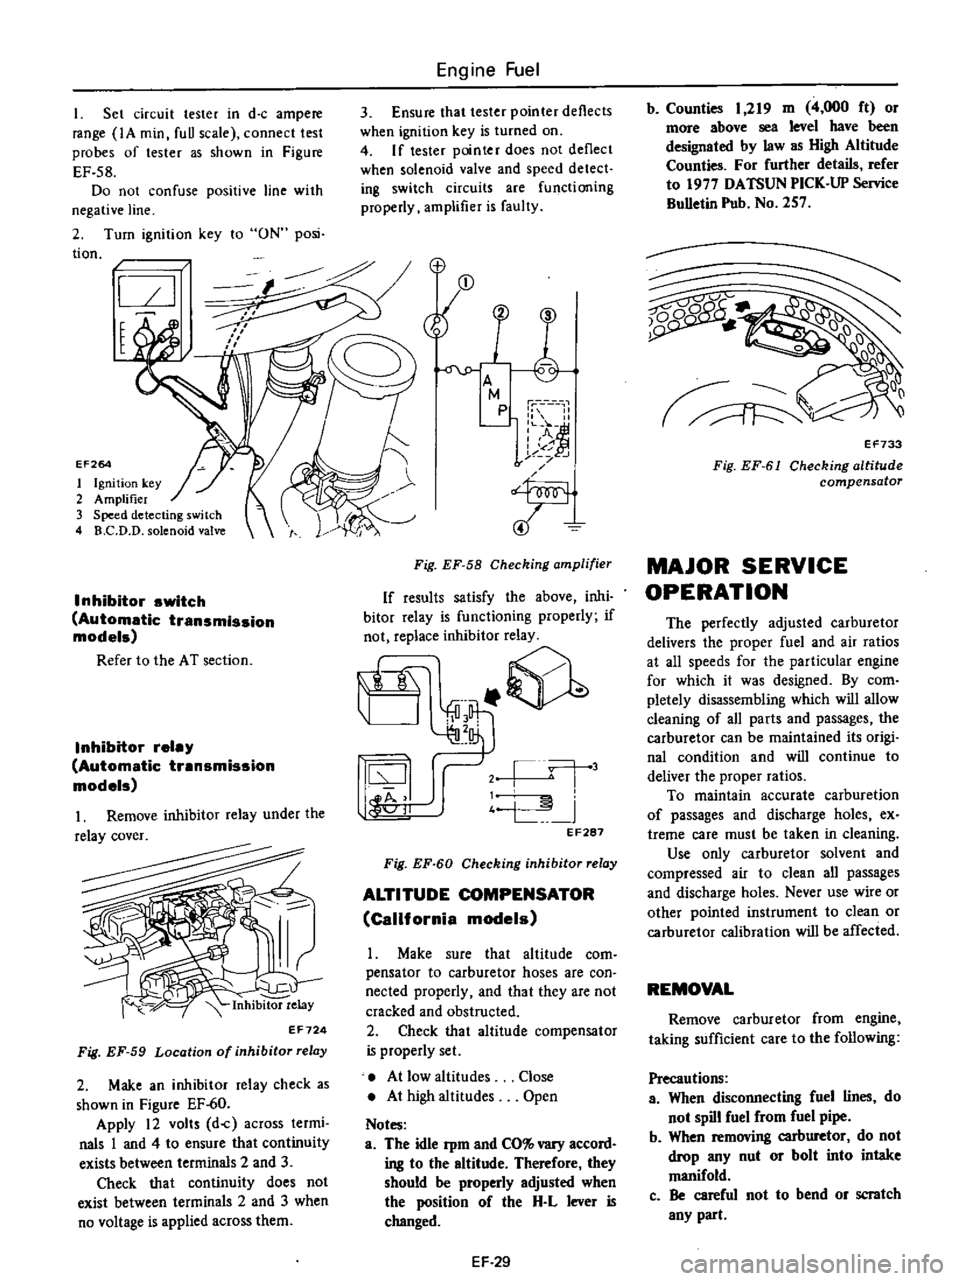
I
Set
circuit
tester
in
d
c
ampere
range
IA
min
fuU
scale
connect
test
probes
of
tester
as
shown
in
Figure
EF
58
Do
not
confuse
positive
line
with
negative
line
2
Turn
ignition
key
to
ON
posi
tion
I
t
EF264
1
Ignition
key
2
Amplifier
3
Speed
detecting
switch
4
B
C
D
D
solenoid
valve
Inhibitor
switch
Automatic
transmission
models
Refer
to
the
AT
section
Inhibitor
relay
Automatic
transmission
models
Inhibitor
relay
EF724
Fig
EF
59
Location
of
inhibitor
relay
2
Make
an
inhibitor
relay
check
as
shown
in
Figure
EF
60
Apply
12
volts
d
c
across
termi
nals
1
and
4
to
ensure
that
continuity
exists
between
terminals
2
and
3
Check
that
continuity
does
not
exist
between
terminals
2
and
3
when
no
voltage
is
applied
across
them
Engine
Fuel
3
Ensure
that
tester
pointer
deflects
when
ignition
key
is
turned
on
4
If
tester
pointer
does
not
deflect
when
solenoid
valve
and
speed
detect
ing
switch
circuits
are
functioning
properly
amplifier
is
faulty
Fig
EF
58
Checking
amplifier
If
results
satisfy
the
above
inhi
bitor
relay
is
functioning
properly
if
not
replace
inhibitor
relay
it
@
j
l
j
4
L
I
44
11
oJ
EF287
Fig
EF
60
Checking
inhibitor
relay
ALTITUDE
COMPENSATOR
California
models
Make
sure
that
altitude
com
pensator
to
carburetor
hoses
are
con
nected
properly
and
that
they
are
not
cracked
and
obstructed
2
Check
that
altitude
compensator
is
properly
set
At
low
altitudes
At
high
altitudes
Notes
a
The
idle
Pm
and
CO
vary
accord
ing
to
the
altitude
Therefore
they
should
be
properly
adjusted
when
the
position
of
the
H
L
lever
is
changed
Close
Open
EF
29
b
Counties
1
219
m
4
000
ft
or
more
above
sea
level
have
been
designated
by
law
as
High
Altitude
Counties
For
further
details
refer
to
1977
DATSUN
PICK
UP
Service
BuUetin
Pub
No
257
Q0
1
v
EF733
Fig
EF
61
Checking
altitude
compensator
MAJOR
SERVICE
OPERATION
The
perfectly
adjusted
carburetor
delivers
the
proper
fuel
and
air
ratios
at
all
speeds
for
the
particular
engine
for
which
it
was
designed
By
com
pletely
disassembling
which
will
allow
deaning
of
all
parts
and
passages
the
carburetor
can
be
maintained
its
origi
nal
condition
and
will
continue
to
deliver
the
proper
ratios
To
maintain
accurate
carburetion
of
passages
and
discharge
holes
ex
treme
care
must
be
taken
in
cleaning
Use
only
carburetor
solvent
and
compressed
air
to
clean
all
passages
and
discharge
holes
Never
use
wire
or
other
pointed
instrument
to
clean
or
carburetor
calibration
will
be
affected
REMOVAL
Remove
carburetor
from
engine
taking
sufficient
care
to
the
following
Precautions
a
When
disconnecting
fuel
lines
do
not
spill
fuel
from
fuel
pipe
b
When
removing
carburetor
do
not
drop
any
nut
or
bolt
into
intake
manifold
c
Be
careful
not
to
bend
or
scratch
any
part
Page 160 of 537
REMOVAL
AND
INSPECTION
Removal
and
inspection
can
be
done
as
follows
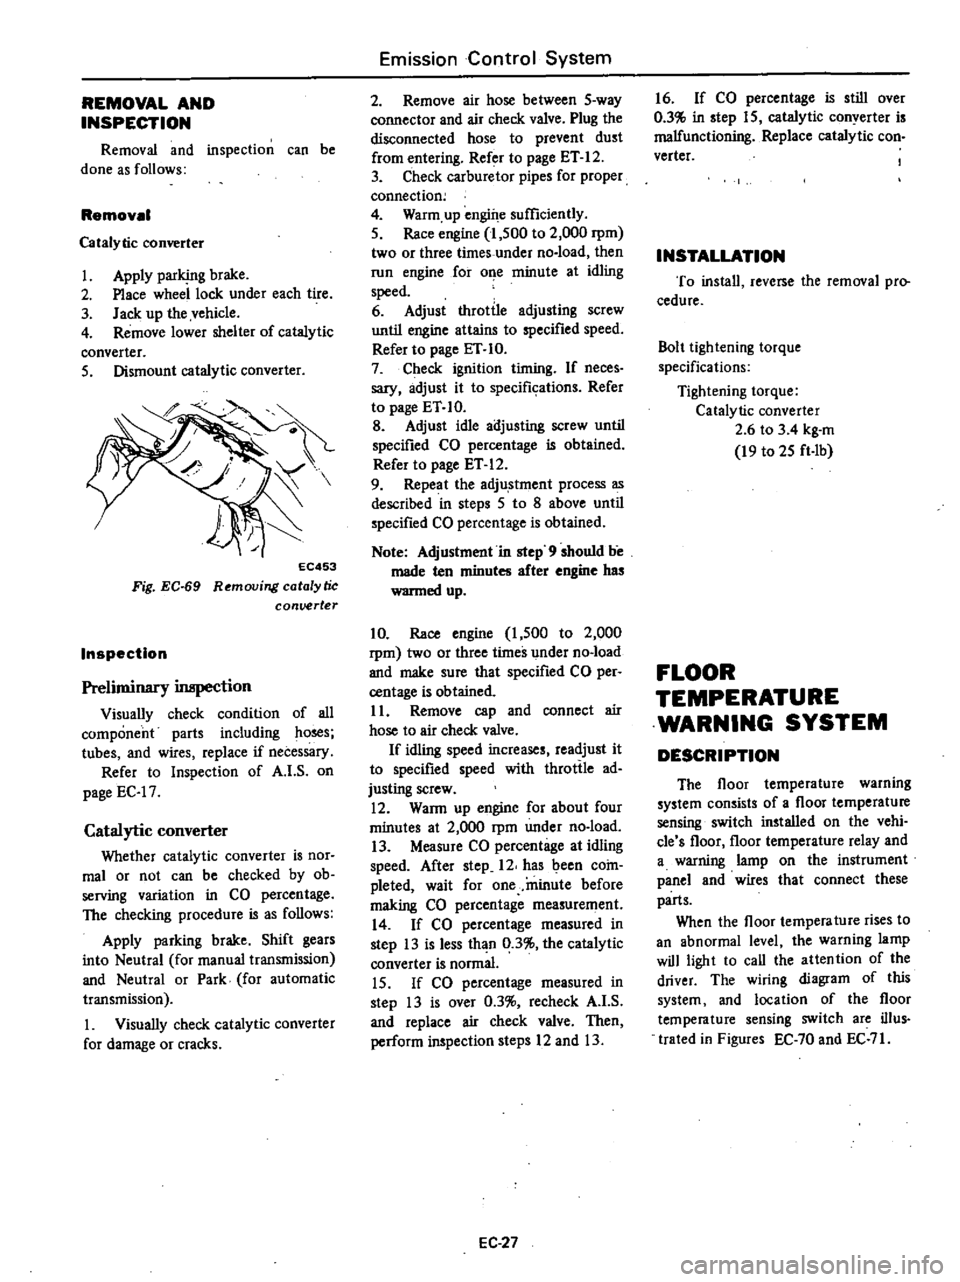
Removal
Catalytic
converter
1
Apply
parking
brake
2
Place
wheel
lock
under
each
tire
3
Jack
up
the
vehicle
4
Remove
lower
shelter
of
catalytic
converter
5
Dismount
catalytic
converter
EC453
Fig
EC
69
Removing
catalytic
conuerter
Inspection
Preliminary
inspection
Visually
check
condition
of
all
component
parts
including
ho
s
tubes
and
wires
replace
if
necessary
Refer
to
Inspection
of
A
I
S
on
page
EC
17
Catalytic
converter
Whether
catalytic
converter
is
nor
mal
or
not
can
be
checked
by
ob
serving
variation
in
CO
percentage
The
checking
procedure
is
as
follows
Apply
parking
brake
Shift
gears
into
Neutral
for
manual
transmission
and
Neutral
or
Park
for
automatic
transmission
1
Visually
check
catalytic
converter
for
damage
or
cracks
Emission
Control
System
2
Remove
air
hose
between
5
way
connector
and
air
check
valve
Plug
the
disconnected
hose
to
prevent
dust
from
entering
Refer
to
page
ET
12
3
Check
carburetor
pipes
for
proper
connection
4
Warm
up
engine
sufficiently
5
Race
engine
1
500
to
2
000
rpm
two
or
three
times
under
no
load
then
run
engine
for
o
e
minute
at
idling
speed
6
Adjust
throttle
adjusting
screw
until
engine
attains
to
specified
speed
Refer
to
page
ET
10
7
Check
ignition
timing
If
neces
sary
adjust
it
to
specifkations
Refer
to
page
ET
10
B
Adjust
idle
adjusting
screw
until
specified
CO
percentage
is
obtained
Refer
to
page
ET
12
9
Repeat
the
adju
stment
process
as
described
in
steps
5
to
8
above
until
specified
CO
percentage
is
obtained
Note
Adjustment
in
step
9
should
be
made
ten
minutes
after
engine
has
wanned
up
10
Race
engine
1
500
to
2
000
rpm
two
or
three
times
under
no
load
and
make
sure
that
specified
CO
per
centage
is
obtained
11
Remove
cap
and
connect
air
hose
to
air
check
valve
If
idling
speed
increases
readjust
it
to
specified
speed
with
throttle
ad
justing
screw
12
WaRn
up
engine
for
about
four
minutes
at
2
000
rpm
under
no
load
13
Measure
CO
percentage
at
idling
speed
After
step
12
has
been
coin
pleted
wait
for
one
minute
before
making
CO
percentage
measurement
14
If
CO
percentage
measured
in
step
13
is
less
than
0
3
the
catalytic
converter
is
normal
15
If
CO
percentage
measured
in
step
13
is
over
0
3
recheck
A
I
S
and
replace
air
check
valve
Then
perform
inspection
steps
12
and
13
EC
27
16
If
CO
percentage
is
still
over
0
3
in
step
15
catalytic
conyerter
is
malfunctioning
Replace
catalytic
con
verter
INSTALLATION
To
install
reverse
the
removal
pro
cedure
Bolt
lightening
torque
specifications
Tightening
torque
Catalytic
converter
2
6
to
3
4
kg
m
19
to
25
ft
Ib
FLOOR
TEMPERATURE
WARNING
SYSTEM
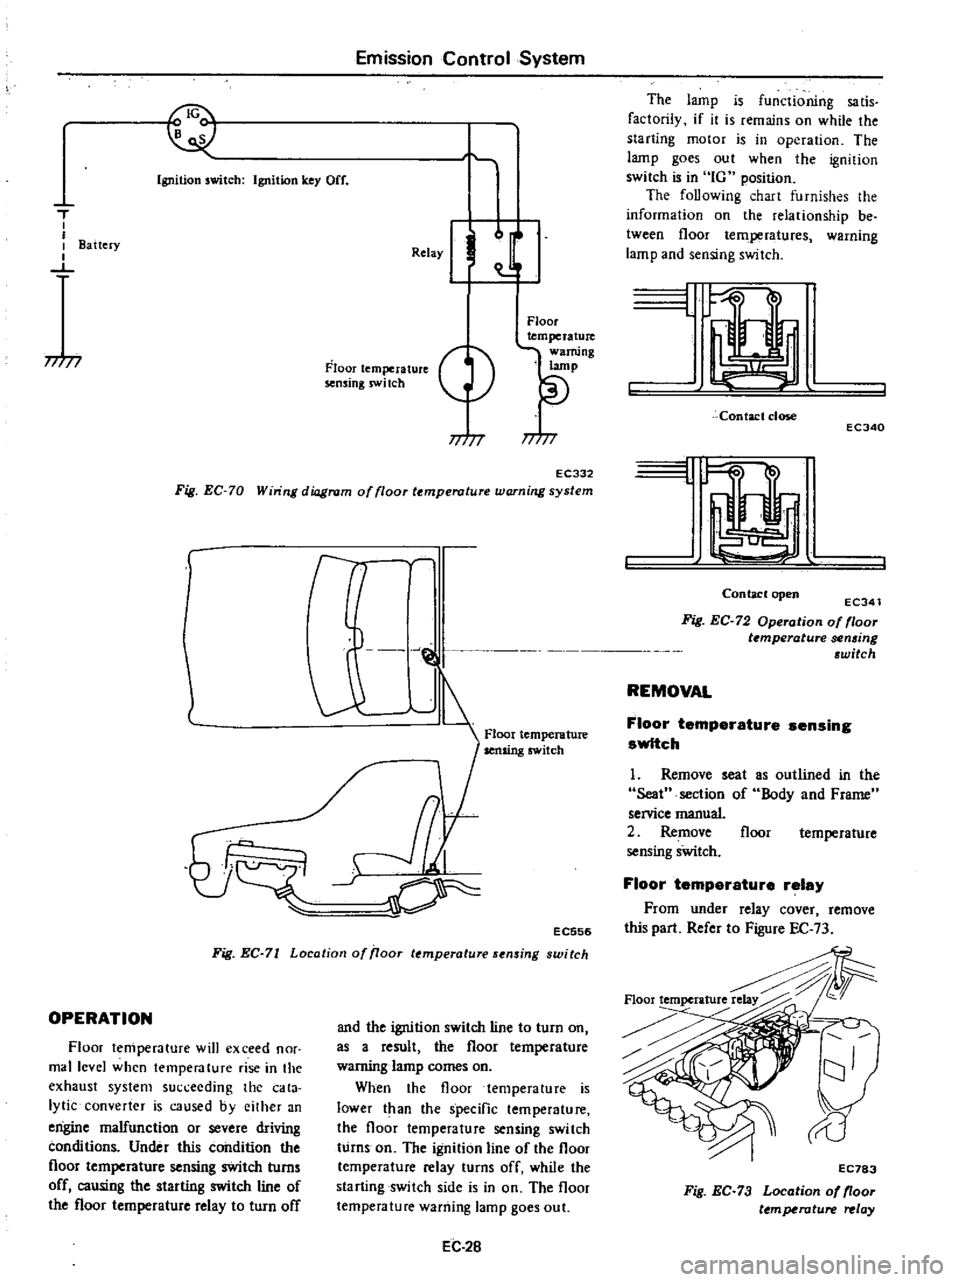
DESCRIPTION
The
floor
temperature
warning
system
consists
of
a
floor
temperature
sensing
switch
installed
on
the
vehi
cle
s
floor
floor
temperature
relay
and
a
warning
lamp
on
the
instrument
panel
and
wires
that
connect
these
parts
When
the
floor
tempera
ture
rises
to
an
abnormal
level
the
warning
lamp
will
light
to
call
the
attention
of
the
driver
The
wiring
diagram
of
this
system
and
location
of
the
floor
temperature
sensing
switch
are
ilIus
trated
in
Figures
EC
70
and
EC
71
Page 161 of 537
I
Emission
Control
System
Ignition
switch
Ignition
key
Off
T
I
I
I
Battery
I
J
77
77
Relay
J
Floor
temperature
sensing
swi
tch
Floor
temperature
warning
lamp
77
77
EC332
Fig
EC
70
Win
ng
diagram
of
floor
temperature
warning
system
r
l
J
@
1
Floor
temperature
Ij
cr
EC556
Fig
EC
71
Location
of
iJoor
temperature
sensing
switch
OPERATION
Floor
temperature
will
exceed
nor
mal
level
when
temperature
rise
in
the
exhaust
system
succeeding
the
cata
lytic
converter
is
caused
byeilher
an
engine
malfunction
or
severe
driving
conditions
Under
this
condition
the
floor
temperature
sensing
switch
turns
off
causing
the
starting
switch
line
of
the
floor
temperature
relay
to
turn
off
and
the
ignition
switch
line
to
turn
on
as
a
result
the
floor
temperature
warning
lamp
comes
on
When
the
floor
temperature
is
lower
t
an
the
specific
temperature
the
floor
temperature
sensing
switch
turns
on
The
ignition
line
of
the
floor
temperature
relay
turns
off
while
the
starting
switch
side
is
in
on
The
floor
temperature
warning
lamp
goes
out
EC
2B
The
lamp
is
functioning
sa
tis
factorily
if
it
is
remains
on
while
the
starting
motor
is
in
operation
The
lamp
goes
out
when
the
ignition
switch
is
in
IG
position
The
foUowing
chart
furnishes
the
information
on
the
relationship
be
tween
floor
temperatures
warning
lamp
and
sensing
switch
L
Contact
close
ECJ40
I
Contaclopen
ECJ41
Fig
EC
72
Operation
of
floor
t
mperature
sen6ing
6witch
REMOVAL
Floor
temperature
sensing
switch
1
Remove
seat
Seat
section
of
service
manual
2
Remove
sensing
sWitch
as
outlined
in
the
Body
and
Frame
floor
temperature
Floor
temperature
relay
From
under
relay
cover
remove
this
part
Refer
to
Figure
EC
73
Floortemperature
EC783
Fig
EC
73
Location
of
floor
ttmperature
relay
Page 162 of 537
Floor
temparature
warning
lamp
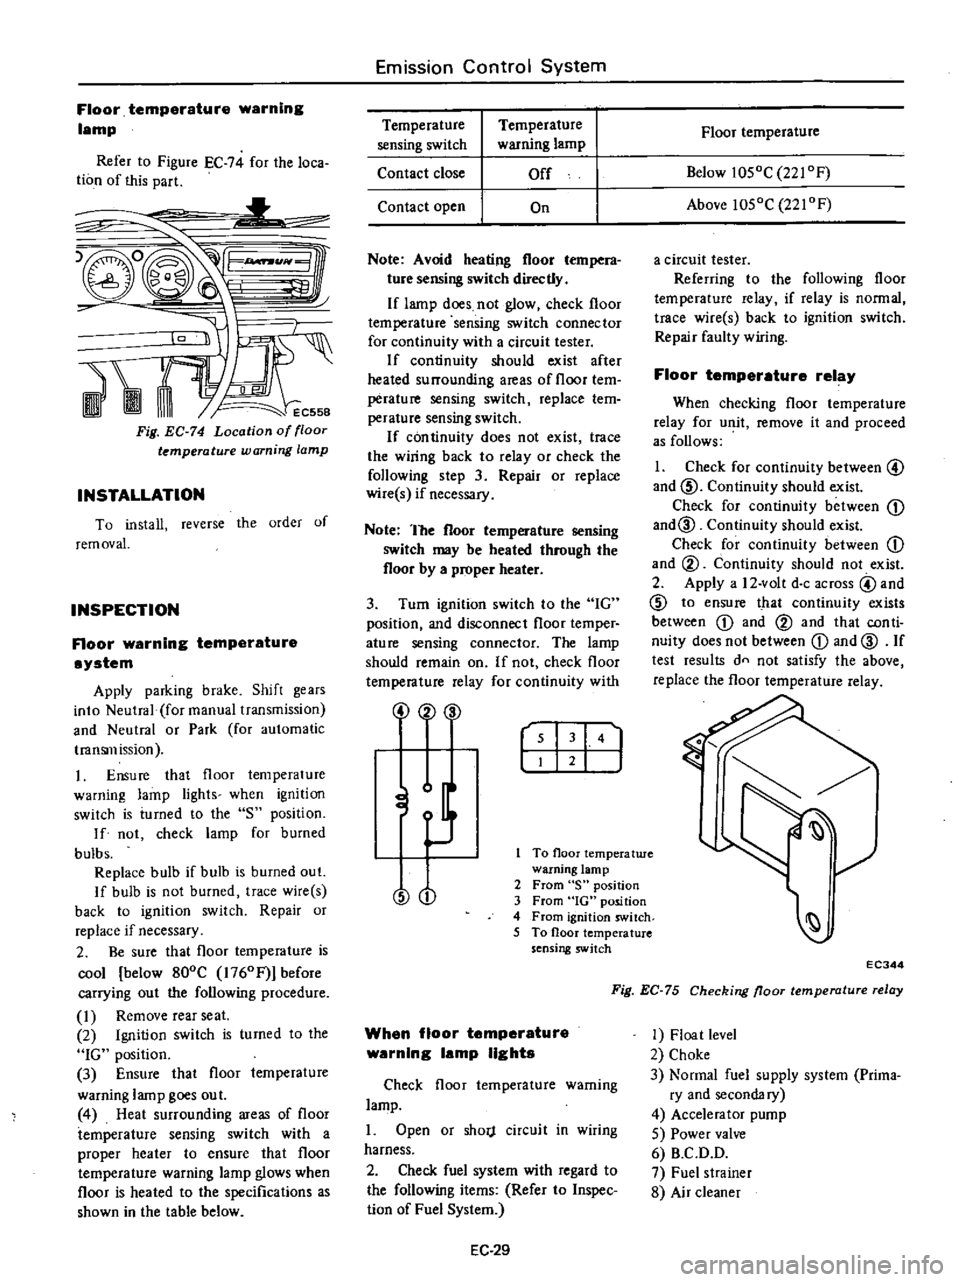
Refer
to
Figure
EC
74
for
the
loca
tion
of
this
part
L
1t
1
RAt
Fig
EC
74
Location
of
floor
temperature
warning
lamp
INSTALLATION
To
install
reverse
the
order
of
rem
ovaL
INSPECTION
Floor
warning
temperature
system
Apply
parking
brake
Shift
gears
into
Neutral
foI
manual
transmission
and
Neutral
or
Park
for
automatic
transmission
1
Ensure
that
floor
temperature
warning
lamp
lights
when
ignition
switch
is
iumed
to
the
S
position
If
not
check
lamp
for
burned
bulbs
Replace
bulb
if
bulb
is
burned
out
If
bulb
is
not
burned
trace
wire
s
back
to
ignition
switch
Repair
or
replace
if
necessary
2
Be
sure
that
floor
temperature
is
cool
below
800C
1760Fj
before
carrying
out
the
following
procedure
I
Remove
rearseat
2
Ignition
switch
is
turned
to
the
IG
position
3
Ensure
that
floor
temperature
warning
lamp
goes
out
4
Heat
surrounding
areas
of
floor
temperature
sensing
switch
with
a
proper
heater
to
ensure
that
floor
temperature
warning
lamp
glows
when
floor
is
heated
to
the
specifications
as
shown
in
the
table
below
Emission
Control
System
Temperature
sensing
switch
Contact
close
Temperature
warning
lamp
Off
Contact
open
On
Note
Avoid
heating
floor
tempera
ture
sensing
switch
directly
If
lamp
does
not
glow
check
floor
temperature
sensing
switch
connector
for
continuity
with
a
circuit
tester
If
continuity
should
exist
after
heated
surrounding
areas
of
floor
tem
perature
sensing
switch
replace
tem
perature
sensing
switch
If
con
tinuity
does
not
exist
trace
the
wiring
back
to
relay
or
check
the
following
step
3
Repair
or
replace
wire
s
if
necessary
Note
The
floor
temperature
sensing
switch
may
be
heated
through
the
floor
by
a
proper
heater
3
Turn
ignition
switch
to
the
IG
position
and
disconnect
floor
temper
ature
sensing
connector
The
lamp
should
remain
on
If
not
check
floor
temperature
relay
for
continuity
with
2
00
r
I
141
J
To
floor
temperatwe
warning
lamp
2
From
S
position
3
From
IG
position
4
From
ignition
switch
5
To
floor
temperature
sensing
switch
O
When
floor
temperature
warning
lamp
lights
Check
floor
temperature
warning
lamp
1
Open
or
shorj
circuit
in
wiring
harness
2
Check
fuel
system
with
regard
to
the
following
items
Refer
to
Inspec
lion
of
Fuel
System
EC
29
Floor
temperature
Below
1050C
221
OF
Above
1050C
221
OF
a
circuit
tester
Referring
to
the
following
floor
temperature
relay
if
relay
is
normal
trace
wire
s
back
to
ignition
switch
Repair
faulty
wiring
Floor
temperature
relay
When
checking
floor
temperature
relay
for
unit
remove
it
and
proceed
as
follows
1
Check
for
continuity
between
@
and
ID
Continuity
should
exist
Check
for
continuity
between
CD
and@
Continuity
should
exist
Check
for
continuity
between
CD
and
@
Continuity
should
not
exist
2
Apply
a
12
volt
doc
across
@
and
ID
to
ensure
that
continuity
exists
between
CD
and
@
and
that
con
ti
nuity
does
not
between
CD
and
@
If
test
results
dn
not
satisfy
the
above
replace
the
floor
temperature
relay
EC344
Fig
EC
75
Checking
floor
temperature
relay
1
Float
level
2
Choke
3
Normal
fuel
supply
system
Prima
ry
and
secondary
4
Accelerator
pump
5
Power
valve
6
B
C
D
D
7
Fuel
strainer
8
Air
cleaner
Page 172 of 537
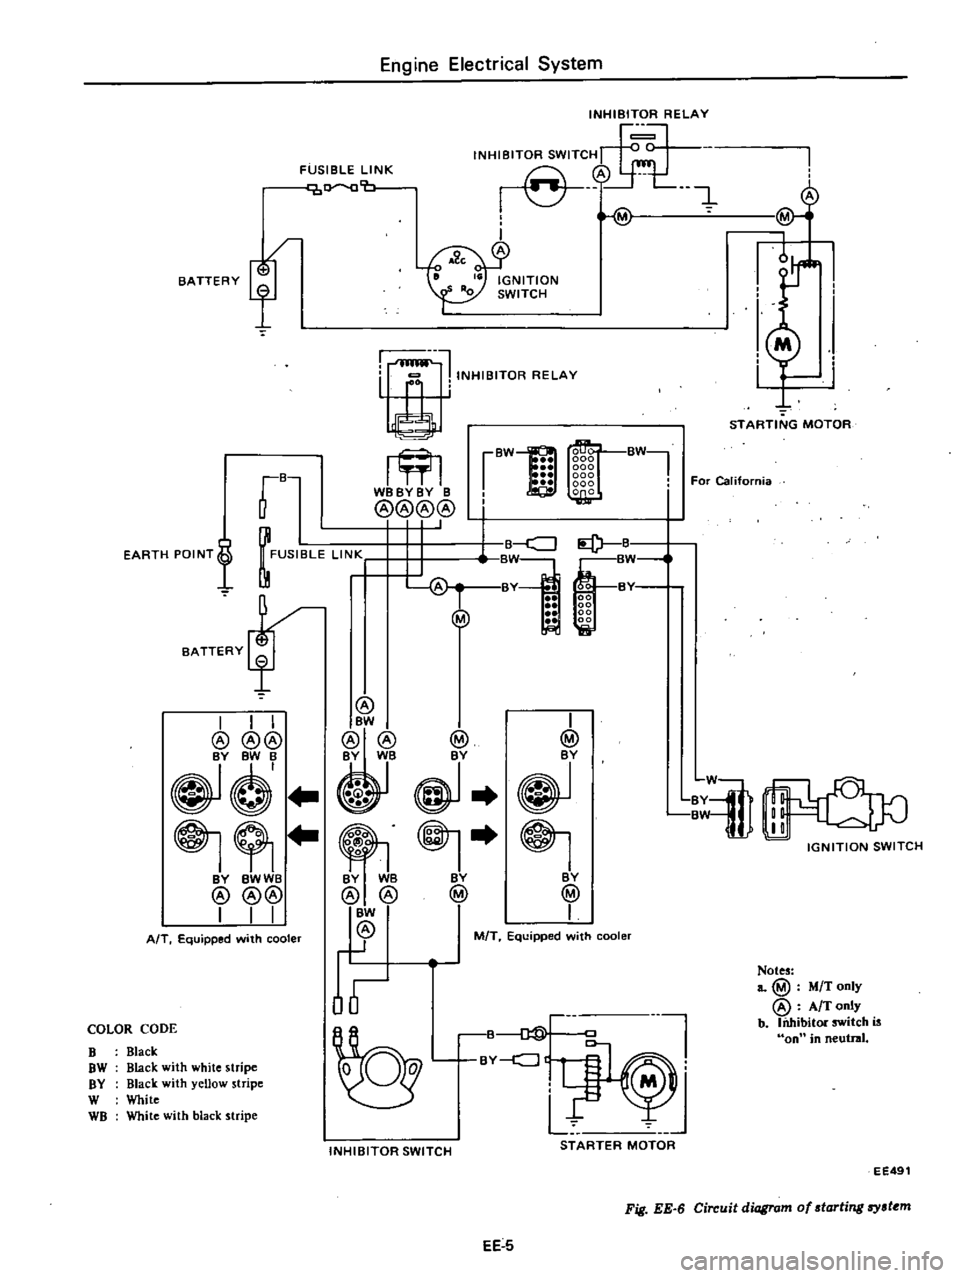
fB
WBBYBY
B
@@@@
I
I
FUSIBLE
lIN
r
T
H
BATTERY
rJ
BATTERY
f
EARTH
POINT
f
I
I
I
@@@
Y
BY
BWWB
@@@
I
I
I
AfT
E
quipped
with
cooler
COLOR
CODE
B
Black
OW
Black
with
white
stripe
BY
Black
with
yellow
stripe
W
White
WB
White
with
black
stripe
Engine
Electrical
System
FUSIBLE
LINK
1Y
O
b
INHIBITOR
RELAY
INHIBITOR
SWITCH
A
I
J
Y
@
I
A
l
rBW
j
CJ
B
W
BWI
000
000
ggg
For
California
I
Bd
f
00
00
00
00
Q
BW
B
Y
BY
WB
BY
@
@
@
BW
@
I
M
T
Equipped
with
cooler
@
I
@
BY
BY
@
I
STARTING
MOTOR
l
BY
BW
9
IGNITION
SWITCH
L
INHIBITOR
SWITCH
STARTER
MOTOR
Notes
a
@
M
T
only
@
A
T
only
b
Inhibitor
switch
is
on
in
neutral
EE
5
Fig
EE
6
Circuit
diagram
0
starting
systom
eE491