dimensions DATSUN PICK-UP 1977 Service Manual
[x] Cancel search | Manufacturer: DATSUN, Model Year: 1977, Model line: PICK-UP, Model: DATSUN PICK-UP 1977Pages: 537, PDF Size: 35.48 MB
Page 53 of 537
r
Engine
Mechanical
INSPECTION
AND
REPAIR
PREPARATION
FOR
INSPECTION
CYLINDER
HEAD
AND
VALVE
CHECKING
CYLINDER
HEAD
MATING
FACE
VALVE
ASSEMBLY
VALVE
SPRING
ROCKER
ARM
AND
VALVE
ROCKER
PIVOT
VALVE
GUIDE
VALVE
SEAT
INSERTS
CAMSHAFT
AND
CAMSHAFT
BEARING
CAMSHAFT
BEARING
CLEARANCE
VALVE
TIMING
CAMSHAFT
ALIGNMENT
CYLINDER
BLOCK
HOW
TO
MEASURE
CYLINDER
BORE
CYLINDER
BORING
PREPARATION
FOR
INSPECTI
N
I
Before
cleaning
check
for
signs
of
water
and
oil
leaks
in
cylinder
block
and
head
2
Clean
oil
carbon
deposits
and
sealant
from
an
parts
Remove
gasket
3
Clean
all
oil
holes
with
solvent
and
dry
with
compressed
air
Make
sure
that
they
are
not
restricted
CYLINDER
HEAD
AND
VALVE
CHECKING
CYLINDER
HEAD
MATING
FACE
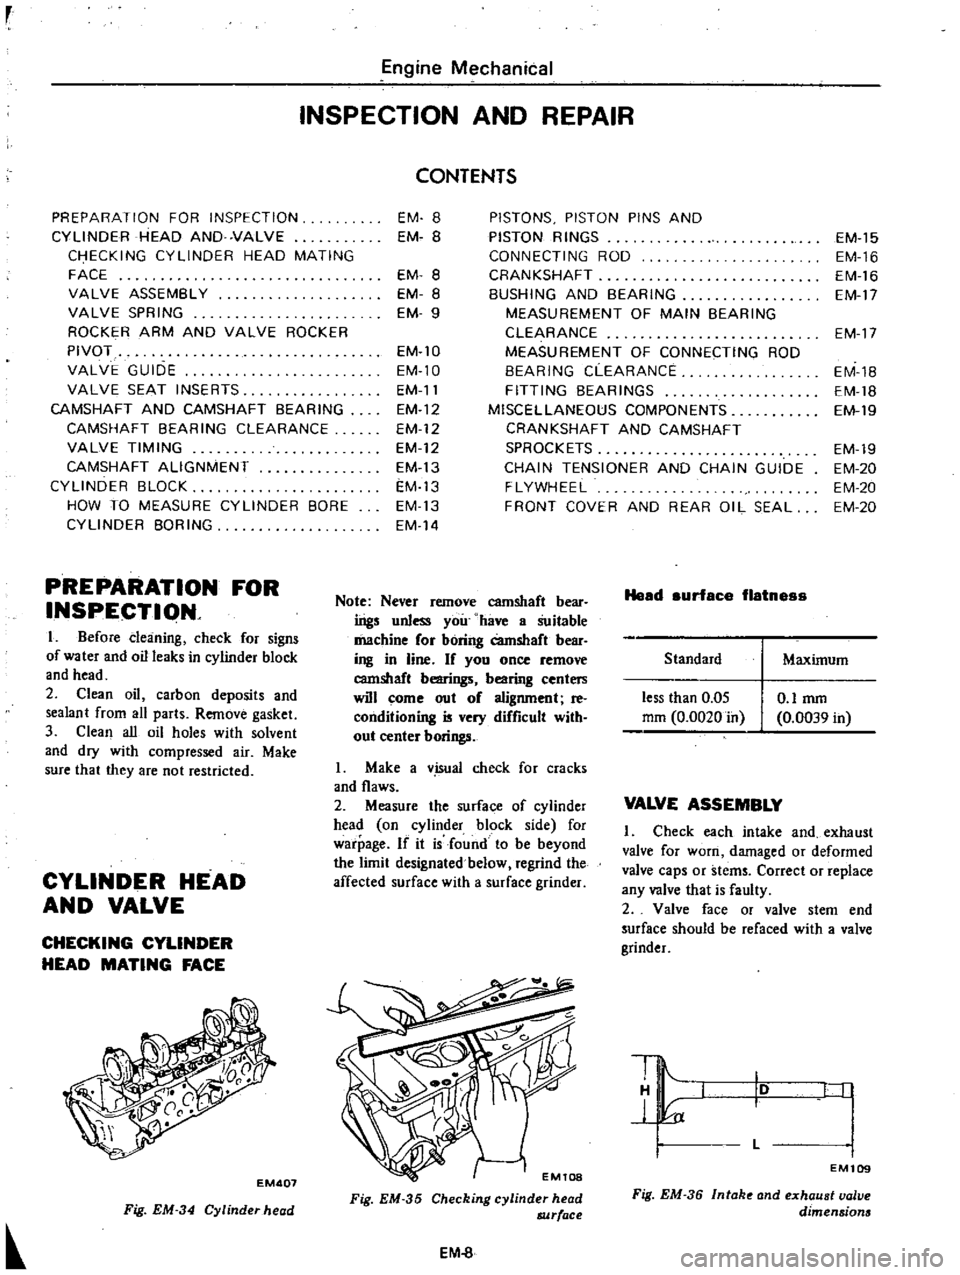
EM407
Fig
EM
34
Cylinder
head
CONTENTS
EM
8
EM
B
EM
8
EM
8
EM
9
EM
lO
EM
l0
EM
11
EM
12
EM
12
EM
12
EM
13
EM
13
EM
13
EM
14
PISTONS
PISTON
PINS
AND
PISTON
RINGS
CONNECTING
ROD
CRANKSHAFT
BUSHING
AND
BEARING
MEASUREMENT
OF
MAIN
BEARING
CLEARANCE
MEASUREMENT
OF
CONNECTING
ROD
BEARING
CLEARANCE
FITTING
BEARINGS
MISCELLANEOUS
COMPONENTS
CRANKSHAFT
AND
CAMSHAFT
SPROCKETS
CHAIN
TENSIONER
AND
CHAIN
GUIDE
FLYWHEEL
FRONT
COVER
AND
REAR
OIL
SEAL
Note
Never
remove
camshaft
bear
ings
unless
you
have
a
Suitable
machine
or
boring
Camshaft
bear
ing
in
line
If
you
once
remove
camshaft
bearings
bearing
centers
will
come
out
o
alignment
reo
conditioning
is
very
difficult
with
out
center
borings
L
Make
a
v
isual
check
for
cracks
and
flaws
2
Measure
the
surface
of
cylinder
head
on
cylinder
block
side
for
warpage
If
it
is
found
to
be
beyond
the
limit
designated
below
regrind
the
affected
surface
with
a
surface
grinder
Fig
EM
35
Checking
cylinder
head
8JJrface
EM
8
Head
surface
flatnes
Standard
less
than
0
05
mm
0
0020
in
O
lmm
0
0039
in
EM
15
EM
16
EM
16
EM
17
EM
17
EM
1B
EM
18
EM
19
EM
19
EM
20
EM
20
EM
20
Maximum
VALVE
ASSEMBLY
Check
each
intake
and
exhaust
valve
for
worn
damaged
or
deformed
valve
caps
or
stems
Correct
or
replace
any
valve
that
is
faulty
2
Valve
face
or
valve
stem
end
surface
should
be
refaced
with
a
valve
grinder
10
L
I
I
I
EM109
Fig
EM
36
Intak
and
exhaust
valve
dimensions
Page 56 of 537
q
1
I
k
k
lO
i
I
37
9
to
38
1
eel
1
492
to
1
500
dis
co
q
0
45
597
to
45
613
1
795
to
1
796
dia
5
Correct
valve
seat
surface
with
new
valve
guide
as
the
axis
VALVE
SEAT
INSERTS
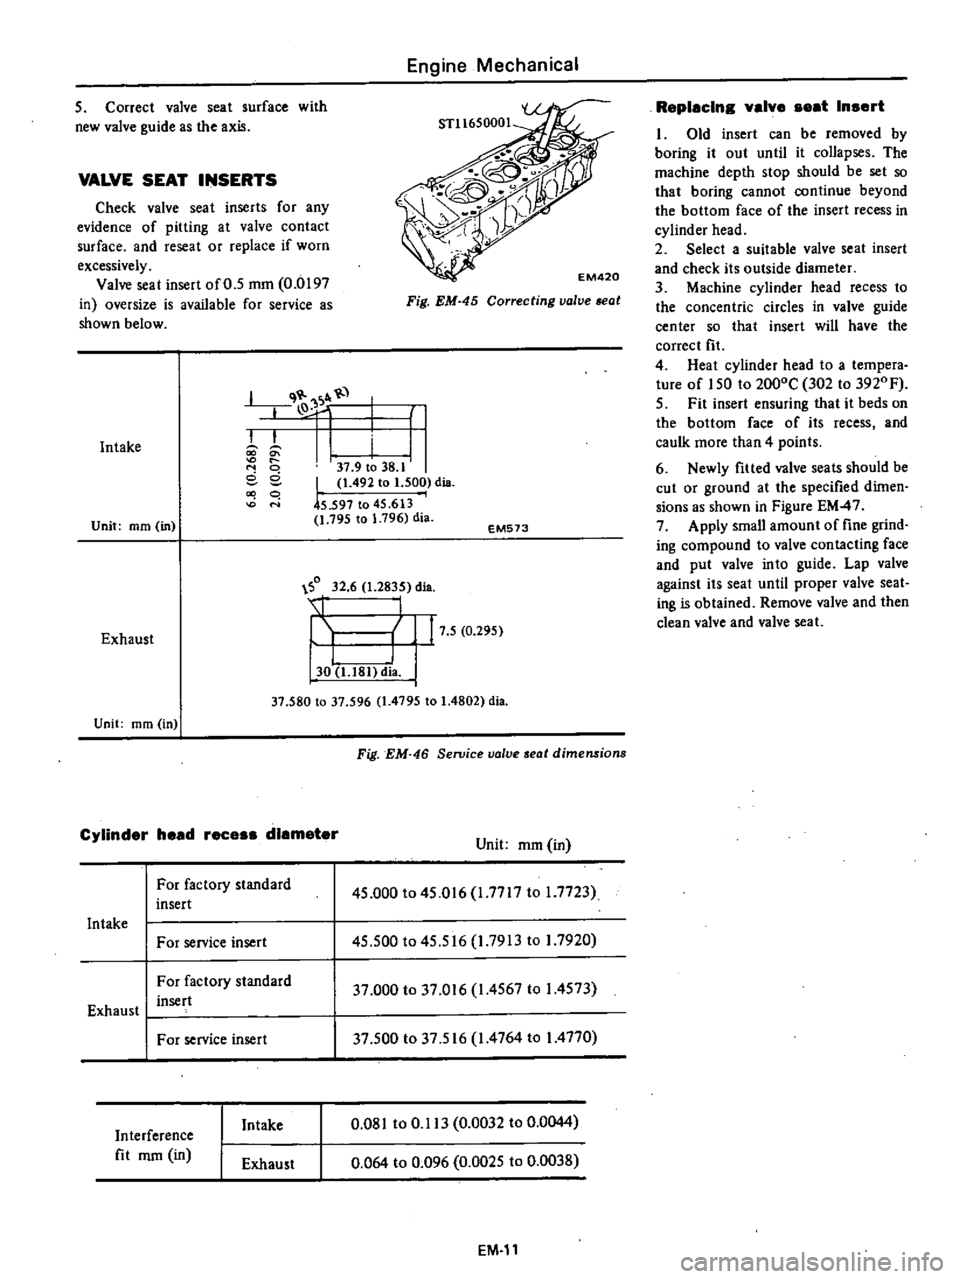
Check
valve
seat
inserts
for
any
evidence
of
pitting
at
valve
contact
surface
and
reseat
or
replace
if
worn
excessively
Valve
seat
insert
of
0
5
mm
0
0197
in
oversize
is
available
for
service
as
shown
below
Intake
Unit
mm
in
Engine
Mechanical
Fig
EM
45
Correcting
valve
seat
EM573
0
32
6
1
2835
dia
Exhaust
I
I
30
U81
dia
17
5
0
295
Unit
mm
in
37
580
to
37
596
1
4795
to
1
4802
dia
Cylinder
head
rece
diameter
For
factory
standard
insert
Intake
For
service
insert
For
factory
standard
insert
Exhaust
I
For
service
insert
Interference
fit
mm
in
Intake
Exhaust
Fig
EM
46
Seroice
valve
seat
dimensions
Unit
mm
in
45
000
to
45
016
1
7717
to
1
7723
45
500
to
45
516
1
7913
to
I
7920
37
000
to
37
016
1
4567
to
I
4573
37
500
to
37
516
1
4764
to
I
4770
0
081
to
0
113
0
0032
to
0
0044
0
064
to
0
096
0
0025
to
0
0038
EM
11
Replacln
valve
eat
In
ert
1
Old
insert
can
be
removed
by
boring
it
out
until
it
collapses
The
machine
depth
stop
should
be
set
so
that
boring
cannot
continue
beyond
the
bottom
face
of
the
insert
recess
in
cylinder
head
2
Select
a
suitable
valve
seat
insert
and
check
its
outside
diameter
3
Machine
cylinder
head
recess
to
the
concentric
circles
in
valve
guide
center
so
that
insert
will
have
the
correct
fit
4
Heat
cylinder
head
to
a
tempera
ture
of
150
to
2000C
302
to
3920
F
5
Fit
insert
ensuring
that
it
beds
on
the
bottom
face
of
its
recess
and
caulk
more
than
4
points
6
Newly
fitted
valve
seats
should
be
cut
or
ground
at
the
specified
dimen
sions
as
shown
in
Figure
EM
47
7
Apply
small
amount
of
fine
grind
ing
compound
to
valve
contacting
face
and
put
valve
into
guide
Lap
valve
against
its
seat
until
proper
valve
seat
ing
is
obtained
Remove
valve
and
then
clean
valve
and
valve
sea
1
Page 57 of 537
Intake
Engine
Mechanical
I
600
38
1
496I
dia
W
39
6
I
559Ildia
1
8
1
6457
dia
45
1
71l1
Unit
mm
in
Exhaust
30
30
1
l811
di
I
32
6
2835
dia
34
6
1
3622
dia
137
1
4567
dia
Unit
mm
m
CAMSHAFT
AND
CAMSHAFT
BEARING
CAMSHAnBEARING
CLEARANCE
Measure
inside
diameter
of
earn
haft
beating
with
an
inside
dial
gauge
and
outside
diameter
of
camshaft
jour
nal
with
a
micrometer
If
wear
is
found
inside
of
bracket
replace
cyl
inder
head
assembly
EM121
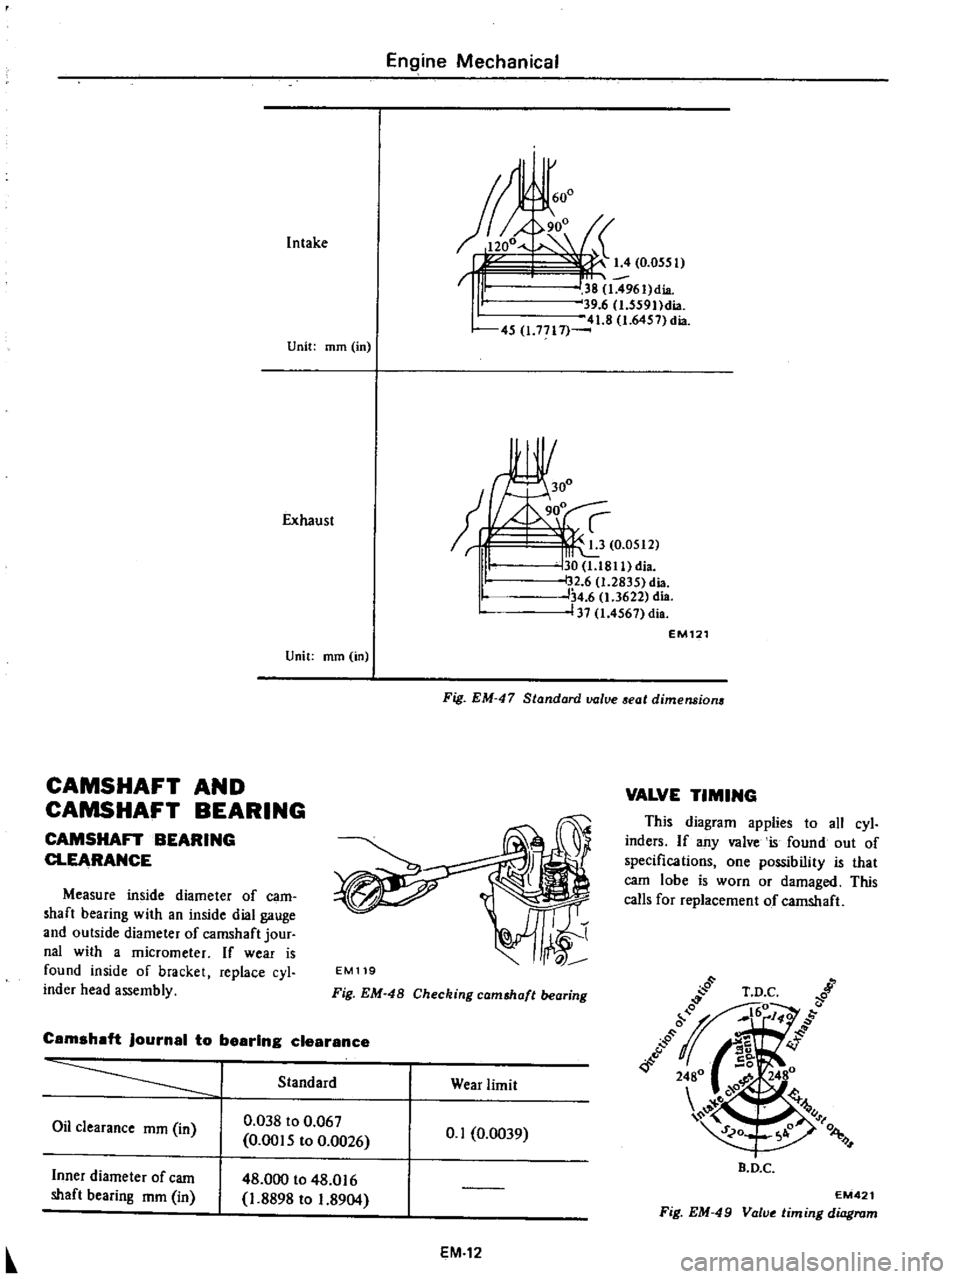
Fig
EM
47
Standard
value
aeat
dimensions
EM119
Fig
EM
48
Checking
cam
haft
bearing
Camshaft
journal
to
bearing
clearance
Standard
Wear
limit
Oil
clearance
mm
in
0
038
to
0
067
0
0015
to
0
0026
0
1
0
0039
Inner
diameter
of
earn
shaft
bearing
mm
in
48
000
to
48
016
1
8898
to
1
8904
EM
12
VALVE
TIMING
This
diagram
applies
to
all
cyl
inders
If
any
valve
is
found
out
of
specifications
one
possibility
that
carn
lobe
is
worn
or
damaged
This
calls
for
replacement
of
camshaft
B
D
C
EM421
Fig
EM
49
Value
timing
diagram
Page 61 of 537
r
Piston
pin
outside
diameter
Piston
pin
hole
diameter
Piston
pin
to
piston
clearance
I
Interference
fit
of
piston
pin
to
connecting
rod
CONNECTING
ROD
I
If
a
connecting
rod
has
any
flaw
on
either
side
of
the
thrust
face
or
the
large
end
correct
or
replace
it
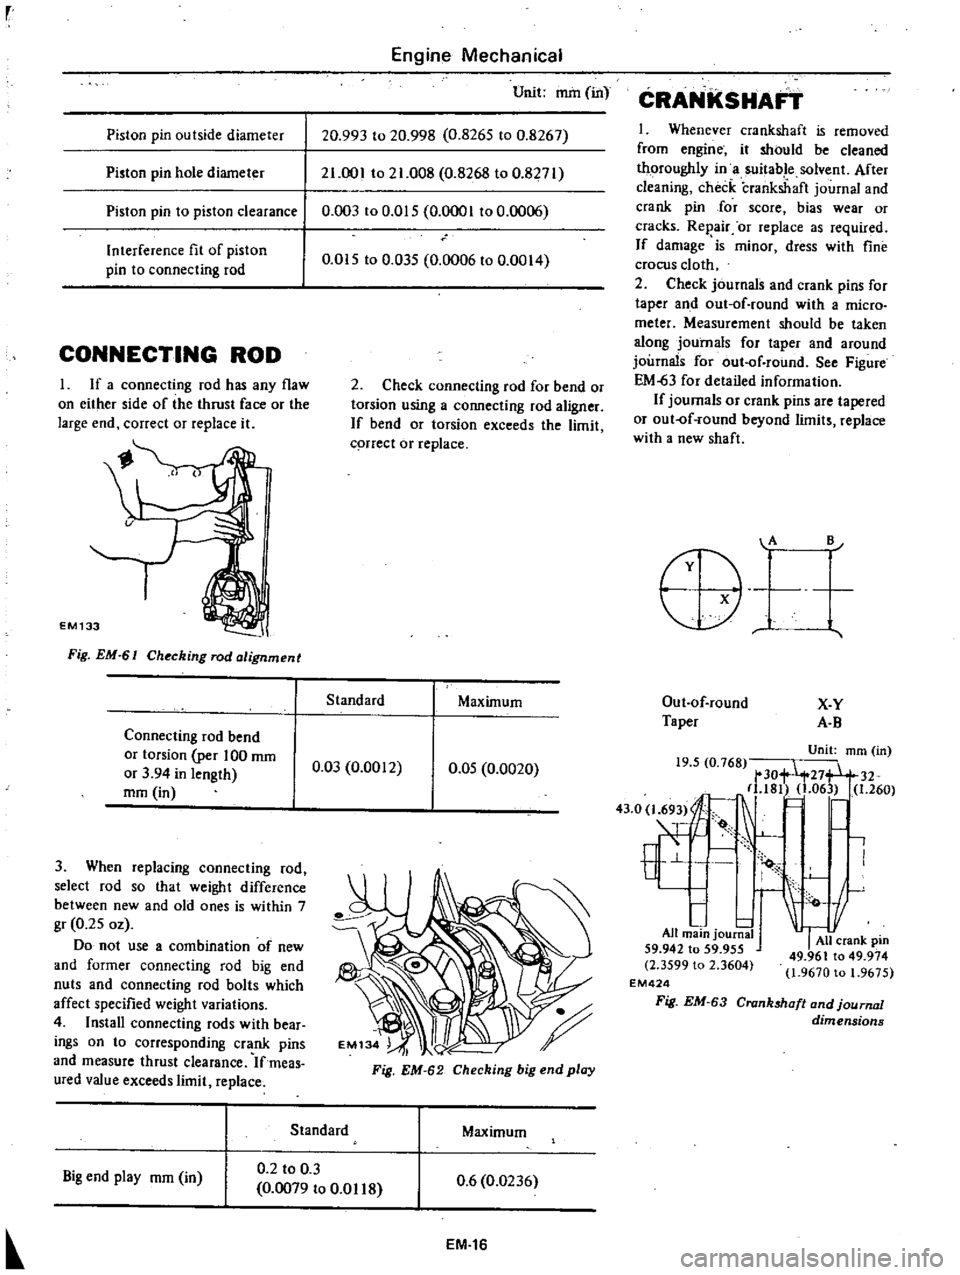
EM133
Fig
EM
61
Ch
cking
rod
alignment
Connecting
rod
bend
or
torsion
per
100
mm
or
3
94
in
length
mm
in
3
When
replacing
connecting
rod
select
rod
so
that
weight
difference
between
new
and
old
ones
is
within
7
gr
0
25
oz
Do
not
use
a
combination
of
new
and
former
connecting
rod
big
end
nuts
and
connecting
rod
bolts
which
affect
specified
weight
variations
4
Install
connecting
rods
with
bear
ings
on
to
corresponding
crank
pins
and
measure
thrust
clearance
Ifmeas
ured
value
exceeds
limit
replace
Engine
Mechanical
Unit
mm
in
20
993
to
20
998
0
8265
to
0
8267
21
001
to
21
008
0
8268
to
0
8271
0
003
to
0
015
0
0001
to
0
006
0
015
to
0
035
0
0006
to
0
0014
2
Check
connecting
rod
for
bend
or
torsion
using
a
connecting
rod
aligner
If
bend
or
torsion
exceeds
the
limit
q
rrect
or
replace
Standard
Maximum
0
03
0
0012
0
05
0
0020
Fig
EM
62
Checking
big
end
play
Standard
Maximum
Big
end
play
mm
in
0
2
to
0
3
0
0079
to
0
01
18
0
6
0
0236
EM
16
CRANKSHAFT
1
Whenever
crankshaft
is
removed
from
engine
it
should
be
cleaned
thoroughly
in
a
suitable
solvent
After
cleaning
check
crankshaft
journal
and
crank
pin
Jor
score
bias
wear
or
cracks
Rep
air
or
replace
as
required
If
damage
is
minor
dress
with
fine
crocus
cloth
2
Check
journals
and
crank
pins
for
taper
and
out
of
round
with
a
micro
meter
Measurement
should
be
taken
along
journals
for
taper
and
around
journals
for
out
of
round
See
Figure
EM
63
for
detailed
information
If
journals
or
crank
pins
are
tapered
or
out
of
round
beyond
limits
replace
with
a
new
shaft
A
B
Out
of
round
X
Y
Taper
A
B
Unit
mm
in
19
5
0
768
tt
30
27
32
181
1
06
1
260
43
O
l
69
I
E
1
All
main
journa
59
942
to
59
955
All
crank
pm
2
3599
l
2
3604
49
961
to
49
974
o
1
9670
to
1
9675
EM424
Fig
EM
63
Crankshaft
and
journal
dimensions
Page 70 of 537
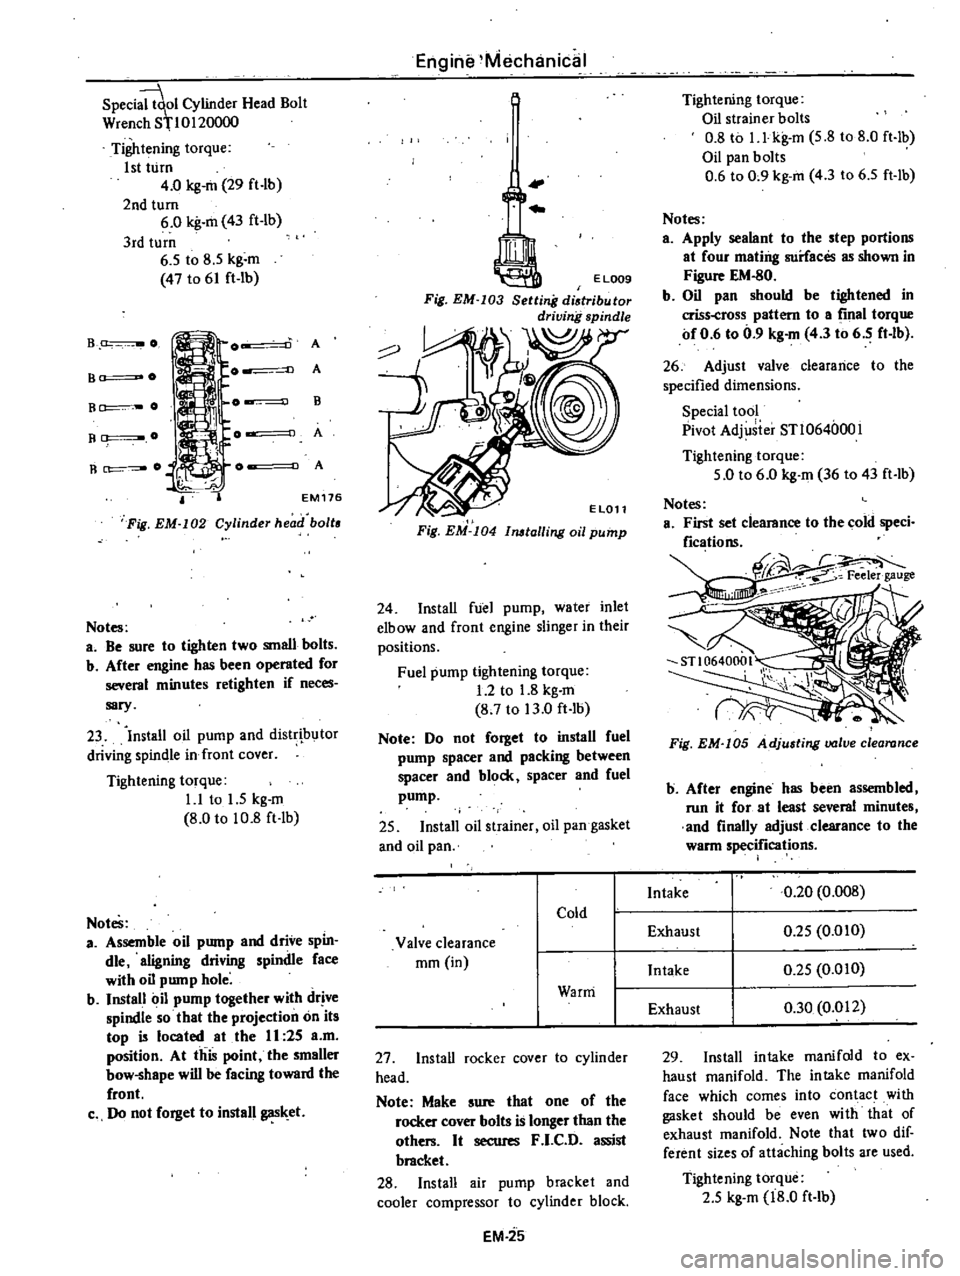
Speci
ol
Cylinder
Head
Bolt
Wren
h
8110120000
Tightening
torque
1st
turn
4
0
kg
m
29
ft
lb
2nd
turn
6
0
kg
m
43
ft
lb
3rd
turn
6
5
to
8
5
kg
m
47
to
61
ft
lb
B
O
A
A
B
A
A
B
O
B
O
R
O
EM
176
Fig
EM
I02
Cylinder
head
boll
Notes
a
Be
sure
to
tighten
two
small
bolts
b
After
engine
has
been
operated
for
several
minutes
retighten
if
neces
sary
23
Install
oil
pump
and
distr
butor
driving
spindle
in
front
cover
Tightening
torque
1
1
to
1
5
kg
m
8
0
to
10
8
ft
lb
Notes
a
Assemble
oil
pump
and
drive
spin
die
aligning
driving
spindle
face
with
oil
pump
hole
b
Install
oil
pump
together
with
drive
spindle
so
that
the
projection
on
its
top
is
located
at
the
II
25
a
m
position
At
this
point
the
smaller
bow
shape
will
be
facing
toward
the
front
c
Do
not
forget
to
install
gas
et
Engine
Mechanical
I
Fig
EM
I04
11l6lalling
oil
pump
24
Install
fuel
pump
water
inlet
elbow
and
front
engine
slinger
in
their
positions
Fuel
pump
tightening
torque
1
2
to
1
8
kg
m
8
7
to
13
0
ft
lb
Note
Do
not
forget
to
install
fuel
pump
spacer
and
packing
between
spacer
and
block
spacer
and
fuel
pump
25
Install
oil
strainer
oil
pan
gasket
and
oil
pan
27
Install
rocker
cover
to
cylinder
head
Note
Make
sure
that
one
of
the
rocker
cover
bolts
is
longer
than
the
others
It
secures
F
I
C
D
assist
bracket
28
Install
air
pump
bracket
and
cooler
compressor
to
cylinder
block
EM
25
Tightening
torque
Oil
strainer
bolts
0
8
to
I
l
kg
m
5
8
to
8
0
ft
lb
Oil
pan
bolts
0
6
to
0
9
kg
m
4
3
to
6
5
ft
lb
Notes
a
Apply
sealant
to
the
step
portions
at
four
mating
surfaces
as
shown
in
Figure
EM
80
b
Oil
pan
should
be
tigh
tened
in
criss
cross
pattern
to
a
final
torque
of
0
6
to
0
9
kg
m
4
3
to
6
5
ft
lb
26
Adjust
valve
clearance
to
the
specified
dimensions
Special
tool
Pivot
Adj
iier
STl064000l
Tightening
torque
5
0
to
6
0
kg
m
36
to
43
ft
lb
Fig
EM
I05
Adjusting
valve
clearance
b
After
engine
has
been
assembled
run
it
for
at
least
several
minutes
and
finally
adjust
clearance
to
the
warm
specifications
29
Install
intake
manifold
to
ex
haust
manifold
The
intake
manifold
face
which
comes
into
contact
with
gasket
should
be
even
with
that
of
exhaust
manifold
Note
that
two
dif
ferent
sizes
of
attaching
bolts
are
used
Tightening
torque
2
5
kg
m
18
0
ft
lb
Page 354 of 537
Level
line
Level
line
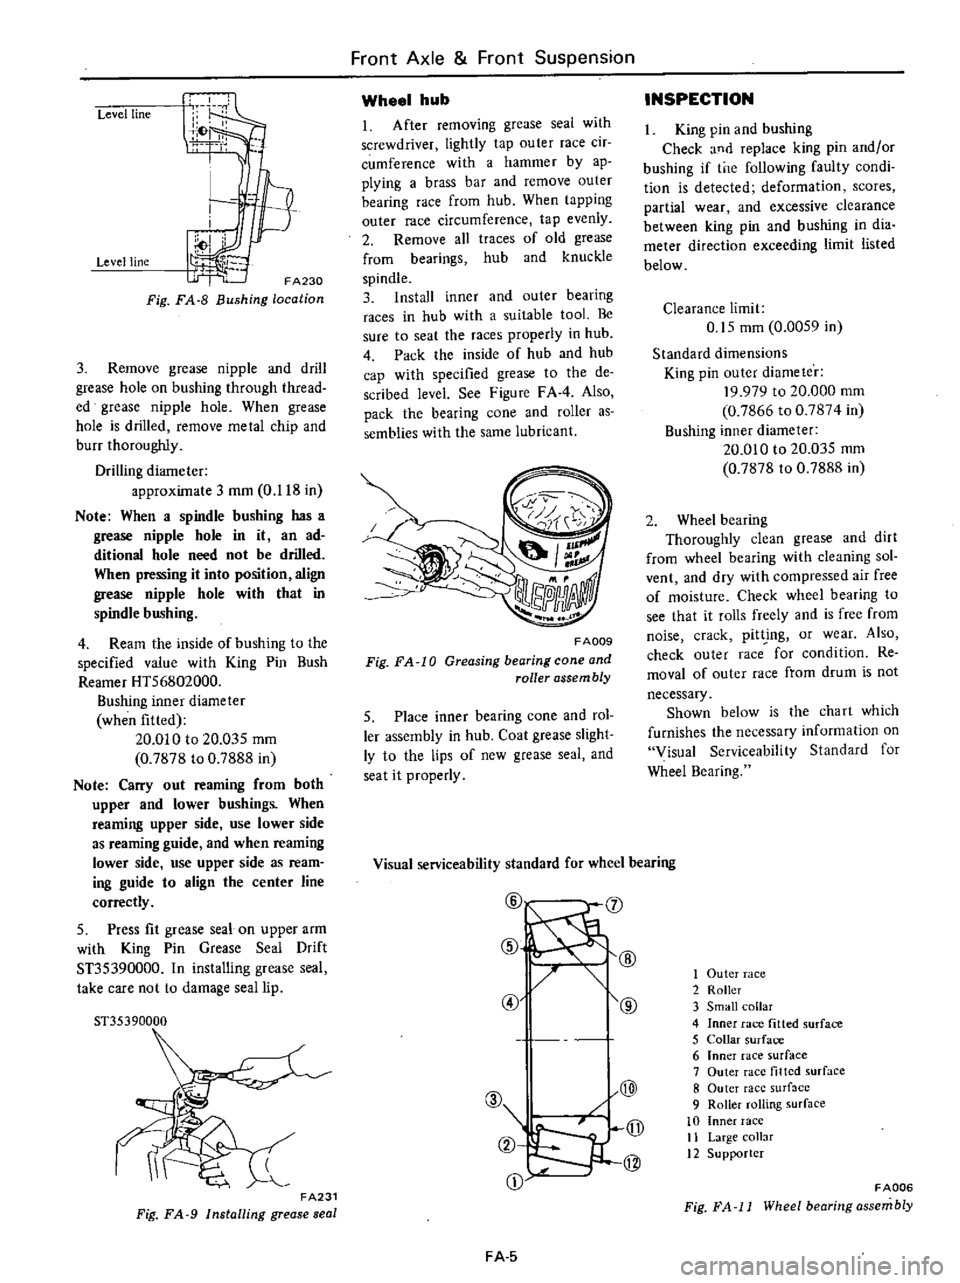
FA230
Fig
FA
8
Bushing
location
3
Remove
grease
nipple
and
drill
grease
hole
on
bushing
through
thread
ed
grease
nipple
hole
When
grease
hole
is
drilled
remove
metal
chip
and
burr
thoroughly
Drilling
diameter
approximate
3
mOl
0
118
in
Note
When
a
spindle
bushing
has
a
grease
nipple
hole
in
it
an
ad
ditional
hole
need
not
be
drilled
When
pressing
it
into
position
align
grease
nipple
hole
with
that
in
spindle
bushing
4
Ream
the
inside
of
bushing
to
the
specified
value
with
King
Pin
Bush
Reamer
HT56802000
Bushing
inner
diameter
when
fitted
20
010
to
20
03S
mOl
0
7878
to
0
7888
in
Note
Carry
out
reaming
from
both
upper
and
lower
bushings
When
reaming
upper
side
use
lower
side
as
reaming
guide
and
when
reaming
lower
side
use
upper
side
as
ream
ing
guide
to
align
the
center
line
correctly
5
Press
fit
grease
seal
on
upper
arm
with
King
Pin
Grease
Seal
Drift
ST35390000
In
installing
grease
seal
take
care
not
to
damage
seal
lip
51
35390000
FA231
Fig
FA
9
Installing
grease
seal
Front
Axle
Front
Suspension
Wheel
hub
1
After
removing
grease
seal
with
screwdriver
lightly
tap
outer
race
cir
cumference
with
a
hammer
by
ap
plying
a
brass
bar
and
remove
outer
bearing
race
from
hub
When
tapping
outer
race
circumference
tap
evenly
2
Remove
all
traces
of
old
grease
from
bearings
hub
and
knuckle
spindle
3
Install
inner
and
outer
bearing
races
in
hub
with
a
suitable
tool
Be
sure
to
seat
the
races
properly
in
hub
4
Pack
the
inside
of
hub
and
hub
cap
with
specified
grease
to
the
de
scribed
level
See
Figure
FAA
Also
pack
the
bearing
cone
and
roller
as
semblies
with
the
same
lubricant
FA009
Fig
FA
10
Greasing
bearing
cone
and
roller
assembly
5
Place
inner
bearing
cone
and
rol
ler
assembly
in
hub
Coat
grease
slight
ly
to
the
lips
of
new
grease
seal
and
seat
it
properly
INSPECTION
King
pin
and
bushing
Check
and
replace
king
pin
andlor
bushing
if
tne
following
faulty
condi
tion
is
detected
deformation
scores
partial
wear
and
excessive
clearance
between
king
pin
and
bushing
in
dia
meter
direction
exceeding
limit
listed
below
Clearance
limit
0
15
mOl
0
00S9
in
Standard
dimensions
King
pin
outer
diameter
19
979
to
20
000
mm
0
7866
to
0
7874
in
Bushing
inner
diameter
20
010
to
20
035
mOl
0
7878
to
0
7888
in
2
Wheel
bearing
ThorougWy
clean
grease
and
dirt
from
wheel
bearing
with
cleaning
sol
vent
and
dry
with
compressed
air
free
of
moisture
Check
wheel
bearing
to
see
that
it
rolls
freely
and
is
free
from
noise
crack
pit
ing
or
wear
Also
check
outer
race
for
condition
Re
moval
of
outer
race
from
drum
is
not
necessary
Shown
below
is
the
cha
rt
which
furnishes
the
necessary
information
on
Visual
Serviceability
Standard
for
Wheel
Bearing
Visual
serviceability
standard
for
wheel
bearing
@
J
@
@
@
@
@
A
Q
jJ
2
@
CD
FA
5
1
Outer
race
2
Roller
3
Small
collar
4
Inner
race
fitted
surface
5
Collar
surface
6
Inner
race
surface
7
Outer
race
tilted
surface
8
Outer
race
surf
lcc
9
Roller
rolling
surface
10
Inner
race
11
Large
collar
12
Supporter
FADD6
Fig
FA
11
Wheel
bearing
assembly
Page 359 of 537
UPPER
AND
LOWER
LINKS
REMOVAL
AND
INSTALLATION
Removal
I
Raise
vehicle
on
a
hoist
or
stands
2
Remove
wheel
and
brake
drum
as
an
assembly
3
Remove
wheel
hub
Refer
to
see
tion
Front
Axle
4
Loosen
bolts
retaining
brake
disc
to
knuckle
spindle
and
remove
brake
disc
5
Remove
knuckle
arm
torsion
bar
spimgJ
stabilizer
shock
absorber
and
tension
rod
in
t
ili
order
referring
the
related
sections
6
Remove
upper
fulcrum
bolt
se
curing
knuckle
spindle
support
to
upper
link
assembly
and
disassemble
them
7
Remove
upper
link
bushings
from
knuckle
spindle
support
8
Remove
screw
bushings
from
both
ends
of
lower
link
fulcrum
pin
9
Loosen
nut
at
lower
portion
of
knuckle
spindle
support
from
inside
and
pull
out
cotter
pin
retaining
ful
crum
pin
10
Pull
out
fulcrum
pin
with
drift
and
remove
knuckle
spindle
support
with
knuckle
spindle
from
lower
link
Then
detach
dust
cover
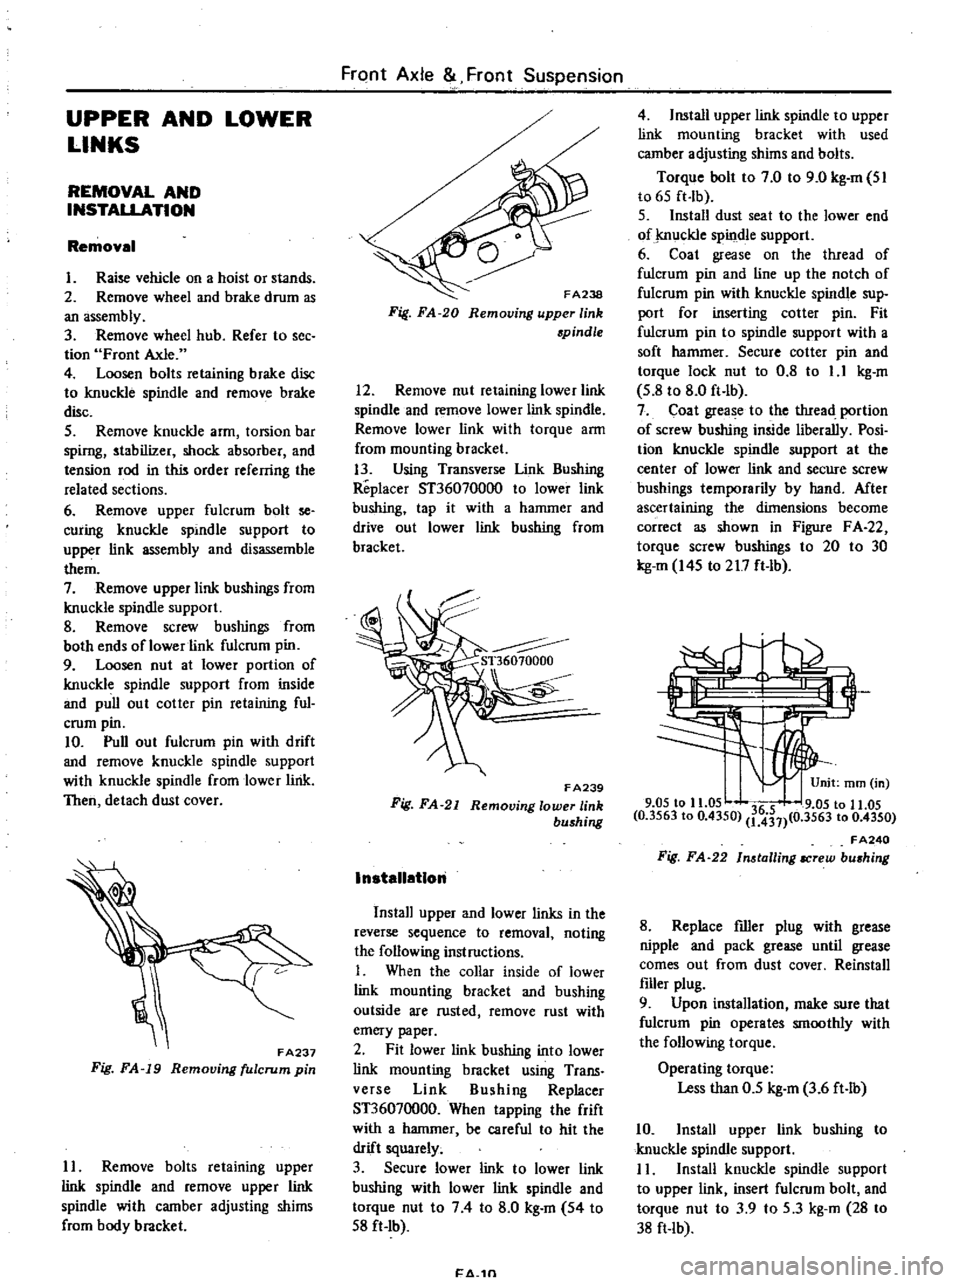
FA237
Fig
FA
19
Removing
fulcrum
pin
II
Remove
bolts
retaining
upper
link
spindle
and
remove
upper
link
spindle
with
camber
adjusting
shims
from
body
bracket
FrClnt
Axle
Front
Suspension
FA238
Fig
FA
20
Removing
upper
link
spindle
12
Remove
nut
retaining
lower
link
spindle
and
remove
lower
link
spindle
Remove
lower
link
with
torque
arm
from
mounting
bracket
13
Using
Transverse
Unk
Bushing
Replacer
ST36070000
to
lower
link
bushing
tap
it
with
a
hammer
and
drive
out
lower
link
bushing
from
bracket
F
A239
Fig
FA
21
Removing
lower
link
bushing
InstallatIon
Install
upper
and
lower
links
in
the
reverse
sequence
to
removal
noting
the
following
instructions
I
When
the
collar
inside
of
lower
link
mounting
bracket
and
bushing
outside
are
rusted
remove
rust
with
emery
paper
2
Fit
lower
link
bushing
into
lower
link
mounting
bracket
using
Trans
verse
Link
Bushing
Replacer
ST36070000
When
tapping
the
frift
with
a
hammer
be
careful
to
hit
the
drift
squarely
3
Secure
lower
link
to
lower
link
bushing
with
lower
link
spindle
and
torque
nut
to
74
to
8
0
kg
m
54
to
S8
ft
Ib
1
4
1n
4
Install
upper
link
spindle
to
upper
link
mounting
bracket
with
used
camber
adjusting
shims
and
bolts
Torque
bolt
to
7
0
to
9
0
kg
m
SI
to
6S
ft
lb
S
Install
dust
seat
to
the
lower
end
of
j
nuckle
spindle
support
6
Coat
grease
on
the
thread
of
fulcrum
pin
and
line
up
the
notch
of
fulcrum
pin
with
knuckle
spindle
sup
port
for
inserting
cotter
pin
Fit
fulcrum
pin
to
spindle
support
with
a
soft
hammer
Secure
cotter
pin
and
torque
lock
nut
to
0
8
to
1
1
kg
m
S
8
to
8
0
ft
lb
7
Coat
grease
to
the
tIuead
portion
of
screw
bushing
inside
liberally
Posi
tion
knuckle
spindle
support
at
the
center
of
lower
link
and
secure
screw
bushings
temporarily
by
hand
Mter
ascertaining
the
dimensions
become
correct
as
shown
in
Figure
F
A
22
torque
screw
bushings
to
20
to
30
kg
m
I4S
to
217
ft
lb
3
9
05
to
11
05
36
5
9
05
to
11
05
0
3563
to
0
4350
1
431
0
3563
to
0
4350
FA240
Fig
FA
22
In
tailing
IICrew
bu
hing
8
Replace
filler
plug
with
grease
nipple
and
pack
grease
until
grease
comes
out
from
dust
cover
Reinstall
filler
plug
9
Upon
installation
make
sure
that
fulcrum
pin
operates
smoothly
with
the
following
torque
Operating
torque
Less
than
0
5
kg
m
3
6
ft
lb
10
Install
upper
link
bushing
to
knuckle
spindle
support
I
I
Install
knuckle
spindle
support
to
upper
link
insert
fulcrum
bolt
and
torque
nut
to
3
9
to
S
3
kg
m
28
to
38
ft
lb
Page 373 of 537
Rear
Axle
Rear
Suspension
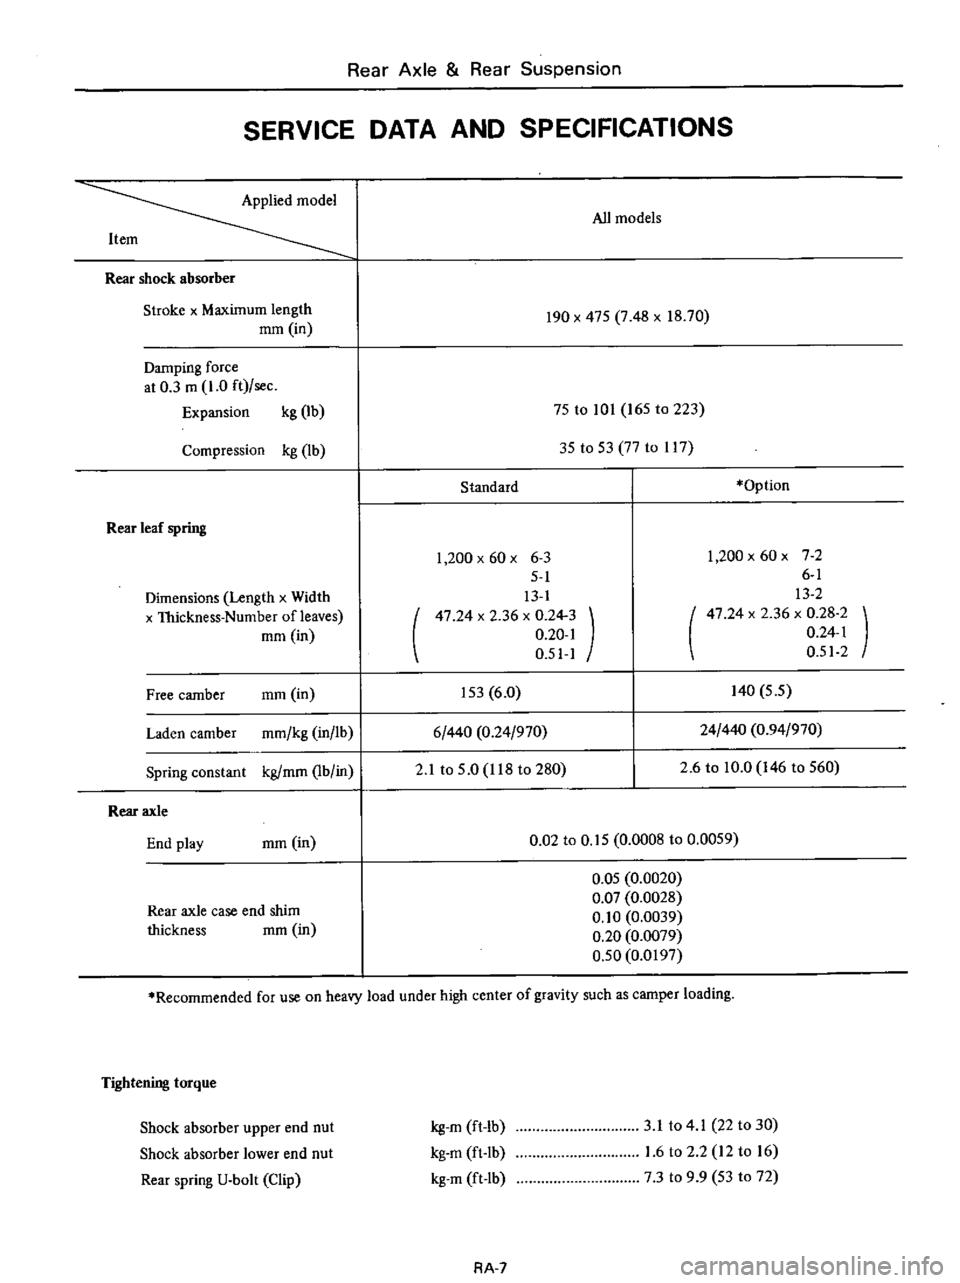
SERVICE
DATA
AND
SPECIFICATIONS
Applied
model
All
models
Item
Rear
shock
absorber
Stroke
x
Maximum
length
mOl
in
190
x
47S
7
48
x
18
70
Damping
force
at
0
3
m
1
0
ft
sec
Expansion
kg
lb
75
to
101
165
to
223
Compression
kg
lb
3S
to
S3
77
to
1l7
Standard
Option
Rear
leaf
spring
Dimensions
Length
x
Width
x
Thickness
Number
of
leaves
mOl
in
1
200
x
60
x
6
3
5
1
13
1
47
24
x
2
36
x
0
24
3
0
20
1
0
51
1
1
200x60x
72
6
1
13
2
47
24
x
2
36
x
0
28
2
0
24
1
0
512
Free
camber
mOl
in
IS3
6
0
140
S
5
Laden
camber
mmlkg
in
lb
6
440
0
24
970
24
440
0
94
970
Spring
constant
kg
mOl
lb
in
2
1
to
S
O
118
to
280
2
6
to
10
0
146
to
S60
Rear
axle
End
play
mOl
in
0
02
to
O
IS
0
0008
to
0
0059
Rear
axle
case
end
shim
thickness
mm
in
O
OS
0
0020
0
07
0
0028
0
10
0
0039
0
20
0
0079
0
50
0
0197
Recommended
for
use
on
heavy
load
under
high
center
of
gravity
such
as
camper
loading
Tightening
torque
Shock
absorber
upper
end
nut
Shock
absorber
lower
end
nut
Rear
spring
U
bolt
Clip
kg
m
ft
lb
kg
m
ft
Ib
kg
m
ft
lb
3
1
to
4
1
22
to
30
1
6
to
2
2
12
to
16
7
3
to
9
9
53
to
72
RA
7
Page 386 of 537
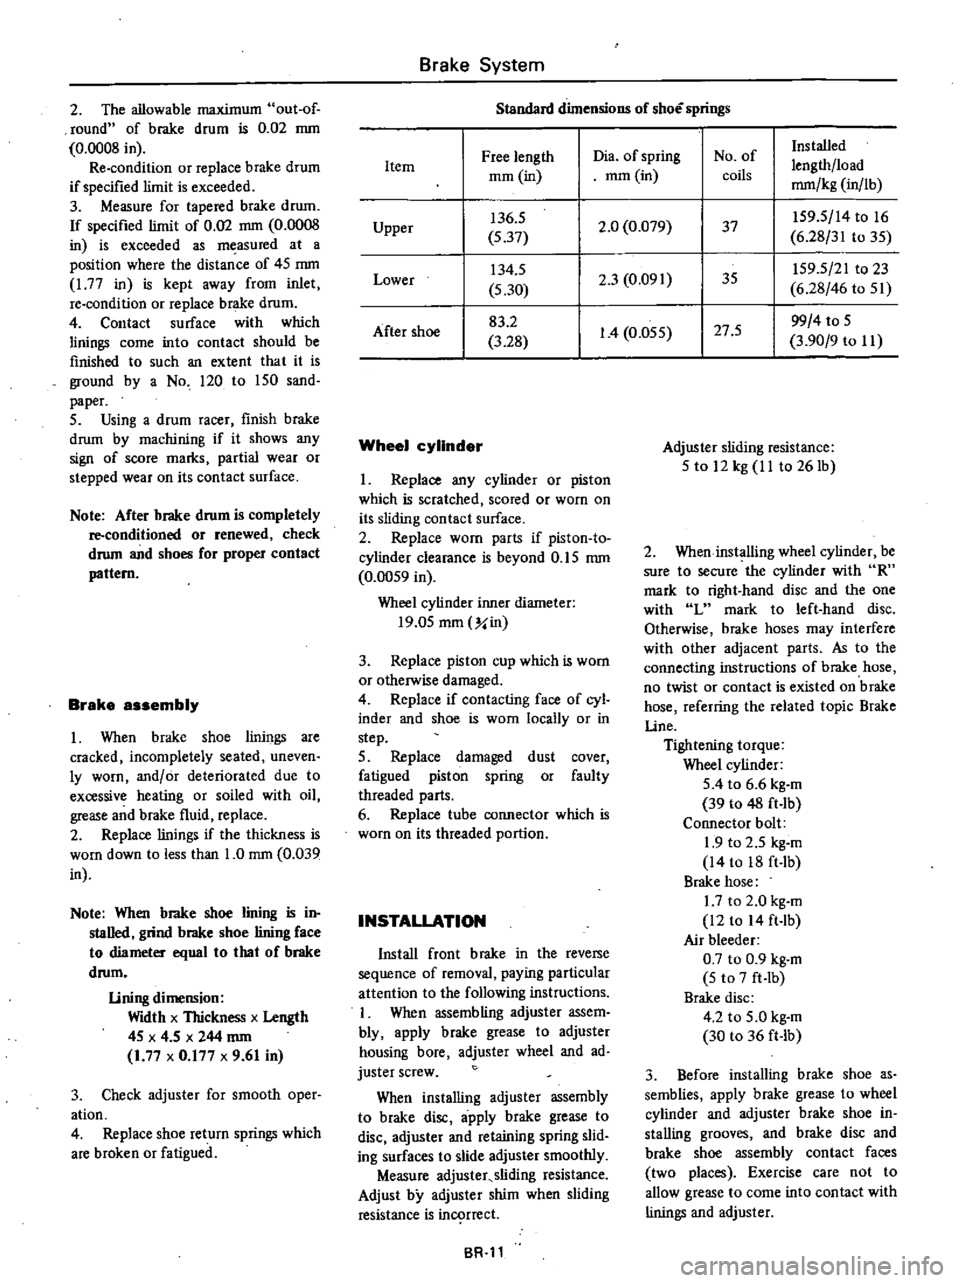
2
The
allowable
maximum
out
of
round
of
brake
drum
is
0
02
mm
0
0008
in
Re
condition
or
replace
brake
drum
if
specified
limit
is
exceeded
3
Measure
for
tapered
brake
drum
If
specified
limit
of
0
02
mm
0
0008
in
is
exceeded
as
measured
at
a
position
where
the
distance
of
4S
mm
177
in
is
kept
away
from
inlet
re
condition
or
replace
brake
drum
4
Contact
surface
with
which
linings
come
into
contact
should
be
finished
to
such
an
extent
that
it
is
ground
by
a
No
120
to
150
sand
paper
S
Using
a
drum
racer
finish
brake
drum
by
machining
if
it
shows
any
sign
of
score
marks
partial
wear
or
stepped
wear
on
its
contact
surface
Note
After
brake
drum
is
completely
re
conditioned
or
renewed
check
drum
and
shoes
for
proper
contact
pattern
Brake
assembly
I
When
brake
shoe
linings
are
cracked
incompletely
seated
uneven
Iy
worn
andlor
deteriorated
due
to
excessive
heating
or
soiled
with
oil
grease
and
brake
fluid
replace
2
Replace
linings
if
the
thickness
is
worn
down
to
less
than
1
0
mm
0
039
in
Note
When
brake
shoe
lining
is
in
stalled
grind
brake
shoe
lining
face
to
diameter
equal
to
that
of
brake
drum
lining
dimension
Width
x
Thickness
x
Length
4S
x
4
S
x
244
mm
1
77
x
0
177
x
9
61
in
3
Check
adjuster
for
smooth
oper
ation
4
Replace
shoe
return
springs
which
are
broken
or
fatigued
Brake
System
Standard
dimensions
of
shoe
springs
Free
length
Dia
of
spring
No
of
Installed
Item
lengthlload
mOl
in
mOl
in
coils
mm
kg
in
lb
Upper
136
5
2
0
0
079
37
IS9
S
14
to
16
S
37
6
28
31
to
3S
Lower
134
S
2
3
0
091
35
IS9
5
21
to
23
5
30
6
28
46
to
Sl
After
shoe
83
2
1
4
O
OSS
27
S
99
4
to
S
3
28
3
90
9
to
II
Wheel
cylinder
I
Replace
any
cylinder
or
piston
which
is
scratched
scored
or
worn
on
its
sliding
contact
surface
2
Replace
worn
parts
if
piston
to
cylinder
clearance
is
beyond
O
IS
mm
0
OOS9
in
Wheel
cylinder
inner
diameter
19
0S
mOl
Y
in
3
Replace
piston
cup
which
is
worn
or
otherwise
damaged
4
Replace
if
contacting
face
of
cyl
inder
and
shoe
is
worn
locally
or
in
step
S
Replace
damaged
dust
cover
fatigued
piston
spring
or
faulty
threaded
parts
6
Replace
tube
connector
which
is
worn
on
its
threaded
portion
INSTALLATION
Install
front
brake
in
the
reverse
sequence
of
removal
paying
particular
attention
to
the
following
instructions
I
When
assembling
adjuster
assem
bly
apply
brake
grease
to
adjuster
housing
bore
adjuster
wheel
and
ad
juster
screw
When
installing
adjuster
assembly
to
brake
disc
apply
brake
grease
to
disc
adjuster
and
retaining
spring
slid
ing
surfaces
to
slide
adjuster
smoothly
Measure
adjuster
sliding
resistance
Adjust
by
adjuster
shim
when
sliding
resistance
is
in
rrect
BR
ll
Adjuster
sliding
resistance
S
to
12
kg
II
to
261b
2
When
installing
wheel
cylinder
be
sure
to
secure
the
cylinder
with
R
mark
to
right
hand
disc
and
the
one
with
L
mark
to
left
hand
disc
Otherwise
brake
hoses
may
interfere
with
other
adjacent
parts
As
to
the
connecting
instructions
of
brake
hose
no
twist
or
contact
is
existed
on
brake
hose
referring
the
related
topic
Brake
line
Tightening
torque
Wheel
cylinder
SA
to
6
6
kg
m
39
to
48
ft
lb
Connector
bolt
1
9
to
2
5
kg
m
14
to
18
ft
Ib
Brake
hose
1
7
to
2
0
kg
m
12
to
14
ft
lb
Air
bleeder
0
7
to
0
9
kg
m
5
to
7
ft
Ib
Brake
disc
4
2
to
S
O
kg
m
30
to
36
ft
lb
3
Before
installing
brake
shoe
as
semblies
apply
brake
grease
to
wheel
cylinder
and
adjuster
brake
shoe
in
stalling
grooves
and
brake
disc
and
brake
shoe
assembly
contact
faces
two
places
Exercise
care
not
to
allow
grease
to
come
into
contact
with
linings
and
adjuster
Page 388 of 537
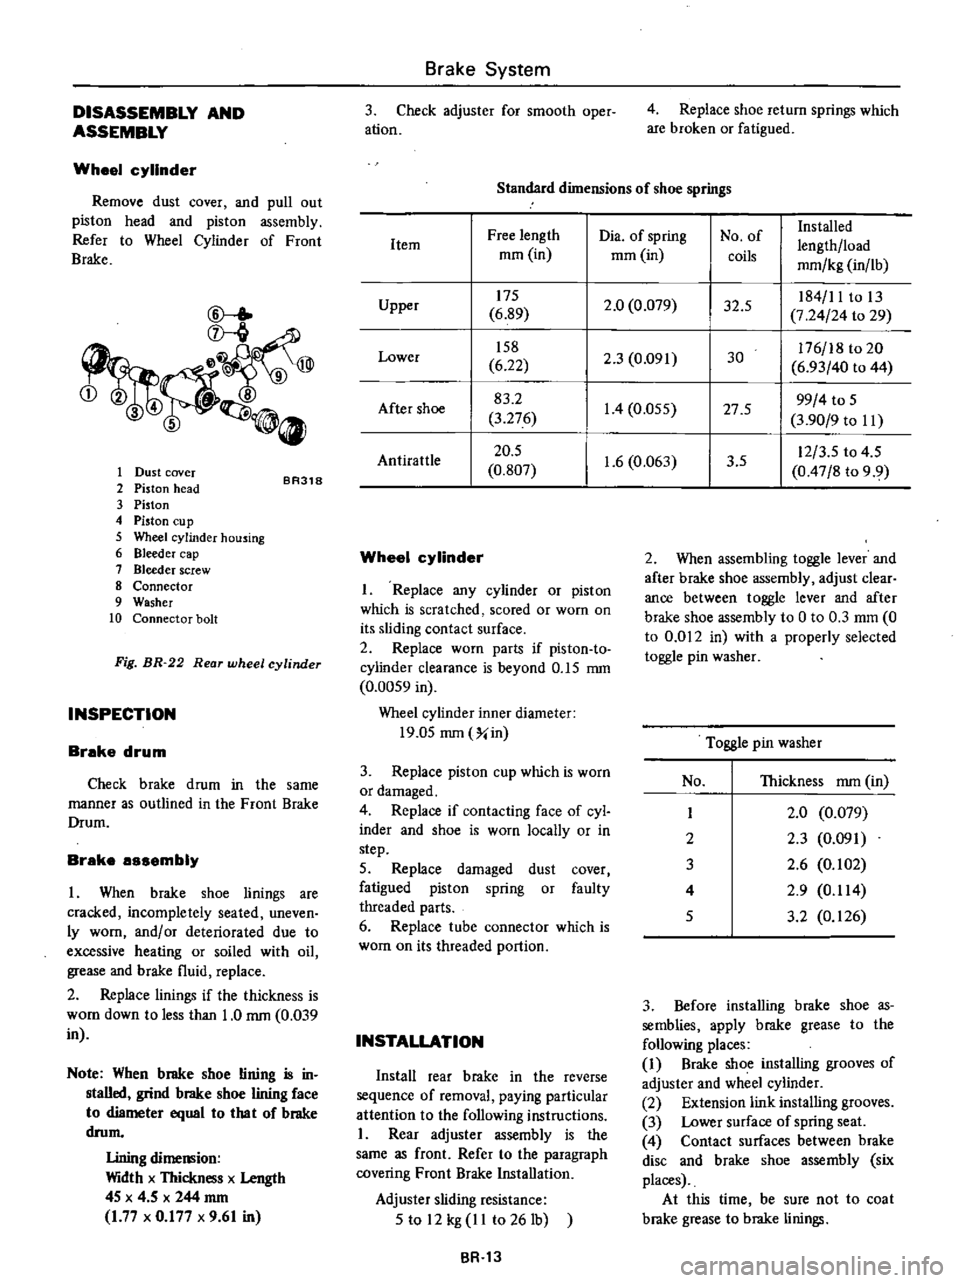
DISASSEMBLY
AND
ASSEMBLY
Wheel
cylinder
Remove
dust
cover
and
pull
out
piston
head
and
piston
assembly
Refer
to
Wheel
Cylinder
of
Front
Brake
CD
l
ID
345
0
1
Dust
cover
2
Piston
head
3
Piston
4
Piston
Cll
p
5
Wheel
cylinder
housing
6
Bleeder
cap
7
Bleeder
screw
8
Connector
9
Washer
10
Connector
bolt
BR318
Fig
BR
22
Rear
wheel
cylinder
INSPECTION
Brake
drum
Check
brake
drum
in
the
same
manner
as
outlined
in
the
Front
Brake
Drum
Brake
assembly
I
When
brake
shoe
linings
are
cracked
incompletely
seated
uneven
ly
worn
andlor
deteriorated
due
to
excessive
heating
or
soiled
with
oil
grease
and
brake
fluid
replace
2
Replace
linings
if
the
thickness
is
WOol
down
to
less
than
1
0
rom
0
039
in
Note
When
brake
shoe
lining
is
in
stalled
grind
brake
shoe
lining
face
to
diameter
equal
10
lha
I
of
brake
drom
Lining
dimemion
Width
x
Thickness
x
Length
4S
x
4
5
x
244
rom
1
77
x
0
177
x
9
61
in
Brake
System
3
Check
adjuster
for
smooth
oper
ation
4
Replace
shoe
return
springs
which
are
broken
or
fatigued
Standard
dimensions
of
shoe
springs
Dia
of
spring
No
of
Installed
Free
length
lengthlload
Item
mOl
in
mOl
in
coils
mmlkg
in
lb
175
2
0
0
079
32
5
184
11
to
13
Upper
6
89
7
24
24
to
29
158
2
3
0
091
30
176
18
to
20
Lower
6
22
6
93
40
to
44
83
2
1
4
0
055
27
5
99
4
to
S
After
shoe
3
276
3
90
9
to
II
20
5
1
6
0
063
3
5
12
3
S
to
4
5
AntiratUe
0
807
0
47
8
to
9
9
Wheel
cylinder
I
Replace
any
cylinder
or
piston
which
is
scratched
scored
or
worn
on
its
sliding
contact
surface
2
Replace
worn
parts
if
piston
to
cylinder
clearance
is
beyond
O
IS
rom
0
00S9
in
Wheel
cylinder
inner
diameter
19
0S
rom
Xin
3
Replace
piston
cup
which
is
worn
or
damaged
4
Replace
if
contacting
face
of
cyl
inder
and
shoe
is
worn
locally
or
in
step
5
Replace
damaged
dust
cover
fatigued
piston
spring
or
faulty
threaded
parts
6
Replace
tube
connector
which
is
worn
on
its
threaded
portion
INSTALLATION
Install
rear
brake
in
the
reverse
sequence
of
removal
paying
particular
attention
to
the
following
instructions
I
Rear
adjuster
assembly
is
the
same
as
front
Refer
to
the
paragraph
covering
Front
Brake
Installation
Adjuster
sliding
resistance
S
to
12
kg
II
to
261b
BR
13
2
When
assembling
toggle
lever
and
after
brake
shoe
assembly
adjust
clear
ance
between
toggle
lever
and
after
brake
shoe
assembly
to
0
to
0
3
mOl
0
to
0
012
in
with
a
properly
selected
toggle
pin
washer
Toggle
pin
washer
No
Thickness
rom
in
I
2
0
0
079
2
2
3
0
091
3
2
6
0
102
4
2
9
0
114
S
3
2
0
126
3
Before
installing
brake
shoe
as
semblies
apply
brake
grease
to
the
following
places
1
Brake
shoe
installing
grooves
of
adjuster
and
wheel
cylinder
2
Extension
link
installing
grooves
3
Lower
surface
of
spring
seat
4
Contact
surfaces
between
brake
disc
and
brake
shoe
assembly
six
places
At
this
time
be
sure
not
to
coat
brake
grease
to
brake
linings