ignition DATSUN PICK-UP 1977 Service Manual
[x] Cancel search | Manufacturer: DATSUN, Model Year: 1977, Model line: PICK-UP, Model: DATSUN PICK-UP 1977Pages: 537, PDF Size: 35.48 MB
Page 13 of 537
DATSUN
PICK
UP
MODEL
620
SERIES
I
NISSAN
I
NISSAN
MOTOR
CO
LTD
TOKYO
JAPAN
SECTION
ET
ENGINE
TUNE
UP
ENGINE
TUNE
UP
ET
2
BASIC
MECHANICAL
SySTEM
ET
7
IGNITION
AND
FUEL
SYSTEM
EMISSION
CONTROL
SYSTEM
ET
13
SERVICE
DATA
AND
ET
25
SPECIFICATIONS
TROUBLE
DIAGNOSES
AND
CORRECTIONS
ET
9
H
27
Page 18 of 537
EMISSION
CONTROL
DEVICES
Enj
Jn
illUde
I
I
AI4
I
L20H
I
11210
FlU
620
NOll
Califor
Non
aUfon
C
hfor
C
lifomla
lIIodch
EJ
L
lPI
Canada
models
Cilnada
CalifornIa
Non
CaliflJl
model
forC
anada
models
Except
modcb
rllodet
Canada
I
M
T
I
AlT
I
M
T
I
AlT
I
M
T
I
A
T
M
T
M
T
I
AfT
M
T
I
AfT
I
A
T
C
Jtrc1cancr
wllh
l1r
numn
rclirfvalvc
I
I
I
X
I
X
I
X
I
X
I
X
I
X
I
I
1
X
I
I
A
T
e
lliT
dl
1er
wilh
l
4t
air
llUlilprCn
rv
I
wflh
tlitlji
Jc
m1JC
ill
i
l
I
I
I
X
I
I
I
I
I
I
AIR
CLEANER
I
A
T
e
air
deaner
with
air
PUlnt
relicI
valve
wilh
iltitudc
compcn
alor
valvel
1
I
I
I
X
I
X
I
I
I
hlle
comDenlator
duallvQe
X
X
X
I
X
I
X
X
X
X
X
I
X
X
I
X
I
X
F
lh
air
due
fo
introducinil
ullidc
air
I
X
I
X
I
X
I
X
I
X
I
X
X
I
X
I
X
I
X
1
X
I
X
I
X
ENGINE
I
Early
fuclcvuporatlYe
sYltem
exhaust
hcalm
I
X
I
X
I
X
I
X
I
X
I
X
X
I
I
X
I
X
I
X
I
X
X
PROPER
X
P
T
C
auluchnkc
I
I
X
1
X
I
X
I
X
X
X
I
X
X
X
I
X
X
X
I
a
c
OO
with
l
onlrol
lIve
I
I
I
I
I
I
I
X
X
CARBURETOR
I
8
C
D
0
without
control
valve
control
valve
attached
to
body
I
I
I
I
X
I
X
m
Throltle
o
ncr
with
control
val
l
X
X
X
X
X
X
X
l
Onlhoot
I
X
I
X
I
X
I
X
I
X
X
X
I
X
I
X
X
I
X
I
X
X
c
I
Altitude
c
Jmpcmalor
with
pipe
fo
U
IC
in
air
bleed
I
X
I
X
I
I
I
I
X
I
X
I
X
0n
tranmlor
unIt
Oiltribulor
II
olck
UD
I
X
I
X
I
I
I
I
X
I
I
X
I
X
I
IGNITION
T
C
S
ISwilchin
valve
I
m
d
llI11OfCuioll
C
l
1J1
TO
l
X
X
X
X
I
X
X
X
I
j
x
SYSTEM
I
S
D
V
Sn
arkdelayvalvc
I
I
I
X
I
I
I
I
I
T
V
V
Thermal
vlcuum
a
vc
r
c
s
I
X
I
X
I
X
I
X
I
X
I
X
X
X
I
X
I
I
I
I
Air
pump
AlP
all
cleaner
Ched
valve
A
B
vlllvc
I
X
X
I
X
I
X
I
X
I
X
X
X
I
X
X
I
X
X
I
X
1
C
A
t
valve
fAir
eonlrol
valve
E
A
R
valve
Rcliefvalvel
X
X
I
X
I
A
I
S
I
Airconlrot
valve
I
I
I
I
X
I
X
I
E
A
R
valve
I
I
I
I
X
I
X
I
Rcliervalvc
I
I
X
I
X
I
X
I
X
X
I
X
I
X
I
X
X
I
X
r
E
G
R
VUIVllID
P
T
svstem
I
X
X
I
X
I
X
I
I
X
X
E
G
R
LG
R
v
lvr
Ive
sv
tem
I
I
X
I
X
I
I
X
X
I
X
X
I
X
SYSTEM
fThermal
acuum
valve
E
C
R
X
X
I
X
I
X
I
X
X
X
X
I
X
I
X
I
X
X
I
X
T
C
J
ITon
cut
E
G
R
I
I
I
X
I
I
I
X
I
I
Wamin
device
e
l
ry
12
500
mile
maintenance
I
I
I
I
I
I
I
I
I
X
I
X
CATALYZER
e
lalvIIC
ln
rler
X
X
I
I
I
I
X
I
I
I
X
I
X
Fluor
h
mocrature
waminl
5Vllcm
with
noor
ICnlor
I
X
X
I
I
I
I
X
I
I
I
X
I
X
Newly
equipped
unit
1917
models
Remark
X
Available
Not
available
M
T
AlT
A
T
C
PT
Ch
T
V
V
C
A
C
Maouallrammln
Automallctunsmls
Automatic
temperature
control
Positive
temperature
cod
icll
nt
Thermal
vacuum
valve
Combined
oLir
control
8
C
0
D
T
C
S
S
D
V
T
C
E
B
P
T
V
c
Boolt
controlled
deceleration
dov
Tran
mlu
controlled
vacuum
advam
system
Spark
delay
valve
TransmlSl
ulI
controlled
exhausl
gu
recnculltlOn
1
lIem
Back
preuure
nansduce
Vacuum
AJ
S
A
B
vlllve
E
A
R
V
Jlvc
E
C
R
V
O
V
T
C
E
AHmjcL
Anu
b
H
ktiu
alvc
Emer
cncy
relief
alvc
E
dlllu
ll
r
r
ula
Vacuum
dclay
11Ie
Tup
E
G
R
E
l
l
epl
t
orCanuda
lIIIII
m
J
C
r
l
l
c
J
l
c
0
Page 21 of 537
Yellow
line
Spark
delay
valve
to
distributor
Spark
delay
valve
to
vacuum
tube
Distributor
to
vacuum
tube
Vacuum
tube
to
carburetor
Vacuum
tube
to
canister
Green
line
Anti
backfire
valve
to
intake
mani
fold
Air
control
valve
to
emergency
air
relief
valve
Intake
manifold
to
vacuum
hose
connector
Intake
manifold
to
canister
CHECKING
ENGINE
COMPRESSION
COMPRESSION
PRESSURE
TEST
I
Warm
up
engine
sufficiently
2
Disconnect
all
spark
plugs
3
Disconnect
anti
dieseling
solenoid
valve
connector
4
Properly
attach
a
compression
tester
to
spark
plug
hole
in
cylinder
being
tested
Engine
Tune
up
I
ET010
Different
compression
in
two
or
more
cylinders
usually
indicates
an
improperly
seated
valve
or
broken
piston
ring
9
Low
compression
in
cylinders
can
result
from
worn
piston
rings
This
condition
may
usually
be
accompanied
by
excessive
fuel
consumption
TEST
RESULT
If
compression
in
one
or
more
cylinders
is
low
pour
a
small
quantity
of
engine
oil
into
cylinders
through
the
spark
plug
holes
and
retest
com
pression
I
If
adding
oil
increases
the
com
pression
pressure
the
chances
are
that
rings
are
faulty
2
If
pressure
stays
low
probable
cause
is
that
valve
is
sticking
or
seating
improperly
3
If
cylinder
compression
in
any
two
adjacent
cylinders
is
low
and
if
adding
oil
does
not
help
the
compres
sian
there
is
leakage
past
the
gasket
surface
Oil
and
water
in
combustion
cham
bers
can
result
from
leakage
IGNITION
AND
FUEL
SYSTEM
Fig
ET
10
Teding
compression
pressure
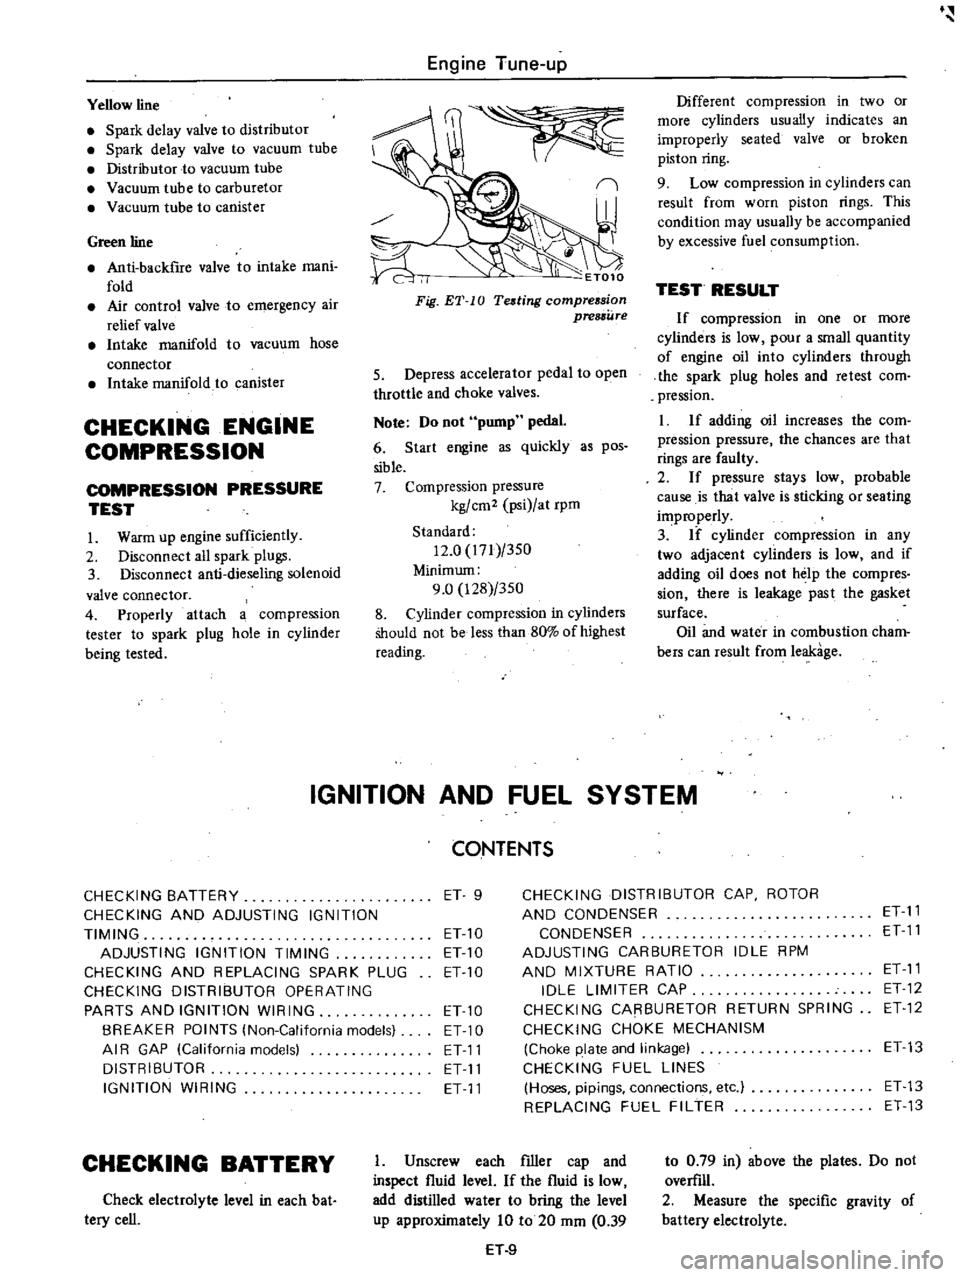
5
Depress
accelerator
pedal
to
open
throttle
and
choke
valves
Note
Do
not
pump
pedal
6
Start
engine
as
quickly
as
pos
sible
7
Compression
pressure
kg
cm2
psi
at
rpm
Standard
12
0
171
350
Minimum
9
0
128
350
8
Cylinder
compression
in
cylinders
Should
not
be
less
than
80
of
highest
reading
CONTENTS
CHECKING
BATTERY
ET
9
CHECKING
DISTRIBUTOR
CAP
ROTOR
CHECKING
AND
ADJUSTING
IGNITION
AND
CONDENSER
ET
11
TIMING
ET
10
CONDENSER
ET
11
ADJUSTING
IGNITION
TIMING
ET10
ADJUSTING
CARBURETOR
IDLE
RPM
CHECKING
AND
REPLACING
SPARK
PLUG
ETlO
AND
MIXTURE
RATIO
ET
11
CHECKING
DISTRIBUTOR
OPERATING
IDLE
LIMITER
CAP
ET
12
PARTS
AND
IGNITION
WIRING
ETlO
CHECKING
CARBURETOR
RETURN
SPRING
ET
12
BREAKER
POINTS
lNon
California
models
ET
10
CHECKING
CHOKE
MECHANISM
AI
R
GAP
lCalifornia
models
ET11
Choke
plate
and
linkage
ET13
DISTRIBUTOR
ET
11
CHECKING
FUEL
LINES
IGNITION
WIRING
ET
11
Hoses
pipings
connections
etc
ET
13
REPLACING
FUEL
FILTER
ET
13
CHECKING
BATTERY
Check
electrolyte
level
in
each
bat
tery
cell
I
Unscrew
each
filler
cap
and
inspect
fluid
level
If
the
fluid
is
low
add
distilled
water
to
bring
the
level
up
approximately
10
to
20
mm
0
39
H
9
to
0
79
in
above
the
plates
Do
not
overfill
2
Measure
the
specific
gravity
of
battery
electrolyte
Page 22 of 537
p
r
ET002
Fig
E1
11
Checking
specific
gravity
of
bottery
electrolyre
Clean
top
of
battery
and
terminals
with
a
solution
of
bakin
soda
and
Pennissible
value
Frigid
climates
Over
1
22
Tropical
climates
lOver
1
18
Other
climates
lOver
1
20
CHECKING
AND
ADJUSTING
IGN
ITIONTIM
iNG
AD
IUSTING
IGNITION
TIMING
I
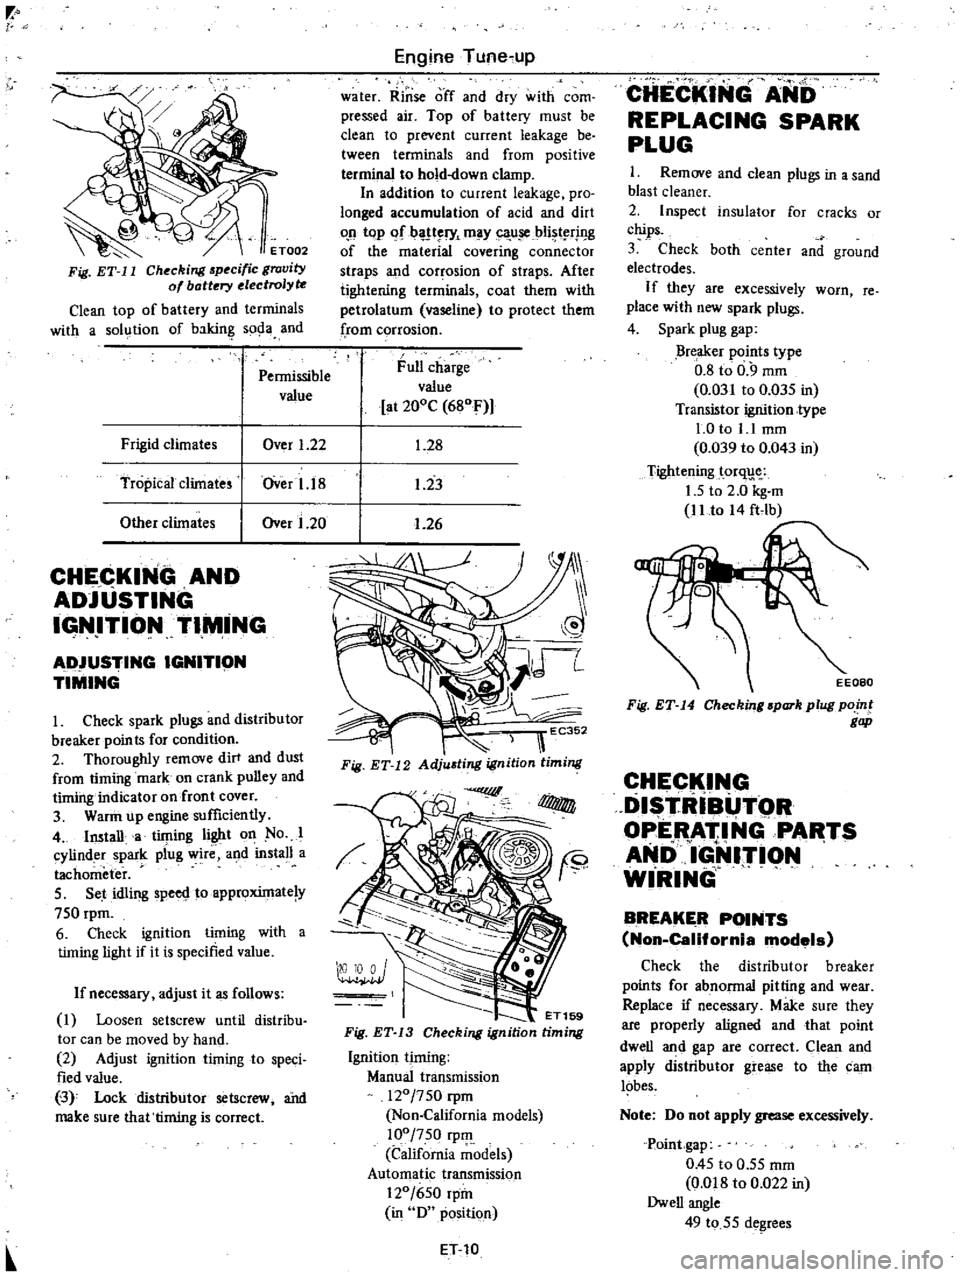
Check
spark
plugs
and
distributor
breaker
points
for
condition
2
Thoroughly
remove
dirt
and
dust
from
timing
mark
on
crank
pulley
and
timing
indicator
on
front
cover
3
Warin
up
engine
sufficiently
4
Imtalla
timing
light
on
No
I
cylinder
spark
plug
wire
and
install
a
tachometer
5
Set
idling
spero
toapproxintate
y
750
rpm
6
Check
ignition
timing
with
a
timing
light
if
it
is
specified
value
If
necessary
adjust
it
as
follows
1
Loosen
setscrew
until
distribu
tor
can
be
moved
by
hand
2
Adjust
ignition
timing
to
speci
fied
value
3
0
Lock
distributor
setscrew
ai1d
make
sure
that
timing
is
correc
Engine
Tune
up
water
Rinse
off
and
dry
with
com
pressed
air
Top
of
battery
must
be
clean
to
prevent
current
leakage
be
tween
terminals
and
from
positive
terminal
to
hold
down
clamp
In
addition
to
current
leakage
pro
longed
accumulation
of
acid
and
dirt
o
n
top
If
l
l
ry
may
ca
u
iCbli
t
rj
I
g
of
the
material
covering
connector
straps
and
corrosion
of
straps
After
tightening
terminals
coat
them
with
petrolatum
vaseline
to
protect
them
from
corrosion
Full
charge
value
at
200C
680F
1
28
1
23
1
26
oo
I
ET169
Fig
ET
13
Checking
ignition
timing
Ignition
timing
Manual
transmission
120
750
rpm
Non
California
models
100
750
rpIll
California
models
Automatic
transmission
120
650
rpin
in
0
position
ET
10
CHECKING
ANb
REPLACING
SPARK
PLUG
I
Remove
and
clean
plugs
in
a
sand
blast
cleaner
2
Inspect
insulator
for
cracks
or
chips
3
Check
both
center
and
ground
electrodes
If
they
are
excessively
worn
re
place
with
new
spark
plugs
4
Spark
plug
gap
Breaker
points
type
0
8
to
0
9
mm
0
031
to
0
035
in
Transistor
ignition
type
1
0
to
1
1
mm
0
039
to
0
043
in
Tightening
torq
1
5
to
2
0
kg
m
11
to
A4
ft
lb
Fig
ET
14
Checking
spark
plug
point
gap
CHECK
I
G
DISTRIBUTOR
OPERATING
PARTS
AND
1
lrI9N
WIRING
BREAKER
POINTS
Non
California
models
Check
the
distributor
breaker
points
for
abnonnal
pitting
and
wear
Replace
if
necessary
Make
sure
they
are
properly
aligned
and
that
point
dwell
and
gap
are
correct
Clean
and
apply
distributor
grease
to
the
carn
lobes
Note
00
not
apply
grease
excessively
Point
gap
0
45
to
0
55
mm
Om8
to
0
022
in
Owell
angle
49
to
55
degrees
Page 23 of 537
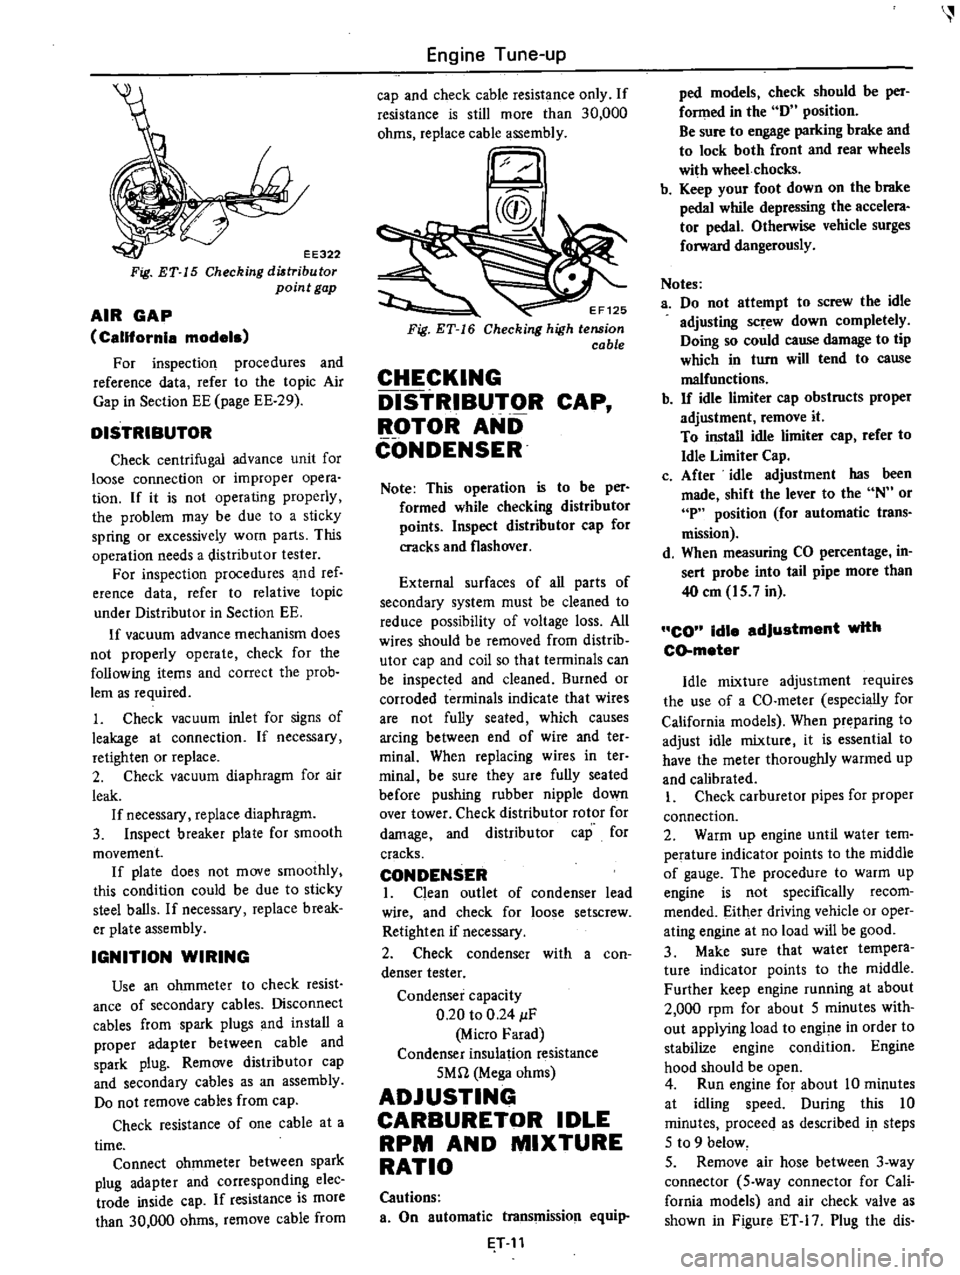
EE322
Fig
ET
15
Checking
diltribu
tor
point
gap
AIR
GAP
California
models
For
inspection
procedures
and
reference
data
refer
to
the
topic
Air
Gap
in
Section
EE
page
EE
29
DISTRIBUTOR
Check
centrifugal
advance
unit
for
loose
connection
or
improper
opera
tion
If
it
is
not
operating
properly
the
problem
may
be
due
to
a
sticky
spring
or
excessively
worn
parts
This
operation
needs
a
distributor
tester
For
inspection
procedures
and
ref
erence
data
refer
to
relative
topic
under
Distributor
in
Section
EE
If
vacuum
advance
mechanism
does
not
properly
operate
check
for
the
following
items
and
correct
the
prob
lem
as
required
1
Check
vacuum
inlet
for
signs
of
leakage
at
connection
If
necessary
retighten
or
replace
2
Check
vacuum
diaphragm
for
air
leak
If
necessary
replace
diaphragm
3
Inspect
breaker
plate
for
smooth
movement
If
plate
does
not
move
smoothly
this
condition
could
be
due
to
sticky
steel
balls
If
necessary
replace
break
er
plate
assembly
IGNITION
WIRING
Use
an
ohmmeter
to
check
resist
ance
of
secondary
cables
Disconnect
cables
from
spark
plugs
and
install
a
proper
adapter
between
cable
and
spark
plug
Remove
distributor
cap
and
secondary
cables
as
an
assembly
Do
not
remove
cables
from
cap
Check
resistance
of
one
cable
at
a
time
Connect
ohmmeter
between
spark
plug
adapter
and
corresponding
elec
trade
inside
cap
If
resistance
is
more
than
30
000
ohms
remove
cable
from
Engine
Tune
up
cap
and
check
cable
resistance
only
If
resistance
is
still
more
than
30
000
ohms
replace
cable
assembly
EF125
Checking
high
tension
cable
CHECKING
DISTRIBUTOR
CAP
ROTOR
AND
CONDENSER
Note
This
operation
is
to
be
per
formed
while
checking
distributor
points
Inspect
distributor
cap
for
cracks
and
flashover
External
surfaces
of
all
parts
of
secondary
system
must
be
cleaned
to
reduce
possibility
of
voltage
loss
All
wires
should
be
removed
from
distrib
utor
cap
and
coil
so
that
terminals
can
be
inspected
and
cleaned
Burned
or
corroded
terminals
indicate
that
wires
are
not
fully
seated
which
causes
arcing
between
end
of
wire
and
ter
minal
When
replacing
wires
in
ter
minai
be
sure
they
are
fully
seated
before
pushing
rubber
nipple
down
over
tower
Check
distributor
rotor
for
damage
and
distributor
cap
for
cracks
CONDENSER
I
Clean
outlet
of
condenser
lead
wire
and
check
for
loose
setscrew
Retighten
if
necessary
2
Check
condenser
with
a
con
denser
tester
Condenser
capacity
0
20
to
0
24
IF
Micro
Farad
Condenser
insulation
resistance
5Mn
Mega
ohms
ADJUSTING
CARBURETOR
IDLE
RPM
AND
MIXTURE
RATIO
Cautions
a
On
automatic
transmission
equip
T
11
ped
models
check
should
be
per
fonned
in
the
D
position
Be
sure
to
engage
parking
brake
and
to
lock
both
front
and
rear
wheels
with
wheel
chocks
b
Keep
your
foot
down
on
the
brake
pedal
while
depressing
the
accelera
tor
pedal
Otherwise
vehicle
surges
forward
dangerously
Notes
a
Do
not
attempt
to
screw
the
idle
adjusting
sc
ew
down
completely
Doing
so
could
cause
damage
to
tip
which
in
turn
will
tend
to
cause
malfunctions
b
If
idle
limiter
cap
obstructs
proper
adjustment
remove
it
To
install
idle
limiter
cap
refer
to
Idle
Limiter
Cap
c
After
idle
adjustment
has
been
made
shift
the
lever
to
the
N
or
P
position
for
automatic
trans
mission
d
When
measuring
CO
percentage
in
sert
probe
into
tail
pipe
more
than
40
em
15
7
in
CO
idle
adjustment
with
CD
meter
Idle
mixture
adjustment
requires
the
use
of
a
CO
meter
especially
for
California
models
When
preparing
to
adjust
idle
mixture
it
is
essential
to
have
the
meter
thoroughly
warmed
up
and
calibrated
I
Check
carburetor
pipes
for
proper
connection
2
Warm
up
engine
until
water
tem
perature
indicator
points
to
the
middle
of
gauge
The
procedure
to
warm
up
engine
is
not
specifically
recom
mended
Either
driving
vehicle
or
oper
ating
engine
at
no
load
will
be
good
3
Make
sure
that
water
tempera
ture
indicator
points
to
the
middle
Further
keep
engine
running
at
about
2
000
rpm
for
about
5
minutes
with
out
applying
load
to
engine
in
order
to
stabilize
engine
condition
Engine
hood
should
be
open
4
Run
engine
for
about
10
minutes
at
idling
speed
During
this
10
minutes
proceeq
as
described
i
steps
5
to
9
below
5
Remove
air
hose
between
3
way
connector
5
way
connector
for
Cali
fornia
models
and
air
check
valve
as
shown
in
Figure
ET
17
Plug
the
dis
Page 24 of 537
r
connected
hose
to
prevent
dust
from
entering
To
air
check
valve
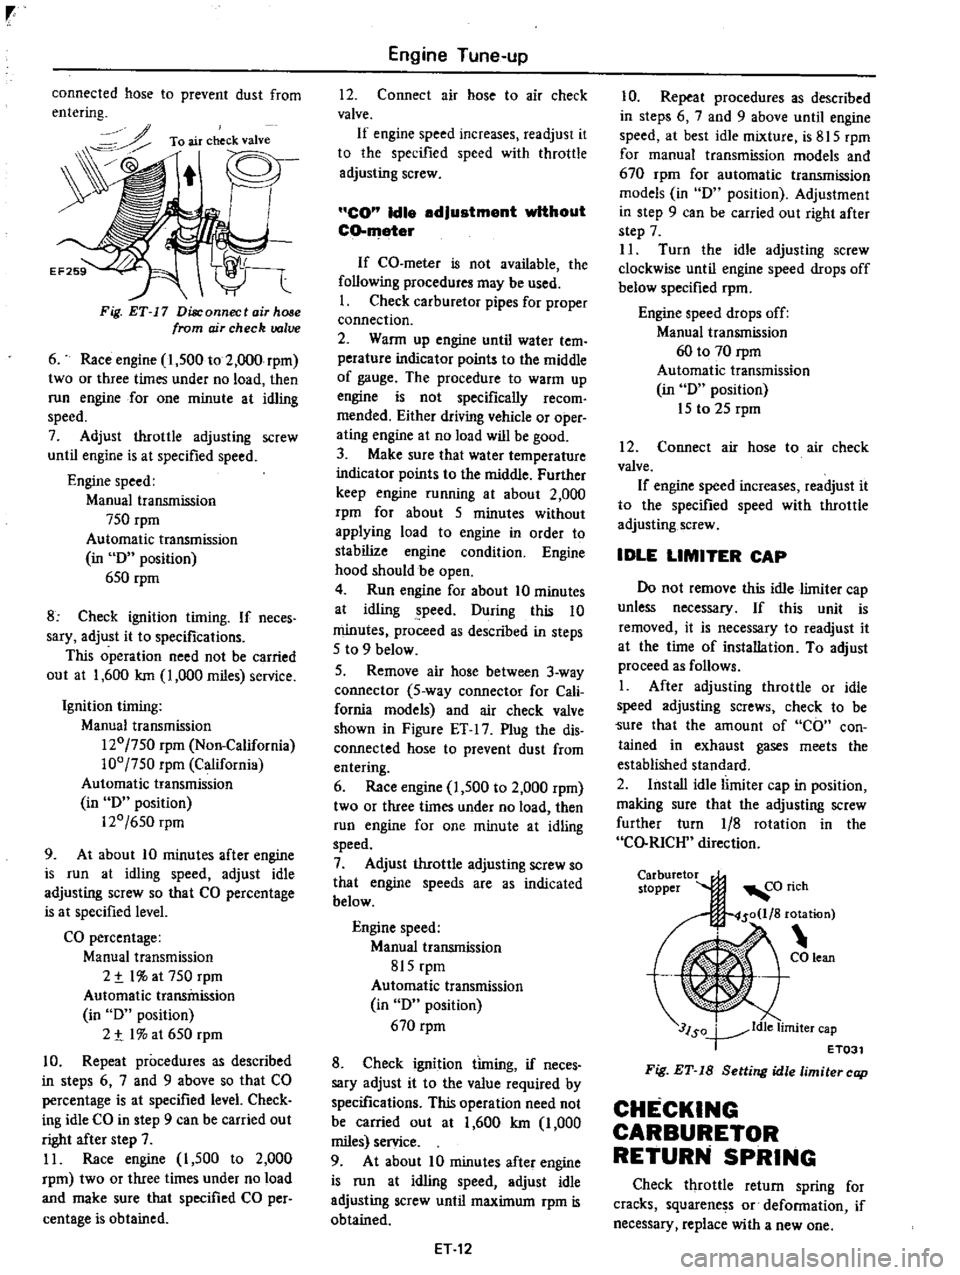
Fig
ET
17
Disconnect
air
hose
from
ojr
check
valve
6
Race
engine
1
500
to
2
000
rpm
two
or
three
times
under
no
load
then
run
engine
for
one
minute
at
idling
speed
7
Adjust
throttle
adjusting
screw
until
engine
is
at
specified
speed
Engine
speed
Manual
transmission
750
rpm
Automatic
transmission
in
D
position
650
rpm
8
Check
ignition
timing
If
neces
sary
adjust
it
to
specifications
This
operation
need
not
be
carried
out
at
1
600
Ian
1
000
miles
service
Ignition
timing
Manual
transmission
120
750
rpm
Non
California
100
750
rpm
California
Automatic
transmission
in
D
position
120
650
rpm
9
At
about
10
minutes
after
engine
is
run
at
idling
speed
adjust
idle
adjusting
screw
so
that
CO
percentage
is
at
specified
level
CO
percentage
Manual
transmission
2
t
I
at
750
rpm
Automatic
transmission
in
D
position
2
t
I
at
650
rpm
10
Repeat
procedures
as
described
in
steps
6
7
and
9
above
so
that
CO
percentage
is
at
specified
level
Check
ing
idle
CO
in
step
9
can
be
carried
out
right
after
step
7
11
Race
engine
I
500
to
2
000
rpm
two
or
three
times
under
no
load
and
make
sure
that
specified
CO
per
centage
is
obtained
Engine
Tune
up
12
Connect
air
hose
to
air
check
valve
If
engine
speed
increases
readjust
it
to
the
specified
speed
with
throttle
adjusting
screw
CO
Idle
adjustment
without
CO
meter
If
CO
meter
is
not
available
the
following
procedures
may
be
used
I
Check
carburetor
pipes
for
proper
connection
2
Wann
up
engine
until
water
tern
perature
indicator
points
to
the
middle
of
gauge
The
procedure
to
warm
up
engine
is
not
specifically
recom
mended
Either
driving
vehicle
or
oper
ating
engine
at
no
load
will
be
good
3
Make
sure
that
water
temperature
indicator
points
to
the
middle
Further
keep
engine
running
at
about
2
000
rpm
for
about
5
minutes
without
applying
load
to
engine
in
order
to
stabilize
engine
condition
Engine
hood
should
be
open
4
Run
engine
for
about
10
minutes
at
idling
peed
During
this
10
minutes
proceed
as
described
in
steps
5
to
9
below
5
Remove
air
hose
between
3
way
connector
5
way
connector
for
Cali
fornia
modeis
and
air
check
valve
shown
in
Figure
ET
17
Plug
the
dis
connected
hose
to
prevent
dust
from
entering
6
Race
engine
1
500
to
2
000
rpm
two
or
three
times
under
no
load
then
run
engine
for
one
minute
at
idling
speed
7
Adjust
throttle
adjusting
screw
so
that
engine
speeds
are
as
indicated
below
Engine
speed
Manual
transmission
815
rpm
Automatic
transmission
in
D
position
670
rpm
8
Check
ignition
timing
if
neces
sary
adjust
it
to
the
value
required
by
specifications
This
operation
need
not
be
carried
out
at
1
600
Ian
1
000
miles
service
9
At
about
10
minutes
after
engine
is
run
at
idling
speed
adjust
idle
adjusting
screw
until
maximum
rpm
is
obtained
ET
12
10
Repeat
procedures
as
described
in
steps
6
7
and
9
above
until
engine
speed
at
best
idle
mixture
is
815
rpm
for
manual
transmission
models
and
670
rpm
for
automatic
transmission
models
in
D
position
Adjustment
in
step
9
can
be
carried
out
right
after
step
7
II
Turn
the
idle
adjusting
screw
clockwise
until
engine
speed
drops
off
below
specified
rpm
Engine
speed
drops
off
Manual
transmission
60
to
70
rpm
Automatic
transmission
in
D
position
15
to
25
rpm
12
Connect
air
hose
to
air
check
valve
If
engine
speed
increases
readjust
it
to
the
specified
speed
with
throttle
adjusting
screw
IDLE
LIMITER
CAP
Do
not
remove
this
idle
limiter
cap
unless
necessary
If
this
unit
is
removed
it
is
necessary
to
readjust
it
at
the
time
of
installation
To
adjust
proceed
as
follows
1
After
adjusting
throttle
or
idle
speed
adjusting
screws
check
to
be
Sure
that
the
amount
of
CO
con
tained
in
exhaust
gases
meets
the
established
standard
2
Install
idle
limiter
cap
in
position
making
sure
that
the
adjusting
screw
further
turn
1
8
rotation
in
the
CO
RICH
direction
Carburetor
stopper
3lSo
ldle
limiter
cap
T
ET031
Fig
ET
18
Setting
idle
limiter
cap
CHECKING
CARBURETOR
RETURN
SPRING
Check
throttle
return
spring
for
cracks
squarene
s
or
defonnation
if
necessary
replace
with
a
new
one
Page 29 of 537
OPERATI
NG
PRESSURE
OF
BOOST
CONTROLLED
DECELERATION
DEVICE
B
C
D
D
ADJUSTMENT
CHECKING
a
C
D
D
CIRCUIT
WITH
FUNCTION
TEST
CONNECTOR
Manual
transmission
models
I
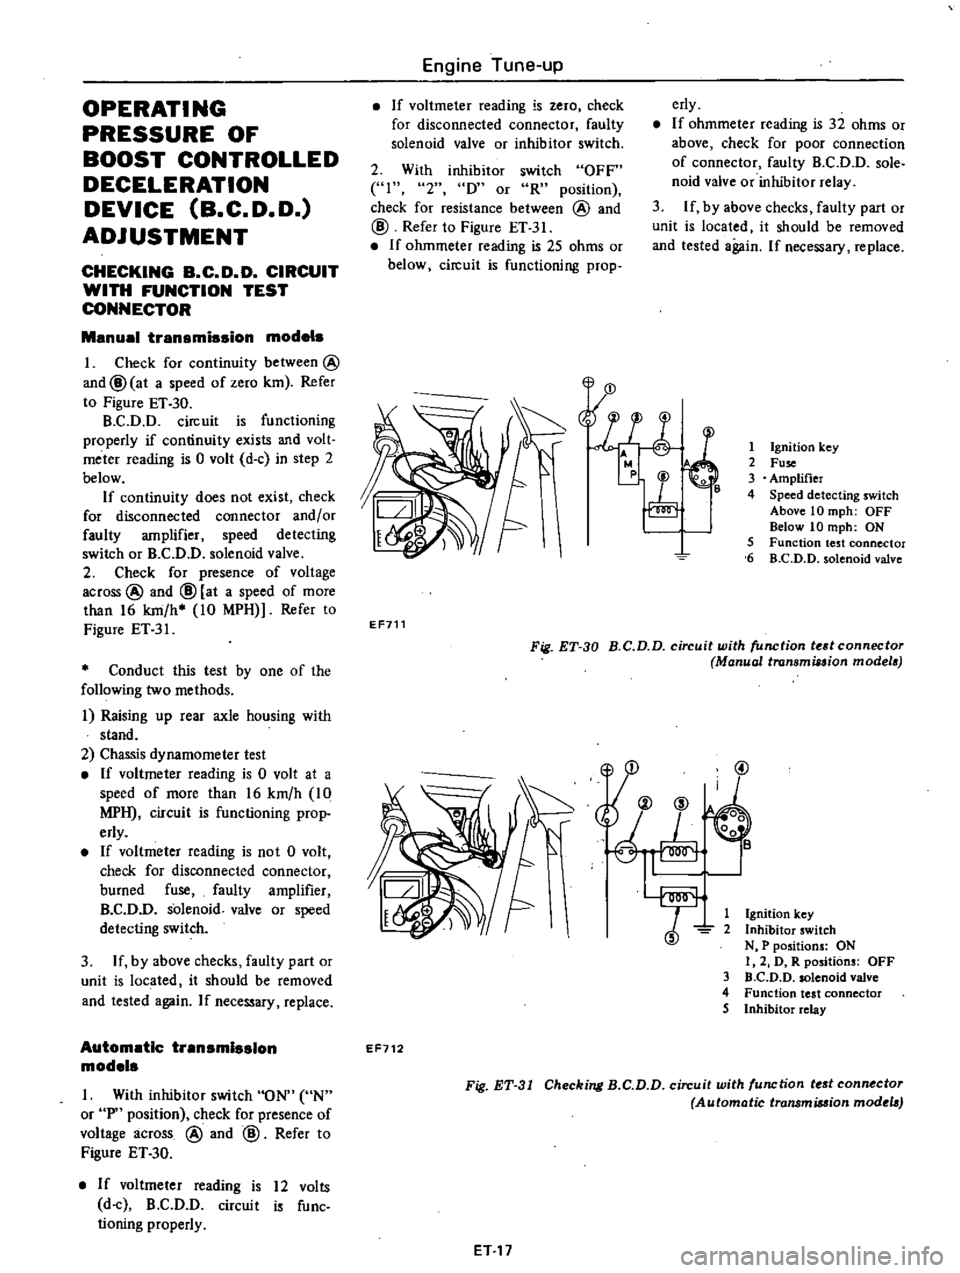
Check
for
continuity
between
@
and@
at
a
speed
of
zero
km
Refer
to
Figure
ET
30
B
C
D
D
circuit
is
functioning
properly
if
continuity
exists
and
volt
meter
reading
is
0
volt
d
c
in
step
2
below
If
continuity
does
not
exist
check
for
disconnected
connector
and
or
faulty
amplifier
speed
detecting
switch
or
B
C
D
D
solenoid
valve
2
Check
for
presence
of
voltage
across
@
and
@
at
a
speed
of
more
than
16
km
h
10
MPH
Refer
to
Figure
ET
31
Conduct
this
test
by
one
of
the
following
two
methods
i
Raising
up
rear
axle
housing
with
stand
2
Chassis
dynamometer
test
If
voltmeter
reading
is
0
volt
at
a
speed
of
more
than
16
km
h
10
MPH
circuit
is
functioning
prop
erly
If
voltmeter
reading
is
not
0
volt
check
for
disconnected
connector
burned
fuse
faulty
amplifier
B
C
D
D
solenoid
valve
or
speed
detecting
switch
3
If
by
above
checks
faulty
part
or
unit
is
located
it
should
be
removed
and
tested
again
If
necessary
replace
Automatic
transmission
models
I
With
inhibitor
switch
ON
UN
or
P
position
check
for
presence
of
voltage
across
@
and
@
Refer
to
Figure
ET
30
If
voltmeter
reading
is
12
volts
d
c
B
C
D
D
circuit
is
func
tioning
properly
Engine
Tune
up
If
voltmeter
reading
is
zero
check
for
disconnected
connector
faulty
solenoid
valve
or
inhibitor
switch
erly
If
ohmmeter
reading
is
32
ohms
or
above
check
for
poor
connection
of
connector
faulty
B
C
D
D
sole
noid
valve
or
inhibitor
relay
3
If
by
above
checks
faulty
part
or
unit
is
located
it
should
be
removed
and
tested
again
If
necessary
replace
2
With
inhibitor
switch
OFF
41
2
D
or
R
position
check
for
resistance
between
@
and
@
Refer
to
Figure
ET
31
If
ohmmeter
reading
is
25
ohms
or
below
circuit
is
functioning
prop
l
E
r
1
Ignition
key
2
Fuse
3
Amplifier
4
Speed
detecting
switch
Above
10
mph
OFF
Below
10
mph
ON
5
Function
test
connector
6
B
C
D
D
solenoid
valve
EF711
Fig
ET
30
B
C
D
D
circuit
with
function
tedconnectoT
Manual
transmission
modela
@
1
Ignition
key
2
Inhibitor
switch
N
P
positions
ON
I
2
D
R
positions
OFF
3
D
C
D
D
solenoid
valve
4
Function
test
connector
5
Inhibitor
relay
EF712
Fig
ET
31
Checking
B
C
D
D
circuit
with
function
tf
st
connf
ctor
Automatic
transmiMion
modtla
ET
17
Page 32 of 537
r
CHECKING
B
C
D
D
SOLENOID
VALVE
I
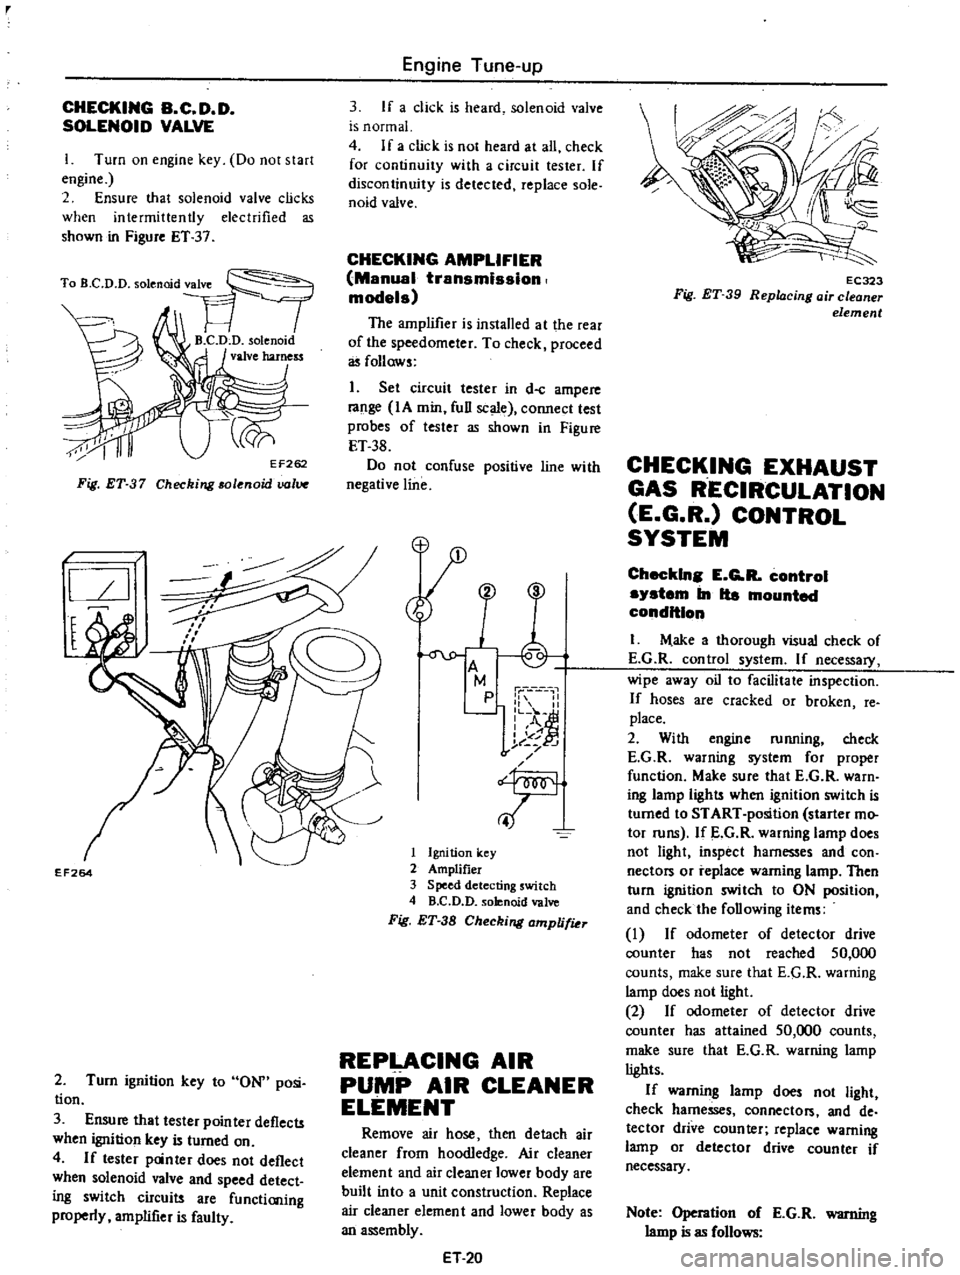
Turn
on
engine
key
Do
not
start
engine
2
Ensure
that
solenoid
valve
clicks
when
intermittently
electrified
as
shown
in
Figure
ET
37
Fig
ET
37
Checking
solenoid
uolV
l
I
l
EF264
2
Turn
ignition
key
to
ON
posi
tion
3
Ensure
that
tester
pointer
deflects
when
ignition
key
is
turned
on
4
If
tester
panter
does
not
deflect
when
solenoid
valve
and
speed
detect
ing
switch
circuits
are
functioning
properly
amplifier
is
faulty
Engine
Tune
up
3
If
a
click
is
heard
solenoid
valve
is
normal
4
If
a
click
is
not
heard
at
all
check
for
continuity
with
a
circuit
tester
If
discontinuity
is
detected
replace
sole
naid
valve
CHECKING
AMPLIFIER
Manual
transmission
models
The
amplifier
is
installed
at
the
rear
of
the
speedometer
To
check
proceed
as
follows
1
Set
circuit
tester
in
d
c
ampere
range
IA
min
full
scale
connect
test
probes
of
tester
as
shown
in
Figure
ET
38
Do
not
confuse
positive
line
with
negative
line
M
p
1
II
L
o
A
I
of
j
t
J
f
T
1
Ignition
key
2
Amplifier
3
Speed
detecting
switch
4
B
C
D
D
solenoid
valve
Fig
ET
38
Checking
amplifiu
REPLACING
AIR
PUMP
AIR
CLEANER
ELEMENT
Remove
air
hose
then
detach
air
cleaner
from
hoodledge
Air
cleaner
element
and
air
cleaner
lower
body
are
built
into
a
unit
construction
Replace
air
cleaner
element
and
lower
body
as
an
assembly
ET
20
EC323
Fig
ET
39
Repl4cing
air
cleaner
element
CHECKING
EXHAUST
GAS
RECIRCULATION
E
G
R
CONTROL
SYSTEM
Checkln
E
G
R
control
system
In
Ita
mounted
condition
I
M
ake
a
thorough
visual
check
of
E
G
R
control
system
If
necessary
wipe
away
oil
to
facilitate
inspection
If
hoses
are
cracked
or
broken
fe
place
2
With
engine
running
check
E
G
R
warning
system
for
proper
function
Make
sure
that
E
G
R
warn
ing
lamp
light
when
ignition
switch
is
turned
to
START
position
starter
mo
tor
runs
If
E
G
R
warning
lamp
does
not
light
inspect
harnesses
and
con
nectors
or
replace
warning
lamp
Then
turn
ignition
switch
to
ON
position
and
check
the
following
items
I
If
odometer
of
detector
drive
counter
has
not
reached
50
000
counts
make
sure
that
E
G
R
warning
lamp
does
not
light
2
If
odometer
of
detector
drive
counter
has
attained
50
000
counts
make
sure
that
E
G
R
warning
lamp
lights
If
warning
lamp
does
not
light
check
harnesses
connector
and
de
tector
drive
counter
replace
warning
lamp
or
detector
drive
counter
if
necessary
Note
Operation
of
E
G
R
warning
lamp
is
as
follows
Page 33 of 537
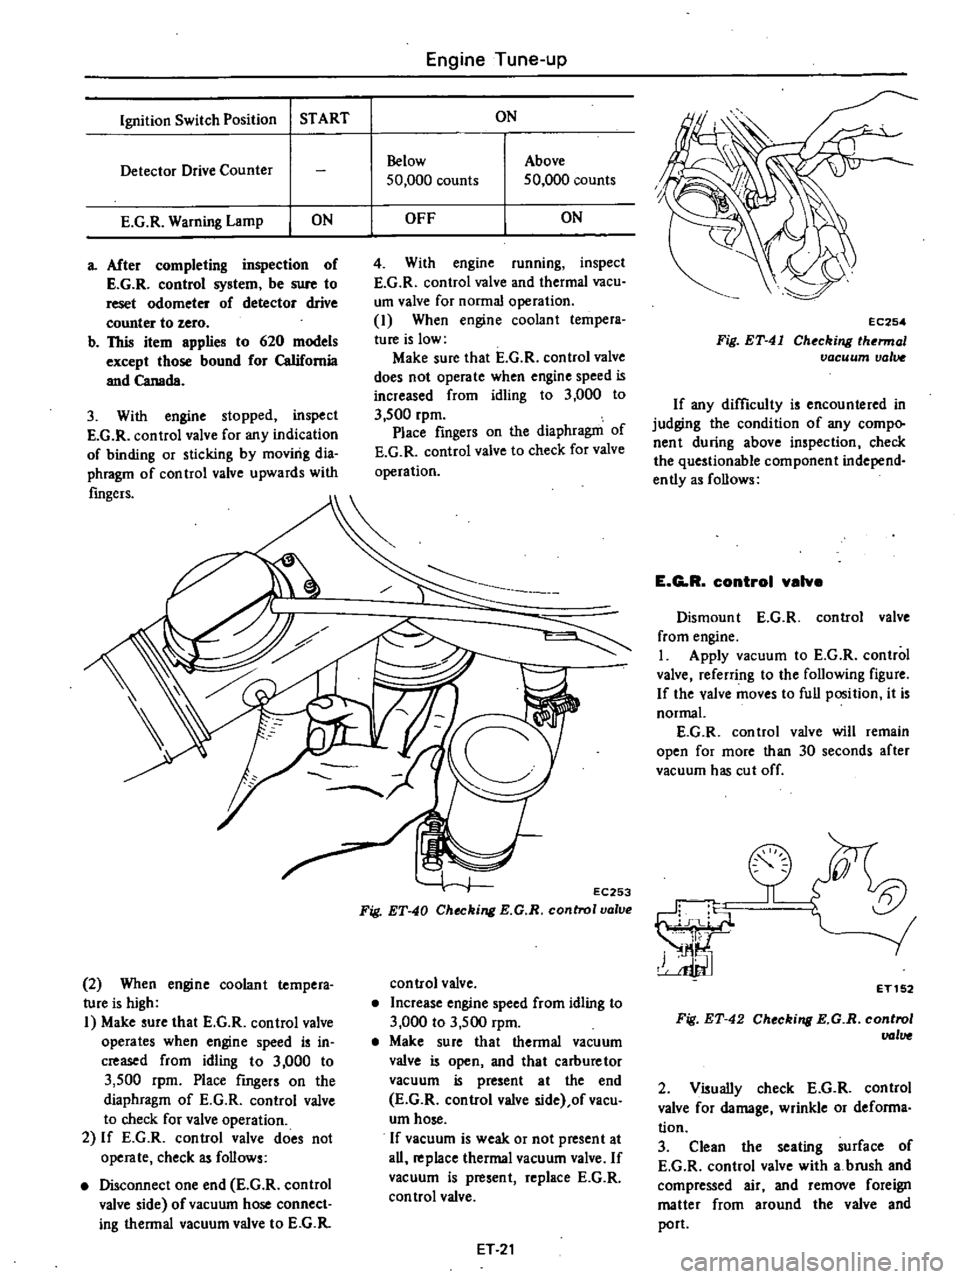
Ignition
Switch
Position
START
Detector
Drive
Counter
E
G
R
Warning
Lamp
ON
a
After
completing
inspection
of
E
G
R
control
system
be
sure
to
reset
odometer
of
detector
drive
counter
to
zero
b
This
item
applies
to
620
models
except
those
bound
for
California
and
Canada
3
With
engine
stopped
inspect
E
G
R
control
valve
for
any
indication
of
binding
or
sticking
by
movirig
dia
phragm
of
control
valve
upwards
with
fmgers
Engine
Tune
up
ON
Below
50
000
counts
Above
50
000
counts
OFF
ON
4
With
engine
running
inspect
E
G
R
control
valve
and
thermal
vacu
um
valve
for
normal
operation
I
When
engine
coolant
tempera
ture
is
low
Make
sure
that
E
G
R
control
valve
does
not
operate
when
engine
speed
is
increased
from
idling
to
3
000
to
3
500
rpm
Place
fingers
on
the
diaphragm
of
E
G
R
control
valve
to
check
for
valve
operation
2
When
engine
coolant
tempera
ture
is
high
I
Make
sure
that
E
G
R
control
valve
operates
when
engine
speed
is
in
creased
from
idling
to
3
000
to
3
500
rpm
Place
fingers
on
the
diaphragm
of
E
G
R
control
valve
to
check
for
valve
operation
2
If
E
G
R
control
valve
does
not
operate
check
as
follows
Disconnect
one
end
E
G
R
control
valve
side
ofvacuum
hose
connect
ing
thermal
vacuum
valve
to
E
G
R
EC253
Fig
ET
40
Checking
E
G
R
control
valve
control
valve
Increase
engine
speed
from
idling
to
3
000
to
3
500
rpm
Make
sure
that
thermal
vacuum
valve
is
open
and
that
carburetor
vacuum
is
present
at
the
end
E
G
R
control
valve
side
ofvacu
urn
hose
If
vacuum
is
weak
or
not
present
at
all
replace
thermal
vacuum
valve
If
vacuum
is
present
replace
E
G
R
con
trol
valve
ET
21
EC254
Fig
ET
41
Checking
thermal
vacuum
valw
If
any
difficulty
is
encountered
in
judging
the
condition
of
any
compo
nent
during
above
inspection
check
the
questionable
component
independ
ently
as
follows
E
G
R
control
valve
Dismount
E
G
R
control
valve
from
engine
I
Apply
vacuum
to
E
G
R
control
valve
referring
to
the
following
figure
If
the
valve
moves
to
full
position
it
is
normal
E
G
R
control
valve
will
remain
open
for
more
than
30
seconds
after
vacuum
has
cut
off
0
r11
hC
J
ET152
Fig
ET
42
Checking
E
G
R
control
VGlve
2
Visually
check
E
G
R
control
valve
for
damage
wrinkle
or
deforma
tion
3
Clean
the
seating
surface
of
E
G
R
control
valve
with
a
brush
and
compressed
air
and
remove
foreign
matter
from
around
the
valve
and
port
Page 35 of 537
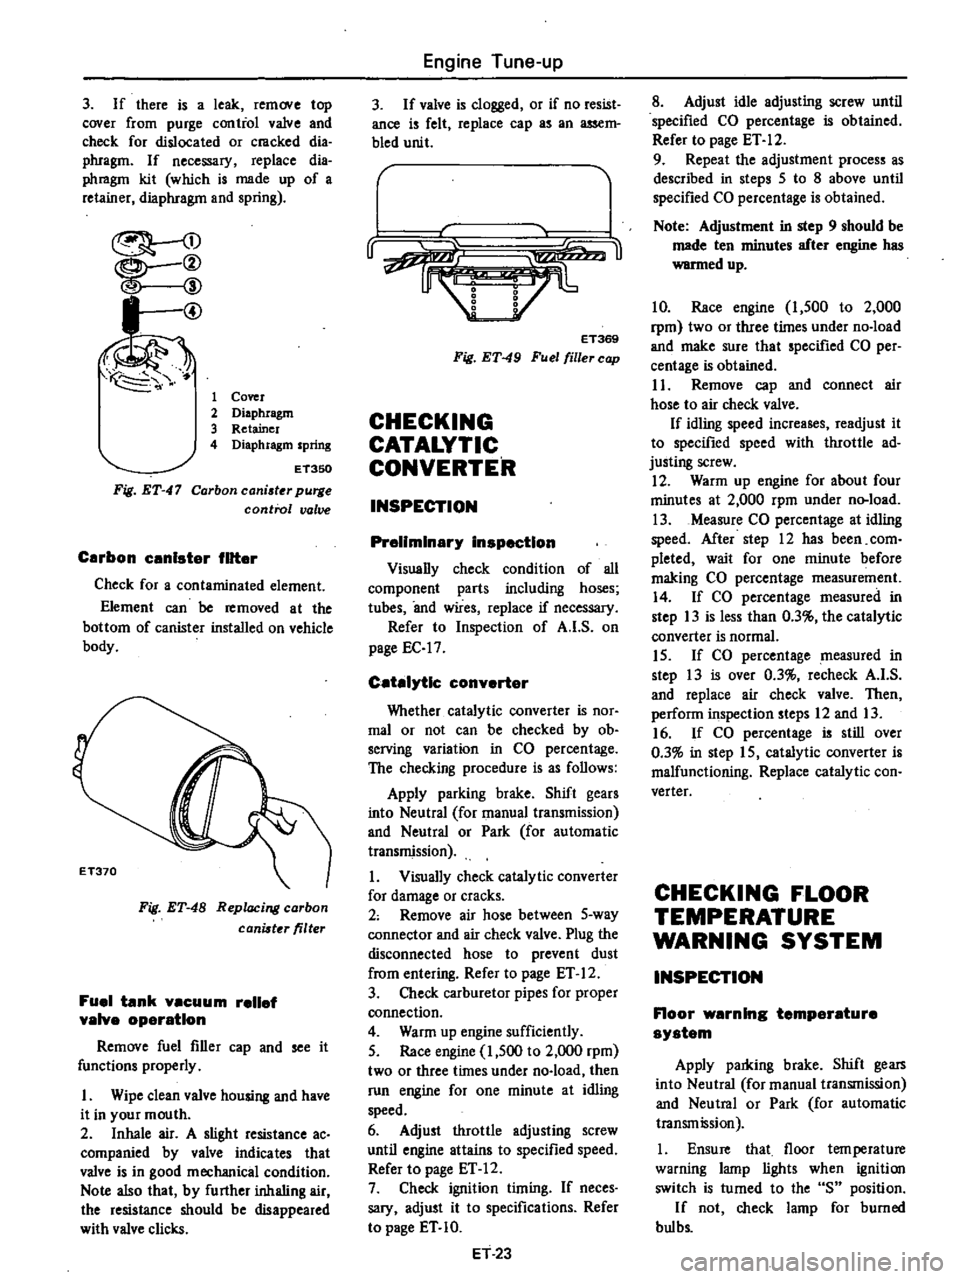
3
If
there
is
a
leak
remove
top
cover
from
purge
contiol
valve
and
check
for
dislocated
or
cmcked
dia
phragm
If
necessary
replace
dia
phmgm
kit
which
is
made
up
of
a
retainer
diaphragm
and
spring
I
@
1
Cover
2
Diaphragm
3
Retainer
4
Diaphragm
spring
Fig
ET
47
ET350
Carbon
caniater
purge
control
valve
Carbon
unlster
filter
Check
for
a
contaminated
element
Element
can
be
removed
at
the
bottom
of
canister
installed
on
vehicle
body
Fig
ET
48
Replacing
carbon
canister
filter
Fuel
tank
vacuum
relief
valve
operation
Remove
fuel
filler
cap
and
see
it
functions
properly
I
Wipe
clean
valve
housing
and
have
it
in
your
mouth
2
Inhale
air
A
slight
resistance
ac
companied
by
valve
indicates
that
valve
is
in
good
mechanical
condition
Note
also
that
by
further
inhaling
air
the
resistance
should
be
disappeared
with
valve
clicks
Engine
Tune
up
3
If
valve
is
clogged
or
if
no
resist
ance
is
felt
replace
cap
as
an
assem
bled
unit
r
u
ET369
Fig
ET
49
Fuel
filler
cap
CHECKING
CATALYTIC
CONVERTER
INSPECTION
Preliminary
inspection
Visually
check
condition
of
all
component
parts
including
hoses
tubes
and
wires
replace
if
necessary
Refer
to
Inspection
of
A
I
S
on
page
EC
17
Catalytic
converter
Whether
catalytic
converter
is
nOf
mal
or
not
can
be
checked
by
ob
serving
variation
in
CO
percentage
The
checking
procedure
is
as
follows
Apply
parking
brake
Shift
gears
into
Neutral
for
manual
transmission
and
Neutral
or
Park
for
automatic
transmission
1
Visually
check
catalytic
converter
for
damage
or
cracks
2
Remove
air
hose
between
5
way
connector
and
air
check
valve
Plug
the
disconnected
hose
to
prevent
dust
from
entering
Refer
to
page
ET
12
3
Check
carburetor
pipes
for
proper
connection
4
Warm
up
engine
sufficiently
5
Race
engine
1
500
to
2
000
rpm
two
or
three
times
under
no
load
then
run
engine
for
one
minute
at
idling
speed
6
Adjust
throttle
adjusting
screw
until
engine
attains
to
specified
speed
Refer
to
page
ET
12
7
Check
ignition
timing
If
neces
sary
adjust
it
to
specifications
Refer
to
page
ET
10
ET
23
8
Adjust
idle
adjusting
screw
until
specified
CO
percentage
is
obtained
Refer
to
page
ET
12
9
Repeat
the
adjustment
process
as
described
in
steps
5
to
8
above
until
specified
CO
percentage
is
obtained
Note
Adjustment
in
step
9
should
be
made
ten
minutes
after
engine
has
warmed
up
10
Race
engine
1
500
to
2
000
rpm
two
or
three
times
under
no
load
and
make
sure
that
specified
CO
per
centage
is
obtained
I
1
Remove
cap
and
connect
air
hose
to
air
check
valve
If
idling
speed
increases
readjust
it
to
specified
speed
with
throttle
ad
justing
screw
12
Warm
up
engine
for
about
four
minutes
at
2
000
rpm
under
n
load
13
Measure
CO
percentage
at
idling
speed
After
step
12
has
been
com
pleted
wait
for
one
minute
before
making
CO
percentage
measurement
14
If
CO
percentage
measured
in
step
13
is
less
than
0
3
the
catalylic
converter
is
normal
15
If
CO
percentage
measured
in
step
13
is
over
0
3
recheck
A
I
S
and
replace
air
check
valve
Then
perform
inspection
steps
12
and
13
16
If
CO
percentage
is
still
over
0
3
in
step
15
catalytic
converter
is
malfunctioning
Replace
catalytic
con
verter
CHECKING
FLOOR
TEMPERATURE
WARNING
SYSTEM
INSPECTION
Floor
warning
temperature
system
Apply
parldng
brake
Shift
gears
into
Neutral
for
manual
transmission
and
Neutral
or
Park
for
automatic
transmission
1
Ensure
that
floor
tern
perature
warning
lamp
lights
when
ignition
switch
is
turned
to
the
S
position
If
not
check
lamp
for
burned
bul
bs