run flat DATSUN PICK-UP 1977 Service Manual
[x] Cancel search | Manufacturer: DATSUN, Model Year: 1977, Model line: PICK-UP, Model: DATSUN PICK-UP 1977Pages: 537, PDF Size: 35.48 MB
Page 230 of 537

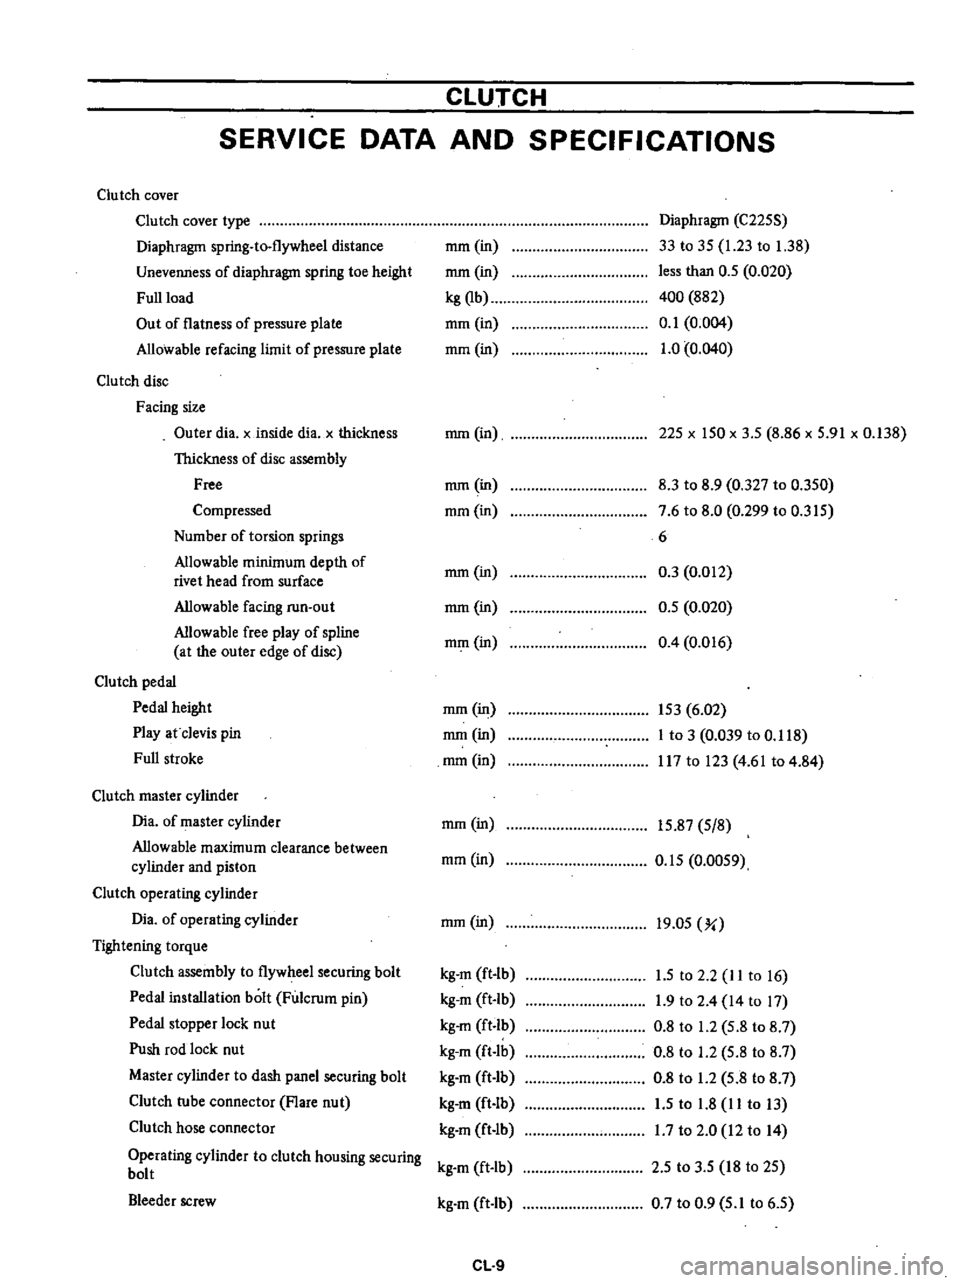
CLUTCH
SERVICE
DATA
AND
SPECIFICATIONS
Clutch
cover
Clu
tch
cover
type
Diaphragm
spring
to
flywheel
distance
Unevenness
of
diaphragm
spring
toe
height
Full
load
Out
of
flatness
of
pressure
plate
Allowable
refacing
limit
of
pressure
plate
Clutch
disc
Facing
size
Outer
dia
x
inside
dia
x
thickness
Thickness
of
disc
assembly
Free
Compressed
Number
of
torsion
springs
Allowable
minimum
depth
of
rivet
head
from
surface
Allowable
facing
run
out
Allowable
free
play
of
spline
at
the
outer
edge
of
disc
Clutch
pedal
Pedal
height
Play
at
clevis
pin
Full
stroke
Clutch
master
cylinder
Dia
of
master
cylinder
Allowable
maximum
clearance
between
cylinder
and
piston
Clutch
operating
cylinder
Dia
of
operating
cylinder
Tightening
torque
Clutch
assembly
to
flywheel
securing
bolt
Pedal
installation
bolt
Fulcrum
pin
Pedal
stopper
lock
nut
Push
rod
lock
nut
Master
cylinder
to
dash
panel
securing
bolt
Clutch
tube
connector
Flare
nut
Clutch
hose
connector
Operating
cylinder
to
clutch
housing
securing
bolt
Bleeder
screw
mm
in
mm
in
kg
Qb
mm
in
mm
in
Diaphragm
C225S
33
to
35
1
23
to
1
38
less
than
0
5
0
020
400
882
0
1
0
004
1
0
0
040
mm
in
225
x
150
x
3
5
8
86
x
5
91
x
0
138
mm
in
mm
in
8
3
to
8
9
0
327
to
0
350
7
6
to
8
0
0
299
to
0
315
6
0
3
0
012
0
5
0
020
0
4
0
016
mm
in
mm
in
mm
in
mm
in
153
6
02
mm
in
I
to
3
0
039
to
0
118
mm
in
117
to
123
4
61
to
4
84
mm
in
15
87
5
8
mm
in
0
15
0
0059
mm
in
19
05
Yo
kg
m
ft
lb
1
5
to
2
2
lito
16
kg
m
ft
Ib
1
9
to
2
4
14
to
17
kg
m
ft
b
0
8
to
1
2
5
8
to
8
7
kg
m
ft
lb
0
8
to
1
2
5
8
to
8
7
kg
m
ft
Ib
0
8
to
1
2
5
8
to
8
7
kg
m
ft
lb
1
5
to
1
8
11
to
13
kg
m
ft
lb
1
7
to
2
0
12
to
14
kg
m
ft
lb
2
5
to
3
5
18
to
25
kg
m
ft
Ib
0
7
to
0
9
5
1
to
6
5
CL
9
Page 403 of 537

Center
This
wear
is
caused
by
overinflation
of
the
tire
The
inflation
pressure
must
be
kept
at
the
specified
value
Shoulder
The
wear
may
be
caused
by
under
inflation
incorrect
wheel
camber
or
continuous
high
speed
driving
on
curves
In
general
the
former
two
causes
are
common
Underinflation
wear
occurs
on
both
sides
of
treads
d
I
Ii
Toe
in
or
toe
out
wear
nf
I
Underinnation
wear
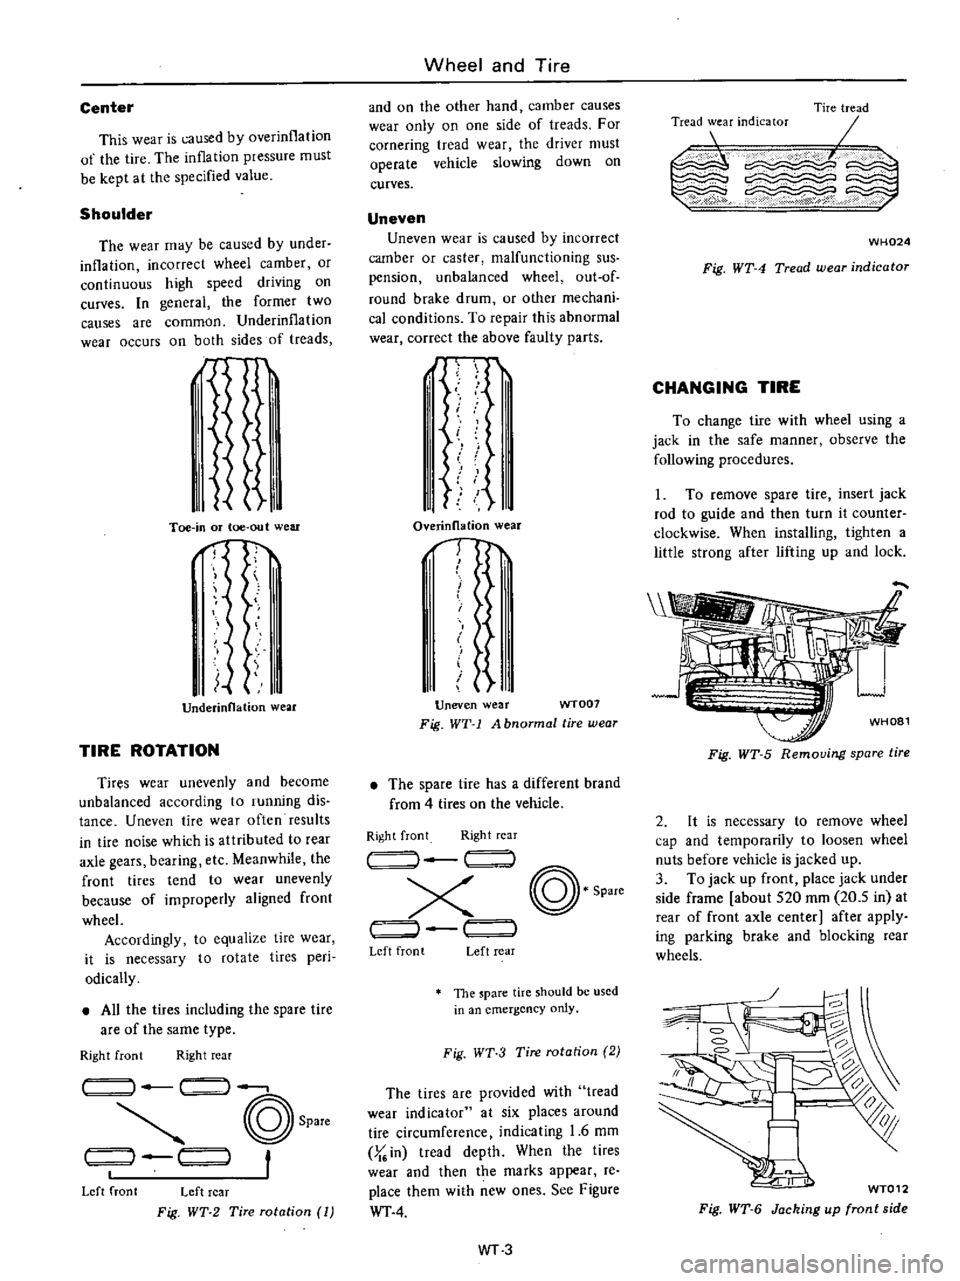
TIRE
ROTATION
Tires
wear
unevenly
and
become
unbalanced
according
to
running
dis
tance
Uneven
tire
wear
often
results
in
tire
noise
which
is
attributed
to
rear
axle
gears
bearing
etc
Meanwhile
the
front
tires
tend
to
wear
unevenly
because
of
improperly
aligned
front
wheel
Accordingly
to
equalize
tire
wear
it
is
necessary
to
rotate
tires
peri
odically
All
the
tires
including
the
spare
tire
are
of
the
same
type
Right
front
Right
rear
14
1
I
@
Spare
t
t
1
1
Left
front
Left
rear
Fig
WT
2
Tire
rotation
1
Wheel
and
Tire
and
on
the
other
hand
camber
causes
wear
only
on
one
side
of
treads
For
cornering
tread
wear
the
driver
must
operate
vehicle
slowing
down
on
curves
Uneven
Uneven
wear
is
caused
by
incorrect
camber
or
caster
malfunctioning
sus
pension
unbalanced
wheel
out
of
round
brake
drum
or
other
mechani
cal
conditions
To
repair
this
abnormal
wear
correct
the
above
faulty
parts
J
I
II
i
11
I
1
Overinllation
wear
1
I
I
t
Uneven
wear
WT007
Fig
WT
1
A
bnormal
tire
wear
The
spare
lire
has
a
different
brand
from
4
tires
on
the
vehicle
Right
front
Right
rear
I
@
Spare
x
J
r
Left
front
Left
rear
The
pare
tire
should
be
used
in
an
emergency
only
Fig
WT
3
Tire
rotation
2
The
tires
are
provided
with
tread
wear
indicator
at
six
places
around
tire
circumference
indicating
1
6
mm
J
in
tread
depth
When
the
tires
wear
and
then
the
marks
appear
re
place
them
with
new
ones
See
Figure
WT
4
WT3
Tire
tread
0E
I
Tread
wear
indicator
c
WH024
Fig
WT
4
Tread
wear
indicator
CHANGING
TIRE
To
change
tire
with
wheel
using
a
jack
in
the
safe
manner
observe
the
following
procedures
1
To
remove
spare
tire
insert
jack
rod
to
guide
and
then
turn
it
counter
clockwise
When
installing
lighten
a
little
strong
after
lifting
up
and
lock
Fig
WT
5
Removing
spare
tire
2
It
is
necessary
to
remove
wheel
cap
and
temporarily
to
loosen
wheel
nuts
before
vehicle
is
jacked
up
3
To
jack
up
front
place
jack
under
side
frame
about
S20
mOl
20
5
in
at
rear
of
front
axle
center
after
apply
ing
parking
brake
and
blocking
rear
wheels
g
1
WT012
Fig
WT
6
Jacking
up
front
side