tire type DATSUN PICK-UP 1977 Service Manual
[x] Cancel search | Manufacturer: DATSUN, Model Year: 1977, Model line: PICK-UP, Model: DATSUN PICK-UP 1977Pages: 537, PDF Size: 35.48 MB
Page 87 of 537
ENGINE
LUBRI
CATION
SYSTEM
Note
Pump
rotors
and
body
are
not
serviced
separately
If
pump
rotors
or
body
are
damaged
or
worn
replacement
of
the
entire
oil
pump
assembly
is
necessary
Tightening
torque
Oil
pump
mounting
bolts
Oil
pump
cover
bolts
Regulator
valve
cap
nut
Specifications
Oil
pressure
at
idling
Regulator
valve
spring
Free
length
Pressured
length
Regulator
valve
opening
pressure
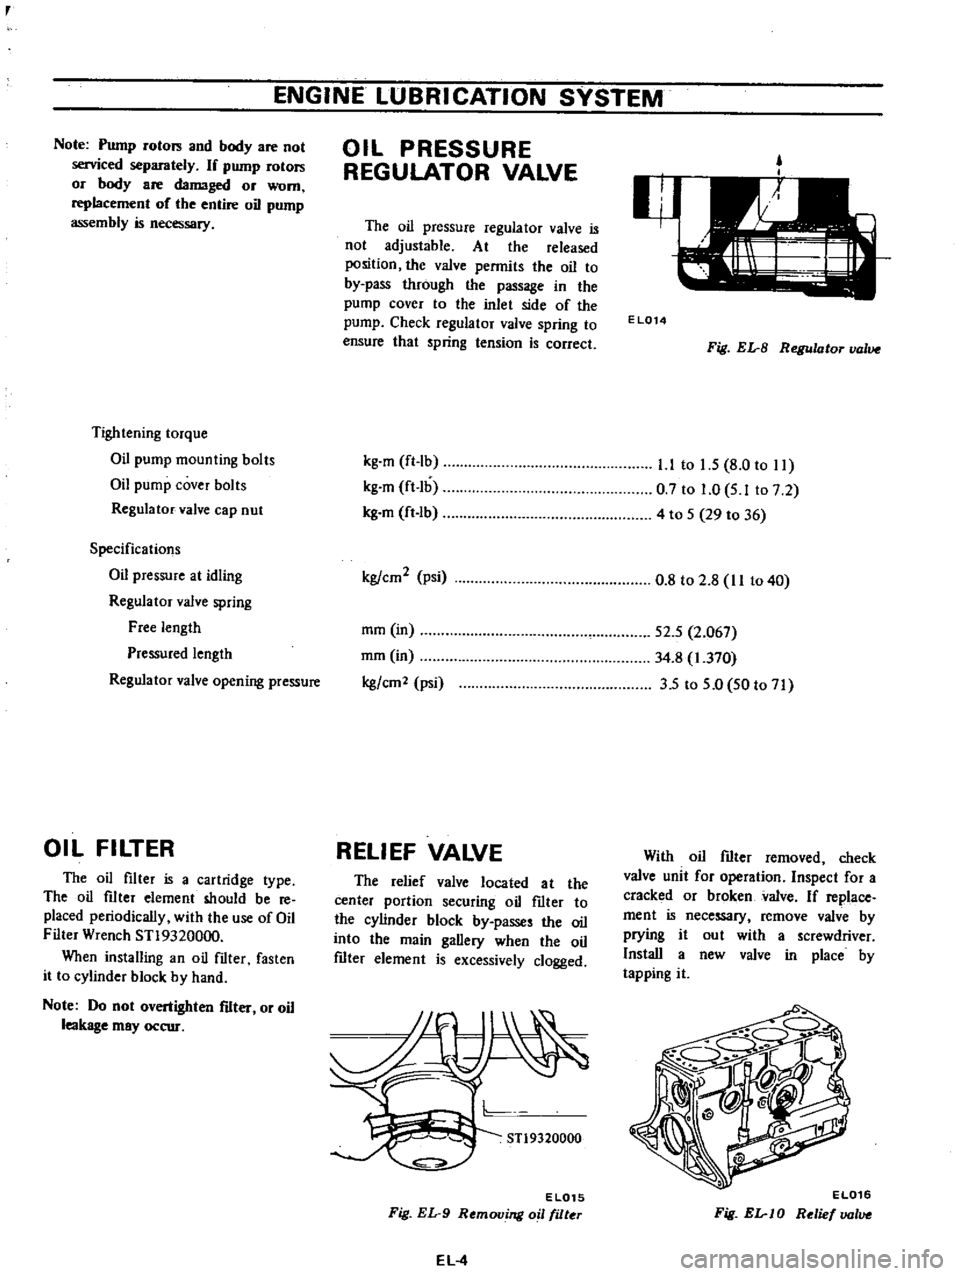
OIL
FILTER
The
oil
filter
is
a
cartridge
type
The
oil
filter
element
should
be
reo
placed
periodically
with
the
use
of
Oil
Filter
Wrench
ST19320000
When
installing
an
oil
filter
fasten
it
to
cylinder
block
by
hand
Note
Do
not
overtighten
filter
or
oil
leakage
may
occur
OIL
PRESSURE
REGULATOR
VALVE
The
oil
pressure
regulator
valve
is
not
adjustable
At
the
released
position
the
valve
permits
the
oil
to
by
pass
through
the
passage
in
the
pump
cover
to
the
inlet
side
of
the
pump
Check
regulator
valve
spring
to
ensure
that
spring
tension
is
correct
kg
m
ft
Ib
kg
m
ft
lb
kg
m
ft
lb
kg
cm2
psi
mm
in
mm
in
kg
em
2
psi
RELIEF
VALVE
The
relief
valve
located
at
the
center
portion
securing
oil
fIlter
to
the
cylinder
block
by
passes
the
oil
into
the
main
gallery
when
the
oil
fIlter
element
is
excessively
clogged
STl9320000
EL015
Fig
EL
9
Removing
oil
filter
EL
4
EL014
Fig
EL
B
Regulator
value
l
l
to
1
5
8
0
to
11
0
7
to
1
0
5
Ito
7
2
4
to
5
29
to
36
0
8
to
2
8
II
to
40
52
5
2
067
34
8
1
370
35
to
5
0
50
to
71
With
oil
fIlter
removed
check
valve
unit
for
operation
Inspect
for
a
cracked
or
broken
valve
If
replace
ment
is
necessary
remove
valve
by
prying
it
out
with
a
screwdriver
Install
a
new
valve
in
place
by
tapping
it
EL016
Fig
EL
JO
Relief
lJOlue
Page 203 of 537
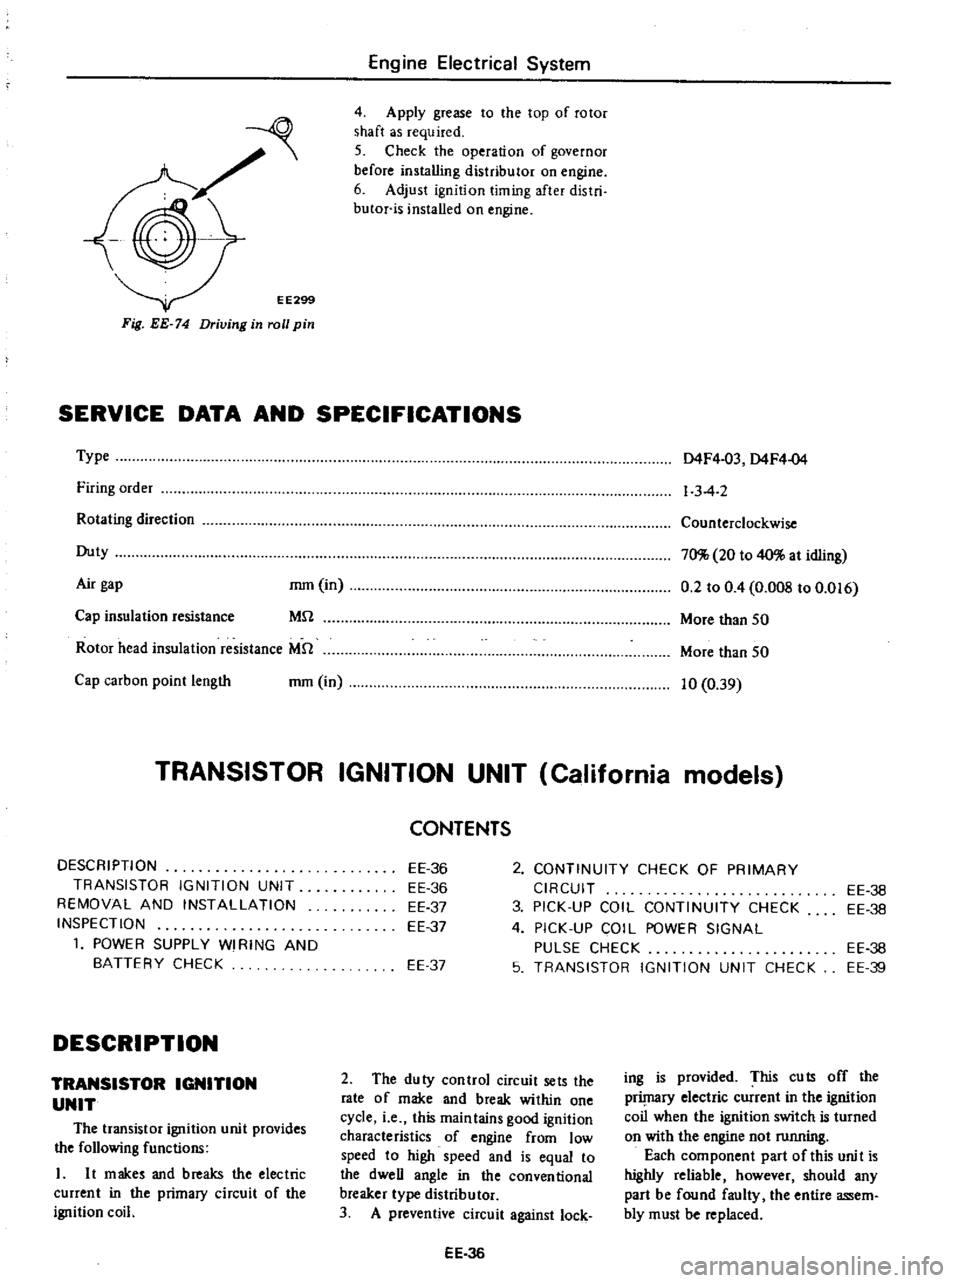
EE299
Fig
EE
74
Driving
in
roll
pin
Engine
Electrical
System
4
Apply
grease
to
the
top
of
rotor
shaft
as
required
5
Check
the
operation
of
governor
before
installing
distributor
on
engine
6
Adjust
ignition
timing
after
distri
butor
is
installed
on
engine
SERVICE
DATA
AND
SPECIFICATIONS
Type
Firing
order
Rotating
direction
Duty
Air
gap
mm
in
MU
Cap
insulation
resistance
Rotor
head
insulation
resistance
MU
Cap
carbon
point
length
mm
in
D4F4
03
D4F4
04
1
3
4
2
Counterclockwise
70
20
to
40
at
idling
0
2
to
0
4
O
OOS
to
0
016
More
than
50
More
than
50
10
0
39
TRANSISTOR
IGNITION
UNIT
California
models
DESCRIPTION
TRANSISTOR
IGNITION
UNIT
REMOVAL
AND
INSTALLATION
INSPECTION
1
POWER
SUPPLY
WI
RING
AND
BATTERY
CHECK
DESCRIPTION
TRANSISTOR
IGNITION
UNIT
The
transistor
ignition
unit
provides
the
following
functions
L
It
makes
and
breaks
the
electric
current
in
the
primacy
circuit
of
the
ignition
coil
2
CONTINUITY
CHECK
OF
PRIMARY
CIRCUIT
3
PICK
UP
COIL
CONTINUITY
CHECK
4
PICK
UP
COIL
POWER
SIGNAL
PULSE
CHECK
5
TRANSISTOR
IGNITION
UNIT
CHECK
CONTENTS
EE
36
EE
36
EE
37
EE
37
EE
37
2
The
duty
control
circuit
sets
the
rate
of
make
and
break
within
one
cycle
i
e
this
maintains
good
ignition
characteristics
of
engine
from
low
speed
to
high
speed
and
is
equal
to
the
dweU
angle
in
the
conventional
breaker
type
distributor
3
A
preventive
circuit
against
lock
EE
36
EE
36
EE
38
EE
38
EE
39
ing
is
provided
This
cuts
off
the
prilnaCY
electric
current
in
the
ignition
coil
when
the
ignition
switch
is
turned
on
with
the
engine
not
running
Each
component
part
of
this
unit
is
highly
reliable
however
should
any
part
be
found
faulty
the
entire
assem
bly
must
be
replaced
Page 377 of 537
The
620
series
vehicles
are
equip
ped
with
hydraulic
brakes
on
the
four
wheels
and
mechanical
hand
brakes
on
the
rear
wheels
The
front
brake
is
the
uni
servo
type
and
the
rear
the
duo
servo
with
the
built
in
hand
BRAKE
PEDAL
FRONT
BRAKE
REAR
BRAKE
BRAKE
PEDAL
Qi
f
l
II
t
Unit
mm
in
I
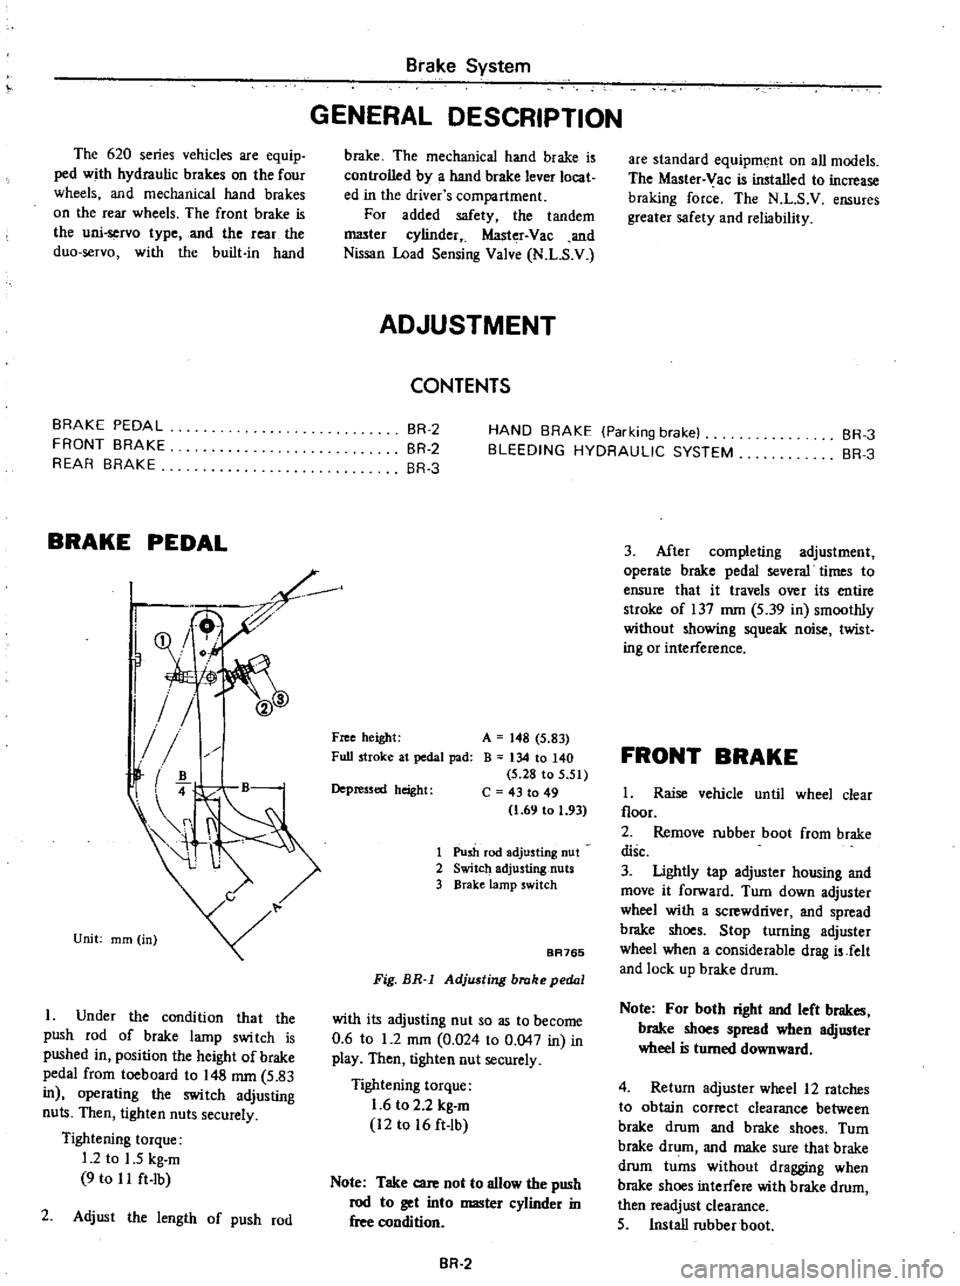
Under
the
condition
that
the
push
rod
of
brake
lamp
swi
tch
is
pushed
in
position
the
height
of
brake
pedal
from
toeboard
to
148
mm
5
83
in
operating
the
switch
adjusting
nuts
Then
tighten
nuts
securely
Tightening
torque
1
2
to
1
5
kg
m
9
to
I
I
ft
Ib
2
Adjust
the
length
of
push
rod
Brake
System
GENERAL
DESCRIPTION
brake
The
mechanical
hand
brake
is
controlled
by
a
hand
brake
lever
locat
ed
in
the
driver
s
compartment
For
added
safety
the
tandem
I
1lI3ter
cylinder
Master
Vac
and
Nissan
Load
Sensing
Valve
N
L
S
V
ADJUSTMENT
CONTENTS
are
standard
equipment
on
all
models
The
Master
Vac
is
installed
to
increase
braking
force
The
N
L
S
V
ensures
greater
safety
and
reliability
BR
2
BR
2
BR
3
HAND
BRAKE
Parking
brake
BLEEDING
HYDRAULIC
SYSTEM
BR
3
BR
3
Free
height
Full
stroke
at
pedal
pad
A
148
5
83
B
134
10
140
5
28
to
5
51
C
43
to
49
1
69
to
1
93
Depressed
height
1
Push
rod
adjusting
nut
2
Switch
adjusting
nuts
3
BraKe
lamp
switch
BA765
Fig
BR
l
Adjusting
brake
pedal
with
its
adjusting
nut
so
as
to
become
0
6
to
1
2
mOl
0
024
to
0
047
in
in
play
Then
tigh1en
nut
securely
Tightening
torque
1
6
to
2
2
kg
m
12
to
16
ft
lb
Note
Take
care
not
to
allow
the
push
rod
to
get
into
master
cylinder
in
free
condition
BR
2
3
After
completing
adjustment
operate
brake
pedal
several
times
to
ensure
that
it
travels
over
its
entire
stroke
of
137
mm
5
39
in
smoothly
without
showing
squeak
noise
twist
ing
or
interference
FRONT
BRAKE
1
Raise
vehicle
until
wheel
clear
floor
2
Remove
rubber
boot
from
brake
disc
3
Ughtly
tap
adjuster
housing
and
move
it
forward
Turn
down
adjuster
wheel
with
a
screwdriver
and
spread
brake
shoes
Stop
turning
adjuster
wheel
when
a
considerable
drag
is
Jelt
and
lock
up
brake
drum
Note
For
both
right
and
left
brakes
brake
shoes
spread
when
adjuster
wheel
is
turned
downward
4
Return
adjuster
wheel
12
ratches
to
obtain
correct
clearance
between
brake
drum
and
brake
shoes
Turn
brake
drum
and
make
sure
that
brake
drum
turns
without
dragging
when
brake
shoes
interfere
with
brake
drum
then
readjust
clearance
5
Install
rubber
boot
Page 403 of 537
Center
This
wear
is
caused
by
overinflation
of
the
tire
The
inflation
pressure
must
be
kept
at
the
specified
value
Shoulder
The
wear
may
be
caused
by
under
inflation
incorrect
wheel
camber
or
continuous
high
speed
driving
on
curves
In
general
the
former
two
causes
are
common
Underinflation
wear
occurs
on
both
sides
of
treads
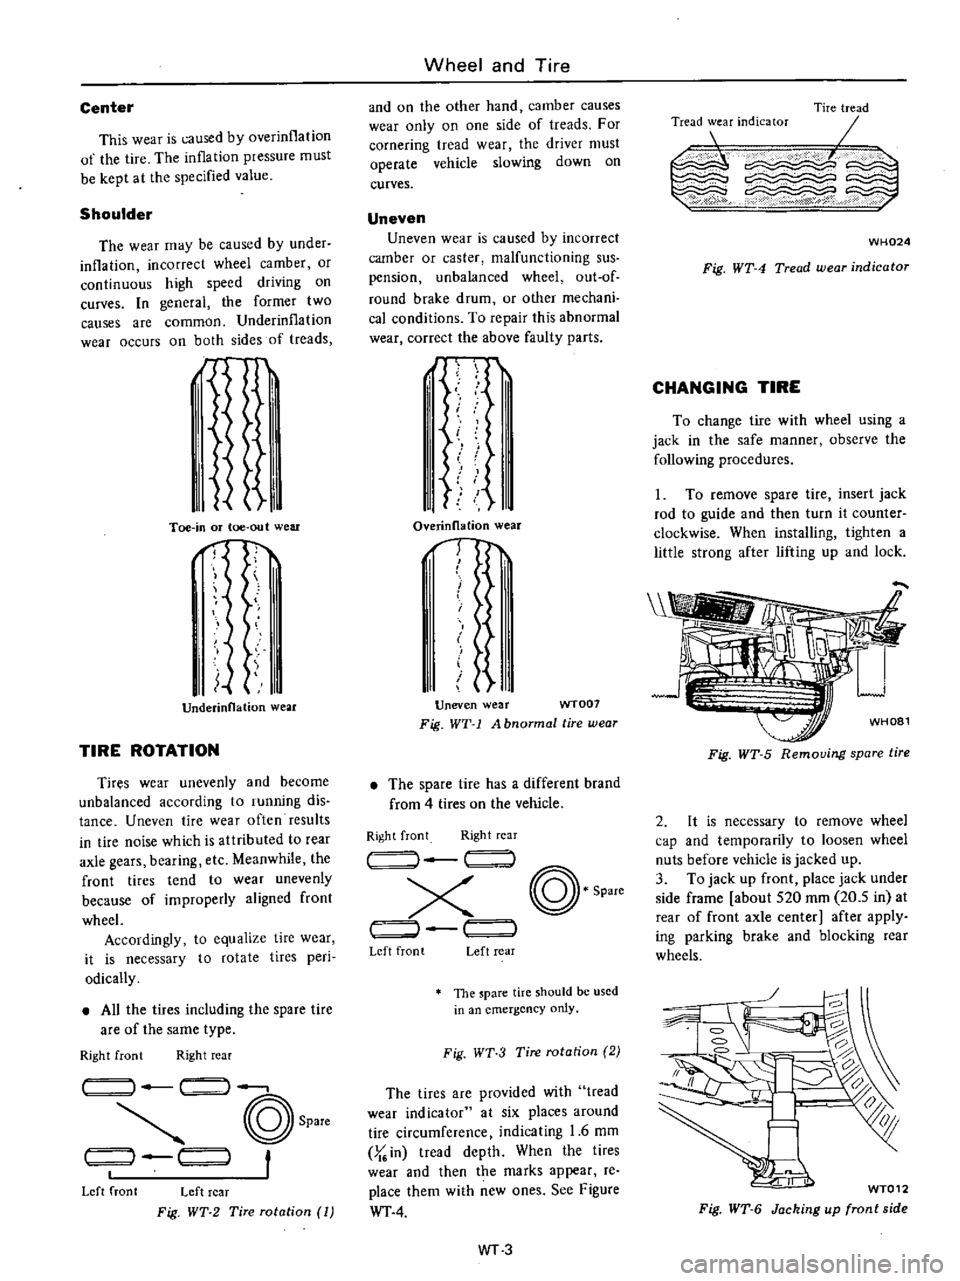
d
I
Ii
Toe
in
or
toe
out
wear
nf
I
Underinnation
wear
TIRE
ROTATION
Tires
wear
unevenly
and
become
unbalanced
according
to
running
dis
tance
Uneven
tire
wear
often
results
in
tire
noise
which
is
attributed
to
rear
axle
gears
bearing
etc
Meanwhile
the
front
tires
tend
to
wear
unevenly
because
of
improperly
aligned
front
wheel
Accordingly
to
equalize
tire
wear
it
is
necessary
to
rotate
tires
peri
odically
All
the
tires
including
the
spare
tire
are
of
the
same
type
Right
front
Right
rear
14
1
I
@
Spare
t
t
1
1
Left
front
Left
rear
Fig
WT
2
Tire
rotation
1
Wheel
and
Tire
and
on
the
other
hand
camber
causes
wear
only
on
one
side
of
treads
For
cornering
tread
wear
the
driver
must
operate
vehicle
slowing
down
on
curves
Uneven
Uneven
wear
is
caused
by
incorrect
camber
or
caster
malfunctioning
sus
pension
unbalanced
wheel
out
of
round
brake
drum
or
other
mechani
cal
conditions
To
repair
this
abnormal
wear
correct
the
above
faulty
parts
J
I
II
i
11
I
1
Overinllation
wear
1
I
I
t
Uneven
wear
WT007
Fig
WT
1
A
bnormal
tire
wear
The
spare
lire
has
a
different
brand
from
4
tires
on
the
vehicle
Right
front
Right
rear
I
@
Spare
x
J
r
Left
front
Left
rear
The
pare
tire
should
be
used
in
an
emergency
only
Fig
WT
3
Tire
rotation
2
The
tires
are
provided
with
tread
wear
indicator
at
six
places
around
tire
circumference
indicating
1
6
mm
J
in
tread
depth
When
the
tires
wear
and
then
the
marks
appear
re
place
them
with
new
ones
See
Figure
WT
4
WT3
Tire
tread
0E
I
Tread
wear
indicator
c
WH024
Fig
WT
4
Tread
wear
indicator
CHANGING
TIRE
To
change
tire
with
wheel
using
a
jack
in
the
safe
manner
observe
the
following
procedures
1
To
remove
spare
tire
insert
jack
rod
to
guide
and
then
turn
it
counter
clockwise
When
installing
lighten
a
little
strong
after
lifting
up
and
lock
Fig
WT
5
Removing
spare
tire
2
It
is
necessary
to
remove
wheel
cap
and
temporarily
to
loosen
wheel
nuts
before
vehicle
is
jacked
up
3
To
jack
up
front
place
jack
under
side
frame
about
S20
mOl
20
5
in
at
rear
of
front
axle
center
after
apply
ing
parking
brake
and
blocking
rear
wheels
g
1
WT012
Fig
WT
6
Jacking
up
front
side
Page 444 of 537
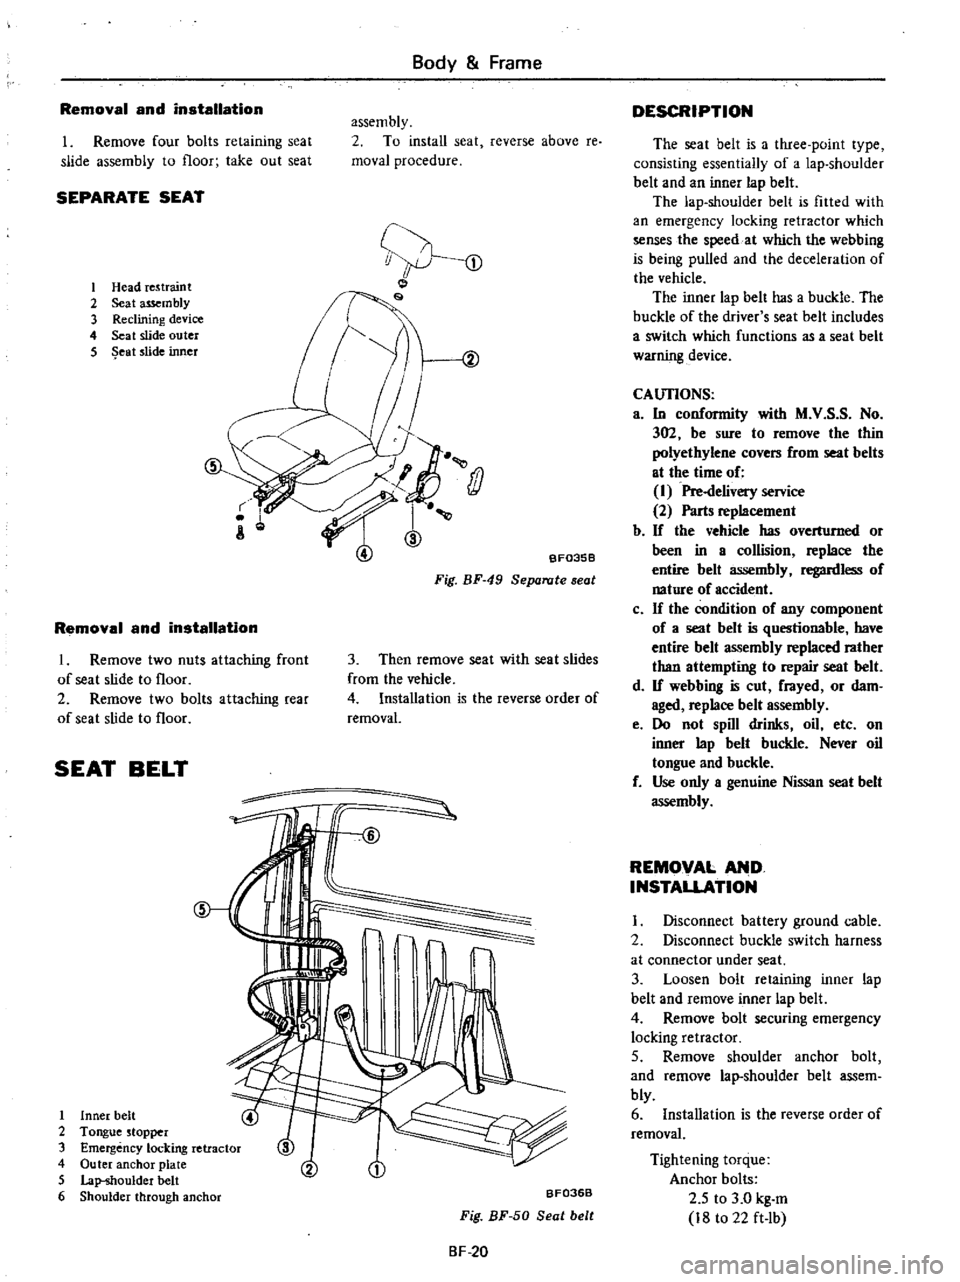
Body
Frame
Removal
and
installation
assembly
2
To
install
seat
reverse
above
re
moval
procedure
1
Remove
four
bolts
retaining
seat
slide
assembly
to
floor
take
out
seat
SEPARATE
SEAT
1
Head
re5traint
2
Seat
assembly
3
Reclining
device
4
Seat
slide
outer
5
eat
slide
inner
s
J
j
BF0358
Fig
BF
49
Separate
seat
Removal
and
installation
I
Remove
two
nuts
attaching
front
of
seat
slide
to
floor
2
Remove
two
bolts
attaching
rear
of
seat
slide
to
floor
3
Then
remove
seat
with
seat
slides
from
the
vehicle
4
Installation
is
the
reverse
order
of
removal
SEAT
BELT
1
Inner
belt
2
Tongue
stopper
3
Emergency
locking
retractor
4
Outer
anchor
plate
5
Lap
shoulder
belt
6
Shoulder
through
anchor
BF036B
Fig
BF
50
Seat
belt
BF
20
DESCRIPTION
The
seat
belt
is
a
three
point
type
consisting
essentiaily
of
a
lap
shoulder
belt
and
an
inner
lap
belt
The
lap
shoulder
belt
is
fitted
with
an
emergency
locking
retractor
which
senses
the
speed
at
which
the
webbing
is
being
pulled
and
the
deceleration
of
the
vehicle
The
inner
lap
belt
has
a
buckle
The
buckle
of
the
driver
s
seat
belt
includes
a
switch
which
functions
as
a
seat
belt
warning
device
CAlJI10NS
a
In
conformity
with
M
V
S
S
No
302
be
sure
to
remove
the
thin
polyethylene
covers
from
seat
belts
at
the
time
of
I
Pre
delivery
service
2
Parts
replacement
b
If
the
vehicle
has
overturned
or
been
in
a
collision
replace
the
entire
belt
assembly
regardless
of
nature
of
accident
c
If
the
condition
of
any
component
of
a
seat
belt
is
questionable
have
entire
belt
assembly
replaced
rather
than
attempting
to
repair
seat
belt
d
If
webbing
is
cut
frayed
or
dam
aged
replace
belt
assembly
e
Do
not
spill
drinks
oil
etc
on
inner
lap
belt
buckle
Never
oil
tongue
and
buckle
f
Use
only
a
genuine
Nissan
seat
belt
assembly
REMOVAL
AND
INSTAUATION
I
Disconnect
battery
ground
cable
2
Disconnect
buckle
switch
harness
at
connector
under
seat
3
Loosen
bolt
retaining
inner
lap
belt
and
remove
inner
lap
belt
4
Remove
bolt
securing
emergency
locking
retractor
5
Remove
shoulder
anchor
bolt
and
remove
lap
shoulder
belt
assem
bly
6
Installation
is
the
reverse
order
of
removal
Tightening
torque
Anchor
bolts
2
5
to
3
0
kg
m
18
to
22
ft
lb