rear view mirror DODGE CHALLENGER 2015 3.G User Guide
[x] Cancel search | Manufacturer: DODGE, Model Year: 2015, Model line: CHALLENGER, Model: DODGE CHALLENGER 2015 3.GPages: 220, PDF Size: 30.96 MB
Page 39 of 220
High Beam Operation
Push the lever forward to activate the high beams. Pull the lever toward you for flash to
pass.
NOTE:
For safe driving, turn off the high beams when oncoming traffic is present to prevent
headlight glare and as a courtesy to other motorists.
HEADLIGHT SWITCH
Automatic Headlights/Parking Lights/Headlights
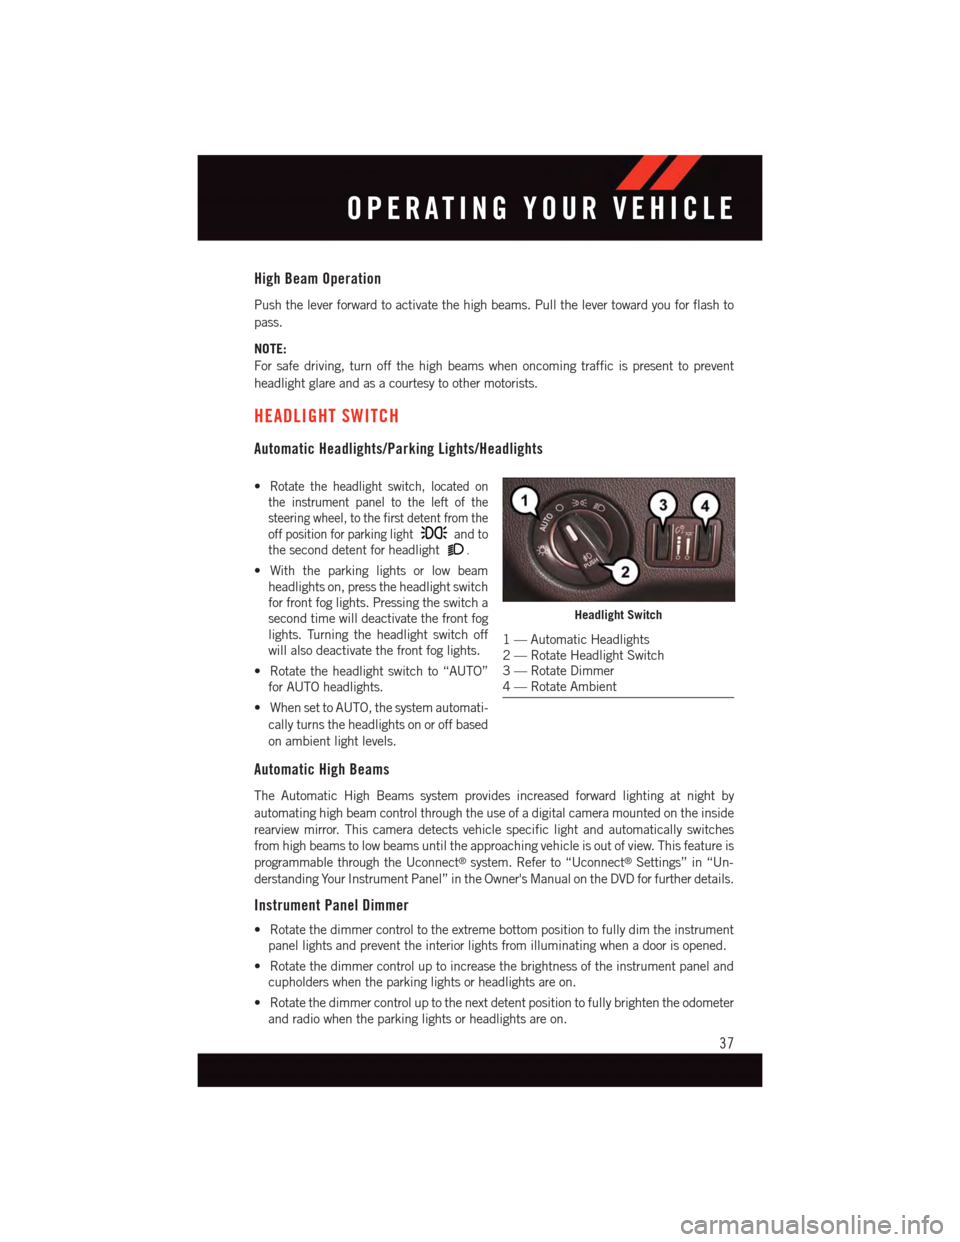
•Rotate the headlight switch, located on
the instrument panel to the left of the
steering wheel, to the first detent from the
off position for parking lightand to
the second detent for headlight.
•Withtheparkinglightsorlowbeam
headlights on, press the headlight switch
for front fog lights. Pressing the switch a
second time will deactivate the front fog
lights. Turning the headlight switch off
will also deactivate the front fog lights.
•Rotatetheheadlightswitchto“AUTO”
for AUTO headlights.
•WhensettoAUTO,thesystemautomati-
cally turns the headlights on or off based
on ambient light levels.
Automatic High Beams
The Automatic High Beams system provides increased forward lighting at night by
automating high beam control through the use of a digital camera mounted on the inside
rearview mirror. This camera detects vehicle specific light and automatically switches
from high beams to low beams until the approaching vehicle is out of view. This feature is
programmable through the Uconnect®system. Refer to “Uconnect®Settings” in “Un-
derstanding Your Instrument Panel” in the Owner's Manual on the DVD for further details.
Instrument Panel Dimmer
•Rotatethedimmercontroltotheextremebottompositiontofullydimtheinstrument
panel lights and prevent the interior lights from illuminating when a door is opened.
•Rotatethedimmercontroluptoincreasethebrightnessoftheinstrumentpaneland
cupholders when the parking lights or headlights are on.
•Rotatethedimmercontroluptothenextdetentpositiontofullybrightentheodometer
and radio when the parking lights or headlights are on.
Headlight Switch
1—AutomaticHeadlights2—RotateHeadlightSwitch3—RotateDimmer4—RotateAmbient
OPERATING YOUR VEHICLE
37
Page 51 of 220
MAX A/C
MAX A/C sets the control for maximum cooling performance.
•PressandreleasetotogglebetweenMAXA/Candthepriorsettings.Thebuttononthe
touchscreen illuminates when MAX A/C is ON.
In MAX A/C, the blower level and mode position can be adjusted to desired user settings.
Pressing other settings will cause the MAX A/C operation to switch to the prior settings and
the MAX A/C indicator will turn off.
SYNC Temperature Button
•Pressthe“SYNC”buttononcetocontroldriverandpassengertemperaturessimulta-
neously.
•Pressthe“SYNC”buttonasecondtimetocontrolthetemperaturesindividually.
Air Recirculation
•UseRecirculationformaximumA/Coperation.
•Forwindowdefogging,turntheRecirculationbuttonoff.
•IftheRecirculationbuttonispushedwhileintheAUTOmode,theindicatorlightmay
flash three times to indicate the cabin air is being controlled automatically. The
Recirculation button will be greyed out in these conditions.
Heated Mirrors (If Equipped)
The mirrors are heated to melt frost or ice. This feature is activated whenever you turn on
the rear window defroster.
PARKVIEW® REAR BACK-UP CAMERA
Yo u c a n s e e a n o n - s c r e e n i m a g e o f t h e r e a r o f y o u r v e h i c l e w h e n e v e r t h e s h i f t l e v e r i s p u t
into REVERSE. The ParkView®Rear Back-Up Camera image will be displayed on the radio
display screen, located on the center stack of the instrument panel.
If the radio display screen appears foggy, clean the camera lens located on the rear of the
vehicle above the rear license plate.
Refer to your Owner's Manual on the DVD for further details.
WARNING!
Drivers must be careful when backing up; even when using the ParkView®Rear
Back-Up Camera. Always check carefully behind your vehicle, and be sure to check for
pedestrians, animals, other vehicles, obstructions, or blind spots before backing up.
Yo u m u s t c o n t i n u e t o p a y a t t e n t i o n w h i l e b a c k i n g u p . F a i l u r e t o d o s o c a n r e s u l t i n
serious injury or death.
OPERATING YOUR VEHICLE
49
Page 57 of 220
Uconnect® ACCESS
Uconnect® Access — If Equipped (Available On Uconnect® 8.4A/8.4AN —
U.S. Residents Only)
WARNING!
ALWAYS drive safely with your hands on the steering wheel. You have full responsibility
and assume all risks related to the use of the Uconnect®features and applications in
this vehicle. Only use Uconnect®when it is safe to do so. Failure to do so may result in
an accident involving serious injury or death.
Uconnect®Access enhances your ownership and driving experience by connecting your
vehicle with a built-in cellular connection. With Uconnect®Access, you can:
•Placeacalltoalocal9-1-1Operatorforemergencyassistance.
•Remotelylock/unlockyourdoorsandstartyourvehiclefromvirtuallyanywhere,using
the Uconnect®Access App from your smartphone. You can also do so by logging into
Mopar Owner Connect, or by calling Uconnect®Care. (Vehicle must be within the
United States and have network coverage).
•TurnyourvehicleintoaWiFiHotspotandconnectyourdevicestotheinternet.
•Receivetextoremailnotificationsifyourvehicle'stheftalarmgoesoff.
•Receivestolenvehicleassistance,usingGPStechnologytohelpauthoritieslocateyour
vehicle if it is stolen.
•Listentoyourtextmessagesorsendfree-formtextmessageswithyourvoicewhile
keeping your hands on the wheel, using the Voice Texting feature. Requires a cell phone
that supports Bluetooth Message Access Profile (MAP).
•Searchforplacestoeat,shop,relaxandplaywithYelp®,usingyourvoiceoron-screen
menu. Then navigate to them (navigation standard on Uconnect®8.4AN, optional on
Uconnect®8.4A).
•GetoperatorassistanceusingtheASSISTbuttononyourinteriorrearviewmirror.
Before you drive, familiarize yourself with the easy-to-use Uconnect® Access.
1. The ASSIST and 9-1-1 buttons are located on your rearview mirror. The ASSIST button
is used for contacting Roadside Assistance, Vehicle Care and Uconnect®Care. The
9-1-1 button connects you to emergency services.
NOTE:
Vehicles sold in Canada and Mexico DO NOT have 9-1-1 Call system capabilities. 9-1-1
or other emergency line operators in Canada and Mexico may not answer or respond to
9-1-1 system calls.
2. The Uconnect®“Apps” button on the menu bar at the bottom right corner of the radio
touchscreen. This is where you can begin your registration process, manage your Apps
and purchase WiFi on demand.
ELECTRONICS
55
Page 60 of 220
If you already have an account with these Apps, scroll down and press the “Link” button
to enter your information. If you do not have an account, you can create a new one.
Aha™ by HARMAN (www.aharadio.com)
•EnteryouremailaddressandpasswordforAha™,orcreateanewAha™account.
•YoucanlinkyourFacebook,TwitterorSlackeraccountsontheAha™website.
iHeartRadio (www.iHeartRadio.com)
•EnteryouremailaddressandpasswordforiHeartRadio,orcreateanewiHeartRadio
account.
•Select“Activate”tocontinue,
•Select“Close”tocompleteactivation.
Pandora® (www.pandora.com)
•EnteryourPandora®username/email address and password, then click “Save.”
•CreateanewPandora®account.
Slacker Radio (www.slacker.com)
•EnteryourSlackerusername/emailaddressandpassword,thenclick“Save.”
•CreateanewSlackerRadioaccount.
Invite family and friends to use the Via Mobile Apps in your vehicle by setting up their own
Via Mobile profile.
Renewing Subscriptions And Purchasing WiFi Hotspot (Uconnect® 8.4A/8.4AN,
U.S. 48 Contiguous States And Alaska)
Subscriptions, and WiFi Hotspot, can be purchased from the Uconnect®Store within your
vehicle, and online at Mopar Owner Connect. If you need help push the ASSIST button on
the rearview mirror, then select Uconnect®Care (or dial 1-855-792-4241).
Purchasing Online
Yo u c a n r e n e w y o u r s u b s c r i p t i o n t o a p a c k a g e o r p u r c h a s e Wi F i f r o m t h e M o p a r O w n e r
Connect website. You must first set up a Uconnect®Access Payment Account online. Log
into moparownerconnect.com
1. Log In to the Mopar Owner Connect website (moparownerconnect.com) with your
username/email and password.
2. Click on the “Shop” tab, then click on the Uconnect®Store.
3. From the Uconnect®Store, select the item you wish to purchase.
ELECTRONICS
58
Page 61 of 220
4. This will launch the selected item into purchase mode along with providing additional
information.
5. The Uconnect®Store will display a “Purchase Overview” message confirming the
financial details of your purchase. Click the “Purchase” key to continue.
6. The Uconnect®Store will ask you to “Confirm Payment” using your default payment
method on file in your Payment Account. Click the “Complete” key to continue.
7. The Uconnect®Payment Account will then ask for your “Payment Account PIN,”
which you established when setting up your Uconnect®payment account. After
entering this four digit PIN, click the “Complete” key to make the purchase.
8. You will receive a confirmation message that your purchase has been submitted. Click
the “OK” button to end the process.
Purchasing WiFi Hotspot While In Your Vehicle
Yo u m u s t s e t u p a U c o n n e c t®Access Payment Account online (log in to
moparownerconnect.com, go to Edit Profile, then Uconnect®Payment Account, to set up
and manage your Payment Account).
1. To purchase WiFi while in your vehicle, ensure the vehicle is running and in Park. Press
the “Apps” button on the touchscreen, then select WiFi within the “Apps” menu.
Follow the on-screen instructions. When asked for your payment PIN, use the 4-digit
PIN you established when setting up your payment account on Mopar Owner Connect.
NOTE:
This may be different than the Uconnect®Security PIN you established for using features
such as Remote Vehicle Start. After purchasing WiFi, it may take up to 30 minutes (with
the vehicle running) before the WiFi will be active in your vehicle.
2. Select WiFi again, then note the hotspot name. Select this network when connecting
devices to the hotspot. Also click on View/Edit Passphrase, then note the security
passphrase you will need to connect to the network on each device.
If your devices cannot see the WiFi Hotspot network after 30 minutes, please contact
Uconnect®Care by pushing the ASSIST button on the rearview mirror, or by calling
1-855-792-4241.
Using Uconnect® Access
Getting Started With Apps
Applications (Apps) and features in your Uconnect®Access system deliver services that are
customized for the driver and are certified by Chrysler Group, LLC. Two different types are:
1.Built-In Features—usethebuilt-in3GCellularNetworkonyourUconnect®8.4A/
8.4AN radio.
ELECTRONICS
59
Page 64 of 220
Built-In Features (Uconnect® 8.4A/8.4AN)
CAUTION!
•Ignoringtherearviewmirrorlightcouldmeanyoumaynothave9-1-1Callservice
if needed. If the rearview mirror light is illuminated, have an authorized dealer
service the 9-1-1 Call system immediately.
•TheOccupantRestraintController(ORC)turnsontheAirBagWarningLightonthe
instrument panel if a malfunction is detected in any part of the air bag system. If the
Air Bag Warning Light is illuminated, the air bag system may not be working
properly and the 9-1-1 system may not be able to send a signal to a 9-1-1 operator.
If the Air Bag Warning Light is illuminated, have an authorized dealer service your
vehicle immediately.
•Ifanyoneinthevehiclecouldbeindanger(e.g.,fireorsmokeisvisible,dangerous
road conditions or location), do not wait for voice contact from a 9-1-1 operator. All
occupants should exit the vehicle immediately and move to a safe location.
•Donotaddanyaftermarketelectricalequipmenttothevehicle’selectricalsystem.
This may prevent your vehicle from sending a signal to initiate an emergency call.
To a v o i d i n t e r f e r e n c e t h a t c a n c a u s e t h e 9 - 1 - 1 C a l l s y s t e m t o f a i l , n e v e r a d d
aftermarket equipment (e.g., two-way mobile radio, CB radio, data recorder, etc.) to
your vehicle’s electrical system or modify the antennas on your vehicle. IF YOUR
VEHICLE LOSES BATTERY POWER FOR ANY REASON (INCLUDING DURING OR
AFTER AN ACCIDENT), THE UCONNECT®FEATURES, APPS AND SERVICES,
AMONG OTHERS, WILL NOT OPERATE.
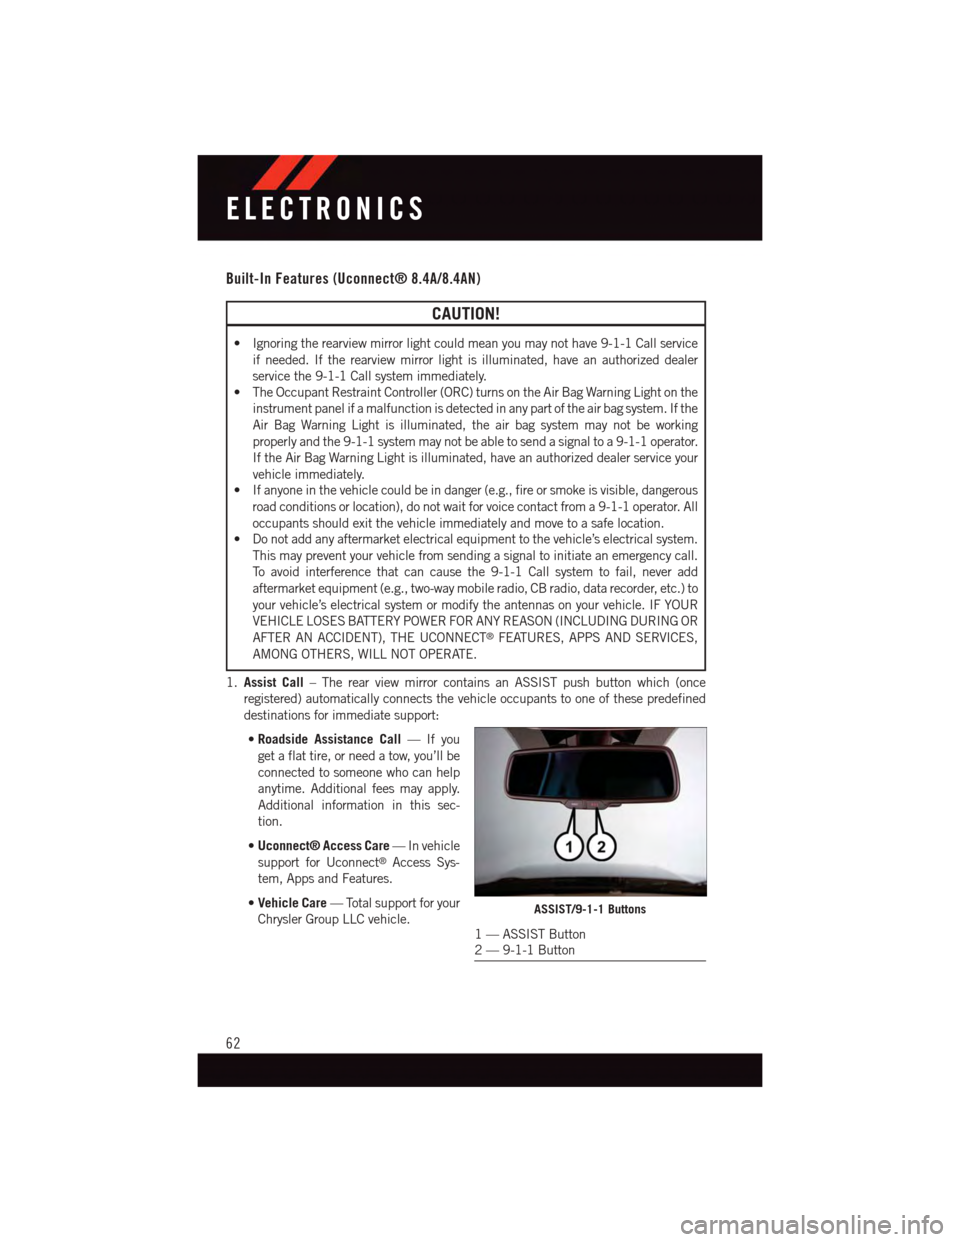
1.Assist Call–TherearviewmirrorcontainsanASSISTpushbuttonwhich(once
registered) automatically connects the vehicle occupants to one of these predefined
destinations for immediate support:
•Roadside Assistance Call—Ifyou
get a flat tire, or need a tow, you’ll be
connected to someone who can help
anytime. Additional fees may apply.
Additional information in this sec-
tion.
•Uconnect® Access Care—Invehicle
support for Uconnect®Access Sys-
tem, Apps and Features.
•Vehicle Care—Totalsupportforyour
Chrysler Group LLC vehicle.ASSIST/9-1-1 Buttons
1—ASSISTButton2—9-1-1Button
ELECTRONICS
62
Page 65 of 220
2.Emergency 9-1-1 Call (If Equipped)—Therearviewmirrorcontainsa9-1-1button
that, when pressed, may place a call from your vehicle to a local 9-1-1 operator to
request help from local police, fire or ambulance personnel. If this button is acciden-
tally pushed, you will have 10 seconds to stop the call. To cancel, push the 9-1-1 Call
button again or press the “cancel” button shown on the touchscreen. After 10 seconds
has passed, the 9-1-1 call will be placed and only the 9-1-1 operator can cancel it. The
LED light on the rearview mirror will turn green once a connection to a 9-1-1 operator
has been made. The green LED light will turn off once the 9-1-1 call is terminated.
Have an authorized dealer service the vehicle if the rearview mirror light is continu-
ously red. On equipped vehicles, this feature requires a functioning electrical system
and wireless coverage to function properly.If a connection is made between a 9-1-1
operator and your vehicle, you understand and agree that 9-1-1 operators may, like
any other 9-1-1 call, record conversations and sounds in and near your vehicle upon
connection.
3.Roadside Assistance (If Equipped)—Ifyourvehicleisequippedwiththisfeatureand
within wireless range, you may be able to connect to Roadside Assistance by pushing
the “ASSIST” button on the rearview mirror. You will be presented with Assist Care
options. Make a selection by pressing the prompts displayed on the radio. If Roadside
Assistance is provided to your vehicle, you agree to be responsible for any additional
roadside assistance service costs that you may incur. To provide Uconnect®Services to
you, we may record and monitor your conversations with Roadside Assistance,
Uconnect®Care or Vehicle Care, whether such conversations are initiated through the
Uconnect®Services in your vehicle, or via a landline or mobile telephone, and may
share information obtained through such recording and monitoring in accordance with
regulatory requirements. You acknowledge, agree and consent to any recording,
monitoring or sharing of information obtained through any such call recordings.
4.Yelp®—Customershavetheabilitytosearchfornearbydestinationsorapointof
interest (POI) either by category or custom search by using keywords (for example,
“Italian restaurant”). Searching can be done by either voice or by using the touch-
screen keypad. Using the touchscreen, launch Yelp®by selecting the “Apps” icon,
press the “All Apps” tab, and then press “Yelp.” Using voice recognition, push the
Voice Command (VR) button on the steering wheel and say “Launch Yelp®.”
5.Security Alarm Notification—TheSecurityAlarmNotificationfeaturenotifiesyouvia
email or text (SMS) message when the vehicle’s factory-installed security alarm system
has been set-off. There are a number of reasons why your alarm may have been
triggered, one of which could be that your vehicle was stolen. If so, please see the
details of the Stolen Vehicle Assistance service below. When you register, Security
Alarm Notification is automatically set to send you an email at the mail address you
provide should the alarm go off. You may also opt to have a text message sent to your
mobile device.
6.Stolen Vehicle Assistance—Ifyourvehicleisstolen,contactlocallawenforcement
immediately to file a stolen vehicle report. Once this report has been filed, Uconnect®
care can help locate your vehicle. The Uconnect®Care agent will ask for the stolen
vehicle report number issued by local law enforcement. Then, using GPS technology
ELECTRONICS
63
Page 78 of 220
Get Started
1. VisitUconnectPhone.comto check mobile device and feature compatibility and to find
phone pairing instructions.
2. Reduce background noise. Wind and passenger conversations are examples of noise
that may impact recognition.
3. Speak clearly at a normal pace and volume while facing straight ahead. The micro-
phone is positioned on the rearview mirror and aimed at the driver.
4. Each time you give a Voice Command, you must first push either the VR or Phone
button, wait untilafterthe beep, then say your Voice Command.
5. You can interrupt the help message or system prompts by pushing the VR or Phone
button and saying a Voice Command from current category.
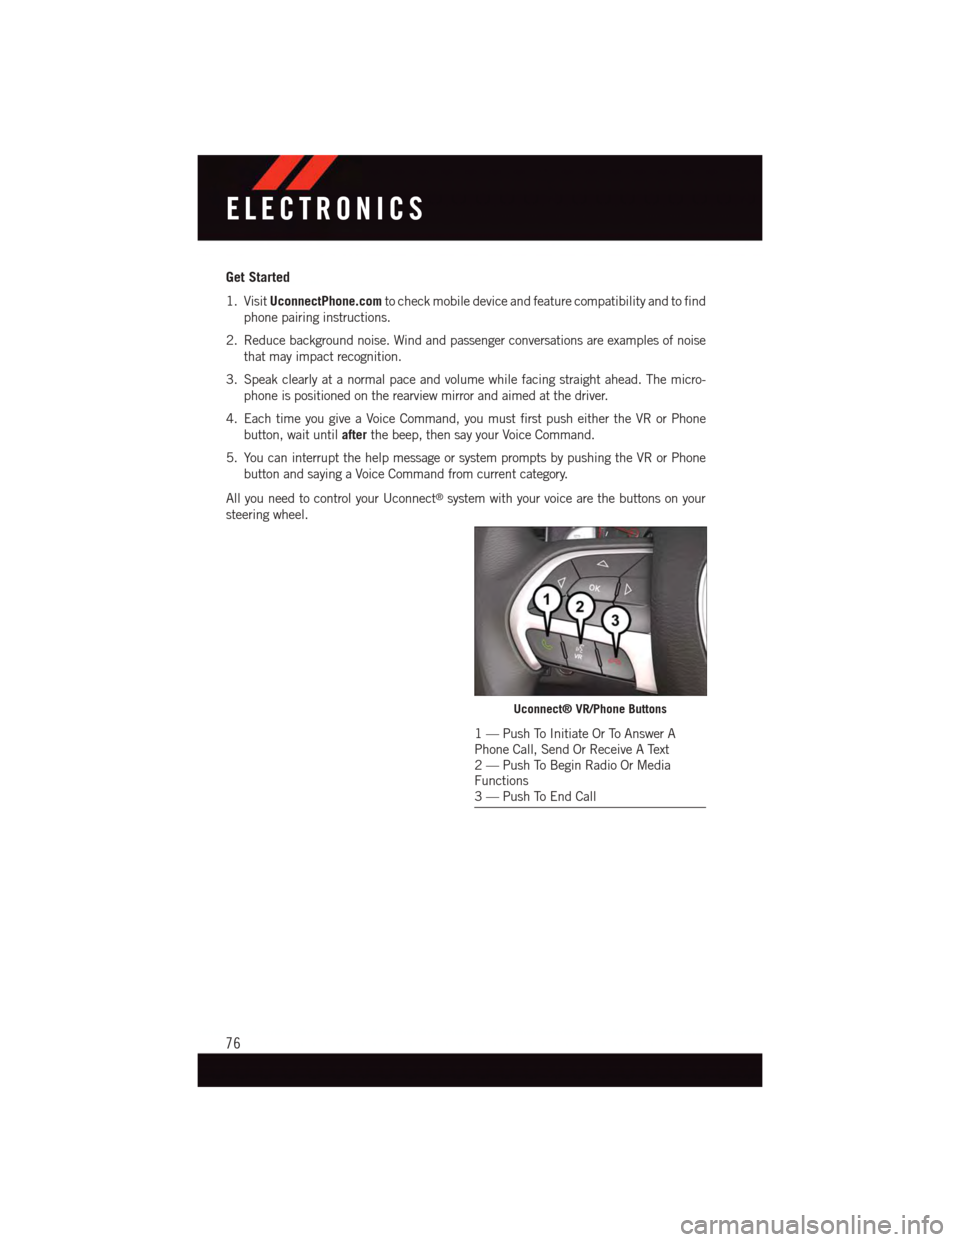
All you need to control your Uconnect®system with your voice are the buttons on your
steering wheel.
Uconnect® VR/Phone Buttons
1—PushToInitiateOrToAnswerAPhone Call, Send Or Receive A Text2—PushToBeginRadioOrMediaFunctions3—PushToEndCall
ELECTRONICS
76
Page 100 of 220
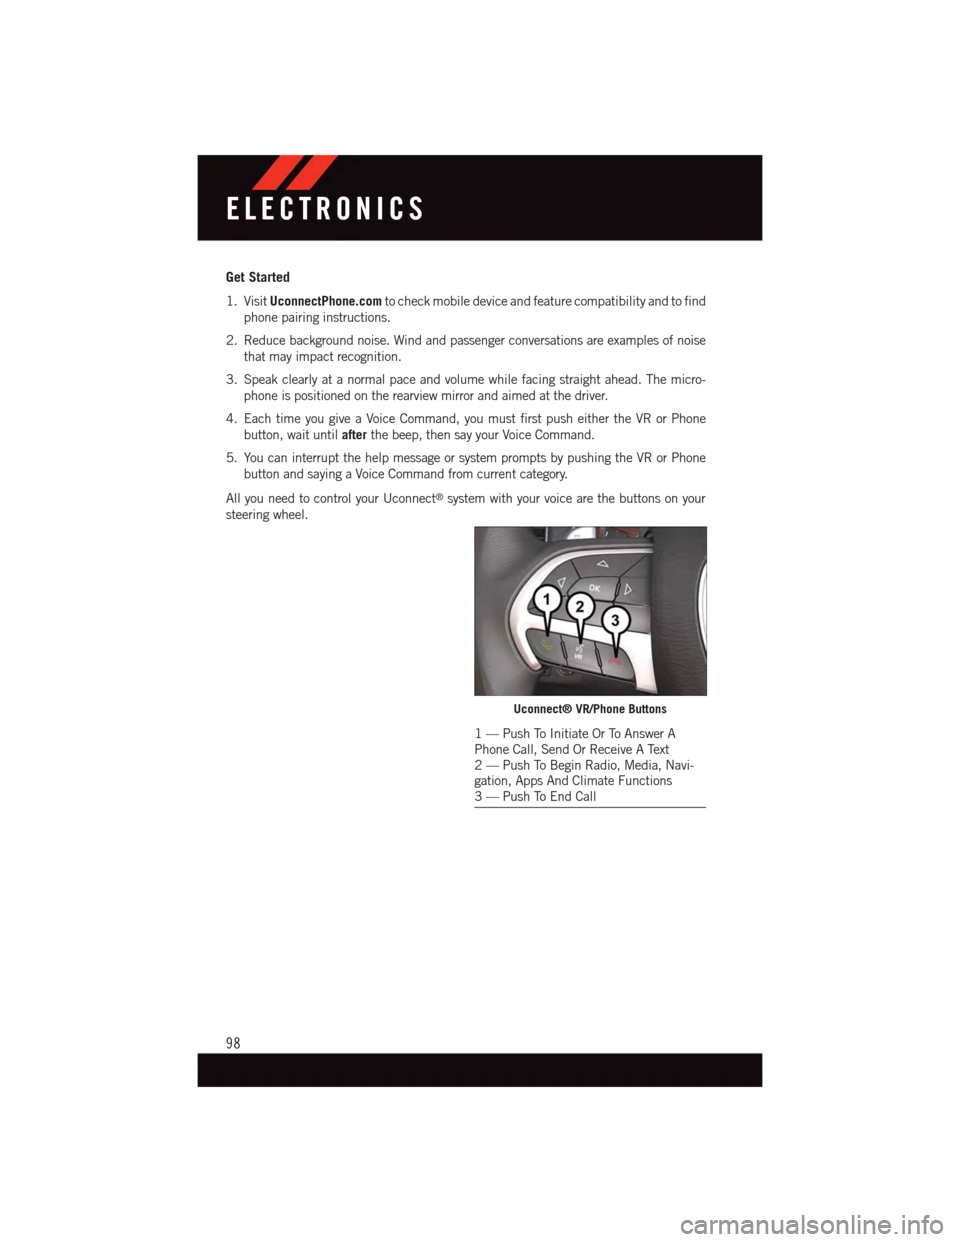
Get Started
1. VisitUconnectPhone.comto check mobile device and feature compatibility and to find
phone pairing instructions.
2. Reduce background noise. Wind and passenger conversations are examples of noise
that may impact recognition.
3. Speak clearly at a normal pace and volume while facing straight ahead. The micro-
phone is positioned on the rearview mirror and aimed at the driver.
4. Each time you give a Voice Command, you must first push either the VR or Phone
button, wait untilafterthe beep, then say your Voice Command.
5. You can interrupt the help message or system prompts by pushing the VR or Phone
button and saying a Voice Command from current category.
All you need to control your Uconnect®system with your voice are the buttons on your
steering wheel.
Uconnect® VR/Phone Buttons
1—PushToInitiateOrToAnswerAPhone Call, Send Or Receive A Text2—PushToBeginRadio,Media,Navi-gation, Apps And Climate Functions3—PushToEndCall
ELECTRONICS
98