stop start DODGE CHARGER 2015 7.G Owner's Manual
[x] Cancel search | Manufacturer: DODGE, Model Year: 2015, Model line: CHARGER, Model: DODGE CHARGER 2015 7.GPages: 236, PDF Size: 35.67 MB
Page 50 of 236
WARNING!
Adaptive Cruise Control (ACC) is a convenience system. It is not a substitute for active
driving involvement. It is always the driver’s responsibility to be attentive of road,
traffic, and weather conditions, vehicle speed, distance to the vehicle ahead; and, most
importantly, brake operation to ensure safe operation of the vehicle under all road
conditions. Your complete attention is always required while driving to maintain safe
control of your vehicle. Failure to follow these warnings can result in a collision and
death or serious personal injury.
The ACC system:
•Doesnotreacttopedestrians,oncomingvehicles,andstationaryobjects(e.g.,
astoppedvehicleinatrafficjamoradisabledvehicle).
•Cannottakestreet,traffic,andweatherconditionsintoaccount,andmaybelimited
upon adverse sight distance conditions.
•Doesnotalwaysfullyrecognizecomplexdrivingconditions,whichcanresultin
wrong or missing distance warnings.
•Willbringthevehicletoacompletestopwhilefollowingatargetvehicleandhold
the vehicle for 2 seconds in the stop position. If the target vehicle does not start
moving within two seconds the ACC system will display a message that the system
will release the brakes and that the brakes must be applied manually. An audible
chime will sound when the brakes are released.
Yo u s h o u l d s w i t c h o f f t h e A C C s y s t e m :
•Whendrivinginfog,heavyrain,heavysnow,sleet,heavytraffic,andcomplex
driving situations (i.e., in highway construction zones).
•Whenenteringaturnlaneorhighwayofframp;whendrivingonroadsthatare
winding, icy, snow-covered, slippery, or have steep uphill or downhill slopes.
•Whentowingatrailerupordownsteepslopes.
•Whencircumstancesdonotallowsafedrivingataconstantspeed.
The Cruise Control system has two control modes:
•AdaptiveCruiseControlmodeformaintaininganappropriatedistancebetween
vehicles.
•Normal(fixedspeed)electronicspeedcontrolmodeforcruisingataconstant
preset speed. For additional information, refer to “Normal (Fixed Speed) Cruise
Control Mode” in this section.
Normal (fixed speed) electronic speed control will not react to preceding vehicles.
Always be aware of the mode selected.
Yo u c a n c h a n g e t h e m o d e b y u s i n g t h e C r u i s e C o n t r o l b u t t o n s . T h e t w o c o n t r o l m o d e s
function differently. Always confirm which mode is selected.
OPERATING YOUR VEHICLE
48
Page 55 of 236
EIGHT-SPEED AUTOMATIC TRANSMISSION
The transmission gear range (PRNDM) is displayed both on the shift lever and in the Driver
Information Display (DID).
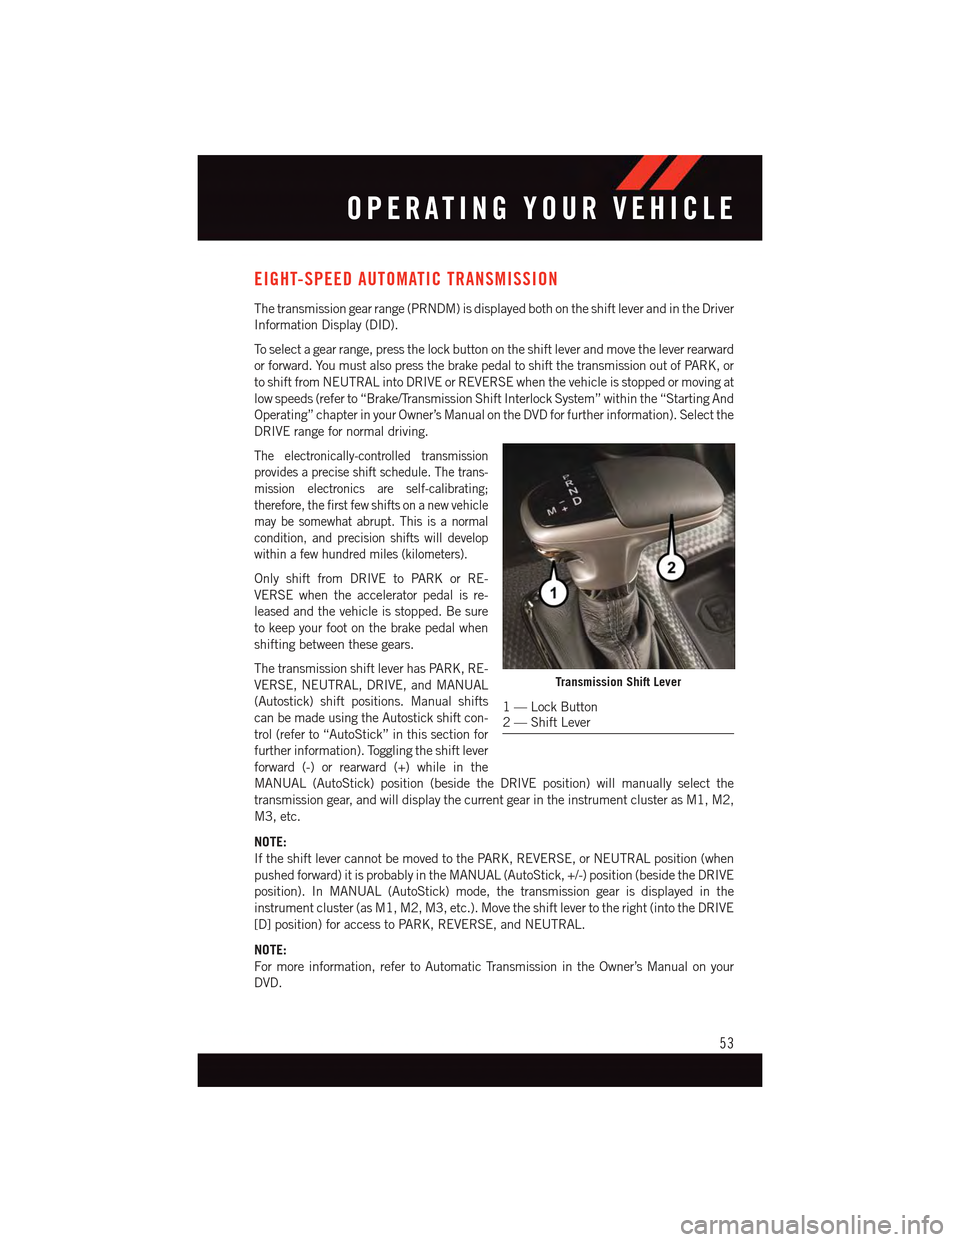
To s e l e c t a g e a r r a n g e , p r e s s t h e l o c k b u t t o n o n t h e s h i f t l e v e r a n d m o v e t h e l e v e r r e a r w a r d
or forward. You must also press the brake pedal to shift the transmission out of PARK, or
to shift from NEUTRAL into DRIVE or REVERSE when the vehicle is stopped or moving at
low speeds (refer to “Brake/Transmission Shift Interlock System” within the “Starting And
Operating” chapter in your Owner’s Manual on the DVD for further information). Select the
DRIVE range for normal driving.
The electronically-controlled transmission
provides a precise shift schedule. The trans-
mission electronics are self-calibrating;
therefore, the first few shifts on a new vehicle
may be somewhat abrupt. This is a normal
condition, and precision shifts will develop
within a few hundred miles (kilometers).
Only shift from DRIVE to PARK or RE-
VERSE when the accelerator pedal is re-
leased and the vehicle is stopped. Be sure
to keep your foot on the brake pedal when
shifting between these gears.
The transmission shift lever has PARK, RE-
VERSE, NEUTRAL, DRIVE, and MANUAL
(Autostick) shift positions. Manual shifts
can be made using the Autostick shift con-
trol (refer to “AutoStick” in this section for
further information). Toggling the shift lever
forward (-) or rearward (+) while in the
MANUAL (AutoStick) position (beside the DRIVE position) will manually select the
transmission gear, and will display the current gear in the instrument cluster as M1, M2,
M3, etc.
NOTE:
If the shift lever cannot be moved to the PARK, REVERSE, or NEUTRAL position (when
pushed forward) it is probably in the MANUAL (AutoStick, +/-) position (beside the DRIVE
position). In MANUAL (AutoStick) mode, the transmission gear is displayed in the
instrument cluster (as M1, M2, M3, etc.). Move the shift lever to the right (into the DRIVE
[D] position) for access to PARK, REVERSE, and NEUTRAL.
NOTE:
For more information, refer to Automatic Transmission in the Owner’s Manual on your
DVD.
Transmission Shift Lever
1—LockButton2—ShiftLever
OPERATING YOUR VEHICLE
53
Page 57 of 236
•Thetransmissionwillautomaticallydownshiftasthevehicleslows(topreventengine
lugging) and will display the current gear.
•Thetransmissionwillautomaticallydownshifttofirstgearwhencomingtoastop.After
astop,thedrivershouldmanuallyupshift(+)thetransmissionasthevehicleis
accelerated.
•Youcanstartout,fromastop,infirstorsecondgear.Tapping(+)(atastop)willallow
starting in second gear. Starting out in second gear can be helpful in snowy or icy
conditions.
•Ifarequesteddownshiftwouldcausetheenginetoover-speed,thatshiftwillnotoccur.
•Thesystemwillignoreattemptstoupshiftattoolowofavehiclespeed.
•Holdingthe(-)paddledepressed(ifequipped),orholdingtheshiftleverinthe(-)
position, will downshift the transmission to the lowest gear possible at the current
speed.
•TransmissionshiftingwillbemorenoticeablewhenAutoStickisengaged.
•Thesystemmayreverttoautomaticshiftmodeifafaultoroverheatconditionis
detected.
To d i s e n g a g e A u t o S t i c k m o d e , r e t u r n t h e s h i f t l e v e r t o t h e D R I V E p o s i t i o n , o r p r e s s a n d
hold the (+) shift paddle (if equipped, and the shift lever is already in DRIVE) until “D” is
once again indicated in the instrument cluster. You can shift in or out of the AutoStick
mode at any time without taking your foot off the accelerator pedal.
WARNING!
Do not downshift for additional engine braking on a slippery surface. The drive wheels
could lose their grip and the vehicle could skid, causing a collision or personal injury.
SPORT MODE — WITHOUT PERFORMANCE CONTROL
Yo u r v e h i c l e i s e q u i p p e d w i t h a S p o r t M o d e f e a t u r e . T h i s m o d e i s a c o n f i g u r a t i o n s e t u p
for typical enthusiast driving. The engine, transmission (when equipped with automatic
transmission), and steering systems are all set to their SPORT settings. Sport Mode will
provide improved throttle response and modified shifting for an enhanced driving
experience, as well the greatest amount of steering feel. This mode may be activated and
deactivated by pressing the Sport button on the instrument panel switch bank.
For vehicles equipped with Drive Modes, refer to “Performance Control — If Equipped”
within “Uconnect Settings” in “Understanding Your Instrument Panel” chapter on your
DVD or in the “Drive Mode Supplement” within your Owners information kit for further
information.
OPERATING YOUR VEHICLE
55
Page 69 of 236
NOTE:
For security reasons, this link is valid for 72 hours from the time you’ve submitted your
email address into the radio touchscreen. If the link has expired, simply re-enter your
email address into the Uconnect®Registration App on the radio touchscreen to receive
another link. The secured registration link will take you through the Uconnect®Access
registration process step by step.
7. To unlock the full potential of Uconnect®Access in your vehicle, you will need to create
or validate an existing Mopar Owner Connect account previously (Owner Center).
Uconnect®along with Mopar Owner Connect have joined forces to create one
destination to manage all of your vehicle needs, from managing your Uconnect®
Access account, to tracking service history and finding recommended accessories for
your vehicle. If you already have a Mopar Owner Connect account, log in to the website
with your existing username/email and password. For assistance with this web based
registration process, call Uconnect®Care at 1-855-792-4241.
8. Once you are logged in to your Mopar Owner Connect account, you will create a
personal Uconnect®Security PIN. The Uconnect®Security PIN will be required to
authenticate you when accessing your account via Uconnect®Care or performing any
remote services such as Remote Door Lock/Unlock, Remote Horn & Lights or Starting
and Stopping the engine.
9. If your vehicle qualifies for a trial package it will be presented. Simply agree to the
Uconnect®Te r m s o f S e r v i c e ( c h e c k b o x ) a n d t h e n s e l e c t t h e “ S t a r t S e r v i c e ” b u t t o n .
At this point your vehicle is registered with Uconnect®Access. Continue to set up Via
Mobile. Apps will be downloaded the next time you start your vehicle. If the Apps have not
appeared after 24 hours, please contact Uconnect®Care.
Download The Uconnect® Access App
The Uconnect®Access smartphone app allows you to remotely lock or unlock your doors,
start your engine (if equipped) and activate your horn and lights from virtually anywhere.
The smartphone app also features Via Mobile (if equipped) which uses your smartphone’s
data plan to access your personal Pandora®,iHeartRadio,SlackerRadioandAha™by
HARMAN accounts and control them using your vehicle touchscreen.
The Uconnect®Access app is only compatible with select iPhone®and Android smart-
phones. Visit UconnectPhone.com or call 1-877-855-8400 to confirm that your smart-
phone is compatible with Uconnect®.Onceyou’veconfirmedyoursmartphoneis
compatible, Android and iPhone®users should visit their respective app store and search
for “Uconnect Access” to download the app.
Set Up Your Via Mobile Profile — If Equipped
Setting up your Via Mobile profile means entering your login information for each App so
that they can work in your vehicle. Complete your Via Mobile Profile online during
registration of your Uconnect®Access system. Access this page by logging into your
Mopar Owner Connect account (moparownerconnect.com), going to Edit Profile, then Via
Mobile Profile.
ELECTRONICS
67
Page 148 of 236
Lap Timer
When selected, the Lap Timer page will show the timer always at 0:00.00 with the
previous Best and Last time data (unless the driver has cleared it via hold to Reset).
•PushingOKwill start “current” timer from 0:00.0.
•WhenOKis pushed, the times are updated accordingly.
•AssoonasthedriverexitstheLapTimerpages,the“current”timerwillstopandthe
time will be reset to 0:00.00.
•IfthedriverstaysontheLapTimerpages,the“current”timerwillresetto0:00.0when
ignition is placed in the off position, or ignition placed in the ON position (or will roll
over at 59:59.99 if ever possible).
•EachtimethedriverpushesOKfor a Lap that current time populates, the Last time and
also populates the 1st (top) space on the Timer History page the current time resets to
0:00.0 at every push of theOKbutton.
•Thetimerwillstopwhenthedrivernavigatesawayfromthispage.
Lap History
When selected, this screen displays the Lap History, and will color highlight the time that
is the best time from the Timer Page.
•EachtimethedriverpushestheOKbutton(whileontheLapTimerpage)thecurrent
Lap Time populates the 1st spot and the rest of the data shifts down.
•ColorwillindicatethetimethatisthebesttimefromtheTimerPage.
•HoldingtheOKbutton only resets the page you are on.
•LapHistorypageisastaticdisplayoflaptimesonly.
Top Speed
When selected, this screen displays the Top Speed since last reset:
•Populatesatopspeedfromfirstdrivecycleandeverytimethatspeedisexceededthat
number is stored here unless/until the driver resets the screen.
•Latchingoverignitioncycles.
•Unitswillchangewiththeglobalchangeinunits.
ELECTRONICS
146
Page 156 of 236
![DODGE CHARGER 2015 7.G Owners Manual In AutoStick mode, the transmission will shift up or down when (+/-) is manually selected
by the driver (using the shift lever, or the shift paddles [if equipped]), unless an engine
lugging or overspe DODGE CHARGER 2015 7.G Owners Manual In AutoStick mode, the transmission will shift up or down when (+/-) is manually selected
by the driver (using the shift lever, or the shift paddles [if equipped]), unless an engine
lugging or overspe](/img/12/5581/w960_5581-155.png)
In AutoStick mode, the transmission will shift up or down when (+/-) is manually selected
by the driver (using the shift lever, or the shift paddles [if equipped]), unless an engine
lugging or overspeed condition would result. It will remain in the selected gear until
another upshift or downshift is chosen, except as described below.
•IntemporaryAutoStickmode(shiftleverinDRIVE),thetransmissionwillautomatically
shift up when maximum engine speed is reached. If the accelerator is fully depressed,
the transmission will downshift when possible (based on current vehicle speed and
gear, except 6.4L models). Lack of accelerator pedal activity will cause the transmis-
sion to revert to automatic operation.
•IfnormalAutoStickmodeisengaged(shiftleverinMANUALposition),manualgear
selection will be maintained until the shift lever is returned to DRIVE, or as described
below. The transmission will not upshift automatically at redline in this mode, nor will
downshifts be obtained if the accelerator pedal is pressed to the floor.
•Thetransmissionwillautomaticallydownshiftasthevehicleslows(topreventengine
lugging) and will display the current gear.
•Thetransmissionwillautomaticallydownshifttofirstgearwhencomingtoastop.After
astop,thedrivershouldmanuallyupshift(+)thetransmissionasthevehicleis
accelerated.
•Youcanstartout,fromastop,infirstorsecondgear.Tapping(+)(atastop)willallow
starting in second gear. Starting out in second gear can be helpful in snowy or icy
conditions.
•Ifarequesteddownshiftwouldcausetheenginetoover-speed,thatshiftwillnotoccur.
•Thesystemwillignoreattemptstoupshiftattoolowofavehiclespeed.
•Holdingthe(-)paddledepressed(ifequipped),orholdingtheshiftleverinthe(-)
position, will downshift the transmission to the lowest gear possible at the current
speed.
•TransmissionshiftingwillbemorenoticeablewhenAutoStickisengaged.
•Thesystemmayreverttoautomaticshiftmodeifafaultoroverheatconditionis
detected.
To d i s e n g a g e A u t o S t i c k m o d e , r e t u r n t h e s h i f t l e v e r t o t h e D R I V E p o s i t i o n , o r p r e s s a n d
hold the (+) shift paddle (if equipped, and the shift lever is already in DRIVE) until “D” is
once again indicated in the instrument cluster. You can shift in or out of the AutoStick
mode at any time without taking your foot off the accelerator pedal.
WARNING!
Do not downshift for additional engine braking on a slippery surface. The drive wheels
could lose their grip and the vehicle could skid, causing a collision or personal injury.
SRT
154
Page 161 of 236
ROADSIDE ASSISTANCE
Dial toll-free 1-800-521-2779 for U.S. Residents or 1-800-363-4869 for Canadian
Residents.
•Provideyourname,vehicleidentificationnumber,licenseplatenumber,andyour
location, including the telephone number from which you are calling.
•Brieflydescribethenatureoftheproblemandanswerafewsimplequestions.
•Youwillbegiventhenameoftheserviceproviderandanestimatedtimeofarrival.
If you feel you are in an “unsafe situation”, please let us know. With your consent, we
will contact local police or safety authorities.
INSTRUMENT CLUSTER WARNING LIGHTS
-LowFuelWarningLight
This warning light indicates when the fuel level reaches approximately 2.0 gal (7.8 L).
This light will turn on and a single chime will sound.
Charging System Light
This light shows the status of the electrical charging system. If the charging system light
remains on, it means that the vehicle is experiencing a problem with the charging system.
We recommend you do not continue driving if the charging system light is on. Have the
vehicle serviced immediately.
Oil Pressure Warning Light
This light indicates low engine oil pressure. If the light turns on while driving, stop the
vehicle and shut off the engine as soon as possible. A chime will sound when this light
turns on.
We recommend you do not operate the vehicle or engine damage will occur. Have the
vehicle serviced immediately.
Anti-Lock Brake (ABS) Light
This light monitors the Anti-Lock Brake System (ABS).
If the light is not on during starting, stays on or turns on while driving, we recommend you
contact the nearest authorized dealer and have the vehicle serviced immediately.
Air Bag Warning Light
If the light is not on during starting, stays on, or turns on while driving, have the vehicle
serviced by an authorized dealer immediately.
WHAT TO DO IN EMERGENCIES
159
Page 162 of 236
Electronic Throttle Control (ETC) Indicator Light
This light informs you of a problem with the system.
If a problem is detected, the light will come on while the engine is running. Cycle the
ignition when the vehicle has completely stopped and the shift lever is placed in the PARK
position; the light should turn off.
If the light remains lit with the engine running, your vehicle will usually be drivable.
However, see an authorized dealer immediately. If the light is flashing when the engine is
running, immediate service is required, and you may experience reduced performance, an
elevated/rough idle or engine stall, and your vehicle may require towing.
Tire Pressure Monitoring System (TPMS) Light
Each tire, including the spare (if provided), should be checked monthly when cold and
inflated to the inflation pressure recommended by the vehicle manufacturer on the
vehicle placard or tire inflation pressure label. (If your vehicle has tires of a different size
than the size indicated on the vehicle placard or tire inflation pressure label, you should
determine the proper tire inflation pressure for those tires).
As an added safety feature, your vehicle has been equipped with a tire pressure
monitoring system (TPMS) that illuminates a low tire pressure telltale when one or more
of your tires is significantly under-inflated. Accordingly, when the low tire pressure telltale
illuminates, you should stop and check your tires as soon as possible and inflate them to
the proper pressure. Driving on a significantly under-inflated tire causes the tire to
overheat and can lead to tire failure. Under-inflation also reduces fuel efficiency and tire
tread life and may affect the vehicle’s handling and stopping ability.
IF THE LIGHT STARTS FLASHING INDICATING A LOW TIRE PRESSURE, ADJUST THE AIR
PRESSURE IN THE LOW TIRE TO THE AIR PRESSURE SHOWN ON THE VEHICLE PLACARD OR
TIRE INFLATION PRESSURE LABEL LOCATED ON THE DRIVER'S DOOR.
NOTE:
AFTER INFLATION, THE VEHICLE MAY NEED TO BE DRIVEN FOR 20 MINUTES
BEFORE THE FLASHING LIGHT WILL TURN OFF.
Please note that the TPMS is not a substitute for proper tire maintenance, and it is the
driver’s responsibility to maintain correct tire pressure, even if under-inflation has not
reached the level to trigger illumination of the TPMS low tire pressure telltale.
Yo u r v e h i c l e h a s a l s o b e e n e q u i p p e d w i t h a T P M S m a l f u n c t i o n i n d i c a t o r t o i n d i c a t e w h e n
the system is not operating properly. The TPMS malfunction indicator is combined with
the low tire pressure telltale.
WHAT TO DO IN EMERGENCIES
160
Page 163 of 236
When the system detects a malfunction, the telltale will flash for approximately one
minute and then remain continuously illuminated. This sequence will continue upon
subsequent vehicle start-ups as long as the malfunction exists. When the malfunction
indicator is illuminated, the system may not be able to detect or signal low tire pressure
as intended. TPMS malfunctions may occur for a variety of reasons, including the
installation of replacement or alternate tires or wheels on the vehicle that prevent the
TPMS from functioning properly. Always check the TPMS malfunction telltale after
replacing one or more tires or wheels on your vehicle to ensure that the replacement or
alternate tires and wheels allow the TPMS to continue to function properly.
NOTE:
Ti r e p r e s s u r e s c h a n g e b y a p p r o x i m a t e l y 1 p s i ( 7 k P a ) p e r 1 2 ° F ( 7 ° C ) o f a i r t e m p e r a t u r e
change. Keep this in mind when checking tire pressure inside a garage, especially in the
Winter. Example: If garage temperature is 68°F (20°C), and the outside temperature is
32°F (0°C), then the cold tire inflation pressure should be increased by 3 psi (21 kPa),
which equals 1 psi (7 kPa) for every 12°F (7°C) for this outside temperature condition.
CAUTION!
The TPMS has been optimized for the original equipment tires and wheels. TPMS
pressures and warning have been established for the tire size equipped on your vehicle.
Undesirable system operation or sensor damage may result when using replacement
equipment that is not of the same size, type, and/or style. Aftermarket wheels can
cause sensor damage. Do not use tire sealant from a can, or balance beads if your
vehicle is equipped with a TPMS, as damage to the sensors may result.
-EngineTemperatureWarningLight
This light warns of an overheated engine condition.
If the light turns on or flashes continuously while driving, safely pull over and stop the
vehicle. If the A/C system is on, turn it off. Also, shift the transmission into NEUTRAL and
idle the vehicle. If the temperature reading does not return to normal, turn the engine off
immediately.
We recommend that you do not operate the vehicle or engine damage will occur. Have the
vehicle serviced immediately.
WARNING!
Ahotenginecoolingsystemisdangerous.Youorotherscouldbebadlyburnedby
steam or boiling coolant.
WHAT TO DO IN EMERGENCIES
161
Page 165 of 236

WARNING!
Driving a vehicle with the red brake light on is dangerous. Part of the brake system may
have failed. It will take longer to stop the vehicle. You could have a collision. Have the
vehicle checked immediately.
Malfunction Indicator Light (MIL)
Certain conditions, such as a poor fuel quality, etc., may illuminate the MIL after engine
start. The vehicle should be serviced if the light stays on through several typical driving
cycles. In most situations, the vehicle will drive normally and not require towing.
If the MIL flashes when the engine is running, serious conditions may exist that could lead
to immediate loss of power or severe catalytic converter damage. We recommend you do
not operate the vehicle. Have the vehicle serviced immediately.
Electronic Stability Control (ESC) OFF Indicator Light
This light indicates the Electronic Stability Control (ESC) is off.
INSTRUMENT CLUSTER INDICATOR LIGHTS
Turn Signal Indicator
The arrows will flash with the exterior turn signals when the turn signal lever is operated.
Atonewillchime,andaDIDmessagewillappearifeitherturnsignalisleftonformore
than 1 mile (1.6 km).
NOTE:
If either indicator flashes at a rapid rate, check for a defective outside light bulb.
High Beam Indicator
Indicates that headlights are on high beam.
Front Fog Light Indicator
This indicator will illuminate when the front fog lights are on.
Vehicle Security Light
This light will flash rapidly for approximately 15 seconds when the vehicle security alarm
is arming. The light will flash at a slower speed continuously after the alarm is set. The
security light will also come on for about three seconds when the ignition is first turned on.
Electronic Speed Control Set
Indicates that the Electronic Speed Control has been set.
WHAT TO DO IN EMERGENCIES
163