set clock DODGE CHARGER 2015 7.G User Guide
[x] Cancel search | Manufacturer: DODGE, Model Year: 2015, Model line: CHARGER, Model: DODGE CHARGER 2015 7.GPages: 236, PDF Size: 35.67 MB
Page 83 of 236
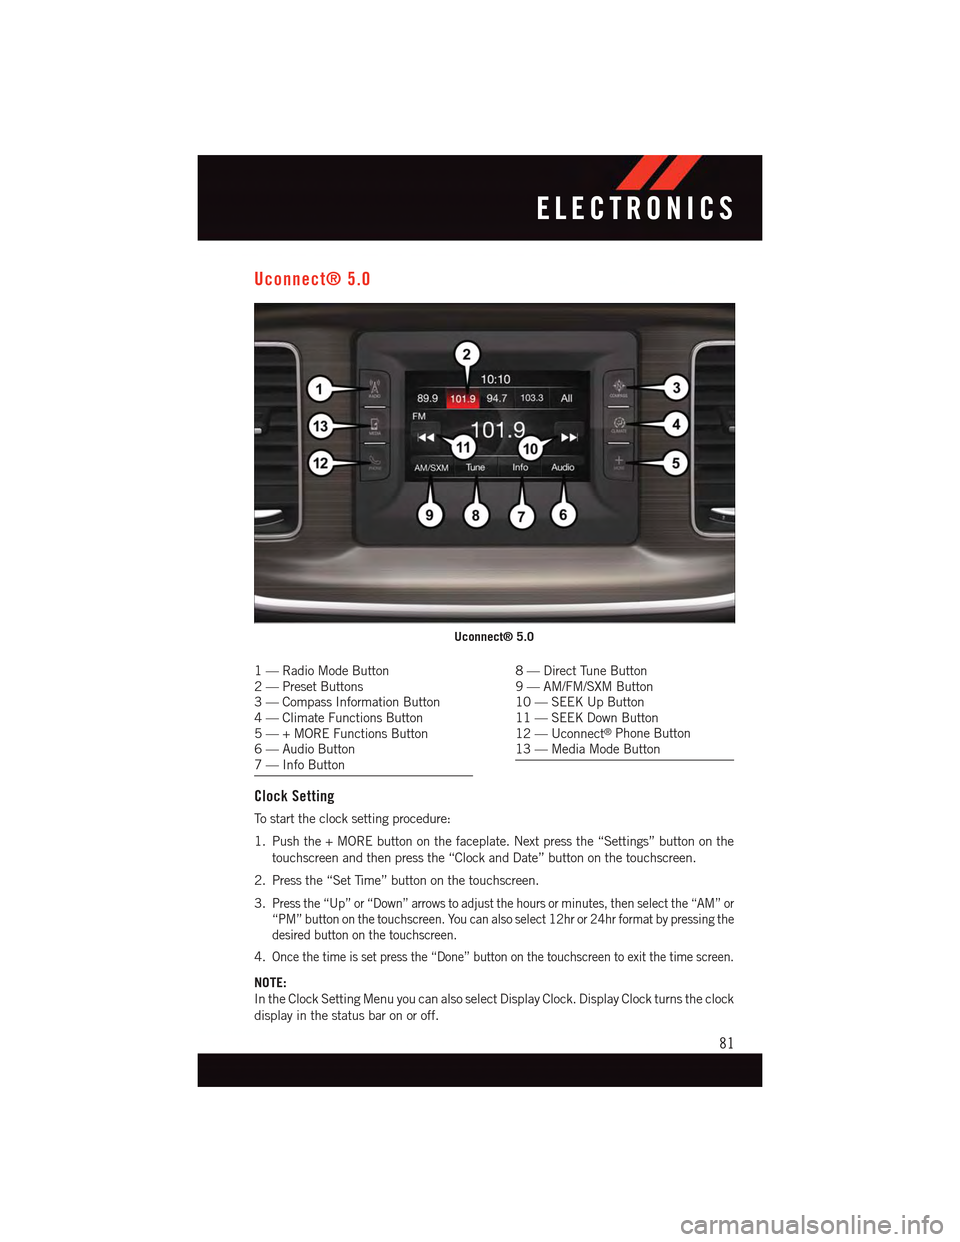
Uconnect® 5.0
1—RadioModeButton2—PresetButtons3—CompassInformationButton4—ClimateFunctionsButton5—+MOREFunctionsButton6—AudioButton7—InfoButton
8—DirectTuneButton9—AM/FM/SXMButton10 — SEEK Up Button11 — SEEK Down Button12 — Uconnect®Phone Button13 — Media Mode Button
Clock Setting
To s t a r t t h e c l o c k s e t t i n g p r o c e d u r e :
1. Push the + MORE button on the faceplate. Next press the “Settings” button on the
touchscreen and then press the “Clock and Date” button on the touchscreen.
2. Press the “Set Time” button on the touchscreen.
3.Press the “Up” or “Down” arrows to adjust the hours or minutes, then select the “AM” or
“PM” button on the touchscreen. You can also select 12hr or 24hr format by pressing the
desired button on the touchscreen.
4.Once the time is set press the “Done” button on the touchscreen to exit the time screen.
NOTE:
In the Clock Setting Menu you can also select Display Clock. Display Clock turns the clock
display in the status bar on or off.
Uconnect® 5.0
ELECTRONICS
81
Page 93 of 236
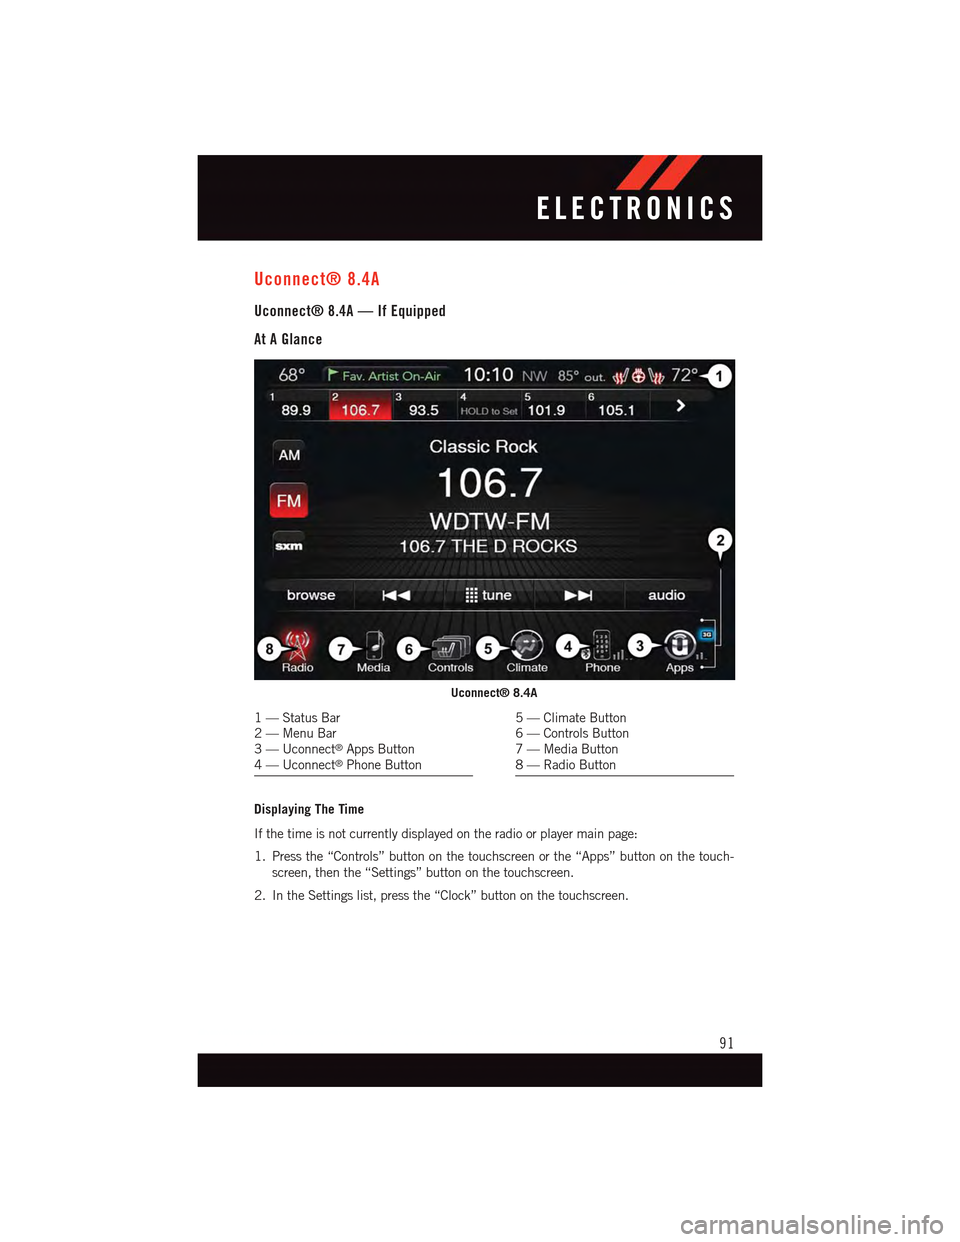
Uconnect® 8.4A
Uconnect® 8.4A — If Equipped
At A Glance
Displaying The Time
If the time is not currently displayed on the radio or player main page:
1. Press the “Controls” button on the touchscreen or the “Apps” button on the touch-
screen, then the “Settings” button on the touchscreen.
2. In the Settings list, press the “Clock” button on the touchscreen.
Uconnect® 8.4A
1—StatusBar2—MenuBar3—Uconnect®Apps Button4—Uconnect®Phone Button
5—ClimateButton6—ControlsButton7—MediaButton8—RadioButton
ELECTRONICS
91
Page 94 of 236
Setting The Time
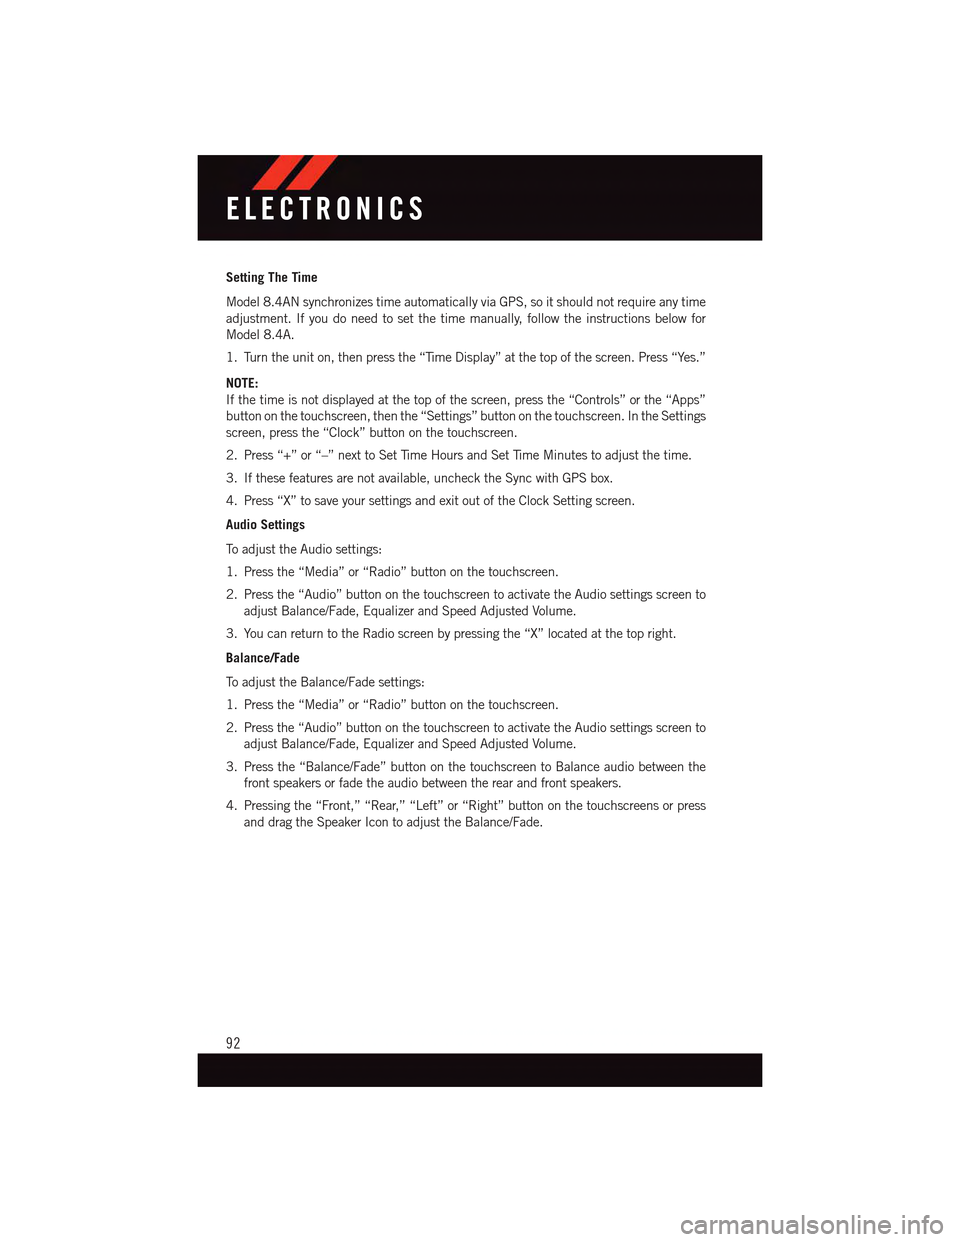
Model 8.4AN synchronizes time automatically via GPS, so it should not require any time
adjustment. If you do need to set the time manually, follow the instructions below for
Model 8.4A.
1. Turn the unit on, then press the “Time Display” at the top of the screen. Press “Yes.”
NOTE:
If the time is not displayed at the top of the screen, press the “Controls” or the “Apps”
button on the touchscreen, then the “Settings” button on the touchscreen. In the Settings
screen, press the “Clock” button on the touchscreen.
2. Press “+” or “–” next to Set Time Hours and Set Time Minutes to adjust the time.
3. If these features are not available, uncheck the Sync with GPS box.
4. Press “X” to save your settings and exit out of the Clock Setting screen.
Audio Settings
To a d j u s t t h e A u d i o s e t t i n g s :
1. Press the “Media” or “Radio” button on the touchscreen.
2. Press the “Audio” button on the touchscreen to activate the Audio settings screen to
adjust Balance/Fade, Equalizer and Speed Adjusted Volume.
3. You can return to the Radio screen by pressing the “X” located at the top right.
Balance/Fade
To a d j u s t t h e B a l a n c e / F a d e s e t t i n g s :
1. Press the “Media” or “Radio” button on the touchscreen.
2. Press the “Audio” button on the touchscreen to activate the Audio settings screen to
adjust Balance/Fade, Equalizer and Speed Adjusted Volume.
3. Press the “Balance/Fade” button on the touchscreen to Balance audio between the
front speakers or fade the audio between the rear and front speakers.
4. Pressing the “Front,” “Rear,” “Left” or “Right” button on the touchscreens or press
and drag the Speaker Icon to adjust the Balance/Fade.
ELECTRONICS
92
Page 120 of 236
Uconnect® 8.4AN
Uconnect® 8.4AN — If Equipped
At A Glance
Displaying The Time
If the time is not currently displayed on the radio or player main page:
1. Press the “Controls” button on the touchscreen or the “Apps” button on the touch-
screen, then the “Settings” button on the touchscreen.
2. In the Settings list, press the “Clock” button on the touchscreen.
Uconnect® 8.4AN
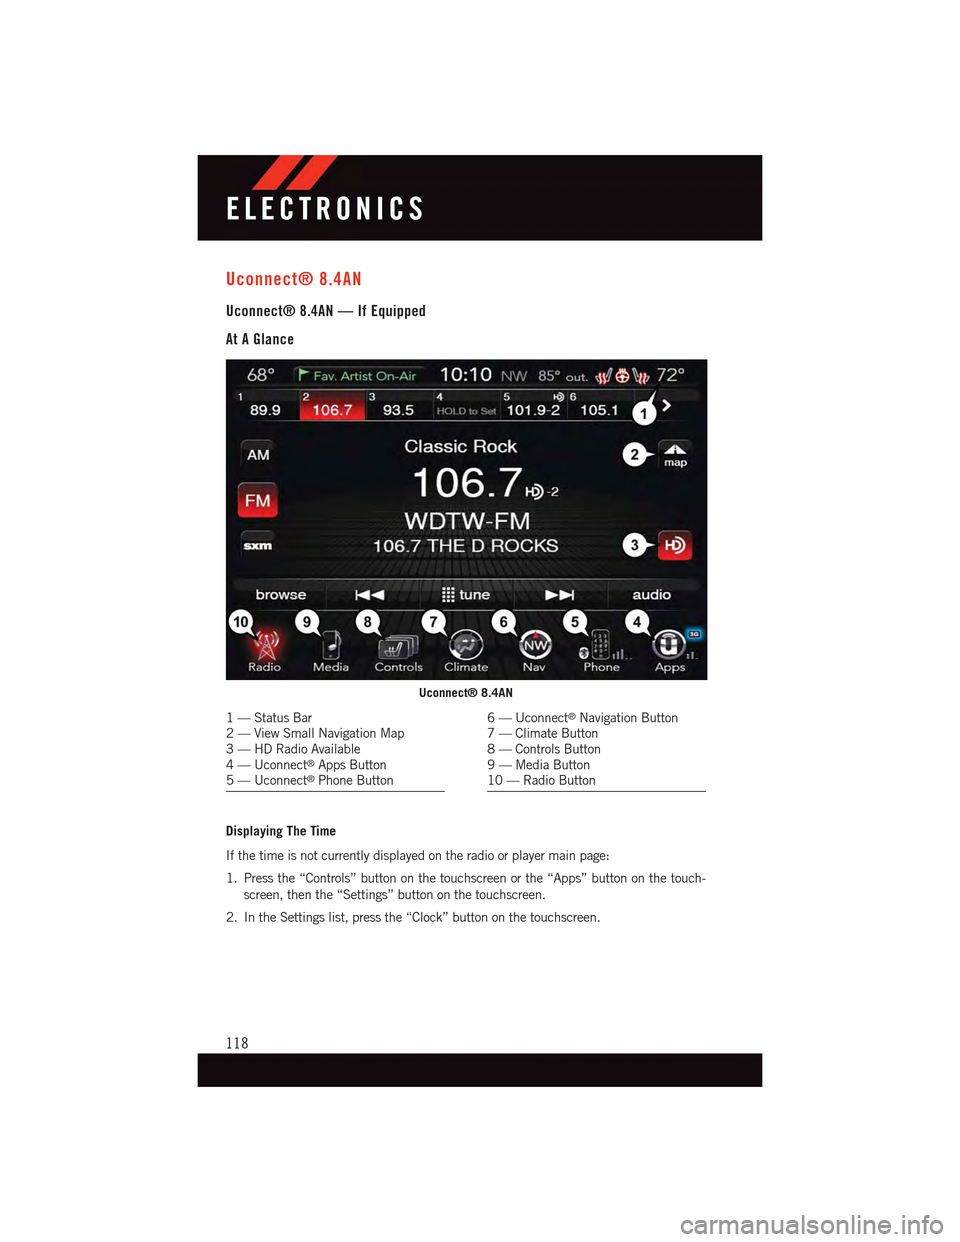
1—StatusBar2—ViewSmallNavigationMap3—HDRadioAvailable4—Uconnect®Apps Button5—Uconnect®Phone Button
6—Uconnect®Navigation Button7—ClimateButton8—ControlsButton9—MediaButton10 — Radio Button
ELECTRONICS
118
Page 121 of 236
Setting The Time
Model 8.4AN synchronizes time automatically via GPS, so it should not require any time
adjustment. If you do need to set the time manually, follow the instructions below for
Model 8.4A.
1. Turn the unit on, then press the “Time Display” at the top of the screen. Press “Yes.”
NOTE:
If the time is not displayed at the top of the screen, press the “Controls” or the “Apps”
button on the touchscreen, then the “Settings” button on the touchscreen. In the Settings
screen, press the “Clock” button on the touchscreen.
2. Press “+” or “–” next to Set Time Hours and Set Time Minutes to adjust the time.
3. If these features are not available, uncheck the Sync with GPS box.
4. Press “X” to save your settings and exit out of the Clock Setting screen.
Audio Settings
To a d j u s t t h e A u d i o s e t t i n g s :
1. Press the “Media” or “Radio” button on the touchscreen.
2. Press the “Audio” button on the touchscreen to activate the Audio settings screen to
adjust Balance/Fade, Equalizer and Speed Adjusted Volume.
3. You can return to the Radio screen by pressing the “X” located at the top right.
Balance/Fade
To a d j u s t t h e B a l a n c e / F a d e s e t t i n g s :
1. Press the “Media” or “Radio” button on the touchscreen.
2. Press the “Audio” button on the touchscreen to activate the Audio settings screen to
adjust Balance/Fade, Equalizer and Speed Adjusted Volume.
3. Press the “Balance/Fade” button on the touchscreen to Balance audio between the
front speakers or fade the audio between the rear and front speakers.
4. Pressing the “Front,” “Rear,” “Left” or “Right” button on the touchscreens or press
and drag the Speaker Icon to adjust the Balance/Fade.
ELECTRONICS
119
Page 149 of 236
PROGRAMMABLE FEATURES
Driver Information Display (DID)
The DID can be used to view or change the following settings. Push the UPor DOWN
button to scroll through the main menus, then push the RIGHTbutton to scroll
through the submenus of each menu item. Push theBACKbutton to scroll back to a
previous menu or sub menu.
•Speedometer•Audio
•VehicleInfo•Messages
•DriverAssist—IfEquipped•ScreenSetup
•FuelEconomy•SpeedWarning—IfEquipped
•Trip•Diagnostic—IfEquipped
Uconnect® Customer Programmable Features
The Uconnect®system allows you to access Customer Programmable feature settings
such as Display, Units, Voice, Clock, Safety & Driving Assistance, Lights, Doors & Locks,
Auto-On Comfort, Engine Off Options, Audio, Phone/Bluetooth®,SiriusXMSetup,Restore
Settings, Clear Personal Data, System Information, and Compass Settings (5.0 Radio
Only) through buttons on the touchscreen.
NOTE:
If equipped with the Super Track Pak option please refer to the “Drive Mode Supplement”
within your Owners Information Kit for further descriptions of these modes.
•Pressthe“Controls”buttonlocatednearthebottomofthetouchscreen,thenpressthe
“Settings” button on the touchscreen to access the Settings screen. When making a
selection, scroll up or down until the preferred setting is highlighted, then press and
release the preferred setting until a check-mark appears next to the setting, showing
that setting has been selected. The following feature settings are available:
•Display•EngineOffOptions
•Units•Audio
•Voice•Phone/Bluetooth®
•Clock•SiriusXMSetup
•Safety&DrivingAssistance•RestoreSettings
•Lights•ClearPersonalData
•Doors&Locks•SystemInformation
•Auto-OnComfort•Compass(5.0RadioOnly)
Refer to “Uconnect Settings/Customer Programmable Features” found within “Under-
standing Your Instrument Panel” located in your Owner's Manual on the DVD for further
information.
ELECTRONICS
147
Page 170 of 236
Preparations For Jacking
1. Park the vehicle on a firm, level surface as far from the edge of the roadway as possible.
Avoid icy or slippery areas.
2. Turn on the Hazard Warning flasher.
3. Set the parking brake.
4. Place the shift lever into PARK.
5. Turn OFF the ignition.
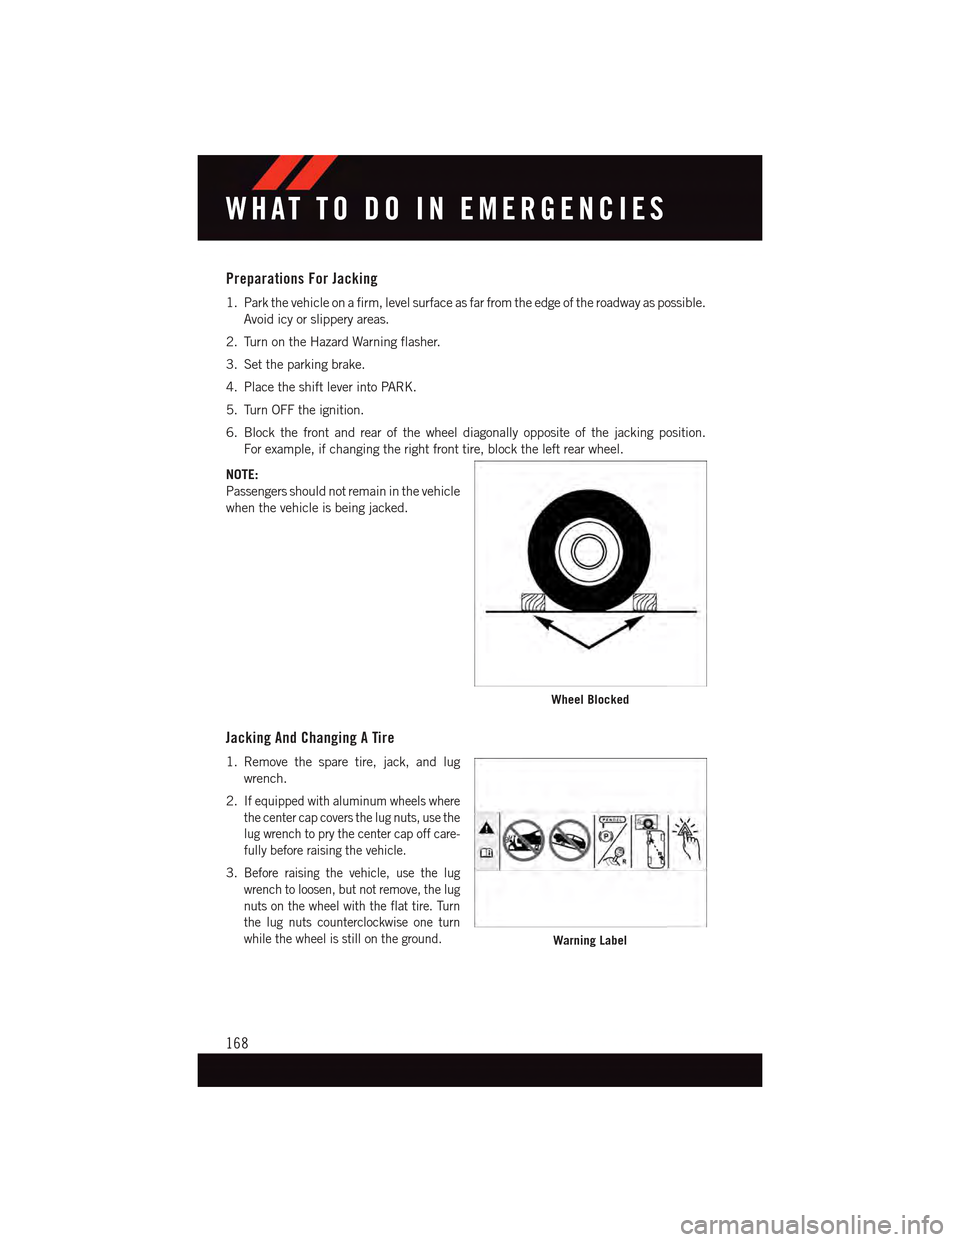
6. Block the front and rear of the wheel diagonally opposite of the jacking position.
For example, if changing the right front tire, block the left rear wheel.
NOTE:
Passengers should not remain in the vehicle
when the vehicle is being jacked.
Jacking And Changing A Tire
1. Remove the spare tire, jack, and lug
wrench.
2.If equipped with aluminum wheels where
the center cap covers the lug nuts, use the
lug wrench to pry the center cap off care-
fully before raising the vehicle.
3.Before raising the vehicle, use the lug
wrench to loosen, but not remove, the lug
nuts on the wheel with the flat tire. Turn
the lug nuts counterclockwise one turn
while the wheel is still on the ground.
Wheel Blocked
Warning Label
WHAT TO DO IN EMERGENCIES
168
Page 223 of 236
FAQ’s
GETTING STARTED
How do I install my LATCH Equipped Child Seat? pg. 24
How do I program my Front Seat Memory? pg. 29
OPERATING YOUR VEHICLE
How does the Automatic Climate Control operate? pg. 58
ELECTRONICS
How do I know which radio I have?
•Uconnect®5.0 pg. 81
•Uconnect®8.4A, 8.4AN pg. 91
How do I select the AUX music source? pg. 97
How do I set the clock on my radio?
•Uconnect®5.0 pg. 81
•Uconnect®8.4A, 8.4AN pg. 91
How do I use the Navigation feature? pg. 100
How do I pair my cell phone via Bluetooth®with the Uconnect®Hands-Free Voice
Activation System? pg. 132
How do I configure my Universal Garage Door Opener (HomeLink)? pg. 148
How do I improve the Bluetooth®performance of my Uconnect®System? pg. 141
UTILITY
How do I know how much I can tow with my Dodge Charger? pg. 152
WHAT TO DO IN EMERGENCIES
What do I do if my TPMS warning light is blinking? pg. 160
How do I change a flat tire? pg. 166
How do I Jump-Start my vehicle? pg. 178
MAINTAINING YOUR VEHICLE
Where is my Fuse Block located? pg. 208
What type of oil do I use in my 3.6L or 5.7L engine? pg. 194
What type of oil do I use in my 6.4L or 6.2L Supercharged engine? pg. 194
How often should I change my engine’s oil? pg. 198
How often should I change my SRT engine’s oil? pg. 203
What should my tire pressure be set at? pg. 213
FREQUENTLY ASKED QUESTIONS
221
Page 224 of 236
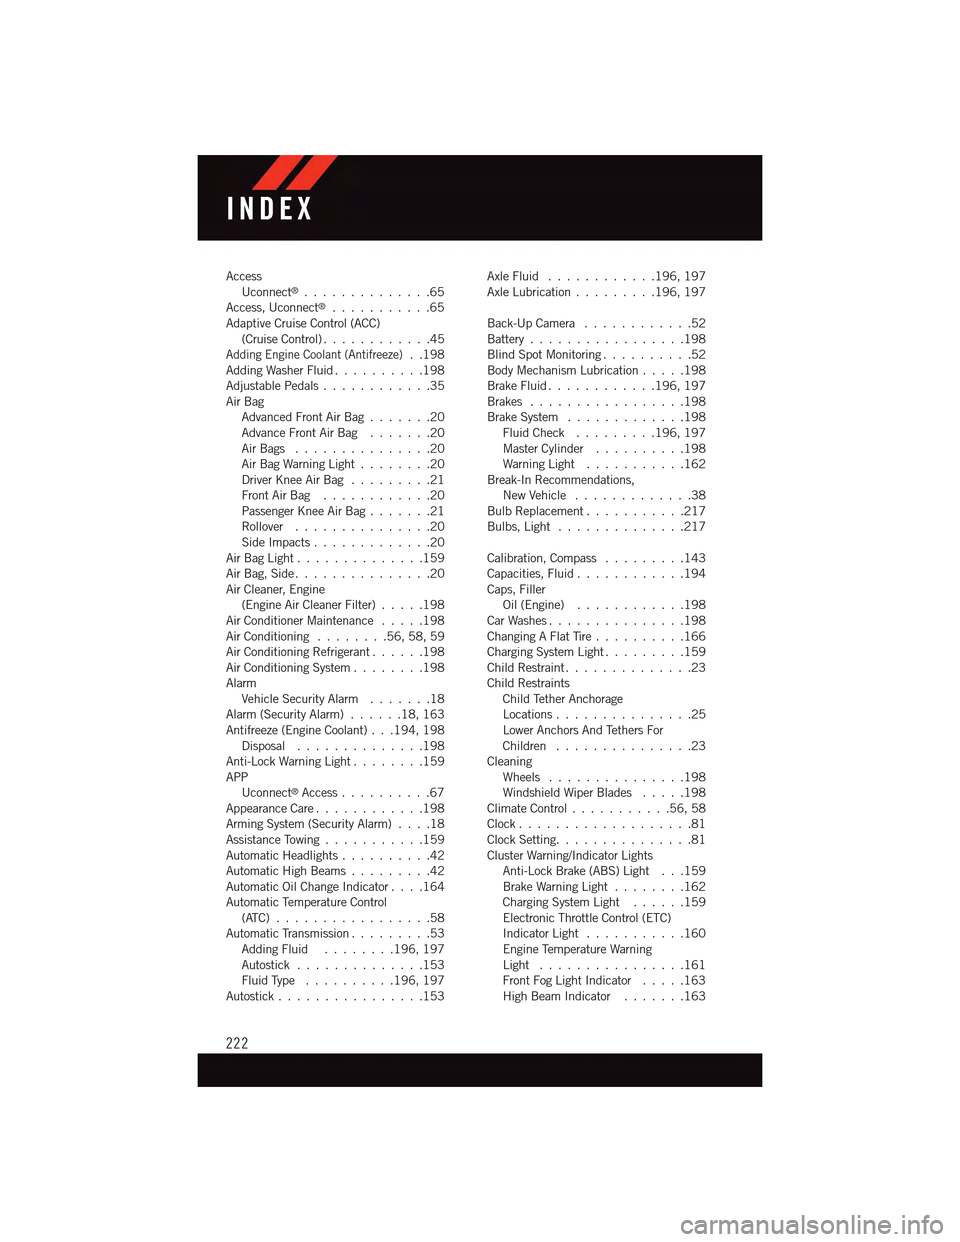
AccessUconnect®..............65Access, Uconnect®...........65Adaptive Cruise Control (ACC)(Cruise Control) . . . . . . . . . . . .45Adding Engine Coolant (Antifreeze)..198Adding Washer Fluid..........198Adjustable Pedals............35Air BagAdvanced Front Air Bag.......20Advance Front Air Bag.......20Air Bags . . . . . . . . . . . . . . .20Air Bag Warning Light . . . . . . . .20Driver Knee Air Bag.........21Front Air Bag . . . . . . . . . . . .20Passenger Knee Air Bag.......21Rollover . . . . . . . . . . . . . . .20Side Impacts.............20Air Bag Light . . . . . . . . . . . . . .159Air Bag, Side . . . . . . . . . . . . . . .20Air Cleaner, Engine(Engine Air Cleaner Filter).....198Air Conditioner Maintenance.....198Air Conditioning........56,58,59Air Conditioning Refrigerant......198Air Conditioning System........198AlarmVehicle Security Alarm.......18Alarm (Security Alarm)......18,163Antifreeze (Engine Coolant) . . .194, 198Disposal . . . . . . . . . . . . . .198Anti-Lock Warning Light........159APPUconnect®Access..........67Appearance Care............198Arming System (Security Alarm)....18Assistance Towing...........159Automatic Headlights..........42Automatic High Beams.........42Automatic Oil Change Indicator....164Automatic Temperature Control(ATC) . . . . . . . . . . . . . . . . .58Automatic Transmission.........53Adding Fluid........196, 197Autostick..............153Fluid Type . . . . . . . . . .196, 197Autostick................153
Axle Fluid . . . . . . . . . . . .196, 197Axle Lubrication . . . . . . . . .196, 197
Back-Up Camera............52Battery . . . . . . . . . . . . . . . . .198Blind Spot Monitoring..........52Body Mechanism Lubrication.....198Brake Fluid . . . . . . . . . . . .196, 197Brakes.................198Brake System.............198Fluid Check.........196, 197Master Cylinder..........198Warning Light . . . . . . . . . . .162Break-In Recommendations,New Vehicle . . . . . . . . . . . . .38Bulb Replacement...........217Bulbs, Light . . . . . . . . . . . . . .217
Calibration, Compass.........143Capacities, Fluid............194Caps, FillerOil (Engine)............198Car Washes . . . . . . . . . . . . . . .198Changing A Flat Tire..........166Charging System Light.........159Child Restraint..............23Child RestraintsChild Tether AnchorageLocations...............25Lower Anchors And Tethers ForChildren . . . . . . . . . . . . . . .23CleaningWheels...............198Windshield Wiper Blades.....198Climate Control . . . . . . . . . . .56, 58Clock . . . . . . . . . . . . . . . . . . .81Clock Setting...............81Cluster Warning/Indicator LightsAnti-Lock Brake (ABS) Light . . .159Brake Warning Light . . . . . . . .162Charging System Light......159Electronic Throttle Control (ETC)Indicator Light . . . . . . . . . . .160Engine Temperature WarningLight . . . . . . . . . . . . . . . .161Front Fog Light Indicator . . . . .163High Beam Indicator.......163
INDEX
222