wheel torque DODGE CHARGER SRT 2015 7.G Owners Manual
[x] Cancel search | Manufacturer: DODGE, Model Year: 2015, Model line: CHARGER SRT, Model: DODGE CHARGER SRT 2015 7.GPages: 595, PDF Size: 16.43 MB
Page 203 of 595
LANESENSE — IF EQUIPPED
LaneSense Operation
The LaneSense system is operational at speeds above
37 mph (60 km/h) and below 112 mph (180 km/h). The
LaneSense system uses a forward looking camera to
detect lane markings and measure vehicle position
within the lane boundaries.
When both lane markings are detected and the driver
unintentionally drifts out of the lane (no turn signal
applied), the LaneSense system provides a haptic warn-
ing in the form of torque applied to the steering wheel to
prompt the driver to remain within the lane boundaries.
If the driver continues to unintentionally drift out of the
lane, the LaneSense system provides a visual warning
through the Driver Information Display (DID) to prompt
the driver to remain within the lane boundaries.
The driver may manually override the haptic warning by
applying torque into the steering wheel at any time.
When only a single lane marking is detected and the
driver unintentionally drifts across the lane marking (no
turn signal applied), the LaneSense system provides a
visual warning through the DID to prompt the driver to
remain within the lane. When only a single lane marking
is detected, a haptic (torque) warning will not be pro-
vided.
NOTE:When operating conditions have been met, the
LaneSense system will monitor if the driver ’s hands are
on the steering wheel and provides an audible warning
to the driver when the driver ’s hands are not detected on
the steering wheel. The system will cancel if the driver
does not return their hands to the wheel.
3
UNDERSTANDING THE FEATURES OF YOUR VEHICLE 201
Page 206 of 595
NOTE:The LaneSense system operates with the similar
behavior for a right lane departure when only the right
lane marking has been detected.
Left Lane Departure — Both Lanes Detected
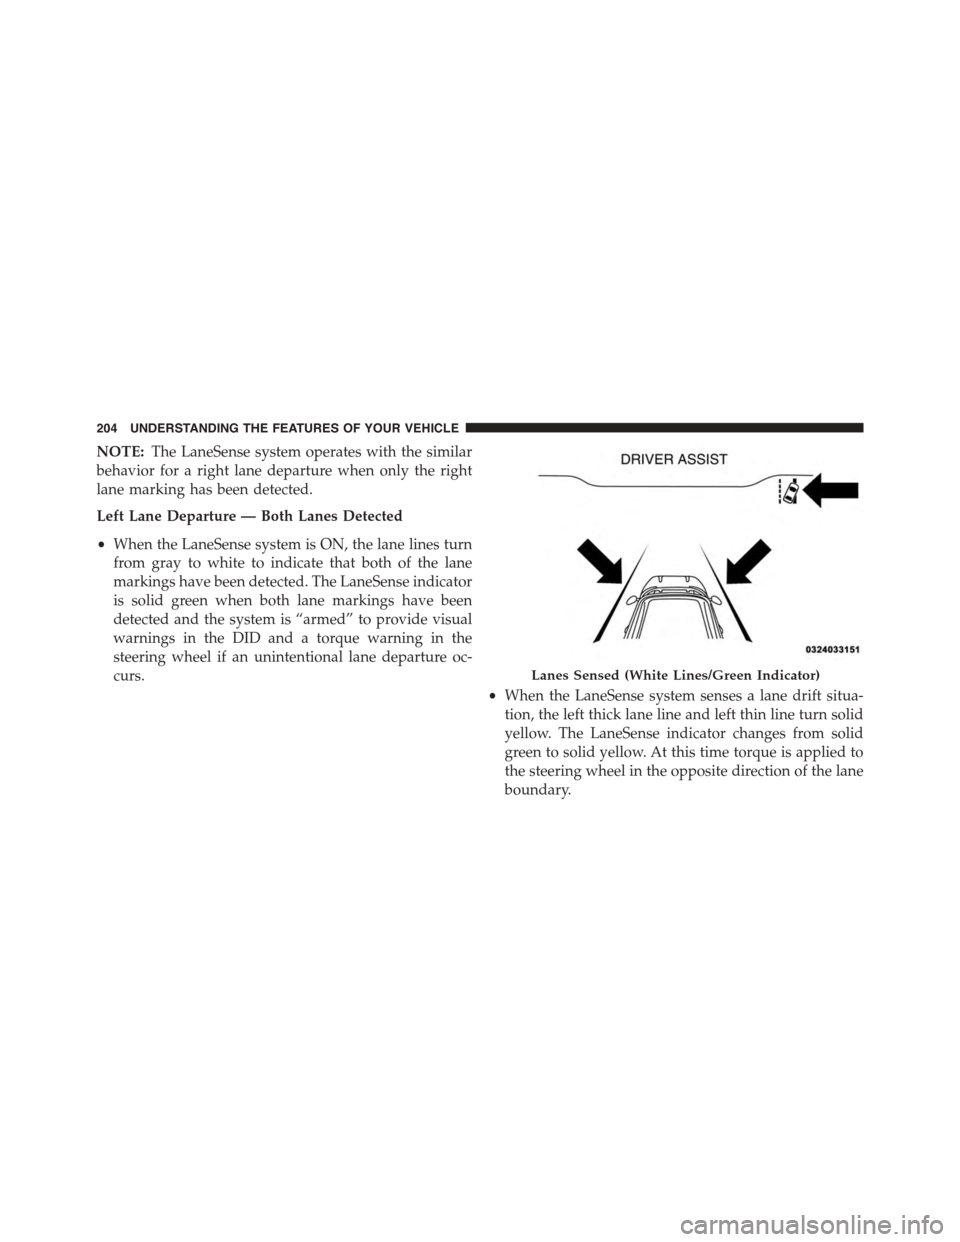
•When the LaneSense system is ON, the lane lines turn
from gray to white to indicate that both of the lane
markings have been detected. The LaneSense indicator
is solid green when both lane markings have been
detected and the system is “armed” to provide visual
warnings in the DID and a torque warning in the
steering wheel if an unintentional lane departure oc-
curs.
•When the LaneSense system senses a lane drift situa-
tion, the left thick lane line and left thin line turn solid
yellow. The LaneSense indicator changes from solid
green to solid yellow. At this time torque is applied to
the steering wheel in the opposite direction of the lane
boundary.
Lanes Sensed (White Lines/Green Indicator)
204 UNDERSTANDING THE FEATURES OF YOUR VEHICLE
Page 207 of 595
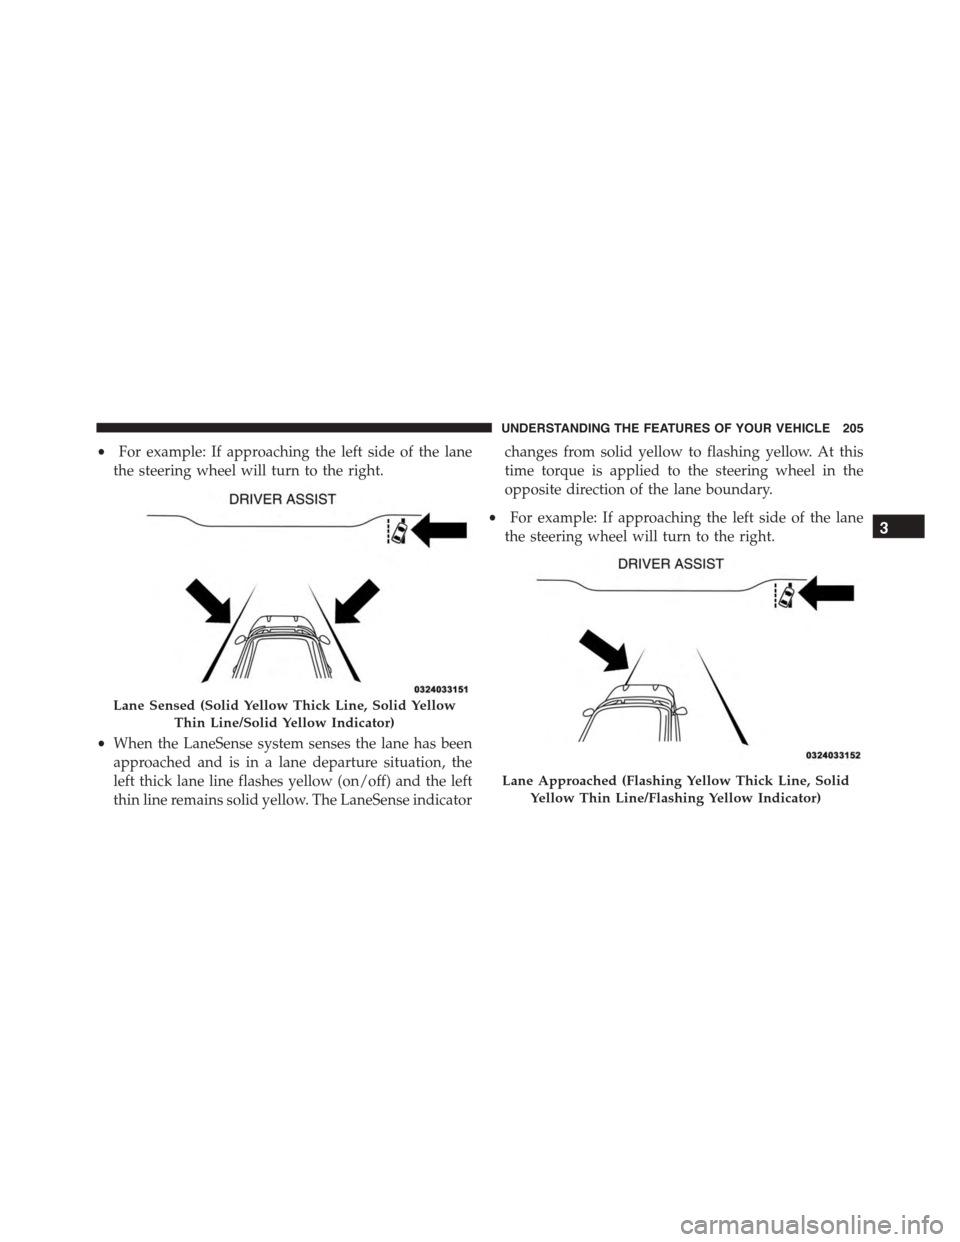
•For example: If approaching the left side of the lane
the steering wheel will turn to the right.
•When the LaneSense system senses the lane has been
approached and is in a lane departure situation, the
left thick lane line flashes yellow (on/off) and the left
thin line remains solid yellow. The LaneSense indicator
changes from solid yellow to flashing yellow. At this
time torque is applied to the steering wheel in the
opposite direction of the lane boundary.
•For example: If approaching the left side of the lane
the steering wheel will turn to the right.
Lane Sensed (Solid Yellow Thick Line, Solid Yellow
Thin Line/Solid Yellow Indicator)
Lane Approached (Flashing Yellow Thick Line, Solid
Yellow Thin Line/Flashing Yellow Indicator)
3
UNDERSTANDING THE FEATURES OF YOUR VEHICLE 205
Page 208 of 595
NOTE:The LaneSense system operates with the similar
behavior for a right lane departure.
Changing LaneSense Status
The LaneSense system settings can be configured
through the Uconnect® system screen.
Follow these steps to change the LaneSense settings:
1. Push the “Controls” button on touchscreen located on
the bottom of the Uconnect® display.
2. Push the “Settings” button.
3. Push the “Safety & Driving Assistance” button.
When in the Safety & Driving Assistance screen, you can
configure the intensity of the torque warning and the
warning zone sensitivity (early/late) through the person-
alization settings.
NOTE:
•When enabled the system operates above 37 mph
(60 km/h) and below 112 mph (180 km/h).
•Use of the turn signal suppresses the warnings.
•The system will not apply torque to the steering wheel
whenever a safety system engages. (anti-lock brakes,
traction control system, electronic stability control,
forward collision warning, etc.)
PARKSENSE® REAR PARK ASSIST — IF
EQUIPPED
The ParkSense® Rear Park Assist system provides visual
and audible indications of the distance between the rear
fascia and a detected obstacle when backing up, e.g.
during a parking maneuver. Refer to “ParkSense® Sys-
tem Usage Precautions” in this section for limitations of
this system and recommendations.
206 UNDERSTANDING THE FEATURES OF YOUR VEHICLE
Page 291 of 595
•LaneSense Strength — If Equipped
When this feature is selected, it sets the strength of the
steering wheel feedback for potential lane departures.
The amount of directional torque the steering system can
apply to the steering wheel to correct for vehicle lane
departure can be set at “Low,” “Medium” or “High.”
For further information, refer to “Lane Departure Warn-
ing (LDW)” in “Understanding The Features Of Your
Vehicle”.
•Steering Feel Options — If Equipped
The Steering Feel Options feature will allow you to adjust
the steering effort and feel. Press the “Sport” button on
the touchscreen to provide the greatest amount of steer-
ing feel, requiring the highest amount of steering effort.
Press the “Normal” button on the touchscreen to provide
greater steering feel, requiring greater steering effort.
Press the “Comfort” button on the touchscreen to provide
a balance of steering feel and steering effort. Press the
back arrow button on the touchscreen to return to the
previous menu.
•ParkSense®
The ParkSense® system will scan for objects behind the
vehicle when the transmission shift lever is in REVERSE
and the vehicle speed is less than 11 mph (18 km/h). It
will provide an alert (audible and/or visual) to indicate
the proximity to other objects. The system can be enabled
with Sound Only, or Sound and Display. To change the
ParkSense® status, press and release the “Sound Only”
or “Sound and Display” button. Then press the back
arrow button on the touchscreen. Refer to “ParkSense®”
in “Understanding The Features Of Your Vehicle” for
system function and operating information.
4
UNDERSTANDING YOUR INSTRUMENT PANEL 289
Page 411 of 595
Warning Light” does not come on when the ignition
switch is turned to the ON position, have the bulb
repaired as soon as possible.
If both the “Brake Warning Light” and the “Anti-Lock
Brake Warning Light” remain on, the ABS and Electronic
Brake Force Distribution (EBD) systems are not function-
ing. Immediate repair to the ABS system is required.
Consult with your authorized dealer service center as
soon as possible.
Traction Control System (TCS)
This system monitors the amount of wheel spin of each
driven wheel. If wheel spin is detected, brake pressure is
applied to the slipping wheel(s) and engine power is
reduced to provide enhanced acceleration and stability.
A feature of the TCS system, Brake Limited Differential
(BLD), controls the wheel spin across a driven axle. If one
wheel on a driven axle is spinning faster than the other, the
system will apply the brake of the spinning wheel. This
will allow more engine torque to be applied to the wheel
that is not spinning. This feature remains active even if TCS
and ESC are in the “Sport Mode (Partial Off)” or#Track
Mode (Full Off)#mode. Refer to “Electronic Stability Con-
trol (ESC)” in this section for more information.
Brake Assist System (BAS)
This system complements the ABS by optimizing the
vehicle braking capability during emergency brake ma-
neuvers. This system detects an emergency braking situ-
ation by sensing the rate and amount of brake application
and then applies optimum pressure to the brakes. This
can help reduce braking distances.
Applying the brakes very quickly results in the best BAS
assistance. To receive the benefits of this system, you
must apply continuous brake pedal pressure during the
stopping sequence. Do not reduce brake pedal pressure
unless braking is no longer desired. Once the brake pedal
is released, the BAS is deactivated.
5
STARTING AND OPERATING 409
Page 415 of 595
Full Off
This mode is intended for off-highway or off-road use
only and should not be used on any public roadways. In
this mode, all TCS and ESC stability features are turned
OFF. To enter the “Full Off” mode, press and hold the
“ESC Off” switch for five seconds while the vehicle is
stopped with the engine running. After five seconds, a
chime will sound, the#ESC OFF Indicator Light#will
illuminate, and the “ESC off” message will appear in the
Driver Information Display (DID). Refer to “Driver In-
formation Display (DID)” in “Understanding Your In-
strument Panel” for further information. To turn ESC ON
again, momentarily press the “ESC Off” switch.
NOTE:The#ESC off#message will display and the
audible chime will sound when the shift lever is moved
into the PARK position from any position other than
PARK and then moved out of the PARK position. This
will occur when the message was previously cleared.
WARNING!
In the ESC “Full Off” mode, the engine torque
reduction and stability features are disabled. There-
fore, the enhanced vehicle stability offered by ESC is
unavailable. In an emergency evasive maneuver, the
ESC system will not engage to assist in maintaining
stability.$ESC Off$mode is intended for off-highway
or off-road use only.
NOTE:When the ESC is switched SPORT, the BLD system
remains active. This feature controls wheel spin across an
axle quite similarly to a limited slip differential. If one
wheel on an axle is spinning faster than the other, the
system will apply the brake of the spinning wheel and
allow more engine torque to be applied to the wheel that is
not spinning. To improve the vehicle’s traction when
driving with tire chains, or when starting off in deep snow,
sand, or gravel, it may be desirable to switch to the “Sport
Mode” by momentarily pressing the “ESC Off” switch.
5
STARTING AND OPERATING 413
Page 465 of 595
WHAT TO DO IN EMERGENCIES
CONTENTS
!HAZARD WARNING FLASHERS...........464
!IF YOUR ENGINE OVERHEATS............464
!WHEEL AND TIRE TORQUE
SPECIFICATIONS......................465
▫Torque Specifications...................465
!TIRE SERVICE KIT — IF EQUIPPED.........467
▫Tire Service Kit Storage.................467
▫Tire Service Kit Components And Operation . .468
▫Tire Service Kit Usage Precautions..........469
▫Sealing A Tire With Tire Service Kit.........472
!JUMP-STARTING PROCEDURES...........478
▫Preparations For Jump-Start..............478
▫Jump-Starting Procedure................480
!FREEING A STUCK VEHICLE.............482
!MANUAL PARK RELEASE — 8 SPEED
TRANSMISSION.......................484
!TOWING A DISABLED VEHICLE...........486
6
Page 467 of 595
CAUTION!
Driving with a hot cooling system could damage
your vehicle. If the temperature gauge reads 240°F
(116°C) or greater pull over and stop the vehicle. Idle
the vehicle with the air conditioner turned off until
the pointer drops back into the normal range 200–
230°F (93–110°C). If the pointer remains at 240°F
(116°C) or greater and you hear a chime, turn the
engine off immediately and call for service.
WARNING!
You or others can be badly burned by hot engine
coolant (antifreeze) or steam from your radiator. If
you see or hear steam coming from under the hood,
do not open the hood until the radiator has had time
to cool. Never try to open a cooling system pressure
cap when the radiator or coolant bottle is hot.
WHEEL AND TIRE TORQUE SPECIFICATIONS
Proper lug nut/bolt torque is very important to ensure
that the wheel is properly mounted to the vehicle. Any
time a wheel has been removed and reinstalled on the
vehicle the lug nuts/bolts should be torqued using a
properly calibrated torque wrench.
Torque Specifications
Lug Nut/Bolt Torque **Lug Nut/
Bolt Size
Lug Nut/
Bolt Socket
Size
111 Ft-Lbs (150 N·m) M14 x 1.50 22 mm
**Use only Chrysler recommended lug nuts/bolts and
clean or remove any dirt or oil before tightening.
Inspect the wheel mounting surface prior to mounting
the tire and remove any corrosion or loose particles.
6
WHAT TO DO IN EMERGENCIES 465
Page 468 of 595
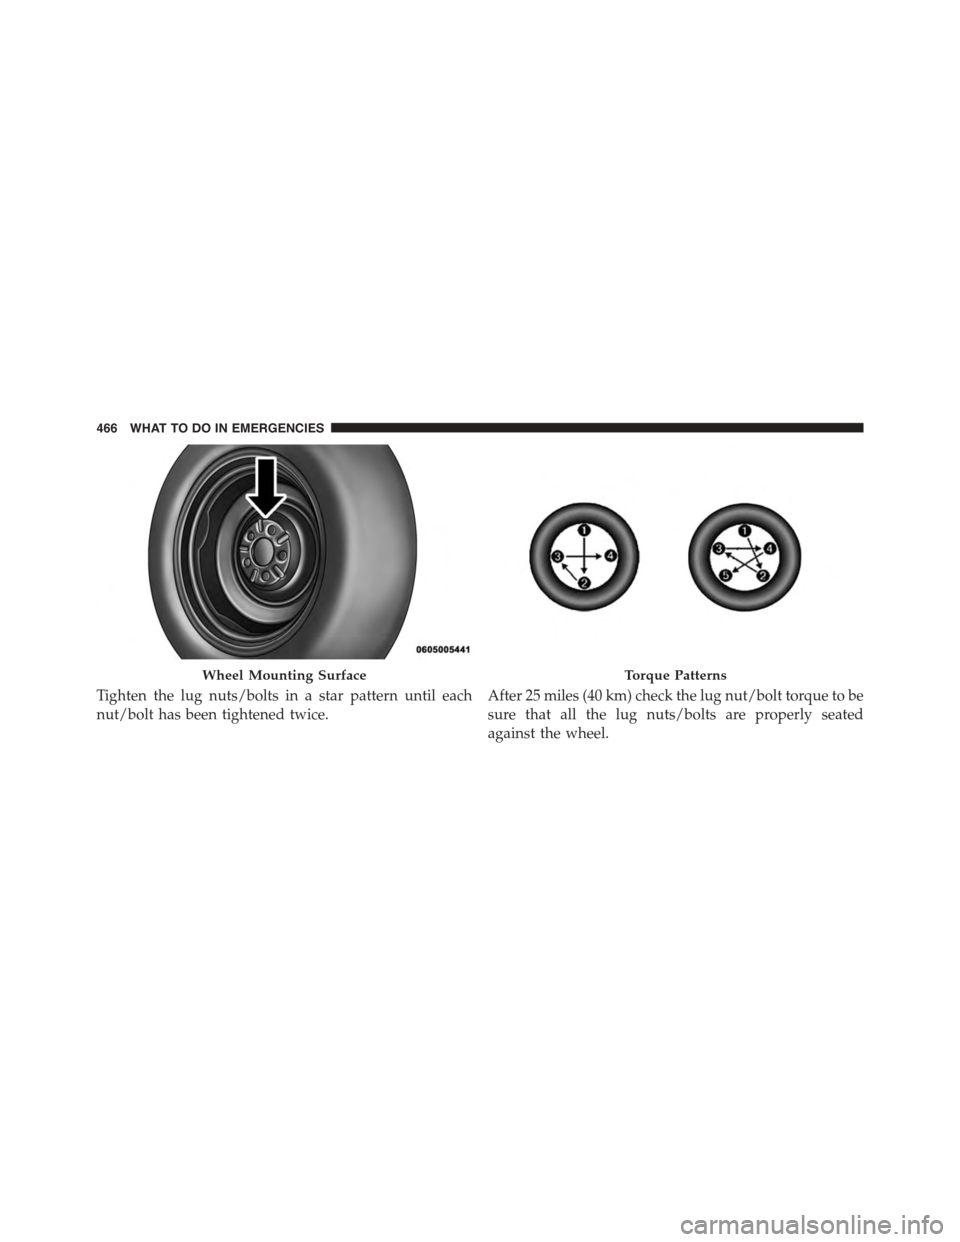
Tighten the lug nuts/bolts in a star pattern until each
nut/bolt has been tightened twice.
After 25 miles (40 km) check the lug nut/bolt torque to be
sure that all the lug nuts/bolts are properly seated
against the wheel.
Wheel Mounting SurfaceTorque Patterns
466 WHAT TO DO IN EMERGENCIES