wheel DODGE DART 2015 PF / 1.G Owner's Manual
[x] Cancel search | Manufacturer: DODGE, Model Year: 2015, Model line: DART, Model: DODGE DART 2015 PF / 1.GPages: 164, PDF Size: 25.19 MB
Page 100 of 164
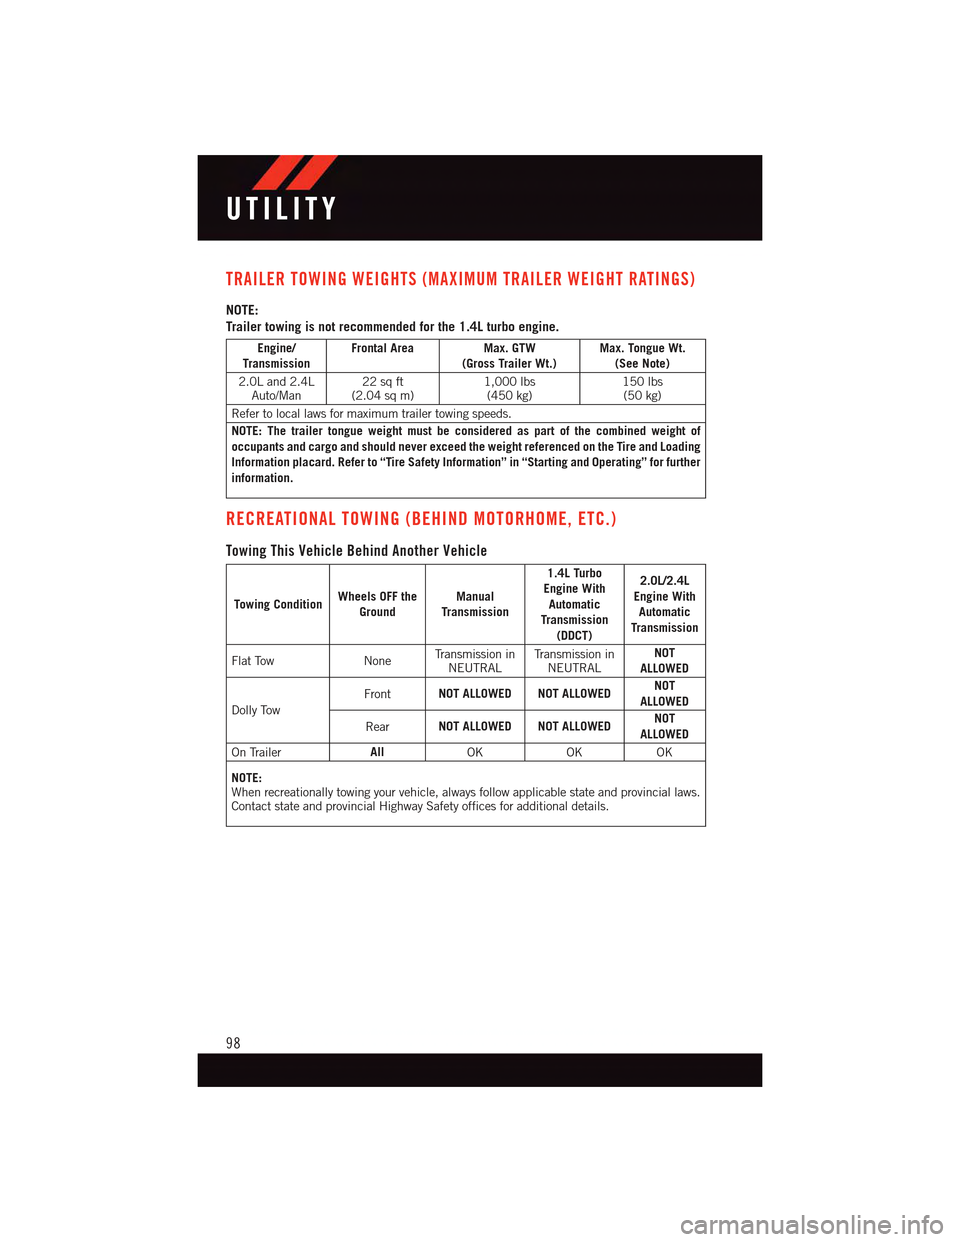
TRAILER TOWING WEIGHTS (MAXIMUM TRAILER WEIGHT RATINGS)
NOTE:
Trailer towing is not recommended for the 1.4L turbo engine.
Engine/TransmissionFrontal Area Max. GTW(Gross Trailer Wt.)Max. Tongue Wt.(See Note)
2.0L and 2.4LAuto/Man22 sq ft(2.04 sq m)1,000 lbs(450 kg)150 lbs(50 kg)
Refer to local laws for maximum trailer towing speeds.
NOTE: The trailer tongue weight must be considered as part of the combined weight ofoccupants and cargo and should never exceed the weight referenced on the Tire and LoadingInformation placard. Refer to “Tire Safety Information” in “Starting and Operating” for furtherinformation.
RECREATIONAL TOWING (BEHIND MOTORHOME, ETC.)
Towing This Vehicle Behind Another Vehicle
Towing ConditionWheels OFF theGroundManualTransmission
1.4L TurboEngine WithAutomaticTransmission(DDCT)
2.0L/2.4LEngine WithAutomaticTransmission
Flat Tow NoneTr a n s m i s s i o n i nNEUTRALTr a n s m i s s i o n i nNEUTRALNOTALLOWED
Dolly Tow
FrontNOT ALLOWED NOT ALLOWEDNOTALLOWED
RearNOT ALLOWED NOT ALLOWEDNOTALLOWED
On TrailerAllOKOKOK
NOTE:When recreationally towing your vehicle, always follow applicable state and provincial laws.Contact state and provincial Highway Safety offices for additional details.
UTILITY
98
Page 101 of 164
NOTE:
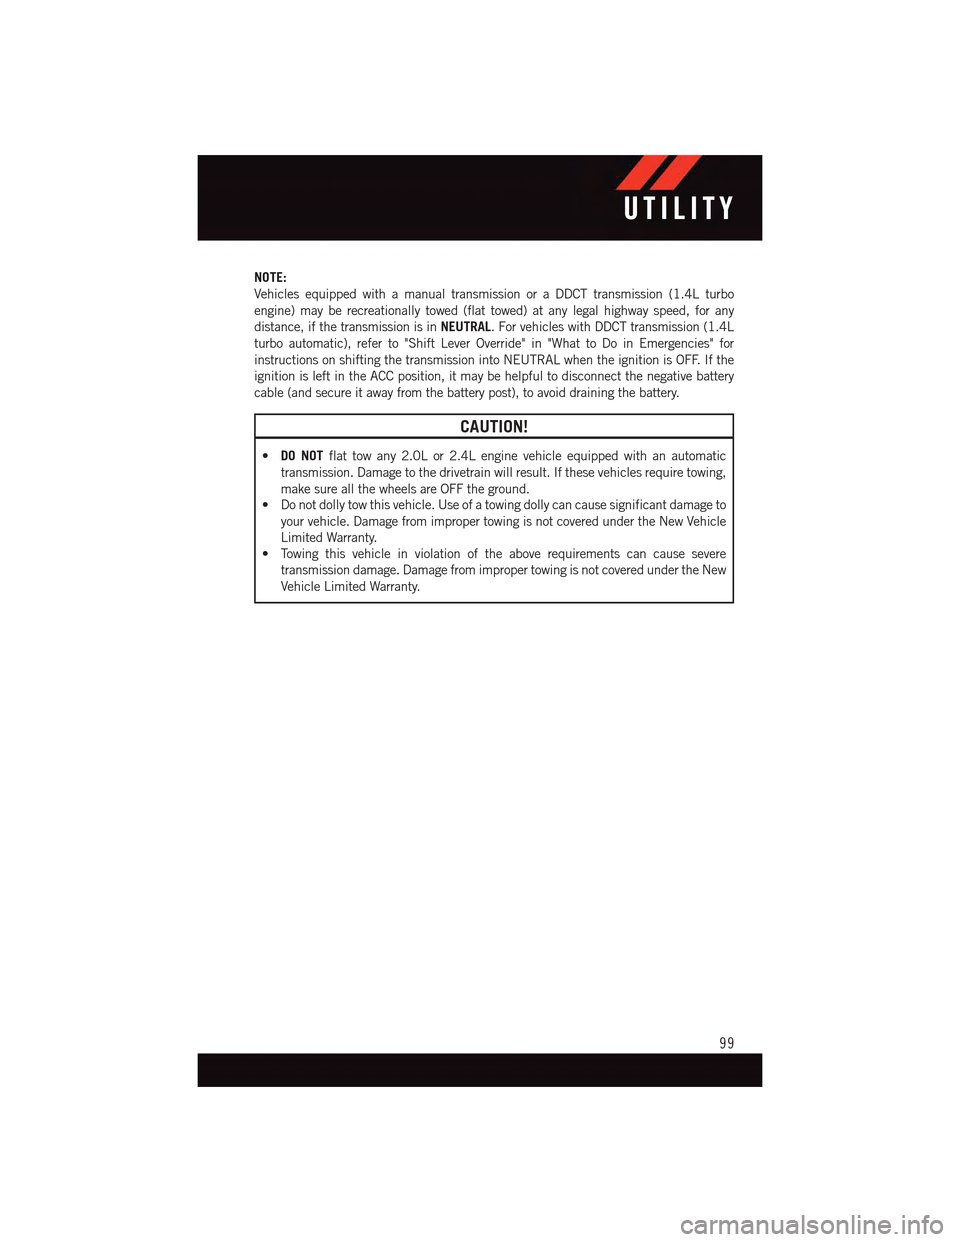
Vehicles equipped with a manual transmission or a DDCT transmission (1.4L turbo
engine) may be recreationally towed (flat towed) at any legal highway speed, for any
distance, if the transmission is inNEUTRAL.ForvehicleswithDDCTtransmission(1.4L
turbo automatic), refer to "Shift Lever Override" in "What to Do in Emergencies" for
instructions on shifting the transmission into NEUTRAL when the ignition is OFF. If the
ignition is left in the ACC position, it may be helpful to disconnect the negative battery
cable (and secure it away from the battery post), to avoid draining the battery.
CAUTION!
•DO NOTflat tow any 2.0L or 2.4L engine vehicle equipped with an automatic
transmission. Damage to the drivetrain will result. If these vehicles require towing,
make sure all the wheels are OFF the ground.
•Donotdollytowthisvehicle.Useofatowingdollycancausesignificantdamageto
your vehicle. Damage from improper towing is not covered under the New Vehicle
Limited Warranty.
•Towingthisvehicleinviolationoftheaboverequirementscancausesevere
transmission damage. Damage from improper towing is not covered under the New
Vehicle Limited Warranty.
UTILITY
99
Page 103 of 164
NOTE:
AFTER INFLATION, THE VEHICLE MAY NEED TO BE DRIVEN FOR 20 MINUTES
BEFORE THE FLASHING LIGHT WILL TURN OFF.
Please note that the TPMS is not a substitute for proper tire maintenance, and it is the
driver’s responsibility to maintain correct tire pressure, even if under-inflation has not
reached the level to trigger illumination of the TPMS low tire pressure telltale.
Yo u r v e h i c l e h a s a l s o b e e n e q u i p p e d w i t h a T P M S m a l f u n c t i o n i n d i c a t o r t o i n d i c a t e w h e n
the system is not operating properly. The TPMS malfunction indicator is combined with
the low tire pressure telltale.
When the system detects a malfunction, the telltale will flash for approximately one
minute and then remain continuously illuminated. This sequence will continue upon
subsequent vehicle start-ups as long as the malfunction exists. When the malfunction
indicator is illuminated, the system may not be able to detect or signal low tire pressure
as intended. TPMS malfunctions may occur for a variety of reasons, including the
installation of replacement or alternate tires or wheels on the vehicle that prevent the
TPMS from functioning properly. Always check the TPMS malfunction telltale after
replacing one or more tires or wheels on your vehicle to ensure that the replacement or
alternate tires and wheels allow the TPMS to continue to function properly.
NOTE:
Ti r e p r e s s u r e s c h a n g e b y a p p r o x i m a t e l y 1 p s i ( 7 k P a ) p e r 1 2 ° F ( 7 ° C ) o f a i r t e m p e r a t u r e
change. Keep this in mind when checking tire pressure inside a garage, especially in the
Winter. Example: If garage temperature is 68°F (20°C) and the outside temperature is
32°F (0°C), then the cold tire inflation pressure should be increased by 3 psi (21 kPa),
which equals 1 psi (7 kPa) for every 12°F (7°C) for this outside temperature condition.
CAUTION!
The TPMS has been optimized for the original equipment tires and wheels. TPMS
pressures and warning have been established for the tire size equipped on your vehicle.
Undesirable system operation or sensor damage may result when using replacement
equipment that is not of the same size, type, and/or style. Aftermarket wheels can
cause sensor damage. Do not use tire sealant from a can, or balance beads if your
vehicle is equipped with a TPMS, as damage to the sensors may result.
WHAT TO DO IN EMERGENCIES
101
Page 110 of 164
JACKING AND TIRE CHANGING — IF EQUIPPED
Jack Location/Spare Tire Stowage
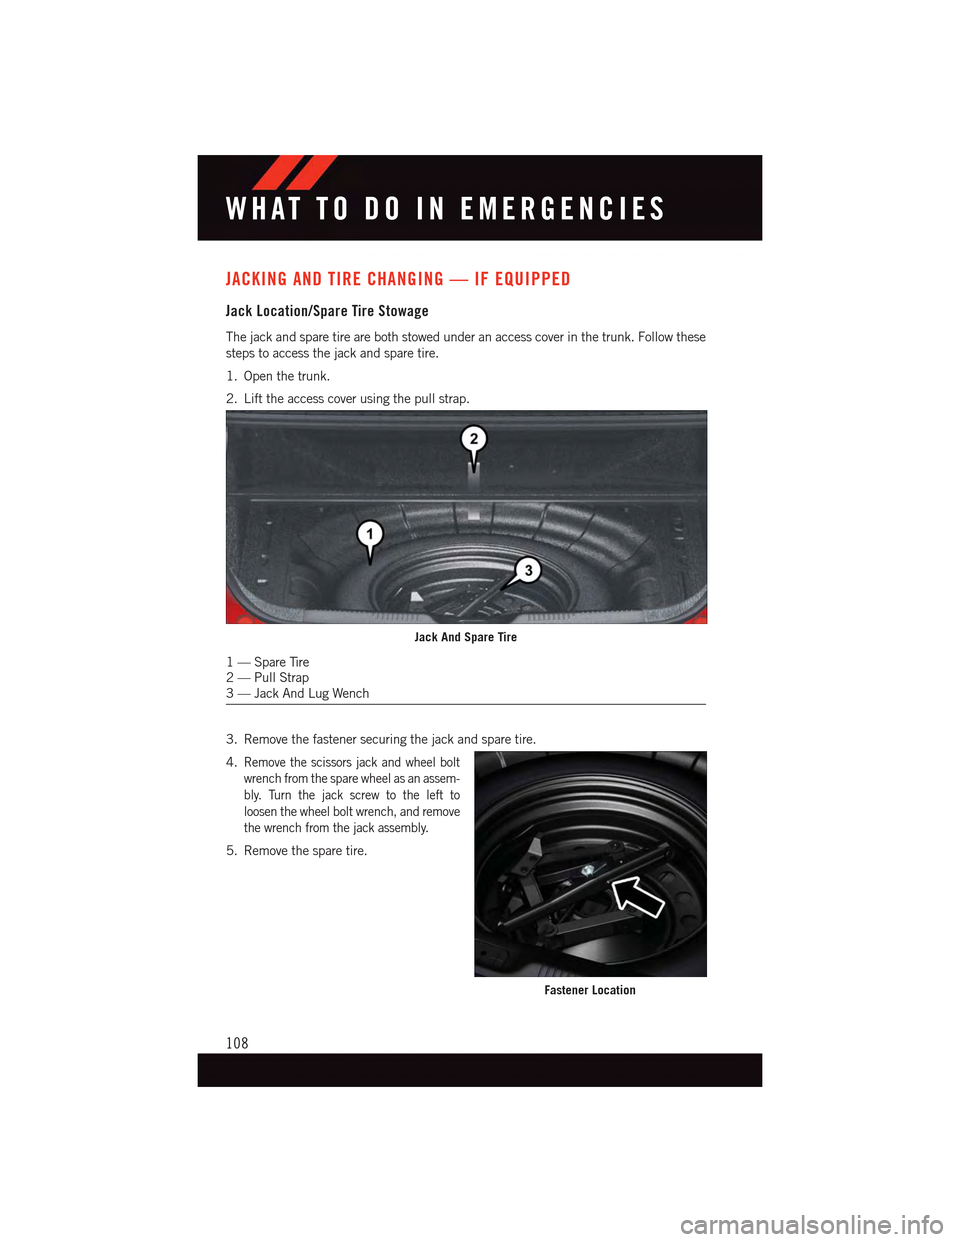
The jack and spare tire are both stowed under an access cover in the trunk. Follow these
steps to access the jack and spare tire.
1. Open the trunk.
2. Lift the access cover using the pull strap.
3. Remove the fastener securing the jack and spare tire.
4.Remove the scissors jack and wheel bolt
wrench from the spare wheel as an assem-
bly. Turn the jack screw to the left to
loosen the wheel bolt wrench, and remove
the wrench from the jack assembly.
5. Remove the spare tire.
Jack And Spare Tire
1—SpareTire2—PullStrap3—JackAndLugWench
Fastener Location
WHAT TO DO IN EMERGENCIES
108
Page 111 of 164
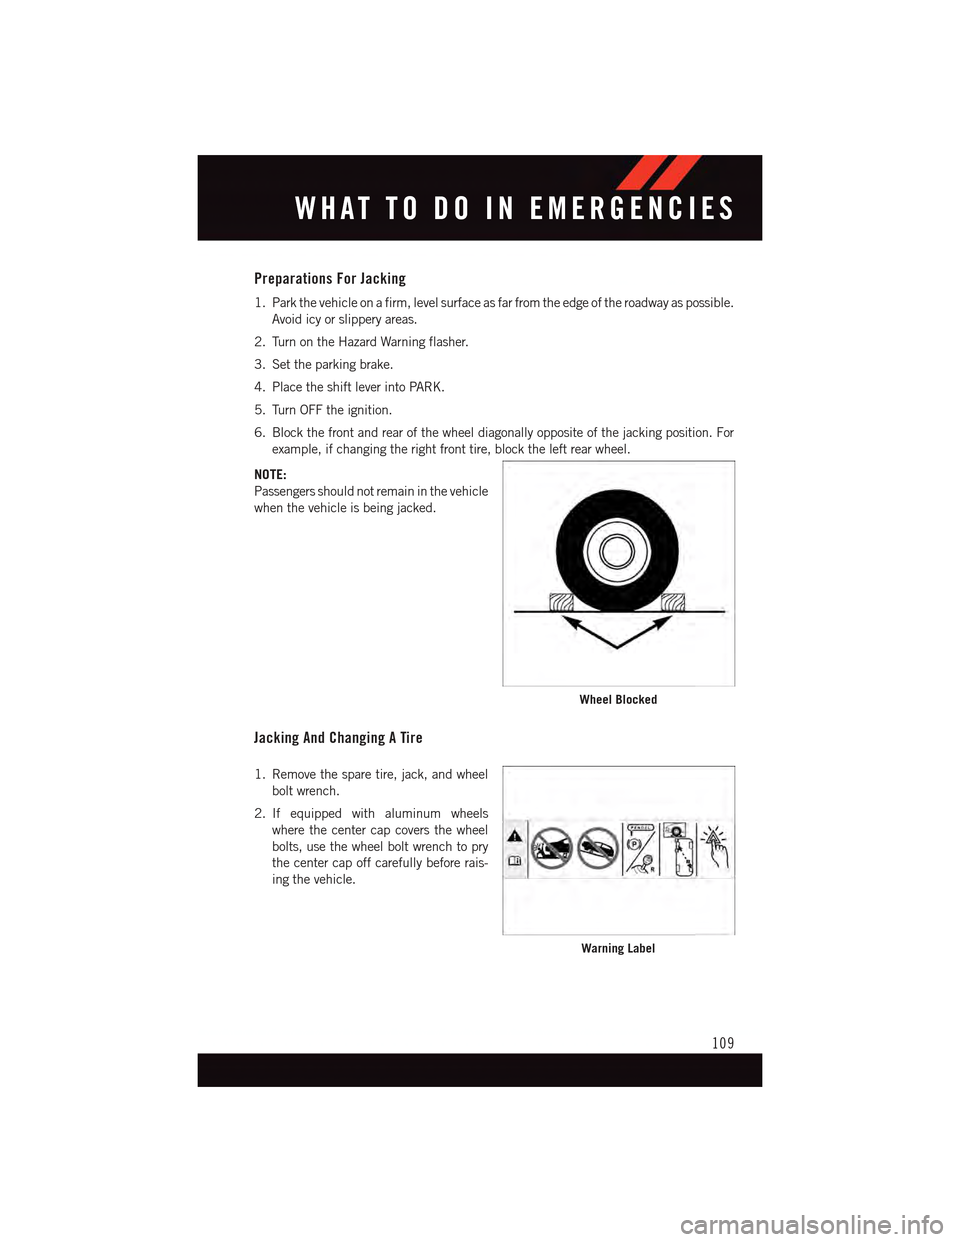
Preparations For Jacking
1. Park the vehicle on a firm, level surface as far from the edge of the roadway as possible.
Avoid icy or slippery areas.
2. Turn on the Hazard Warning flasher.
3. Set the parking brake.
4. Place the shift lever into PARK.
5. Turn OFF the ignition.
6. Block the front and rear of the wheel diagonally opposite of the jacking position. For
example, if changing the right front tire, block the left rear wheel.
NOTE:
Passengers should not remain in the vehicle
when the vehicle is being jacked.
Jacking And Changing A Tire
1. Remove the spare tire, jack, and wheel
bolt wrench.
2. If equipped with aluminum wheels
where the center cap covers the wheel
bolts, use the wheel bolt wrench to pry
the center cap off carefully before rais-
ing the vehicle.
Wheel Blocked
Warning Label
WHAT TO DO IN EMERGENCIES
109
Page 112 of 164
3. Before raising the vehicle, use the wheel bolt wrench to loosen, but not remove, the
wheel bolts on the wheel with the flat tire. Turn the wheel bolts counterclockwise one
turn while the wheel is still on the ground.
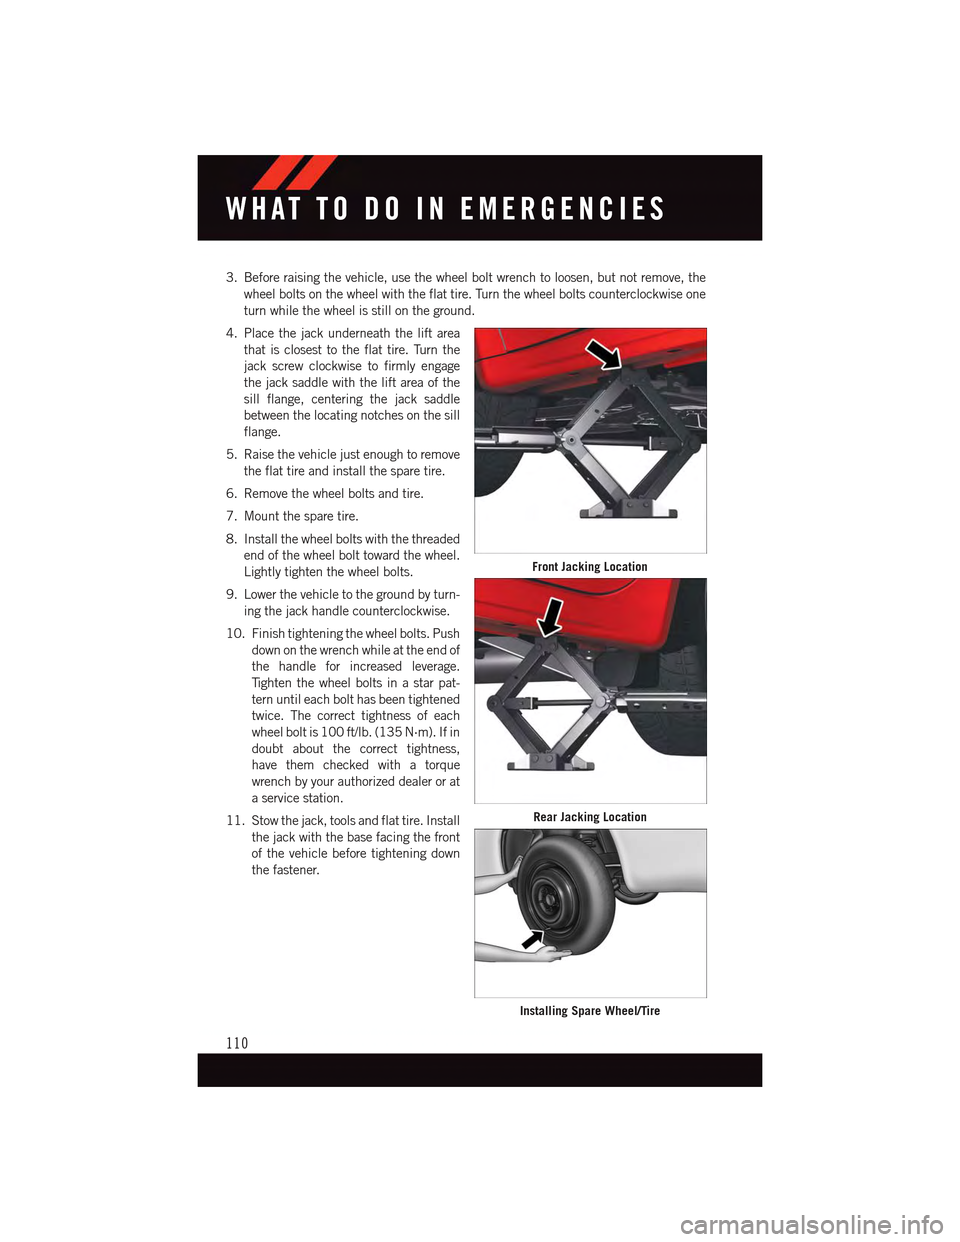
4. Place the jack underneath the lift area
that is closest to the flat tire. Turn the
jack screw clockwise to firmly engage
the jack saddle with the lift area of the
sill flange, centering the jack saddle
between the locating notches on the sill
flange.
5. Raise the vehicle just enough to remove
the flat tire and install the spare tire.
6. Remove the wheel bolts and tire.
7. Mount the spare tire.
8. Install the wheel bolts with the threaded
end of the wheel bolt toward the wheel.
Lightly tighten the wheel bolts.
9. Lower the vehicle to the ground by turn-
ing the jack handle counterclockwise.
10. Finish tightening the wheel bolts. Push
down on the wrench while at the end of
the handle for increased leverage.
Ti g h t e n t h e w h e e l b o l t s i n a s t a r p a t -
tern until each bolt has been tightened
twice. The correct tightness of each
wheel bolt is 100 ft/lb. (135 N·m). If in
doubt about the correct tightness,
have them checked with a torque
wrench by your authorized dealer or at
aservicestation.
11. Stow the jack, tools and flat tire. Install
the jack with the base facing the front
of the vehicle before tightening down
the fastener.
Front Jacking Location
Rear Jacking Location
Installing Spare Wheel/Tire
WHAT TO DO IN EMERGENCIES
110
Page 113 of 164
Road Tire Installation
Vehicles Equipped With Wheel Covers
1. Mount the road tire on the axle.
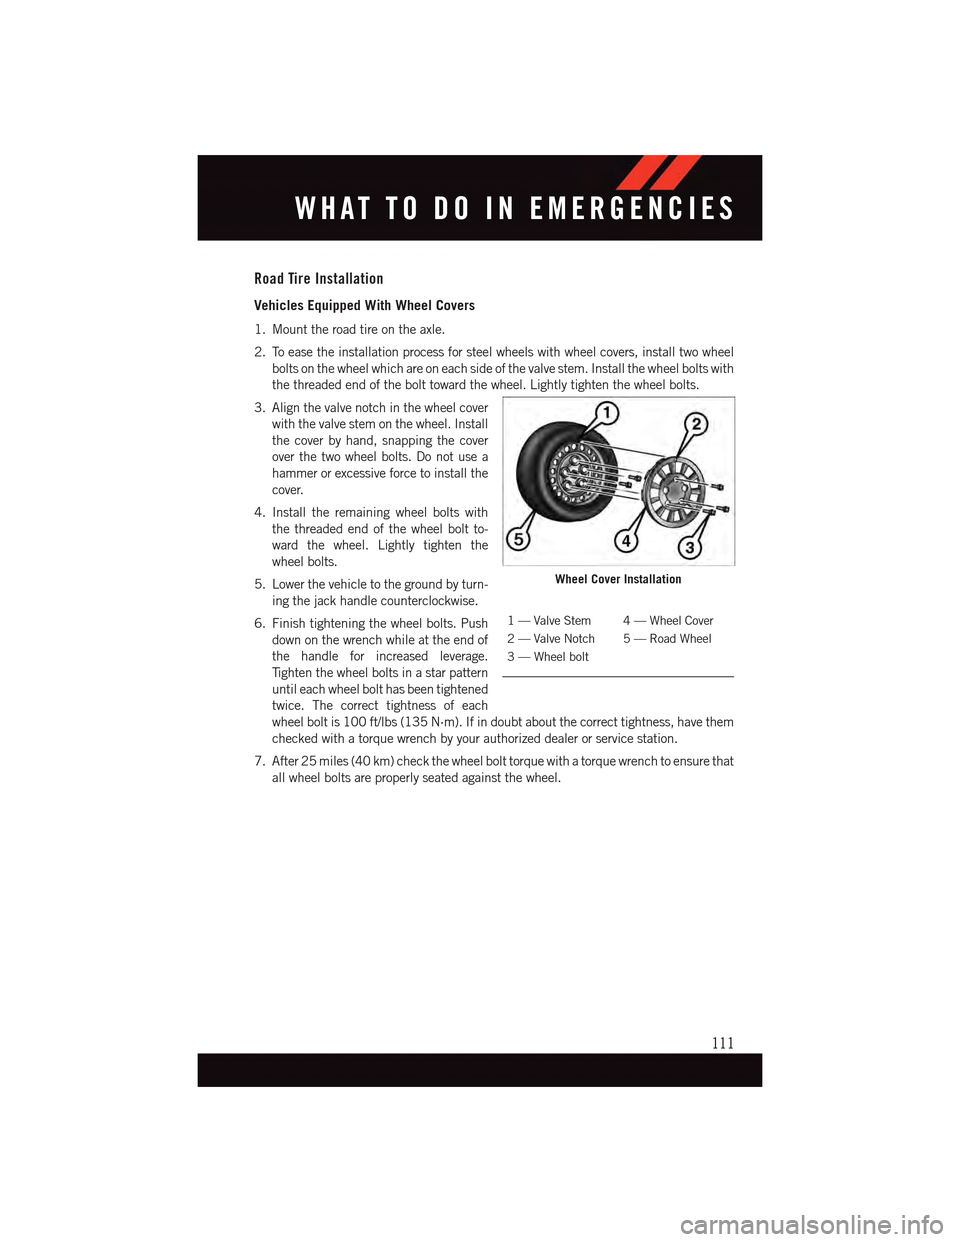
2. To ease the installation process for steel wheels with wheel covers, install two wheel
bolts on the wheel which are on each side of the valve stem. Install the wheel bolts with
the threaded end of the bolt toward the wheel. Lightly tighten the wheel bolts.
3. Align the valve notch in the wheel cover
with the valve stem on the wheel. Install
the cover by hand, snapping the cover
over the two wheel bolts. Do not use a
hammer or excessive force to install the
cover.
4. Install the remaining wheel bolts with
the threaded end of the wheel bolt to-
ward the wheel. Lightly tighten the
wheel bolts.
5. Lower the vehicle to the ground by turn-
ing the jack handle counterclockwise.
6. Finish tightening the wheel bolts. Push
down on the wrench while at the end of
the handle for increased leverage.
Ti g h t e n t h e w h e e l b o l t s i n a s t a r p a t t e r n
until each wheel bolt has been tightened
twice. The correct tightness of each
wheel bolt is 100 ft/lbs (135 N·m). If in doubt about the correct tightness, have them
checked with a torque wrench by your authorized dealer or service station.
7. After 25 miles (40 km) check the wheel bolt torque with a torque wrench to ensure that
all wheel bolts are properly seated against the wheel.
Wheel Cover Installation
1—ValveStem 4—WheelCover
2—ValveNotch 5—RoadWheel
3—Wheelbolt
WHAT TO DO IN EMERGENCIES
111
Page 114 of 164
Vehicles Without Wheel Covers
1. Mount the road tire on the axle.
2. Install the remaining wheel bolts with the threaded end of the wheel bolt toward the
wheel. Lightly tighten the wheel bolts.
3. Lower the vehicle to the ground by turning the jack handle counterclockwise.
4. Finish tightening the wheel bolts. Push down on the wrench while at the end of the
handle for increased leverage. Tighten the wheel bolts in a star pattern until each bolt
has been tightened twice. The correct tightness of each wheel bolt is 100 ft/lbs
(135 N·m). If in doubt about the correct tightness, have them checked with a torque
wrench by your authorized dealer or service station.
5. After 25 miles (40 km) check the wheel bolt torque with a torque wrench to ensure that
all wheel bolts are properly seated against the wheel.
CAUTION!
•Thewinchmechanismisdesignedforusewiththejack-handleonly.Useofanair
wrench or other power tools is not recommended and they can damage the winch.•Donotattempttoraisethevehiclebyjackingonlocationsotherthanthose
indicated in the Jacking Instructions for this vehicle.
•Besuretomountthesparetirewiththevalvestemfacingoutward.Thevehicle
could be damaged if the spare tire is mounted incorrectly.
WHAT TO DO IN EMERGENCIES
112
Page 115 of 164
WARNING!
•Donotattempttochangeatireonthesideofthevehicleclosetomovingtraffic.
Pull far enough off the road to avoid the danger of being hit when operating the jack
or changing the wheel.
•Beingunderajacked-upvehicleisdangerous.Thevehiclecouldslipoffthejack
and fall on you. You could be crushed. Never put any part of your body under a
vehicle that is on a jack. If you need to get under a raised vehicle, take it to an
authorized service center where it can be raised on a lift.
•Neverstartorruntheenginewhilethevehicleisonajack.
•Thejackisdesignedtobeusedasatoolforchangingtiresonly.Thejackshouldnot
be used to lift the vehicle for service purposes. The vehicle should be jacked on a
firm level surface only. Avoid ice or slippery areas.
•Carefullyfollowthesetirechangingwarningstohelppreventpersonalinjuryor
damage to your vehicle:
•Alwaysparkonafirm,levelsurfaceasfarfromtheedgeoftheroadwayaspossible
before raising the vehicle.
•TurnontheHazardWarningflasher.
•Blockthewheeldiagonallyoppositethewheeltoberaised.
•SettheparkingbrakefirmlyandsetanautomatictransmissioninPARK.
•Donotletanyonesitinthevehiclewhenitisonajack.
•Donotgetunderthevehiclewhenitisonajack.
•Onlyusethejackinthepositionsindicatedandforliftingthisvehicleduringatire
change.
•Ifworkingonorneararoadway,beextremelycarefulofmotortraffic.
•Toassurethatsparetires,flatorinflated,aresecurelystowed,sparesmustbe
stowed with the valve stem facing the ground.
•Raisingthevehiclehigherthannecessarycanmakethevehiclelessstable.Itcould
slip off the jack and hurt someone near it. Raise the vehicle only enough to remove
the tire.
•Toavoidpossiblepersonalinjury,handlethewheelcoverswithcaretoavoidcontact
with any sharp edges.
•Toavoidtheriskofforcingthevehicleoffthejack,donottightenthewheelnuts
fully until the vehicle has been lowered. Failure to follow this warning may result in
personal injury.
•Aloosetireorjack,thrownforwardinacollisionorhardstopcouldendangerthe
occupants of the vehicle. Always stow the jack parts and the spare tire in the places
provided. Have the deflated (flat) tire repaired or replaced immediately.
WHAT TO DO IN EMERGENCIES
113
Page 117 of 164
Tire Service Kit Usage Precautions
•ReplacetheTireServiceKitSealantBottle(1)andSealantHose(6)priortothe
expiration date (printed on the bottle label) to assure optimum operation of the system.
Refer to “Sealing A Tire With Tire Service Kit” section (F) “Sealant Bottle and Hose
Replacement.”
•TheSealantBottle(1)andSealantHose(6)areaonetireapplicationuse.Aftereach
use, always replace these components immediately at an authorized dealer.
•WhentheTireServiceKitsealantisinaliquidform,cleanwater,andadampclothwill
remove the material from the vehicle or tire and wheel components. Once the sealant
dries, it can easily be peeled off and properly discarded.
•Foroptimumperformance,makesurethevalvestemonthewheelisfreeofdebris
before connecting the Tire Service Kit.
•Yo u c a n u s e t h e Ti r e S e r v i c e K i t a i r p u m p t o i n f l a t e b i c y c l e t i r e s . T h e k i t a l s o c o m e s w i t h t w oneedles, located in the Accessory Storage Compartment (on the bottom of the air pump) forinflating sport balls, rafts, or similar inflatable items. However, use only the Air Pump Hose(7) and make sure the Mode Select Knob (5) is in the Air Mode when inflating such itemsto avoid injecting sealant into them. The Tire Service Kit Sealant is only intended to sealpunctures less than 1/4 inch (6 mm) diameter in the tread of your vehicle.
•DonotliftorcarrytheTireServiceKitbythehoses.
Sealing A Tire With Tire Service Kit
(A) Whenever You Stop To Use Tire Service Kit:
1. Pull over to a safe location and turn on the vehicle’s Hazard Warning flashers.
2.Verify that the valve stem (on the wheel with the deflated tire) is in a position that is near
to the ground. This will allow the Tire Service Kit Hoses (6) and (7) to reach the valve stem
and keep the Tire Service Kit flat on the ground. This will provide the best positioning of the
kit when injecting the sealant into the deflated tire and running the air pump. Move the
vehicle as necessary to place the valve stem in this position before proceeding.
3. Place the transmission in PARK (auto transmission) or in Gear (manual transmission)
and cycle the ignition to the OFF position.
4. Set the parking brake.
(B) Setting Up To Use Tire Service Kit:
1. Turn the Mode Select Knob (5) to the Sealant Mode position.
2. Uncoil the Sealant Hose (6) and then remove the cap from the fitting at the end of the
hose.
3. Place the Tire Service Kit flat on the ground next to the deflated tire.
4. Remove the cap from the valve stem and then screw the fitting at the end of the
Sealant Hose (6) onto the valve stem.
5. Uncoil the Power Plug (8) and insert the plug into the vehicle’s 12 Volt power outlet.
6. Do not remove foreign objects (e.g., screws or nails) from the tire.
WHAT TO DO IN EMERGENCIES
115