DODGE DURANGO 2015 3.G Repair Manual
Manufacturer: DODGE, Model Year: 2015, Model line: DURANGO, Model: DODGE DURANGO 2015 3.GPages: 236, PDF Size: 35.01 MB
Page 61 of 236
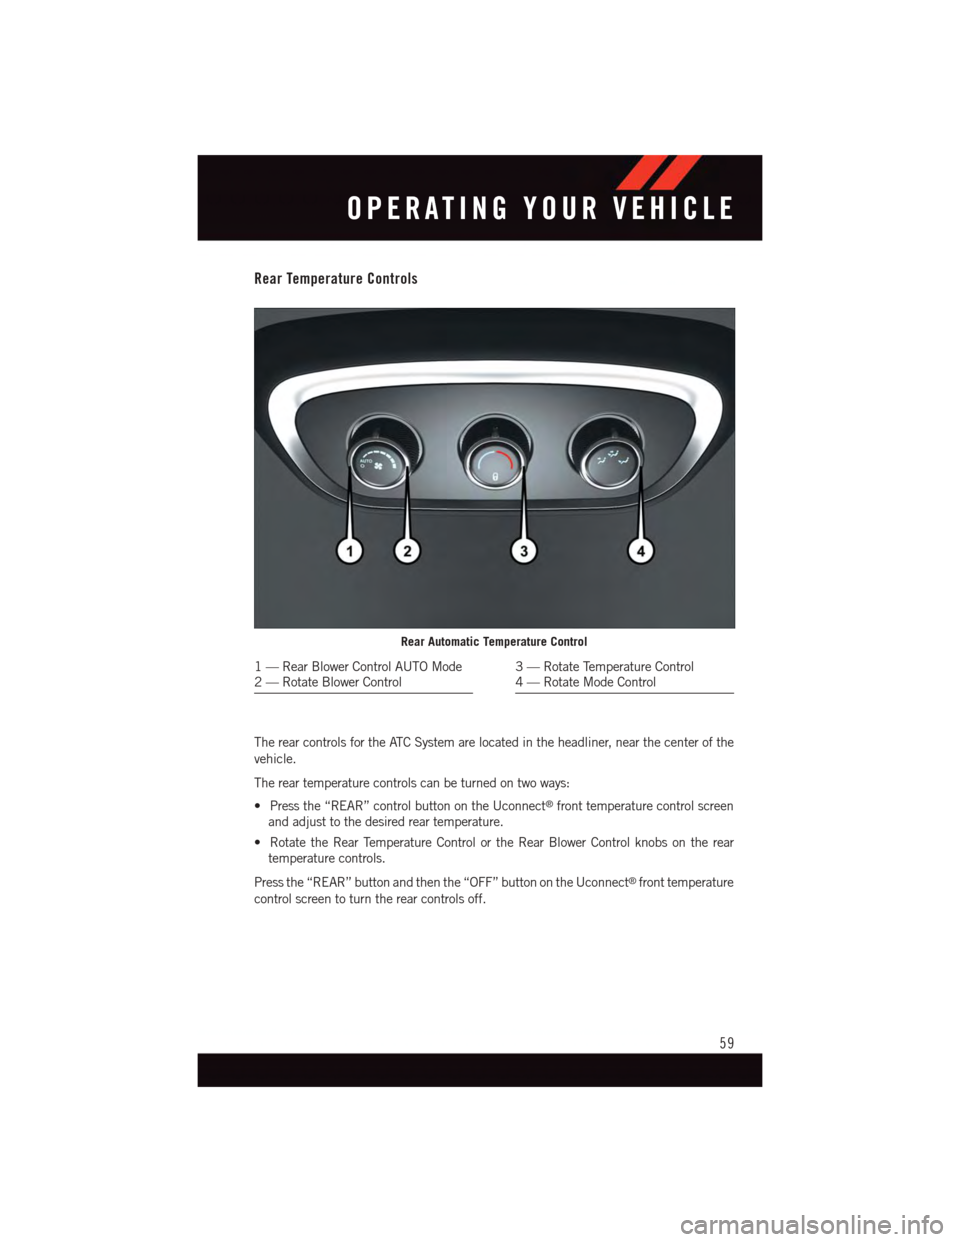
Rear Temperature Controls
The rear controls for the ATC System are located in the headliner, near the center of the
vehicle.
The rear temperature controls can be turned on two ways:
•Pressthe“REAR”controlbuttonontheUconnect®front temperature control screen
and adjust to the desired rear temperature.
•RotatetheRearTemperatureControlortheRearBlowerControlknobsontherear
temperature controls.
Press the “REAR” button and then the “OFF” button on the Uconnect®front temperature
control screen to turn the rear controls off.
Rear Automatic Temperature Control
1—RearBlowerControlAUTOMode2—RotateBlowerControl3—RotateTemperatureControl4—RotateModeControl
OPERATING YOUR VEHICLE
59
Page 62 of 236
PARKSENSE® REAR PARK ASSIST
The four ParkSense®sensors, located in the rear fascia/bumper, monitor the area behind
the vehicle that is within the sensors’ field of view.
The sensors can detect obstacles from approximately 12 in (30 cm) up to 79 in (200 cm)
from the rear bumper while the vehicle is in REVERSE, a warning will display in the Driver
Information Display (DID) and a chime will sound (when Sound and Display is selected
from the Customer Programmable Features section of the Uconnect®System screen). As
the vehicle moves closer to the object, the chime rate will change from single 1/2 second
tone, to slow, to fast, to continuous.
Cleaning The ParkSense® Sensors
If “PARKSENSE UNAVAILABLE WIPE REAR SENSORS" or "PARKSENSE UNAVAIL-
ABLE WIPE FRONT SENSORS” appears in the “Driver Information Display (DID),” clean
the ParkSense®sensors with water, car wash soap and a soft cloth. Do not use rough or
hard cloths. Do not scratch or poke the sensors. Otherwise, you could damage the sensors.
OPERATING YOUR VEHICLE
60
Page 63 of 236
PARKVIEW® REAR BACK-UP CAMERA
Yo u c a n s e e a n o n - s c r e e n i m a g e o f t h e r e a r o f y o u r v e h i c l e w h e n e v e r t h e s h i f t l e v e r / g e a r
selector is put into REVERSE. The ParkView®Rear Back-Up Camera image will be
displayed on the radio display screen, located on the center stack of the instrument panel.
If the radio display screen appears foggy, clean the camera lens located on the liftgate.
WARNING!
Drivers must be careful when backing up; even when using the ParkView®Rear
Back-Up Camera. Always check carefully behind your vehicle, and be sure to check for
pedestrians, animals, other vehicles, obstructions, or blind spots before backing up.
Yo u m u s t c o n t i n u e t o p a y a t t e n t i o n w h i l e b a c k i n g u p . F a i l u r e t o d o s o c a n r e s u l t i n
serious injury or death.
BLIND SPOT MONITORING
The Blind Spot Monitoring (BSM) system uses two radar-based sensors, located inside the
rear bumper fascia, to detect Highway licensable vehicles (automobiles, trucks, motor-
cycles etc.) that enter the blind spot zones from the rear/front/side of the vehicle.
The Blind Spot Monitoring (BSM) system warning light, located in the outside mirrors, will
illuminate if a vehicle moves into a blind spot zone.
The BSM system can also be configured to sound an audible (chime) alert and mute the
radio to notify you of objects that have entered the detection zones.
Refer to “Blind Spot Monitoring” in “Understanding The Features Of Your Vehicle” in your
Owner's Manual on the DVD for further details.
OPERATING YOUR VEHICLE
61
Page 64 of 236
POWER SUNROOF
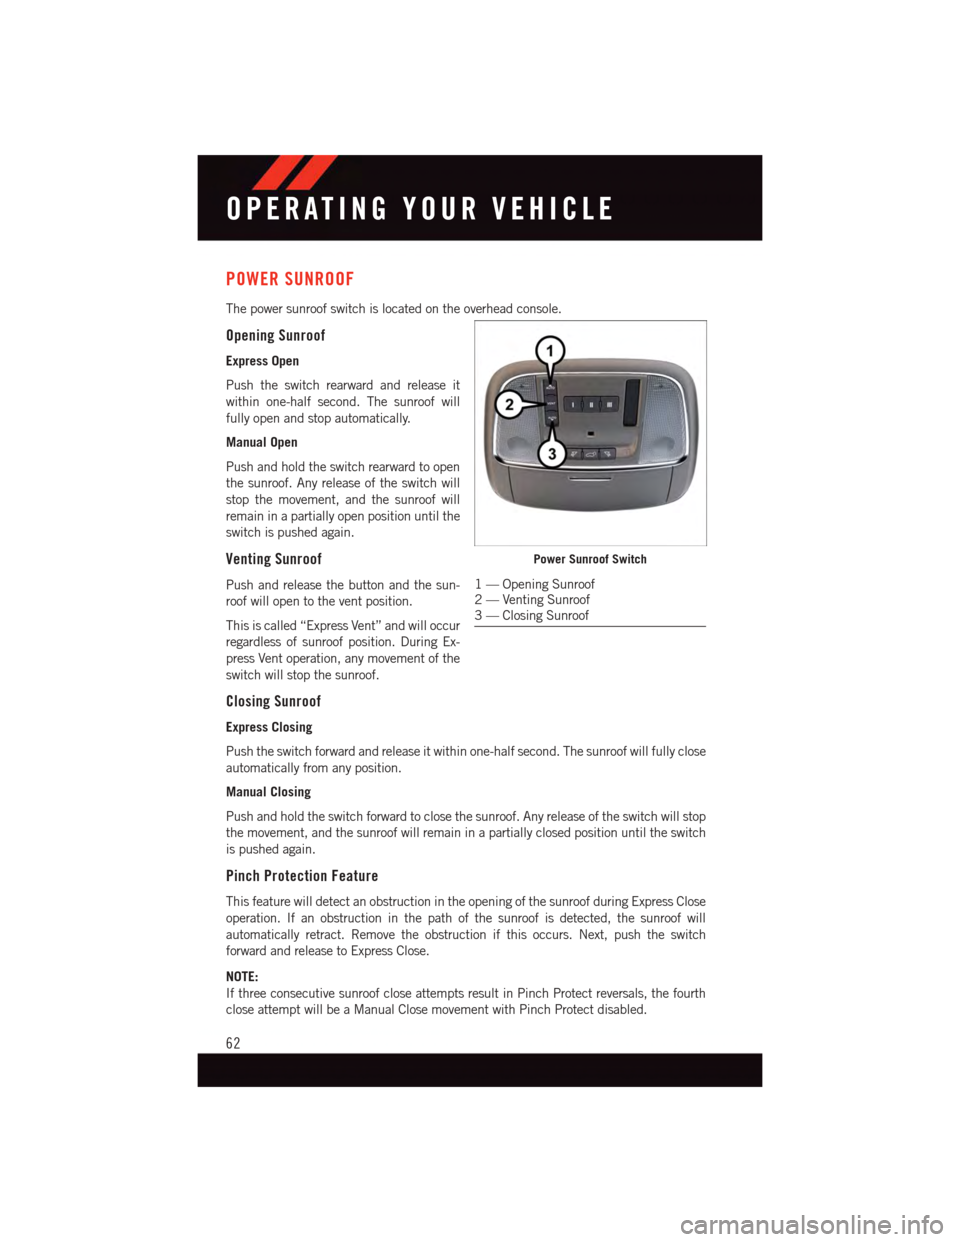
The power sunroof switch is located on the overhead console.
Opening Sunroof
Express Open
Push the switch rearward and release it
within one-half second. The sunroof will
fully open and stop automatically.
Manual Open
Push and hold the switch rearward to open
the sunroof. Any release of the switch will
stop the movement, and the sunroof will
remain in a partially open position until the
switch is pushed again.
Venting Sunroof
Push and release the button and the sun-
roof will open to the vent position.
This is called “Express Vent” and will occur
regardless of sunroof position. During Ex-
press Vent operation, any movement of the
switch will stop the sunroof.
Closing Sunroof
Express Closing
Push the switch forward and release it within one-half second. The sunroof will fully close
automatically from any position.
Manual Closing
Push and hold the switch forward to close the sunroof. Any release of the switch will stop
the movement, and the sunroof will remain in a partially closed position until the switch
is pushed again.
Pinch Protection Feature
This feature will detect an obstruction in the opening of the sunroof during Express Close
operation. If an obstruction in the path of the sunroof is detected, the sunroof will
automatically retract. Remove the obstruction if this occurs. Next, push the switch
forward and release to Express Close.
NOTE:
If three consecutive sunroof close attempts result in Pinch Protect reversals, the fourth
close attempt will be a Manual Close movement with Pinch Protect disabled.
Power Sunroof Switch
1—OpeningSunroof2—VentingSunroof3—ClosingSunroof
OPERATING YOUR VEHICLE
62
Page 65 of 236
WARNING!
•Donotletchildrenplaywiththesunroof.Neverleavechildrenunattendedina
vehicle, or with access to an unlocked vehicle. Do not leave the Key Fob in or near
the vehicle, and do not leave the ignition of a vehicle equipped with Keyless
Enter-N-Go™ in the ACC or ON/RUN mode. Occupants, particularly unattended
children, can become entrapped by the power sunroof while operating the power
sunroof switch. Such entrapment may result in serious injury or death.
•Inacollision,thereisagreaterriskofbeingthrownfromavehiclewithanopen
sunroof. You could also be severely injured or killed. Always fasten your seat belt
properly and make sure all passengers are properly secured.
•Do not allow small children to operate the sunroof. Never allow your fingers, other body
parts, or any object to project through the sunroof opening. Injury may result.
WIND BUFFETING
Wind buffeting can be described as a helicopter-type percussion sound. If buffeting
occurs with the rear windows open, adjust the front and rear windows together.
If buffeting occurs with the sunroof open, adjust the sunroof opening, or adjust any
window. This will minimize buffeting.
OPERATING YOUR VEHICLE
63
Page 66 of 236
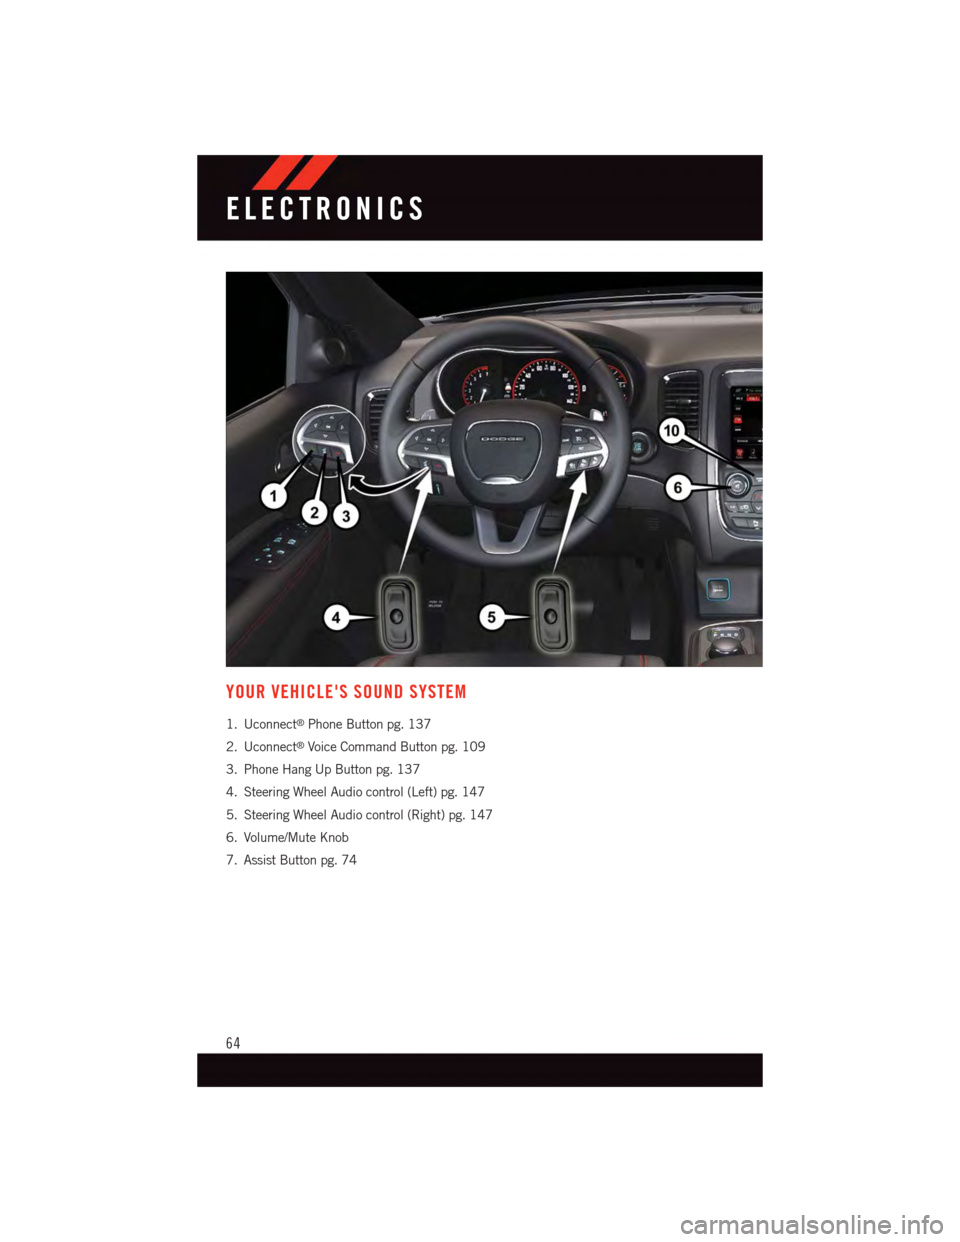
YOUR VEHICLE'S SOUND SYSTEM
1. Uconnect®Phone Button pg. 137
2. Uconnect®Voice Command Button pg. 109
3. Phone Hang Up Button pg. 137
4. Steering Wheel Audio control (Left) pg. 147
5. Steering Wheel Audio control (Right) pg. 147
6. Volume/Mute Knob
7. Assist Button pg. 74
ELECTRONICS
64
Page 67 of 236
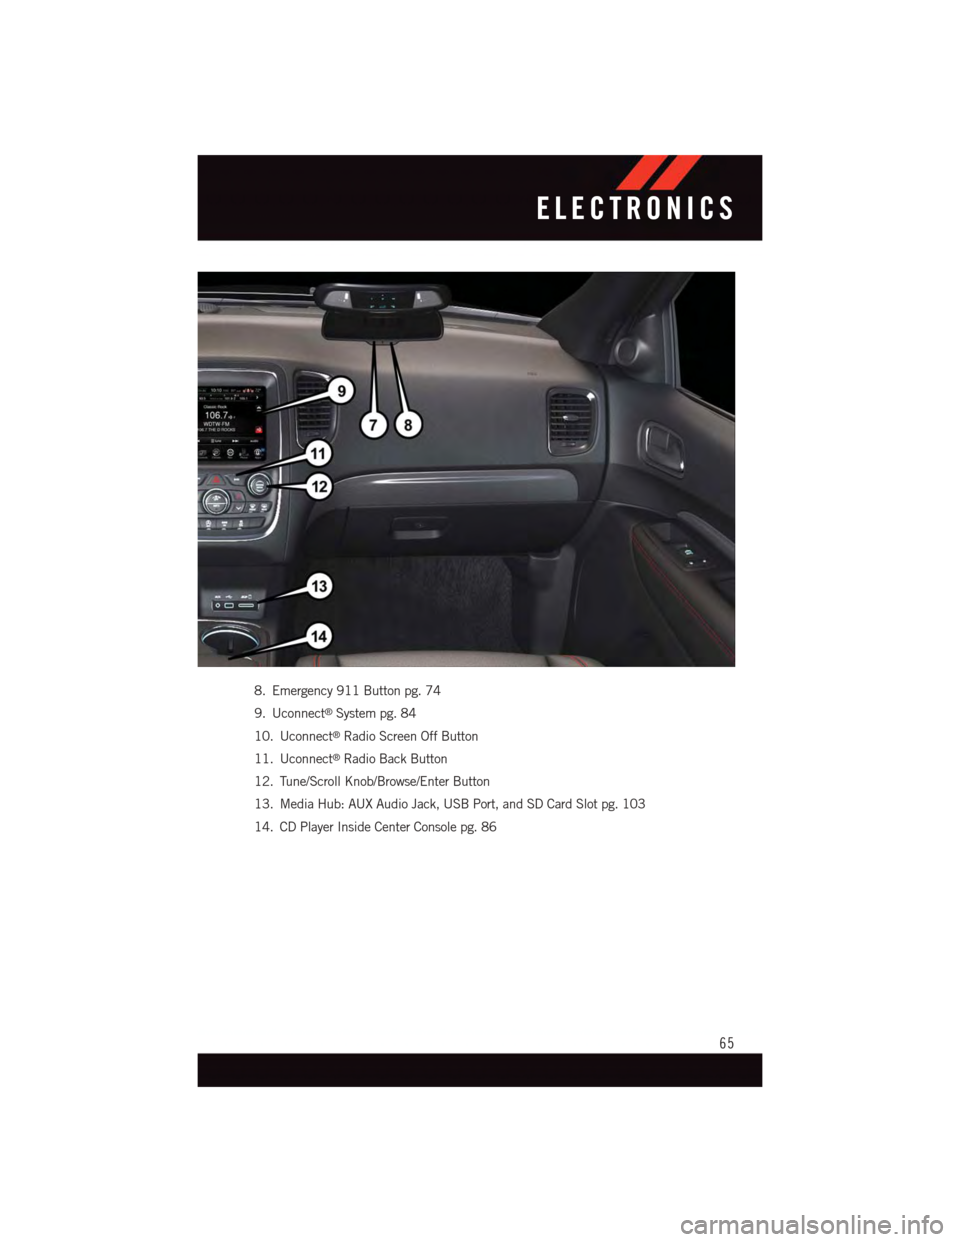
8. Emergency 911 Button pg. 74
9. Uconnect®System pg. 84
10. Uconnect®Radio Screen Off Button
11. Uconnect®Radio Back Button
12. Tune/Scroll Knob/Browse/Enter Button
13. Media Hub: AUX Audio Jack, USB Port, and SD Card Slot pg. 103
14. CD Player Inside Center Console pg. 86
ELECTRONICS
65
Page 68 of 236
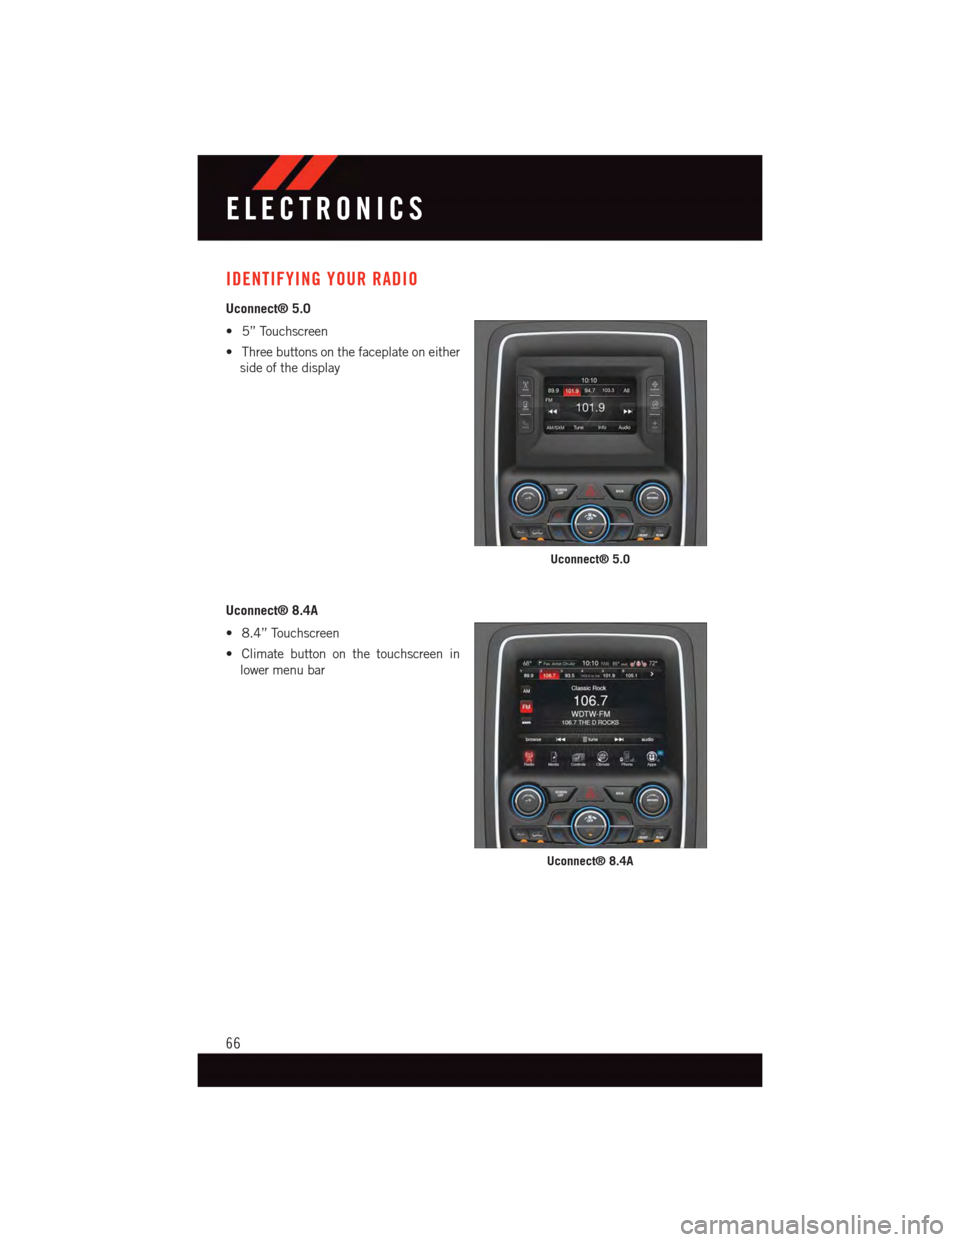
IDENTIFYING YOUR RADIO
Uconnect® 5.0
•5”Touchscreen
•Threebuttonsonthefaceplateoneither
side of the display
Uconnect® 8.4A
•8.4”Touchscreen
•Climatebuttononthetouchscreenin
lower menu bar
Uconnect® 5.0
Uconnect® 8.4A
ELECTRONICS
66
Page 69 of 236
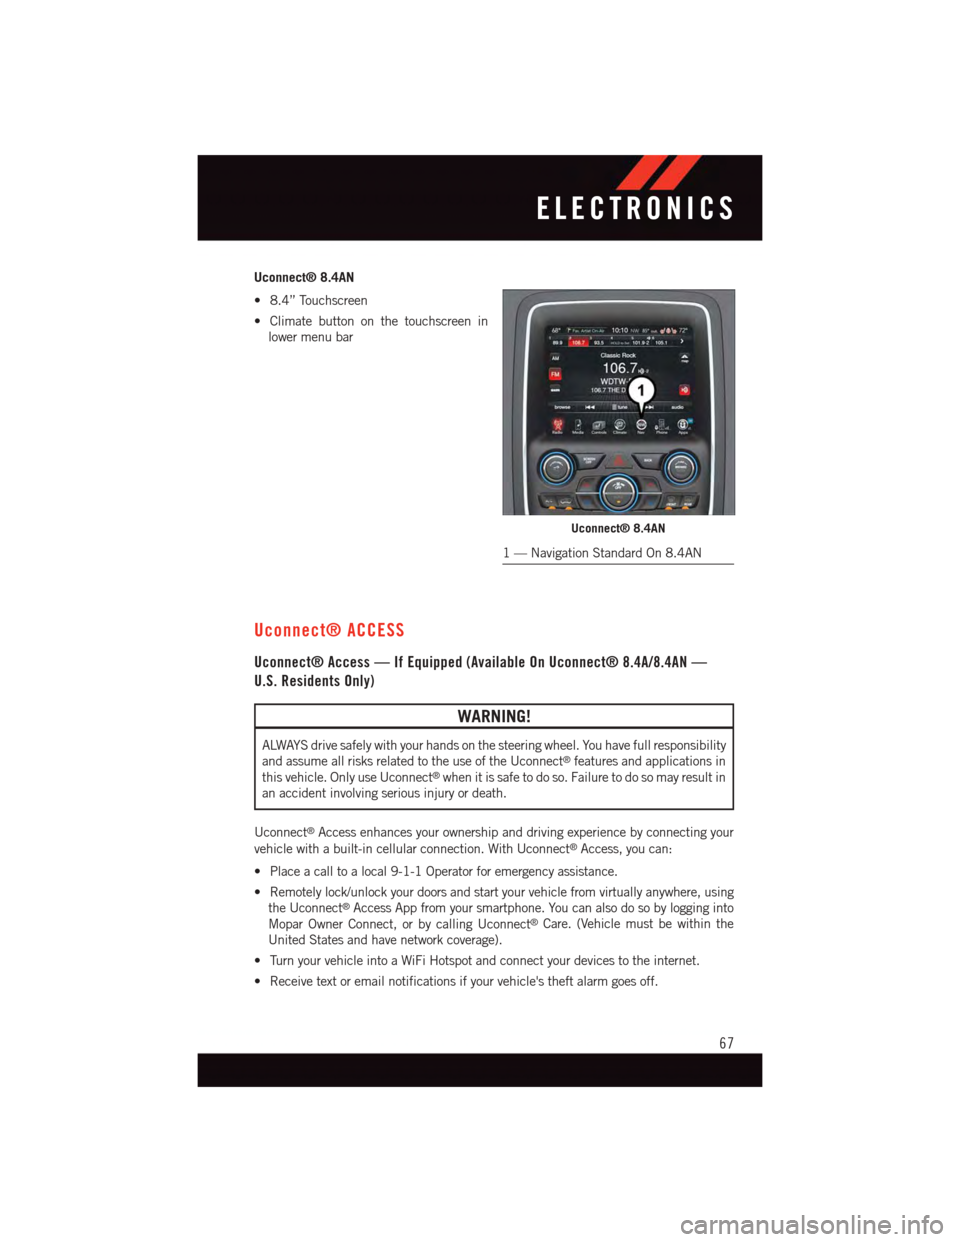
Uconnect® 8.4AN
•8.4”Touchscreen
•Climatebuttononthetouchscreenin
lower menu bar
Uconnect® ACCESS
Uconnect® Access — If Equipped (Available On Uconnect® 8.4A/8.4AN —
U.S. Residents Only)
WARNING!
ALWAYS drive safely with your hands on the steering wheel. You have full responsibility
and assume all risks related to the use of the Uconnect®features and applications in
this vehicle. Only use Uconnect®when it is safe to do so. Failure to do so may result in
an accident involving serious injury or death.
Uconnect®Access enhances your ownership and driving experience by connecting your
vehicle with a built-in cellular connection. With Uconnect®Access, you can:
•Placeacalltoalocal9-1-1Operatorforemergencyassistance.
•Remotelylock/unlockyourdoorsandstartyourvehiclefromvirtuallyanywhere,using
the Uconnect®Access App from your smartphone. You can also do so by logging into
Mopar Owner Connect, or by calling Uconnect®Care. (Vehicle must be within the
United States and have network coverage).
•TurnyourvehicleintoaWiFiHotspotandconnectyourdevicestotheinternet.
•Receivetextoremailnotificationsifyourvehicle'stheftalarmgoesoff.
Uconnect® 8.4AN
1—NavigationStandardOn8.4AN
ELECTRONICS
67
Page 70 of 236
•Receivestolenvehicleassistance,usingGPStechnologytohelpauthoritieslocateyour
vehicle if it is stolen.
•Listentoyourtextmessagesorsendfree-formtextmessageswithyourvoicewhile
keeping your hands on the wheel, using the Voice Texting feature. Requires a cell phone
that supports Bluetooth Message Access Profile (MAP).
•Searchforplacestoeat,shop,relaxandplaywithYelp®,usingyourvoiceoron-screen
menu. Then navigate to them (navigation standard on Uconnect®8.4AN, optional on
Uconnect®8.4A).
•GetoperatorassistanceusingtheASSISTbuttononyourinteriorrearviewmirror.
Before you drive, familiarize yourself with the easy-to-use Uconnect® Access.
1. The ASSIST and 9-1-1 buttons are located on your rearview mirror. The ASSIST button
is used for contacting Roadside Assistance, Vehicle Care and Uconnect®Care. The
9-1-1 button connects you to emergency services.
NOTE:
Vehicles sold in Canada and Mexico DO NOT have 9-1-1 Call system capabilities. 9-1-1
or other emergency line operators in Canada and Mexico may not answer or respond to
9-1-1 system calls.
2. The Uconnect®“Apps” button on the menu bar at the bottom right corner of the radio
touchscreen. This is where you can begin your registration process, manage your Apps
and purchase WiFi on demand.
3. The Uconnect®Voice Command and Uconnect®Phone buttons are located on the left
side of your steering wheel. These buttons let you use your voice to give commands,
make phone calls, send and receive text messages hands-free, enter navigation
destinations, and control your radio and media devices.
Included Trial Period For New Vehicles
Yo u r n e w v e h i c l e m a y c o m e w i t h a n i n c l u d e d t r i a l p e r i o d f o r u s e o f t h e U c o n n e c t®Access
Services starting at the date of vehicle purchase (date based on vehicle sales notification
from your dealer).To activate the trial, you must first register with Uconnect® Access.
After the trial period, if you wish to continue your Uconnect®Access Services you can
choose to purchase a subscription.
Features And Packages
•After the trial period, you can subscribe to continue your service by visiting the Uconnect®
Store located within the Mopar Owner Connect websitemoparownerconnect.com. If you
need assistance, U.S. residents can call Uconnect®Care at 1-855-792-4241.
•Forthelatestinformationonpackagesandpricinginformation:U.S.residentsvisit
DriveUconnect.com.
ELECTRONICS
68