spare tire location DODGE DURANGO 2020 Owners Manual
[x] Cancel search | Manufacturer: DODGE, Model Year: 2020, Model line: DURANGO, Model: DODGE DURANGO 2020Pages: 464, PDF Size: 22.14 MB
Page 8 of 464
6
RECREATIONAL TOWING (BEHIND
MOTORHOME, ETC.) ......................................... 253 Towing This Vehicle Behind Another
Vehicle .......................................................253 Recreational Towing — Rear-Wheel
Drive Models ..............................................254 Recreational Towing — All Wheel Drive
Models (Single-Speed Transfer Case) ......254 Recreational Towing — All-Wheel Drive
Models (Two-Speed Transfer Case) ..........254
DRIVING TIPS ..................................................... 257
On-Road Driving Tips .................................257
Off-Road Driving Tips .................................258
IN CASE OF EMERGENCY
HAZARD WARNING FLASHERS ....................... 261
ASSIST AND SOS MIRROR — IF EQUIPPED.... 261General Information ..................................265
BULB REPLACEMENT ....................................... 266
Replacement Bulbs .................................266
Bulb Replacement ....................................268
FUSES .................................................................. 269
General Information ..................................270Underhood Fuses.......................................270 JACKING AND TIRE CHANGING .......................275
Run Flat Tires ............................................. 276
Jack Location ............................................. 276
Spare Tire Stowage ................................... 277
Spare Tire Removal ................................... 277
Preparations For Jacking .......................... 279Jacking Instructions .................................. 279Road Tire Installation ................................ 283
JUMP STARTING ................................................ 283
Preparations For Jump Start ..................... 284Jump Starting Procedure .......................... 285
REFUELING IN EMERGENCY –
IF EQUIPPED ...................................................... 286
IF YOUR ENGINE OVERHEATS .........................287
MANUAL PARK RELEASE .................................. 287
FREEING A STUCK VEHICLE .............................289
TOWING A DISABLED VEHICLE .......................290 Rear Wheel Drive Models.......................... 292All Wheel Drive Models.............................. 292
TOWING A DISABLED SRT VEHICLE ................293
ENHANCED ACCIDENT RESPONSE SYSTEM
(EARS) .................................................................293
EVENT DATA RECORDER (EDR) .......................293
SERVICING AND MAINTENANCE
SCHEDULED SERVICING — NON-SRT .............. 294
Maintenance Plan — Non-SRT .................. 294Heavy Duty Use Of The Vehicle................. 298
SCHEDULED SERVICING – SRT ....................... 298
Maintenance Plan — SRT .......................... 300
ENGINE COMPARTMENT .................................. 304
3.6L Engine ................................................ 304
5.7L Engine ................................................ 305
6.4L Engine ................................................ 306
Checking Oil Level ..................................... 307
Adding Washer Fluid ................................ 307
Maintenance-Free Battery ....................... 307Pressure Washing...................................... 308
DEALER SERVICE .............................................. 308
Engine Oil .................................................. 308
Engine Oil Filter ......................................... 311Engine Air Cleaner Filter............................ 311Air Conditioner Maintenance .................... 313Accessory Drive Belt Inspection ............... 315Body Lubrication ....................................... 316
Windshield Wiper Blades ......................... 316
Exhaust System ........................................ 320
Cooling System .......................................... 321
Brake System ............................................ 325Automatic Transmission............................ 326Front/Rear Axle Fluid ............................... 327Transfer Case ............................................ 327
20_WD_OM_EN_USC_t.book Page 6
Page 279 of 464
IN CASE OF EMERGENCY277
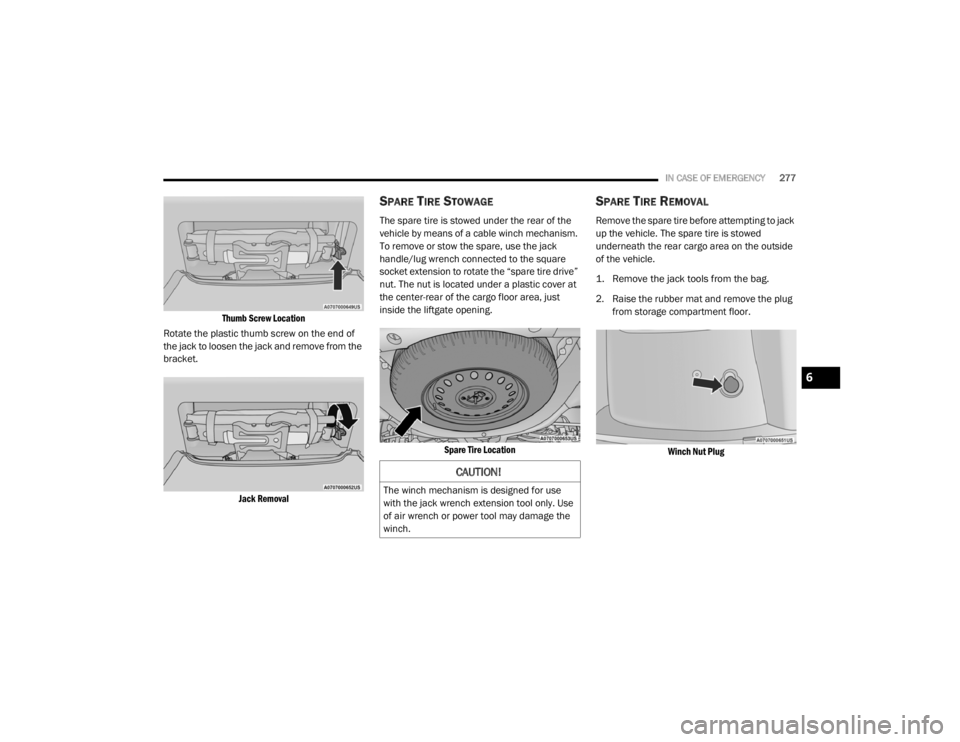
Thumb Screw Location
Rotate the plastic thumb screw on the end of
the jack to loosen the jack and remove from the
bracket.
Jack Removal
SPARE TIRE STOWAGE
The spare tire is stowed under the rear of the
vehicle by means of a cable winch mechanism.
To remove or stow the spare, use the jack
handle/lug wrench connected to the square
socket extension to rotate the “spare tire drive”
nut. The nut is located under a plastic cover at
the center-rear of the cargo floor area, just
inside the liftgate opening.
Spare Tire Location
SPARE TIRE REMOVAL
Remove the spare tire before attempting to jack
up the vehicle. The spare tire is stowed
underneath the rear cargo area on the outside
of the vehicle.
1. Remove the jack tools from the bag.
2. Raise the rubber mat and remove the plug from storage compartment floor.
Winch Nut Plug
CAUTION!
The winch mechanism is designed for use
with the jack wrench extension tool only. Use
of air wrench or power tool may damage the
winch.
6
20_WD_OM_EN_USC_t.book Page 277
Page 280 of 464
278IN CASE OF EMERGENCY
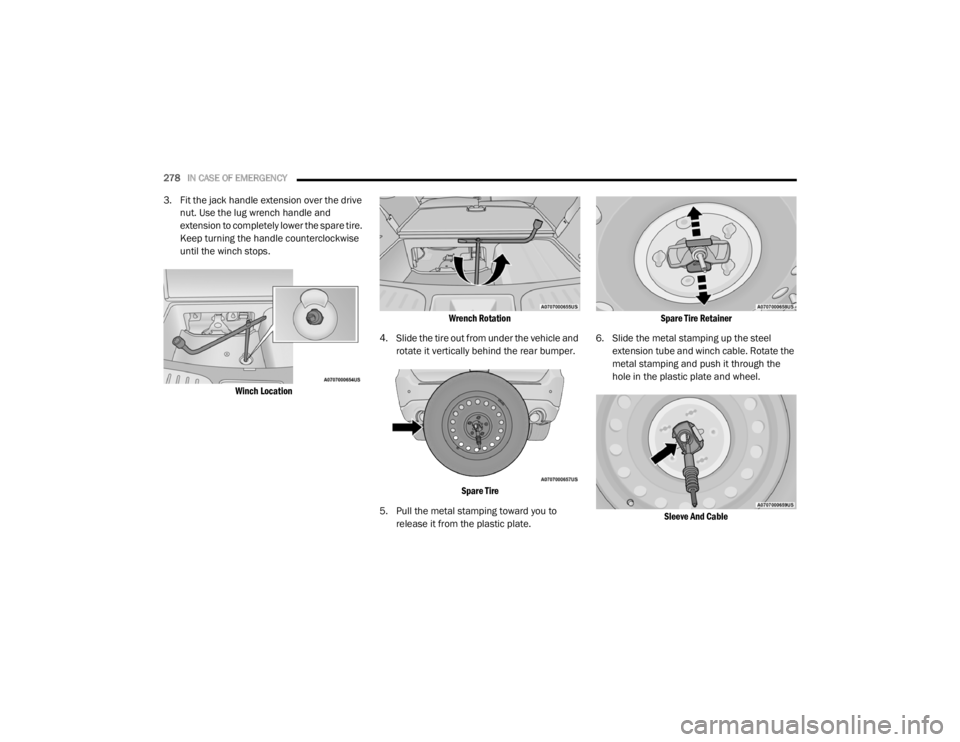
3. Fit the jack handle extension over the drive
nut. Use the lug wrench handle and
extension to completely lower the spare tire.
Keep turning the handle counterclockwise
until the winch stops.
Winch Location Wrench Rotation
4. Slide the tire out from under the vehicle and rotate it vertically behind the rear bumper.
Spare Tire
5. Pull the metal stamping toward you to release it from the plastic plate.
Spare Tire Retainer
6. Slide the metal stamping up the steel extension tube and winch cable. Rotate the
metal stamping and push it through the
hole in the plastic plate and wheel.
Sleeve And Cable
20_WD_OM_EN_USC_t.book Page 278
Page 282 of 464
280IN CASE OF EMERGENCY
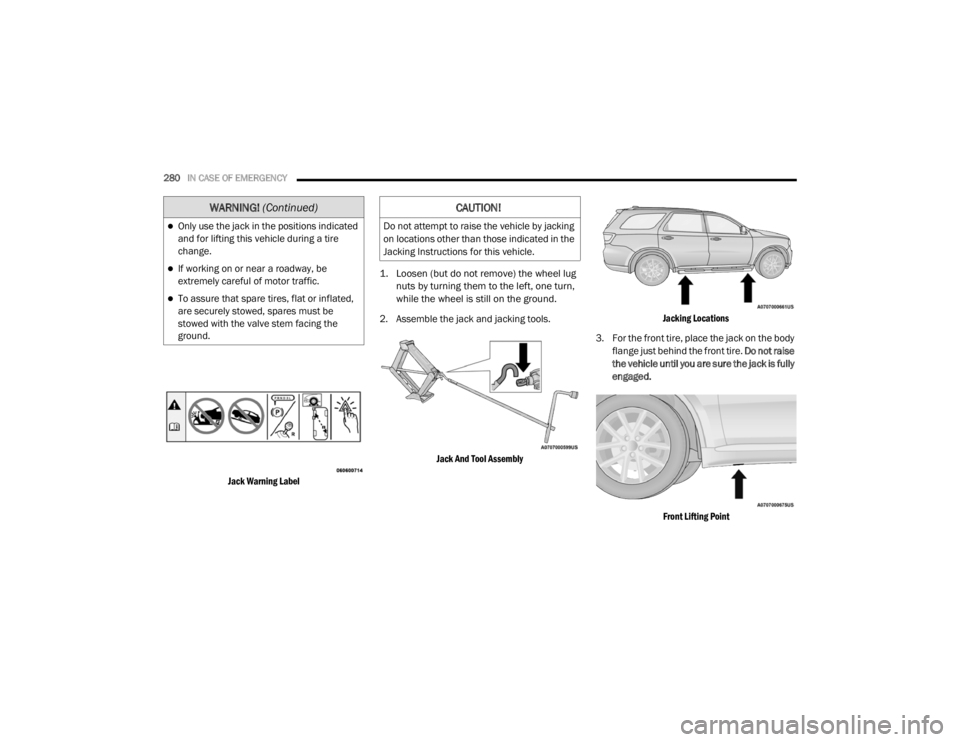
Jack Warning Label
1. Loosen (but do not remove) the wheel lug
nuts by turning them to the left, one turn,
while the wheel is still on the ground.
2. Assemble the jack and jacking tools.
Jack And Tool Assembly Jacking Locations
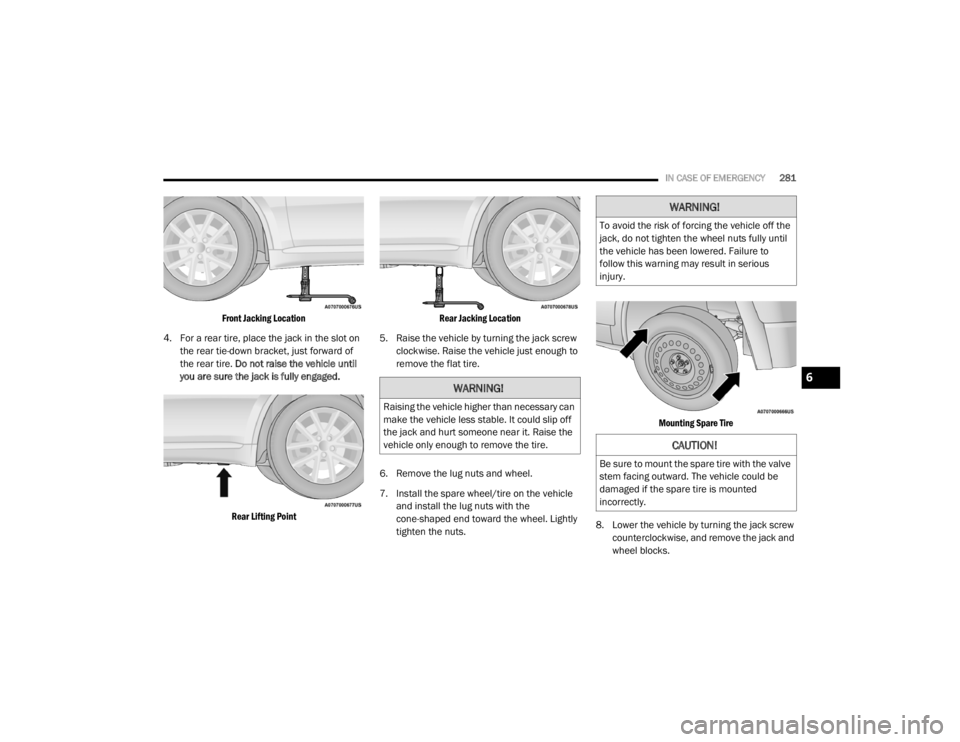
3. For the front tire, place the jack on the body flange just behind the front tire. Do not raise
the vehicle until you are sure the jack is fully
engaged.
Front Lifting Point
Only use the jack in the positions indicated
and for lifting this vehicle during a tire
change.
If working on or near a roadway, be
extremely careful of motor traffic.
To assure that spare tires, flat or inflated,
are securely stowed, spares must be
stowed with the valve stem facing the
ground.
WARNING! (Continued)CAUTION!
Do not attempt to raise the vehicle by jacking
on locations other than those indicated in the
Jacking Instructions for this vehicle.
20_WD_OM_EN_USC_t.book Page 280
Page 283 of 464
IN CASE OF EMERGENCY281
Front Jacking Location
4. For a rear tire, place the jack in the slot on the rear tie-down bracket, just forward of
the rear tire. Do not raise the vehicle until
you are sure the jack is fully engaged.
Rear Lifting Point Rear Jacking Location
5. Raise the vehicle by turning the jack screw clockwise. Raise the vehicle just enough to
remove the flat tire.
6. Remove the lug nuts and wheel.
7. Install the spare wheel/tire on the vehicle and install the lug nuts with the
cone-shaped end toward the wheel. Lightly
tighten the nuts.
Mounting Spare Tire
8. Lower the vehicle by turning the jack screw counterclockwise, and remove the jack and
wheel blocks.
WARNING!
Raising the vehicle higher than necessary can
make the vehicle less stable. It could slip off
the jack and hurt someone near it. Raise the
vehicle only enough to remove the tire.
WARNING!
To avoid the risk of forcing the vehicle off the
jack, do not tighten the wheel nuts fully until
the vehicle has been lowered. Failure to
follow this warning may result in serious
injury.
CAUTION!
Be sure to mount the spare tire with the valve
stem facing outward. The vehicle could be
damaged if the spare tire is mounted
incorrectly.
6
20_WD_OM_EN_USC_t.book Page 281
Page 284 of 464
282IN CASE OF EMERGENCY
9. Finish tightening the lug nuts. Push down on
the wrench while at the end of the handle
for increased leverage. Tighten the lug nuts
in a star pattern until each nut has been
tightened twice. Refer to “Wheel and Tire
Torque Specifications” in “Technical
Specifications” for proper lug nut torque. If
in doubt about the correct tightness, have
them checked with a torque wrench by an
authorized dealer or at a service station.
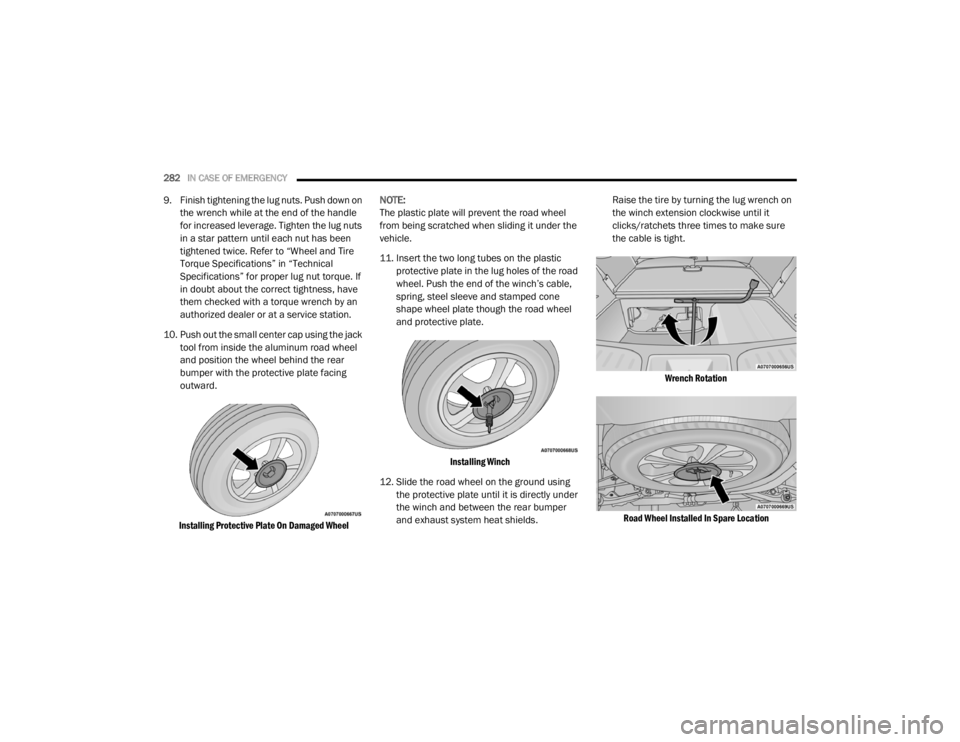
10. Push out the small center cap using the jack tool from inside the aluminum road wheel
and position the wheel behind the rear
bumper with the protective plate facing
outward.
Installing Protective Plate On Damaged Wheel
NOTE:
The plastic plate will prevent the road wheel
from being scratched when sliding it under the
vehicle.
11. Insert the two long tubes on the plastic
protective plate in the lug holes of the road
wheel. Push the end of the winch’s cable,
spring, steel sleeve and stamped cone
shape wheel plate though the road wheel
and protective plate.
Installing Winch
12. Slide the road wheel on the ground using the protective plate until it is directly under
the winch and between the rear bumper
and exhaust system heat shields. Raise the tire by turning the lug wrench on
the winch extension clockwise until it
clicks/ratchets three times to make sure
the cable is tight.
Wrench Rotation
Road Wheel Installed In Spare Location
20_WD_OM_EN_USC_t.book Page 282
Page 334 of 464
332SERVICING AND MAINTENANCE
Tire Loading And Tire Pressure
NOTE:
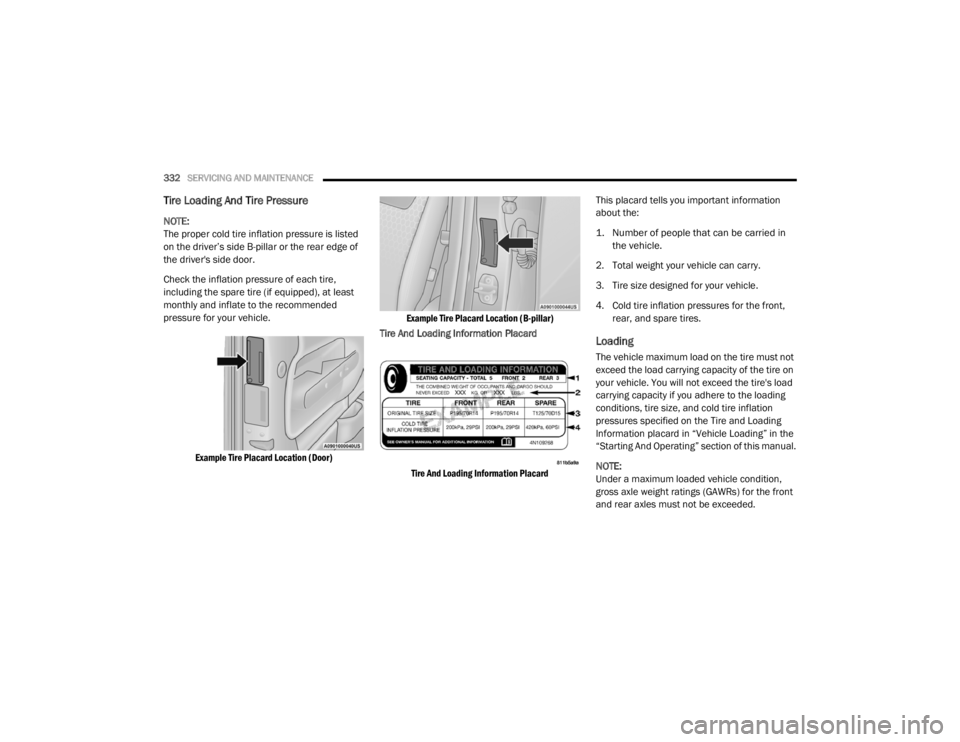
The proper cold tire inflation pressure is listed
on the driver’s side B-pillar or the rear edge of
the driver's side door.
Check the inflation pressure of each tire,
including the spare tire (if equipped), at least
monthly and inflate to the recommended
pressure for your vehicle.
Example Tire Placard Location (Door) Example Tire Placard Location (B-pillar)
Tire And Loading Information Placard
Tire And Loading Information Placard
This placard tells you important information
about the:
1. Number of people that can be carried in
the vehicle.
2. Total weight your vehicle can carry.
3. Tire size designed for your vehicle.
4. Cold tire inflation pressures for the front, rear, and spare tires.
Loading
The vehicle maximum load on the tire must not
exceed the load carrying capacity of the tire on
your vehicle. You will not exceed the tire's load
carrying capacity if you adhere to the loading
conditions, tire size, and cold tire inflation
pressures specified on the Tire and Loading
Information placard in “Vehicle Loading” in the
“Starting And Operating” section of this manual.
NOTE:
Under a maximum loaded vehicle condition,
gross axle weight ratings (GAWRs) for the front
and rear axles must not be exceeded.
20_WD_OM_EN_USC_t.book Page 332
Page 451 of 464

449
B
Battery
................................................. 111, 307Charging System Light............................... 111Keyless Key Fob Replacement.................... 15Battery Saver Feature...................................... 53Belts, Seat..................................................... 181Blind Spot Monitoring.................................... 131Bluetooth Connect Or Disconnect Link Betweenthe Uconnect Phone And Mobile
Phone
................................................... 422Connecting To A Particular Mobile Phone Or Audio Device After Pairing..... 417Bluetooth Mode............................................. 406Body Mechanism Lubrication........................ 316B-Pillar Location............................................. 332Brake Assist System...................................... 123Brake Control System, Electronic.................. 123Brake Fluid................................. 325, 358, 360Brake System...................................... 325, 350Anti-Lock (ABS).......................................... 350Fluid Check..................................... 325, 360Master Cylinder......................................... 325Parking...................................................... 190Warning Light............................................ 110Brake/Transmission Interlock....................... 192Bulb Replacement............................... 266, 268Bulbs, Light.................................................... 183
C
Camera, Rear................................................ 237Capacities, Fluid.................................. 355, 356Caps, FillerOil (Engine)............................. 304, 309, 310Radiator (Coolant Pressure)..................... 323Car Washes................................................... 347Carbon Monoxide Warning................... 180, 354Cargo Area Cover............................................. 77Cargo Compartment........................................ 77Light............................................................ 77Luggage Carrier........................................... 90Cargo Light....................................................... 77Cargo Tie-Downs.............................................. 78Cellular Phone.............................................. 436Center High Mounted Stop Light................... 269Chains, Tire.......................................... 343, 344Changing A Flat Tire...................................... 327Chart, Tire Sizing........................................... 329Check Engine Light
(Malfunction Indicator Light)......................... 121Checking Your Vehicle For Safety................. 180Checks, Safety.............................................. 180Child Restraint.............................................. 163Child RestraintsBooster Seats........................................... 166Child Seat Installation.............................. 177
How To Stow An unused ALR Seat Belt..... 174Infant And Child Restraints....................... 164Locating The LATCH Anchorages.............. 171Lower Anchors And Tethers For Children................................................ 167Older Children And Child Restraints.......... 165Seating Positions...................................... 166Child Safety Locks............................................29Clean Air Gasoline......................................... 352CleaningWheels...................................................... 342Climate Control................................................58Automatic....................................................58Cold Weather Operation................................ 188Compact Spare Tire...................................... 341Contract, Service........................................... 445Cooling Pressure Cap (Radiator Cap)............ 323Cooling System............................................. 321Adding Coolant (Antifreeze)...................... 322Coolant Level................................... 323, 324Cooling Capacity.............................. 355, 356Disposal Of Used Coolant......................... 323Drain, Flush, And Refill............................. 321Inspection............................... 321, 323, 324Points To Remember................................ 324Pressure Cap............................................ 323
11
20_WD_OM_EN_USC_t.book Page 449