start stop button DODGE DURANGO 2020 Owner's Manual
[x] Cancel search | Manufacturer: DODGE, Model Year: 2020, Model line: DURANGO, Model: DODGE DURANGO 2020Pages: 464, PDF Size: 22.14 MB
Page 215 of 464
STARTING AND OPERATING213
The ACC system applies the brake down to a
full stop when following a target vehicle. If an
ACC host vehicle follows a target vehicle to a
standstill, the host vehicle will release the
vehicle brakes two seconds after coming to a
full stop.
The ACC system maintains set speed when
driving uphill and downhill. However, a slight
speed change on moderate hills is normal. In
addition, downshifting may occur while
climbing uphill or descending downhill. This
is normal operation and necessary to main -
tain set speed. When driving uphill and down -
hill, the ACC system will cancel if the braking
temperature exceeds normal range (over -
heated).
SETTING THE FOLLOWING DISTANCE IN
ACC
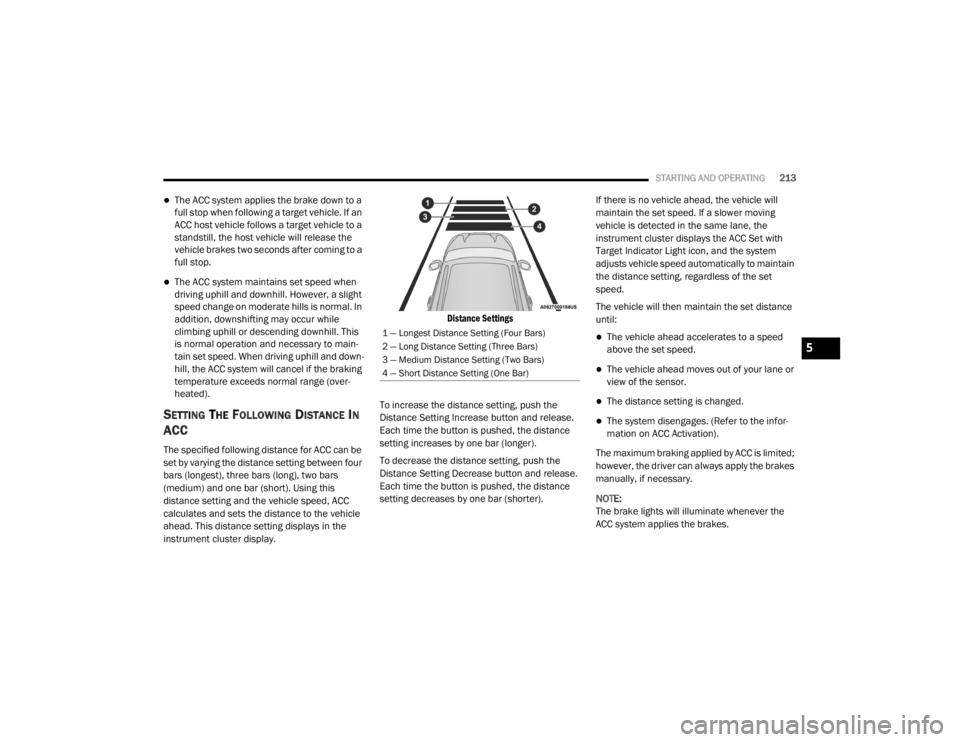
The specified following distance for ACC can be
set by varying the distance setting between four
bars (longest), three bars (long), two bars
(medium) and one bar (short). Using this
distance setting and the vehicle speed, ACC
calculates and sets the distance to the vehicle
ahead. This distance setting displays in the
instrument cluster display.
Distance Settings
To increase the distance setting, push the
Distance Setting Increase button and release.
Each time the button is pushed, the distance
setting increases by one bar (longer).
To decrease the distance setting, push the
Distance Setting Decrease button and release.
Each time the button is pushed, the distance
setting decreases by one bar (shorter). If there is no vehicle ahead, the vehicle will
maintain the set speed. If a slower moving
vehicle is detected in the same lane, the
instrument cluster displays the ACC Set with
Target Indicator Light icon, and the system
adjusts vehicle speed automatically to maintain
the distance setting, regardless of the set
speed.
The vehicle will then maintain the set distance
until:
The vehicle ahead accelerates to a speed
above the set speed.
The vehicle ahead moves out of your lane or
view of the sensor.
The distance setting is changed.
The system disengages. (Refer to the infor
-
mation on ACC Activation).
The maximum braking applied by ACC is limited;
however, the driver can always apply the brakes
manually, if necessary.
NOTE:
The brake lights will illuminate whenever the
ACC system applies the brakes.
1 — Longest Distance Setting (Four Bars)
2 — Long Distance Setting (Three Bars)
3 — Medium Distance Setting (Two Bars)
4 — Short Distance Setting (One Bar)
5
20_WD_OM_EN_USC_t.book Page 213
Page 236 of 464
234STARTING AND OPERATING
LANESENSE — IF EQUIPPED
LANESENSE OPERATION
The LaneSense system is operational at speeds
above 37 mph (60 km/h) and below 112 mph
(180 km/h). The LaneSense system uses a
forward looking camera to detect lane markings
and measure vehicle position within the lane
boundaries. When both lane markings are detected and the
driver unintentionally drifts out of the lane (no
turn signal applied), the LaneSense system
provides a haptic warning in the form of torque
applied to the steering wheel to prompt the
driver to remain within the lane boundaries. If
the driver continues to unintentionally drift out
of the lane, the LaneSense system provides a
visual warning through the instrument cluster
display to prompt the driver to remain within the
lane boundaries.
The driver may manually override the haptic
warning by applying torque into the steering
wheel at any time.
When only a single lane marking is detected
and the driver unintentionally drifts across the
lane marking (no turn signal applied), the
LaneSense system provides visual warnings
through the instrument cluster display to
prompt the driver to remain within the lane.
When only a single lane marking is detected, a
haptic (torque) warning will not be provided.
NOTE:
When operating conditions have been met, the
LaneSense system will monitor if the driver’s
hands are on the steering wheel and provides
an audible warning to the driver when the
driver’s hands are not detected on the steering
wheel. The system will cancel if the driver does
not return their hands to the wheel.
TURNING LANESENSE ON OR OFF
The default status of LaneSense is off. The LED
in LaneSense button will be illuminated while
the system is deactivated.
The LaneSense button is located on
the switch panel below the Uconnect
display.
CAUTION!
ParkSense is only a parking aid and it is
unable to recognize every obstacle,
including small obstacles. Parking curbs
might be temporarily detected or not
detected at all. Obstacles located above or
below the sensors will not be detected
when they are in close proximity.
The vehicle must be driven slowly when
using ParkSense in order to be able to stop
in time when an obstacle is detected. It is
recommended that the driver looks over
his/her shoulder when using ParkSense.
20_WD_OM_EN_USC_t.book Page 234
Page 240 of 464
238STARTING AND OPERATING
The following table shows the approximate
distances for each zone:
NOTE:
If snow, ice, mud, or any foreign substance
builds up on the camera lens, clean the lens,
rinse with water, and dry with a soft cloth. Do
not cover the lens.
Rear Camera — Viewing At Speed When the vehicle is in PARK,
NEUTRAL or DRIVE, the Rear View
Camera can be activated with the
“Backup Camera” button in the
Controls menu. This feature allows the customer to monitor the
area directly behind the vehicle (or trailer, if
equipped) for up to 10 seconds while driving. If
the vehicle speed remains below 8 mph
(13 km/h), the Rear View Camera image will be
displayed continuously until deactivated via the
“X” button on the touchscreen.
REFUELING THE VEHICLE
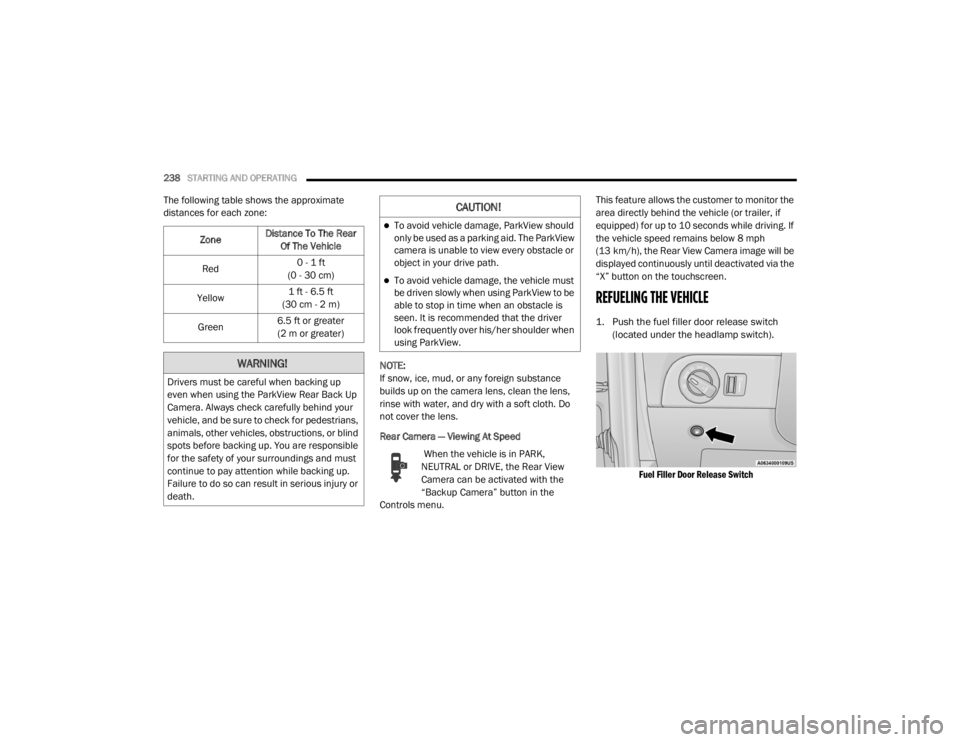
1. Push the fuel filler door release switch
(located under the headlamp switch).
Fuel Filler Door Release Switch
Zone
Distance To The Rear
Of The Vehicle
Red 0 - 1 ft
(0 - 30 cm)
Yellow 1 ft - 6.5 ft
(30 cm - 2 m)
Green 6.5 ft or greater
(2 m or greater)
WARNING!
Drivers must be careful when backing up
even when using the ParkView Rear Back Up
Camera. Always check carefully behind your
vehicle, and be sure to check for pedestrians,
animals, other vehicles, obstructions, or blind
spots before backing up. You are responsible
for the safety of your surroundings and must
continue to pay attention while backing up.
Failure to do so can result in serious injury or
death.
CAUTION!
To avoid vehicle damage, ParkView should
only be used as a parking aid. The ParkView
camera is unable to view every obstacle or
object in your drive path.
To avoid vehicle damage, the vehicle must
be driven slowly when using ParkView to be
able to stop in time when an obstacle is
seen. It is recommended that the driver
look frequently over his/her shoulder when
using ParkView.
20_WD_OM_EN_USC_t.book Page 238
Page 252 of 464
250STARTING AND OPERATING
2. Hook up the trailer and make the electrical
connections according to the trailer
manufacturer's instructions.
3. When a trailer with electric/EOH brakes is plugged in, the trailer connected message
should appear in the instrument cluster
display (if the connection is not recognized
by the ITBM, braking functions will not be
available), the GAIN setting will illuminate
and the correct type of trailer must be
selected from the instrument cluster display
options.
4. Push the UP or DOWN button on the steering wheel until “TRAILER TOW”
appears on the screen.
5. Push the RIGHT arrow on the steering wheel to enter “TRAILER TOW”.
6. Push the UP or DOWN buttons until the Trailer Brake Type appears on the screen.
7. Push the RIGHT arrow and then push the UP or DOWN buttons until the proper Trailer
Brake Type appears on the screen. 8. In a traffic-free environment, tow the trailer
on a dry, level surface at a speed of
20–25 mph (30–40 km/h) and squeeze
the manual brake control lever completely.
9. If the trailer wheels lockup (indicated by squealing tires), reduce the GAIN setting; if
the trailer wheels turn freely, increase the
GAIN setting.
Repeat steps 8 and 9 until the GAIN setting is at
a point just below trailer wheel lockup. If towing
a heavier trailer, trailer wheel lockup may not be
attainable even with the maximum GAIN setting
of 10.
Display Messages
The trailer brake control interacts with the
instrument cluster display. Display messages,
along with a single chime, will be displayed
when a malfunction is determined in the trailer
connection, trailer brake control, or on the
trailer. Refer to “Instrument Cluster Display” in
“Getting To Know Your Instrument Panel” for
further information.WARNING!
Connecting a trailer that is not compatible
with the ITBM system may result in reduced
or complete loss of trailer braking. There may
be a increase in stopping distance or trailer
instability which could result in personal
injury.
CAUTION!
Connecting a trailer that is not compatible
with the ITBM system may result in reduced
or complete loss of trailer braking. There may
be a increase in stopping distance or trailer
instability which could result in damage to
your vehicle, trailer, or other property.
20_WD_OM_EN_USC_t.book Page 250
Page 257 of 464
STARTING AND OPERATING255
Shifting Into NEUTRAL (N)
Use the following procedure to prepare your
vehicle for recreational towing.
1. Bring the vehicle to a complete stop on
level ground, with the engine running.
2. Press and hold the brake pedal.
3. Shift the transmission into NEUTRAL.
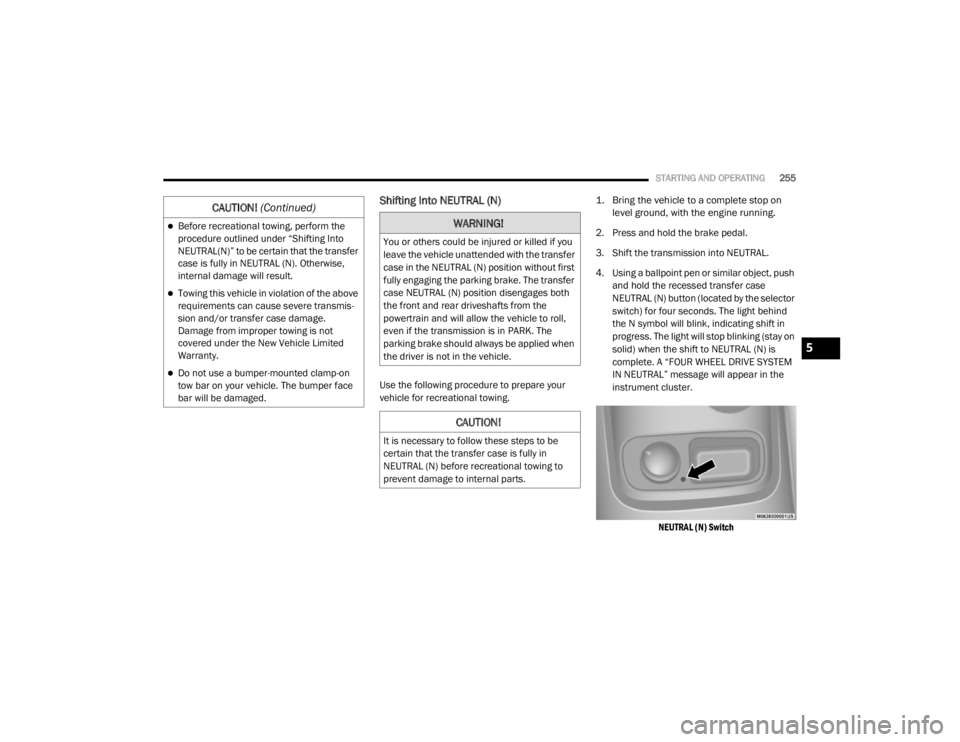
4. Using a ballpoint pen or similar object, push and hold the recessed transfer case
NEUTRAL (N) button (located by the selector
switch) for four seconds. The light behind
the N symbol will blink, indicating shift in
progress. The light will stop blinking (stay on
solid) when the shift to NEUTRAL (N) is
complete. A “FOUR WHEEL DRIVE SYSTEM
IN NEUTRAL” message will appear in the
instrument cluster.
NEUTRAL (N) Switch
Before recreational towing, perform the
procedure outlined under “Shifting Into
NEUTRAL(N)” to be certain that the transfer
case is fully in NEUTRAL (N). Otherwise,
internal damage will result.
Towing this vehicle in violation of the above
requirements can cause severe transmis -
sion and/or transfer case damage.
Damage from improper towing is not
covered under the New Vehicle Limited
Warranty.
Do not use a bumper-mounted clamp-on
tow bar on your vehicle. The bumper face
bar will be damaged.
CAUTION! (Continued)
WARNING!
You or others could be injured or killed if you
leave the vehicle unattended with the transfer
case in the NEUTRAL (N) position without first
fully engaging the parking brake. The transfer
case NEUTRAL (N) position disengages both
the front and rear driveshafts from the
powertrain and will allow the vehicle to roll,
even if the transmission is in PARK. The
parking brake should always be applied when
the driver is not in the vehicle.
CAUTION!
It is necessary to follow these steps to be
certain that the transfer case is fully in
NEUTRAL (N) before recreational towing to
prevent damage to internal parts.
5
20_WD_OM_EN_USC_t.book Page 255
Page 258 of 464

256STARTING AND OPERATING
5. After the shift is completed and the
NEUTRAL (N) light stays on, release the
NEUTRAL (N) button.
6. Shift the transmission into REVERSE.
7. Release the brake pedal for five seconds and ensure that there is no vehicle
movement.
8. Press and hold the brake pedal. Shift the transmission back into NEUTRAL.
9. Firmly apply the parking brake.
10. With the transmission and transfer case in NEUTRAL, push and hold the ENGINE
START/STOP button until the engine turns
off.
11. Place the transmission gear selector in PARK. Release the brake pedal.
12. Push the ENGINE START/STOP button twice (without pressing the brake pedal) to turn
the ignition to the OFF mode. 13. Attach the vehicle to the tow vehicle using a
suitable tow bar.
14. Release the parking brake.
NOTE:
Steps 1 through 3 are requirements that
must be met before pushing the NEUTRAL (N)
button, and must continue to be met until the
shift has been completed. If any of these
requirements are not met before pushing the
NEUTRAL (N) button or are no longer met
during the shift, the NEUTRAL (N) indicator
light will flash continuously until all require -
ments are met or until the NEUTRAL (N)
button is released.
The ignition must be in the ON/RUN mode for
a shift to take place and for the position indi -
cator lights to be operable. If the ignition is
not in the ON/RUN mode, the shift will not
take place and no position indicator lights will
be on or flashing.
A flashing NEUTRAL (N) position indicator
light indicates that shift requirements have
not been met.
Shifting Out Of NEUTRAL (N)
Use the following procedure to prepare your
vehicle for normal usage.
1. Bring the vehicle to a complete stop,
leaving it connected to the tow vehicle.
2. Firmly apply the parking brake.
3. Start the engine.
4. Press and hold the brake pedal.
5. Shift the transmission into NEUTRAL.
CAUTION!
Damage to the transmission may occur if the
transmission is shifted into PARK with the
transfer case in NEUTRAL (N) and the engine
running. With the transfer case in NEUTRAL
(N) ensure that the engine is OFF before
shifting the transmission into PARK.
20_WD_OM_EN_USC_t.book Page 256
Page 387 of 464
MULTIMEDIA385
Doors & Locks
After pressing the Doors & Locks button on the touchscreen, the following settings will be available:Daytime Running Lights — If Equipped
OnOff
NOTE:
When the “Daytime Running Lights” feature is selected, the daytime running lights can be turned On or Off. The feature is only available if allowed by
law in the country of the vehicle purchase. Flash Lights With Lock OnOff
Setting Name Selectable Options
Setting NameSelectable Options
Auto Door LocksOn Off
NOTE:
When the “Auto Door Locks” feature is selected, all doors will lock automatically when the vehicle reaches a speed of 12 mph (20 km/h). Auto Unlock On Exit On Off
NOTE:
When this feature is selected, all doors unlock when the vehicle is stopped, the transmission is in the PARK or NEUTRAL position and the driver's door
is opened. Flash Lights With Lock On Off
Sound Horn With Lock Off1st Press 2nd Press
Sound Horn With Remote Start On Off
9
20_WD_OM_EN_USC_t.book Page 385
Page 399 of 464
MULTIMEDIA397
Seek And Direct Tune Functions
The Seek Up and Down functions are activated
by pressing the double arrow buttons on the
touchscreen to the right and left of the radio
station display or by pushing the left Steering
Wheel Audio Control up or down.
Seek Up
Press and release the Seek Up button on the
touchscreen to tune the radio to the next
listenable station or channel. During a Seek Up
function, if the radio reaches the starting
station after passing through the entire band
two times, the radio will stop at the station
where it began.
Fast Seek Up
Press and hold the Seek Up button on the
touchscreen to advance the radio through the
available stations or channels at a faster rate.
The radio stops at the next available station or
channel when the button on the touchscreen is
released. Seek Down
Press and release the Seek Down button on the
touchscreen to tune the radio to the next
listenable station or channel. During a Seek
Down function, if the radio reaches the starting
station after passing through the entire band
two times, the radio will stop at the station
where it began.
Fast Seek Down
Press and hold the Seek Down button on the
touchscreen to advance the radio through the
available stations or channel at a faster rate.
The radio stops at the next available station or
channel when the button on the touchscreen is
released.
Direct Tune
Press the Tune button on the touchscreen
located at the bottom of the radio screen. The
Direct Tune button on the touchscreen is
available in AM, FM, and SXM radio modes and
can be used to direct tune the radio to a desired
station or channel.Press the available number button on the
touchscreen to begin selecting a desired
station. Once a number has been entered, any
numbers that are no longer possible (stations
that cannot be reached) will become
deactivated/grayed out.
Undo
You can backspace an entry by pressing the
bottom left on the touchscreen.
OK
Once the last digit of a station has been
entered, press the OK button, and the Direct
Tune screen will close. The system will
automatically tune to that station.
The selected Station or Channel number is
displayed in the Direct Tune text box.
Setting Presets
The Presets are available for all Radio Modes,
and are activated by pressing any of the six
Preset buttons on the touchscreen, located at
the top of the screen.
9
20_WD_OM_EN_USC_t.book Page 397
Page 429 of 464
MULTIMEDIA427
BLU-RAY™ DISC PLAYER
Play A Blu-ray™ Disc
The Blu-ray™ disc player is located in the center
console.
Blu-ray™ Disc Player Location
1. Insert a Blu-ray™ disc into the disc player with the label facing as indicated on the
Blu-ray™ player. The radio automatically
selects the appropriate mode after the disc
is recognized and displays the menu
screen, the language screen, or starts
playing the first track.
2. To watch a Blu-ray™ disc on Rear 1 for driver's side rear passengers, ensure the
Remote Control and Headphone switch is
on Rear 1. 3. To watch a Blu-ray™ disc on Rear 2 for
passenger side rear passengers, ensure the
Remote Control and Headphone switch is
on Rear 2.
NOTE:
To view a Blu-ray™ disc on the radio, press
the Media button on the touchscreen, and
then press the Disc button. Press the Play
button, and then the Full Screen button.
Viewing a Blu-ray™ disc on the radio screen is
not available in all states/provinces. The
vehicle must be stopped, and the gear
selector must be in the PARK (P) position for
vehicles with automatic transmission.
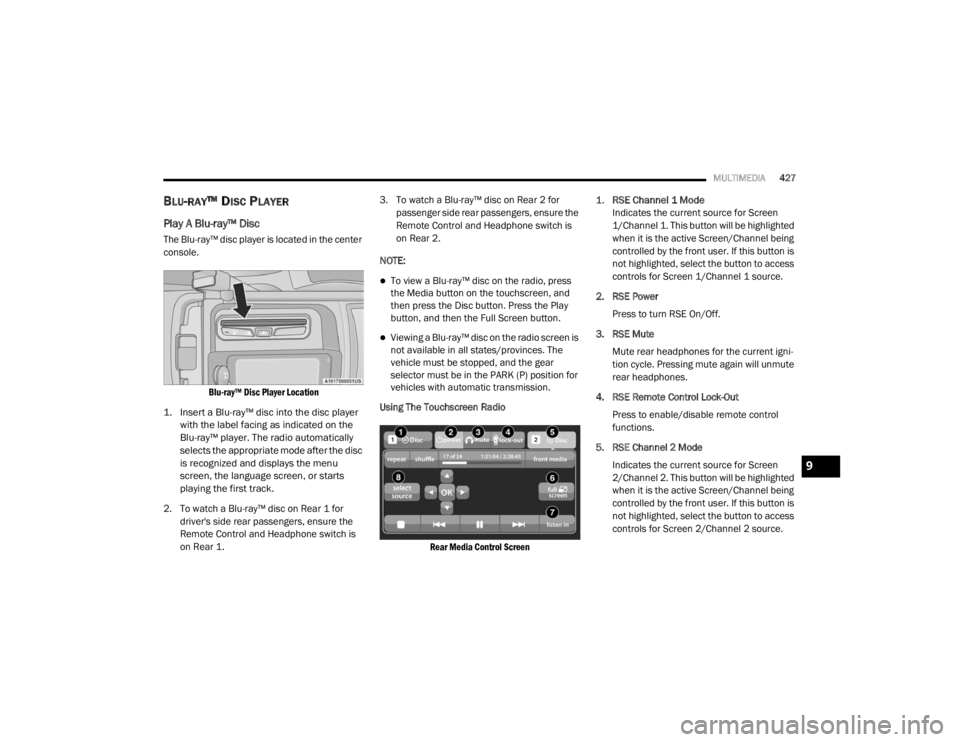
Using The Touchscreen Radio
Rear Media Control Screen
1.
RSE Channel 1 Mode
Indicates the current source for Screen
1/Channel 1. This button will be highlighted
when it is the active Screen/Channel being
controlled by the front user. If this button is
not highlighted, select the button to access
controls for Screen 1/Channel 1 source.
2. RSE Power Press to turn RSE On/Off.
3. RSE Mute Mute rear headphones for the current igni -
tion cycle. Pressing mute again will unmute
rear headphones.
4. RSE Remote Control Lock-Out Press to enable/disable remote control
functions.
5. RSE Channel 2 Mode Indicates the current source for Screen
2/Channel 2. This button will be highlighted
when it is the active Screen/Channel being
controlled by the front user. If this button is
not highlighted, select the button to access
controls for Screen 2/Channel 2 source.
9
20_WD_OM_EN_USC_t.book Page 427
Page 431 of 464
MULTIMEDIA429
3. To watch a DVD/Blu-ray™ Disc on Rear 2
(passenger’s side rear passenger), ensure
the Remote Control and Headphone
channel selector switch is on Rear 2.
Play A DVD/Blu-ray™ Disc Using The
Touchscreen Radio
1. Insert the DVD/Blu-ray™ Disc with the label facing as indicated on the DVD/Blu-ray™
Disc player. The radio automatically
selects the appropriate mode after the disc
is recognized and displays the menu
screen or starts playing the first track.
2. To watch a DVD/Blu-ray™ Disc on Rear 1 (driver’s side rear passenger), ensure the
Remote Control and Headphone channel
selector switch is on Rear 1.
3. To watch a DVD/Blu-ray™ Disc on Rear 2 (passenger’s side rear passenger), ensure
the Remote Control and Headphone
channel selector switch is on Rear 2.
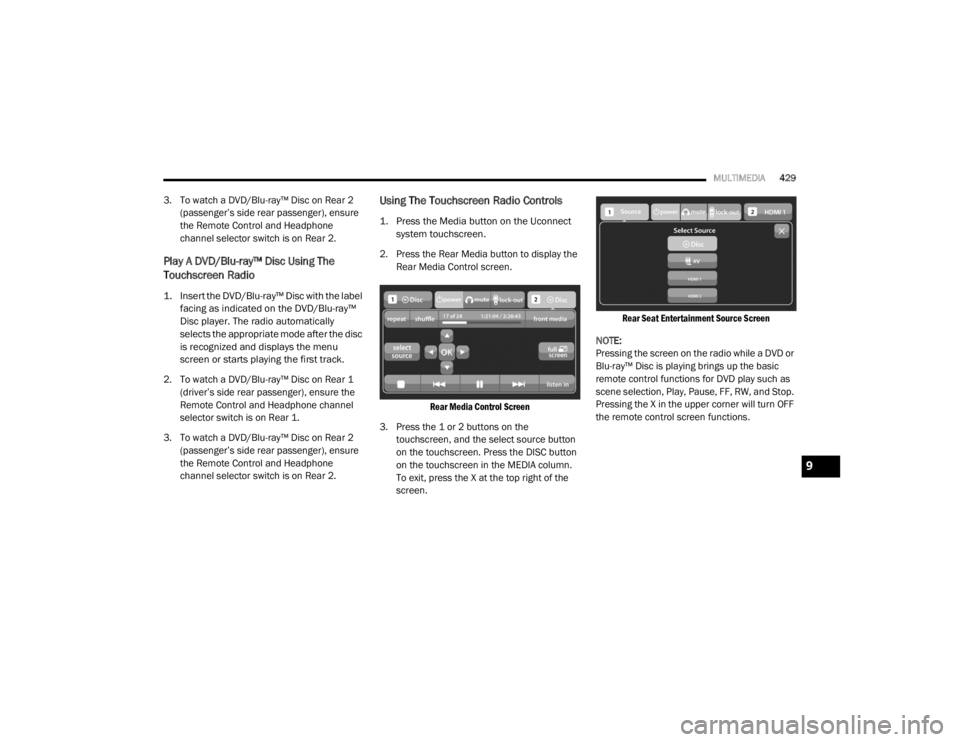
Using The Touchscreen Radio Controls
1. Press the Media button on the Uconnect system touchscreen.
2. Press the Rear Media button to display the Rear Media Control screen.
Rear Media Control Screen
3. Press the 1 or 2 buttons on the touchscreen, and the select source button
on the touchscreen. Press the DISC button
on the touchscreen in the MEDIA column.
To exit, press the X at the top right of the
screen.
Rear Seat Entertainment Source Screen
NOTE:
Pressing the screen on the radio while a DVD or
Blu-ray™ Disc is playing brings up the basic
remote control functions for DVD play such as
scene selection, Play, Pause, FF, RW, and Stop.
Pressing the X in the upper corner will turn OFF
the remote control screen functions.
9
20_WD_OM_EN_USC_t.book Page 429