tow DODGE DURANGO 2023 Workshop Manual
[x] Cancel search | Manufacturer: DODGE, Model Year: 2023, Model line: DURANGO, Model: DODGE DURANGO 2023Pages: 328, PDF Size: 13.82 MB
Page 150 of 328
148STARTING AND OPERATING
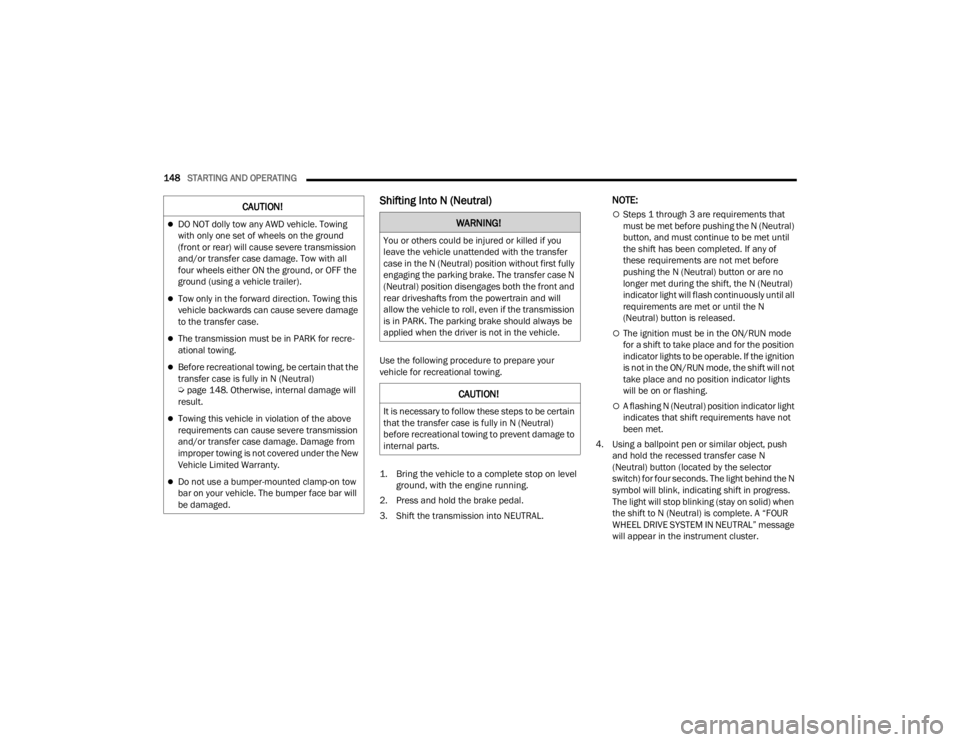
Shifting Into N (Neutral)
Use the following procedure to prepare your
vehicle for recreational towing.
1. Bring the vehicle to a complete stop on level
ground, with the engine running.
2. Press and hold the brake pedal.
3. Shift the transmission into NEUTRAL.
NOTE:
Steps 1 through 3 are requirements that
must be met before pushing the N (Neutral)
button, and must continue to be met until
the shift has been completed. If any of
these requirements are not met before
pushing the N (Neutral) button or are no
longer met during the shift, the N (Neutral)
indicator light will flash continuously until all
requirements are met or until the N
(Neutral) button is released.
The ignition must be in the ON/RUN mode
for a shift to take place and for the position
indicator lights to be operable. If the ignition
is not in the ON/RUN mode, the shift will not
take place and no position indicator lights
will be on or flashing.
A flashing N (Neutral) position indicator light
indicates that shift requirements have not
been met.
4. Using a ballpoint pen or similar object, push and hold the recessed transfer case N
(Neutral) button (located by the selector
switch) for four seconds. The light behind the N
symbol will blink, indicating shift in progress.
The light will stop blinking (stay on solid) when
the shift to N (Neutral) is complete. A “FOUR
WHEEL DRIVE SYSTEM IN NEUTRAL” message
will appear in the instrument cluster.
CAUTION!
DO NOT dolly tow any AWD vehicle. Towing
with only one set of wheels on the ground
(front or rear) will cause severe transmission
and/or transfer case damage. Tow with all
four wheels either ON the ground, or OFF the
ground (using a vehicle trailer).
Tow only in the forward direction. Towing this
vehicle backwards can cause severe damage
to the transfer case.
The transmission must be in PARK for recre -
ational towing.
Before recreational towing, be certain that the
transfer case is fully in N (Neutral)
Ú page 148. Otherwise, internal damage will
result.
Towing this vehicle in violation of the above
requirements can cause severe transmission
and/or transfer case damage. Damage from
improper towing is not covered under the New
Vehicle Limited Warranty.
Do not use a bumper-mounted clamp-on tow
bar on your vehicle. The bumper face bar will
be damaged.
WARNING!
You or others could be injured or killed if you
leave the vehicle unattended with the transfer
case in the N (Neutral) position without first fully
engaging the parking brake. The transfer case N
(Neutral) position disengages both the front and
rear driveshafts from the powertrain and will
allow the vehicle to roll, even if the transmission
is in PARK. The parking brake should always be
applied when the driver is not in the vehicle.
CAUTION!
It is necessary to follow these steps to be certain
that the transfer case is fully in N (Neutral)
before recreational towing to prevent damage to
internal parts.
23_WD_OM_EN_USC_t.book Page 148
Page 151 of 328
STARTING AND OPERATING149
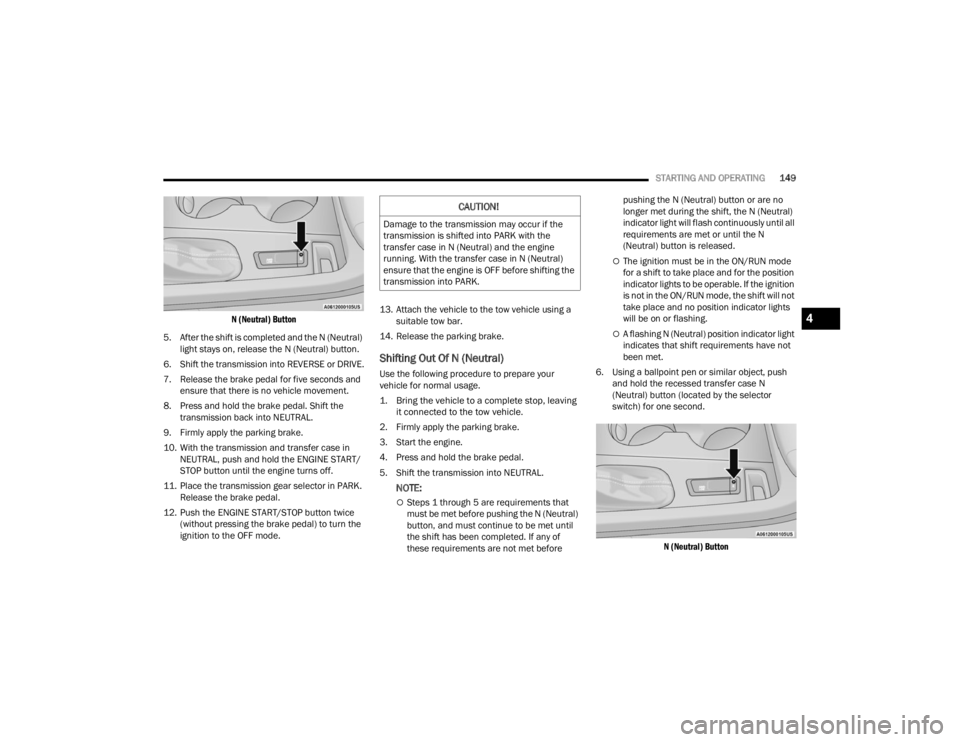
N (Neutral) Button
5. After the shift is completed and the N (Neutral) light stays on, release the N (Neutral) button.
6. Shift the transmission into REVERSE or DRIVE.
7. Release the brake pedal for five seconds and ensure that there is no vehicle movement.
8. Press and hold the brake pedal. Shift the transmission back into NEUTRAL.
9. Firmly apply the parking brake.
10. With the transmission and transfer case in NEUTRAL, push and hold the ENGINE START/
STOP button until the engine turns off.
11. Place the transmission gear selector in PARK. Release the brake pedal.
12. Push the ENGINE START/STOP button twice (without pressing the brake pedal) to turn the
ignition to the OFF mode. 13. Attach the vehicle to the tow vehicle using a
suitable tow bar.
14. Release the parking brake.
Shifting Out Of N (Neutral)
Use the following procedure to prepare your
vehicle for normal usage.
1. Bring the vehicle to a complete stop, leaving it connected to the tow vehicle.
2. Firmly apply the parking brake.
3. Start the engine.
4. Press and hold the brake pedal.
5. Shift the transmission into NEUTRAL.
NOTE:
Steps 1 through 5 are requirements that
must be met before pushing the N (Neutral)
button, and must continue to be met until
the shift has been completed. If any of
these requirements are not met before pushing the N (Neutral) button or are no
longer met during the shift, the N (Neutral)
indicator light will flash continuously until all
requirements are met or until the N
(Neutral) button is released.
The ignition must be in the ON/RUN mode
for a shift to take place and for the position
indicator lights to be operable. If the ignition
is not in the ON/RUN mode, the shift will not
take place and no position indicator lights
will be on or flashing.
A flashing N (Neutral) position indicator light
indicates that shift requirements have not
been met.
6. Using a ballpoint pen or similar object, push and hold the recessed transfer case N
(Neutral) button (located by the selector
switch) for one second.
N (Neutral) Button
CAUTION!
Damage to the transmission may occur if the
transmission is shifted into PARK with the
transfer case in N (Neutral) and the engine
running. With the transfer case in N (Neutral)
ensure that the engine is OFF before shifting the
transmission into PARK.
4
23_WD_OM_EN_USC_t.book Page 149
Page 152 of 328
150STARTING AND OPERATING
7. When the N (Neutral) indicator light turns off, release the N (Neutral) button.
8. After the N (Neutral) button has been released, the transfer case will shift to the position
indicated by the selector switch.
9. Shift the transmission into PARK and turn the
engine off.
10. Release the brake pedal.
11. Disconnect vehicle from the tow vehicle.
12. Start the engine.
13. Press and hold the brake pedal.
14. Release the parking brake.
15. Shift the transmission into REVERSE or DRIVE, release the brake pedal, and check that the
vehicle operates normally.
DRIVING TIPS
ON-ROAD DRIVING TIPS
Utility vehicles have higher ground clearance and a
narrower track to make them capable of
performing in a wide variety of off-road
applications. Specific design characteristics give
them a higher center of gravity than conventional
passenger cars. An advantage of the higher ground clearance is a
better view of the road, allowing you to anticipate
problems. They are not designed for cornering at
the same speeds as conventional passenger cars
any more than sports cars are designed to perform
satisfactorily in off-road conditions. Avoid sharp
turns or abrupt maneuvers. As with other vehicles
of this type, failure to operate this vehicle correctly
may result in loss of control or vehicle rollover.
OFF-ROAD DRIVING TIPS
When To Use 4WD Low — If Equipped
When off-road driving, shift to 4WD Low for
additional traction. This range should be limited to
extreme situations such as deep snow, mud, or
sand where additional low speed pulling power is
needed. Vehicle speeds in excess of 25 mph
(40 km/h) should be avoided when in 4WD Low.
Driving Through Water
Although your vehicle is capable of driving through
water, there are a number of precautions that
must be considered before entering the water.
Driving through water more than a few inches/
centimeters deep will require extra caution to
ensure safety and prevent damage to your vehicle.
If you must drive through water, try to determine
the depth and the bottom condition (and location
of any obstacles) prior to entering. Proceed with
caution and maintain a steady controlled speed
less than 5 mph (8 km/h) in deep water to
minimize wave effects.
WARNING!
Do not drive in 4WD Low on dry pavement;
driveline damage may result. 4WD Low locks
front and rear drivelines together and does not
allow for differential action between the front to
rear driveshafts. Driving in 4WD Low on
pavement will cause driveline binding; use only
on wet or slippery surfaces.
CAUTION!
When driving through water, do not exceed
5 mph (8 km/h). Always check water depth
before entering as a precaution, and check all
fluids afterward. Driving through water may
cause damage not covered by the New Vehicle
Limited Warranty.
23_WD_OM_EN_USC_t.book Page 150
Page 168 of 328
166MULTIMEDIA
Trailer
Camera
When the Trailer button is pressed on the touchscreen, the system will display settings related to trailer towing.
NOTE:Depending on the vehicle’s options, feature settings may vary.
Setting Name Description
Trailer SelectSelect from “Trailer 1”, “Trailer 2”, “Trailer 3”, and “Trailer 4”. These trailer
designations can be used to save different trailer settings.
Trailer Brake Type This setting will set the system to a specific trailer type. The available options
are “Light Electric”, “Heavy Electric”, “Light Electric Over Hydraulic”, and
“Heavy Electric Over Hydraulic”.
Trailer Name This setting will personalize the trailer name depending on the type of trailer
you are hauling. Select the trailer name from the following list: trailer, boat,
car, cargo, equipment, flatbed, horse, livestock, motorcycle, snowmobile,
travel, and utility.
When the Camera button is pressed on the touchscreen, the system displays the options related to the vehicle’s camera features.
NOTE:Depending on the vehicle’s options, feature settings may vary.
Setting Name
Description
ParkView Backup Camera DelayThis setting will add a timed delay to the ParkView Backup Camera when
shifting out of REVERSE.
ParkView Backup Camera Active Guidelines This setting will turn the ParkView Backup Camera Active Guidelines on or off.
23_WD_OM_EN_USC_t.book Page 166
Page 184 of 328
182SAFETY
The parking brake must be off.
The driver door must be closed.
The vehicle must be on a sufficient grade.
The gear selection must match vehicle uphill
direction (i.e., vehicle facing uphill is in forward
gear; vehicle backing uphill is in REVERSE gear).
HSA will work in REVERSE gear and all forward
gears. The system will not activate if the trans -
mission is in PARK or NEUTRAL. For vehicles
equipped with a manual transmission, if the
clutch is pressed, HSA will remain active.
Disabling And Enabling HSA
This feature can be turned on or turned off. To
change the current setting see Ú page 153.
Towing With HSA
HSA will also provide assistance to mitigate roll
back while towing a trailer.
Rain Brake Support (RBS)
RBS may improve braking performance in wet
conditions. It will periodically apply a small amount
of brake pressure to remove any water buildup on
the front brake rotors. It functions when the
windshield wipers are in LO or HI speed. When Rain
Brake Support is active, there is no notification to
the driver and no driver interaction is required.
Ready Alert Braking (RAB)
RAB may reduce the time required to reach full
braking during emergency braking situations. It
anticipates when an emergency braking situation
may occur by monitoring how fast the throttle is
released by the driver. The Electronic Brake
Controller (EBC) will prepare the brake system for
a panic stop.
Traction Control System (TCS)
The TCS monitors the amount of wheel spin of
each of the driven wheels. If wheel spin is
detected, the TCS may apply brake pressure to the
spinning wheel(s) and/or reduce engine power to
provide enhanced acceleration and stability. A
feature of the TCS, Brake Limited Differential (BLD)
functions similarly to a limited slip differential and
controls the wheel spin across a driven axle. If one
wheel on a driven axle is spinning faster than the
other, the system will apply the brake of the
WARNING!
There may be situations where the Hill Start
Assist (HSA) will not activate and slight rolling
may occur, such as on minor hills or with a
loaded vehicle, or while pulling a trailer. HSA is
not a substitute for active driving involvement. It
is always the driver’s responsibility to be
attentive to distance to other vehicles, people,
and objects, and most importantly brake
operation to ensure safe operation of the vehicle
under all road conditions. Your complete
attention is always required while driving to
maintain safe control of your vehicle. Failure to
follow these warnings can result in a collision or
serious personal injury.
WARNING!
If you use a trailer brake controller with your
trailer, the trailer brakes may be activated and
deactivated with the brake switch. If so, there
may not be enough brake pressure to hold
both the vehicle and the trailer on a hill when
the brake pedal is released. In order to avoid
rolling down an incline while resuming accel -
eration, manually activate the trailer brake or
apply more vehicle brake pressure prior to
releasing the brake pedal.
HSA is not a parking brake. Always apply the
parking brake fully when exiting your vehicle.
Also, be certain to place the transmission in
PARK.
Failure to follow these warnings can result in a
collision or serious personal injury.
23_WD_OM_EN_USC_t.book Page 182
Page 185 of 328
SAFETY183
spinning wheel. This will allow more engine power
to be applied to the wheel that is not spinning. BLD
may remain enabled even if TCS and ESC are in
reduced modes.
Trailer Sway Control (TSC)
TSC uses sensors in the vehicle to recognize an
excessively swaying trailer and will take the
appropriate actions to attempt to stop the sway.
Note that TSC cannot stop all trailers from swaying.
Always use caution when towing a trailer and follow
the trailer tongue weight recommendations
Ú page 137.
When TSC is functioning, the ESC Activation/
Malfunction Indicator Light will flash, the engine
power may be reduced and you may feel the
brakes being applied to individual wheels to
attempt to stop the trailer from swaying. TSC is
disabled when the ESC system is in the “Partial
Off” mode.
AUXILIARY DRIVING SYSTEMS
BLIND SPOT MONITORING (BS M) —
I
F EQUIPPED
BSM uses two radar sensors, located inside the
rear fascia/bumper, to detect highway licensable
vehicles (automobiles, trucks, motorcycles, etc.)
that enter the blind spot zones from the rear/front/
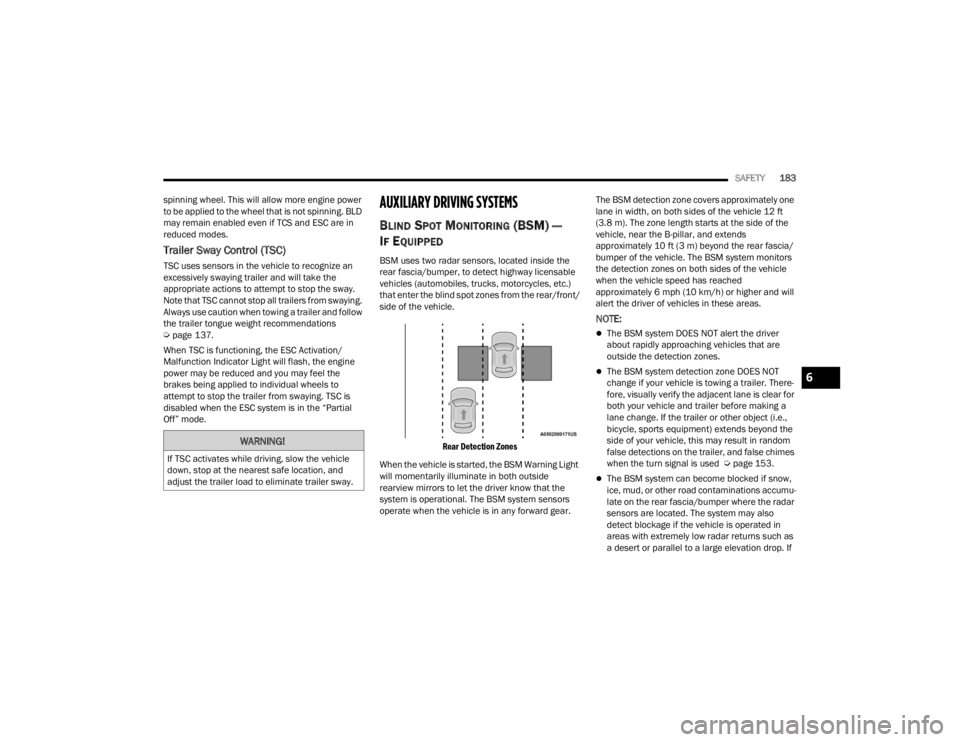
side of the vehicle.
Rear Detection Zones
When the vehicle is started, the BSM Warning Light
will momentarily illuminate in both outside
rearview mirrors to let the driver know that the
system is operational. The BSM system sensors
operate when the vehicle is in any forward gear. The BSM detection zone covers approximately one
lane in width, on both sides of the vehicle 12 ft
(3.8 m). The zone length starts at the side of the
vehicle, near the B-pillar, and extends
approximately 10 ft (3 m) beyond the rear fascia/
bumper of the vehicle. The BSM system monitors
the detection zones on both sides of the vehicle
when the vehicle speed has reached
approximately 6 mph (10 km/h) or higher and will
alert the driver of vehicles in these areas.
NOTE:
The BSM system DOES NOT alert the driver
about rapidly approaching vehicles that are
outside the detection zones.
The BSM system detection zone DOES NOT
change if your vehicle is towing a trailer. There
-
fore, visually verify the adjacent lane is clear for
both your vehicle and trailer before making a
lane change. If the trailer or other object (i.e.,
bicycle, sports equipment) extends beyond the
side of your vehicle, this may result in random
false detections on the trailer, and false chimes
when the turn signal is used Ú page 153.
The BSM system can become blocked if snow,
ice, mud, or other road contaminations accumu -
late on the rear fascia/bumper where the radar
sensors are located. The system may also
detect blockage if the vehicle is operated in
areas with extremely low radar returns such as
a desert or parallel to a large elevation drop. If
WARNING!
If TSC activates while driving, slow the vehicle
down, stop at the nearest safe location, and
adjust the trailer load to eliminate trailer sway.
6
23_WD_OM_EN_USC_t.book Page 183
Page 187 of 328
SAFETY185
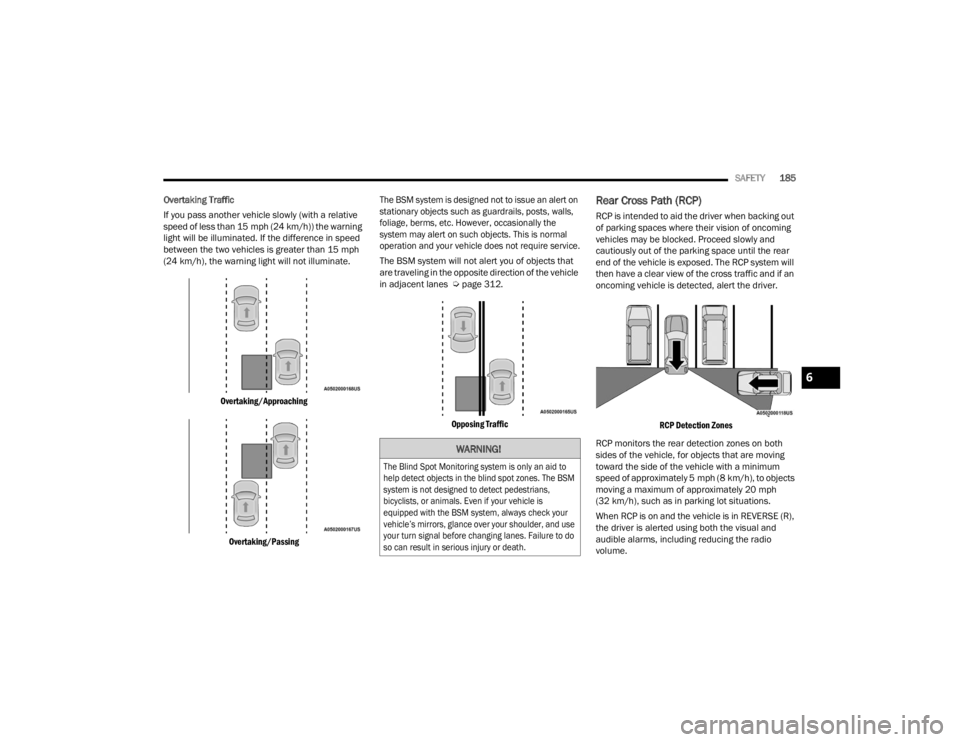
Overtaking Traffic
If you pass another vehicle slowly (with a relative
speed of less than 15 mph (24 km/h)) the warning
light will be illuminated. If the difference in speed
between the two vehicles is greater than 15 mph
(24 km/h), the warning light will not illuminate.
Overtaking/Approaching
Overtaking/Passing The BSM system is designed not to issue an alert on
stationary objects such as guardrails, posts, walls,
foliage, berms, etc. However, occasionally the
system may alert on such objects. This is normal
operation and your vehicle does not require service.
The BSM system will not alert you of objects that
are traveling in the opposite direction of the vehicle
in adjacent lanes Ú
page 312.
Opposing Traffic
Rear Cross Path (RCP)
RCP is intended to aid the driver when backing out
of parking spaces where their vision of oncoming
vehicles may be blocked. Proceed slowly and
cautiously out of the parking space until the rear
end of the vehicle is exposed. The RCP system will
then have a clear view of the cross traffic and if an
oncoming vehicle is detected, alert the driver.
RCP Detection Zones
RCP monitors the rear detection zones on both
sides of the vehicle, for objects that are moving
toward the side of the vehicle with a minimum
speed of approximately 5 mph (8 km/h), to objects
moving a maximum of approximately 20 mph
(32 km/h), such as in parking lot situations.
When RCP is on and the vehicle is in REVERSE (R),
the driver is alerted using both the visual and
audible alarms, including reducing the radio
volume.
WARNING!
The Blind Spot Monitoring system is only an aid to
help detect objects in the blind spot zones. The BSM
system is not designed to detect pedestrians,
bicyclists, or animals. Even if your vehicle is
equipped with the BSM system, always check your
vehicle’s mirrors, glance over your shoulder, and use
your turn signal before changing lanes. Failure to do
so can result in serious injury or death.
6
23_WD_OM_EN_USC_t.book Page 185
Page 195 of 328
SAFETY193
(Continued)
BeltAlert Warning Sequence
The BeltAlert warning sequence is activated when
the vehicle is moving above a specified vehicle
speed range and the driver or outboard front seat
passenger is unbuckled (if equipped with outboard
front passenger seat BeltAlert) (the outboard front
passenger seat BeltAlert is not active when the
outboard front passenger seat is unoccupied). The
BeltAlert warning sequence starts by blinking the
Seat Belt Reminder Light and sounding an
intermittent chime. Once the BeltAlert warning
sequence has completed, the Seat Belt Reminder
Light will remain on until the seat belts are
buckled. The BeltAlert warning sequence may
repeat based on vehicle speed until the driver and
occupied outboard front seat passenger seat belts
are buckled. The driver should instruct all
occupants to buckle their seat belts.
Change Of Status
If the driver or outboard front seat passenger (if
equipped with outboard front passenger seat
BeltAlert) unbuckles their seat belt while the
vehicle is traveling, the BeltAlert warning sequence
will begin until the seat belts are buckled again.
The outboard front passenger seat BeltAlert is not
active when the outboard front passenger seat is
unoccupied. BeltAlert may be triggered when an
animal or other items are placed on the outboard
front passenger seat or when the seat is folded flat
(if equipped). It is recommended that pets be
restrained in the rear seat (if equipped) in pet
harnesses or pet carriers that are secured by seat
belts, and cargo is properly stowed.
BeltAlert can be activated or deactivated by an
authorized dealer. FCA US LLC does not
recommend deactivating BeltAlert.
NOTE:If BeltAlert has been deactivated and the driver or
outboard front seat passenger (if equipped with
outboard front passenger seat BeltAlert) is
unbuckled the Seat Belt Reminder Light will turn
on and remain on until the driver and outboard
front seat passenger seat belts are buckled.
Lap/Shoulder Belts
All seating positions in your vehicle are equipped
with lap/shoulder belts.
The seat belt webbing retractor will lock only during
very sudden stops or collisions. This feature allows
the shoulder part of the seat belt to move freely
with you under normal conditions. However, in a
collision the seat belt will lock and reduce your risk
of striking the inside of the vehicle or being thrown
out of the vehicle.
WARNING!
Relying on the air bags alone could lead to
more severe injuries in a collision. The air
bags work with your seat belt to restrain you
properly. In some collisions, the air bags won’t
deploy at all. Always wear your seat belt even
though you have air bags.
In a collision, you and your passengers can
suffer much greater injuries if you are not prop
-
erly buckled up. You can strike the interior of
your vehicle or other passengers, or you can be
thrown out of the vehicle. Always be sure you and
others in your vehicle are buckled up properly.
It is dangerous to ride in a cargo area, inside
or outside of a vehicle. In a collision, people
riding in these areas are more likely to be seri -
ously injured or killed.
Do not allow people to ride in any area of your
vehicle that is not equipped with seats and
seat belts.
Be sure everyone in your vehicle is in a seat and
using a seat belt properly. Occupants, including
the driver, should always wear their seat belts
whether or not an air bag is also provided at their
seating position to minimize the risk of severe
injury or death in the event of a crash.
6
23_WD_OM_EN_USC_t.book Page 193
Page 197 of 328
SAFETY195
Lap/Shoulder Belt Operating Instructions
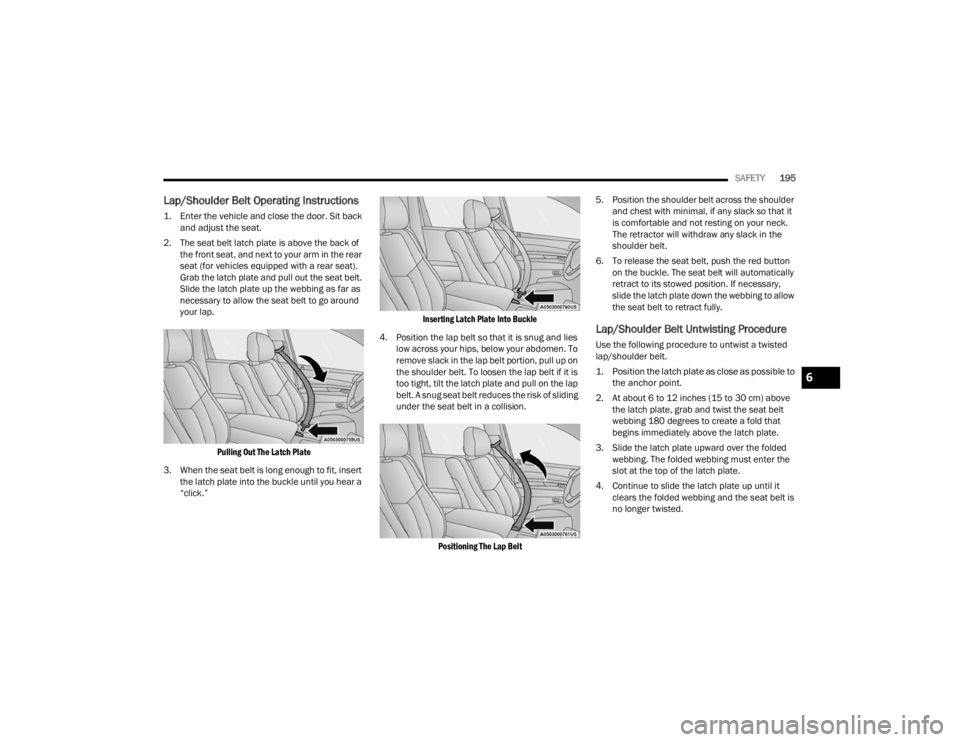
1. Enter the vehicle and close the door. Sit back
and adjust the seat.
2. The seat belt latch plate is above the back of the front seat, and next to your arm in the rear
seat (for vehicles equipped with a rear seat).
Grab the latch plate and pull out the seat belt.
Slide the latch plate up the webbing as far as
necessary to allow the seat belt to go around
your lap.
Pulling Out The Latch Plate
3. When the seat belt is long enough to fit, insert the latch plate into the buckle until you hear a
“click.”
Inserting Latch Plate Into Buckle
4. Position the lap belt so that it is snug and lies low across your hips, below your abdomen. To
remove slack in the lap belt portion, pull up on
the shoulder belt. To loosen the lap belt if it is
too tight, tilt the latch plate and pull on the lap
belt. A snug seat belt reduces the risk of sliding
under the seat belt in a collision.
Positioning The Lap Belt
5. Position the shoulder belt across the shoulder
and chest with minimal, if any slack so that it
is comfortable and not resting on your neck.
The retractor will withdraw any slack in the
shoulder belt.
6. To release the seat belt, push the red button on the buckle. The seat belt will automatically
retract to its stowed position. If necessary,
slide the latch plate down the webbing to allow
the seat belt to retract fully.
Lap/Shoulder Belt Untwisting Procedure
Use the following procedure to untwist a twisted
lap/shoulder belt.
1. Position the latch plate as close as possible to the anchor point.
2. At about 6 to 12 inches (15 to 30 cm) above the latch plate, grab and twist the seat belt
webbing 180 degrees to create a fold that
begins immediately above the latch plate.
3. Slide the latch plate upward over the folded webbing. The folded webbing must enter the
slot at the top of the latch plate.
4. Continue to slide the latch plate up until it clears the folded webbing and the seat belt is
no longer twisted.
6
23_WD_OM_EN_USC_t.book Page 195
Page 211 of 328
SAFETY209
Do not drive your vehicle after the air bags have
deployed. If you are involved in another collision,
the air bags will not be in place to protect you.
NOTE:
Air bag covers may not be obvious in the interior
trim, but they will open during air bag deploy -
ment.
After any collision, the vehicle should be taken
to an authorized dealer immediately.
Enhanced Accident Response System
In the event of an impact, if the communication
network remains intact, and the power remains
intact, depending on the nature of the event, the
Occupant Restraint Controller (ORC) will determine
whether to have the Enhanced Accident Response
System perform the following functions:
Cut off fuel to the engine (if equipped).
Cut off battery power to the electric motor (if
equipped).
Flash hazard lights as long as the battery has
power.
Turn on the interior lights, which remain on as
long as the battery has power or for 15 minutes
from the intervention of the Enhanced Accident
Response System.
Unlock the power door locks.
Your vehicle may also be designed to perform any
of these other functions in response to the
Enhanced Accident Response System:
Turn off the Fuel Filter Heater, Turn off the HVAC
Blower Motor, Close the HVAC Circulation Door
Cut off battery power to the:
Engine
Electric Motor (if equipped)
Electric power steering
Brake booster
Electric park brake
Automatic transmission gear selector
Horn
Front wiper
Headlight washer pump (if equipped)
NOTE:After an accident, remember to cycle the ignition to
the STOP (OFF/LOCK) position and remove the key
from the ignition switch to avoid draining the battery. Carefully check the vehicle for fuel leaks in
the engine compartment and on the ground near
the engine compartment and fuel tank before
resetting the system and starting the engine. If
there are no fuel leaks or damage to the vehicle
electrical devices (e.g. headlights) after an
accident, reset the system by following the
procedure described below. If you have any doubt,
contact an authorized dealer.
Enhanced Accident Response System
Reset Procedure
In order to reset the Enhanced Accident Response
System functions after an event, the ignition switch
must be changed from ignition START or ON/RUN
to ignition OFF. Carefully check the vehicle for fuel
leaks in the engine compartment and on the
ground near the engine compartment and fuel
tank before resetting the system and starting the
engine.
After an accident, if the vehicle will not start after
performing the reset procedure, the vehicle must
be towed to an authorized dealer to be inspected
and to have the Enhanced Accident Response
System reset.
WARNING!
Deployed air bags and seat belt pretensioners
cannot protect you in another collision. Have the
air bags, seat belt pretensioners, and the seat
belt retractor assemblies replaced by an
authorized dealer immediately. Also, have the
Occupant Restraint Controller System serviced
as well.
6
23_WD_OM_EN_USC_t.book Page 209