tow DODGE DURANGO 2023 Repair Manual
[x] Cancel search | Manufacturer: DODGE, Model Year: 2023, Model line: DURANGO, Model: DODGE DURANGO 2023Pages: 328, PDF Size: 13.82 MB
Page 221 of 328
SAFETY219
LATCH-compatible child restraint systems will be
equipped with a rigid bar or a flexible strap on each
side. Each will have a hook or connector to attach
to the lower anchorage and a way to tighten the
connection to the anchorage. Forward-facing child
restraints and some rear-facing child restraints will
also be equipped with a tether strap. The tether
strap will have a hook at the end to attach to the
top tether anchorage and a way to tighten the strap
after it is attached to the anchorage.
Center Seat LATCH — Five Or Seven
Passenger Vehicles Second Row Seating
Only Vehicle With A Center Arm Rest Tether —
Five Or Seven Passenger Seating Only
For rear-facing child restraints secured in the
center seat position with the vehicle seat belts, the
rear center seat position has an armrest tether
that secures the arm rest in the upward position.
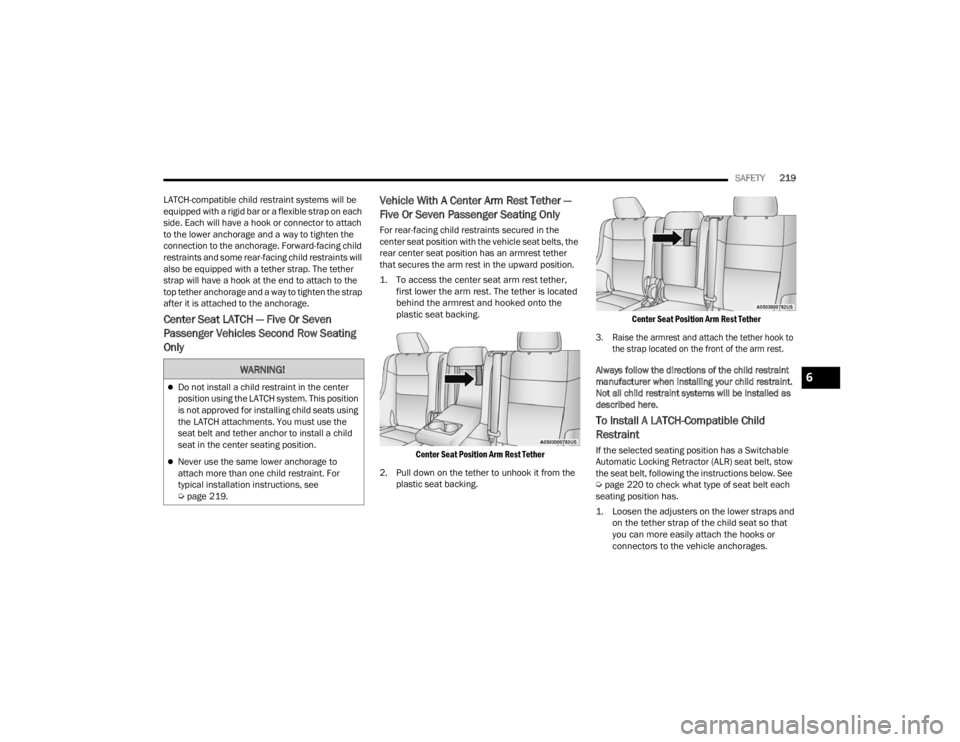
1. To access the center seat arm rest tether,
first lower the arm rest. The tether is located
behind the armrest and hooked onto the
plastic seat backing.
Center Seat Position Arm Rest Tether
2. Pull down on the tether to unhook it from the plastic seat backing.
Center Seat Position Arm Rest Tether
3. Raise the armrest and attach the tether hook to the strap located on the front of the arm rest.
Always follow the directions of the child restraint
manufacturer when installing your child restraint.
Not all child restraint systems will be installed as
described here.
To Install A LATCH-Compatible Child
Restraint
If the selected seating position has a Switchable
Automatic Locking Retractor (ALR) seat belt, stow
the seat belt, following the instructions below. See
Ú page 220 to check what type of seat belt each
seating position has.
1. Loosen the adjusters on the lower straps and on the tether strap of the child seat so that
you can more easily attach the hooks or
connectors to the vehicle anchorages.
WARNING!
Do not install a child restraint in the center
position using the LATCH system. This position
is not approved for installing child seats using
the LATCH attachments. You must use the
seat belt and tether anchor to install a child
seat in the center seating position.
Never use the same lower anchorage to
attach more than one child restraint. For
typical installation instructions, see
Úpage 219.
6
23_WD_OM_EN_USC_t.book Page 219
Page 222 of 328
220SAFETY
2. Place the child seat between the lower anchorages for that seating position. If the
second row seat can be reclined, you may
recline the seat and/or raise the head restraint
(if adjustable) to get a better fit. If the rear seat
can be moved forward and rearward in the
vehicle, you may wish to move it to its
rear-most position to make room for the child
seat. You may also move the front seat forward
to allow more room for the child seat.
3. Attach the lower hooks or connectors of the child restraint to the lower anchorages in the
selected seating position.
4. If the child restraint has a tether strap, connect it to the top tether anchorage. See
Úpage 223 for directions to attach a tether
anchor.
5. Tighten all of the straps as you push the child restraint rearward and downward into the
seat. Remove slack in the straps according to
the child restraint manufacturer’s instructions.
6. Test that the child restraint is installed tightly by pulling back and forth on the child seat at
the belt path. It should not move more than
1 inch (25.4 mm) in any direction.
How To Stow An Unused Switchable-ALR
(ALR) Seat Belt:
When using the LATCH attaching system to install
a child restraint, stow all ALR seat belts that are not
being used by other occupants or being used to
secure child restraints. An unused belt could injure
a child if they play with it and accidentally lock the
seat belt retractor. Before installing a child
restraint using the LATCH system, buckle the seat
belt behind the child restraint and out of the child’s
reach. If the buckled seat belt interferes with the
child restraint installation, instead of buckling it
behind the child restraint, route the seat belt
through the child restraint belt path and then
buckle it. Do not lock the seat belt. Remind all
children in the vehicle that the seat belts are not
toys and that they should not play with them.
Installing Child Restraints Using The
Vehicle Seat Belt
Child restraint systems are designed to be secured
in vehicle seats by lap belts or the lap belt portion
of a lap/shoulder belt.
WARNING!
Improper installation of a child restraint to the
LATCH anchorages can lead to failure of the
restraint. The child could be badly injured or
killed. Follow the child restraint manufac -
turer’s directions exactly when installing an
infant or child restraint.
Child restraint anchorages are designed to
withstand only those loads imposed by
correctly-fitted child restraints. Under no
circumstances are they to be used for adult
seat belts, harnesses, or for attaching other
items or equipment to the vehicle.
WARNING!
Improper installation or failure to properly
secure a child restraint can lead to failure of
the restraint. The child could be badly injured
or killed.
Follow the child restraint manufacturer’s
directions exactly when installing an infant or
child restraint.
23_WD_OM_EN_USC_t.book Page 220
Page 229 of 328
SAFETY227
(Continued)
PERIODIC SAFETY CHECKS YOU SHOULD
M
AKE OUTSIDE THE VEHICLE
Tires
Examine tires for excessive tread wear and uneven
wear patterns. Check for stones, nails, glass, or
other objects lodged in the tread or sidewall.
Inspect the tread for cuts and cracks. Inspect
sidewalls for cuts, cracks, and bulges. Check the
lug nut/bolt torque for tightness. Check the tires
(including spare) for proper cold inflation pressure.
Lights
Have someone observe the operation of brake
lights and exterior lights while you work the
controls. Check turn signal and high beam
indicator lights on the instrument panel.
Door Latches
Check for proper closing, latching, and locking.
ONLY use the driver’s side floor mat on the
driver’s side floor area. To check for interfer -
ence, with the vehicle properly parked with the
engine off, fully depress the accelerator, the
brake, and the clutch pedal (if present) to
check for interference. If your floor mat inter -
feres with the operation of any pedal, or is not
secure to the floor, remove the floor mat from
the vehicle and place the floor mat in your
trunk.
ONLY use the passenger’s side floor mat on
the passenger’s side floor area.
ALWAYS make sure objects cannot fall or slide
into the driver’s side floor area when the
vehicle is moving. Objects can become
trapped under accelerator, brake, or clutch
pedals and could cause a loss of vehicle
control.
WARNING!
NEVER place any objects under the floor mat
(e.g., towels, keys, etc.). These objects could
change the position of the floor mat and may
cause interference with the accelerator,
brake, or clutch pedals.
If the vehicle carpet has been removed and
re-installed, always properly attach carpet to
the floor and check the floor mat fasteners are
secure to the vehicle carpet. Fully depress
each pedal to check for interference with the
accelerator, brake, or clutch pedals then
re-install the floor mats.
It is recommended to only use mild soap and
water to clean your floor mats. After cleaning,
always check your floor mat has been properly
installed and is secured to your vehicle using
the floor mat fasteners by lightly pulling mat.
WARNING!
6
23_WD_OM_EN_USC_t.book Page 227
Page 234 of 328
232IN CASE OF EMERGENCY
(Continued)
Automatic SOS — If Equipped
Automatic SOS is a hands-free safety service that
can immediately connect you with help in the event
that your vehicle’s airbags deploy. Please refer to
your provided radio supplement for complete
information.
ASSIST Call
The ASSIST Button is used to automatically
connect you to any one of the following support
centers:
Roadside Assistance – If you get a flat tire, or
need a tow, just push the ASSIST button and you
will be connected to a representative for assis-
tance. Roadside Assistance will know what
vehicle you’re driving and its location. Additional
fees may apply for roadside assistance.
SiriusXM Guardian™ Customer Care – In-vehicle
support for SiriusXM Guardian™.
Vehicle Customer Care – Total support for all
other vehicle issues.
Uconnect Customer Care - Total support for
Radio, Phone and NAV issues.
JACKING AND TIRE CHANGING
Use this QR code to access your
digital experience.
PREPARATIONS FOR JACKING
1. Park the vehicle on a firm, level surface as far
from the edge of the roadway as possible.
Avoid icy or slippery areas.
2. Turn on the Hazard Warning Flashers.
3. Apply the parking brake.
4. Place the gear selector into PARK (P).
5. Turn OFF the ignition.
CAUTION!
To avoid damage to the mirror during cleaning,
never spray any cleaning solution directly onto
the mirror. Apply the solution onto a clean cloth
and wipe the mirror clean.
WARNING!
Do not attempt to change a tire on the side of
the vehicle close to moving traffic. Pull far
enough off the road to avoid the danger of
being hit when operating the jack or changing
the wheel.
Being under a jacked-up vehicle is dangerous.
The vehicle could slip off the jack and fall on
you. You could be crushed. Never put any part
of your body under a vehicle that is on a jack.
If you need to get under a raised vehicle, take
it to a service center where it can be raised on
a lift.
Never start or run the engine while the vehicle
is on a jack.
The jack is designed to be used as a tool for
changing tires only. The jack should not be
used to lift the vehicle for service purposes.
The vehicle should be jacked on a firm level
surface only. Avoid ice or slippery areas.
WARNING!
Do not attempt to change a tire on the side of
the vehicle close to moving traffic. Pull far
enough off the road to avoid being hit when
operating the jack or changing the wheel.
WARNING!
23_WD_OM_EN_USC_t.book Page 232
Page 236 of 328
234IN CASE OF EMERGENCY
SPARE TIRE STOWAGE
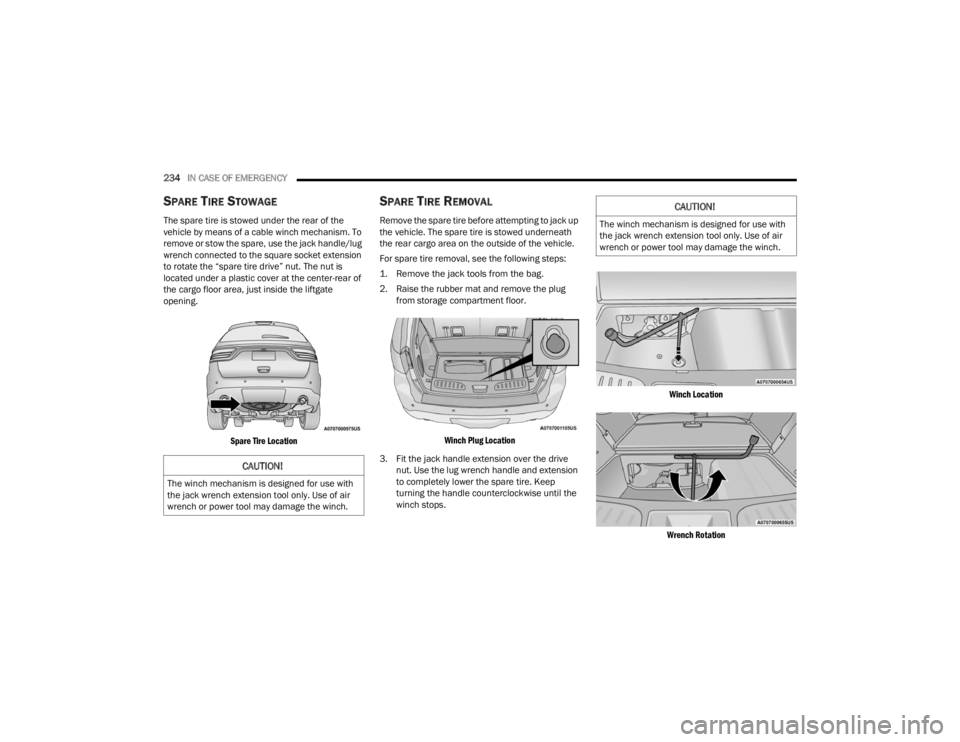
The spare tire is stowed under the rear of the
vehicle by means of a cable winch mechanism. To
remove or stow the spare, use the jack handle/lug
wrench connected to the square socket extension
to rotate the “spare tire drive” nut. The nut is
located under a plastic cover at the center-rear of
the cargo floor area, just inside the liftgate
opening.
Spare Tire Location
SPARE TIRE REMOVAL
Remove the spare tire before attempting to jack up
the vehicle. The spare tire is stowed underneath
the rear cargo area on the outside of the vehicle.
For spare tire removal, see the following steps:
1. Remove the jack tools from the bag.
2. Raise the rubber mat and remove the plug from storage compartment floor.
Winch Plug Location
3. Fit the jack handle extension over the drive nut. Use the lug wrench handle and extension
to completely lower the spare tire. Keep
turning the handle counterclockwise until the
winch stops.
Winch Location
Wrench Rotation
CAUTION!
The winch mechanism is designed for use with
the jack wrench extension tool only. Use of air
wrench or power tool may damage the winch.
CAUTION!
The winch mechanism is designed for use with
the jack wrench extension tool only. Use of air
wrench or power tool may damage the winch.
23_WD_OM_EN_USC_t.book Page 234
Page 237 of 328
IN CASE OF EMERGENCY235
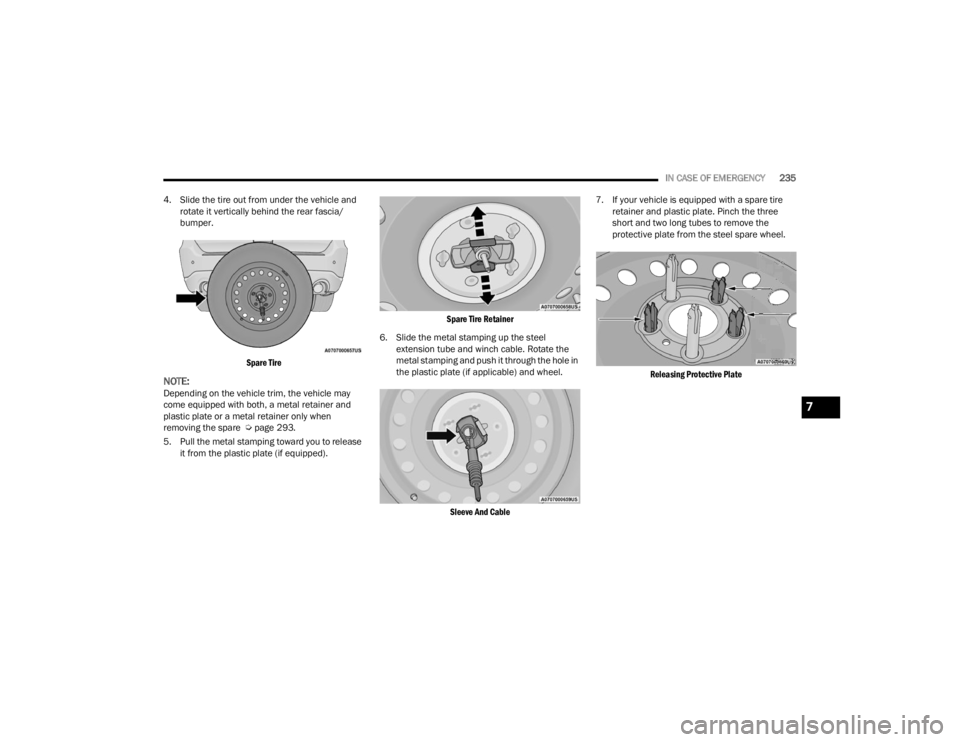
4. Slide the tire out from under the vehicle and rotate it vertically behind the rear fascia/
bumper.
Spare Tire
NOTE:Depending on the vehicle trim, the vehicle may
come equipped with both, a metal retainer and
plastic plate or a metal retainer only when
removing the spare Ú page 293.
5. Pull the metal stamping toward you to release it from the plastic plate (if equipped).
Spare Tire Retainer
6. Slide the metal stamping up the steel extension tube and winch cable. Rotate the
metal stamping and push it through the hole in
the plastic plate (if applicable) and wheel.
Sleeve And Cable
7. If your vehicle is equipped with a spare tire
retainer and plastic plate. Pinch the three
short and two long tubes to remove the
protective plate from the steel spare wheel.
Releasing Protective Plate
7
23_WD_OM_EN_USC_t.book Page 235
Page 238 of 328
236IN CASE OF EMERGENCY
(Continued)
JACKING INSTRUCTIONS
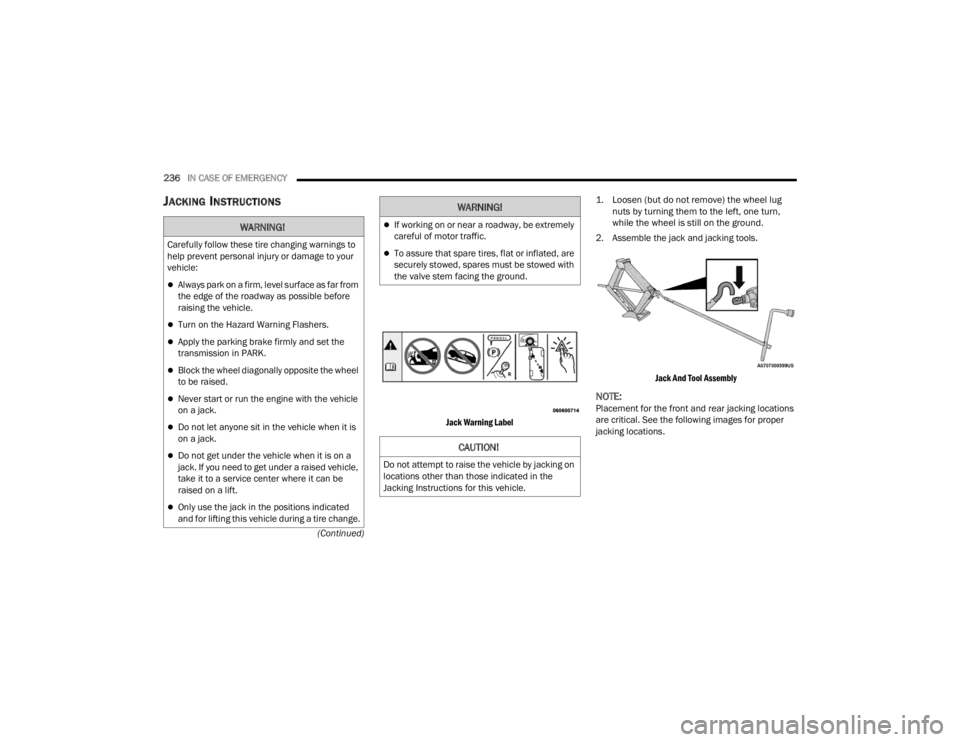
Jack Warning Label
1. Loosen (but do not remove) the wheel lug
nuts by turning them to the left, one turn,
while the wheel is still on the ground.
2. Assemble the jack and jacking tools.
Jack And Tool Assembly
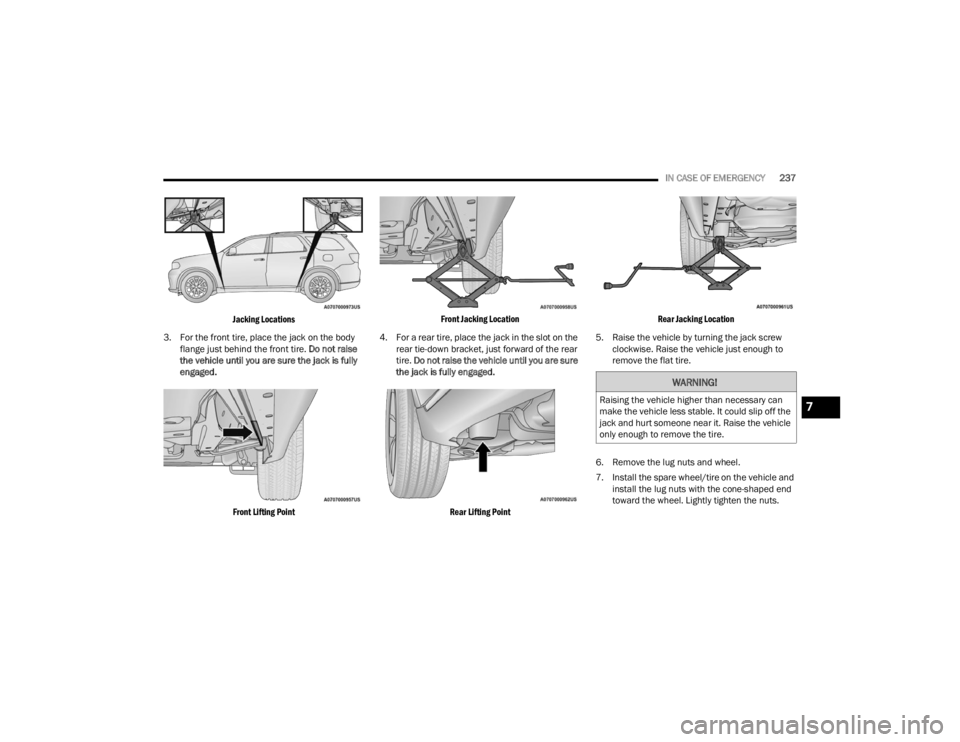
NOTE:Placement for the front and rear jacking locations
are critical. See the following images for proper
jacking locations.
WARNING!
Carefully follow these tire changing warnings to
help prevent personal injury or damage to your
vehicle:
Always park on a firm, level surface as far from
the edge of the roadway as possible before
raising the vehicle.
Turn on the Hazard Warning Flashers.
Apply the parking brake firmly and set the
transmission in PARK.
Block the wheel diagonally opposite the wheel
to be raised.
Never start or run the engine with the vehicle
on a jack.
Do not let anyone sit in the vehicle when it is
on a jack.
Do not get under the vehicle when it is on a
jack. If you need to get under a raised vehicle,
take it to a service center where it can be
raised on a lift.
Only use the jack in the positions indicated
and for lifting this vehicle during a tire change.
If working on or near a roadway, be extremely
careful of motor traffic.
To assure that spare tires, flat or inflated, are
securely stowed, spares must be stowed with
the valve stem facing the ground.
CAUTION!
Do not attempt to raise the vehicle by jacking on
locations other than those indicated in the
Jacking Instructions for this vehicle.
WARNING!
23_WD_OM_EN_USC_t.book Page 236
Page 239 of 328
IN CASE OF EMERGENCY237
Jacking Locations
3. For the front tire, place the jack on the body flange just behind the front tire. Do not raise
the vehicle until you are sure the jack is fully
engaged.
Front Lifting Point Front Jacking Location
4. For a rear tire, place the jack in the slot on the rear tie-down bracket, just forward of the rear
tire. Do not raise the vehicle until you are sure
the jack is fully engaged.
Rear Lifting Point Rear Jacking Location
5. Raise the vehicle by turning the jack screw clockwise. Raise the vehicle just enough to
remove the flat tire.
6. Remove the lug nuts and wheel.
7. Install the spare wheel/tire on the vehicle and install the lug nuts with the cone-shaped end
toward the wheel. Lightly tighten the nuts.
WARNING!
Raising the vehicle higher than necessary can
make the vehicle less stable. It could slip off the
jack and hurt someone near it. Raise the vehicle
only enough to remove the tire.7
23_WD_OM_EN_USC_t.book Page 237
Page 241 of 328
IN CASE OF EMERGENCY239
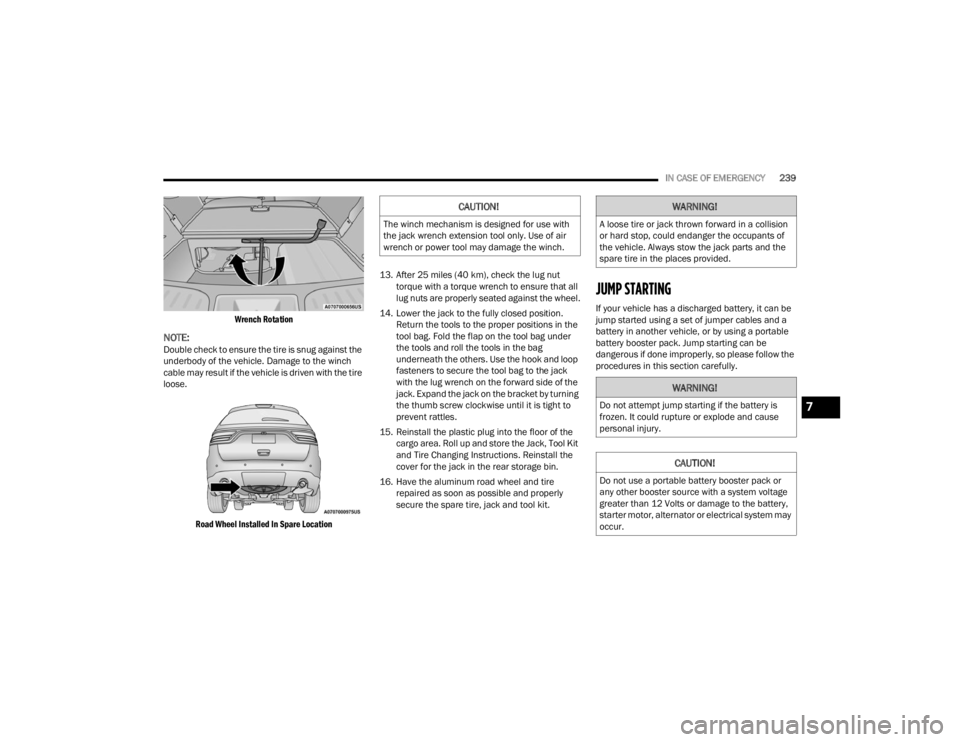
Wrench Rotation
NOTE:Double check to ensure the tire is snug against the
underbody of the vehicle. Damage to the winch
cable may result if the vehicle is driven with the tire
loose.
Road Wheel Installed In Spare Location
13. After 25 miles (40 km), check the lug nut
torque with a torque wrench to ensure that all
lug nuts are properly seated against the wheel.
14. Lower the jack to the fully closed position. Return the tools to the proper positions in the
tool bag. Fold the flap on the tool bag under
the tools and roll the tools in the bag
underneath the others. Use the hook and loop
fasteners to secure the tool bag to the jack
with the lug wrench on the forward side of the
jack. Expand the jack on the bracket by turning
the thumb screw clockwise until it is tight to
prevent rattles.
15. Reinstall the plastic plug into the floor of the cargo area. Roll up and store the Jack, Tool Kit
and Tire Changing Instructions. Reinstall the
cover for the jack in the rear storage bin.
16. Have the aluminum road wheel and tire repaired as soon as possible and properly
secure the spare tire, jack and tool kit.
JUMP STARTING
If your vehicle has a discharged battery, it can be
jump started using a set of jumper cables and a
battery in another vehicle, or by using a portable
battery booster pack. Jump starting can be
dangerous if done improperly, so please follow the
procedures in this section carefully.
CAUTION!
The winch mechanism is designed for use with
the jack wrench extension tool only. Use of air
wrench or power tool may damage the winch.
WARNING!
A loose tire or jack thrown forward in a collision
or hard stop, could endanger the occupants of
the vehicle. Always stow the jack parts and the
spare tire in the places provided.
WARNING!
Do not attempt jump starting if the battery is
frozen. It could rupture or explode and cause
personal injury.
CAUTION!
Do not use a portable battery booster pack or
any other booster source with a system voltage
greater than 12 Volts or damage to the battery,
starter motor, alternator or electrical system may
occur.
7
23_WD_OM_EN_USC_t.book Page 239
Page 245 of 328
IN CASE OF EMERGENCY243
5. Remove funnel from filler pipe, clean off prior to putting back in the spare tire storage area.
IF YOUR ENGINE OVERHEATS
If the vehicle is overheating, it will need to be
serviced by an authorized dealer.
Potential signs of vehicle overheating can be:
Temperature gauge is at HOT (H)
Strong smell of coolant
White smoke coming from engine or exhaust
Coolant bottle coolant has bubbles present In the event it is observed that the temperature
gauge is moving towards or close to the HOT (H)
position, you can reduce the potential for
overheating by taking the appropriate action.
On the highways — slow down.
In city traffic — while stopped, place the trans
-
mission in NEUTRAL (N), but do not increase the
engine idle speed while preventing vehicle
motion with the brakes.
If your Air Conditioner (A/C) is on, turn it off. The
A/C system adds heat to the engine cooling
system and turning the A/C off can help remove
this heat.
You can also turn the temperature control to
maximum heat, the mode control to floor and
the blower control to high. This allows the heater
core to act as a supplement to the radiator and
aids in removing heat from the engine cooling
system.
MANUAL PARK RELEASE
In order to move the vehicle in cases where the
transmission will not shift out of PARK (P) (such as
a depleted battery), a Manual Park Release is
available.
CAUTION!
To avoid fuel spillage and overfilling, do not “top
off” the fuel tank after filling.
WARNING!
You or others can be badly burned by hot engine
coolant (antifreeze) or steam from your radiator.
If you see or hear steam coming from under the
hood, do not open the hood until the radiator
has had time to cool. Never try to open a cooling
system pressure cap when the radiator or
coolant bottle is hot.CAUTION!
Driving with a hot cooling system could damage
your vehicle. If the temperature gauge reads
HOT (H), pull over and stop the vehicle. Idle the
vehicle with the air conditioner turned off until
the pointer drops back into the normal range. If
the pointer remains on HOT (H), and you hear
continuous chimes, turn the engine off
immediately and call for service.
WARNING!
Always secure your vehicle by fully applying the
parking brake before activating the Manual Park
Release. In addition, you should be seated in the
driver’s seat with your foot firmly on the brake
pedal when activating the Manual Park Release.
Activating the Manual Park Release will allow
your vehicle to roll away if it is not secured by the
parking brake, or by proper connection to a tow
vehicle. Activating the Manual Park Release on
an unsecured vehicle could lead to serious
injury or death for those in or around the vehicle.
7
23_WD_OM_EN_USC_t.book Page 243