DODGE GRAND CARAVAN 2009 5.G Owners Manual
Manufacturer: DODGE, Model Year: 2009, Model line: GRAND CARAVAN, Model: DODGE GRAND CARAVAN 2009 5.GPages: 535, PDF Size: 18.61 MB
Page 231 of 535
The tie down holes on the crossbar ends should always
be used to tie down the load. Check the straps frequently
to be sure that the load remains securely attached.CAUTION!
Crossbars should remain equally spaced or paral-
lel at any luggage rack position for proper func-
tion. Noncompliance could result in damage to the
luggage rack, cargo and/or vehicle.
To avoid damage to the roof rack and vehicle, do
not exceed the maximum roof rack load capacity of
150 lbs (68 kg). Always distribute heavy loads as
evenly as possible and secure the load appropri-
ately.
(Continued) CAUTION! (Continued)
Long loads which extend over the windshield,
such as wood panels or surfboards, or loads with
large frontal area should be secured to both the
front and rear of the vehicle.
Travel at reduced speeds and turn corners care-
fully when carrying large or heavy loads on the
roof rack. Wind forces, due to natural causes or
nearby truck traffic, can add sudden upward lift to
a load. This is especially true on large flat loads
and may result in damage to the cargo or your
vehicle.
UNDERSTANDING THE FEATURES OF YOUR VEHICLE 229 3
Page 232 of 535
WARNING!Cargo must be securely tied before driving your
vehicle. Improperly secured loads can fly off the
vehicle, particularly at high speeds, resulting in per-
sonal injury or property damage. Follow the Roof
Rack Cautions when carrying cargo on your roof
rack.
SUN SCREENS — IF EQUIPPED
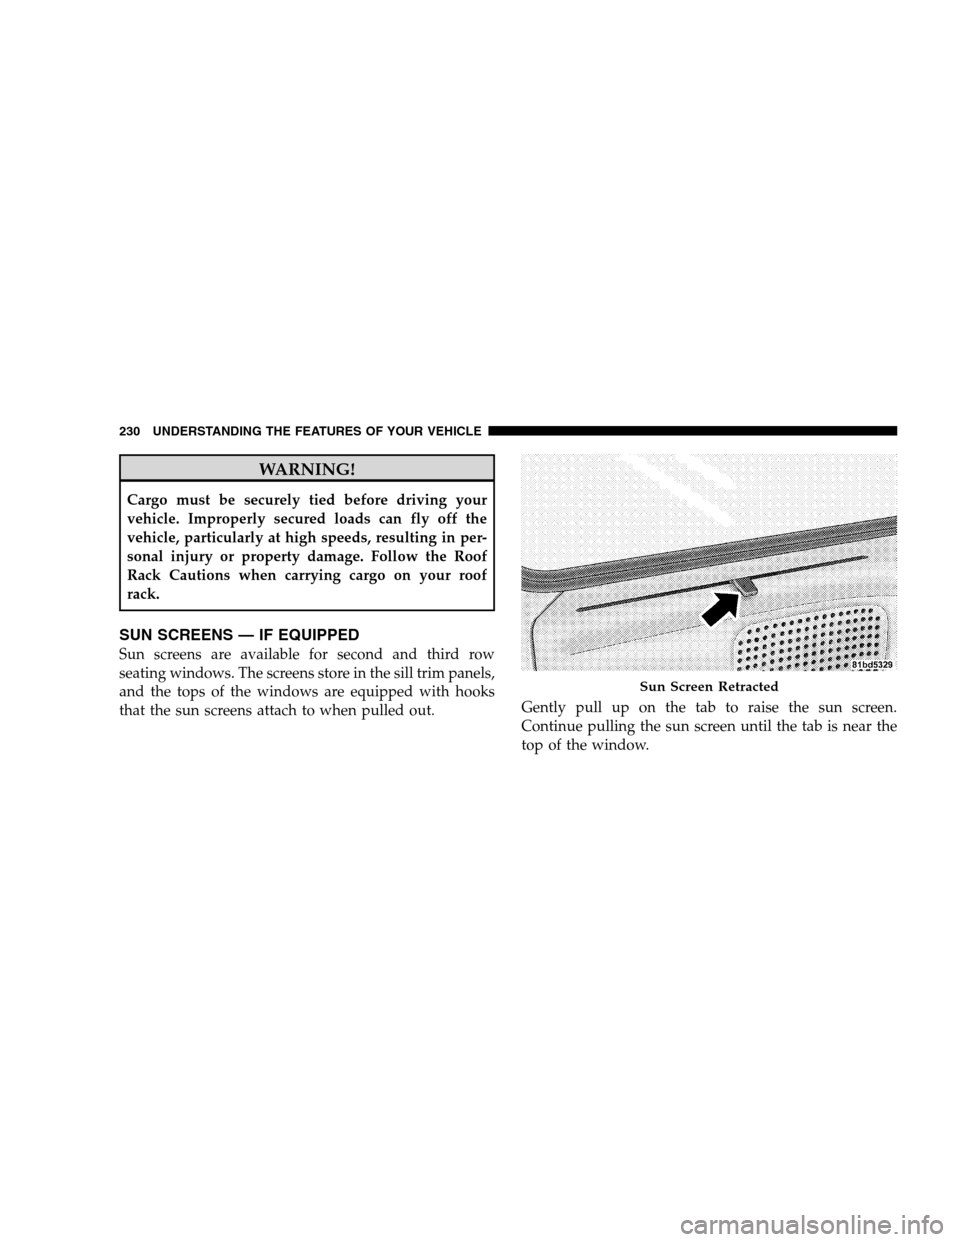
Sun screens are available for second and third row
seating windows. The screens store in the sill trim panels,
and the tops of the windows are equipped with hooks
that the sun screens attach to when pulled out.
Gently pull up on the tab to raise the sun screen.
Continue pulling the sun screen until the tab is near the
top of the window. Sun Screen Retracted
230 UNDERST
ANDING THE FEATURES OF YOUR VEHICLE
Page 233 of 535
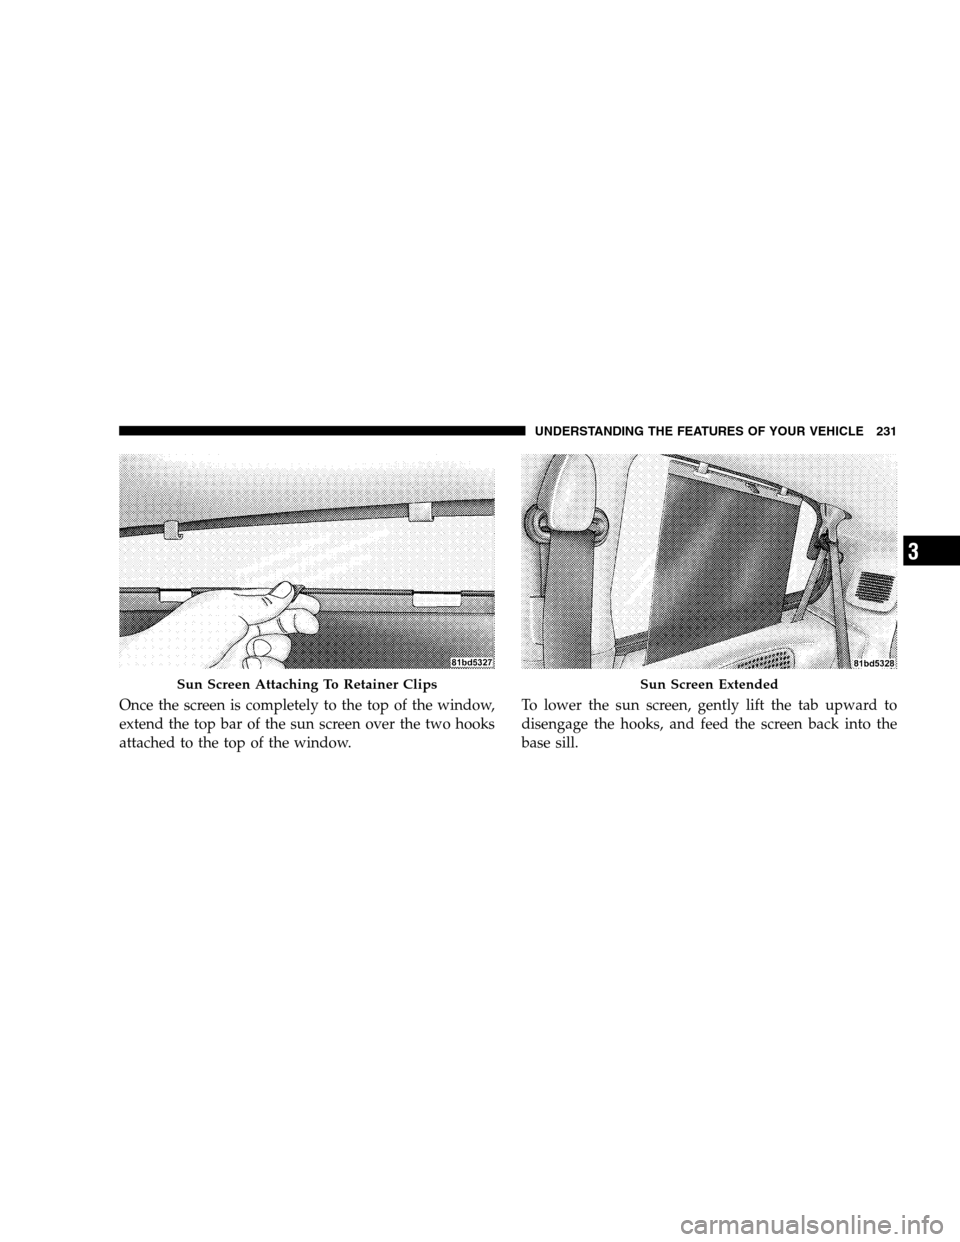
Once the screen is completely to the top of the window,
extend the top bar of the sun screen over the two hooks
attached to the top of the window.To lower the sun screen, gently lift the tab upward to
disengage the hooks, and feed the screen back into the
base sill.Sun Screen Attaching To Retainer Clips Sun Screen Extended
UNDERSTANDING
THE FEATURES OF YOUR VEHICLE 231 3
Page 234 of 535

Page 235 of 535
UNDERSTANDING YOUR INSTRUMENT PANELCONTENTS
m
Instrument Panel Features . . . . . . . . . . . . . . . 237
m Instrument Cluster – Base . . . . . . . . . . . . . . . 238
m Instrument Cluster – Premium . . . . . . . . . . . . 239
m Instrument Cluster Descriptions . . . . . . . . . . . 240
m Compass Mini-Trip Computer (CMTC) —
If Equipped . . . . . . . . . . . . . . . . . . . . . . . . . . 252
▫ CMTC Reset Buttons . . . . . . . . . . . . . . . . . . 253
▫ Compass/Temperature Display . . . . . . . . . . 254 m
Electronic Vehicle Information Center (EVIC) —
If Equipped . . . . . . . . . . . . . . . . . . . . . . . . . . 256
▫ Electronic Vehicle Information Center (EVIC)
Displays . . . . . . . . . . . . . . . . . . . . . . . . . . . 258
▫ Trip Functions . . . . . . . . . . . . . . . . . . . . . . 260
▫ Compass Display . . . . . . . . . . . . . . . . . . . . 261
▫ Personal Settings
(Customer-Programmable Features) . . . . . . . 263 4
Page 236 of 535
mAM/FM/CD/DVD Radio (RER/REN) – If
Equipped . . . . . . . . . . . . . . . . . . . . . . . . . . . . 268
▫ Operating Instructions — Voice Recognition
System (VR) — If Equipped . . . . . . . . . . . . . 268
▫ Operating Instructions — uconnectt phone
— If Equipped . . . . . . . . . . . . . . . . . . . . . . 268
▫ Clock Setting Procedure . . . . . . . . . . . . . . 268
m Sales Code RES — AM/FM Stereo Radio With
CD Player (MP3 AUX Jack) . . . . . . . . . . . . . . . 270
▫ Operating Instructions — Radio Mode . . . . 270
▫ Operation Instructions — CD Mode For CD
And MP3 Audio Play . . . . . . . . . . . . . . . . . 273
▫ Notes On Playing MP3 Files . . . . . . . . . . . 275
▫ Operation Instructions - Auxiliary Mode . . . 278 m
Sales Code RES/RSC — AM/FM Stereo Radio
With CD Player (MP3 AUX Jack) And Sirius
Radio. . . . . . . . . . . . . . . . . . . . . . . . . . . . . . . 279
▫ Operating Instructions — Radio Mode . . . . 279
▫ Operation Instructions — CD Mode For CD
And MP3 Audio Play . . . . . . . . . . . . . . . . . 284
▫ Notes On Playing MP3 Files . . . . . . . . . . . 286
▫ List Button (CD Mode For MP3 Play) . . . . . 289
▫ Info Button (CD Mode For MP3 Play) . . . . 289
m Universal Consumer Interface (UCI) — If
Equipped . . . . . . . . . . . . . . . . . . . . . . . . . . . . 290
▫ Connecting The iPodt . . . . . . . . . . . . . . . . 291
▫ Using This Feature . . . . . . . . . . . . . . . . . . 292
▫ Controlling The iPodt Using Radio
Buttons . . . . . . . . . . . . . . . . . . . . . . . . . . . 292
234 UNDERSTANDING YOUR INSTRUMENT PANEL
Page 237 of 535
▫Play Mode . . . . . . . . . . . . . . . . . . . . . . . . 292
▫ List Or Browse Mode . . . . . . . . . . . . . . . . 294
m uconnectt studios (Satellite Radio) — If
Equipped (REN/REQ/RER/RES/REU Radios
Only) . . . . . . . . . . . . . . . . . . . . . . . . . . . . . . . 296
▫ System Activation . . . . . . . . . . . . . . . . . . . 296
▫ Electronic Serial Number/Sirius
Identification Number (ESN/SID) . . . . . . . . . 296
▫ Selecting uconnectt studios (Satellite)
Mode . . . . . . . . . . . . . . . . . . . . . . . . . . . . . 297
▫ Satellite Antenna . . . . . . . . . . . . . . . . . . . 297
▫ Reception Quality . . . . . . . . . . . . . . . . . . . 297
▫ Operating Instructions — uconnectt studios
(Satellite) Mode . . . . . . . . . . . . . . . . . . . . . 298 ▫
Operating Instructions — uconnectt phone
(If Equipped) . . . . . . . . . . . . . . . . . . . . . . . 300
▫ Operating Instructions — Video
Entertainment System (VES)™
(If Equipped) . . . . . . . . . . . . . . . . . . . . . . . 301
m uconnectt studios (Sirius Backseat TV™) — If
Equipped . . . . . . . . . . . . . . . . . . . . . . . . . . . . 301
m Video Entertainment System (VES)™ — If
Equipped . . . . . . . . . . . . . . . . . . . . . . . . . . . . 301
m Remote Sound System Controls — If
Equipped . . . . . . . . . . . . . . . . . . . . . . . . . . . . 303
▫ Radio Operation . . . . . . . . . . . . . . . . . . . . 303
▫ CD Player . . . . . . . . . . . . . . . . . . . . . . . . 304
m CD/DVD Maintenance . . . . . . . . . . . . . . . . 304
m Radio Operation And Cellular Phones . . . . . . 305
UNDERSTANDING YOUR INSTRUMENT PANEL 235 4
Page 238 of 535
mClimate Controls . . . . . . . . . . . . . . . . . . . . . 305
▫ Manual Heating And Air Conditioning
System . . . . . . . . . . . . . . . . . . . . . . . . . . . . 305
▫ Rear Manual Climate Control — If
Equipped . . . . . . . . . . . . . . . . . . . . . . . . . . 311
▫ Automatic Temperature Control (ATC) — If
Equipped . . . . . . . . . . . . . . . . . . . . . . . . . . 314
▫ Summer Operation . . . . . . . . . . . . . . . . . . 322 ▫
Winter Operation . . . . . . . . . . . . . . . . . . . 323
▫ Vacation/Storage . . . . . . . . . . . . . . . . . . . 323
▫ Window Fogging . . . . . . . . . . . . . . . . . . . 323
▫ Outside Air Intake . . . . . . . . . . . . . . . . . . 323
▫ Operating Tips . . . . . . . . . . . . . . . . . . . . . 324
▫ A/C Air Filter— If Equipped . . . . . . . . . . . 324
236 UNDERSTANDING YOUR INSTRUMENT PANEL
Page 239 of 535
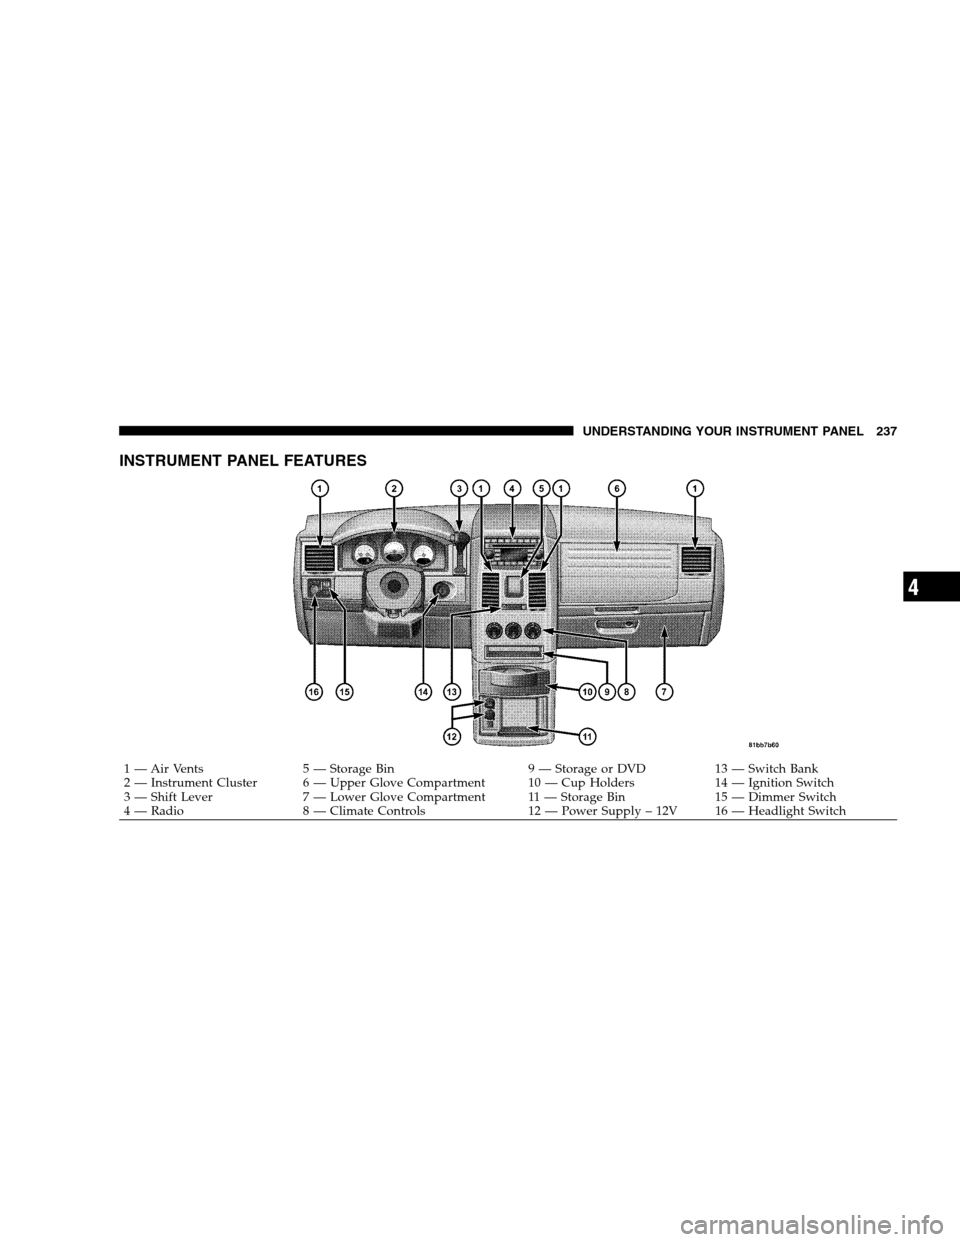
INSTRUMENT PANEL FEATURES
1 — Air Vents
5 — Storage Bin 9 — Storage or DVD13 — Switch Bank
2 — Instrument Cluster 6 — Upper Glove Compartment 10 — Cup Holders 14 — Ignition Switch
3 — Shift Lever 7 — Lower Glove Compartment 11 — Storage Bin 15 — Dimmer Switch
4 — Radio 8 — Climate Controls 12 — Power Supply – 12V 16 — Headlight SwitchUNDERSTANDING YOUR INSTRUMENT PANEL 237 4
Page 240 of 535
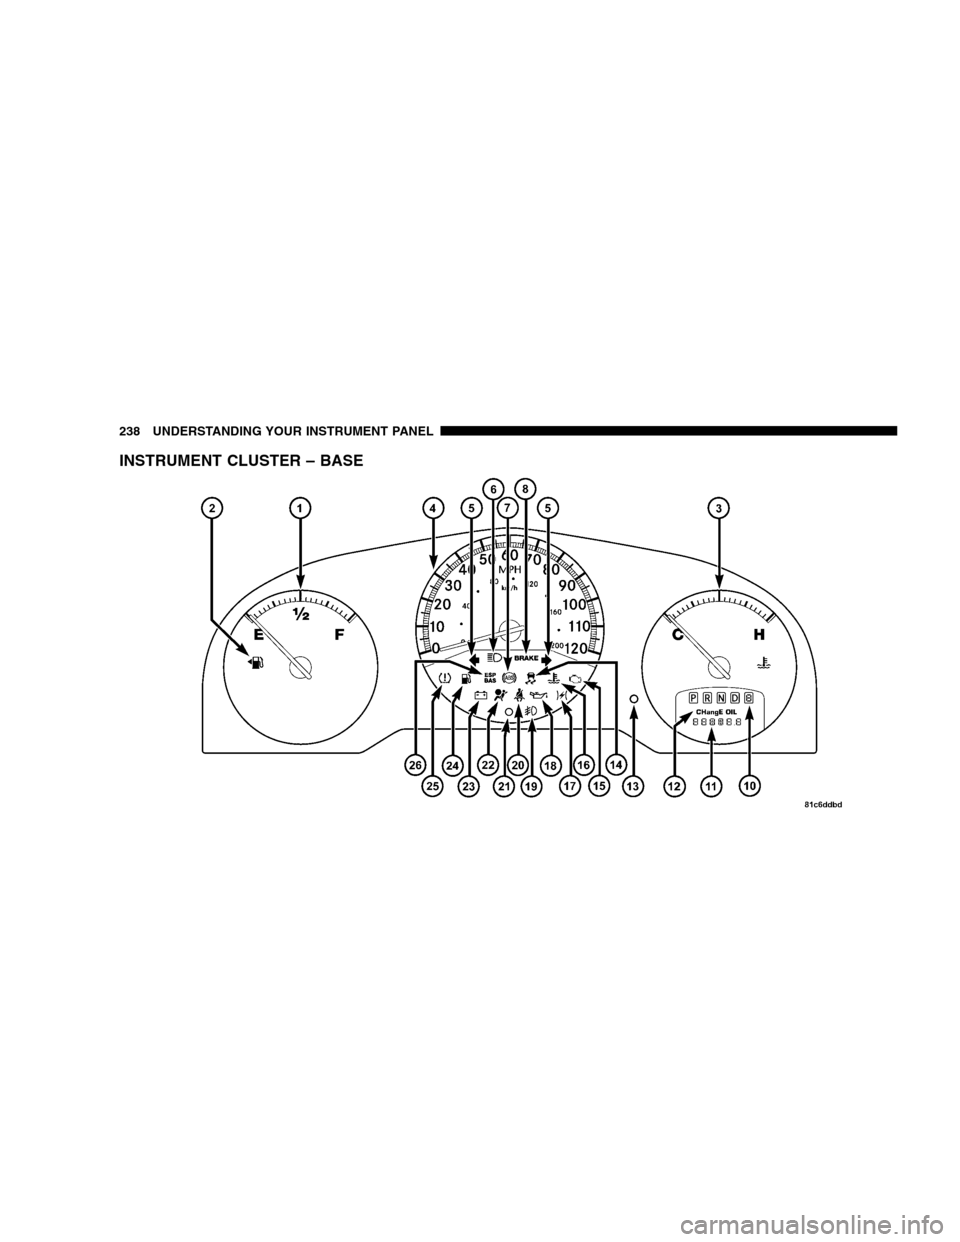
INSTRUMENT CLUSTER – BASE238 UNDERSTANDING YOUR INSTRUMENT PANEL