DODGE GRAND CARAVAN 2020 Owners Manual
Manufacturer: DODGE, Model Year: 2020, Model line: GRAND CARAVAN, Model: DODGE GRAND CARAVAN 2020Pages: 380, PDF Size: 14.92 MB
Page 101 of 380

GETTING TO KNOW YOUR INSTRUMENT PANEL99
Each tire, including the spare (if provided),
should be checked monthly when cold and
inflated to the inflation pressure recommended
by the vehicle manufacturer on the vehicle
placard or tire inflation pressure label. If your
vehicle has tires of a different size than the size
indicated on the vehicle placard or tire inflation
pressure label, you should determine the
proper tire inflation pressure for those tires.
As an added safety feature, your vehicle has
been equipped with a Tire Pressure Monitoring
System (TPMS) that illuminates a low tire
pressure telltale when one or more of your tires
is significantly under-inflated. Accordingly, when
the low tire pressure telltale illuminates, you
should stop and check your tires as soon as
possible, and inflate them to the proper
pressure. Driving on a significantly
under-inflated tire causes the tire to overheat
and can lead to tire failure. Under-inflation also
reduces fuel efficiency and tire tread life, and
may affect the vehicle’s handling and stopping
ability. Please note that the TPMS is not a substitute for
proper tire maintenance, and it is the driver’s
responsibility to maintain correct tire pressure,
even if under-inflation has not reached the level
to trigger illumination of the TPMS low tire
pressure telltale.
Your vehicle has also been equipped with a
TPMS malfunction indicator to indicate when
the system is not operating properly. The TPMS
malfunction indicator is combined with the low
tire pressure telltale. When the system detects
a malfunction, the telltale will flash for approxi
-
mately one minute and then remain contin -
uously illuminated. This sequence will continue
upon subsequent vehicle start-ups as long as
the malfunction exists. When the malfunction
indicator is illuminated, the system may not be
able to detect or signal low tire pressure as
intended. TPMS malfunctions may occur for a
variety of reasons, including the installation of
replacement or alternate tires or wheels on the
vehicle that prevent the TPMS from functioning
properly. Always check the TPMS malfunction
telltale after replacing one or more tires or
wheels on your vehicle to ensure that the
replacement or alternate tires and wheels allow
the TPMS to continue to function properly.CAUTION!
The TPMS has been optimized for the original
equipment tires and wheels. TPMS pressures
and warning have been established for the
tire size equipped on your vehicle.
Undesirable system operation or sensor
damage may result when using replacement
equipment that is not of the same size, type,
and/or style. Aftermarket wheels can cause
sensor damage. Using aftermarket tire
sealants may cause the Tire Pressure
Monitoring System (TPMS) sensor to become
inoperable. After using an aftermarket tire
sealant it is recommended that you take your
vehicle to an authorized dealer to have your
sensor function checked.
3
20_RT_OM_EN_USC_t.book Page 99
Page 102 of 380
100GETTING TO KNOW YOUR INSTRUMENT PANEL
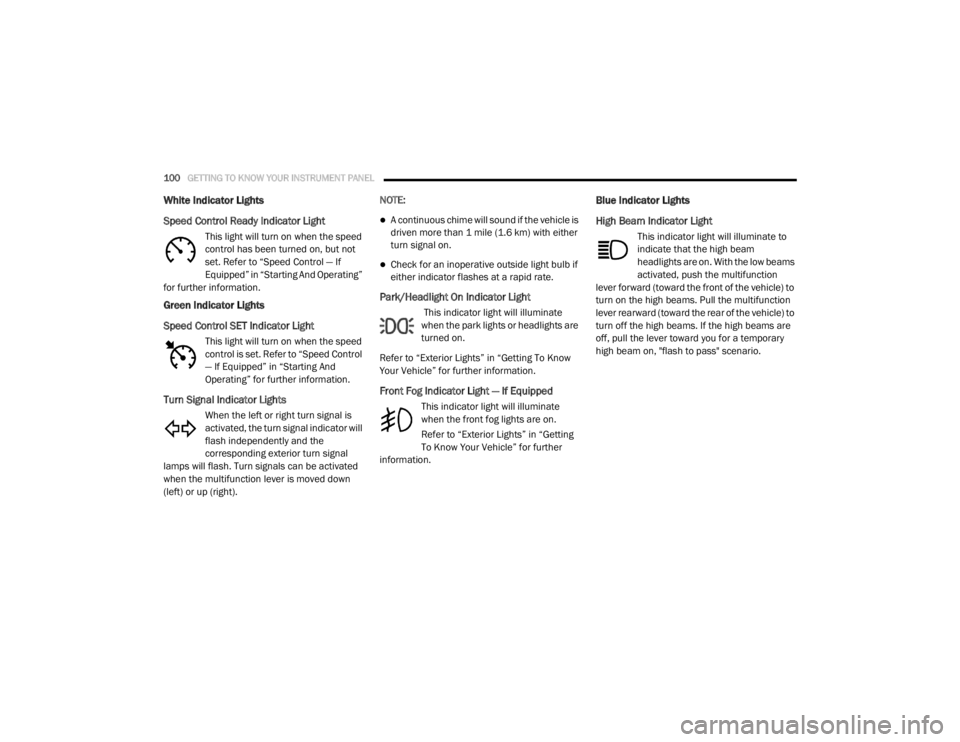
White Indicator Lights
Speed Control Ready Indicator Light
This light will turn on when the speed
control has been turned on, but not
set. Refer to “Speed Control — If
Equipped” in “Starting And Operating”
for further information.
Green Indicator Lights
Speed Control SET Indicator Light
This light will turn on when the speed
control is set. Refer to “Speed Control
— If Equipped” in “Starting And
Operating” for further information.
Turn Signal Indicator Lights
When the left or right turn signal is
activated, the turn signal indicator will
flash independently and the
corresponding exterior turn signal
lamps will flash. Turn signals can be activated
when the multifunction lever is moved down
(left) or up (right). NOTE:
A continuous chime will sound if the vehicle is
driven more than 1 mile (1.6 km) with either
turn signal on.
Check for an inoperative outside light bulb if
either indicator flashes at a rapid rate.
Park/Headlight On Indicator Light
This indicator light will illuminate
when the park lights or headlights are
turned on.
Refer to “Exterior Lights” in “Getting To Know
Your Vehicle” for further information.
Front Fog Indicator Light — If Equipped
This indicator light will illuminate
when the front fog lights are on.
Refer to “Exterior Lights” in “Getting
To Know Your Vehicle” for further
information.
Blue Indicator Lights
High Beam Indicator Light
This indicator light will illuminate to
indicate that the high beam
headlights are on. With the low beams
activated, push the multifunction
lever forward (toward the front of the vehicle) to
turn on the high beams. Pull the multifunction
lever rearward (toward the rear of the vehicle) to
turn off the high beams. If the high beams are
off, pull the lever toward you for a temporary
high beam on, "flash to pass" scenario.
20_RT_OM_EN_USC_t.book Page 100
Page 103 of 380

GETTING TO KNOW YOUR INSTRUMENT PANEL101
ONBOARD DIAGNOSTIC SYSTEM — OBD II
Your vehicle is equipped with a sophisticated
Onboard Diagnostic system called OBD II. This
system monitors the performance of the
emissions, engine, and automatic transmission
control systems. When these systems are
operating properly, your vehicle will provide
excellent performance and fuel economy, as
well as emissions well within current
government regulations.
If any of these systems require service, the
OBD II system will turn on the Malfunction
Indicator Light (MIL). It will also store diagnostic
codes and other information to assist your
service technician in making repairs. Although
your vehicle will usually be drivable and not
need towing, see an authorized dealer for
service as soon as possible.
Onboard Diagnostic System (OBD II)
Cybersecurity
Your vehicle is required to have an Onboard
Diagnostic system (OBD II) and a connection
port to allow access to information related to
the performance of your emissions controls.
Authorized service technicians may need to
access this information to assist with the
diagnosis and service of your vehicle and
emissions system. For further information, refer to “Cybersecurity”
in “Multimedia”.
CAUTION!
Prolonged driving with the MIL on could
cause further damage to the emission
control system. It could also affect fuel
economy and driveability. The vehicle must
be serviced before any emissions tests can
be performed.
If the MIL is flashing while the vehicle is
running, severe catalytic converter damage
and power loss will soon occur. Immediate
service is required.
WARNING!
ONLY an authorized service technician
should connect equipment to the OBD II
connection port in order to read the VIN,
diagnose, or service your vehicle.
If unauthorized equipment is connected to
the OBD II connection port, such as a
driver-behavior tracking device, it may:
Be possible that vehicle systems,
including safety related systems, could
be impaired or a loss of vehicle control
could occur that may result in an
accident involving serious injury or
death.
Access, or allow others to access,
information stored in your vehicle
systems, including personal
information.
3
20_RT_OM_EN_USC_t.book Page 101
Page 104 of 380

102GETTING TO KNOW YOUR INSTRUMENT PANEL
EMISSIONS INSPECTION AND
MAINTENANCE PROGRAMS
In some localities, it may be a legal requirement
to pass an inspection of your vehicle's
emissions control system. Failure to pass could
prevent vehicle registration.
For states that require an Inspection
and Maintenance (I/M), this check
verifies the “Malfunction Indicator
Light (MIL)” is functioning and is not
on when the engine is running, and that the
OBD II system is ready for testing.
Normally, the OBD II system will be ready. The
OBD II system may not be ready if your vehicle
was recently serviced, recently had a depleted
battery or a battery replacement. If the OBD II
system should be determined not ready for the
I/M test, your vehicle may fail the test.
Your vehicle has a simple ignition actuated test,
which you can use prior to going to the test
station. To check if your vehicle's OBD II system
is ready, you must do the following:
1. Cycle the ignition switch to the ON position,
but do not crank or start the engine.
NOTE:
If you crank or start the engine, you will have to
start this test over.
2. As soon as you cycle the ignition switch to the ON position, you will see the
“Malfunction Indicator Light (MIL)” symbol
come on as part of a normal bulb check.
3. Approximately 15 seconds later, one of two things will happen:
The MIL will flash for about 10 seconds
and then return to being fully illuminated
until you turn OFF the ignition or start the
engine. This means that your vehicle's
OBD II system is not ready and you should
not proceed to the I/M station.
The MIL will not flash at all and will remain
fully illuminated until you place the ignition
in the off position or start the engine. This
means that your vehicle's OBD II system is
ready and you can proceed to the I/M
station. If your OBD II system is not ready,
you should
see an authorized dealer or repair facility. If your
vehicle was recently serviced or had a battery
failure or replacement, you may need to do
nothing more than drive your vehicle as you
normally would in order for your OBD II system
to update. A recheck with the above test routine
may then indicate that the system is now ready.
Regardless of whether your vehicle's OBD II
system is ready or not, if the MIL is illuminated
during normal vehicle operation you should
have your vehicle serviced before going to the
I/M station. The I/M station can fail your vehicle
because the MIL is on with the engine running.
20_RT_OM_EN_USC_t.book Page 102
Page 105 of 380
103(Continued)
SAFETY
SAFETY FEATURES
Anti-Lock Brake System (ABS)
The Anti-Lock Brake System (ABS) provides
increased vehicle stability and brake
performance under most braking conditions.
The system automatically prevents wheel lock,
and enhances vehicle control during braking.
The ABS performs a self-check cycle to ensure
that the ABS is working properly each time the
vehicle is started and driven. During this
self-check, you may hear a slight clicking sound
as well as some related motor noises.
ABS is activated during braking when the
system detects one or more wheels begin to
lock. Road conditions such as ice, snow, gravel,
bumps, railroad tracks, loose debris, or panic
stops may increase the likelihood of ABS
activation(s).
You also may experience the following when
ABS activates:
The ABS motor noise (it may continue to run
for a short time after the stop)
The clicking sound of solenoid valves
Brake pedal pulsations
A slight drop of the brake pedal at the end of
the stop
These are all normal characteristics of ABS.
ABS is designed to function with the Original
Equipment Manufacturer (OEM) tires. Modifi-
cation may result in degraded ABS
performance.
WARNING!
The ABS contains sophisticated electronic
equipment that may be susceptible to inter -
ference caused by improperly installed or
high output radio transmitting equipment.
This interference can cause possible loss of
anti-lock braking capability. Installation of
such equipment should be performed by
qualified professionals.
Pumping of the Anti-Lock Brakes will
diminish their effectiveness and may lead
to a collision. Pumping makes the stopping
distance longer. Just press firmly on your
brake pedal when you need to slow down or
stop.
The ABS cannot prevent the natural laws of
physics from acting on the vehicle, nor can
it increase braking or steering efficiency
beyond that afforded by the condition of the
vehicle brakes and tires or the traction
afforded.
The ABS cannot prevent collisions,
including those resulting from excessive
speed in turns, following another vehicle
too closely, or hydroplaning.
The capabilities of an ABS equipped vehicle
must never be exploited in a reckless or
dangerous manner that could jeopardize
the user’s safety or the safety of others.
WARNING! (Continued)
4
20_RT_OM_EN_USC_t.book Page 103
Page 106 of 380
104SAFETY
Anti-Lock Brake Warning Light
The yellow “Anti-Lock Brake Warning Light” will
turn on when the ignition is placed in the ON/
RUN mode and may stay on for as long as four
seconds.
If the “Anti-Lock Brake Warning Light” remains
on or comes on while driving, it indicates that
the anti-lock portion of the brake system is not
functioning and that service is required.
However, the conventional brake system will
continue to operate normally if the “Anti-Lock
Brake Warning Light” is on.
If the “Anti-Lock Brake Warning Light” is on, the
brake system should be serviced as soon as
possible to restore the benefits of anti-lock
brakes. If the “Anti-Lock Brake Warning Light”
does not come on when the ignition is placed in
the ON/RUN mode, have the light repaired as
soon as possible.
Electronic Brake Control (EBC) System
Your vehicle is equipped with an advanced
Electronic Brake Control (EBC) system. This
system includes Electronic Brake Force Distri -
bution (EBD), Anti-Lock Brake System (ABS),
Brake Assist System (BAS), Hill Start Assist
(HSA), Traction Control System (TCS), Electronic Stability Control (ESC), and Electronic Roll
Mitigation (ERM). These systems work together
to enhance both vehicle stability and control in
various driving conditions.
Your vehicle may also be equipped with Trailer
Sway Control (TSC).
Brake Assist System (BAS)
The Brake Assist System (BAS) is designed to
optimize the vehicle’s braking capability during
emergency braking maneuvers. The system
detects an emergency braking situation by
sensing the rate and amount of brake
application and then applies optimum pressure
to the brakes. This can help reduce braking
distances. The BAS complements the Anti-Lock
Brake System (ABS). Applying the brakes very
quickly results in the best BAS assistance. To
receive the benefit of the system, you must
apply continuous braking pressure during the
stopping sequence, (do not “pump” the brakes).
Do not reduce brake pedal pressure unless
braking is no longer desired. Once the brake
pedal is released, the BAS is deactivated.
Brake System Warning Light
The red “Brake System Warning Light” will turn
on when the ignition is placed in the ON/RUN
mode and may stay on for as long as four
seconds.
If the “Brake System Warning Light” remains on
or comes on while driving, it indicates that the
brake system is not functioning properly and
that immediate service is required. If the “Brake
System Warning Light” does not come on when
the ignition is placed in the ON/RUN mode,
have the light repaired as soon as possible.
WARNING!
The Brake Assist System (BAS) cannot
prevent the natural laws of physics from
acting on the vehicle, nor can it increase the
traction afforded by prevailing road
conditions. BAS cannot prevent collisions,
including those resulting from excessive
speed in turns, driving on very slippery
surfaces, or hydroplaning. The capabilities of
a BAS-equipped vehicle must never be
exploited in a reckless or dangerous manner,
which could jeopardize the user's safety or
the safety of others.
20_RT_OM_EN_USC_t.book Page 104
Page 107 of 380
SAFETY105
Electronic Brake Force Distribution (EBD)
The Electronic Brake Force Distribution (EBD)
function manages the distribution of the
braking torque between the front and rear axles
by limiting braking pressure to the rear axle.
This is done to prevent overslip of the rear
wheels to avoid vehicle instability, and to
prevent the rear axle from entering ABS before
the front axle.
Electronic Roll Mitigation (ERM)
The Electronic Roll Mitigation (ERM) system
anticipates the potential for wheel lift by
monitoring the driver’s steering wheel input and
the speed of the vehicle. When ERM determines
that the rate of change of the steering wheel
angle and vehicle’s speed are sufficient to
potentially cause wheel lift, it then applies the
appropriate brake and may also reduce engine
power to lessen the chance that wheel lift will
occur. ERM can only reduce the chance of
wheel lift occurring during severe or evasive
driving maneuvers; it cannot prevent wheel lift
due to other factors, such as road conditions,
leaving the roadway, or striking objects or other
vehicles.
Electronic Stability Control (ESC)
This system enhances directional control and
stability of the vehicle under various driving
conditions. ESC corrects for oversteering or
understeering of the vehicle by applying the
brake of the appropriate wheel(s) to assist in
counteracting the oversteer or understeer
condition. Engine power may also be reduced to
help the vehicle maintain the desired path. ESC uses sensors in the vehicle to determine
the vehicle path intended by the driver and
compares it to the actual path of the vehicle.
When the actual path does not match the
intended path, ESC applies the brake of the
appropriate wheel to assist in counteracting the
oversteer or understeer condition.
Oversteer — when the vehicle is turning more
than appropriate for the steering wheel posi
-
tion.
Understeer — when the vehicle is turning less
than appropriate for the steering wheel
position.
The “ESC Activation/Malfunction Indicator
Light” located in the instrument cluster will start
to flash as soon as the ESC system becomes
active. The “ESC Activation/Malfunction
Indicator Light” also flashes when the TCS is
active. If the “ESC Activation/Malfunction
Indicator Light” begins to flash during
acceleration, ease up on the accelerator and
apply as little throttle as possible. Be sure to
adapt your speed and driving to the prevailing
road conditions.
WARNING!
Many factors, such as vehicle loading, road
conditions and driving conditions, influence
the chance that wheel lift or rollover may
occur. ERM cannot prevent all wheel lift or
rollovers, especially those that involve leaving
the roadway or striking objects or other
vehicles. The capabilities of an
ERM-equipped vehicle must never be
exploited in a reckless or dangerous manner
which could jeopardize the user's safety or
the safety of others.
4
20_RT_OM_EN_USC_t.book Page 105
Page 108 of 380
106SAFETY
(Continued)
ESC Operating Modes
NOTE:
Depending upon model and mode of operation,
the ESC system may have multiple operating
modes.
ESC On
This is the normal operating mode for the ESC.
Whenever the vehicle is started, the ESC system
will be in this mode. This mode should be used
for most driving conditions. Alternate ESC
modes should only be used for specific reasons
as noted in the following paragraphs.
Partial Off
The “Partial Off” mode is intended for times
when a more spirited driving experience is
desired. This mode may modify TCS and ESC
thresholds for activation, which allows for more
wheel spin than normally allowed. This mode
may be useful if the vehicle becomes stuck.
WARNING!
Electronic Stability Control (ESC) cannot
prevent the natural laws of physics from
acting on the vehicle, nor can it increase
the traction afforded by prevailing road
conditions. ESC cannot prevent accidents,
including those resulting from excessive
speed in turns, driving on very slippery
surfaces, or hydroplaning. ESC also cannot
prevent accidents resulting from loss of
vehicle control due to inappropriate driver
input for the conditions. Only a safe, atten -
tive, and skillful driver can prevent acci -
dents. The capabilities of an ESC equipped
vehicle must never be exploited in a reck -
less or dangerous manner which could
jeopardize the user’s safety or the safety of
others.Vehicle modifications, or failure to properly
maintain your vehicle, may change the
handling characteristics of your vehicle,
and may negatively affect the performance
of the ESC system. Changes to the steering
system, suspension, braking system, tire
type and size or wheel size may adversely
affect ESC performance. Improperly
inflated and unevenly worn tires may also
degrade ESC performance. Any vehicle
modification or poor vehicle maintenance
that reduces the effectiveness of the ESC
system can increase the risk of loss of
vehicle control, vehicle rollover, personal
injury and death.
WARNING! (Continued)
20_RT_OM_EN_USC_t.book Page 106
Page 109 of 380
SAFETY107
To enter the “Partial Off” mode, momentarily
push the “ESC OFF” switch and the “ESC OFF
Indicator Light” will illuminate. To turn the ESC
on again, momentarily push the “ESC OFF”
switch and the “ESC OFF Indicator Light” will
turn off. NOTE:
The Electronic Stability Control (ESC) cannot
prevent the natural laws of physics from acting
on the vehicle, nor can it increase the traction
afforded by prevailing road conditions. ESC
cannot prevent all accidents, including those
resulting from excessive speed in turns, driving
on very slippery surfaces, or hydroplaning. ESC
also cannot prevent collisions.
ESC Activation/Malfunction Indicator Light
And ESC OFF Indicator Light
The “ESC Activation/Malfunction
Indicator Light” in the instrument
cluster will come on when the ignition
is placed in the ON mode. It should go
out with the engine running. If the “ESC
Activation/Malfunction Indicator Light” comes
on continuously with the engine running, a
malfunction has been detected in the ESC
system. If this light remains on after several
ignition cycles, and the vehicle has been driven
several miles (kilometers) at speeds greater
than 30 mph (48 km/h), see an authorized
dealer as soon as possible to have the problem
diagnosed and corrected. The “ESC Activation/Malfunction Indicator
Light” (located in the instrument cluster) starts
to flash as soon as the tires lose traction and
the ESC system becomes active. The “ESC
Activation/Malfunction Indicator Light” also
flashes when TCS is active. If the “ESC
Activation/Malfunction Indicator Light” begins
to flash during acceleration, ease up on the
accelerator and apply as little throttle as
possible. Be sure to adapt your speed and
driving to the prevailing road conditions.
NOTE:
The “ESC Activation/Malfunction Indicator
Light” and the “ESC OFF Indicator Light”
come on momentarily each time the ignition
is placed in the ON position.
Each time the ignition is placed in the ON
position, the ESC system will be on even if it
was turned off previously.
The ESC system will make buzzing or clicking
sounds when it is active. This is normal; the
sounds will stop when ESC becomes inactive
following the maneuver that caused the ESC
activation.
WARNING!
When in “Partial Off” mode, the TCS func
-
tionality of ESC, (except for the limited slip
feature described in the TCS section), has
been disabled and the “ESC OFF Indicator
Light” will be illuminated. When in “Partial
Off” mode, the engine power reduction
feature of TCS is disabled, and the
enhanced vehicle stability offered by the
ESC system is reduced.
Trailer Sway Control (TSC) is disabled when
the ESC system is in the “Partial Off” mode.
4
20_RT_OM_EN_USC_t.book Page 107
Page 110 of 380
108SAFETY
The “ESC OFF Indicator Light”
indicates the customer has elected to
have the Electronic Stability Control
(ESC) in a reduced mode.
Hill Start Assist (HSA)
The Hill Start Assist (HSA) system is designed to
mitigate roll back from a complete stop while on
an incline. If the driver releases the brake while
stopped on an incline, HSA will continue to hold
the brake pressure for a short period. If the
driver does not apply the throttle before this
time expires, the system will release brake
pressure and the vehicle will roll down the hill as
normal.
The following conditions must be met in order
for HSA to activate:
The feature must be enabled.
The vehicle must be stopped.
The park brake must be off.
The driver door must be closed.
The vehicle must be on a sufficient grade.
The gear selection must match vehicle uphill
direction (i.e., vehicle facing uphill is in
forward gear; vehicle backing uphill is in
REVERSE gear).
HSA will work in REVERSE gear and all
forward gears. The system will not activate if
the transmission is in PARK or NEUTRAL. For
vehicles equipped with a manual transmis -
sion, if the clutch is pressed, HSA will remain
active.
Towing With HSA
HSA will also provide assistance to mitigate roll
back while towing a trailer.
WARNING!
There may be situations where the Hill Start
Assist (HSA) will not activate and slight rolling
may occur, such as on minor hills or with a
loaded vehicle, or while pulling a trailer. HSA
is not a substitute for active driving
involvement. It is always the driver’s
responsibility to be attentive to distance to
other vehicles, people, and objects, and most
importantly brake operation to ensure safe
operation of the vehicle under all road
conditions. Your complete attention is always
required while driving to maintain safe control
of your vehicle. Failure to follow these
warnings can result in a collision or serious
personal injury.
WARNING!
If you use a trailer brake controller with your
trailer, the trailer brakes may be activated
and deactivated with the brake switch. If
so, there may not be enough brake pres -
sure to hold both the vehicle and the trailer
on a hill when the brake pedal is released.
In order to avoid rolling down an incline
while resuming acceleration, manually acti -
vate the trailer brake or apply more vehicle
brake pressure prior to releasing the brake
pedal.
HSA is not a parking brake. Always apply
the parking brake fully when exiting your
vehicle. Also, be certain to place the trans -
mission in PARK.
Failure to follow these warnings can result
in a collision or serious personal injury.
20_RT_OM_EN_USC_t.book Page 108