DODGE GRAND CARAVAN 2020 Owners Manual
Manufacturer: DODGE, Model Year: 2020, Model line: GRAND CARAVAN, Model: DODGE GRAND CARAVAN 2020Pages: 380, PDF Size: 14.92 MB
Page 201 of 380

IN CASE OF EMERGENCY199
CavityCartridge Fuse Mini-Fuse Description
J140 Amp Green –Power Folding Seat
J2 30 Amp Pink –Power Liftgate Module
J3 30 Amp Pink –Rear Door Module
J4 25 Amp Clear –Driver Door Node
J5 25 Amp Clear –Passenger Door Node
J6 40 Amp Green –Antilock Brakes Pump/Stability Control System
J7 30 Amp Pink –Antilock Brakes Valve/Stability Control System
J8 40 Amp Green
–
Power Memory Seat – If Equipped
J9 ––Not Used
J10 30 Amp Pink –Headlamp Wash/Manifold Tuning Valve – If Equipped
J11 30 Amp Pink –Power Sliding Door Module/Anti–Theft Module – If
Equipped
J12 30 Amp Pink –HVAC Rear Blower, Radiator Fan Motor
J13 60 Amp Yellow –Ignition Off Draw (IOD) – Main
J14 40 Amp Green –Rear Window Defogger
J15 40 Amp Green –Front Blower
J17 40 Amp Green –Starter Solenoid
J18 20 Amp Blue –Powertrain Control Module Trans Range
J19 60 Amp Yellow –Radiator Fan
J20 30 Amp Pink –Front Wiper LO/HI
6
20_RT_OM_EN_USC_t.book Page 199
Page 202 of 380

200IN CASE OF EMERGENCY
J2120 Amp Blue –Front/Rear Washer
J22 25 Amp Clear –Sunroof Module
M1 –15 Amp Blue Rear Center Brake Lamp/Brake Switch
M2 –20 Amp Yellow Front Fog Lamps
M3 –20 Amp Yellow Vacuum Pump Motor
M5 –25 Amp Clear Inverter
M6 –20 Amp Yellow Power Outlet #1 (ACC), Rain Sensor, Cigar Lighter
(Instrument Panel or with Console Rear)
M7 –20 Amp Yellow Power Outlet #2 (BATT/ACC SELECT) – Center Seat or with
Console Rear
M8 –20 Amp Yellow Front Heated Seat — If Equipped
M9 –20 Amp Yellow Rear Heated Seat — If Equipped
M10 –15 Amp BlueIgnition Off Draw — Video System, Satellite Radio, DVD,
Hands-Free Module, Universal Garage Door Opener, Vanity
Lamp, Streaming Video Module — If Equipped
M11 –10 Amp Red Climate Control System
M12 –30 Amp Green Amplifier/Radio
M13 –20 Amp Yellow Instrument Cluster, SIREN, Clock Module, Multifunction
Control Switch – If Equipped
M14 –20 Amp Yellow Trailer Tow — If Equipped
M15 –20 Amp Yellow Rear View Mirror, Instrument Cluster, Multifunction Control
Switch, Tire Pressure Monitor
Cavity
Cartridge Fuse Mini-Fuse Description
20_RT_OM_EN_USC_t.book Page 200
Page 203 of 380

IN CASE OF EMERGENCY201
M16 –10 Amp Red Airbag Module/Occupant Classification Module
M17 –15 Amp Blue Left Tail/License/Park Lamp, Running Lamps
M18 –15 Amp Blue Right Tail/Park/Run Lamp
M19 –25 Amp Clear Powertrain
M20 –15 Amp BlueInstrument Cluster Interior Light, Switch Bank, Steering
Column Module, Switch Steering Wheel
M21 –20 Amp Yellow Powertrain
M22 –10 Amp Red Horn
M23 –10 Amp Red Horn
M24 –25 Amp Clear Rear Wiper
M25 –20 Amp Yellow Fuel Pump
M26 –10 Amp Red Power Mirror Switch, Driver Window Switch
M27
– 10 Amp Red Wireless Control Module, Keyless Entry Module
M28 –10 Amp Red Powertrain, Transmission Control Module
M29 –10 Amp Red Occupant Classification Module
M30 –15 Amp Blue Diagnostic Feed
M31 –20 Amp Yellow Back-Up Lamps
M32 –10 Amp Red Airbag Module, THATCHUM — If Equipped
M33 –10 Amp Red Powertrain
CavityCartridge Fuse Mini-Fuse Description
6
20_RT_OM_EN_USC_t.book Page 201
Page 204 of 380
202IN CASE OF EMERGENCY
(Continued)
(Continued)
The power windows are fused by a 25 Amp circuit breaker located in the Totally Integrated Power Module.
JACKING AND TIRE CHANGING
M34
–10 Amp RedPark Assist, Heater Climate Control Module, Headlamp
Wash, Compass, Rear Camera, Door Lamps, Flashlight,
Relay Diesel Cabin Heater
M35 –10 Amp Red Heated Mirrors
M36 –20 Amp Yellow Power Outlet #3 (Instrument Panel Or With Console
Center)
M37 –10 Amp Red Antilock Brakes, Stability Control, Stop Lamp, Fuel Pump
M38 –25 Amp Clear Door Lock/Unlock Motors, Liftgate Lock/Unlock Motors
CavityCartridge Fuse Mini-Fuse Description
WARNING!
Do not attempt to change a tire on the side
of the vehicle close to moving traffic. Pull
far enough off the road to avoid the danger
of being hit when operating the jack or
changing the wheel.
Being under a jacked-up vehicle is
dangerous. The vehicle could slip off the
jack and fall on you. You could be crushed.
Never put any part of your body under a
vehicle that is on a jack. If you need to get
under a raised vehicle, take it to a service
center where it can be raised on a lift.
Never start or run the engine while the
vehicle is on a jack.
WARNING! (Continued)
The jack is designed to be used as a tool for
changing tires only. The jack should not be
used to lift the vehicle for service purposes.
The vehicle should be jacked on a firm level
surface only. Avoid ice or slippery areas.
WARNING! (Continued)
20_RT_OM_EN_USC_t.book Page 202
Page 205 of 380
IN CASE OF EMERGENCY203
Jack Location
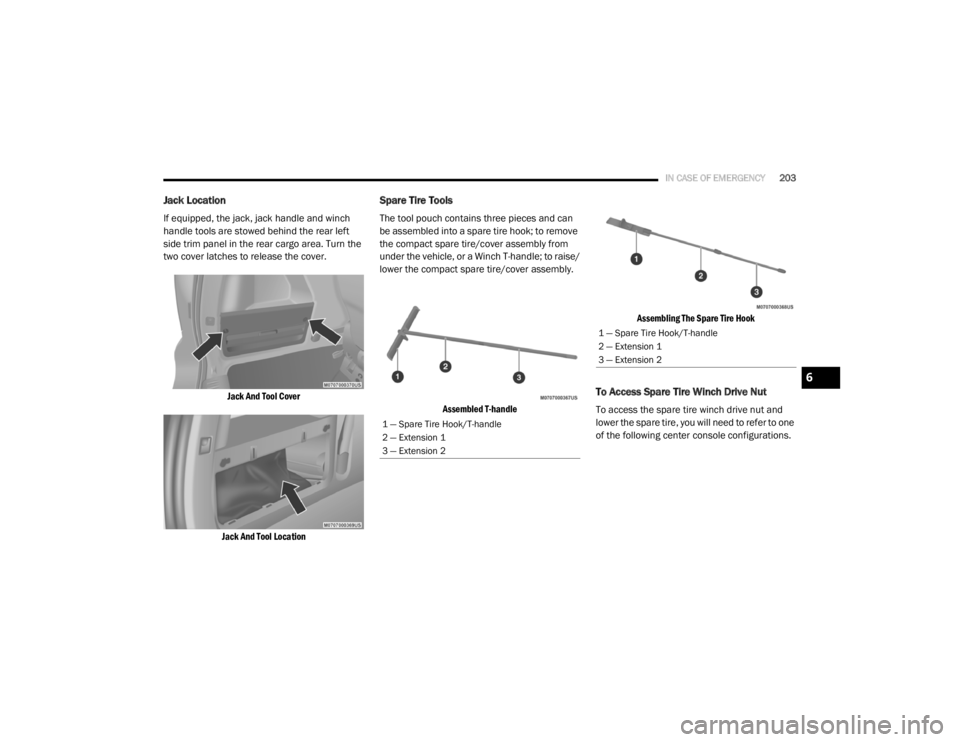
If equipped, the jack, jack handle and winch
handle tools are stowed behind the rear left
side trim panel in the rear cargo area. Turn the
two cover latches to release the cover.
Jack And Tool Cover
Jack And Tool Location
Spare Tire Tools
The tool pouch contains three pieces and can
be assembled into a spare tire hook; to remove
the compact spare tire/cover assembly from
under the vehicle, or a Winch T-handle; to raise/
lower the compact spare tire/cover assembly.
Assembled T-handle Assembling The Spare Tire Hook
To Access Spare Tire Winch Drive Nut
To access the spare tire winch drive nut and
lower the spare tire, you will need to refer to one
of the following center console configurations.
1 — Spare Tire Hook/T-handle
2 — Extension 1
3 — Extension 2
1 — Spare Tire Hook/T-handle
2 — Extension 1
3 — Extension 2
6
20_RT_OM_EN_USC_t.book Page 203
Page 206 of 380
204IN CASE OF EMERGENCY
Super Console — If Equipped
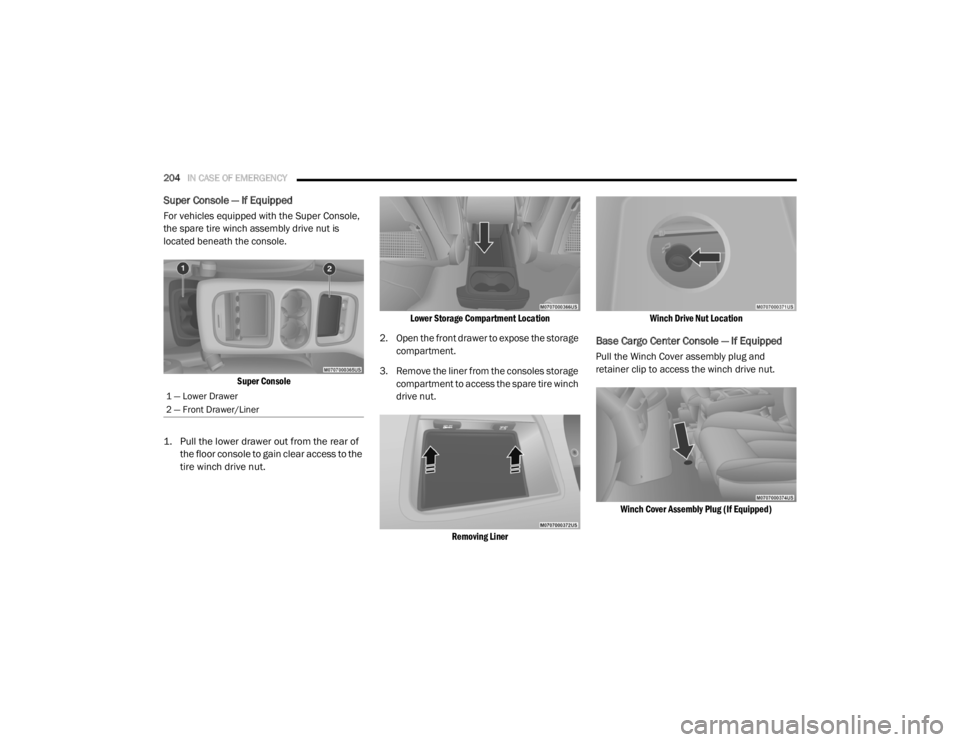
For vehicles equipped with the Super Console,
the spare tire winch assembly drive nut is
located beneath the console.
Super Console
1. Pull the lower drawer out from the rear of the floor console to gain clear access to the
tire winch drive nut.
Lower Storage Compartment Location
2. Open the front drawer to expose the storage compartment.
3. Remove the liner from the consoles storage compartment to access the spare tire winch
drive nut.
Removing Liner Winch Drive Nut Location
Base Cargo Center Console — If Equipped
Pull the Winch Cover assembly plug and
retainer clip to access the winch drive nut.
Winch Cover Assembly Plug (If Equipped)
1 — Lower Drawer
2 — Front Drawer/Liner
20_RT_OM_EN_USC_t.book Page 204
Page 207 of 380
IN CASE OF EMERGENCY205
Spare Tire Removal
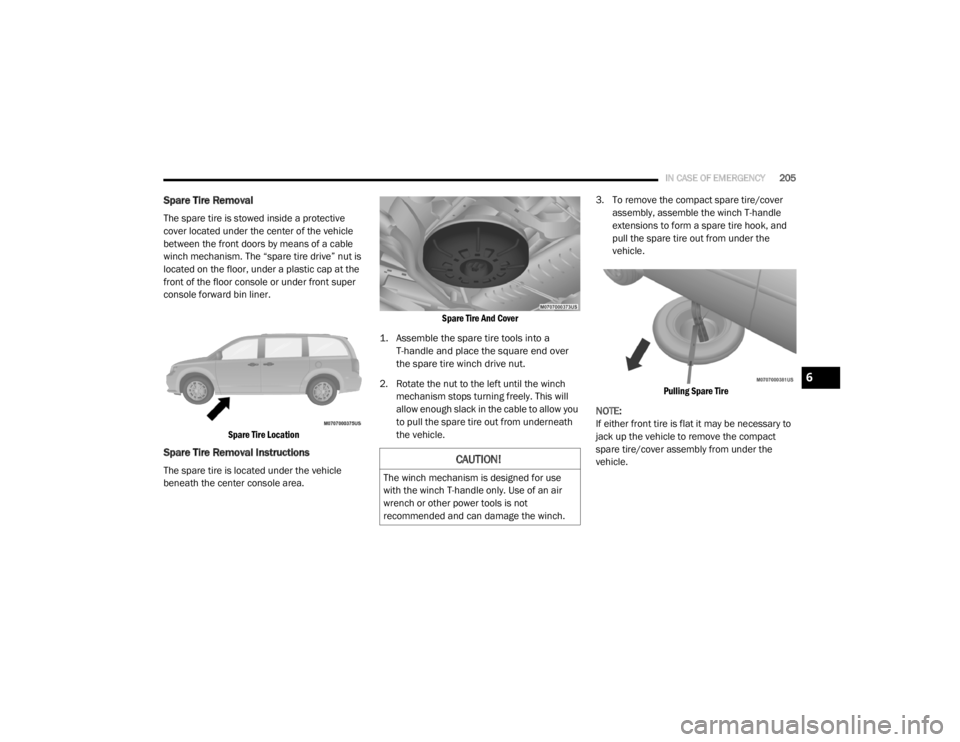
The spare tire is stowed inside a protective
cover located under the center of the vehicle
between the front doors by means of a cable
winch mechanism. The “spare tire drive” nut is
located on the floor, under a plastic cap at the
front of the floor console or under front super
console forward bin liner.
Spare Tire Location
Spare Tire Removal Instructions
The spare tire is located under the vehicle
beneath the center console area.
Spare Tire And Cover
1. Assemble the spare tire tools into a T-handle and place the square end over
the spare tire winch drive nut.
2. Rotate the nut to the left until the winch mechanism stops turning freely. This will
allow enough slack in the cable to allow you
to pull the spare tire out from underneath
the vehicle. 3. To remove the compact spare tire/cover
assembly, assemble the winch T-handle
extensions to form a spare tire hook, and
pull the spare tire out from under the
vehicle.
Pulling Spare Tire
NOTE:
If either front tire is flat it may be necessary to
jack up the vehicle to remove the compact
spare tire/cover assembly from under the
vehicle.CAUTION!
The winch mechanism is designed for use
with the winch T-handle only. Use of an air
wrench or other power tools is not
recommended and can damage the winch.
6
20_RT_OM_EN_USC_t.book Page 205
Page 208 of 380
206IN CASE OF EMERGENCY
(Continued)
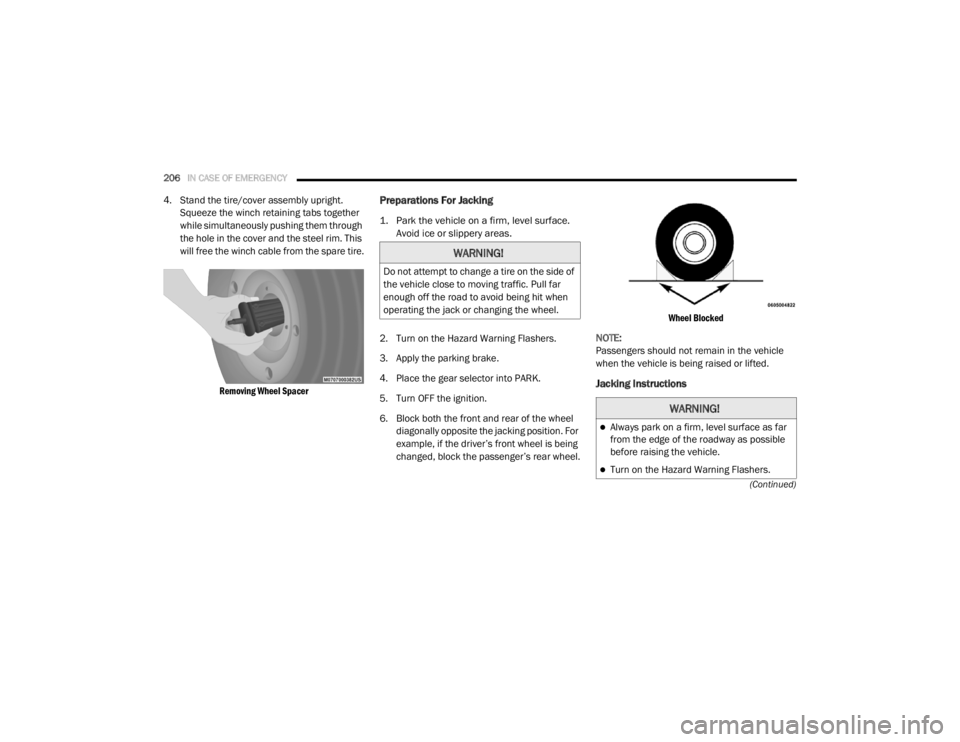
4. Stand the tire/cover assembly upright. Squeeze the winch retaining tabs together
while simultaneously pushing them through
the hole in the cover and the steel rim. This
will free the winch cable from the spare tire.
Removing Wheel Spacer
Preparations For Jacking
1. Park the vehicle on a firm, level surface. Avoid ice or slippery areas.
2. Turn on the Hazard Warning Flashers.
3. Apply the parking brake.
4. Place the gear selector into PARK.
5. Turn OFF the ignition.
6. Block both the front and rear of the wheel diagonally opposite the jacking position. For
example, if the driver’s front wheel is being
changed, block the passenger’s rear wheel.
Wheel Blocked
NOTE:
Passengers should not remain in the vehicle
when the vehicle is being raised or lifted.
Jacking Instructions
WARNING!
Do not attempt to change a tire on the side of
the vehicle close to moving traffic. Pull far
enough off the road to avoid being hit when
operating the jack or changing the wheel.
WARNING!
Always park on a firm, level surface as far
from the edge of the roadway as possible
before raising the vehicle.
Turn on the Hazard Warning Flashers.
20_RT_OM_EN_USC_t.book Page 206
Page 209 of 380
IN CASE OF EMERGENCY207
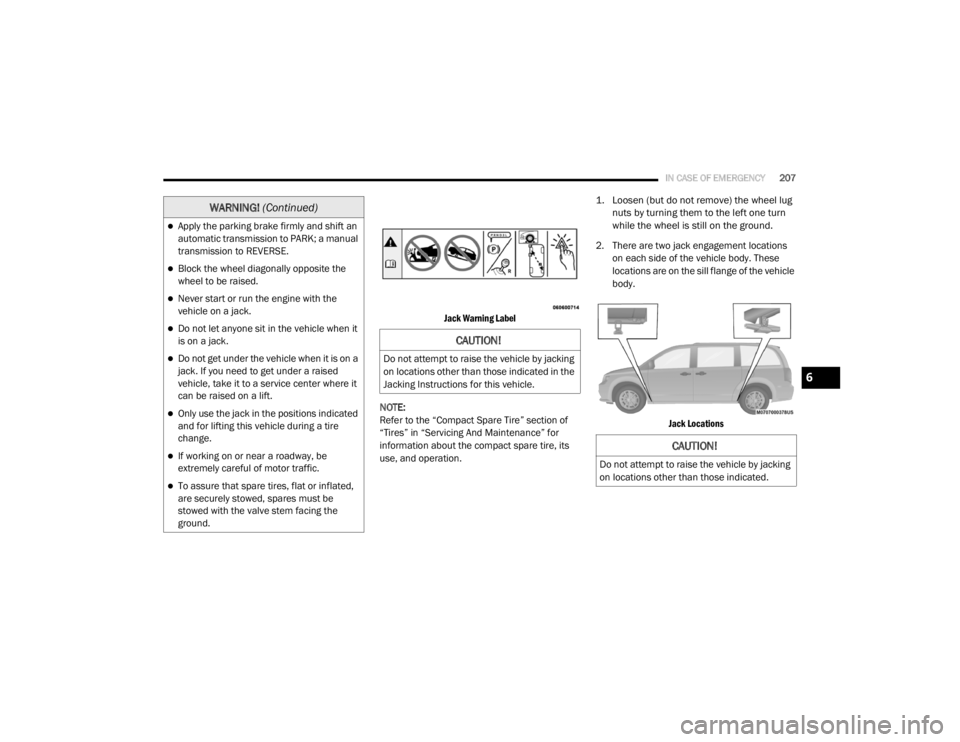
Jack Warning Label
NOTE:
Refer to the “Compact Spare Tire” section of
“Tires” in “Servicing And Maintenance” for
information about the compact spare tire, its
use, and operation.
1. Loosen (but do not remove) the wheel lug
nuts by turning them to the left one turn
while the wheel is still on the ground.
2. There are two jack engagement locations on each side of the vehicle body. These
locations are on the sill flange of the vehicle
body.
Jack Locations
Apply the parking brake firmly and shift an
automatic transmission to PARK; a manual
transmission to REVERSE.
Block the wheel diagonally opposite the
wheel to be raised.
Never start or run the engine with the
vehicle on a jack.
Do not let anyone sit in the vehicle when it
is on a jack.
Do not get under the vehicle when it is on a
jack. If you need to get under a raised
vehicle, take it to a service center where it
can be raised on a lift.
Only use the jack in the positions indicated
and for lifting this vehicle during a tire
change.
If working on or near a roadway, be
extremely careful of motor traffic.
To assure that spare tires, flat or inflated,
are securely stowed, spares must be
stowed with the valve stem facing the
ground.
WARNING! (Continued)
CAUTION!
Do not attempt to raise the vehicle by jacking
on locations other than those indicated in the
Jacking Instructions for this vehicle.
CAUTION!
Do not attempt to raise the vehicle by jacking
on locations other than those indicated.
6
20_RT_OM_EN_USC_t.book Page 207
Page 210 of 380
208IN CASE OF EMERGENCY
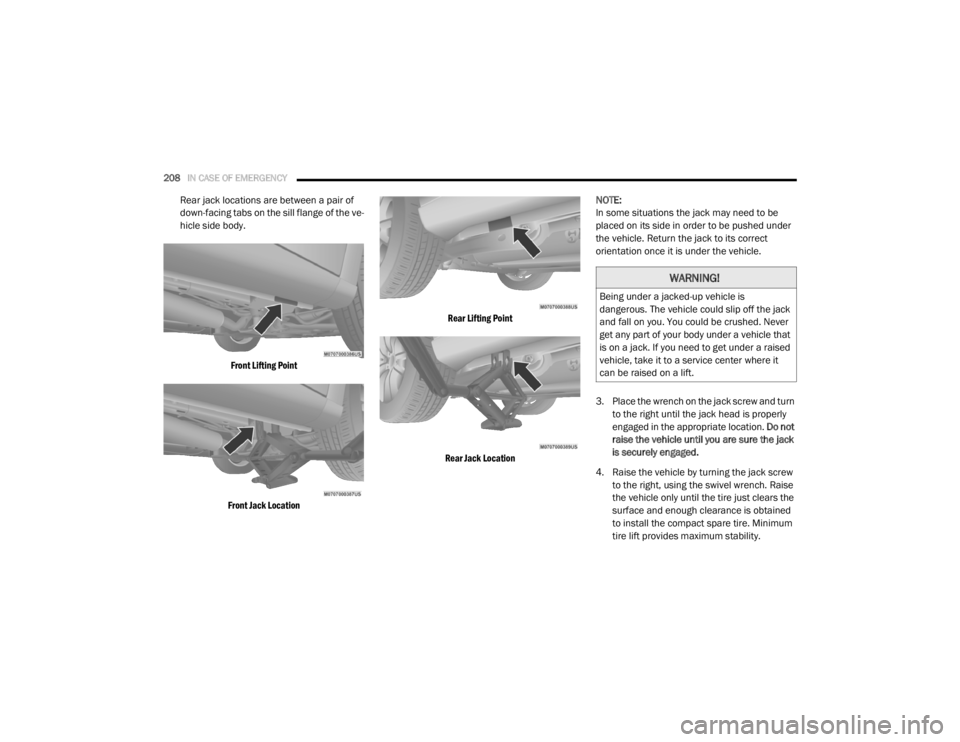
Rear jack locations are between a pair of
down-facing tabs on the sill flange of the ve -
hicle side body.
Front Lifting Point
Front Jack Location Rear Lifting Point
Rear Jack Location
NOTE:
In some situations the jack may need to be
placed on its side in order to be pushed under
the vehicle. Return the jack to its correct
orientation once it is under the vehicle.
3. Place the wrench on the jack screw and turn
to the right until the jack head is properly
engaged in the appropriate location. Do not
raise the vehicle until you are sure the jack
is securely engaged.
4. Raise the vehicle by turning the jack screw to the right, using the swivel wrench. Raise
the vehicle only until the tire just clears the
surface and enough clearance is obtained
to install the compact spare tire. Minimum
tire lift provides maximum stability.
WARNING!
Being under a jacked-up vehicle is
dangerous. The vehicle could slip off the jack
and fall on you. You could be crushed. Never
get any part of your body under a vehicle that
is on a jack. If you need to get under a raised
vehicle, take it to a service center where it
can be raised on a lift.
20_RT_OM_EN_USC_t.book Page 208