garage door opener DODGE GRAND CARAVAN 2020 Owners Manual
[x] Cancel search | Manufacturer: DODGE, Model Year: 2020, Model line: GRAND CARAVAN, Model: DODGE GRAND CARAVAN 2020Pages: 380, PDF Size: 14.92 MB
Page 5 of 380

3
WINDOWS ............................................................59 Power Vent Windows — If Equipped .......... 59
Power Windows ............................................ 59
HOOD......................................................................61
Opening The Hood ....................................... 61
Closing The Hood ......................................... 61
LIFTGATE ................................................................62
Opening ........................................................ 62
Closing .......................................................... 62
Power Liftgate — If Equipped ...................... 62
Cargo Area Features ................................... 63
LOAD LEVELING SYSTEM — IF EQUIPPED .........63
GARAGE DOOR OPENER — IF EQUIPPED ..........63
Before You Begin Programming
HomeLink® .................................................. 64 Programming A Rolling Code ...................... 64
Programming A Non-Rolling Code............... 65
Canadian/Gate Operator Programming ..... 66
Using HomeLink® ........................................ 67
Security......................................................... 67
Troubleshooting Tips ................................... 67
General Information .................................... 68
INTERNAL EQUIPMENT ........................................68
Storage ......................................................... 68
Cupholders .................................................. 73
Sun Screens — If Equipped ......................... 75
Electrical Power Outlets — If Equipped....... 75
Power Inverter — If Equipped ...................... 77
Smoker's Package Kit — If Equipped ......... 78
Sunglass Storage Bin — If Equipped........... 78 ROOF LUGGAGE RACK — IF EQUIPPED ............. 79
Deploying The Crossbars............................. 79
Stowing The Crossbars................................ 80
GETTING TO KNOW YOUR INSTRUMENT PANEL
INSTRUMENT CLUSTER ...................................... 82 Instrument Cluster Descriptions ................ 84
INSTRUMENT CLUSTER DISPLAY ..................... 85
Instrument Cluster Display Location And
Controls ....................................................... 85 Oil Life Reset ................................................ 87
Instrument Cluster Display Menu Items .... 87
TRIP COMPUTER ................................................. 93
WARNING LIGHTS AND MESSAGES .................. 94 Red Warning Lights ..................................... 94
Yellow Warning Lights ................................. 97
White Indicator Lights ............................... 100Green Indicator Lights ............................... 100Blue Indicator Lights.................................. 100
ONBOARD DIAGNOSTIC SYSTEM — OBD II..... 101
Onboard Diagnostic System (OBD II)
Cybersecurity ............................................. 101
EMISSIONS INSPECTION AND
MAINTENANCE PROGRAMS .............................102
SAFETY
SAFETY FEATURES .............................................103
Anti-Lock Brake System (ABS) ................. 103
Electronic Brake Control (EBC) System ... 104 AUXILIARY DRIVING SYSTEMS ........................ 110
Blind Spot Monitoring (BSM)
— If Equipped ............................................. 110 Tire Pressure Monitoring System
(TPMS) ........................................................ 115
OCCUPANT RESTRAINT SYSTEMS ................. 119
Occupant Restraint Systems Features .... 119
Important Safety Precautions ................... 119
Seat Belt Systems .................................... 120Supplemental Restraint Systems (SRS)... 131
Child Restraints ......................................... 141Transporting Pets ..................................... 159
SAFETY TIPS ...................................................... 159
Transporting Passengers .......................... 159
Exhaust Gas ............................................... 159
Safety Checks You Should Make
Inside The Vehicle .................................... 160 Periodic Safety Checks You Should
Make Outside The Vehicle ........................ 161
STARTING AND OPERATING
STARTING THE ENGINE .................................... 162
Normal Starting ......................................... 162Cold Weather Operation
(Below –22°F Or −30°C) ......................... 163 After Starting — Warming Up The
Engine ........................................................ 163 If Engine Fails To Start ............................. 163
ENGINE BLOCK HEATER — IF EQUIPPED ........ 163
20_RT_OM_EN_USC_t.book Page 3
Page 65 of 380

GETTING TO KNOW YOUR VEHICLE63
Using the above ways:
When the liftgate is fully closed, the liftgate
will open
When the liftgate is fully open, the liftgate will
close
When the liftgate is moving, the liftgate will
reverse
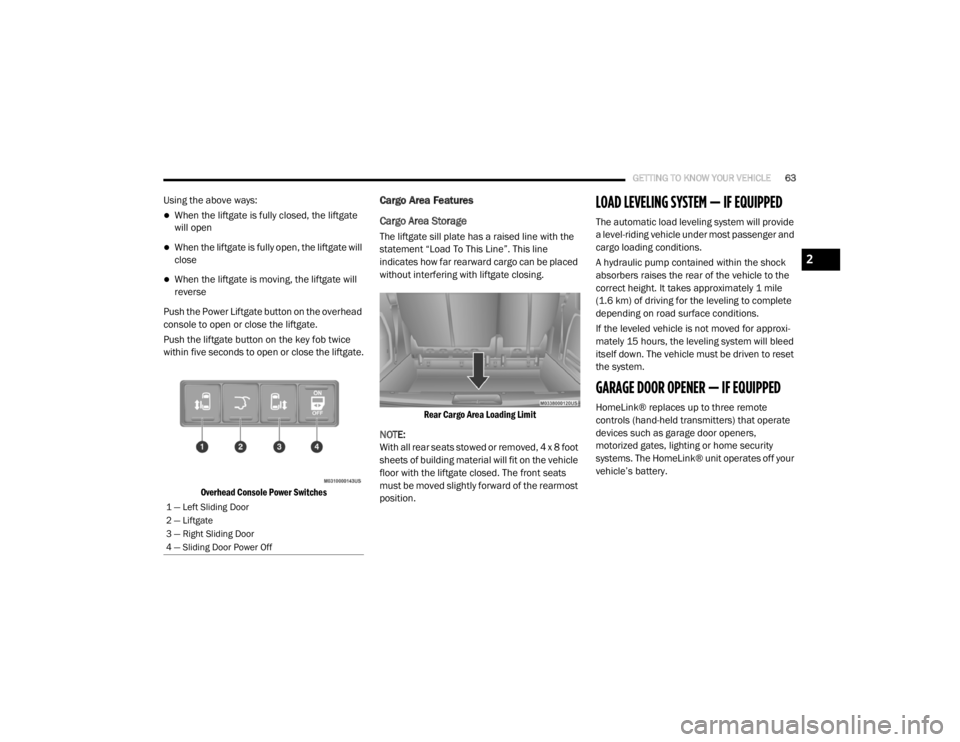
Push the Power Liftgate button on the overhead
console to open or close the liftgate.
Push the liftgate button on the key fob twice
within five seconds to open or close the liftgate.
Overhead Console Power Switches
Cargo Area Features
Cargo Area Storage
The liftgate sill plate has a raised line with the
statement “Load To This Line”. This line
indicates how far rearward cargo can be placed
without interfering with liftgate closing.
Rear Cargo Area Loading Limit
NOTE:
With all rear seats stowed or removed, 4 x 8 foot
sheets of building material will fit on the vehicle
floor with the liftgate closed. The front seats
must be moved slightly forward of the rearmost
position.
LOAD LEVELING SYSTEM — IF EQUIPPED
The automatic load leveling system will provide
a level-riding vehicle under most passenger and
cargo loading conditions.
A hydraulic pump contained within the shock
absorbers raises the rear of the vehicle to the
correct height. It takes approximately 1 mile
(1.6 km) of driving for the leveling to complete
depending on road surface conditions.
If the leveled vehicle is not moved for approxi-
mately 15 hours, the leveling system will bleed
itself down. The vehicle must be driven to reset
the system.
GARAGE DOOR OPENER — IF EQUIPPED
HomeLink® replaces up to three remote
controls (hand-held transmitters) that operate
devices such as garage door openers,
motorized gates, lighting or home security
systems. The HomeLink® unit operates off your
vehicle’s battery.
1 — Left Sliding Door
2 — Liftgate
3 — Right Sliding Door
4 — Sliding Door Power Off
2
20_RT_OM_EN_USC_t.book Page 63
Page 66 of 380

64GETTING TO KNOW YOUR VEHICLE
The HomeLink® buttons, located on either the
overhead console, headliner or sunvisor,
designate the three different HomeLink®
channels. The HomeLink® indicator is located
above the center button.
HomeLink® Buttons/Overhead Consoles
HomeLink® Buttons/Sunvisor/Headliner
NOTE:
HomeLink® is disabled when the vehicle
security alarm is active.
Before You Begin Programming HomeLink®
Be sure that your vehicle is parked outside of
the garage before you begin programming.
For more efficient programming and accurate
transmission of the radio-frequency signal, it is
recommended that a new battery be placed in
the hand-held transmitter of the device that is
being programmed to the HomeLink® system.
To erase the channels, place the ignition in the
ON/RUN position and push and hold the two
outside HomeLink® buttons (I and III) for up to
20 seconds or until the red indicator flashes.
NOTE:
Erasing all channels should only be
performed when programming HomeLink®
for the first time. Do not erase channels when
programming additional buttons.
If you have any problems, or require assis
-
tance, please call toll-free 1-800-355-3515
or, on the Internet at HomeLink.com for infor-
mation or assistance.
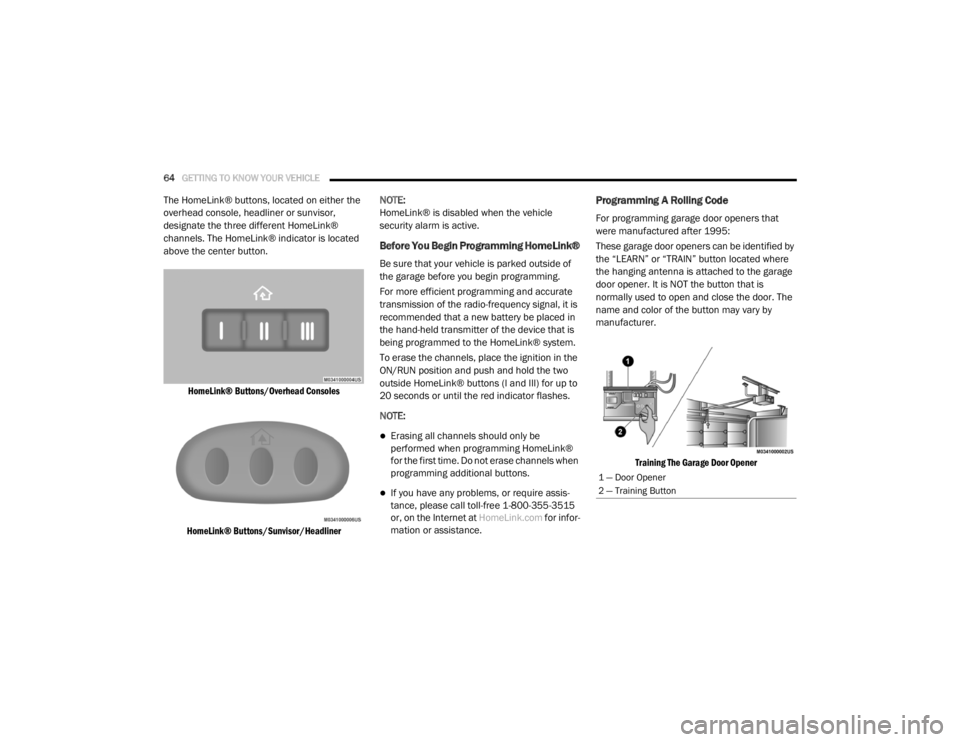
Programming A Rolling Code
For programming garage door openers that
were manufactured after 1995:
These garage door openers can be identified by
the “LEARN” or “TRAIN” button located where
the hanging antenna is attached to the garage
door opener. It is NOT the button that is
normally used to open and close the door. The
name and color of the button may vary by
manufacturer.
Training The Garage Door Opener
1 — Door Opener
2 — Training Button
20_RT_OM_EN_USC_t.book Page 64
Page 67 of 380

GETTING TO KNOW YOUR VEHICLE65
1. Place the ignition in the ON/RUN position.
2. Place the hand-held transmitter
1 to 3 inches (3 to 8 cm) away from the
HomeLink® button you wish to program
while keeping the HomeLink® indicator
light in view.
3. Push and hold the HomeLink® button you want to program while you push and hold
the hand-held transmitter button.
4. Continue to hold both buttons and observe the indicator light. The HomeLink®
indicator will flash slowly and then rapidly
after HomeLink® has received the
frequency signal from the hand-held
transmitter. Release both buttons after the
indicator light changes from slow to rapid.
5. At the garage door opener (in the garage), locate the “LEARN” or “TRAINING” button.
This can usually be found where the
hanging antenna wire is attached to the
garage door opener/device motor. Firmly
push and release the “LEARN” or
“TRAINING” button. On some garage door
openers/devices there may be a light that
blinks when the garage door opener/device
is in the LEARN/TRAIN mode. NOTE:
You have 30 seconds in which to initiate the
next step after the LEARN button has been
pushed.
6. Return to the vehicle and push the
programmed HomeLink® button twice
(holding the button for two seconds each
time). If the garage door opener/device
activates, programming is complete.
NOTE:
If the garage door opener/device does not
activate, push the button a third time (for two
seconds) to complete the training. To program the remaining two HomeLink®
buttons, repeat each step for each remain -
ing button. DO NOT erase the channels.
Reprogramming A Single HomeLink® Button
(Rolling Code)
To reprogram a channel that has been
previously trained, follow these steps:
1. Place the ignition in the ON/RUN position.
2. Push and hold the desired HomeLink®
button until the indicator light begins to
flash after 20 seconds. Do not release the
button.
3. Without releasing the button , proceed with
“Programming A Rolling Code” step two and
follow all remaining steps.
Programming A Non-Rolling Code
For programming garage door openers
manufactured before 1995:
1. Place the ignition in the ON/RUN position.
NOTE:
For vehicles equipped with Keyless Enter-N-Go,
place the ignition in the RUN position with the
engine on. Make sure while programming
HomeLink® with the engine on that your vehicle
is outside of your garage, or that the garage
door remains open at all times.
2. Place the hand-held transmitter 1 to 3 inches (3 to 8 cm) away from the
HomeLink® button you wish to program
while keeping the HomeLink® indicator
light in view.
2
20_RT_OM_EN_USC_t.book Page 65
Page 69 of 380

GETTING TO KNOW YOUR VEHICLE67
5. Push and hold the programmed
HomeLink® button and observe the
indicator light.
NOTE:
If the indicator light stays on constantly,
programming is complete and the garage
door/device should activate when the
HomeLink® button is pushed.
To program the two remaining
HomeLink® buttons, repeat each step
for each remaining button. DO NOT erase
the channels.
If you unplugged the garage door
opener/device for programming, plug it back in
at this time.
Using HomeLink®
To operate, push and release the programmed
HomeLink® button. Activation will now occur for
the programmed device (i.e. garage door
opener, gate operator, security system, entry
door lock, home/office lighting, etc.) The
hand-held transmitter of the device may also be
used at any time.
Security
It is advised to erase all channels before you sell
or turn in your vehicle.
To do this, push and hold the two outside
buttons for 20 seconds until the red indicator
flashes.
NOTE:
All channels will be erased. Individual channels
cannot be erased.
The HomeLink® Universal Transceiver is
disabled when the vehicle security alarm is
active.
Troubleshooting Tips
If you are having trouble programming
HomeLink®, here are some of the most
common solutions:
Replace the battery in the garage door
opener hand-held transmitter.
Push the LEARN button on the garage door
opener to complete the training for a Rolling
Code.
Did you unplug the device for programming
and remember to plug it back in?
If you have any problems, or require assistance,
please call toll-free 1-800-355-3515 or, on the
Internet at HomeLink.com for information or
assistance.
WARNING!
Vehicle exhaust contains carbon monoxide,
a dangerous gas. Do not run your vehicle in
the garage while programming the trans -
ceiver. Exhaust gas can cause serious
injury or death.
Your motorized door or gate will open and
close while you are programming the
universal transceiver. Do not program the
transceiver if people, pets or other objects
are in the path of the door or gate. Only use
this transceiver with a garage door opener
that has a “stop and reverse” feature as
required by Federal safety standards. This
includes most garage door opener models
manufactured after 1982. Do not use a
garage door opener without these safety
features.
2
20_RT_OM_EN_USC_t.book Page 67
Page 202 of 380

200IN CASE OF EMERGENCY
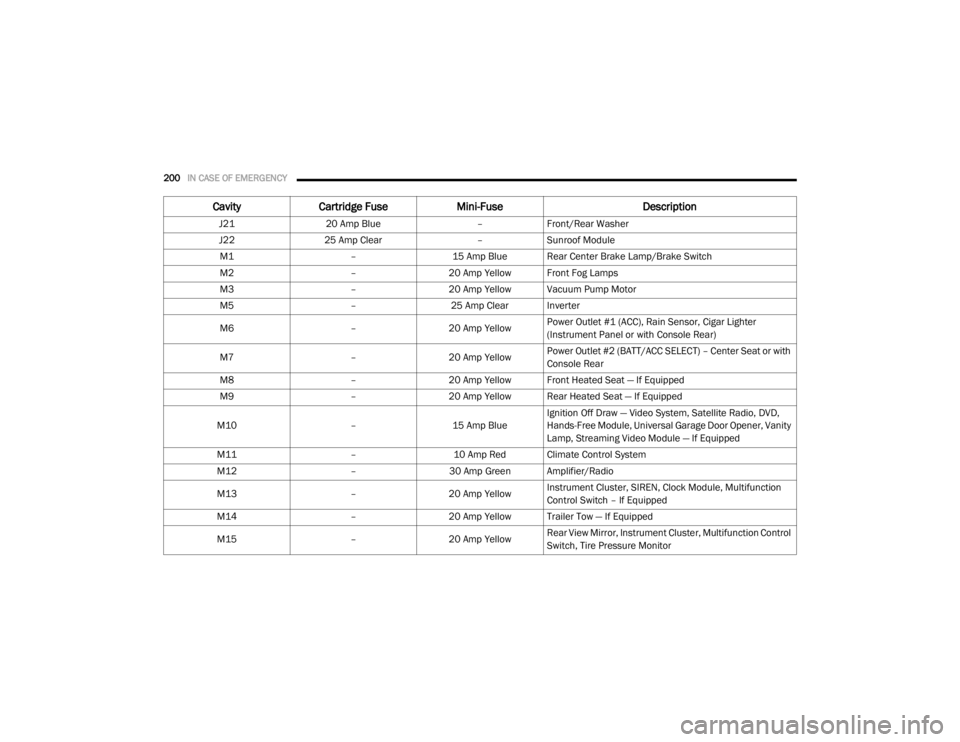
J2120 Amp Blue –Front/Rear Washer
J22 25 Amp Clear –Sunroof Module
M1 –15 Amp Blue Rear Center Brake Lamp/Brake Switch
M2 –20 Amp Yellow Front Fog Lamps
M3 –20 Amp Yellow Vacuum Pump Motor
M5 –25 Amp Clear Inverter
M6 –20 Amp Yellow Power Outlet #1 (ACC), Rain Sensor, Cigar Lighter
(Instrument Panel or with Console Rear)
M7 –20 Amp Yellow Power Outlet #2 (BATT/ACC SELECT) – Center Seat or with
Console Rear
M8 –20 Amp Yellow Front Heated Seat — If Equipped
M9 –20 Amp Yellow Rear Heated Seat — If Equipped
M10 –15 Amp BlueIgnition Off Draw — Video System, Satellite Radio, DVD,
Hands-Free Module, Universal Garage Door Opener, Vanity
Lamp, Streaming Video Module — If Equipped
M11 –10 Amp Red Climate Control System
M12 –30 Amp Green Amplifier/Radio
M13 –20 Amp Yellow Instrument Cluster, SIREN, Clock Module, Multifunction
Control Switch – If Equipped
M14 –20 Amp Yellow Trailer Tow — If Equipped
M15 –20 Amp Yellow Rear View Mirror, Instrument Cluster, Multifunction Control
Switch, Tire Pressure Monitor
Cavity
Cartridge Fuse Mini-Fuse Description
20_RT_OM_EN_USC_t.book Page 200
Page 373 of 380

371
Fluid, Brake
................................................... 274Fluids And Lubricants.................................... 272Fog Lights........................................ 37, 39, 196Fog Lights, Service......................................... 196Fold In Floor (Stow ‘n Go) Seating.................... 21Fold-Flat Seats................................................. 20Freeing A Stuck Vehicle................................. 223Fuel............................................................... 267Adding....................................................... 181Additives................................................... 268Clean Air.................................................... 268Economy Mode.......................................... 167Ethanol...................................................... 268Gasoline.................................................... 267Materials Added........................................ 268Methanol................................................... 268Octane Rating................................. 267, 272Specifications............................................ 272Tank Capacity............................................ 271Fueling........................................................... 181Fuses................................................... 197, 198
G
Garage Door Opener (HomeLink).................... 63Gasoline, (Fuel)............................................. 267Gasoline, Clean Air........................................ 268Gasoline, Reformulated................................. 268Gear Ranges.................................................. 168
Gear Selector Override................................. 222Glass Cleaning.............................................. 265Gross Axle Weight Rating.............................. 183Gross Vehicle Weight Rating......................... 183GVWR............................................................ 182
H
Hands-Free Phone Uconnect
.................................................. 304HazardDriving Through Flowing, Rising,
Or Shallow Standing Water
....................... 192Hazard Warning Flashers.............................. 194Head Restraints............................................... 30Headlights....................................................... 37Automatic.................................................... 38Bulb Replacement.................................... 196Cleaning................................................... 263High Beam/Low Beam Select Switch... 37, 38Lights On Reminder.............................. 37, 39Passing................................................. 37, 38Replacing................................................. 196Switch.......................................................... 37Time Delay............................................ 37, 38Heated Mirrors.......................................... 34, 37Heater, Engine Block.................................... 163
High Beam/Low Beam Select
(Dimmer) Switch..............................................38Hill Start Assist.............................................. 108HitchesTrailer Towing........................................... 184HomeLink (Garage Door Opener).....................63Hood Prop........................................................61Hood Release...................................................61Hook, Coat.......................................................73
I
Ignition.............................................................11Switch..........................................................11Inside Rearview Mirror.....................................35Instrument Cluster...........................................82Descriptions....................................... 84, 100Display.........................................................85Display Controls...........................................85Menu Items.................................................87Instrument Panel Lens Cleaning................... 265Integrated Power Module (Fuses)................. 198Interior And Instrument Lights.........................39Interior Appearance Care.............................. 264Interior Lights...................................................39Intermittent Wipers (Delay Wipers)..................42InverterPower...........................................................77iPod/USB/MP3 Control................................. 340Bluetooth Streaming Audio.............. 343, 362
11
20_RT_OM_EN_USC_t.book Page 371
Page 378 of 380

376
Transfer Case Fluid
.......................................................... 274TransmissionAutomatic........................................ 165, 243Fluid................................................ 243, 274Maintenance............................................. 243Transporting Pets.......................................... 159Tread Wear Indicators................................... 255Turn Signals......................... 37, 100, 196, 197
U
UconnectAdvanced Phone Connectivity
...................314Phone Call Features.................................. 309Uconnect (Hands-Free Phone)....................... 304Uconnect Phone............................................ 311Umbrella Holder.............................................. 72Uniform Tire Quality Grades........................... 261Universal Garage Door Opener (HomeLink)..... 63Universal Transmitter...................................... 63Untwisting Procedure, Seat Belt.................... 123USB............................................................... 340
V
Vanity Mirrors.................................................. 37VarianceCompass..................................................... 89Vehicle Identification Number (VIN).............. 266Vehicle Loading................................... 182, 249Vehicle Modifications/Alterations...................... 8Vehicle Storage.......................................57, 262Viscosity, Engine Oil...................................... 234Voice CommandCommands............................................... 361System Operation..................................... 360Voice Training........................................... 363Voice Recognition System (VR)..................... 360
W
Warning Flashers, Hazard............................. 194Warning Lights
(Instrument Cluster Descriptions).................... 97Warnings And Cautions...................................... 8Warranty Information.................................... 366WasherAdding Fluid.............................................. 232
Washers, Windshield.......................................41Washing Vehicle............................................ 263WaterDriving Through........................................ 192Wheel And Wheel Tire Care........................... 259Wheel And Wheel Tire Trim........................... 259Window Fogging...............................................58Windows..........................................................59Rear Vent.....................................................59Windshield Defroster.................................... 160Windshield Washers.............................. 41, 232Windshield Wiper Blades.............................. 238Wipers Blade Replacement........................... 238Wipers, Intermittent.........................................42
20_RT_OM_EN_USC_t.book Page 376