window DODGE HORNET 2023 User Guide
[x] Cancel search | Manufacturer: DODGE, Model Year: 2023, Model line: HORNET, Model: DODGE HORNET 2023Pages: 288, PDF Size: 14.2 MB
Page 49 of 288
GETTING TO KNOW YOUR VEHICLE47
Recirculation Button
Press and release this button on the
touchscreen, or push the button on the
faceplate, to change the system between
automatic, recirculation, and outside air
modes. Recirculation can be used when outside
conditions such as smoke, odors, dust, or high humidity
are present. Recirculation can be used in all modes.
Recirculation may be unavailable (button on the
touchscreen grayed out) if conditions exist that could
create fogging on the inside of the windshield. The A/C can
be deselected manually without disturbing the mode
control selection. Continuous use of the Recirculation
mode may make the inside air stuffy and window fogging
may occur. Extended use of this mode is not
recommended.
AUTO Button
Press and release this button on the
touchscreen, or push the button on the
faceplate, to change the current setting. The
AUTO indicator illuminates when AUTO is on.
This feature automatically controls the interior cabin
temperature by adjusting distribution and amount of
airflow. Toggling this function will cause the system to
switch between manual override mode and automatic
modes
Úpage 49.
MAX Defrost Button
Press and release the touchscreen button, or
push and release the button on the faceplate,
to change the current airflow setting to Defrost
mode. The indicator illuminates when this
feature is on. Performing this function will cause the
automatic climate controls to change to manual mode,
and the following settings will occur:
The blower speed increases to full (all LEDs on)
NOTE:The blower speed increases to full only if warm outlet
temperature can be guaranteed. Otherwise, the blower
bars will be proportional to outlet air temperature.
The air conditioning compressor is turned on
(A/C LED off)
Both driver and passenger temperature controls are
set to HI
Defrost mode is selected (LED on)
Rear defroster is turned on (LED on)
The air recirculation is turned off (LED off)
If MAX Defrost mode is turned off, the Climate Control
system will return to the previous setting. MAX Defrost
automatically turns off after a few minutes.
Rear Defrost Button
Press and release the button on the
touchscreen, or push and release the button on
the faceplate, to turn on the rear window
defroster and the heated outside mirrors
(if equipped). The Rear Defrost indicator illuminates when
the rear window defroster is on. The rear window defroster
automatically turns off after 10 minutes.
CAUTION!
Failure to follow these cautions can cause damage to
the heating elements:
Use care when washing the inside of the rear
window. Do not use abrasive window cleaners on the
interior surface of the window. Use a soft cloth and a
mild washing solution, wiping parallel to the heating
elements. Labels can be peeled off after soaking
with warm water.
Do not use scrapers, sharp instruments, or abrasive
window cleaners on the interior surface of the
window.
Keep all objects a safe distance from the window.
2
23_GG_OM_EN_USC_t.book Page 47
Page 50 of 288
48GETTING TO KNOW YOUR VEHICLE
Driver And Passenger Temperature
Control Buttons
These buttons provide the driver and passenger with
independent temperature control.
SYNC Button
Press the SYNC button on the touchscreen to
toggle the Sync feature on/off. The SYNC
indicator is illuminated when SYNC is on. SYNC
is used to synchronize the passenger
temperature setting with the driver temperature setting.
Changing the passenger temperature setting while in
SYNC will automatically exit this feature.
NOTE:The SYNC button is only available on the touchscreen.
Blower Control
Blower Control is used to regulate the amount of
air forced through the Climate Control system.
There are seven blower speeds available.
Adjusting the blower will cause automatic mode
to switch to manual operation. The speeds can be selected
using either the blower control buttons on the faceplate or
the buttons on the touchscreen.
Faceplate
Press the small blower icon button to decrease the blower
speed, or press the large blower icon button to increase
the blower speed.
Touchscreen
Blower speed can also be selected by pressing a number
on the blower bar area.
Mode Control
Select Mode by pressing one of the Mode
buttons on the touchscreen, or the faceplate,
to change the airflow distribution mode. The
airflow distribution mode can be adjusted so air
comes from the instrument panel outlets, floor outlets,
defrost outlets and demist outlets.
Panel Mode
Air comes from the outlets in the instrument
panel. Each of these outlets can be individually
adjusted to direct the flow of air. The air vanes
of the center outlets and outboard outlets can
be moved up and down or side to side to regulate airflow
direction. There is a shut-off wheel located below the air
vanes to shut off or adjust the amount of airflow from
these outlets.
Bi-Level Mode
Air comes from the instrument panel outlets
and floor outlets. A slight amount of air is
directed through the defrost and side window
demister outlets.
NOTE:Bi-Level mode is designed under comfort conditions to
provide cooler air out of the panel outlets and warmer air
from the floor outlets.
Floor Mode
Air comes from the floor outlets. A slight
amount of air is directed through the defrost,
side window demister outlets, and panel
outboard outlets.
Defrost Mode
Air comes from the windshield and side
window demist outlets. When the defrost
button is selected, the blower level may
increase. Use Defrost mode with maximum
temperature settings for best windshield and side window
defrosting and defogging. When toggling the front defrost
mode button, the Climate Control system will return to the
previous setting.
Mix Mode
Air is directed through the floor, defrost, and
side window demister outlets. This setting
works best in cold or snowy conditions that
require extra heat to the windshield. This
setting is good for maintaining comfort while reducing
moisture on the windshield. A slight amount of air is also
directed through the panel outboard outlets.
Push upward on the driver’s or
passenger’s side toggle switch on the
faceplate, or press and slide the
temperature bar towards the red arrow
button on the touchscreen for warmer
temperature settings.
Push downward the driver’s or
passenger’s side toggle switch on the
faceplate, or press and slide the
temperature bar towards the blue arrow
button on the touchscreen for cooler
temperature settings.
23_GG_OM_EN_USC_t.book Page 48
Page 52 of 288
50GETTING TO KNOW YOUR VEHICLE
Winter Operation
To ensure the best possible heater and defroster
performance, make sure the engine cooling system is
functioning properly and the proper amount, type, and
concentration of coolant is used. Use of the Air
Recirculation mode during Winter months is not
recommended, because it may cause window fogging.
Vacation/Storage
For information on maintaining the Climate Control system
when the vehicle is being stored for an extended period of
time, see
Úpage 261.
Window Fogging
Vehicle windows tend to fog on the inside in mild, rainy,
and/or humid weather. To clear the windows, select
Defrost or Mix mode and increase the front blower speed.
Do not use the Recirculation mode without A/C for long
periods, as fogging may occur.
Outside Air Intake
Make sure the air intake, located directly in front of the
windshield, is free of obstructions, such as leaves. Leaves
collected in the air intake may reduce airflow, and if they
enter the air distribution box, they could plug the water
drains. In Winter months, make sure the air intake is clear
of ice, slush, and snow.
Cabin Air Filter
The Climate Control system filters out dust and pollen
from the air. Contact an authorized dealer to service your
cabin air filter, and to have it replaced when needed.
Operating Tips ChartINTERIOR STORAGE AND EQUIPMENT
STORAGE
Glove Compartment
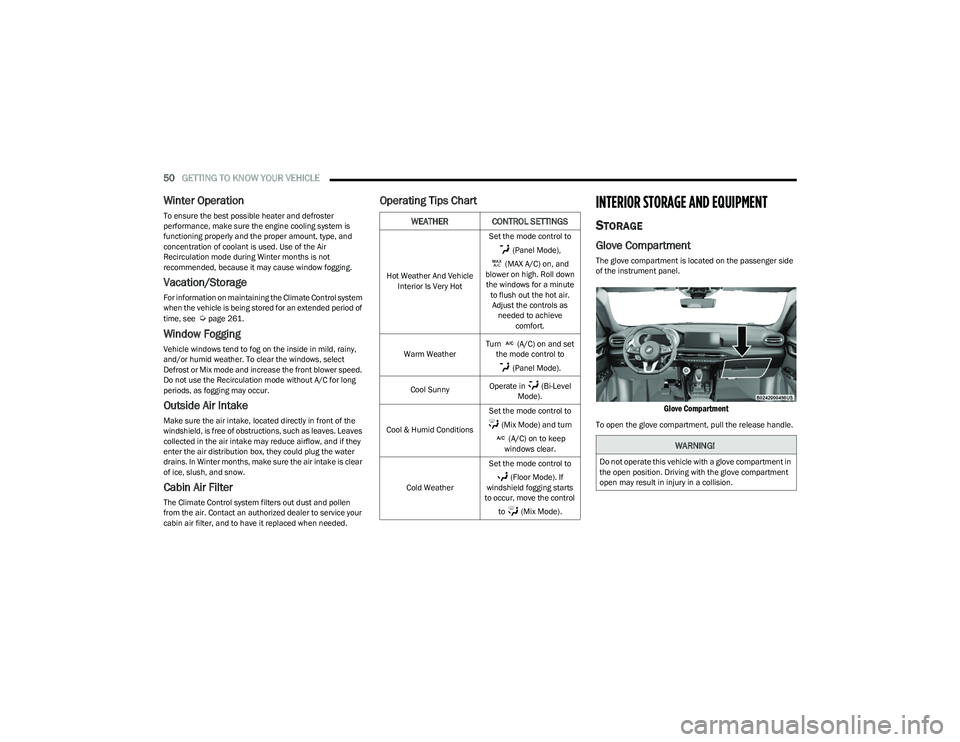
The glove compartment is located on the passenger side
of the instrument panel.
Glove Compartment
To open the glove compartment, pull the release handle.
WEATHER CONTROL SETTINGS
Hot Weather And Vehicle
Interior Is Very Hot Set the mode control to
(Panel Mode),
(MAX A/C) on, and
blower on high. Roll down the windows for a minute to flush out the hot air. Adjust the controls as needed to achieve comfort.
Warm Weather Turn (A/C) on and set
the mode control to
(Panel Mode).
Cool Sunny Operate in (Bi-Level
Mode).
Cool & Humid Conditions Set the mode control to
(Mix Mode) and turn (A/C) on to keep
windows clear.
Cold Weather Set the mode control to
(Floor Mode). If
windshield fogging starts
to occur, move the control
to (Mix Mode).
WARNING!
Do not operate this vehicle with a glove compartment in
the open position. Driving with the glove compartment
open may result in injury in a collision.
23_GG_OM_EN_USC_t.book Page 50
Page 57 of 288
GETTING TO KNOW YOUR VEHICLE55
WINDOWS
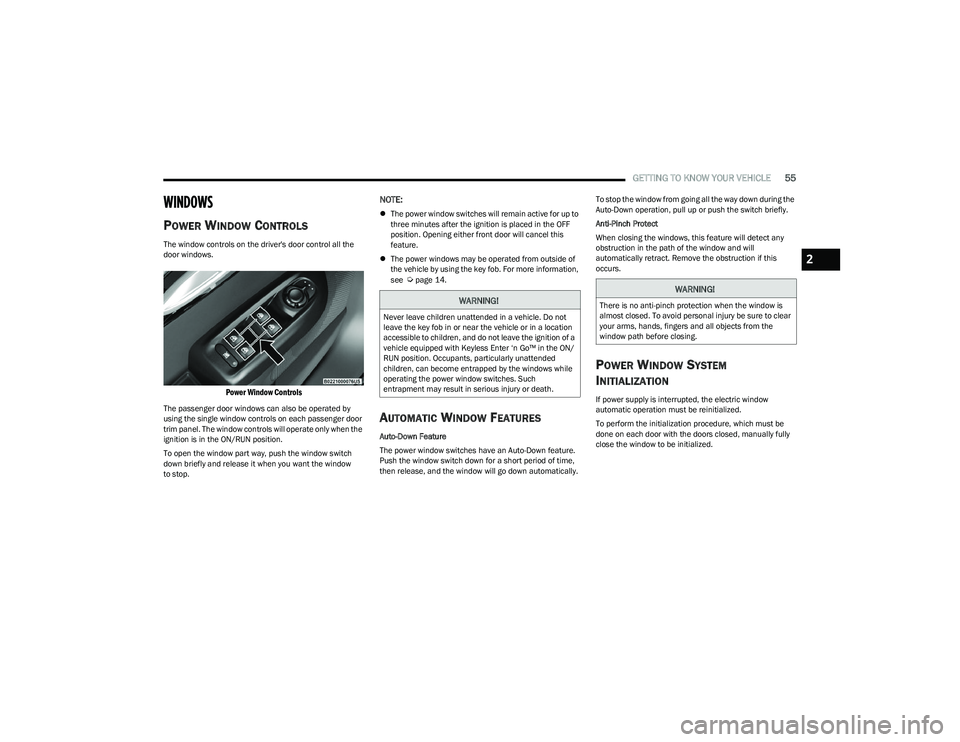
POWER WINDOW CONTROLS
The window controls on the driver's door control all the
door windows.
Power Window Controls
The passenger door windows can also be operated by
using the single window controls on each passenger door
trim panel. The window controls will operate only when the
ignition is in the ON/RUN position.
To open the window part way, push the window switch
down briefly and release it when you want the window
to stop.
NOTE:
The power window switches will remain active for up to
three minutes after the ignition is placed in the OFF
position. Opening either front door will cancel this
feature.
The power windows may be operated from outside of
the vehicle by using the key fob. For more information,
see
Úpage 14.
AUTOMATIC WINDOW FEATURES
Auto-Down Feature
The power window switches have an Auto-Down feature.
Push the window switch down for a short period of time,
then release, and the window will go down automatically. To stop the window from going all the way down during the
Auto-Down operation, pull up or push the switch briefly.
Anti-Pinch Protect
When closing the windows, this feature will detect any
obstruction in the path of the window and will
automatically retract. Remove the obstruction if this
occurs.
POWER WINDOW SYSTEM
I
NITIALIZATION
If power supply is interrupted, the electric window
automatic operation must be reinitialized.
To perform the initialization procedure, which must be
done on each door with the doors closed, manually fully
close the window to be initialized.
WARNING!
Never leave children unattended in a vehicle. Do not
leave the key fob in or near the vehicle or in a location
accessible to children, and do not leave the ignition of a
vehicle equipped with Keyless Enter ‘n Go™ in the ON/
RUN position. Occupants, particularly unattended
children, can become entrapped by the windows while
operating the power window switches. Such
entrapment may result in serious injury or death.
WARNING!
There is no anti-pinch protection when the window is
almost closed. To avoid personal injury be sure to clear
your arms, hands, fingers and all objects from the
window path before closing.
2
23_GG_OM_EN_USC_t.book Page 55
Page 58 of 288
56GETTING TO KNOW YOUR VEHICLE
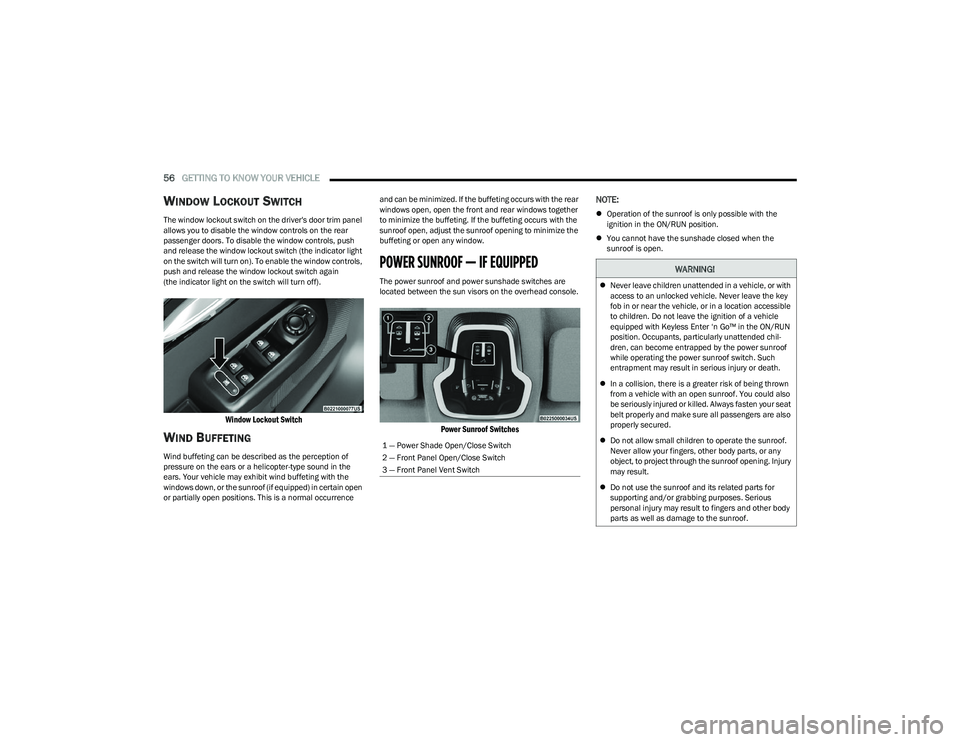
WINDOW LOCKOUT SWITCH
The window lockout switch on the driver's door trim panel
allows you to disable the window controls on the rear
passenger doors. To disable the window controls, push
and release the window lockout switch (the indicator light
on the switch will turn on). To enable the window controls,
push and release the window lockout switch again
(the indicator light on the switch will turn off).
Window Lockout Switch
WIND BUFFETING
Wind buffeting can be described as the perception of
pressure on the ears or a helicopter-type sound in the
ears. Your vehicle may exhibit wind buffeting with the
windows down, or the sunroof (if equipped) in certain open
or partially open positions. This is a normal occurrence and can be minimized. If the buffeting occurs with the rear
windows open, open the front and rear windows together
to minimize the buffeting. If the buffeting occurs with the
sunroof open, adjust the sunroof opening to minimize the
buffeting or open any window.
POWER SUNROOF — IF EQUIPPED
The power sunroof and power sunshade switches are
located between the sun visors on the overhead console.
Power Sunroof Switches
NOTE:
Operation of the sunroof is only possible with the
ignition in the ON/RUN position.
You cannot have the sunshade closed when the
sunroof is open.
1 — Power Shade Open/Close Switch
2 — Front Panel Open/Close Switch
3 — Front Panel Vent Switch
WARNING!
Never leave children unattended in a vehicle, or with
access to an unlocked vehicle. Never leave the key
fob in or near the vehicle, or in a location accessible
to children. Do not leave the ignition of a vehicle
equipped with Keyless Enter ‘n Go™ in the ON/RUN
position. Occupants, particularly unattended chil -
dren, can become entrapped by the power sunroof
while operating the power sunroof switch. Such
entrapment may result in serious injury or death.
In a collision, there is a greater risk of being thrown
from a vehicle with an open sunroof. You could also
be seriously injured or killed. Always fasten your seat
belt properly and make sure all passengers are also
properly secured.
Do not allow small children to operate the sunroof.
Never allow your fingers, other body parts, or any
object, to project through the sunroof opening. Injury
may result.
Do not use the sunroof and its related parts for
supporting and/or grabbing purposes. Serious
personal injury may result to fingers and other body
parts as well as damage to the sunroof.
23_GG_OM_EN_USC_t.book Page 56
Page 63 of 288
GETTING TO KNOW YOUR VEHICLE61
NOTE:
Before closing the liftgate, make sure to be in posses -
sion of the key fob because the liftgate may be locked.
Use the interior door lock/unlock button on the door
panel or the key fob to lock and unlock the liftgate. The
manual door locks on the doors and the exterior door
lock cylinder will not lock and unlock the liftgate.
The liftgate will either unlock along with the vehicle
doors, or it will need to be unlocked by pushing the
electronic liftgate release, depending on the selected
setting in the Uconnect system
Úpage 130.
The power liftgate buttons will not operate if the vehicle
is in gear or the vehicle speed is above 0 mph (0 km/h).
The power liftgate will not operate in temperatures
below −22°F (−30°C) or temperatures above 150°F
(65°C). Be sure to remove any buildup of snow or ice
from the liftgate before pushing any of the power lift -
gate switches.
If anything obstructs the power liftgate while it is
closing or opening, the liftgate will automatically
reverse to the closed or open position. After multiple
obstructions in the same cycle, the liftgate will auto -
matically stop and must be opened or closed manually.
There are pinch sensors attached to the side of the lift -
gate. Light pressure anywhere along these strips will
cause the liftgate to return to the open position.
The power liftgate must be in the full open position in
order for the rear liftgate close button, on the located
on the base of the liftgate, to operate. If the liftgate is
not fully open, push the liftgate button on the key fob to
fully open the liftgate and then push it again to close.
If the electronic liftgate release handle is pushed a
second time while the power liftgate is opening, the
liftgate motor will disengage to allow manual operation.
If your liftgate is power closing and you put the vehicle
in gear, the liftgate will continue to power close.
However, vehicle movement may result in the detec -
tion of an obstruction.
Allow the power system to open the liftgate. Manually
pushing or pulling the liftgate may activate the liftgate
obstacle detection feature and stop the power opera -
tion or reverse its direction.
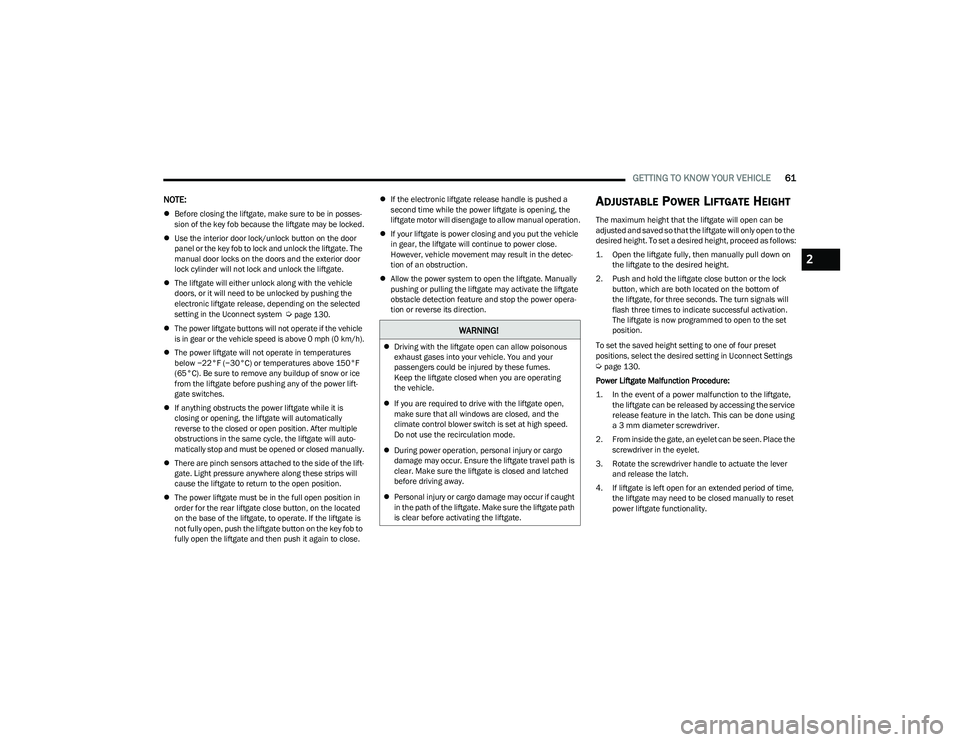
ADJUSTABLE POWER LIFTGATE HEIGHT
The maximum height that the liftgate will open can be
adjusted and saved so that the liftgate will only open to the
desired height. To set a desired height, proceed as follows:
1. Open the liftgate fully, then manually pull down on the liftgate to the desired height.
2. Push and hold the liftgate close button or the lock button, which are both located on the bottom of
the liftgate, for three seconds. The turn signals will
flash three times to indicate successful activation.
The liftgate is now programmed to open to the set
position.
To set the saved height setting to one of four preset
positions, select the desired setting in Uconnect Settings
Úpage 130.
Power Liftgate Malfunction Procedure:
1. In the event of a power malfunction to the liftgate, the liftgate can be released by accessing the service
release feature in the latch. This can be done using
a 3 mm diameter screwdriver.
2. From inside the gate, an eyelet can be seen. Place the screwdriver in the eyelet.
3. Rotate the screwdriver handle to actuate the lever and release the latch.
4. If liftgate is left open for an extended period of time, the liftgate may need to be closed manually to reset
power liftgate functionality.
WARNING!
Driving with the liftgate open can allow poisonous
exhaust gases into your vehicle. You and your
passengers could be injured by these fumes.
Keep the liftgate closed when you are operating
the vehicle.
If you are required to drive with the liftgate open,
make sure that all windows are closed, and the
climate control blower switch is set at high speed.
Do not use the recirculation mode.
During power operation, personal injury or cargo
damage may occur. Ensure the liftgate travel path is
clear. Make sure the liftgate is closed and latched
before driving away.
Personal injury or cargo damage may occur if caught
in the path of the liftgate. Make sure the liftgate path
is clear before activating the liftgate.
2
23_GG_OM_EN_USC_t.book Page 61
Page 65 of 288
GETTING TO KNOW YOUR VEHICLE63
NOTE:Allow the power system to open the liftgate. Manually
pushing or pulling the liftgate may activate the liftgate
obstacle detection feature and stop the power operation
or reverse its direction.
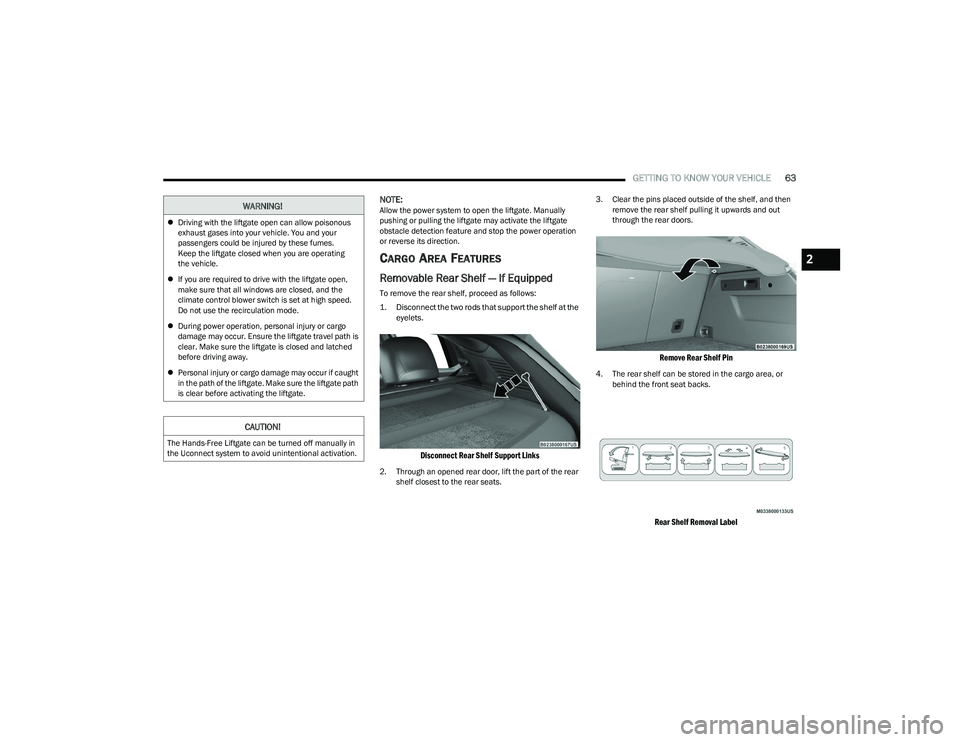
CARGO AREA FEATURES
Removable Rear Shelf — If Equipped
To remove the rear shelf, proceed as follows:
1. Disconnect the two rods that support the shelf at the
eyelets.
Disconnect Rear Shelf Support Links
2. Through an opened rear door, lift the part of the rear shelf closest to the rear seats. 3. Clear the pins placed outside of the shelf, and then
remove the rear shelf pulling it upwards and out
through the rear doors.
Remove Rear Shelf Pin
4. The rear shelf can be stored in the cargo area, or behind the front seat backs.
Rear Shelf Removal Label
WARNING!
Driving with the liftgate open can allow poisonous
exhaust gases into your vehicle. You and your
passengers could be injured by these fumes.
Keep the liftgate closed when you are operating
the vehicle.
If you are required to drive with the liftgate open,
make sure that all windows are closed, and the
climate control blower switch is set at high speed.
Do not use the recirculation mode.
During power operation, personal injury or cargo
damage may occur. Ensure the liftgate travel path is
clear. Make sure the liftgate is closed and latched
before driving away.
Personal injury or cargo damage may occur if caught
in the path of the liftgate. Make sure the liftgate path
is clear before activating the liftgate.
CAUTION!
The Hands-Free Liftgate can be turned off manually in
the Uconnect system to avoid unintentional activation.
2
23_GG_OM_EN_USC_t.book Page 63
Page 82 of 288
80
STARTING AND OPERATING
STARTING THE ENGINE
Before starting your vehicle, adjust your seat, adjust both
inside and outside mirrors, and fasten your seat belts.Start the engine with the gear selector in the NEUTRAL or
PARK position. Apply the brake before shifting to any
driving range.
NORMAL STARTING
Place the ignition switch in the START position and release
when the engine starts. If the engine fails to start within
10 seconds, place the ignition switch in the OFF position,
wait 10 to 15 seconds, then repeat the “Normal Starting”
procedure.
Tip Start Feature
Place the ignition switch in the START position and release
it as soon as the starter engages. The starter motor will
continue to run, and will automatically disengage itself
when the engine is running. If the engine fails to start,
place the ignition switch in the OFF position, wait 10 to
15 seconds, then repeat the “Normal Starting” procedure.
Automatic Transmission
The gear selector must be in the NEUTRAL or PARK
position before you can start the engine. Apply the brakes
before shifting into any driving gear.Keyless Enter ’n Go™ Functions — Using The ENGINE
START/STOP Button
1. The transmission must be in PARK or NEUTRAL.
2. Press and hold the brake pedal while pushing the
ENGINE START/STOP button once.
3. The system starts the vehicle. If the vehicle fails to start, the starter will disengage automatically after
10 seconds.
4. If you wish to stop the cranking of the engine prior to the engine starting, push the ENGINE START/STOP
button again.
WARNING!
When exiting the vehicle, always remove the key fob
from the vehicle and lock your vehicle.
Never leave children alone in a vehicle, or with
access to an unlocked vehicle.
Allowing children to be in a vehicle unattended is
dangerous for a number of reasons. A child or others
could be seriously or fatally injured. Children should
be warned not to touch the parking brake, brake
pedal or the transmission gear selector.
Do not leave the key fob in or near the vehicle, or in
a location accessible to children, and do not leave
the ignition of a vehicle equipped with Keyless
Enter ’n Go™ in the ON/RUN position. A child could
operate power windows, other controls, or move the
vehicle.
Do not leave children or animals inside parked
vehicles in hot weather. Interior heat buildup may
cause serious injury or death.
CAUTION!
Damage to the transmission may occur if the following
precautions are not observed:
Do not shift between PARK, REVERSE, NEUTRAL, or
DRIVE when the engine is above idle speed.
Shift into or out of PARK or REVERSE only after the
vehicle has come to a complete stop.
Before shifting into any gear, make sure your foot is
firmly on the brake pedal.
23_GG_OM_EN_USC_t.book Page 80
Page 84 of 288
82STARTING AND OPERATING
STOPPING THE ENGINE
Vehicles Equipped With Electronic Key
(Keyless Enter ’n Go™):
To shut off the engine with vehicle speed greater than
5 mph (8 km/h), you must push and hold the ignition or
push the ENGINE START/STOP button three times
consecutively within a few seconds. The engine will shut
down, and the ignition will be placed in the ON/RUN
position.
Turning off the car (placing the ignition from the ON/RUN
position to the OFF position), the power supply to the
accessories are maintained for a period of three minutes.
Opening the driver’s side door with the ignition in ON/RUN
will sound a short chime that reminds the driver to place
the ignition to OFF.
When the ignition is in the OFF position, the window
switches remain active for up to 10 minutes.
Opening a front door will cancel this function.
After severe driving, idle the engine to allow the
temperature inside the engine compartment to cool
before shutting off the engine.
ENGINE BREAK-IN RECOMMENDATIONS
A long break-in period is not required for the engine and
drivetrain (transmission and axle) in your vehicle.
Drive moderately during the first 300 miles (500 km).
After the initial 60 miles (100 km), speeds up to 50 or
55 mph (80 or 90 km/h) are desirable. While cruising, brief full-throttle acceleration within the
limits of local traffic laws contributes to a good break-in.
Wide-open throttle acceleration in low gear can be
detrimental and should be avoided.
The engine oil installed in the engine at the factory is a
high-quality energy conserving type lubricant. Oil changes
should be consistent with anticipated climate conditions
under which vehicle operations will occur. For the
recommended viscosity and quality grades
Úpage 269.
NOTE:A new engine may consume some oil during its first few
thousand miles (kilometers) of operation. This should be
considered a normal part of the break-in and not inter
-
preted as a problem.
PARK BRAKE
ELECTRIC PARK BRAKE (EPB)
Your vehicle is equipped with an EPB system that offers
simple operation, and some additional features that make
the parking brake more convenient and useful.
The parking brake is primarily intended to prevent the
vehicle from rolling while parked. Before leaving the
vehicle, make sure that the parking brake is applied.
Also, be certain to leave the transmission in PARK. You can engage the parking brake in two ways:
Manually, by applying the EPB switch.
Automatically, by enabling the Auto Park Brake feature
in the Customer Programmable Features section of the
Uconnect settings
Úpage 130.
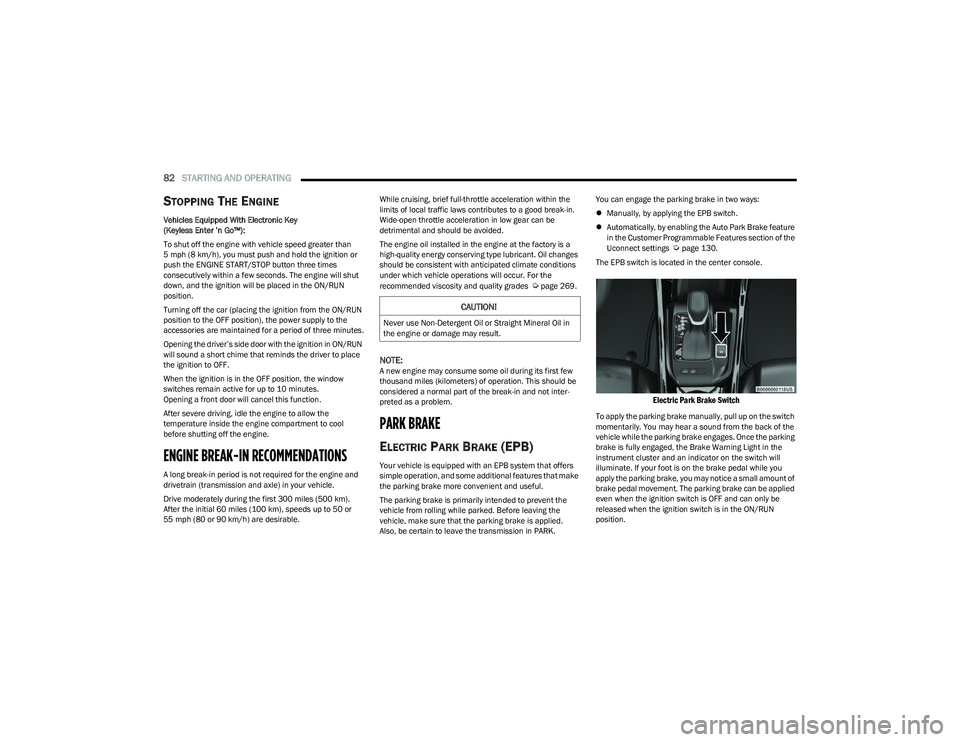
The EPB switch is located in the center console.
Electric Park Brake Switch
To apply the parking brake manually, pull up on the switch
momentarily. You may hear a sound from the back of the
vehicle while the parking brake engages. Once the parking
brake is fully engaged, the Brake Warning Light in the
instrument cluster and an indicator on the switch will
illuminate. If your foot is on the brake pedal while you
apply the parking brake, you may notice a small amount of
brake pedal movement. The parking brake can be applied
even when the ignition switch is OFF and can only be
released when the ignition switch is in the ON/RUN
position.
CAUTION!
Never use Non-Detergent Oil or Straight Mineral Oil in
the engine or damage may result.
23_GG_OM_EN_USC_t.book Page 82
Page 85 of 288
STARTING AND OPERATING83
(Continued)
NOTE:The EPB Warning Light will illuminate if the EPB switch is
held for longer than 60 seconds in either the released or
applied position. The light will extinguish upon releasing
the switch.
If the Auto Park Brake feature is enabled, the parking
brake will automatically engage whenever the
transmission is placed into PARK. If your foot is on the
brake pedal, you may notice a small amount of brake
pedal movement while the parking brake is engaging.
The parking brake will release automatically when the
ignition switch is ON/RUN, the transmission is in DRIVE or
REVERSE, the driver’s seat belt is buckled, and an attempt
is made to drive away.
To release the parking brake manually, the ignition switch
must be in the ON/RUN position. Put your foot on the
brake pedal, then push the EPB switch down momentarily.
You may hear a sound from the back of the car while the
parking brake disengages. You may also notice a small
amount of movement in the brake pedal. Once the parking
brake is fully disengaged, the Brake Warning Light in the
instrument cluster and the LED indicator on the switch will
extinguish.
NOTE:When parking on a hill, it is important to turn the front
wheels toward the curb on a downhill grade and away from
the curb on an uphill grade. Apply the parking brake before
placing the gear selector in PARK, otherwise the load on
the transmission locking mechanism may make it difficult to move the gear selector out of PARK. The parking brake
should always be applied whenever the driver is not in the
vehicle.
If exceptional circumstances should make it necessary to
engage the parking brake while the vehicle is in motion,
maintain upward pressure on the EPB switch for as long as
engagement is desired. The Brake Warning Light will
illuminate, and a continuous chime will sound. The rear
stop lamps will also be illuminated automatically while the
vehicle remains in motion.
To disengage the parking brake while the vehicle is in
motion, release the switch. If the vehicle is brought to a
complete stop using the parking brake, when the vehicle
reaches approximately 3 mph, (5 km/h) the parking brake
will remain engaged.
WARNING!
Do not rely on the parking brake to operate effec -
tively if the rear brakes have been immersed in water
or mud.
Never use the PARK position as a substitute for the
parking brake. Always apply the parking brake fully
when parked to guard against vehicle movement and
possible injury or damage.
When leaving the vehicle, always remove the key fob
from the ignition and lock your vehicle.
Never leave children alone in a vehicle, or with
access to an unlocked vehicle. Allowing children to
be in a vehicle unattended is dangerous for a
number of reasons. A child or others could be seri -
ously or fatally injured. Children should be warned
not to touch the parking brake, brake pedal or the
gear selector.
Do not leave the key fob in or near the vehicle, or in
a location accessible to children, and do not leave
the ignition of a vehicle equipped with Keyless
Enter ’n Go™ in the ACC or ON/RUN position. A child
could operate power windows, other controls, or
move the vehicle.
Be sure the parking brake is fully disengaged before
driving; failure to do so can lead to brake failure and
a collision.
Always fully apply the parking brake when leaving
your vehicle, or it may roll and cause damage or
injury. Also be certain to leave the transmission in
PARK. Failure to do so may allow the vehicle to roll
and cause damage or injury.
CAUTION!
If the Brake System Warning Light remains on with the
parking brake released, a brake system malfunction is
indicated. Have the brake system serviced by an
authorized dealer immediately.
WARNING!
4
23_GG_OM_EN_USC_t.book Page 83