DODGE JOURNEY 2014 1.G Owners Manual
JOURNEY 2014 1.G
DODGE
DODGE
https://www.carmanualsonline.info/img/12/5648/w960_5648-0.png
DODGE JOURNEY 2014 1.G Owners Manual
Trending: CD player, AUX, bolt pattern, checking oil, glove box, seats, keyless entry
Page 591 of 651
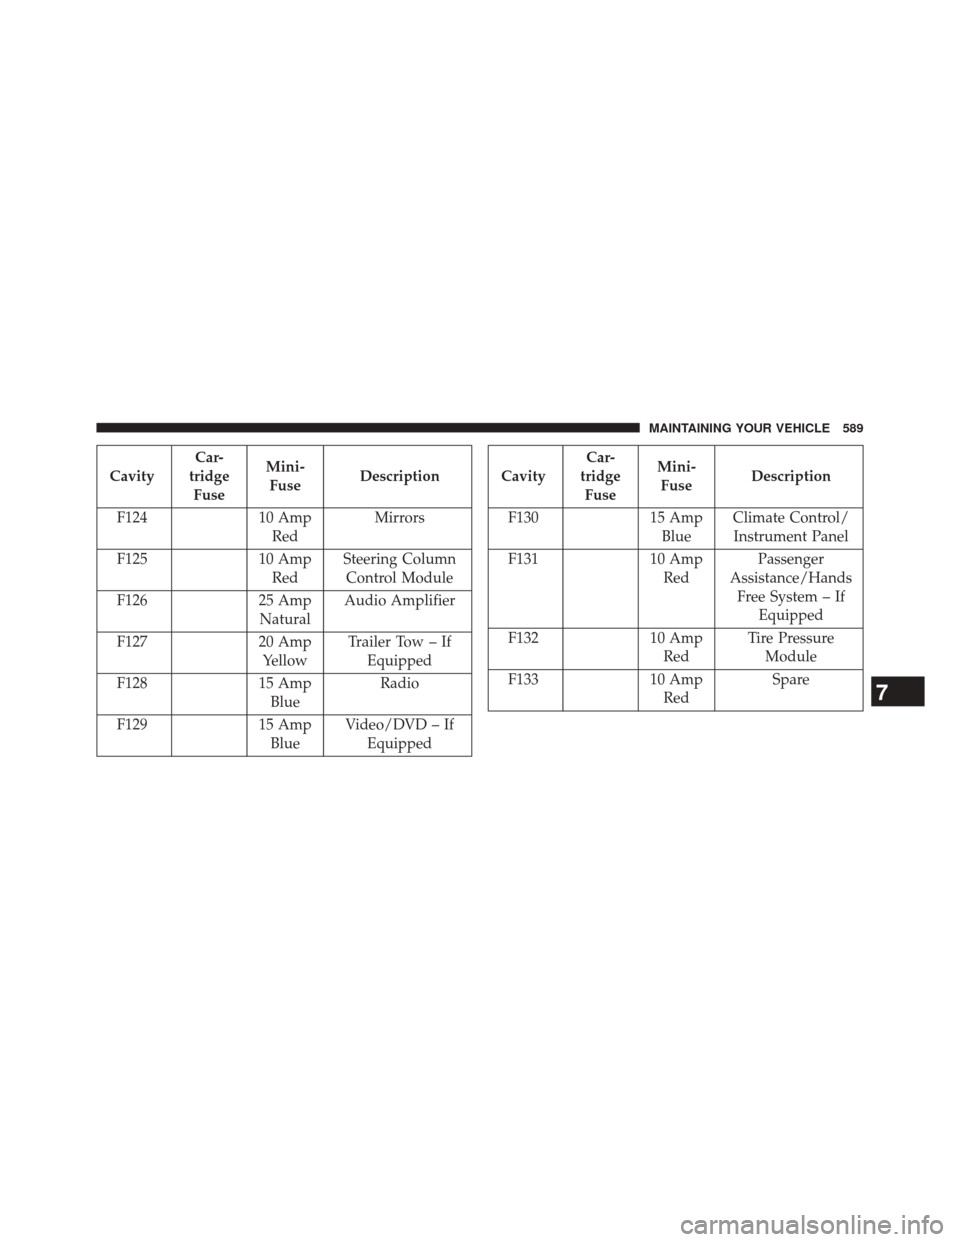
CavityCar-
tridge Fuse Mini-
Fuse Description
F124 10 Amp
Red Mirrors
F125 10 Amp
Red Steering Column
Control Module
F126 25 Amp
Natural Audio Amplifier
F127 20 Amp
Yellow Trailer Tow – If
Equipped
F128 15 Amp
Blue Radio
F129 15 Amp
Blue Video/DVD – If
EquippedCavity Car-
tridge Fuse Mini-
Fuse Description
F130 15 Amp
Blue Climate Control/
Instrument Panel
F131 10 Amp
Red Passenger
Assistance/Hands Free System – If Equipped
F132 10 Amp
Red Tire Pressure
Module
F133 10 Amp
Red Spare
7
MAINTAINING YOUR VEHICLE 589
Page 592 of 651
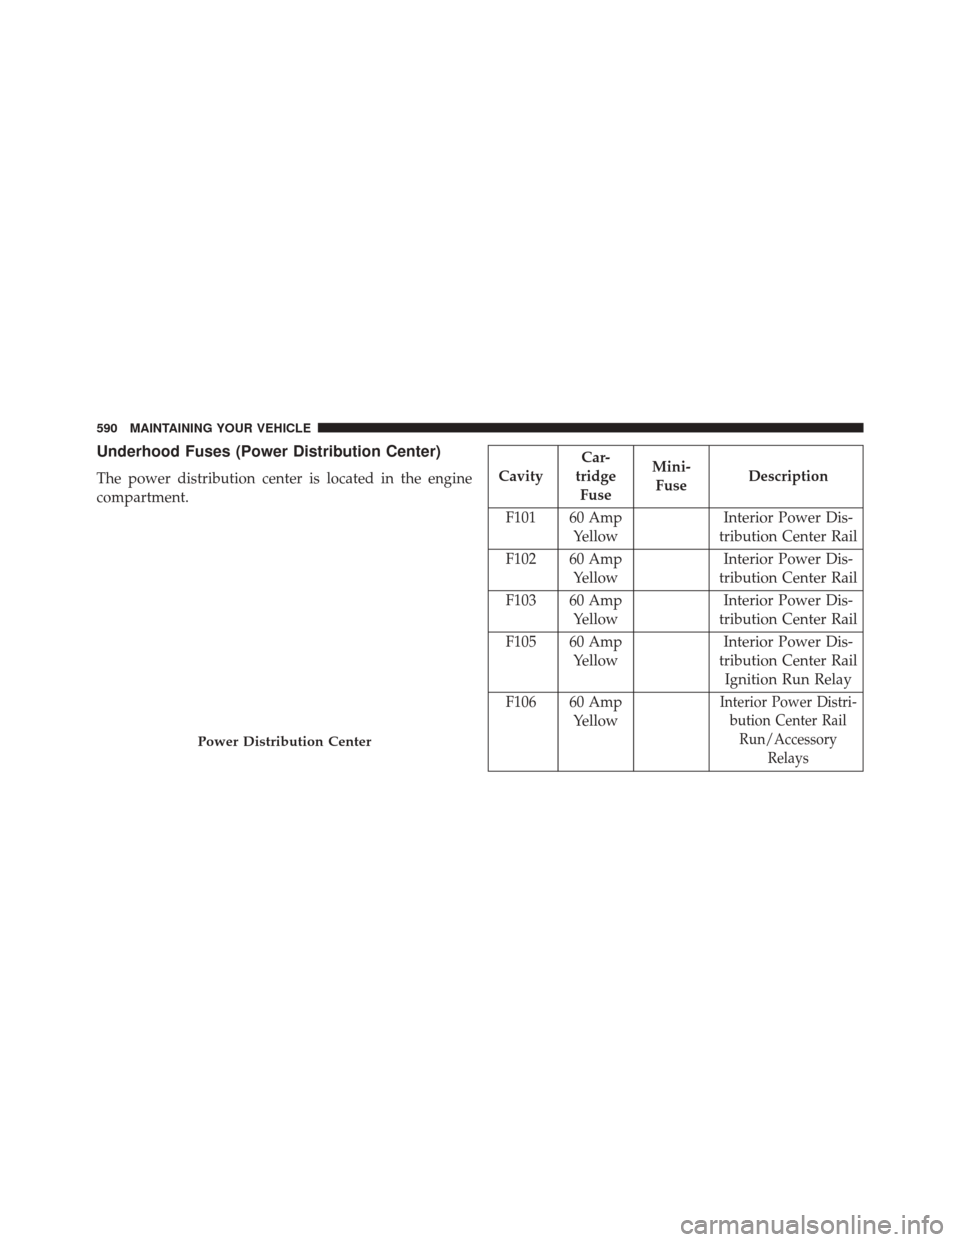
Underhood Fuses (Power Distribution Center)
The power distribution center is located in the engine
compartment.CavityCar-
tridge Fuse Mini-
Fuse Description
F101 60 Amp Yellow Interior Power Dis-
tribution Center Rail
F102 60 Amp Yellow Interior Power Dis-
tribution Center Rail
F103 60 Amp Yellow Interior Power Dis-
tribution Center Rail
F105 60 Amp Yellow Interior Power Dis-
tribution Center Rail Ignition Run Relay
F106 60 Amp Yellow
Interior Power Distri-bution Center RailRun/Accessory Relays
Power Distribution Center
590 MAINTAINING YOUR VEHICLE
Page 593 of 651
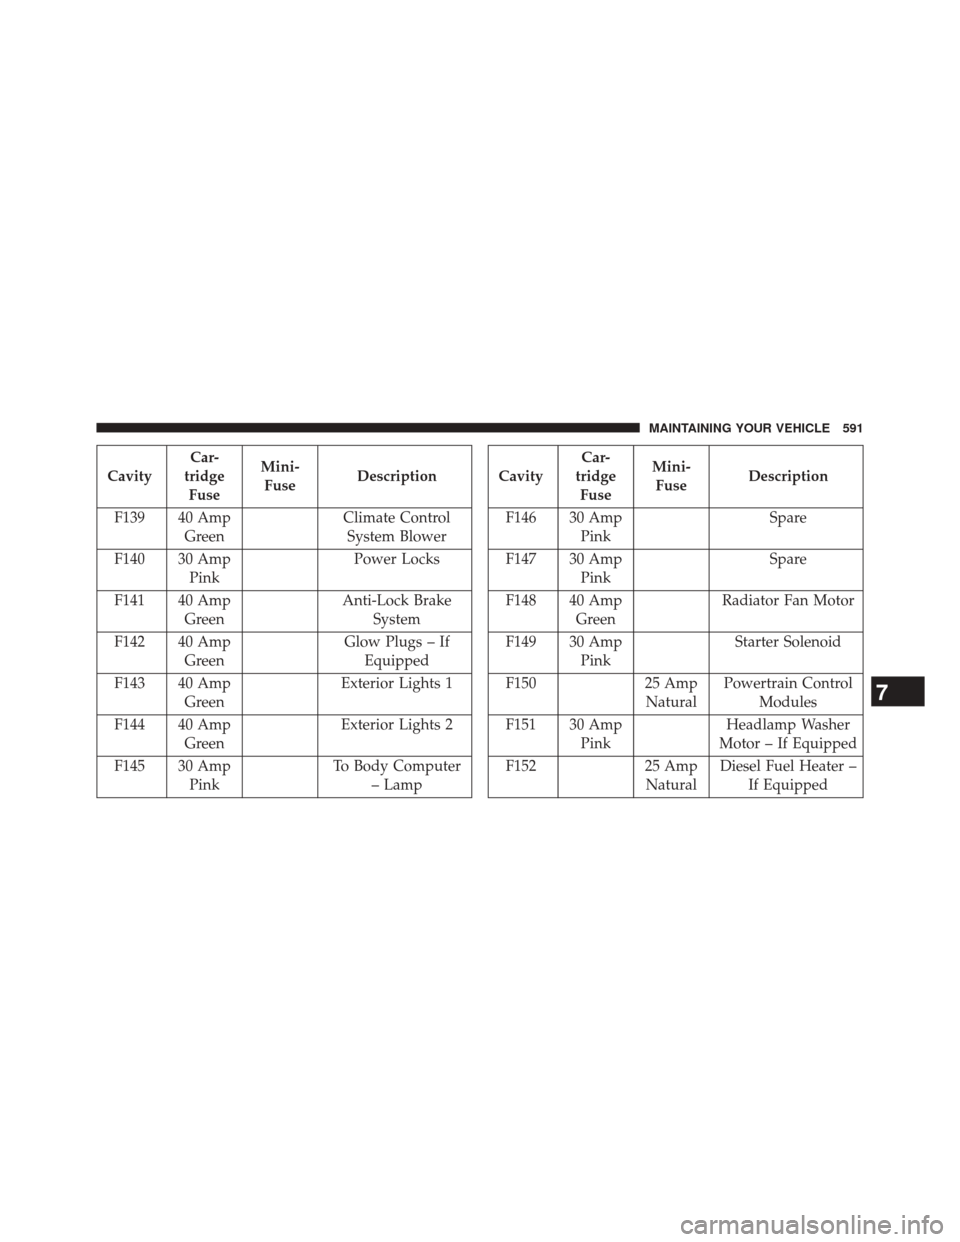
CavityCar-
tridge Fuse Mini-
Fuse Description
F139 40 Amp Green Climate Control
System Blower
F140 30 Amp Pink Power Locks
F141 40 Amp Green Anti-Lock Brake
System
F142 40 Amp Green Glow Plugs – If
Equipped
F143 40 Amp Green Exterior Lights 1
F144 40 Amp Green Exterior Lights 2
F145 30 Amp Pink To Body Computer
– LampCavity Car-
tridge Fuse Mini-
Fuse Description
F146 30 Amp Pink Spare
F147 30 Amp Pink Spare
F148 40 Amp Green Radiator Fan Motor
F149 30 Amp Pink Starter Solenoid
F150 25 Amp
Natural Powertrain Control
Modules
F151 30 Amp Pink Headlamp Washer
Motor – If Equipped
F152 25 Amp
Natural Diesel Fuel Heater –
If Equipped
7
MAINTAINING YOUR VEHICLE 591
Page 594 of 651
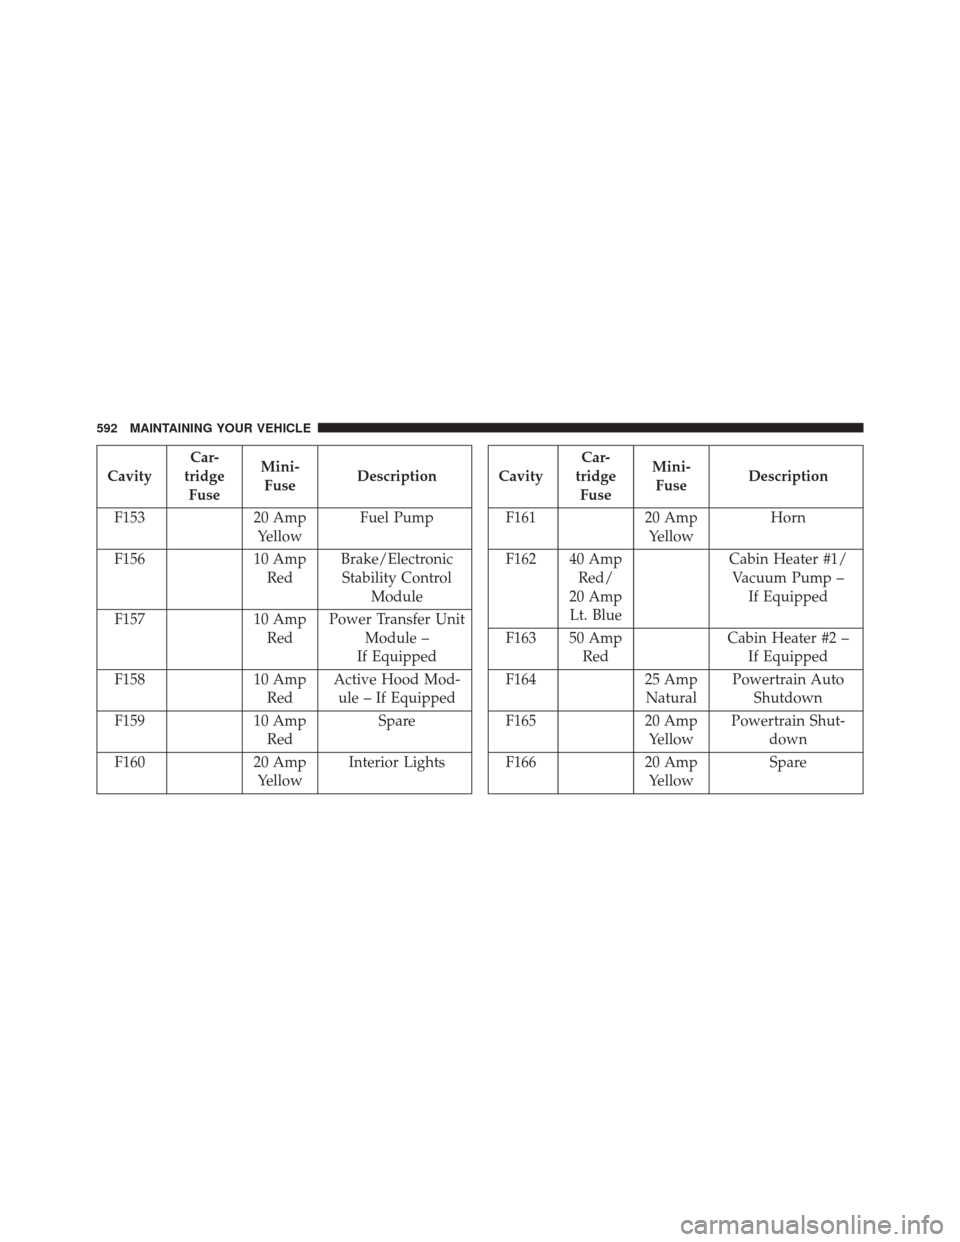
CavityCar-
tridge Fuse Mini-
Fuse Description
F153 20 Amp
Yellow Fuel Pump
F156 10 Amp
Red Brake/Electronic
Stability Control Module
F157 10 Amp
Red Power Transfer Unit
Module –
If Equipped
F158 10 Amp
Red Active Hood Mod-
ule – If Equipped
F159 10 Amp
Red Spare
F160 20 Amp
Yellow Interior LightsCavityCar-
tridge Fuse Mini-
Fuse Description
F161 20 Amp
Yellow Horn
F162 40 Amp Red/
20 Amp Lt. Blue Cabin Heater #1/
Vacuum Pump – If Equipped
F163 50 Amp Red Cabin Heater #2 –
If Equipped
F164 25 Amp
Natural Powertrain Auto
Shutdown
F165 20 Amp
Yellow Powertrain Shut-
down
F166 20 Amp
Yellow Spare
592 MAINTAINING YOUR VEHICLE
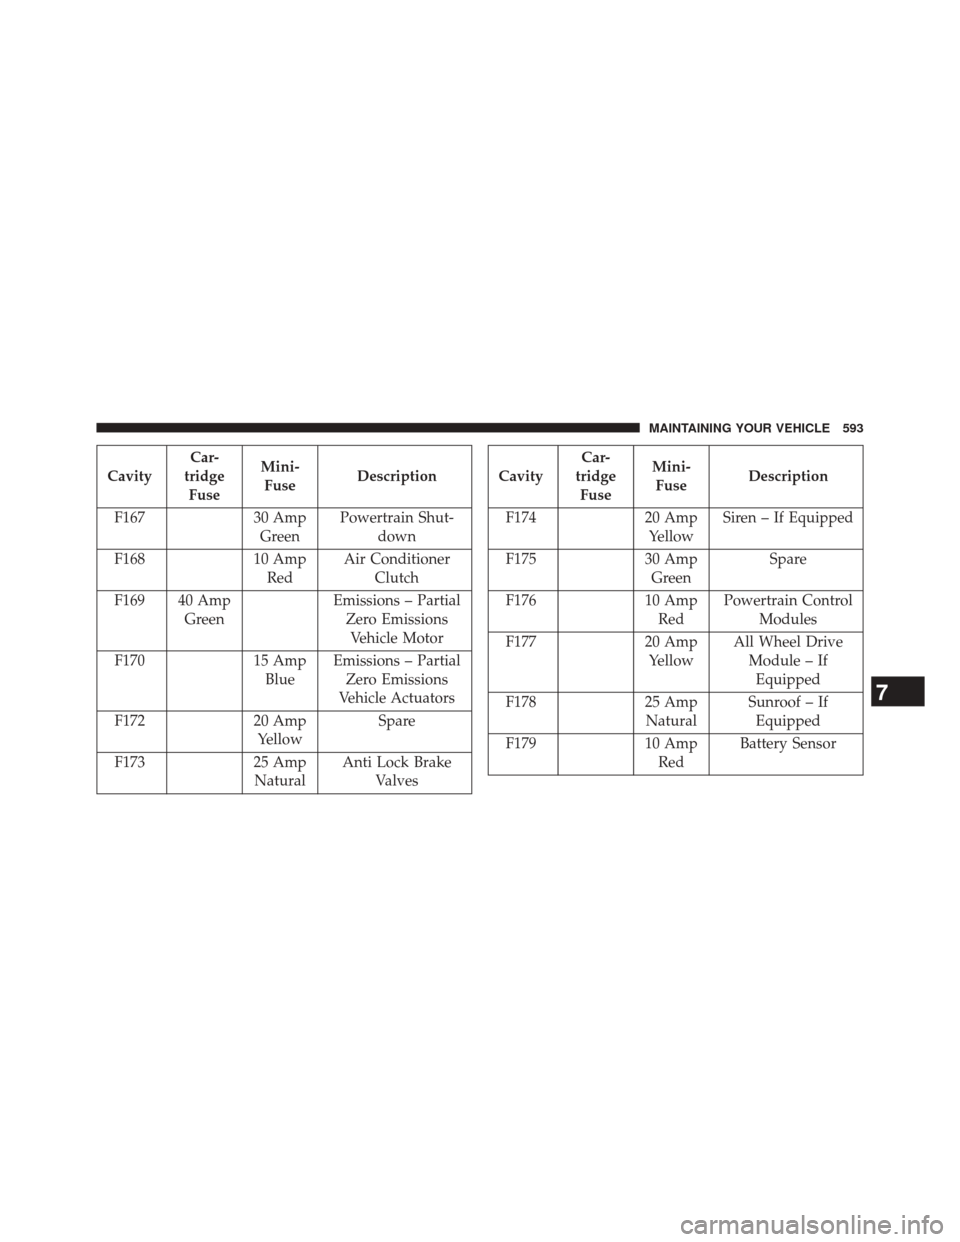
Page 595 of 651
CavityCar-
tridge Fuse Mini-
Fuse Description
F167 30 Amp
Green Powertrain Shut-
down
F168 10 Amp
Red Air Conditioner
Clutch
F169 40 Amp Green Emissions – Partial
Zero EmissionsVehicle Motor
F170 15 Amp
Blue Emissions – Partial
Zero Emissions
Vehicle Actuators
F172 20 Amp
Yellow Spare
F173 25 Amp
Natural Anti Lock Brake
ValvesCavity Car-
tridge Fuse Mini-
Fuse Description
F174 20 Amp
Yellow Siren – If Equipped
F175 30 Amp
Green Spare
F176 10 Amp
Red Powertrain Control
Modules
F177 20 Amp
Yellow All Wheel Drive
Module – IfEquipped
F178 25 Amp
Natural Sunroof – If
Equipped
F179 10 Amp
Red Battery Sensor
7
MAINTAINING YOUR VEHICLE 593
Page 596 of 651
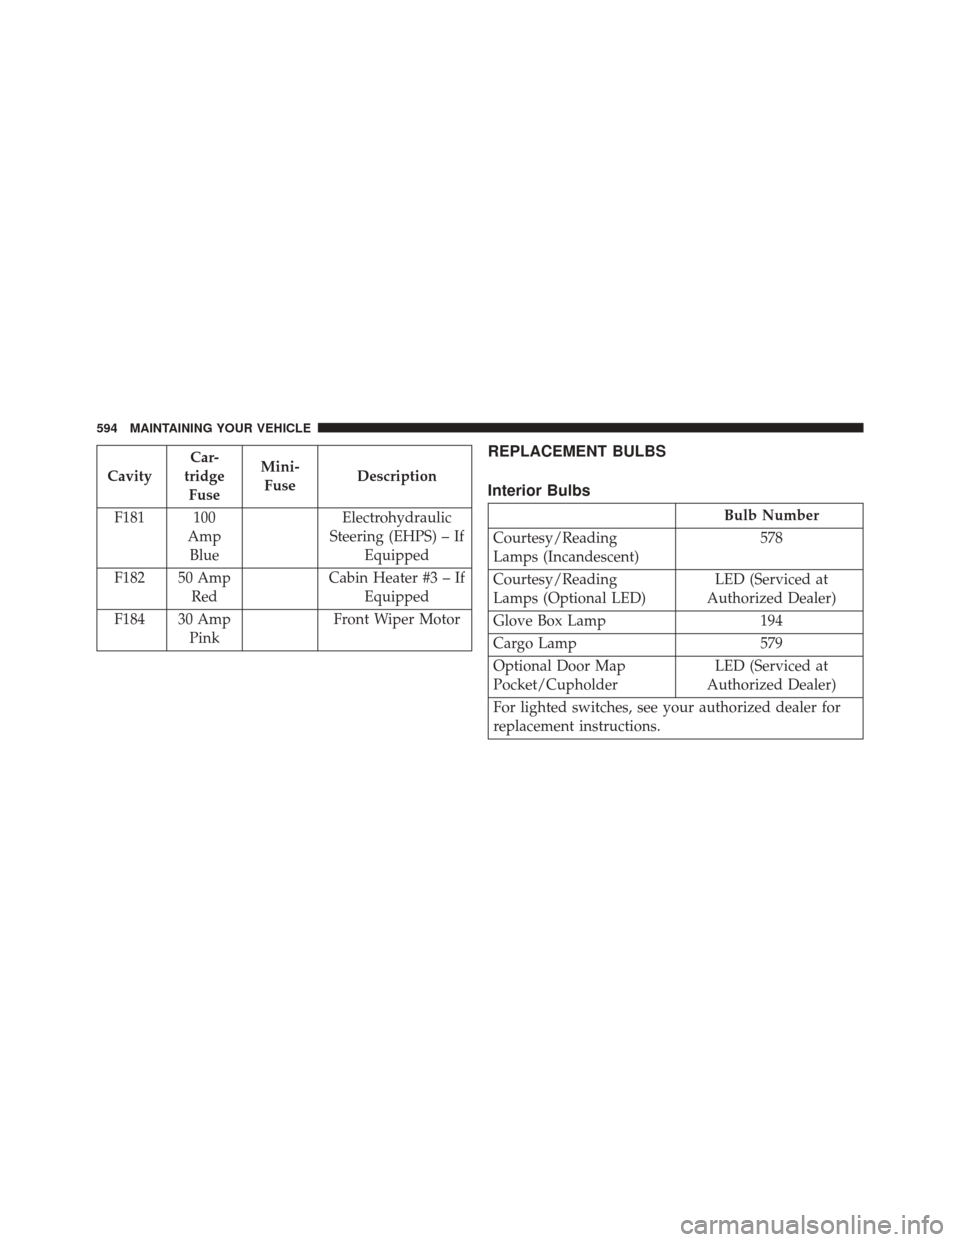
CavityCar-
tridge Fuse Mini-
Fuse Description
F181 100 AmpBlue Electrohydraulic
Steering (EHPS) – If Equipped
F182 50 Amp Red Cabin Heater #3 – If
Equipped
F184 30 Amp Pink Front Wiper Motor
REPLACEMENT BULBS
Interior Bulbs
Bulb Number
Courtesy/Reading
Lamps (Incandescent) 578
Courtesy/Reading
Lamps (Optional LED) LED (Serviced at
Authorized Dealer)
Glove Box Lamp 194
Cargo Lamp 579
Optional Door Map
Pocket/Cupholder LED (Serviced at
Authorized Dealer)
For lighted switches, see your authorized dealer for
replacement instructions.
594 MAINTAINING YOUR VEHICLE
Page 597 of 651
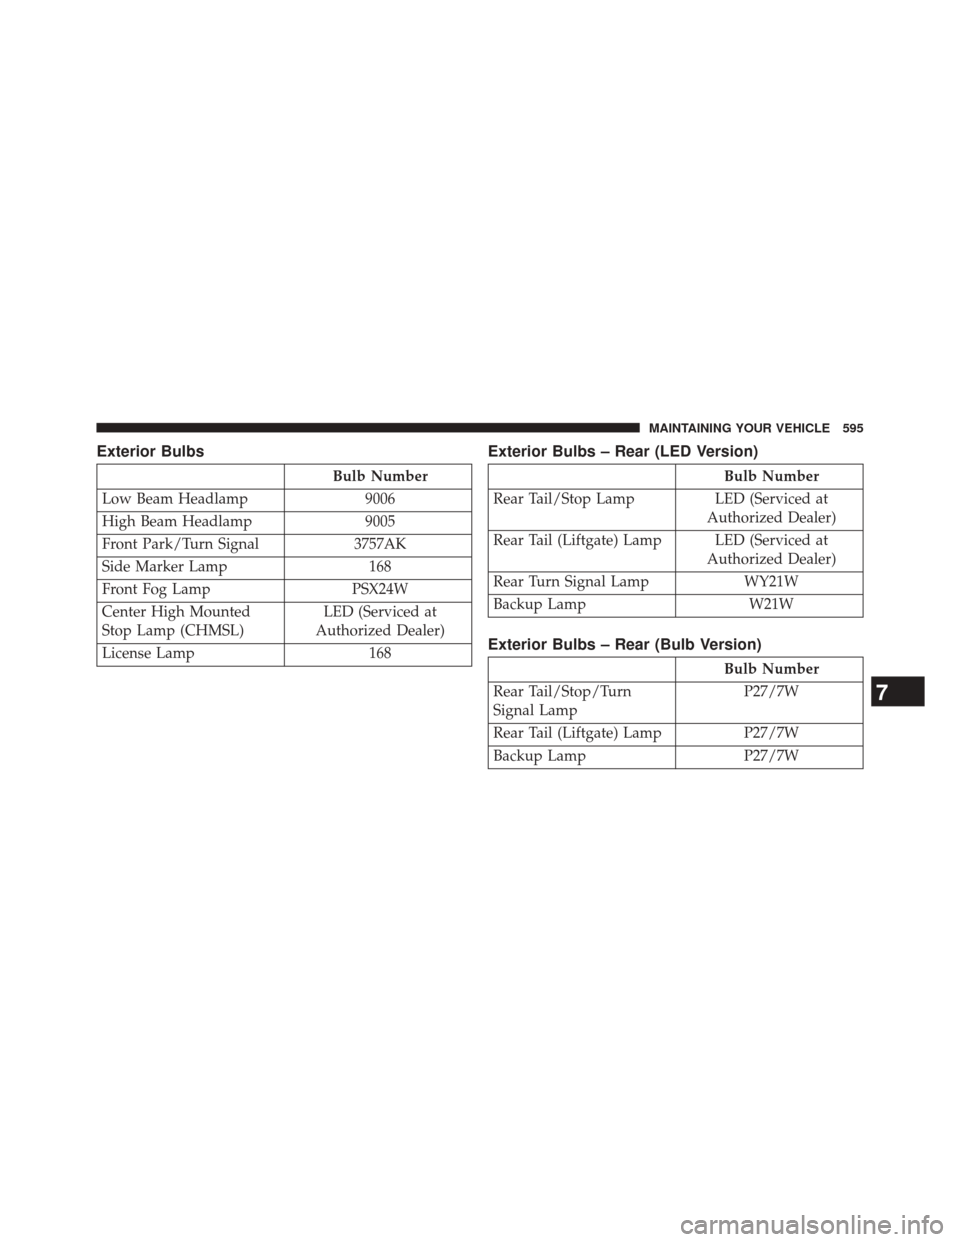
Exterior Bulbs
Bulb Number
Low Beam Headlamp 9006
High Beam Headlamp 9005
Front Park/Turn Signal 3757AK
Side Marker Lamp 168
Front Fog Lamp PSX24W
Center High Mounted
Stop Lamp (CHMSL) LED (Serviced at
Authorized Dealer)
License Lamp 168
Exterior Bulbs – Rear (LED Version)
Bulb Number
Rear Tail/Stop Lamp LED (Serviced at
Authorized Dealer)
Rear Tail (Liftgate) Lamp LED (Serviced at Authorized Dealer)
Rear Turn Signal Lamp WY21W
Backup Lamp W21W
Exterior Bulbs – Rear (Bulb Version)
Bulb Number
Rear Tail/Stop/Turn
Signal Lamp P27/7W
Rear Tail (Liftgate) Lamp P27/7W
Backup Lamp P27/7W
7
MAINTAINING YOUR VEHICLE 595
Page 598 of 651
BULB REPLACEMENT
NOTE:Lens fogging can occur under certain atmo-
spheric conditions. This will usually clear as atmospheric
conditions change to allow the condensation to change
back into a vapor. Turning the lamps on will usually
accelerate the clearing process.
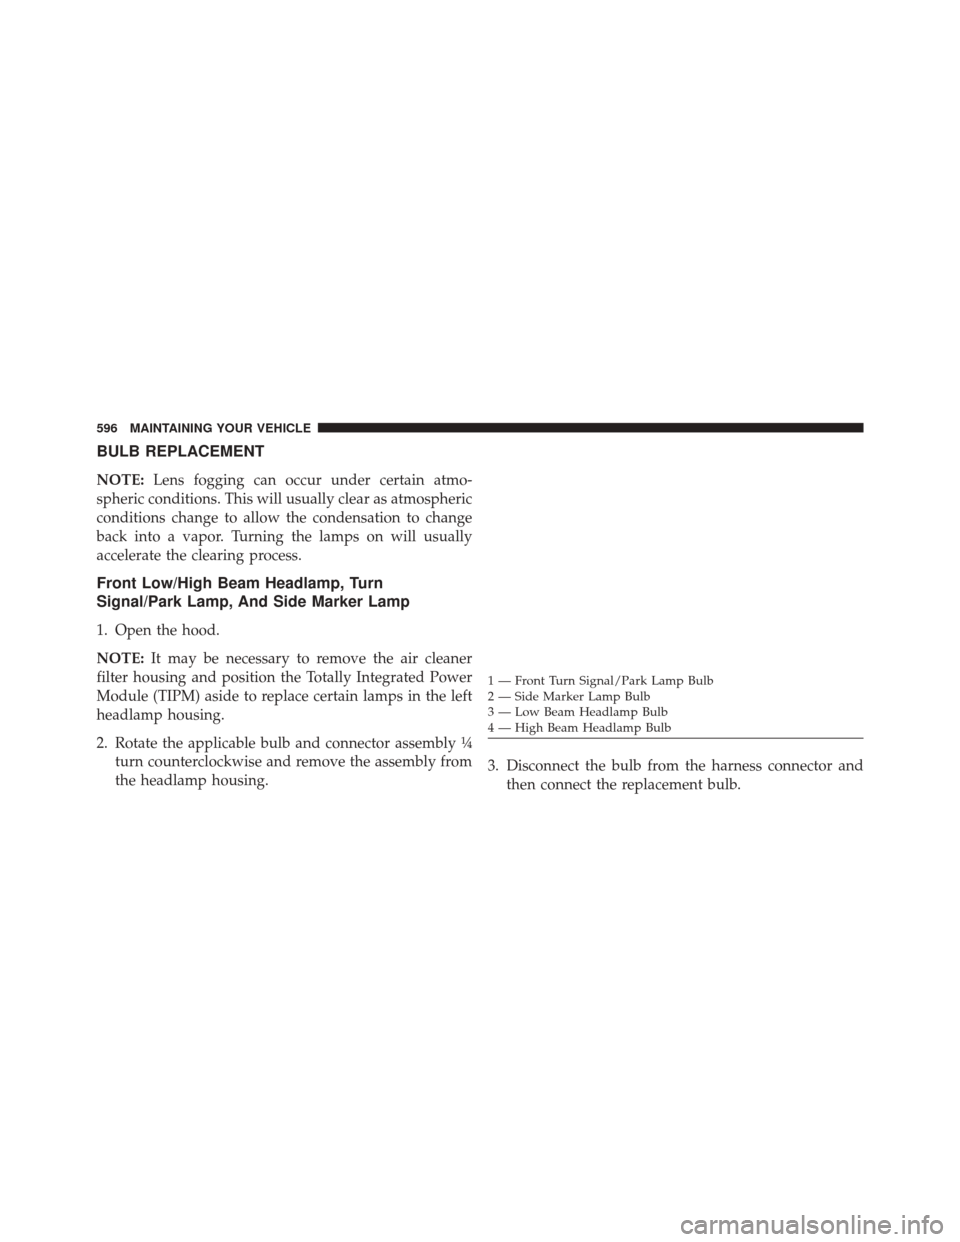
Front Low/High Beam Headlamp, Turn
Signal/Park Lamp, And Side Marker Lamp
1. Open the hood.
NOTE: It may be necessary to remove the air cleaner
filter housing and position the Totally Integrated Power
Module (TIPM) aside to replace certain lamps in the left
headlamp housing.
2. Rotate the applicable bulb and connector assembly ¼ turn counterclockwise and remove the assembly from
the headlamp housing. 3. Disconnect the bulb from the harness connector and
then connect the replacement bulb.
1 — Front Turn Signal/Park Lamp Bulb
2 — Side Marker Lamp Bulb
3 — Low Beam Headlamp Bulb
4 — High Beam Headlamp Bulb
596 MAINTAINING YOUR VEHICLE
Page 599 of 651
CAUTION!
Do not touch the new bulb with your fingers. Oil
contamination will severely shorten bulb life. If the
bulb comes in contact with any oily surface, clean the
bulb with rubbing alcohol.
4. Install the bulb and connector assembly into the headlamp housing and rotate it ¼ turn clockwise to
lock it in place.
Front Fog Lamp
NOTE: Turn the steering wheel to the right if replacing
the left front fog lamp or to the left if replacing the right
front fog lamp to allow for easier access to the front of the
wheel well.
1. Remove the fasteners retaining the front lower wheel well access panel and remove the access panel. 2. Remove the electrical connector from the fog lamp
housing.
3. Squeeze the two tabs on the side of the bulb socket and pull straight out from the fog lamp.
Front Fog Lamp Electrical Connector
7
MAINTAINING YOUR VEHICLE 597
Page 600 of 651
CAUTION!
Do not touch the new bulb with your fingers. Oil
contamination will severely shorten bulb life. If the
bulb comes in contact with an oily surface, clean the
bulb with rubbing alcohol.
4. Install the replacement bulb and connector assembly straight into the fog lamp until it locks into place.
5. Reinstall the front lower wheel well access panel and fasteners.
Rear Turn Signal And Backup Lamp
The tail lamps are a two-piece design. The tail/stop/rear
turn signal lamps are located in the rear corner body
panels. The tail and backup lamps are located in the
liftgate.
Changing The Rear Turn Signal Lamp
1. Open the liftgate.
2. Remove the two fasteners from the inboard side of thetail lamp housing.
Inboard Tail Lamp Housing Fasteners
598 MAINTAINING YOUR VEHICLE
Trending: fuse, wiper blades, steering wheel adjustment, coolant capacity, lane assist, oil pressure, open gas tank
