key DODGE JOURNEY 2020 Owner's Manual
[x] Cancel search | Manufacturer: DODGE, Model Year: 2020, Model line: JOURNEY, Model: DODGE JOURNEY 2020Pages: 396, PDF Size: 25.53 MB
Page 75 of 396
GETTING TO KNOW YOUR VEHICLE 73
cancel this feature. The time is programmable.
Refer to “Uconnect Settings” in “Multimedia”
for further information.
Auto-Down Feature
The driver's power window switch has an
Auto-Down feature. Push the window switch
past the first detent, release, and the window
will go down automatically.
To open the window part way, push the window
sw
itch to the first detent and release it when
you want the window to stop.
To stop the window from going all the way down
d u
ring the Auto-Down operation, pull up on the
switch briefly.
Auto-Up Feature With Anti-Pinch Protection
On some models, the driver and front
passenger power window switches have an
Auto-Up feature. Pull the window switch up to
the second detent, release, and the window will
go up automatically.
To stop the window from going all the way up
du
ring the Auto-Up operation, push down on the
switch briefly.
To close the window part way, pull the window
s w
itch up to the first detent and release it when
you want the window to stop.
NOTE:
If the window runs into any obstacle during
Auto-Closure, it will reverse direction and
then go back down. Remove the obstacle and
use the window switch again to close the
window.
Any impact due to rough road conditions may
trigger the Auto-Reverse function unexpect -
edly during Auto-Closure. If this happens, pull
t h
e switch lightly to the first detent and hold
to close window manually.
Reset Auto-Up
Should the Auto-Up feature stop working, the
window may need to be reset. To reset Auto-Up:
1. M ake sure the door is fully closed.
2
. P ull the window switch up to close the
w
indow completely and continue to hold the
switch up for an additional two seconds
after the window is closed.
3. Push the window switch down firmly to the s
econd detent to open the window
completely and continue to hold the switch
down for an additional two seconds after
the window is fully open.
WARNING!
Never leave children unattended in a vehicle.
Do not leave the key fob in or near the vehicle or
i n
a location accessible to children, and do not
leave the ignition of a vehicle equipped with
Keyless Enter-N-Go in the ACC or ON/RUN mode.
Occupants, particularly unattended children,
can become entrapped by the windows while
o p
erating the power window switches. Such
entrapment may result in serious injury or death.
WARNING!
There is no anti-pinch protection when the
window is almost closed. To avoid personal
injury, be sure to clear your arms, hands,
fingers, and objects from the window path
before closing the window. Such entrapment
may result in serious injury.
2
Page 76 of 396
74 GETTING TO KNOW YOUR VEHICLE
Window Lockout Switch
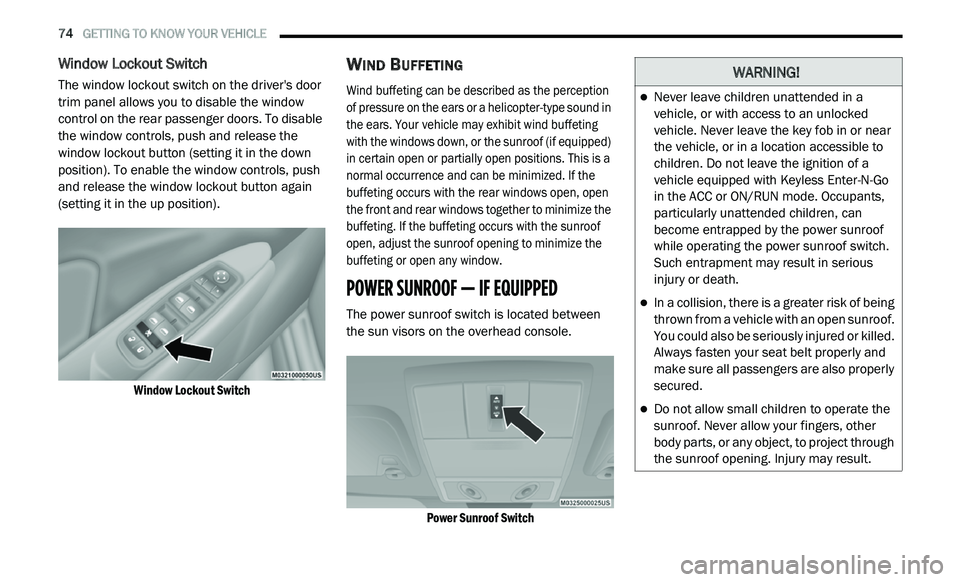
The window lockout switch on the driver's door
trim panel allows you to disable the window
control on the rear passenger doors. To disable
the window controls, push and release the
window lockout button (setting it in the down
position). To enable the window controls, push
and release the window lockout button again
(setting it in the up position).
Window Lockout Switch
WIND BUFFETING
Wind buffeting can be described as the perception
of pressure on the ears or a helicopter-type sound in
the ears. Your vehicle may exhibit wind buffeting
with the windows down, or the sunroof (if equipped)
in certain open or partially open positions. This is a
normal occurrence and can be minimized. If the
buffeting occurs with the rear windows open, open
the front and rear windows together to minimize the
buffeting. If the buffeting occurs with the sunroof
open, adjust the sunroof opening to minimize the
buffeting or open any window.
POWER SUNROOF — IF EQUIPPED
The power sunroof switch is located between
the sun visors on the overhead console.
Power Sunroof Switch
WARNING!
Never leave children unattended in a
vehicle, or with access to an unlocked
vehicle. Never leave the key fob in or near
the vehicle, or in a location accessible to
children. Do not leave the ignition of a
vehicle equipped with Keyless Enter-N-Go
in the ACC or ON/RUN mode. Occupants,
particularly unattended children, can
become entrapped by the power sunroof
while operating the power sunroof switch.
Such entrapment may result in serious
injury or death.
In a collision, there is a greater risk of being
thrown from a vehicle with an open sunroof.
You could also be seriously injured or killed.
Always fasten your seat belt properly and
make sure all passengers are also properly
secured.
Do not allow small children to operate the
sunroof. Never allow your fingers, other
body parts, or any object, to project through
the sunroof opening. Injury may result.
Page 79 of 396
GETTING TO KNOW YOUR VEHICLE 77
LIFTGATE
OPENING
The liftgate can be unlocked or locked pushing
the unlock or lock button on the Remote
Keyless Entry key fob, the Keyless Enter-N-Go
(Passive Entry) lock/unlock button underneath
the left side of the accent bar, which is located
on the liftgate below the glass, or by activating
the power door lock switch located on either
front door trim panel. Refer to “Keyless Enter-N-Go — Passive Entry” in
“
D
oors” in this chapter for further information
on Keyless Enter-N-Go (Passive Entry).
NOTE:
The liftgate cannot be unlocked or locked with
th
e manual door locks on the door trim panels
or the door lock cylinder on the driver's door.
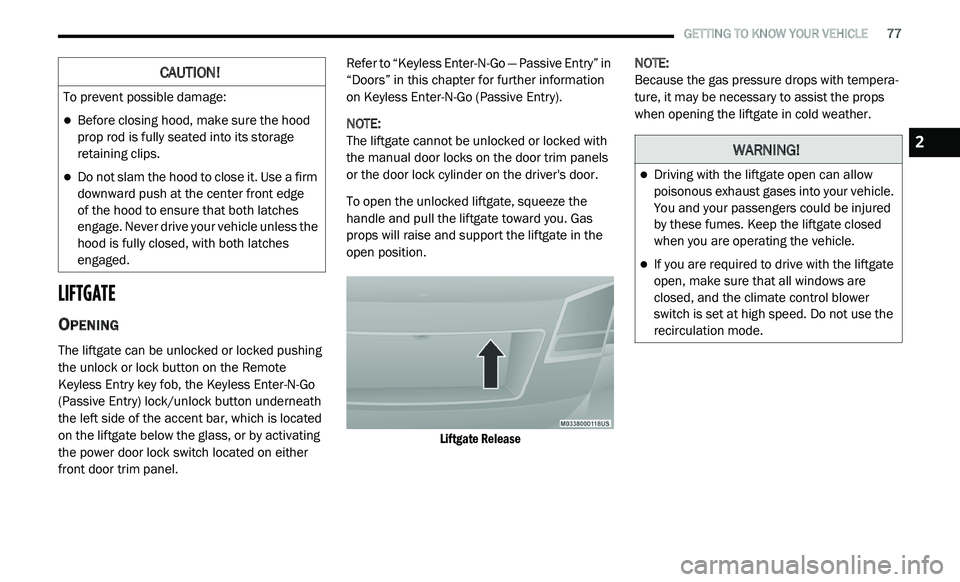
To open the unlocked liftgate, squeeze the
h a
ndle and pull the liftgate toward you. Gas
props will raise and support the liftgate in the
open position.
Liftgate Release
NOTE:
Because the gas pressure drops with tempera -
ture, it may be necessary to assist the props
w h
en opening the liftgate in cold weather.
CAUTION!
To prevent possible damage:
Before closing hood, make sure the hood
prop rod is fully seated into its storage
retaining clips.
Do not slam the hood to close it. Use a firm
downward push at the center front edge
of the hood to ensure that both latches
e n
gage. Never drive your vehicle unless the
hood is fully closed, with both latches
engaged.
WARNING!
Driving with the liftgate open can allow
poisonous exhaust gases into your vehicle.
You and your passengers could be injured
by these fumes. Keep the liftgate closed
when you are operating the vehicle.
If you are required to drive with the liftgate
open, make sure that all windows are
closed, and the climate control blower
switch is set at high speed. Do not use the
recirculation mode.
2
Page 83 of 396
GETTING TO KNOW YOUR VEHICLE 81
Programming A Rolling Code
For programming garage door openers that
were manufactured after 1995:
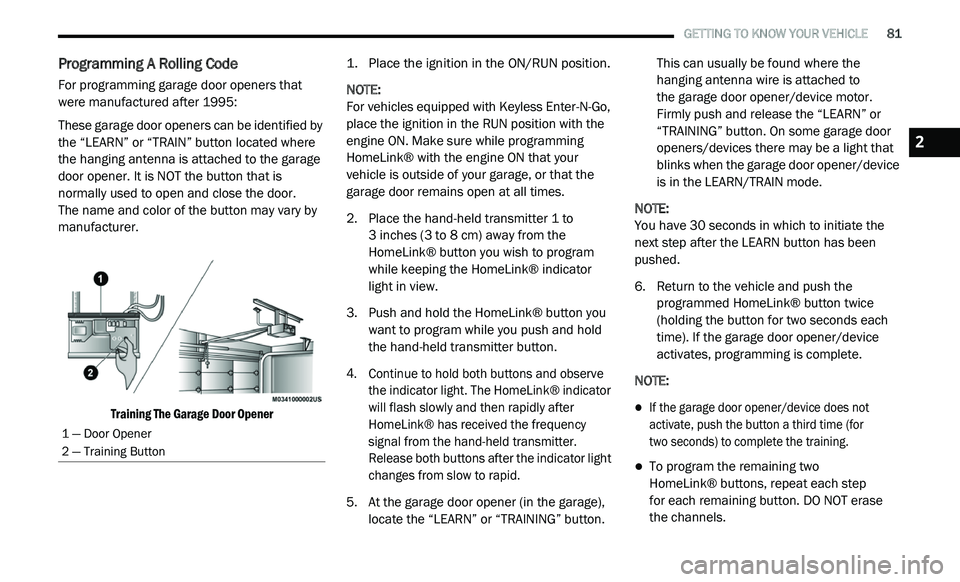
These garage door openers can be identified by
th
e “LEARN” or “TRAIN” button located where
the hanging antenna is attached to the garage
door opener. It is NOT the button that is
normally used to open and close the door.
The name and color of the button may vary by
m a
nufacturer.
Training The Garage Door Opener
1. P
lace the ignition in the ON/RUN position.
N
OTE:
For vehicles equipped with Keyless Enter-N-Go,
p l
ace the ignition in the RUN position with the
engine ON. Make sure while programming
HomeLink® with the engine ON that your
vehicle is outside of your garage, or that the
garage door remains open at all times.
2. P lace the hand-held transmitter 1 to
3
inches (3 to 8 cm) away from the
H o
meLink® button you wish to program
while keeping the HomeLink® indicator
light in view.
3. Push and hold the HomeLink® button you w
ant to program while you push and hold
the hand-held transmitter button.
4. C ontinue to hold both buttons and observe
t
he indicator light. The HomeLink® indicator
will flash slowly and then rapidly after
HomeLink® has received the frequency
signal from the hand-held transmitter.
Release both buttons after the indicator light
changes from slow to rapid.
5. A t the garage door opener (in the garage),
l
ocate the “LEARN” or “TRAINING” button. This can usually be found where the
hanging antenna wire is attached to
the garage door opener/device motor.
F i
rmly push and release the “LEARN” or
“TRAINING” button. On some garage door
openers/devices there may be a light that
blinks when the garage door opener/device
is in the LEARN/TRAIN mode.
NOTE:
You have 30 seconds in which to initiate the
n e
xt step after the LEARN button has been
pushed.
6. R eturn to the vehicle and push the
p
rogrammed HomeLink® button twice
(holding the button for two seconds each
time). If the garage door opener/device
activates, programming is complete.
NOTE:
If the garage door opener/device does not
activate, push the button a third time (for
two seconds) to complete the training.
To program the remaining two
HomeLink® buttons, repeat each step
for each remaining button. DO NOT erase
the channels.
1 — Door Opener
2 — Training Button
2
Page 84 of 396
82 GETTING TO KNOW YOUR VEHICLE
Programming A Non-Rolling Code
For programming garage door openers
manufactured before 1995:
1. P lace the ignition in the ON/RUN position.
N
OTE:
For vehicles equipped with Keyless Enter-N-Go,
p l
ace the ignition in the RUN position with the
engine on. Make sure while programming
HomeLink® with the engine on that your vehicle
is outside of your garage, or that the garage
door remains open at all times.
2. P lace the hand-held transmitter 1 to 3
inches
(3 to 8 cm) away from the HomeLink® button
y o
u wish to program while keeping the
HomeLink® indicator light in view.
3. P ush and hold the HomeLink® button you
w
ant to program while you push and hold
the hand-held transmitter button.
4. C ontinue to hold both buttons and observe
t
he indicator light. The HomeLink®
indicator will flash slowly and then rapidly
after HomeLink® has received the
frequency signal from the hand-held
transmitter. Release both buttons after the
indicator light changes from slow to rapid. 5. P
ush and hold the programmed
H
omeLink® button and observe the
indicator light.
NOTE:
If the indicator light stays on constantly,
programming is complete and the garage
door/device should activate when the
HomeLink® button is pushed.
To program the two remaining HomeLink®
buttons, repeat each step for each remaining
button. DO NOT erase the channels.
CANADIAN/GATE OPERATOR
P
ROGRAMMING
For programming transmitters in Canada/
United States that require the transmitter
signals to “time-out” after several seconds of
transmission:
Canadian radio frequency laws require
t r
ansmitter signals to time-out (or quit) after
several seconds of transmission, which may not
be long enough for HomeLink® to pick up the
signal during programming. Similar to this
Canadian law, some U.S. gate operators are
designed to time-out in the same manner. It may be helpful to unplug the device during the
c
y
cling process to prevent possible overheating
of the garage door or gate motor.
1. P lace the ignition in the ON/RUN position.
N
OTE:
For vehicles equipped with Keyless Enter-N-Go,
p l
ace the ignition in the ON/RUN position with
the engine on. Make sure while programming
HomeLink® with the engine on that your vehicle
is outside of your garage, or that the garage
door remains open at all times.
2. P lace the hand-held transmitter 1 to
3
inches (3 to 8 cm) away from the
H o
meLink® button you wish to program
while keeping the HomeLink® indicator
light in view.
3. Continue to push and hold the HomeLink® b
utton while you push and release (“cycle”) your
hand-held transmitter every two seconds until
HomeLink® has successfully accepted the
frequency signal. The indicator light will flash
slowly and then rapidly when fully trained.
Page 96 of 396
94 GETTING TO KNOW YOUR INSTRUMENT PANEL
INSTRUMENT CLUSTER DESCRIPTIONS
1. Tachometer
Indicates the engine speed in revolutions
per minute (RPM x 1000).
2. I nstrument Cluster Display
When the appropriate conditions exist,
this display shows the instrument cluster
display messages. Refer to “Instrument
Cluster Display” in this chapter for further
information.
3. S peedometer
Indicates vehicle speed.
4. F uel Gauge
The pointer shows the level of fuel in the
fuel tank when the Keyless Push Button
Ignition is in the ON/RUN position.
The fuel pump symbol points
to the side of the vehicle where
t h
e fuel door is located. 5. T
emperature Gauge
The temperature gauge shows engine
coolant temperature. Any reading within
the normal range indicates that the
engine cooling system is operating satis
-
factorily.
The gauge pointer will likely indicate a
higher temperature when driving in hot
weather, up mountain grades, or when
towing a trailer. It should not be allowed
to exceed the upper limits of the normal
operating range.
NOTE:
The hard telltales will illuminate for a bulb check
w h
en the ignition is first cycled.
WARNING!
A hot engine cooling system is dangerous.
You or others could be badly burned by steam
o r
boiling coolant. You may want to call an
authorized dealer for service if your vehicle
overheats. If you decide to look under the hood
yourself, see “Servicing And Maintenance.”
Follow the warnings under the Cooling System
Pressure Cap paragraph.
CAUTION!
Driving with a hot engine cooling system could
damage your vehicle. If the temperature gauge
reads “H,” pull over and stop the vehicle. Idle
the vehicle with the air conditioner turned off
until the pointer drops back into the normal
range. If the pointer remains on the “H,” turn
the engine off immediately and call an
authorized dealer for service.
Page 140 of 396
138 SAFETY
(Continued)
Your vehicle may also be designed to perform
any of these other functions in response to the
Enhanced Accident Response System:
Turn off the Fuel Filter Heater, Turn off the
HVAC Blower Motor, Close the HVAC Circula-
tion Door
Cut off battery power to the:
Engine
Electric Motor (if equipped)
Electric power steering
Brake booster
Electric park brake
Automatic transmission gear selector
Horn
Front wiper
Headlamp washer pump NOTE:
After an accident, remember to cycle the ignition
t o
the STOP (OFF/LOCK) position and remove the
key from the ignition switch to avoid draining the
battery. Carefully check the vehicle for fuel leaks
in the engine compartment and on the ground
near the engine compartment and fuel tank
before resetting the system and starting the
engine. If there are no fuel leaks or damage to
the vehicle electrical devices (e.g. headlights)
after an accident, reset the system by following
the procedure described below. If you have any
doubt, contact an authorized dealer.
Enhanced Accident Response System
Reset Procedure
In order to reset the Enhanced Accident
Response System functions after an event, the
ignition switch must be changed from ignition
START or ON/RUN to ignition OFF. Carefully
check the vehicle for fuel leaks in the engine
compartment and on the ground near the
engine compartment and fuel tank before
resetting the system and starting the engine.
Maintaining Your Air Bag System
WARNING!
Modifications to any part of the air bag
system could cause it to fail when you need
it. You could be injured if the air bag system
is not there to protect you. Do not modify
the components or wiring, including adding
any kind of badges or stickers to the
steering wheel hub trim cover or the upper
passenger side of the instrument panel.
Do not modify the front bumper, vehicle
bo
dy structure, or add aftermarket side
steps or running boards.
It is dangerous to try to repair any part of
the air bag system yourself. Be sure to tell
anyone who works on your vehicle that it
has an air bag system.
Page 158 of 396
156 SAFETY
(Continued)
PERIODIC SAFETY CHECKS YOU SHOULD
M
AKE OUTSIDE THE VEHICLE
Tires
Examine tires for excessive tread wear and
uneven wear patterns. Check for stones, nails,
glass, or other objects lodged in the tread or
sidewall. Inspect the tread for cuts and cracks.
Inspect sidewalls for cuts, cracks, and bulges.
Check the wheel nuts for tightness. Check the
tires (including spare) for proper cold inflation
pressure.
Lights
Have someone observe the operation of brake
lights and exterior lights while you work the
controls. Check turn signal and high beam
indicator lights on the instrument panel.
Door Latches
Check for proper closing, latching, and locking.
Fluid Leaks
Check area under the vehicle after overnight
parking for fuel, coolant, oil, or other fluid leaks.
Also, if gasoline fumes are detected or if fuel, or
brake fluid leaks are suspected, the cause
should be located and corrected immediately.
ONLY use the driver’s side floor mat on the
driver’s side floor area. To check for inter -
ference, with the vehicle properly parked
w i
th the engine off, fully depress the accel -
erator, the brake, and the clutch pedal
(if present) to check for interference. If your
f l
oor mat interferes with the operation of
any pedal, or is not secure to the floor,
remove the floor mat from the vehicle and
place the floor mat in your trunk.
ONLY use the passenger’s side floor mat on
the passenger’s side floor area.
ALWAYS make sure objects cannot fall or
slide into the driver’s side floor area when
the vehicle is moving. Objects can become
trapped under accelerator, brake, or clutch
pedals and could cause a loss of vehicle
control.
WARNING! (Continued)
NEVER place any objects under the floor
mat (e.g., towels, keys, etc.). These objects
could change the position of the floor mat
and may cause interference with the accel -
erator, brake, or clutch pedals.
If the vehicle carpet has been removed and
re-installed, always properly attach carpet
to the floor and check the floor mat
fasteners are secure to the vehicle carpet.
Fully depress each pedal to check for inter -
ference with the accelerator, brake, or
c lu
tch pedals then re-install the floor mats.
It is recommended to only use mild soap
and water to clean your floor mats. After
cleaning, always check your floor mat has
been properly installed and is secured to
your vehicle using the floor mat fasteners
by lightly pulling mat.
WARNING! (Continued)
Page 159 of 396
157
(Continued)
STARTING AND OPERATING
STARTING THE ENGINE
Before starting your vehicle, adjust your seat,
adjust the inside and outside mirrors, fasten
your seat belt, and if present, instruct all other
occupants to buckle their seat belts.
AUTOMATIC TRANSMISSION
The gear selector must be in the NEUTRAL or
PARK position before you can start the engine.
Apply the brakes before shifting into any driving
gear.
WARNING!
When exiting the vehicle, always make sure
the ignition is in “OFF” mode, remove the key
fob from the vehicle and lock the vehicle.
Never leave children alone in a vehicle, or
with access to an unlocked vehicle. Leaving
children in a vehicle unattended is
dangerous for a number of reasons. A child
or others could be seriously or fatally injured.
Children should be warned not to touch the
parking brake, brake pedal or the transmis -
sion gear selector.
Do not leave the key fob in or near the
vehicle (or in a location accessible to chil -
dren), and do not leave the ignition (of a
v e
hicle equipped with Keyless Enter-N-Go)
in the ACC or ON/RUN mode. A child could
operate power windows, other controls, or
move the vehicle.
Do not leave children or animals inside
parked vehicles in hot weather. Interior
heat build-up may cause serious injury or
death.
WARNING! (Continued)CAUTION!
Damage to the transmission may occur if the
following precautions are not observed:
Do not shift from REVERSE, PARK, or
NEUTRAL into any forward gear when the
engine is above idle speed.
Shift into PARK only after the vehicle has
come to a complete stop.
Shift into or out of REVERSE only after the
vehicle has come to a complete stop and
the engine is at idle speed.
Before shifting into any gear, make sure
your foot is firmly on the brake pedal.
5
Page 160 of 396
158 STARTING AND OPERATING
NORMAL STARTING
To Turn On The Engine Using The ENGINE
START/STOP Button
1. T he transmission must be in PARK.
2
. P ress and hold the brake pedal while pushing
t
he ENGINE START/STOP button once.
3. T he system takes over and attempts to start
t
he vehicle. If the vehicle fails to start, the
starter will disengage automatically after
10 seconds.
4. If you wish to stop the cranking of the e
ngine prior to the engine starting, push the
ENGINE START/STOP button again.
NOTE:
Normal starting of either a cold or a warm
e n
gine is obtained without pumping or pressing
the accelerator pedal.
To Turn Off The Engine Using ENGINE
START/STOP Button
1. P lace the gear selector in PARK, then push
a
nd release the ENGINE START/STOP
button.
2. T he ignition will return to the OFF mode. 3
. I
f the gear selector is not in PARK, the
E
NGINE START/STOP button must be held
for two seconds or three short pushes in a
row with the vehicle speed above 5 mph
( 8
km/h) before the engine will shut off.
The ignition will remain in the ACC mode
u n
til the gear selector is in PARK and the
button is pushed twice to the OFF mode.
If the gear selector is not in PARK and the
E N
GINE START/STOP button is pushed
once, the instrument cluster will display a
“Vehicle Not In Park” message and the
engine will remain running. Never leave a
vehicle out of the PARK position, or it
could roll.
NOTE:
If the gear selector is in NEUTRAL, push and
r e
lease the ENGINE START/STOP button with
the vehicle speed below 5 mph (8 km/h) before
t h
e engine will shut off, and the ignition will
remain in the ACC position. The system will
automatically time out and the ignition will cycle
to the OFF mode after 30 minutes of inactivity if
t h
e ignition is left in the ACC or RUN (engine not
running) mode and the transmission is in PARK. ENGINE START/STOP Button Functions — With
D
r
iver’s Foot OFF The Brake Pedal (In PARK Or
NEUTRAL Position)
The ENGINE START/STOP button operates
s i
milar to an ignition switch. It has three modes:
OFF, ACC, and RUN. To change the ignition
modes without starting the vehicle and use the
accessories, follow these directions:
1. S tart with the ignition in the OFF mode.
2
. P ush the ENGINE START/STOP button once
t
o place the ignition to the ACC mode.
3. P ush the ENGINE START/STOP button a
s
econd time to place the ignition to the RUN
mode.
4. P ush the ENGINE START/STOP button a
t
hird time to return the ignition to the OFF
mode.
KEYLESS ENTER-N-GO — IGNITION
This feature allows the driver to operate the
ignition switch with the push of a button, as long
as the Remote Start/Keyless Enter-N-Go key
fob is in the passenger compartment.