ESP DODGE JOURNEY 2020 Owners Manual
[x] Cancel search | Manufacturer: DODGE, Model Year: 2020, Model line: JOURNEY, Model: DODGE JOURNEY 2020Pages: 396, PDF Size: 25.53 MB
Page 2 of 396

WARNING: Operating, servicing and maintaining a passenger vehicle or off-highway \
motor vehicle can expose you to
chemicals including engine exhaust, carbon monoxide, phthalates, and lea\
d, which are known to the State of California to
cause cancer and birth defects or other reproductive harm. To minimize exposure, avoid breathing exhaust, do not idle the
engine except as necessary, service your vehicle in a well-ventilated area and wear gloves or wash\
your hands frequently
when servicing your vehicle. For more information go to www.P65Warnings.ca.gov/passenger-vehicle.
This Owner’s Manual illustrates and describes the operation of features and equipme\
nt that are either standard or optional on this vehicle. This manual may also include
a description of features and equipment that are no longer available or \
were not ordered on this vehicle. Please disregard any features and equipment described in this
manual that are not on this vehicle. FCA US LLC reserves the right to make changes in design and specificat\
ions, and/or make additions to or improvements to its
products without imposing any obligation upon itself to install them on \
products previously manufactured.
With respect to any vehicles sold in Canada, the name FCA US LLC shall b\
e deemed to be deleted and the name FCA Canada Inc. used in substitution therefore.
If you are the first registered retail owner of your vehicle, you may \
obtain a complimentary printed copy of the Warranty Booklet by calling 1-800-423-6343 (U.S.) or
1-800-387-1143 (Canada) or by contacting your dealer.
This Owner’s Manual is intended to familiarize you with the important features of y\
our vehicle. Your most up-to-date Owner’s Manual, Navigation/Uconnect manuals and
Warranty Booklet can be found by visiting the website on the back cover. U.S. residents can purchase replacement kits by visiting www.techauthority.com and Canadian
residents can purchase replacement kits by calling 1-800-387-1143.
The driver’s primary responsibility is the safe operation of the vehicle. Driving w\
hile distracted can result in loss of vehicle control, resulting in an accident and
personal injury. FCA US LLC strongly recommends that the driver use extreme caution whe\
n using any device or feature that may take their attention off the road.
Use of any electrical devices, such as cellular telephones, computers, p\
ortable radios, vehicle navigation or other devices, by the driver while the vehicle is moving
is dangerous and could lead to a serious accident. Texting while driving is also dangerous and should never be done while th\
e vehicle is moving. If you find yourself
unable to devote your full attention to vehicle operation, pull off the \
road to a safe location and stop your vehicle. Some states or provinces prohibit the use of
cellular telephones or texting while driving. It is always the driver’\
s responsibility to comply with all local laws.
This Owner’s Manual has been prepared to help you get acquainted with your new Dodg\
e brand vehicle and to provide a convenient reference source
for common questions.
Not all features shown in this manual may apply to your vehicle. For add\
itional information, visit www.mopar.com (U.S.), www.mopar.ca (Canada) or your local
Dodge brand dealer.
Drunk driving is one of the most frequent causes of accidents. Your driving ability can be seriously impaired with blood alcohol levels
far below the legal minimum. If you are drinking, don’t drive. Ride with a designated non-drinking driver, call a cab, a friend or use
public transportation.
DRIVING AND ALCOHOL
Driving after drinking can lead to an accident. Your perceptions are less sharp, your reflexes are slower and your judg\
ment is impaired
when you have been drinking. Never drink and then drive.
WARNING
Page 7 of 396
5
JACKING AND TIRE CHANGING........................ 199
Jack Location .. ...........................................199
Spare Tire Location And Removal . . ..........200
Preparations For Jacking. . .........................201
Jacking Instructions . . .................................201
Road Tire Installation . . ..............................205
Spare Tire Stowage. . ..................................206
JUMP STARTING ................................................ 2 0 6
Preparations For Jump Start .. ...................207
Jump Starting Procedure. . .........................208
IF YOUR ENGINE OVERHEATS . . ....................... 209
2.4L Engine — If Equipped .. ...................... 210
GEAR SELECTOR OVERRIDE . . .......................... 210
FREEING A STUCK VEHICLE .. ........................... 211
TOWING A DISABLED VEHICLE .. ...................... 212
Front-Wheel Drive (FWD) Models.. ............213
Tow Eye Usage — If Equipped . . ................213
ENHANCED ACCIDENT RESPONSE
SYSTEM (EARS) . .
............................................... 215
EVENT DATA RECORDER (EDR) .. ..................... 215
SERVICING AND MAINTENANCE
SCHEDULED SERVICING ................................... 216
Maintenance Plan.. ....................................217
ENGINE COMPARTMENT . . ................................ 220
2.4L Engine .. ..............................................220
Checking Oil Level . . ................................... 221
Adding Washer Fluid . . ...............................221
Maintenance-Free Battery . . ...................... 221
Pressure Washing . . ....................................222 DEALER SERVICE .
.
............................................222
Engine Oil .................................................. 223
E ngine Oil Filter . . ........................................ 224
Engine Air Cleaner Filter . . ......................... 224
Air Conditioner Maintenance . . ................. 224
Accessory Drive Belt Inspection . . ............. 225
Body Lubrication . . ...................................... 226
Windshield Wiper Blades . . ........................ 226
Exhaust System . . ...................................... 227
Cooling System . . ....................................... 228
Brake System . . .......................................... 232
Automatic Transmission. . .......................... 233
RAISING THE VEHICLE . . .....................................234
TIRES....................................................................234 T ire Safety Information .. ........................... 234
Tires — General Information . . .................. 242
Tire Types . .................................................. 246
S pare Tires — If Equipped . . ....................... 247
Wheel And Wheel Trim Care . . .................. 249
Tire Chains and Traction Devices . . ........... 250
Tire Rotation Recommendations . . ........... 251
DEPARTMENT OF TRANSPORTATION UNIFORM
TIRE QUALITY GRADES . .
...................................251
Treadwear .................................................. 251
T raction Grades . . ....................................... 251
Temperature Grades . . ............................... 252
BODYWORK . . ...................................................... 252
Protection From Atmospheric Agents..
..... 252
Body And Underbody Maintenance . . ........ 253
Preserving The Bodywork . . ........................ 253INTERIORS .
.
....................................................... 254
Seats And Fabric Parts .. ............................ 254
Plastic And Coated Parts. . ......................... 254
Leather Parts . . ........................................... 255
Glass Surfaces . . ........................................ 255
Cleaning The Cupholders . . ....................... 255
TECHNICAL SPECIFICATIONS
IDENTIFICATION DATA ...................................... 256
Vehicle Identification Number .. ................ 256
BRAKE SYSTEM . . ............................................... 256
WHEEL AND TIRE TORQUE
SPECIFICATIONS ..
.............................................. 257
Torque Specifications.. .............................. 257
FUEL REQUIREMENTS . . .................................... 257
Reformulated Gasoline .. .......................... 258
Materials Added To Fuel . . ......................... 258
Gasoline/Oxygenate Blends . . ................... 258
Do Not Use E-85 In Non-Flex Fuel
Vehicles . ..................................................... 259
C
NG And LP Fuel System Modifications . . 259
MMT In Gasoline. . ...................................... 259
Fuel System Cautions. . .............................. 259
Carbon Monoxide Warnings. . .................... 260
FLUID CAPACITIES . . ........................................... 261
FLUIDS AND LUBRICANTS .. .............................. 262
Engine ....................................................... 262
C hassis . ..................................................... 264
Page 11 of 396
9
GETTING TO KNOW YOUR VEHICLE
KEYS
KEY FOB
Your vehicle uses a keyless ignition system.
The ignition system consists of a key fob with
R e
mote Keyless Entry (RKE) and a START/STOP
push button ignition system. The Remote
Keyless Entry system consists of a key fob and
Keyless Enter-N-Go feature if equipped.
NOTE:
The key fob may not be found if it is located next
t o
a mobile phone, laptop or other electronic
device; these devices may block the key fob’s
wireless signal.
The Remote Keyless Entry key fob also contains
an
emergency key, which stores in the rear of
the key fob.
The emergency key allows for entry into the
v e
hicle should the battery in the vehicle or the
key fob become depleted. The emergency key is
also for locking the glove compartment. You can
keep the emergency key with you when valet
parking. To remove the emergency key, slide the
m
e
chanical latch on the back of the key fob
sideways with your thumb and then pull the key
out with your other hand.
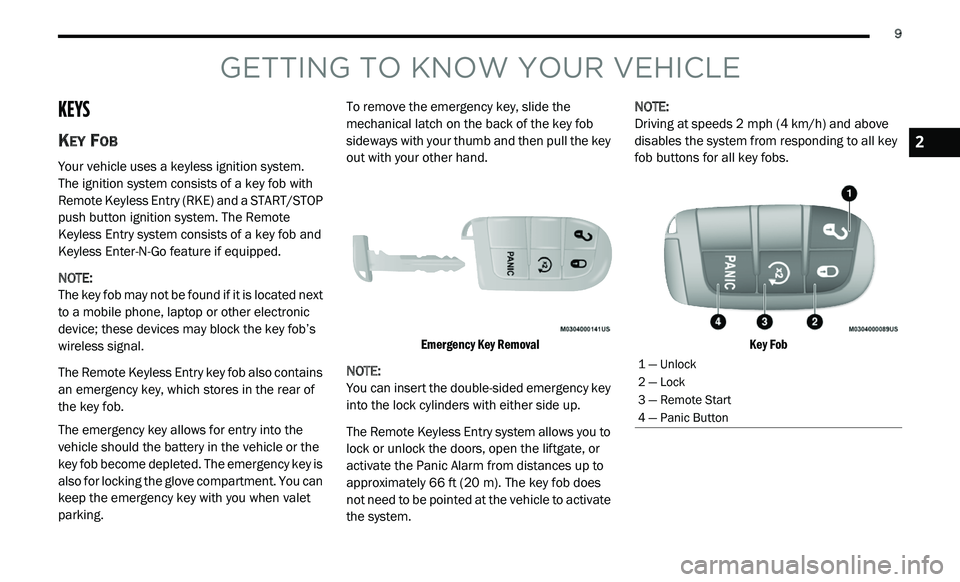
Emergency Key Removal
NOTE:
You can insert the double-sided emergency key
in
to the lock cylinders with either side up.
The Remote Keyless Entry system allows you to
l o
ck or unlock the doors, open the liftgate, or
activate the Panic Alarm from distances up to
approximately 66 ft (20 m). The key fob does
n o
t need to be pointed at the vehicle to activate
the system. NOTE:
Driving at speeds 2 mph (4 km/h) and above
d i
sables the system from responding to all key
fob buttons for all key fobs.
Key Fob
1 — Unlock
2 — Lock
3 — Remote Start
4 — Panic Button
2
Page 14 of 396
12 GETTING TO KNOW YOUR VEHICLE
4. To assemble the key fob case, snap the two
halves together.
Programming Additional Key Fobs
Programming the key fob may be performed by
an authorized dealer.
NOTE:
Once a key fob is programmed to a vehicle, it
c a
nnot be repurposed and reprogrammed to
another vehicle.
General Information
The following regulatory statement applies to all
Radio Frequency (RF) devices equipped in this
vehicle:
This device complies with Part 15 of the FCC
R u
les and with Innovation, Science and
Economic Development Canada license-exempt
RSS standard(s). Operation is subject to the
following two conditions:
1. T his device may not cause harmful
i
nterference, and
2. T his device must accept any interference
r
eceived, including interference that may
cause undesired operation. Le présent appareil est conforme aux CNR
d
`
Innovation, Science and Economic
Development applicables aux appareils radio
exempts de licence. L'exploitation est autorisée
aux deux conditions suivantes:
1. l 'appareil ne doit pas produire de
b
rouillage, et
2. l 'utilisateur de l'appareil doit accepter tout
b
rouillage radioélectrique subi, même si le
brouillage est susceptible d'en compro -
mettre le fonctionnement.
La operación de este equipo está sujeta a las
s i
guientes dos condiciones:
1. e s posible que este equipo o dispositivo no
c
ause interferencia perjudicial y
2. e ste equipo o dispositivo debe aceptar
c
ualquier interferencia, incluyendo la que
pueda causar su operación no deseada.
NOTE:
Changes or modifications not expressly
a p
proved by the party responsible for compli -
ance could void the user’s authority to operate
t h
e equipment.
IGNITION SWITCH
KEYLESS PUSH BUTTON IGNITION
This feature allows the driver to operate the
ignition with the push of a button as long as the
key fob is in the passenger compartment.
The Keyless Push Button Ignition has four
op
erating positions, three of which are labeled
and will illuminate when in position. The three
positions are OFF, ACC, and ON/RUN. The fourth
position is START. During START, RUN will
illuminate.
NOTE:
If the ignition switch does not change with the
p u
sh of a button, the key fob may have a low or
depleted battery. In this situation, a back up
method can be used to operate the ignition
switch. Put the nose side (side opposite of the
emergency key) of the key fob against the
START/STOP ignition button and push to
operate the ignition switch.
Page 18 of 396
16 GETTING TO KNOW YOUR VEHICLE
REMOTE START COMFORT SYSTEM — IF
E
QUIPPED
When Remote Start is activated, the driver
heated seat feature will automatically turn on in
cold weather. This feature will stay on through
the duration of Remote Start or until the ignition
switch is placed in the ON/RUN position.
The Remote Start Comfort system can be
a c
tivated and deactivated through the
Uconnect system. Refer to “Uconnect Settings”
in “Multimedia” for further information on
Remote Start Comfort system operation.
GENERAL INFORMATION
The following regulatory statement applies to all
Radio Frequency (RF) devices equipped in this
vehicle:
This device complies with Part 15 of the FCC
R u
les and with Innovation, Science and
Economic Development Canada license-exempt
RSS standard(s). Operation is subject to the
following two conditions:
1. T his device may not cause harmful
i
nterference, and
2. T
his device must accept any interference
r
eceived, including interference that may
cause undesired operation.
Le présent appareil est conforme aux CNR
d`
Innovation, Science and Economic
Development applicables aux appareils radio
exempts de licence. L'exploitation est autorisée
aux deux conditions suivantes:
1. l 'appareil ne doit pas produire de
b
rouillage, et
2. l 'utilisateur de l'appareil doit accepter tout
b
rouillage radioélectrique subi, même si le
brouillage est susceptible d'en compro -
mettre le fonctionnement.
La operación de este equipo está sujeta a las
s i
guientes dos condiciones:
1. e s posible que este equipo o dispositivo no
c
ause interferencia perjudicial y
2. e ste equipo o dispositivo debe aceptar
c
ualquier interferencia, incluyendo la que
pueda causar su operación no deseada. NOTE:
Changes or modifications not expressly
a p
proved by the party responsible for compli -
ance could void the user’s authority to operate
t h
e equipment.
SENTRY KEY
The Sentry Key Immobilizer system prevents
unauthorized vehicle operation by disabling the
engine. The system does not need to be armed
or activated. Operation is automatic, regardless
of whether the vehicle is locked or unlocked.
The system uses a key fob and a Keyless Push
Bu
tton Ignition, and a Radio Frequency (RF)
receiver to prevent unauthorized vehicle
operation. Therefore, only key fobs that are
programmed to the vehicle can be used to start
and operate the vehicle. If an invalid key fob
is used to attempt to start and operate the
v e
hicle, the system will not allow the engine to
crank. If an invalid key fob is used to start the
engine, the system will shut the engine off in
two seconds.
Page 20 of 396
18 GETTING TO KNOW YOUR VEHICLE
Le présent appareil est conforme aux CNR
d`Innovation, Science and Economic
Development applicables aux appareils radio
exempts de licence. L'exploitation est autorisée
aux deux conditions suivantes:
1. l 'appareil ne doit pas produire de
b
rouillage, et
2. l 'utilisateur de l'appareil doit accepter tout
b
rouillage radioélectrique subi, même si le
brouillage est susceptible d'en compro -
mettre le fonctionnement.
La operación de este equipo está sujeta a las
s i
guientes dos condiciones:
1. e s posible que este equipo o dispositivo no
c
ause interferencia perjudicial y
2. e ste equipo o dispositivo debe aceptar
c
ualquier interferencia, incluyendo la que
pueda causar su operación no deseada.
NOTE:
Changes or modifications not expressly
a p
proved by the party responsible for compli -
ance could void the user’s authority to operate
t h
e equipment.
VEHICLE SECURITY ALARM — IF EQUIPPED
The vehicle security alarm monitors the vehicle
doors and liftgate for unauthorized entry and the
START/STOP ignition button for unauthorized
operation. While the vehicle security alarm is
armed, interior switches for door locks are
disabled. If something triggers the alarm, the
vehicle security alarm will provide the following
audible and visible signals: the horn will pulse,
the headlights will turn on, the park lamps and/or
turn signals will flash, and the vehicle security
light in the instrument cluster will flash.
TO ARM THE SYSTEM
Follow these steps to arm the vehicle security
alarm:
1. M ake sure the vehicle ignition system is
O
FF (refer to "Starting The Engine" in
"Starting And Operating" for further
information).
2. Perform one of the following methods to l
ock the vehicle:
Push lock on the interior power door lock
switch with the driver and/or passenger
door open.
Push the lock button on the exterior
Passive Entry Door Handle with a valid
key fob available in the same exterior
zone (refer to "Keyless Enter-N-Go —
Passive Entry" in “Doors” in this chapter
for further information).
Push the lock button on the key fob.
3. I f any doors are open, close them.
TO DISARM THE SYSTEM
The vehicle security alarm can be disarmed
using any of the following methods:
Push the unlock button on the key fob.
Grasp the Passive Entry Door Handle with a
valid key fob within 5 ft (1.5 m) of the passive
e n
try door handle (if equipped). Refer to
"Keyless Enter-N-Go — Passive Entry" in
“Doors” in this chapter for further information.
Cycle the vehicle ignition system out of the
OFF position.
For vehicles equipped with Keyless
Enter-N-Go — Passive Entry, push the
START/STOP ignition button (requires at
least one valid key fob in the vehicle).
Page 23 of 396
GETTING TO KNOW YOUR VEHICLE 21
NOTE:
Use the Automatic Unlock Doors On Exit feature
i n
accordance with local laws.
KEYLESS ENTER-N-GO — PASSIVE
E
NTRY (IF EQUIPPED)
The Passive Entry system is an enhancement to
the vehicle’s Remote Keyless Entry (RKE)
system and a feature of Keyless Enter-N-Go.
This feature allows you to lock and unlock the
vehicle’s door(s) without having to push the key
fob lock or unlock buttons.
NOTE:
Passive Entry may be programmed on/off;
refer to “Uconnect Settings” in “Multimedia”
for further information.
If wearing gloves on your hands, or if it has
been raining/snowing on the Passive Entry
door handle, the unlock sensitivity can be
affected, resulting in a slower response time.
If the vehicle is unlocked by Passive Entry
and no door is opened within 60 seconds, the
vehicle will re-lock and if equipped will arm
the security alarm.
The key fob may not be detected by the
vehicle Passive Entry system if it is located
next to a mobile phone, laptop, or other elec -
tronic device; these devices may interfere
w i
th the key fob’s wireless signal and prevent
the Passive Entry system from locking/
unlocking the vehicle.
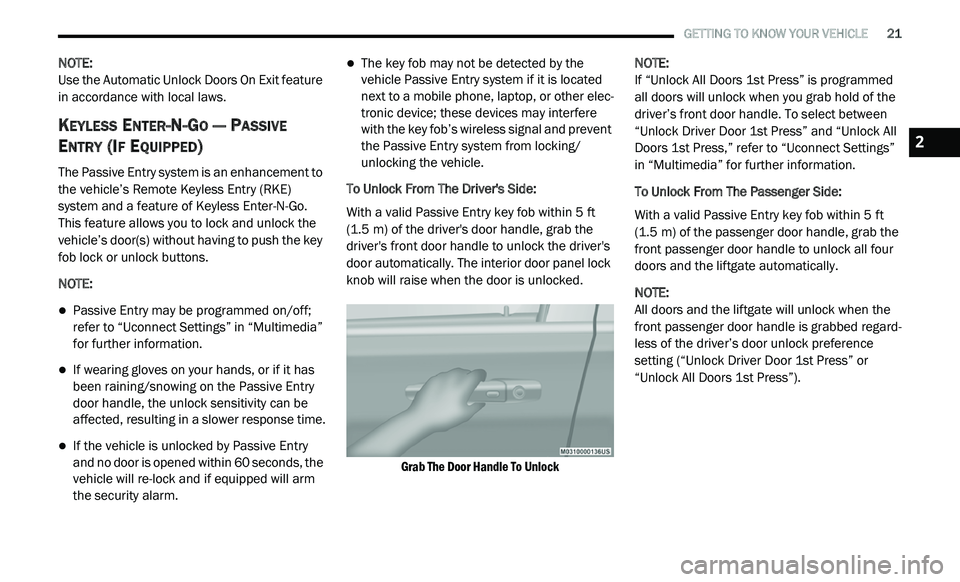
To Unlock From The Driver's Side:
With a valid Passive Entry key fob within 5 ft
( 1
.5 m) of the driver's door handle, grab the
d r
iver's front door handle to unlock the driver's
door automatically. The interior door panel lock
knob will raise when the door is unlocked.
Grab The Door Handle To Unlock
NOTE:
If “Unlock All Doors 1st Press” is programmed
a l
l doors will unlock when you grab hold of the
driver’s front door handle. To select between
“Unlock Driver Door 1st Press” and “Unlock All
Doors 1st Press,” refer to “Uconnect Settings”
in “Multimedia” for further information.
To Unlock From The Passenger Side:
With a valid Passive Entry key fob within 5 ft
( 1
.5 m) of the passenger door handle, grab the
f r
ont passenger door handle to unlock all four
doors and the liftgate automatically.
NOTE:
All doors and the liftgate will unlock when the
fr
ont passenger door handle is grabbed regard -
less of the driver’s door unlock preference
s e
tting (“Unlock Driver Door 1st Press” or
“Unlock All Doors 1st Press”).
2
Page 25 of 396
GETTING TO KNOW YOUR VEHICLE 23
The vehicle doors can also be locked by using
the key fob lock button or the lock button
located on the vehicle’s interior door panel.
General Information
The following regulatory statement applies to all
Radio Frequency (RF) devices equipped in this
vehicle:
This device complies with Part 15 of the FCC
Ru
les and with Innovation, Science and
Economic Development Canada license-exempt
RSS standard(s). Operation is subject to the
following two conditions:
1. T his device may not cause harmful
i
nterference, and
2. T his device must accept any interference
r
eceived, including interference that may
cause undesired operation. Le présent appareil est conforme aux CNR
d
`
Innovation, Science and Economic
Development applicables aux appareils radio
exempts de licence. L'exploitation est autorisée
aux deux conditions suivantes:
1. l 'appareil ne doit pas produire de
b
rouillage, et
2. l 'utilisateur de l'appareil doit accepter tout
b
rouillage radioélectrique subi, même si le
brouillage est susceptible d'en compro -
mettre le fonctionnement.
La operación de este equipo está sujeta a las
s i
guientes dos condiciones:
1. e s posible que este equipo o dispositivo no
c
ause interferencia perjudicial y
2. e ste equipo o dispositivo debe aceptar
c
ualquier interferencia, incluyendo la que
pueda causar su operación no deseada.
NOTE:
Changes or modifications not expressly
a p
proved by the party responsible for compli -
ance could void the user’s authority to operate
t h
e equipment.
CHILD-PROTECTION DOOR LOCK
S
YSTEM — REAR DOORS
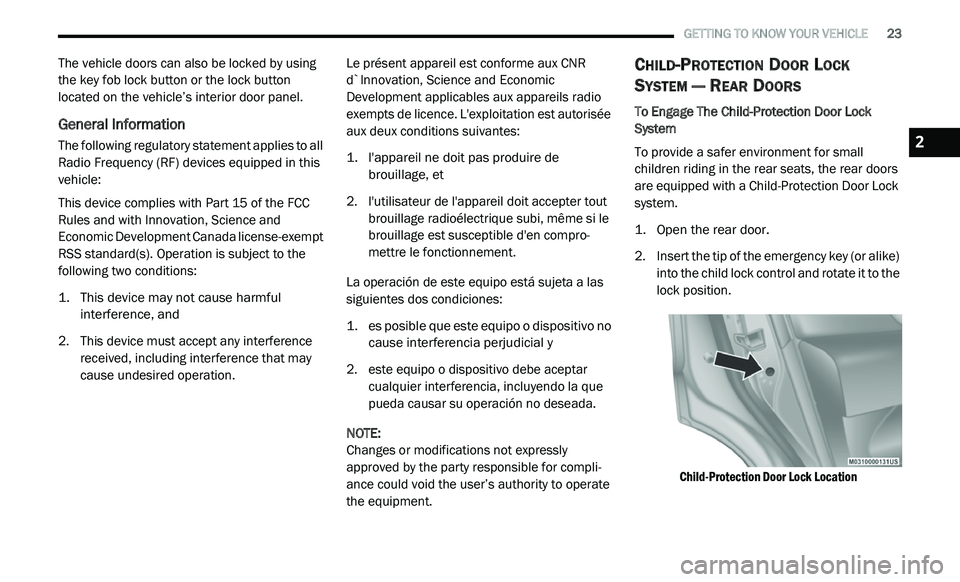
To Engage The Child-Protection Door Lock
System
To provide a safer environment for small
c h
ildren riding in the rear seats, the rear doors
are equipped with a Child-Protection Door Lock
system.
1. Open the rear door.
2
. I nsert the tip of the emergency key (or alike)
i
nto the child lock control and rotate it to the
lock position.
Child-Protection Door Lock Location
2
Page 34 of 396
32 GETTING TO KNOW YOUR VEHICLE
(Continued)
Vehicles Equipped With Remote Start
On models that are equipped with remote start,
th
e heated seats can be programmed to come
on during a remote start.
This feature can be programmed through the
U c
onnect system. Refer to “Uconnect Settings”
in “Multimedia” for further information.
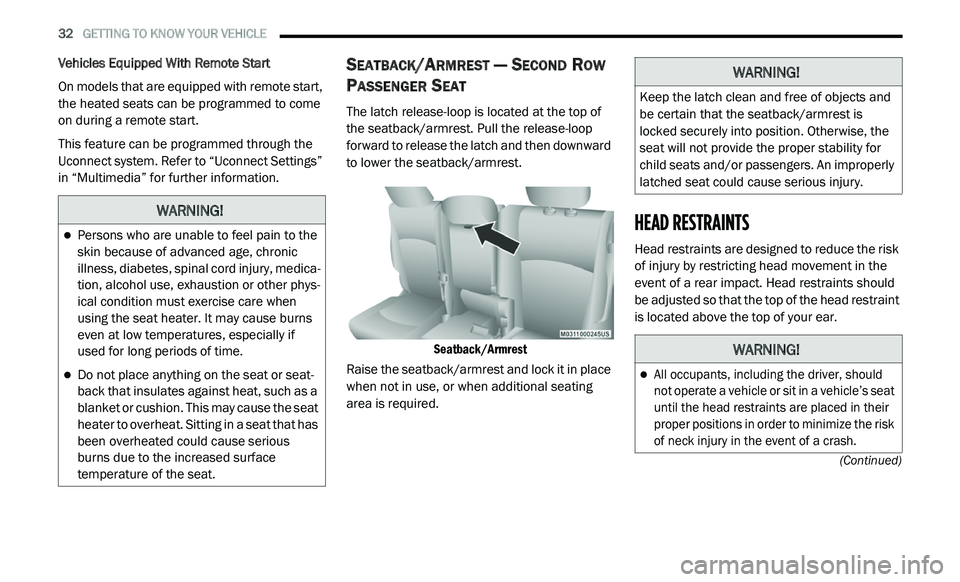
SEATBACK/ARMREST — SECOND ROW
P
ASSENGER SEAT
The latch release-loop is located at the top of
the seatback/armrest. Pull the release-loop
forward to release the latch and then downward
to lower the seatback/armrest.
Seatback/Armrest
Raise the seatback/armrest and lock it in place
w h
en not in use, or when additional seating
area is required.
HEAD RESTRAINTS
Head restraints are designed to reduce the risk
of injury by restricting head movement in the
event of a rear impact. Head restraints should
be adjusted so that the top of the head restraint
is located above the top of your ear.
WARNING!
Persons who are unable to feel pain to the
skin because of advanced age, chronic
illness, diabetes, spinal cord injury, medica -
tion, alcohol use, exhaustion or other phys -
ical condition must exercise care when
u s
ing the seat heater. It may cause burns
even at low temperatures, especially if
used for long periods of time.
Do not place anything on the seat or seat -
back that insulates against heat, such as a
b la
nket or cushion. This may cause the seat
heater to overheat. Sitting in a seat that has
been overheated could cause serious
burns due to the increased surface
temperature of the seat.
WARNING!
Keep the latch clean and free of objects and
be certain that the seatback/armrest is
locked securely into position. Otherwise, the
seat will not provide the proper stability for
child seats and/or passengers. An improperly
latched seat could cause serious injury.
WARNING!
All occupants, including the driver, should
not operate a vehicle or sit in a vehicle’s seat
until the head restraints are placed in their
proper positions in order to minimize the risk
of neck injury in the event of a crash.
Page 38 of 396
36 GETTING TO KNOW YOUR VEHICLE
The heated steering wheel control button is
located within the Uconnect system. You can
gain access to the control button through the
climate screen or the controls screen.
Press the heated steering wheel button
once to turn the heating element on.
Press the heated steering wheel button a
second time to turn the heating element off.
NOTE:
The engine must be running for the heated
s t
eering wheel to operate.
Vehicles Equipped With Remote Start
On models that are equipped with remote start,
t h
e heated steering wheel can be programmed
to come on during a remote start through the
Uconnect system. Refer to “Uconnect Settings”
in “Multimedia” for further information.
MIRRORS
INSIDE DAY/NIGHT MIRROR — IF
E
QUIPPED
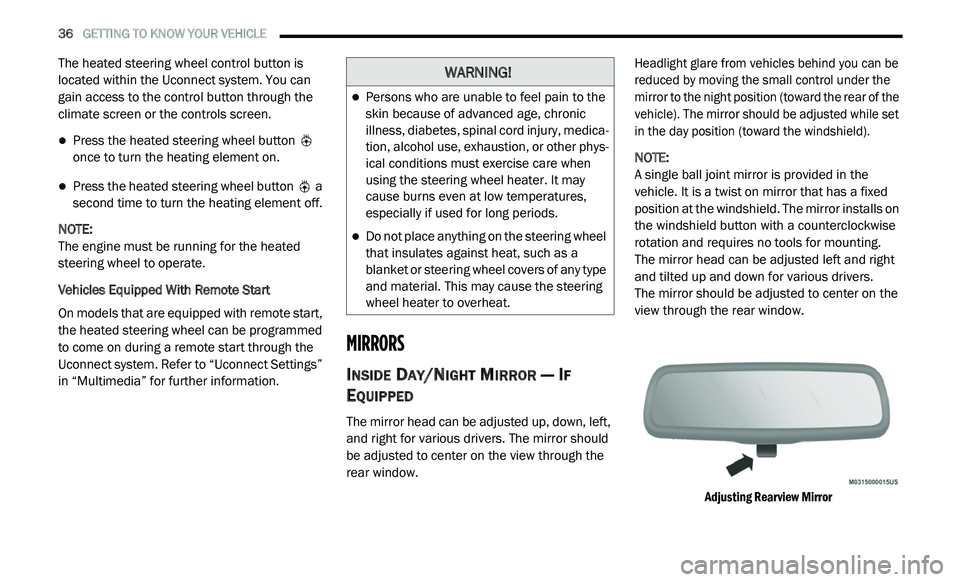
The mirror head can be adjusted up, down, left,
and right for various drivers. The mirror should
be adjusted to center on the view through the
rear window.
Headlight glare from vehicles behind you can be
r
e
duced by moving the small control under the
mirror to the night position (toward the rear of the
vehicle). The mirror should be adjusted while set
in the day position (toward the windshield).
NOTE:
A single ball joint mirror is provided in the
v e
hicle. It is a twist on mirror that has a fixed
position at the windshield. The mirror installs on
the windshield button with a counterclockwise
rotation and requires no tools for mounting.
The mirror head can be adjusted left and right
a n
d tilted up and down for various drivers.
The mirror should be adjusted to center on the
v i
ew through the rear window.
Adjusting Rearview Mirror
WARNING!
Persons who are unable to feel pain to the
skin because of advanced age, chronic
illness, diabetes, spinal cord injury, medica -
tion, alcohol use, exhaustion, or other phys -
ical conditions must exercise care when
u s
ing the steering wheel heater. It may
cause burns even at low temperatures,
especially if used for long periods.
Do not place anything on the steering wheel
that insulates against heat, such as a
blanket or steering wheel covers of any type
and material. This may cause the steering
wheel heater to overheat.