length DODGE NEON 1999 Service User Guide
[x] Cancel search | Manufacturer: DODGE, Model Year: 1999, Model line: NEON, Model: DODGE NEON 1999Pages: 1200, PDF Size: 35.29 MB
Page 314 of 1200
WINDSHIELD WIPERS AND WASHERS
CONTENTS
page page
WINDSHIELD WASHER SYSTEM............. 8WINDSHIELD WIPERS..................... 1
WINDSHIELD WIPERS
INDEX
page page
GENERAL INFORMATION
INTRODUCTION......................... 1
DESCRIPTION AND OPERATION
WIPER BLADES.......................... 1
DIAGNOSIS AND TESTING
WINDSHIELD WIPER CONDITION............ 2
WIPER MOTOR.......................... 3
WIPER SWITCH.......................... 5
REMOVAL AND INSTALLATION
WIPER ARM............................. 5WIPER BLADE ELEMENT.................. 5
WIPER BLADE........................... 5
WIPER LINKAGE......................... 6
WIPER MODULE......................... 6
WIPER MOTOR.......................... 6
WIPER SWITCH.......................... 6
CLEANING AND INSPECTION
WIPER BLADES.......................... 6
ADJUSTMENTS
WIPER ARM ADJUSTMENT................. 7
GENERAL INFORMATION
INTRODUCTION
WARNING: VEHICLES ARE EQUIPPED WITH AN
AIRBAG, REFER TO GROUP 8M, RESTRAINT SYS-
TEMS FOR STEERING WHEEL OR COLUMN SER-
VICE PROCEDURES.
The windshield wipers will only operate with the
ignition switch in the ACCESSORY or IGNITION
RUN position. The wiper circuit is protect against
over loads by a fuse in the fuse block and a circuit
breaker within the wiper motor. This protects the cir-
cuitry of the wiper system and the vehicle.
The wiper motor has permanent magnet fields.
The intermittent wiper system, in addition to low
and high speed, has a delay mode and a pulse wipe
mode. The delay mode has a range of 1 to 15 seconds.
Pulse wipe is accomplished by momentarily moving
the stalk lever into the WASH position while the
wiper switch is in either OFF or DELAY position.
The wiper blades then sweep once or twice and
return to the previous wiper switch mode, OFF or
DELAY.The intermittent wiper function is integral to the
wiper switch. All electronics and relay are inside the
switch assembly.
The wiper system completes the wipe cycle when
the switch is turned OFF. The blades park in the
lowest portion of the wipe pattern.
DESCRIPTION AND OPERATION
WIPER BLADES
Wiper blades, exposed to the weather for a long
period of time, tend to lose their wiping effectiveness.
Periodic cleaning of the wiper blade is suggested to
remove the accumulation of salt and road film. The
wiper blades, arms, and windshield should be
cleaned with a sponge or cloth and a mild detergent
or nonabrasive cleaner. If the blades continue to
streak or smear, they should be replaced. The right
and left wipers are different blade lengths. The
driver side length is 525 mm and the passenger side
length is 450 mm. The blades should not be inter-
changed.
PLWINDSHIELD WIPERS AND WASHERS 8K - 1
Page 406 of 1200
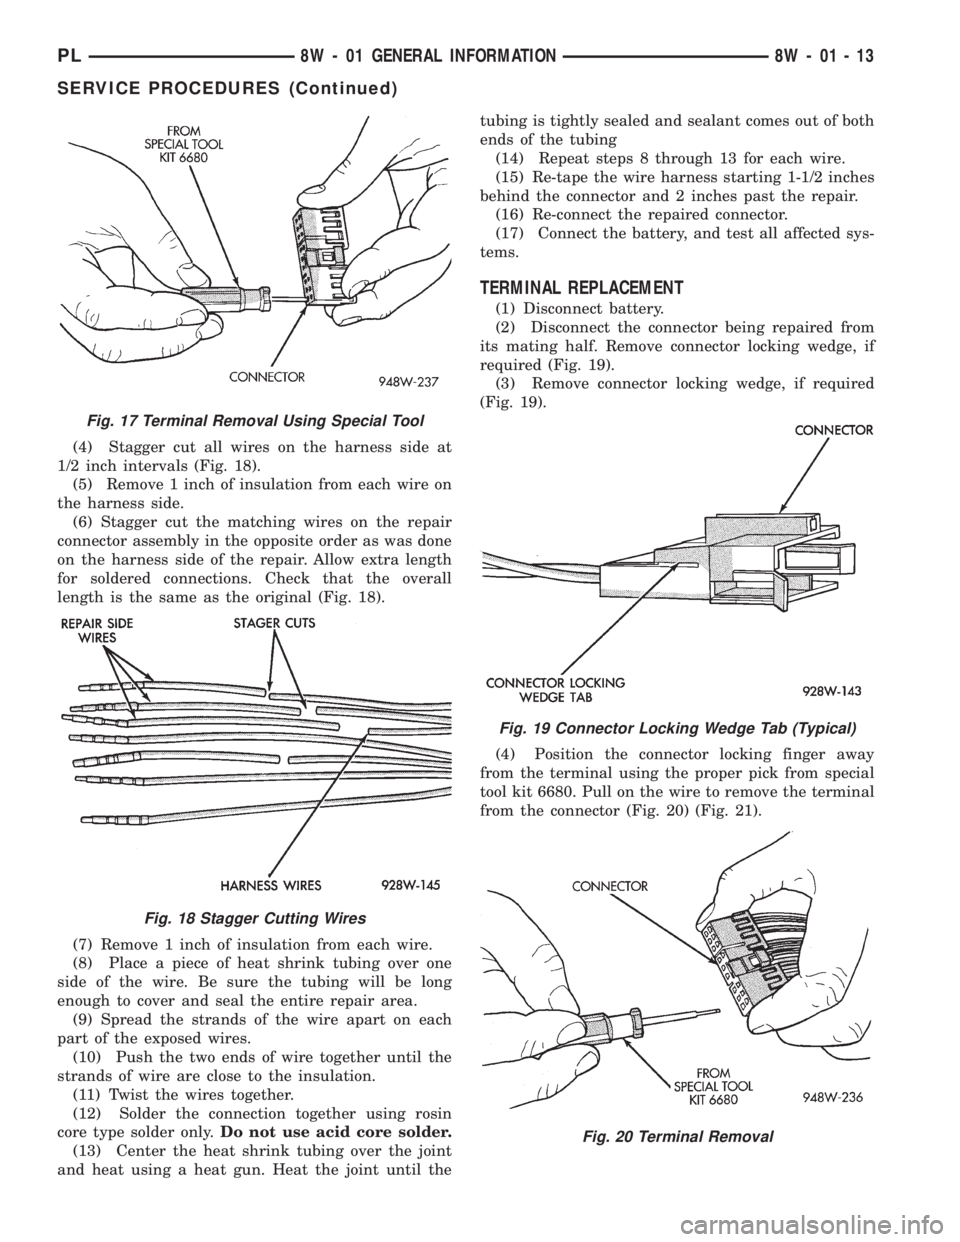
(4) Stagger cut all wires on the harness side at
1/2 inch intervals (Fig. 18).
(5) Remove 1 inch of insulation from each wire on
the harness side.
(6) Stagger cut the matching wires on the repair
connector assembly in the opposite order as was done
on the harness side of the repair. Allow extra length
for soldered connections. Check that the overall
length is the same as the original (Fig. 18).
(7) Remove 1 inch of insulation from each wire.
(8) Place a piece of heat shrink tubing over one
side of the wire. Be sure the tubing will be long
enough to cover and seal the entire repair area.
(9) Spread the strands of the wire apart on each
part of the exposed wires.
(10) Push the two ends of wire together until the
strands of wire are close to the insulation.
(11) Twist the wires together.
(12) Solder the connection together using rosin
core type solder only.Do not use acid core solder.
(13) Center the heat shrink tubing over the joint
and heat using a heat gun. Heat the joint until thetubing is tightly sealed and sealant comes out of both
ends of the tubing
(14) Repeat steps 8 through 13 for each wire.
(15) Re-tape the wire harness starting 1-1/2 inches
behind the connector and 2 inches past the repair.
(16) Re-connect the repaired connector.
(17) Connect the battery, and test all affected sys-
tems.
TERMINAL REPLACEMENT
(1) Disconnect battery.
(2) Disconnect the connector being repaired from
its mating half. Remove connector locking wedge, if
required (Fig. 19).
(3) Remove connector locking wedge, if required
(Fig. 19).
(4) Position the connector locking finger away
from the terminal using the proper pick from special
tool kit 6680. Pull on the wire to remove the terminal
from the connector (Fig. 20) (Fig. 21).
Fig. 17 Terminal Removal Using Special Tool
Fig. 18 Stagger Cutting Wires
Fig. 19 Connector Locking Wedge Tab (Typical)
Fig. 20 Terminal Removal
PL8W - 01 GENERAL INFORMATION 8W - 01 - 13
SERVICE PROCEDURES (Continued)
Page 407 of 1200
(5) Cut the wire 6 inches from the back of the
connector.
(6) Remove 1 inch of insulation from the wire on
the harness side.
(7) Select a wire from the terminal repair assem-
bly that best matches the color wire being repaired.
(8) Cut the repair wire to the proper length and
remove 1 inch of insulation.
(9) Place a piece of heat shrink tubing over one
side of the wire. Make sure the tubing will be long
enough to cover and seal the entire repair area.
(10) Spread the strands of the wire apart on each
part of the exposed wires.
(11) Push the two ends of wire together until the
strands of wire are close to the insulation.
(12) Twist the wires together.
(13) Solder the connection together using rosin
core type solder only.Do not use acid core solder.
(14) Center the heat shrink tubing over the joint
and heat using a heat gun. Heat the joint until the
tubing is tightly sealed and sealant comes out of both
ends of the tubing.
(15) Insert the repaired wire into the connector.
(16) Install the connector locking wedge, if
required, and reconnect the connector to its mating
half/component.(17) Re-tape the wire harness starting 1-1/2 inches
behind the connector and 2 inches past the repair.
(18) Connect battery, and test all affected systems.
DIODE REPLACEMENT
(1) Disconnect the battery.
(2) Locate the diode in the harness, and remove
the protective covering.
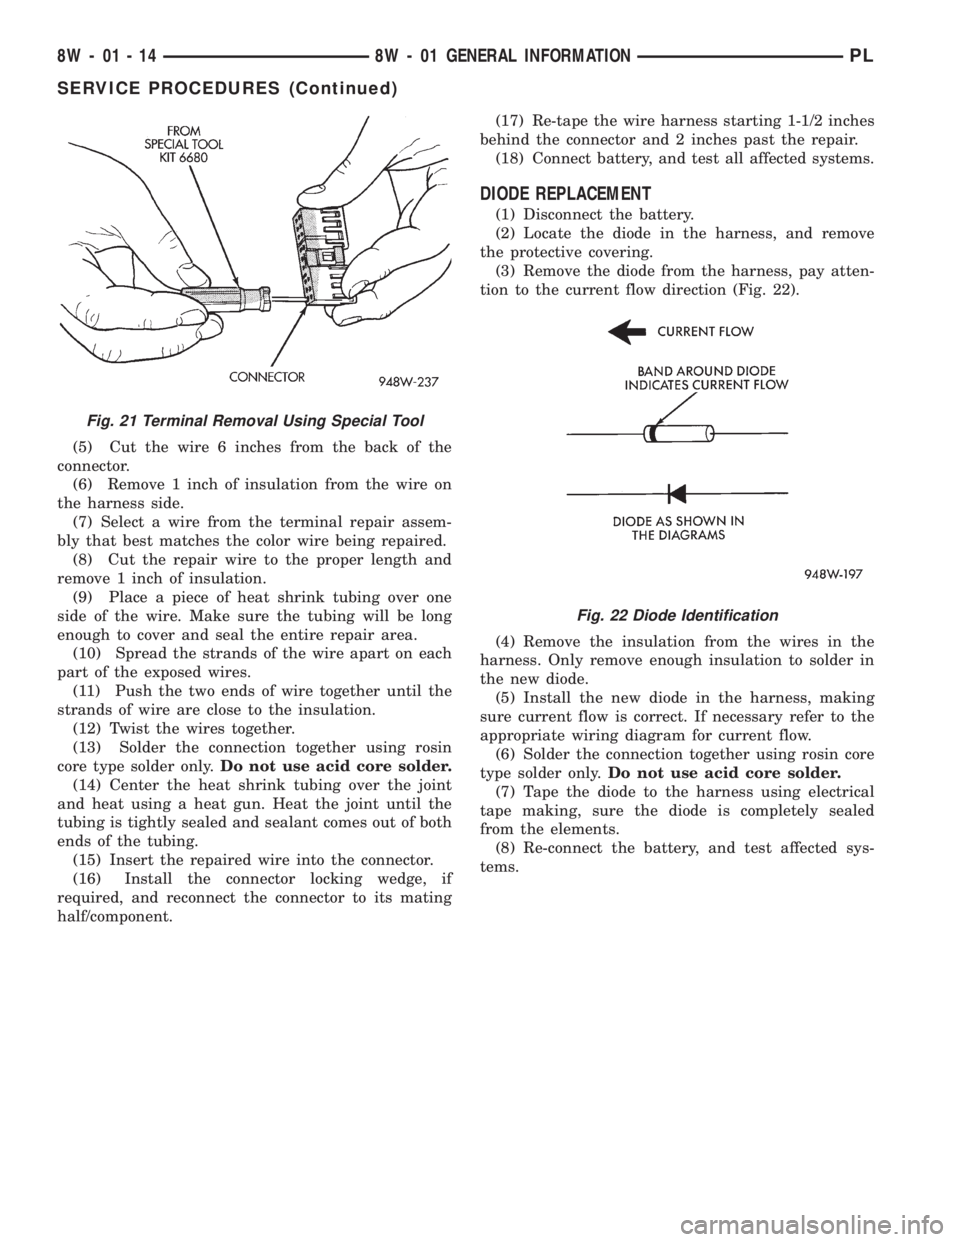
(3) Remove the diode from the harness, pay atten-
tion to the current flow direction (Fig. 22).
(4) Remove the insulation from the wires in the
harness. Only remove enough insulation to solder in
the new diode.
(5) Install the new diode in the harness, making
sure current flow is correct. If necessary refer to the
appropriate wiring diagram for current flow.
(6) Solder the connection together using rosin core
type solder only.Do not use acid core solder.
(7) Tape the diode to the harness using electrical
tape making, sure the diode is completely sealed
from the elements.
(8) Re-connect the battery, and test affected sys-
tems.
Fig. 21 Terminal Removal Using Special Tool
Fig. 22 Diode Identification
8W - 01 - 14 8W - 01 GENERAL INFORMATIONPL
SERVICE PROCEDURES (Continued)
Page 726 of 1200
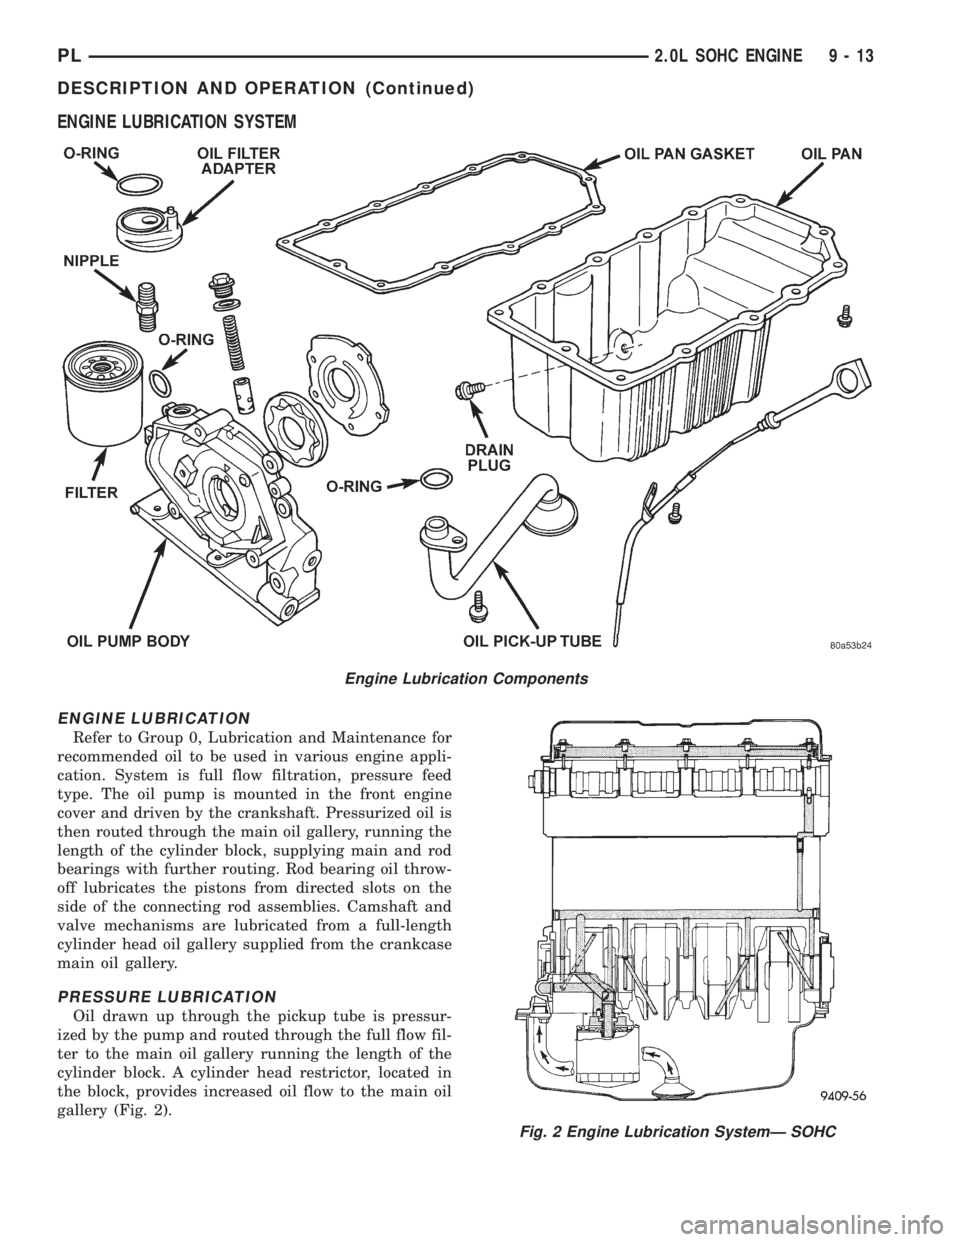
ENGINE LUBRICATION SYSTEM
ENGINE LUBRICATION
Refer to Group 0, Lubrication and Maintenance for
recommended oil to be used in various engine appli-
cation. System is full flow filtration, pressure feed
type. The oil pump is mounted in the front engine
cover and driven by the crankshaft. Pressurized oil is
then routed through the main oil gallery, running the
length of the cylinder block, supplying main and rod
bearings with further routing. Rod bearing oil throw-
off lubricates the pistons from directed slots on the
side of the connecting rod assemblies. Camshaft and
valve mechanisms are lubricated from a full-length
cylinder head oil gallery supplied from the crankcase
main oil gallery.
PRESSURE LUBRICATION
Oil drawn up through the pickup tube is pressur-
ized by the pump and routed through the full flow fil-
ter to the main oil gallery running the length of the
cylinder block. A cylinder head restrictor, located in
the block, provides increased oil flow to the main oil
gallery (Fig. 2).
Engine Lubrication Components
Fig. 2 Engine Lubrication SystemÐ SOHC
PL2.0L SOHC ENGINE 9 - 13
DESCRIPTION AND OPERATION (Continued)
Page 760 of 1200
DISASSEMBLY AND ASSEMBLY
OIL PUMP
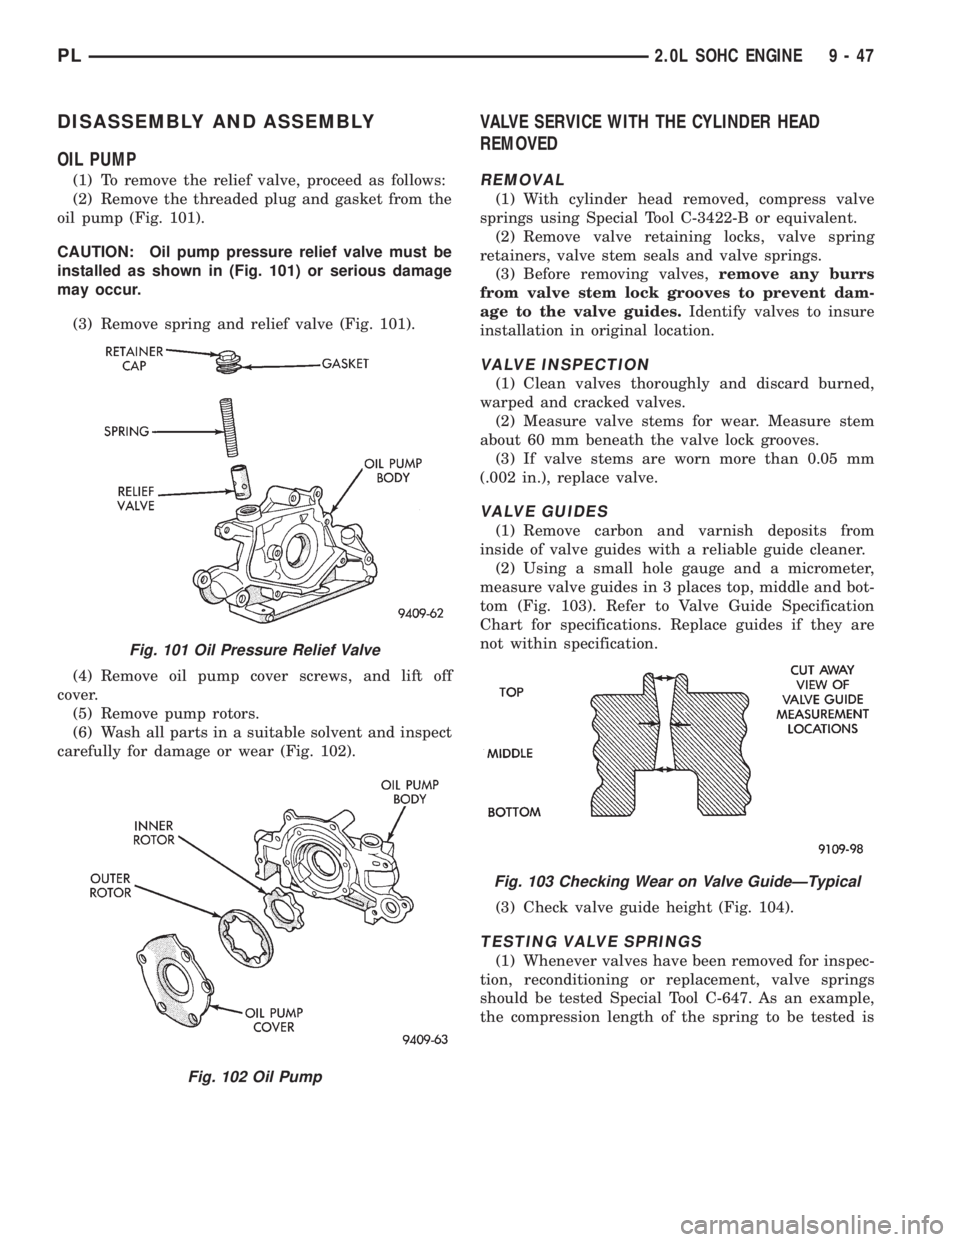
(1) To remove the relief valve, proceed as follows:
(2) Remove the threaded plug and gasket from the
oil pump (Fig. 101).
CAUTION: Oil pump pressure relief valve must be
installed as shown in (Fig. 101) or serious damage
may occur.
(3) Remove spring and relief valve (Fig. 101).
(4) Remove oil pump cover screws, and lift off
cover.
(5) Remove pump rotors.
(6) Wash all parts in a suitable solvent and inspect
carefully for damage or wear (Fig. 102).
VALVE SERVICE WITH THE CYLINDER HEAD
REMOVED
REMOVAL
(1) With cylinder head removed, compress valve
springs using Special Tool C-3422-B or equivalent.
(2) Remove valve retaining locks, valve spring
retainers, valve stem seals and valve springs.
(3) Before removing valves,remove any burrs
from valve stem lock grooves to prevent dam-
age to the valve guides.Identify valves to insure
installation in original location.
VALVE INSPECTION
(1) Clean valves thoroughly and discard burned,
warped and cracked valves.
(2) Measure valve stems for wear. Measure stem
about 60 mm beneath the valve lock grooves.
(3) If valve stems are worn more than 0.05 mm
(.002 in.), replace valve.
VALVE GUIDES
(1) Remove carbon and varnish deposits from
inside of valve guides with a reliable guide cleaner.
(2) Using a small hole gauge and a micrometer,
measure valve guides in 3 places top, middle and bot-
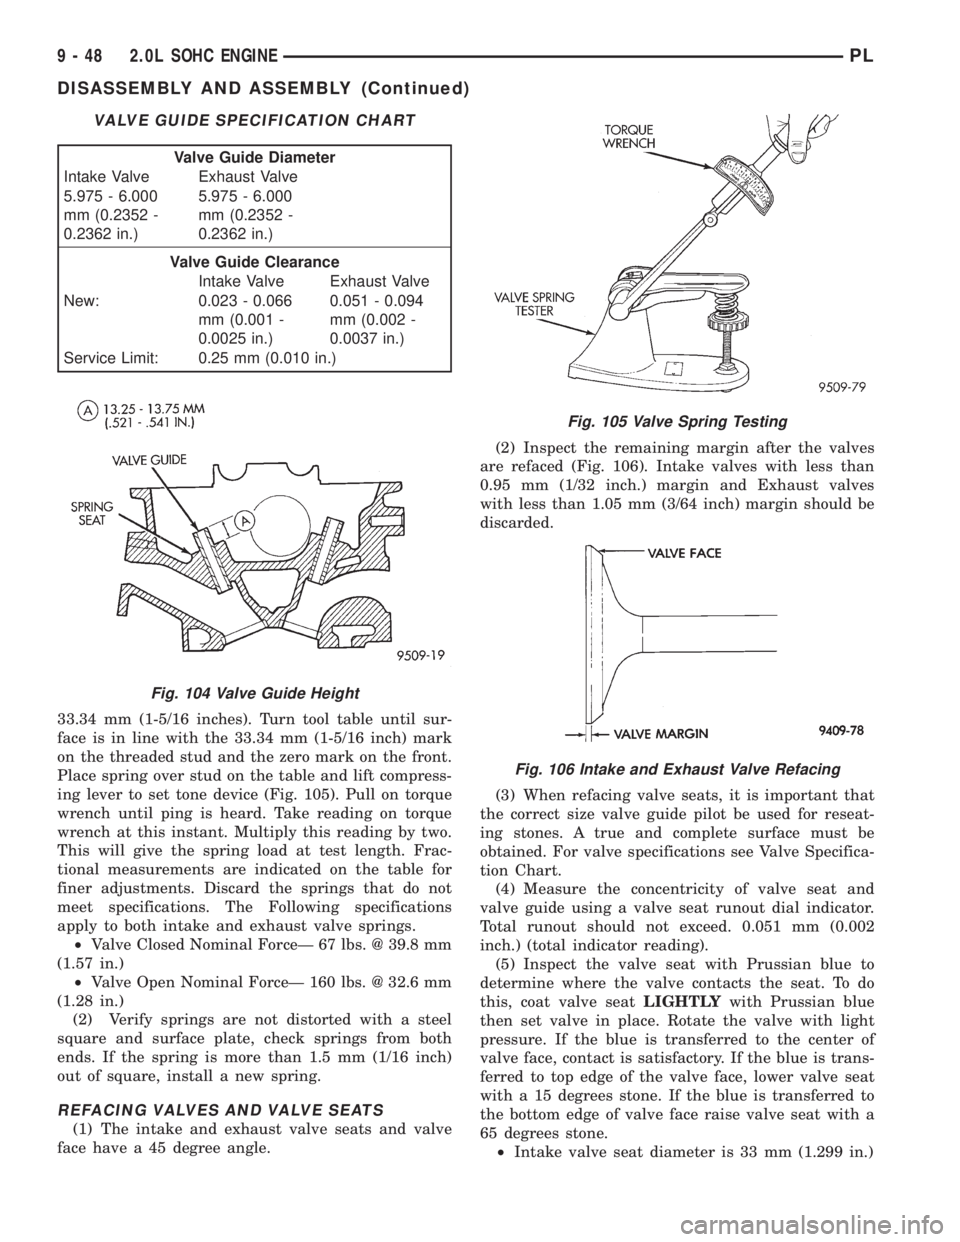
tom (Fig. 103). Refer to Valve Guide Specification
Chart for specifications. Replace guides if they are
not within specification.
(3) Check valve guide height (Fig. 104).
TESTING VALVE SPRINGS
(1) Whenever valves have been removed for inspec-
tion, reconditioning or replacement, valve springs
should be tested Special Tool C-647. As an example,
the compression length of the spring to be tested is
Fig. 101 Oil Pressure Relief Valve
Fig. 102 Oil Pump
Fig. 103 Checking Wear on Valve GuideÐTypical
PL2.0L SOHC ENGINE 9 - 47
Page 761 of 1200
33.34 mm (1-5/16 inches). Turn tool table until sur-
face is in line with the 33.34 mm (1-5/16 inch) mark
on the threaded stud and the zero mark on the front.
Place spring over stud on the table and lift compress-
ing lever to set tone device (Fig. 105). Pull on torque
wrench until ping is heard. Take reading on torque
wrench at this instant. Multiply this reading by two.
This will give the spring load at test length. Frac-
tional measurements are indicated on the table for
finer adjustments. Discard the springs that do not
meet specifications. The Following specifications
apply to both intake and exhaust valve springs.
²Valve Closed Nominal ForceÐ 67 lbs. @ 39.8 mm
(1.57 in.)
²Valve Open Nominal ForceÐ 160 lbs. @ 32.6 mm
(1.28 in.)
(2) Verify springs are not distorted with a steel
square and surface plate, check springs from both
ends. If the spring is more than 1.5 mm (1/16 inch)
out of square, install a new spring.
REFACING VALVES AND VALVE SEATS
(1) The intake and exhaust valve seats and valve
face have a 45 degree angle.(2) Inspect the remaining margin after the valves
are refaced (Fig. 106). Intake valves with less than
0.95 mm (1/32 inch.) margin and Exhaust valves
with less than 1.05 mm (3/64 inch) margin should be
discarded.
(3) When refacing valve seats, it is important that
the correct size valve guide pilot be used for reseat-
ing stones. A true and complete surface must be
obtained. For valve specifications see Valve Specifica-
tion Chart.
(4) Measure the concentricity of valve seat and
valve guide using a valve seat runout dial indicator.
Total runout should not exceed. 0.051 mm (0.002
inch.) (total indicator reading).
(5) Inspect the valve seat with Prussian blue to
determine where the valve contacts the seat. To do
this, coat valve seatLIGHTLYwith Prussian blue
then set valve in place. Rotate the valve with light
pressure. If the blue is transferred to the center of
valve face, contact is satisfactory. If the blue is trans-
ferred to top edge of the valve face, lower valve seat
with a 15 degrees stone. If the blue is transferred to
the bottom edge of valve face raise valve seat with a
65 degrees stone.
²Intake valve seat diameter is 33 mm (1.299 in.)
VALVE GUIDE SPECIFICATION CHART
Valve Guide Diameter
Intake Valve Exhaust Valve
5.975 - 6.000
mm (0.2352 -
0.2362 in.)5.975 - 6.000
mm (0.2352 -
0.2362 in.)
Valve Guide Clearance
Intake Valve Exhaust Valve
New: 0.023 - 0.066
mm (0.001 -
0.0025 in.)0.051 - 0.094
mm (0.002 -
0.0037 in.)
Service Limit: 0.25 mm (0.010 in.)
Fig. 104 Valve Guide Height
Fig. 105 Valve Spring Testing
Fig. 106 Intake and Exhaust Valve Refacing
9 - 48 2.0L SOHC ENGINEPL
DISASSEMBLY AND ASSEMBLY (Continued)
Page 762 of 1200
²Exhaust valve seat diameter is 28 mm (1.102
in.)
(6) Valve seats which are worn or burned can be
reworked, provided that correct angle and seat width
are maintained. The intake valve seat must be ser-
viced when the valve seat width is 2.0 mm (0.079 in.)
or greater. The exhaust valve seat must be serviced
when the valve seat width is 2.5 mm (0.098 in.) or
greater. Otherwise the cylinder head must be
replaced.
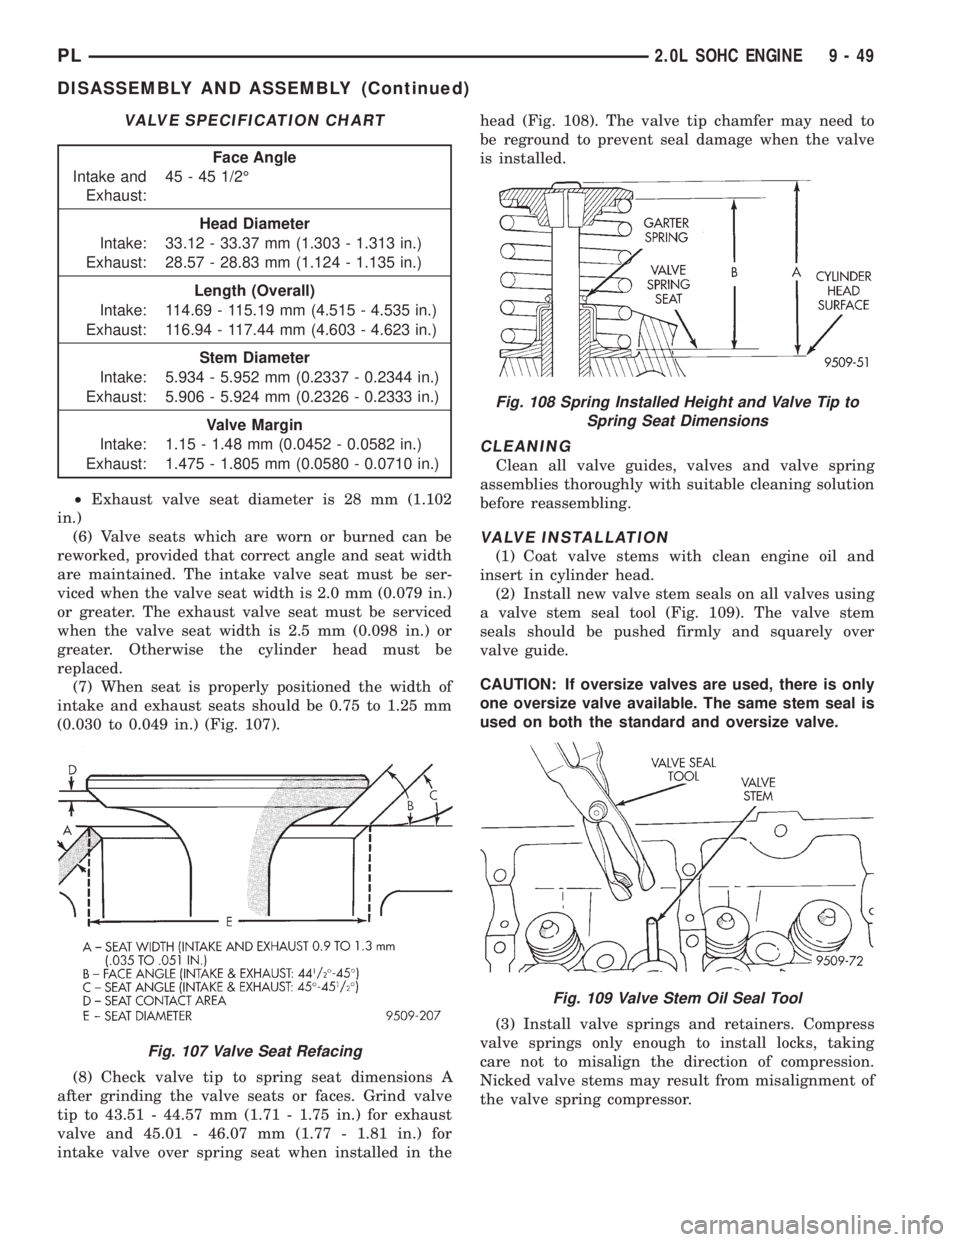
(7) When seat is properly positioned the width of
intake and exhaust seats should be 0.75 to 1.25 mm
(0.030 to 0.049 in.) (Fig. 107).
(8) Check valve tip to spring seat dimensions A
after grinding the valve seats or faces. Grind valve
tip to 43.51 - 44.57 mm (1.71 - 1.75 in.) for exhaust
valve and 45.01 - 46.07 mm (1.77 - 1.81 in.) for
intake valve over spring seat when installed in thehead (Fig. 108). The valve tip chamfer may need to
be reground to prevent seal damage when the valve
is installed.
CLEANING
Clean all valve guides, valves and valve spring
assemblies thoroughly with suitable cleaning solution
before reassembling.
VALVE INSTALLATION
(1) Coat valve stems with clean engine oil and
insert in cylinder head.
(2) Install new valve stem seals on all valves using
a valve stem seal tool (Fig. 109). The valve stem
seals should be pushed firmly and squarely over
valve guide.
CAUTION: If oversize valves are used, there is only
one oversize valve available. The same stem seal is
used on both the standard and oversize valve.
(3) Install valve springs and retainers. Compress
valve springs only enough to install locks, taking
care not to misalign the direction of compression.
Nicked valve stems may result from misalignment of
the valve spring compressor.
VALVE SPECIFICATION CHART
Face Angle
Intake and
Exhaust:45 - 45 1/2É
Head Diameter
Intake: 33.12 - 33.37 mm (1.303 - 1.313 in.)
Exhaust: 28.57 - 28.83 mm (1.124 - 1.135 in.)
Length (Overall)
Intake: 114.69 - 115.19 mm (4.515 - 4.535 in.)
Exhaust: 116.94 - 117.44 mm (4.603 - 4.623 in.)
Stem Diameter
Intake: 5.934 - 5.952 mm (0.2337 - 0.2344 in.)
Exhaust: 5.906 - 5.924 mm (0.2326 - 0.2333 in.)
Valve Margin
Intake: 1.15 - 1.48 mm (0.0452 - 0.0582 in.)
Exhaust: 1.475 - 1.805 mm (0.0580 - 0.0710 in.)
Fig. 107 Valve Seat Refacing
Fig. 108 Spring Installed Height and Valve Tip to
Spring Seat Dimensions
Fig. 109 Valve Stem Oil Seal Tool
PL2.0L SOHC ENGINE 9 - 49
DISASSEMBLY AND ASSEMBLY (Continued)
Page 764 of 1200
(8) Inspect oil pressure relief valve plunger for
scoring and free operation in its bore. Small marks
may be removed with 400-grit wet or dry sandpaper.(9) The relief valve spring has a free length of
approximately 60.7 mm (2.39 inches) it should test
between 18 and 19 pounds when compressed to 40.5
mm (1.60 inches). Replace spring that fails to meet
specifications.
(10) If oil pressure is low and pump is within spec-
ifications, inspect for worn engine bearings, damaged
or missing oil pick-up tube o-ring, clogged oil pick-up
tube screen, clogged oil filter and stuck open pres-
sure relief valve or other reasons for oil pressure
loss.
CYLINDER BLOCK AND BORE
(1) Clean cylinder block thoroughly and check all
core hole plugs for evidence of leaking.
(2) If new core plugs are installed, Refer to Engine
Core Plugs outlined in this section.
(3) Examine block and cylinder bores for cracks or
fractures.
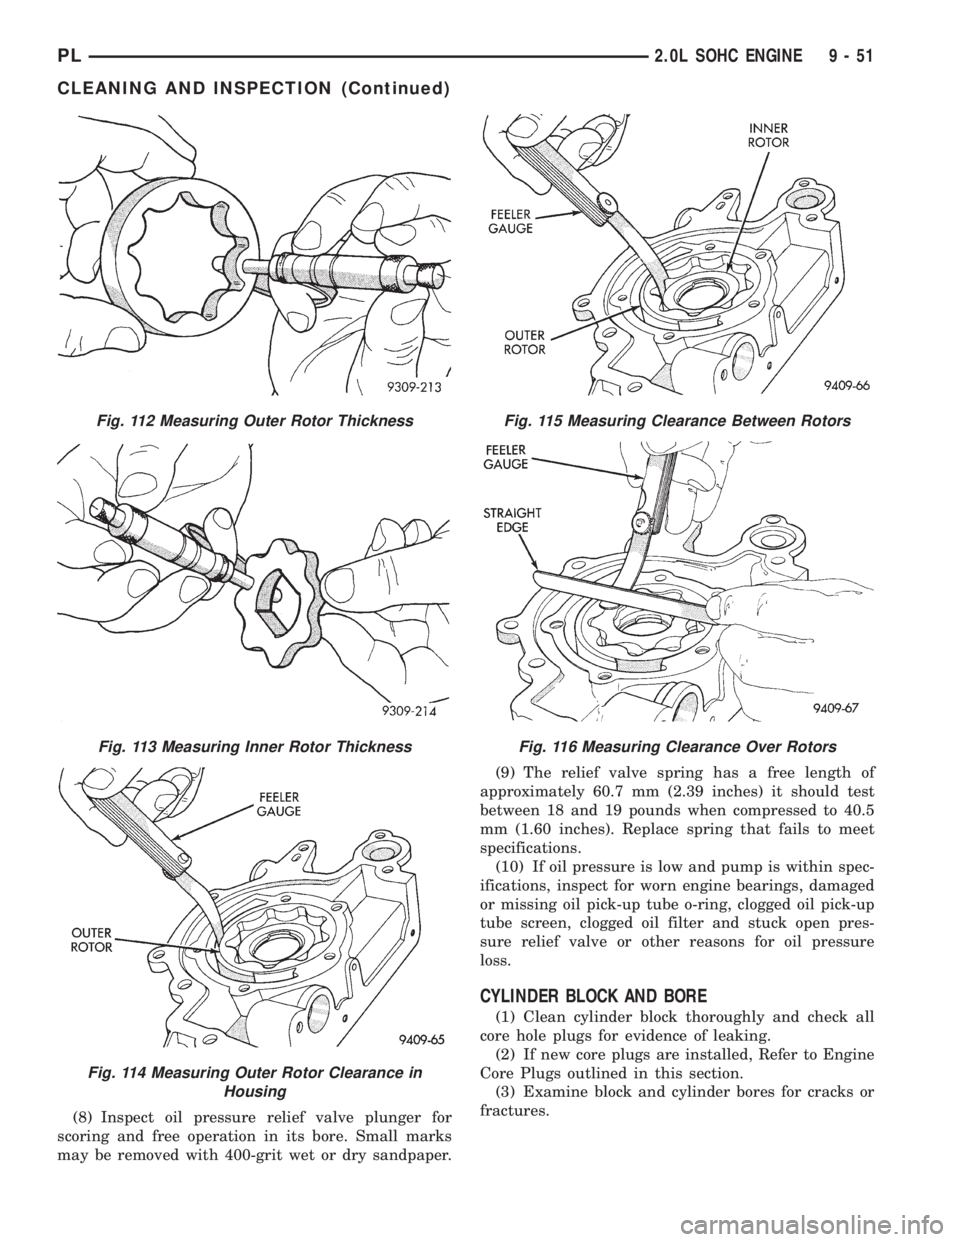
Fig. 112 Measuring Outer Rotor Thickness
Fig. 113 Measuring Inner Rotor Thickness
Fig. 114 Measuring Outer Rotor Clearance in
Housing
Fig. 115 Measuring Clearance Between Rotors
Fig. 116 Measuring Clearance Over Rotors
PL2.0L SOHC ENGINE 9 - 51
CLEANING AND INSPECTION (Continued)
Page 765 of 1200
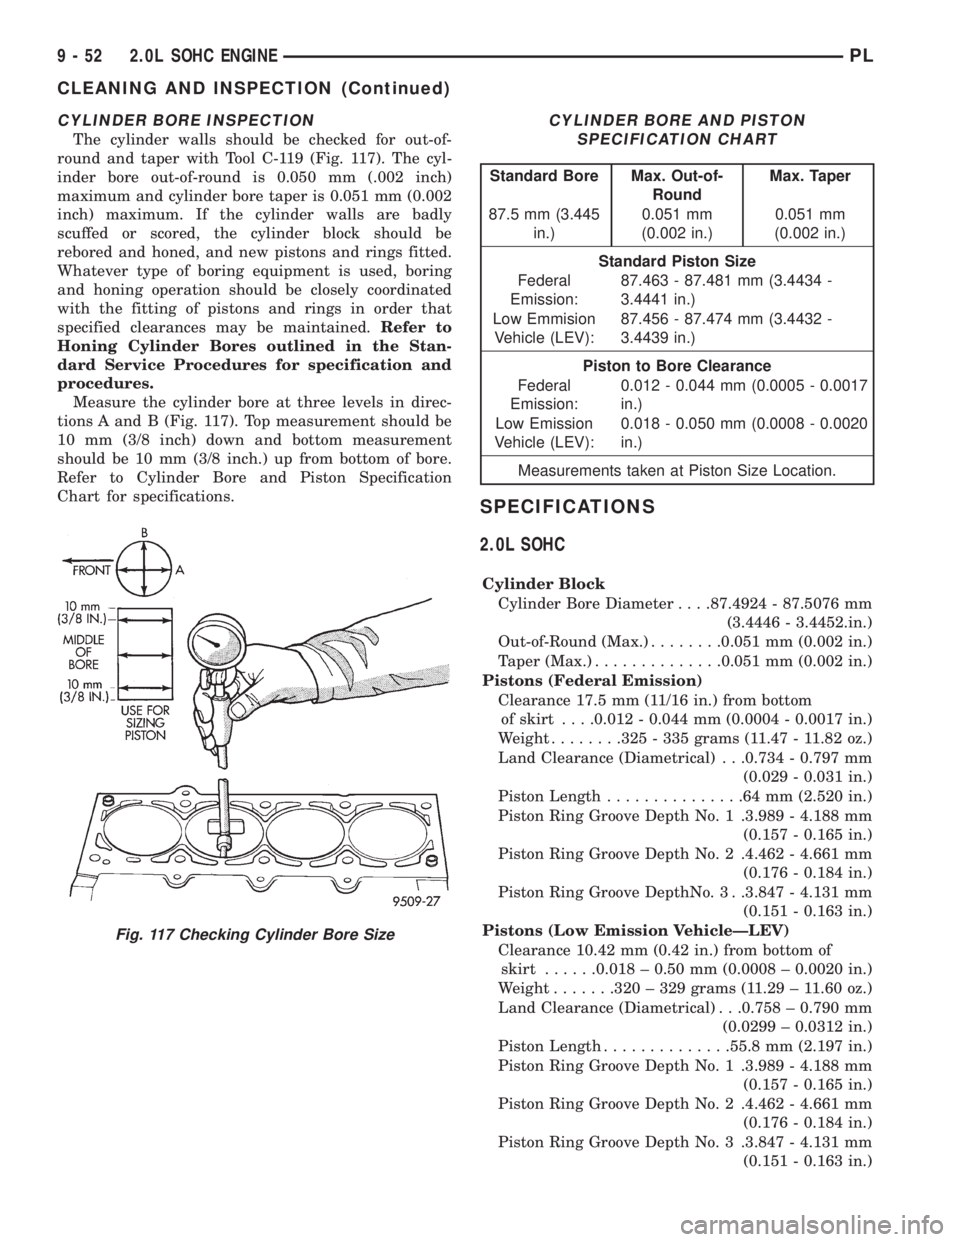
CYLINDER BORE INSPECTION
The cylinder walls should be checked for out-of-
round and taper with Tool C-119 (Fig. 117). The cyl-
inder bore out-of-round is 0.050 mm (.002 inch)
maximum and cylinder bore taper is 0.051 mm (0.002
inch) maximum. If the cylinder walls are badly
scuffed or scored, the cylinder block should be
rebored and honed, and new pistons and rings fitted.
Whatever type of boring equipment is used, boring
and honing operation should be closely coordinated
with the fitting of pistons and rings in order that
specified clearances may be maintained.Refer to
Honing Cylinder Bores outlined in the Stan-
dard Service Procedures for specification and
procedures.
Measure the cylinder bore at three levels in direc-
tions A and B (Fig. 117). Top measurement should be
10 mm (3/8 inch) down and bottom measurement
should be 10 mm (3/8 inch.) up from bottom of bore.
Refer to Cylinder Bore and Piston Specification
Chart for specifications.
SPECIFICATIONS
2.0L SOHC
Cylinder Block
Cylinder Bore Diameter. . . .87.4924 - 87.5076 mm
(3.4446 - 3.4452.in.)
Out-of-Round (Max.)........0.051 mm (0.002 in.)
Taper (Max.)..............0.051 mm (0.002 in.)
Pistons (Federal Emission)
Clearance 17.5 mm (11/16 in.) from bottom
of skirt. . . .0.012 - 0.044 mm (0.0004 - 0.0017 in.)
Weight........325 - 335 grams (11.47 - 11.82 oz.)
Land Clearance (Diametrical) . . .0.734 - 0.797 mm
(0.029 - 0.031 in.)
Piston Length...............64mm(2.520 in.)
Piston Ring Groove Depth No. 1 .3.989 - 4.188 mm
(0.157 - 0.165 in.)
Piston Ring Groove Depth No. 2 .4.462 - 4.661 mm
(0.176 - 0.184 in.)
Piston Ring Groove DepthNo. 3 . .3.847 - 4.131 mm
(0.151 - 0.163 in.)
Pistons (Low Emission VehicleÐLEV)
Clearance 10.42 mm (0.42 in.) from bottom of
skirt......0.018 ± 0.50 mm (0.0008 ± 0.0020 in.)
Weight.......320 ± 329 grams (11.29 ± 11.60 oz.)
Land Clearance (Diametrical) . . .0.758 ± 0.790 mm
(0.0299 ± 0.0312 in.)
Piston Length..............55.8 mm (2.197 in.)
Piston Ring Groove Depth No. 1 .3.989 - 4.188 mm
(0.157 - 0.165 in.)
Piston Ring Groove Depth No. 2 .4.462 - 4.661 mm
(0.176 - 0.184 in.)
Piston Ring Groove Depth No. 3 .3.847 - 4.131 mm
(0.151 - 0.163 in.)
Fig. 117 Checking Cylinder Bore Size
CYLINDER BORE AND PISTON
SPECIFICATION CHART
Standard Bore Max. Out-of-
RoundMax. Taper
87.5 mm (3.445
in.)0.051 mm
(0.002 in.)0.051 mm
(0.002 in.)
Standard Piston Size
Federal
Emission:87.463 - 87.481 mm (3.4434 -
3.4441 in.)
Low Emmision
Vehicle (LEV):87.456 - 87.474 mm (3.4432 -
3.4439 in.)
Piston to Bore Clearance
Federal
Emission:0.012 - 0.044 mm (0.0005 - 0.0017
in.)
Low Emission
Vehicle (LEV):0.018 - 0.050 mm (0.0008 - 0.0020
in.)
Measurements taken at Piston Size Location.
9 - 52 2.0L SOHC ENGINEPL
CLEANING AND INSPECTION (Continued)
Page 766 of 1200
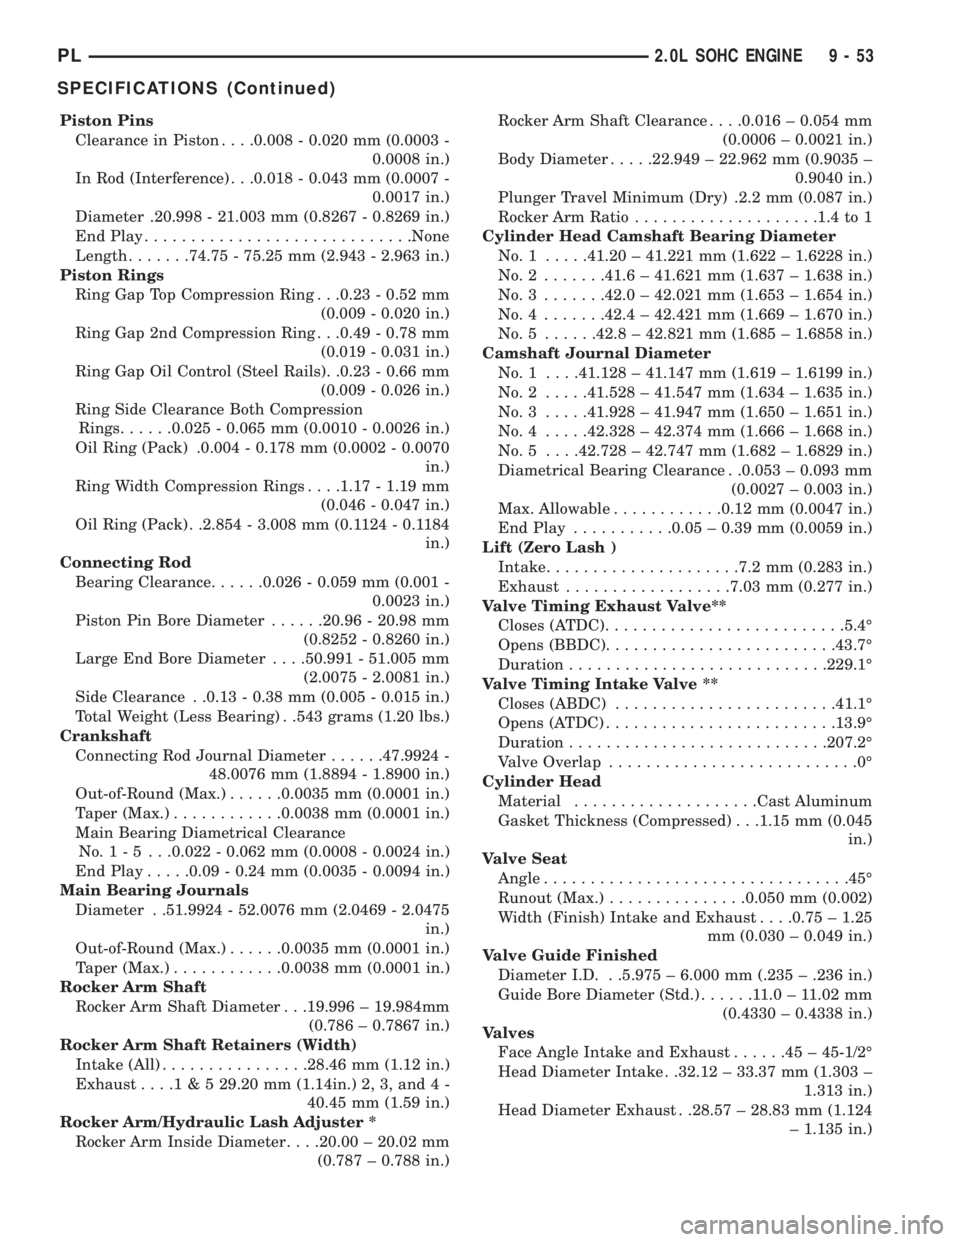
Piston Pins
Clearance in Piston. . . .0.008 - 0.020 mm (0.0003 -
0.0008 in.)
In Rod (Interference) . . .0.018 - 0.043 mm (0.0007 -
0.0017 in.)
Diameter .20.998 - 21.003 mm (0.8267 - 0.8269 in.)
End Play.............................None
Length.......74.75 - 75.25 mm (2.943 - 2.963 in.)
Piston Rings
Ring Gap Top Compression Ring . . .0.23 - 0.52 mm
(0.009 - 0.020 in.)
Ring Gap 2nd Compression Ring . . .0.49 - 0.78 mm
(0.019 - 0.031 in.)
Ring Gap Oil Control (Steel Rails). .0.23 - 0.66 mm
(0.009 - 0.026 in.)
Ring Side Clearance Both Compression
Rings......0.025 - 0.065 mm (0.0010 - 0.0026 in.)
Oil Ring (Pack) .0.004 - 0.178 mm (0.0002 - 0.0070
in.)
Ring Width Compression Rings. . . .1.17 - 1.19 mm
(0.046 - 0.047 in.)
Oil Ring (Pack) . .2.854 - 3.008 mm (0.1124 - 0.1184
in.)
Connecting Rod
Bearing Clearance......0.026 - 0.059 mm (0.001 -
0.0023 in.)
Piston Pin Bore Diameter......20.96 - 20.98 mm
(0.8252 - 0.8260 in.)
Large End Bore Diameter. . . .50.991 - 51.005 mm
(2.0075 - 2.0081 in.)
Side Clearance . .0.13 - 0.38 mm (0.005 - 0.015 in.)
Total Weight (Less Bearing) . .543 grams (1.20 lbs.)
Crankshaft
Connecting Rod Journal Diameter......47.9924 -
48.0076 mm (1.8894 - 1.8900 in.)
Out-of-Round (Max.)......0.0035 mm (0.0001 in.)
Taper (Max.)............0.0038 mm (0.0001 in.)
Main Bearing Diametrical Clearance
No.1-5 ...0.022 - 0.062 mm (0.0008 - 0.0024 in.)
End Play.....0.09 - 0.24 mm (0.0035 - 0.0094 in.)
Main Bearing Journals
Diameter . .51.9924 - 52.0076 mm (2.0469 - 2.0475
in.)
Out-of-Round (Max.)......0.0035 mm (0.0001 in.)
Taper (Max.)............0.0038 mm (0.0001 in.)
Rocker Arm Shaft
Rocker Arm Shaft Diameter . . .19.996 ± 19.984mm
(0.786 ± 0.7867 in.)
Rocker Arm Shaft Retainers (Width)
Intake (All)................28.46 mm (1.12 in.)
Exhaust....1 & 5 29.20 mm (1.14in.) 2, 3, and 4 -
40.45 mm (1.59 in.)
Rocker Arm/Hydraulic Lash Adjuster *
Rocker Arm Inside Diameter. . . .20.00 ± 20.02 mm
(0.787 ± 0.788 in.)Rocker Arm Shaft Clearance. . . .0.016 ± 0.054 mm
(0.0006 ± 0.0021 in.)
Body Diameter.....22.949 ± 22.962 mm (0.9035 ±
0.9040 in.)
Plunger Travel Minimum (Dry) .2.2 mm (0.087 in.)
Rocker Arm Ratio....................1.4 to 1
Cylinder Head Camshaft Bearing Diameter
No.1 .....41.20 ± 41.221 mm (1.622 ± 1.6228 in.)
No.2 .......41.6 ± 41.621 mm (1.637 ± 1.638 in.)
No.3 .......42.0 ± 42.021 mm (1.653 ± 1.654 in.)
No.4 .......42.4 ± 42.421 mm (1.669 ± 1.670 in.)
No.5 ......42.8 ± 42.821 mm (1.685 ± 1.6858 in.)
Camshaft Journal Diameter
No. 1 . . . .41.128 ± 41.147 mm (1.619 ± 1.6199 in.)
No.2 .....41.528 ± 41.547 mm (1.634 ± 1.635 in.)
No.3 .....41.928 ± 41.947 mm (1.650 ± 1.651 in.)
No.4 .....42.328 ± 42.374 mm (1.666 ± 1.668 in.)
No. 5 . . . .42.728 ± 42.747 mm (1.682 ± 1.6829 in.)
Diametrical Bearing Clearance . .0.053 ± 0.093 mm
(0.0027 ± 0.003 in.)
Max. Allowable............0.12 mm (0.0047 in.)
End Play...........0.05 ± 0.39 mm (0.0059 in.)
Lift (Zero Lash )
Intake.....................7.2 mm (0.283 in.)
Exhaust..................7.03 mm (0.277 in.)
Valve Timing Exhaust Valve**
Closes (ATDC)..........................5.4É
Opens (BBDC).........................43.7É
Duration............................229.1É
Valve Timing Intake Valve **
Closes (ABDC)........................41.1É
Opens (ATDC).........................13.9É
Duration............................207.2É
Valve Overlap...........................0É
Cylinder Head
Material....................Cast Aluminum
Gasket Thickness (Compressed) . . .1.15 mm (0.045
in.)
Valve Seat
Angle.................................45É
Runout (Max.)...............0.050 mm (0.002)
Width (Finish) Intake and Exhaust. . . .0.75 ± 1.25
mm (0.030 ± 0.049 in.)
Valve Guide Finished
Diameter I.D. . .5.975 ± 6.000 mm (.235 ± .236 in.)
Guide Bore Diameter (Std.)......11.0±11.02 mm
(0.4330 ± 0.4338 in.)
Valves
Face Angle Intake and Exhaust......45±45-1/2É
Head Diameter Intake . .32.12 ± 33.37 mm (1.303 ±
1.313 in.)
Head Diameter Exhaust . .28.57 ± 28.83 mm (1.124
± 1.135 in.)
PL2.0L SOHC ENGINE 9 - 53
SPECIFICATIONS (Continued)